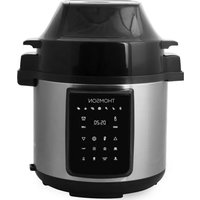
TFPC607 - Friteuse THOMSON - Notice d'utilisation et mode d'emploi gratuit
Retrouvez gratuitement la notice de l'appareil TFPC607 THOMSON au format PDF.


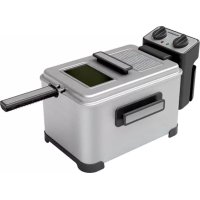
| Type de produit | Friteuse électrique |
| Marque | Thomson |
| Modèle | TFPC607 |
| Puissance | 1500 W |
| Capacité de l'huile | 1,5 L |
| Capacité des aliments | 1 kg |
| Dimensions (L x P x H) | 30 x 25 x 20 cm |
| Poids | 2,5 kg |
| Alimentation | 220-240 V, 50-60 Hz |
| Longueur du câble | 0,9 m |
| Matériau | Acier inoxydable et plastique |
| Réglage de température | Thermostat réglable (150 °C à 190 °C) |
| Fonction de filtrage | Système de filtration d'odeurs |
| Poignée froide | Oui |
| Arrêt automatique | Oui, sécurité thermique |
| Panier | Panier amovible avec poignée |
| Voyant lumineux | Indicateur de mise en marche et de température |
| Nettoyage | Cuve anti-adhésive, panier et couvercle lavables au lave-vaisselle |
| Pièces détachées disponibles | Panier, couvercle, filtre |
| Garantie | 2 ans |
FOIRE AUX QUESTIONS - TFPC607 THOMSON
Questions des utilisateurs sur TFPC607 THOMSON
0 question sur cet appareil. Repondez a celles que vous connaissez ou posez la votre.
Poser une nouvelle question sur cet appareil
Téléchargez la notice de votre Friteuse au format PDF gratuitement ! Retrouvez votre notice TFPC607 - THOMSON et reprennez votre appareil électronique en main. Sur cette page sont publiés tous les documents nécessaires à l'utilisation de votre appareil TFPC607 de la marque THOMSON.
MODE D'EMPLOI TFPC607 THOMSON
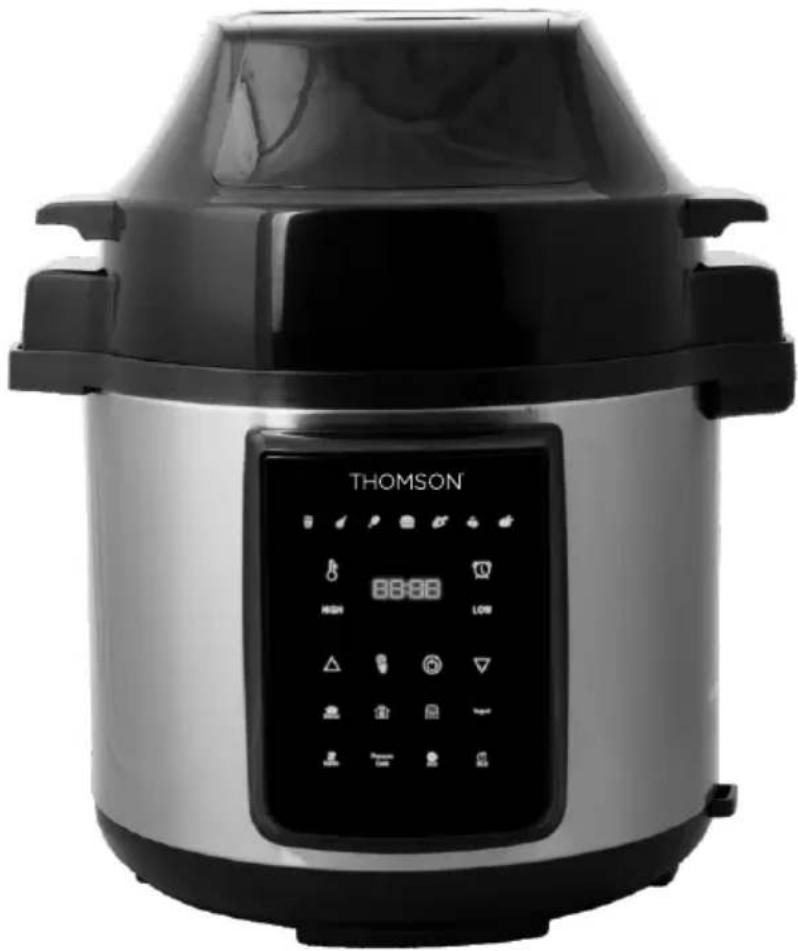
THOMSON™
MODEL:TFPC607
PRESSURE COOKER
&
AIR FRYER
natural_image
Thomson electric cooktop with digital display and control buttons (no visible text or symbols on the device body)For service assistance and product information, please call: 1-800-968-9853.
Curtis International Ltd.
7045 BECKETT DRIVE, UNIT 15, MISSISSAUGA, ON, L5S 2A3 www.curtisint.com
Table of Contents
IMPORTANT SAFEGUARDS 3
Precautions 5
Special Cord Set Instructions 5
Product Introduction 6
Features 6
Before the First Use 7
Install the Condensation Collector 7
Remove and Install the Anti-Block Shield 7
Remove and Install the Sealing Ring 7
Safe Lid Opening 8
Parts & Accessories 11
Using the Accessories 12
Operation of the Digital Control Panel 14
Cooking Chart for air fryer 18
Pressure cooker mode parameters 19
Care & Maintenance 20
Cleaning 20
Troubleshooting 20
Warranty Card 23
When using electrical appliances, basic safety precautions should always be followed, including:
- NEVER IMMERSE the Main Unit Housing, which contains electrical components and heating elements, in water. Do not rinse under the tap.
• TO AVOID ELECTRICAL SHOCK, DO NOT put liquid of any kind into the Main Unit Housing containing the electrical components. - This appliance has a polarized plug (one blade is wider than the other). To REDUCE THE RISK OF ELECTRIC SHOCK, this plug is intended to fit into a polarized outlet only one way. If the plug does not fit fully into the outlet, reverse the plug. If it still does not fit, contact a qualified electrician. DO NOT ATTEMPT to modify the plug in any way.
- MAKE SURE the appliance is plugged into a wall socket. Always make sure that the plug is inserted into the wall socket properly.
- To prevent food contact with the interior upper screen and heat element, DO NOT OVERFILL the Rotating Mesh Basket.
- DO NOT COVER the Air Intake Vent or Air Outlet Vent while the Power Air Fryer Oven is operating. Doing so will prevent even cooking and may damage the Unit or cause it to overheat.
- NEVER POUR oil into the Rotating Mesh Basket. Fire and personal injury could result.
- While cooking, the internal temperature of the Unit reaches several hundred degrees Fahrenheit. TO AVOID PERSONAL INJURY, never place hands inside the Unit unless it is thoroughly cooled down.
- This appliance is NOT INTENDED FOR USE by persons with reduced physical, sensory, or mental capabilities, or lack of experience and knowledge, unless they are UNDER THE SUPERVISION of a responsible person or have been given proper instruction in using the appliance. This appliance is NOT INTENDED FOR USE by children.
- When cooking, DO NOT PLACE the appliance against a wall or against other appliances. Leave at least 5" free space on the back and sides and above the appliance. Do not place anything on top of the appliance.
- DO NOT USE this Unit if the plug, the power cord, or the appliance itself is damaged in any way.
• DO NOT PLACE the Unit on stove top surfaces. - If the power cord is damaged, YOU MUST HAVE IT REPLACED by the manufacturer, its service agent, or a similarly qualified person in order to avoid hazard.
- Keep the appliance and its power cord OUT OF THE REACH of children when it is in operation or in the "cooling down" process.
- KEEP THE POWER CORD AWAY from hot surfaces. DO NOT PLUG in the power cord or operate the Unit controls with wet hands.
- NEVER CONNECT this appliance to an external timer switch or separate remote-control system.
- NEVER USE this appliance with an extension cord of any kind.
- DO NOT OPERATE the appliance on or near combustible materials such as tablecloths and curtains.
- DO NOT USE the Power Air Fryer Oven for any purpose other than described in this manual.
- NEVER OPERATE the appliance unattended.
-
When in operation, air is released through the Air Outlet Vent. KEEP YOUR HANDS AND FACE at a safe distance from the Air Outlet Vent. Also avoid the air while removing the Rotating Mesh Basket from the appliance.
-
The Unit's outer surfaces may become hot during use. The Rotating Mesh Basket WILL BE HOT. WEAR OVEN MITTS, or use the fetch tool when handling hot components. Wear oven mitts when handling hot surfaces.
- Should the Unit emit black smoke, UNPLUG IMMEDIATELY and wait for smoking to stop before removing oven contents.
- When time has run out, cooking will stop but the fan WILL CONTINUE RUNNING for 20 seconds to "cool down" the Unit.
• Always operate the appliance on a horizontal surface that is level, stable, and noncombustible. - This appliance is intended for normal household use only. It is not intended for use in commercial or retail environments.
- If the Power Air Fryer Oven is used improperly or for professional or semi-professional purposes or if it is not used according to the instructions in the user manual, the warranty becomes invalid and we will not be held liable for damages.
• Always unplug the appliance after use. - Let the appliance cool down for approximately 30 minutes before handling, cleaning, or storing.
- Make sure the ingredients prepared in this Unit come out cooked to a golden-yellow color rather than dark or brown. Remove burnt remnants.
Overheating Protection
Should the inner temperature control system fail, the overheating protection system will be activated and the Unit will not function. Should this happen, unplug the power cord. Allow time for the Unit to cool completely before restarting or storing.
LED ERROR INDICATORS:
If any of the below error codes appear on the pressure cooker display, reset the unit by unplugging the power cord and retrying again after 10 minutes. If the error code remains, discontinue use and contact the manufacturer.
| Indicator code | Problems/ Causes |
| E1 | Open circuit of the sensor for pressure cooker |
| E2 | It has not a inner pot, you need to place the pot |
| E3 | Overheating |
| E4 | Open Circuit of pressure switch |
| E5 | Open circuit of the sensor for Air fryer |
Electric Power
If the electrical circuit is overloaded with other appliances, your new Unit may not operate properly. It should be operated on a dedicated electrical circuit.
Precautions
Before each use, please make sure to inspect the following:
- The anti-block shield, float valve and exhaust valve are not blocked by food debris.
- The bottom surface of the inner pot and the heating plate are free of any foreign objects.
- The steam release handle is in the "Sealing" position for all pressure cooking.
After cooking, wait until the cooker cools down for a while and release the pressure using the steam release handle. Use extreme caution when opening the lid. Scald and serious burns can be caused by the steam inside the unit.
If all LED lights are flashing on the control panel, unplug the power cord immediately and consult the "Troubleshooting" section.
Care must be taken with the sealing ring to avoid deformation. Failure to do so may prevent the product from working properly.
Special Cord Set Instructions
Model TFPC607 has a 3-prong grounding plug. To reduce the risk of electric shock, plug the power cord into a grounded (earthed) electrical outlet that is easily accessible at all times.
A short power supply cord is provided to reduce the hazards resulting from entanglement and tripping. An extension cord may be used if care is exercised in its use. If an extension cord is used, use only a 3-wire extension cord that has a 3-prong grounding plug and a 3-slot receptacle that will accept the plug on the appliance. The electrical rating of the cord must be at least 12 amps and 120 volts. The extended cord must be arranged so that it will not drape over edge of table or counter where it can be pulled by children or tripped over accidentally.
Product Introduction
Thomson programmable pressure cooker is the new generation of smart kitchen appliances. It is a 8-in-1 mufti-function cooker combining the benefits of a Pressure Cooker, Air fryer, Sauté, Slow Cooker, Rice Cooker, Steamer, Yogurt Maker and Food Warmer. Thomson is a convenient and kitchen-friendly time saver. Its 22 micro-processor controlled intelligent programs make your everyday cooking as easy as pressing a button.
It brings your green thinking right into the kitchen by saving up to 90% of energy compared with conventional cooking. In most cases, your Thomson reduces the cooking time by 90%, and preserves more vitamins and minerals in the natural ingredients.
Thomson has been designed to avoid the common errors and safety hazards of old stove-top pressure cookers using safety mechanisms and patented technologies. They include lid position monitoring, locking the lid under pressure, electronic pressure and temperature control, dry burn detection with automatic shutoff, over-pressure protection, and temperature and electrical current limiting fuse. Thomson has earned the entrusted ETL certification by going through the rigorous Intertek lab testing.
Features
- Mufti-function: Air frying, pressure cooking, slow cooking, making yogurt and keeping warm etc.
- Convenient cooking programs controlled by a microprocessor: Simply press one of the function keys to start cooking. The microprocessor controls the time, cooking pressure and temperature eliminating the need to watch over the cooker in the kitchen.
- Clean and pleasant: Thomson produces very little noise and leaks almost no steam. This keeps the aromas and flavor of ingredients in the food and avoids messy spills, splashes or spatters to clean up.
- Dual pressure settings for fast and flexible cooking: Cooking with the high pressure reduces cooking time by up to 90% and low pressure avoids overcooking delicate food.
- Up to 24-hour delayed cooking: Long 12 hour timer. Perfect for meal planning.
- Up to 24-hour of manual cooking time selection.
- Auto keep warm: After cooking, the keep-warm function starts automatically for 10 hours.
Before the First Use
Before the first use, please take out all accessories from the package and read this manual carefully. Please pay particular attention to operational instructions and cautions to avoid any injury or property damage. Please wash the inside of the lid and the inner pot with warm soapy water, rinse and dry thoroughly. Wipe the outer housing with a clean damp cloth. Never immerse the cooker housing in water or any other liquid. The inner pot, sealing ring and steam release handle and all accessories are dishwasher safe. But never clean the lid and housing in a dishwasher.
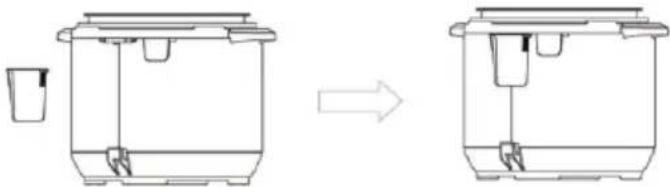
Install the Condensation Collector
To install the water box, slide it into the slot on the cooker housing. Follow the reverse order to remove it for cleaning.
natural_image
Diagram showing a device being processed from a left-side component to a right-side component (no text or symbols present)Remove and Install the Anti-Block Shield
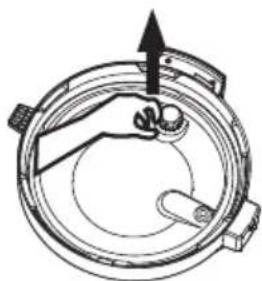
The anti-block shield can be removed by pushing it on the side to lift it up. To install the anti-block shield, position it in place and press it down. The anti-block shield can be installed on either direction lengthwise.
natural_image
Diagram of a mechanical component with an arrow indicating upward motion (no text or symbols)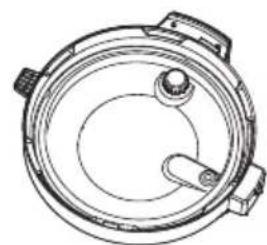
natural_image
Technical line drawing of a circular mechanical component with central hub and side tabs (no text or symbols)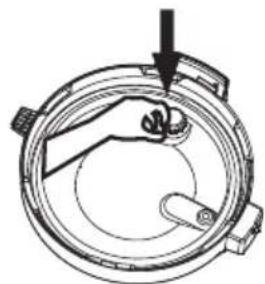
natural_image
Diagram of a mechanical component with a hand pressing a button, no text or symbols presentRemove and Install the Sealing Ring
The sealing ring can be removed by pulling upwards from the sealing ring rack in sections. To re-install the sealing ring, pressing it down into the rack section by section. The sealing ring can be installed on either side facing up.
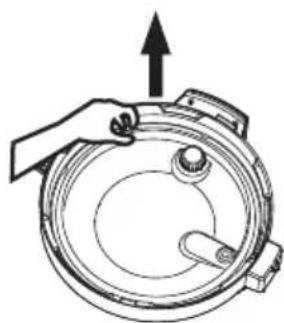
natural_image
Diagram of a hand pressing down on a circular mechanical component with an upward arrow (no text or symbols)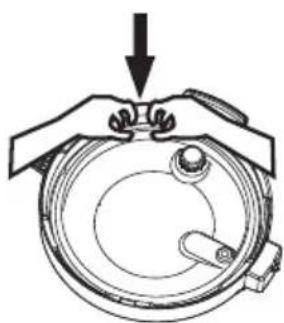
natural_image
Diagram of hands holding a circular component with a handle, no text or symbols presentPlease note the following:
- Prior to each use, inspect to make sure the sealing ring is well seated in the sealing ring rack and the anti-block shield is mounted properly on the steam release pipe. A properly seated sealing ring can be shifted, with a bit of effort, clockwise or anti-clockwise inside the sealing ring rack.
• After use, remove any foreign objects from the sealing ring and anti-block shield. - Keep the sealing ring clean to avoid odor. Washing the sealing ring in warm soapy water or dishwasher can remove odor. However, it is normal for the sealing ring to absorb the smell of certain acidic foods. That's why it is always a good idea to have more than one sealing ring on hand.
- Never pull the sealing ring by force, as the pulling may cause deformation and affect its function in sealing the pressure.
- A sealing ring with cracks, cuts or other damages should not be used. A new sealing ring replacement should be used.
Safe Lid Opening
- Make sure the pressure cooking program has completed or press "Keep-Warm/Power button" to terminate the program.
- Releasing pressure in one of the following approaches.
Quick Release:
- Slide the steam release handle to the "Venting" position to let out steam until the float valve drops down.
Caution:
- Please keep hands and face away from the hole on the top of the steam release handle when using Quick Release. The escaping steam is very hot and can cause scalding.
• Never pull out the steam release handle when it is letting out steam. - Please be aware that Quick Release is not suitable for food in large liquid volume or with high starch content (e.g. porridge, congee, sticky liquids, soup, etc.). Food content may splatter out with steam. Use Natural Release instead.
Natural Release:
- Allow the cooker to cool down naturally until the float valve drops down. This may take 10 to 15 minutes after cooking is finished and the cooker is in Keep-Warm mode.
-
Putting a wet towel on the lid can speed up cooling.
-
Open the lid: Hold the lid handle, turn the lid counterclockwise to the open position, and lift the lid up to open. To avoid vacuum suction on the lid, turn the steam release handle to "Venting" position to let in air when lifting the lid.
-
Caution: Do not open the lid until pressure inside the pot is completely released. As a safety feature, until the float valve drops down, the lid is locked and cannot be opened.
- If the float valve is stuck due to food debris or stickiness, you can push it down with a pen or chopsticks when you are certain the pressure has been released by moving the steam release handle in the venting position.
SAVE THESE INSTRUCTIONS - FOR HOUSEHOLD USE ONLY.
Open: Grip handle, press lid release button and turn lid in counter-clockwise until (▼) symbol on lid is aligned with (☐▲) symbol on cooker base rim. Lift the lid vertically from the cooker base. It can stand on the lid rest.
*NOTE: If you encounter any difficulty in opening and closing the lid, refer to the Troubleshooting section of the user manual. Always check the cooker base rim and remove any food debris/residue to ensure lid will lock properly.
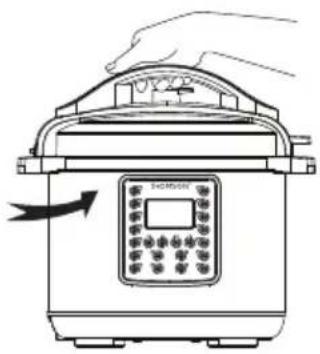
natural_image
Line drawing of a rice cooker with a hand operating it, showing control panel and directional arrow (no text or symbols)open
Close: Grip handle and lower down the lid to cooker base rim. Ensure that (▼) symbol on lid aligns with (☐▲) symbol on cooker base rim and rotate clockwise until (▼) symbol on lid is aligned with (▲ 🔒) symbol on cooker base rim.
NOTE: Make sure that locking pin located at the side of lid is fully retracted into the lid. This indicates that lid is closed correctly.
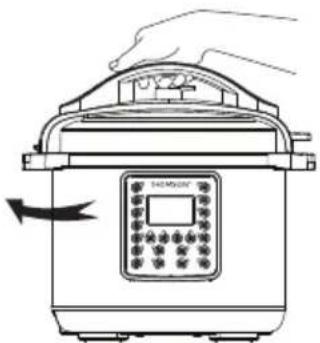
natural_image
Line drawing of a rice cooker with a hand pressing down on top (no text or symbols)close
*CAUTION: Inspect the lid to make sure that it is free from any damage prior to using your pressure cooker.
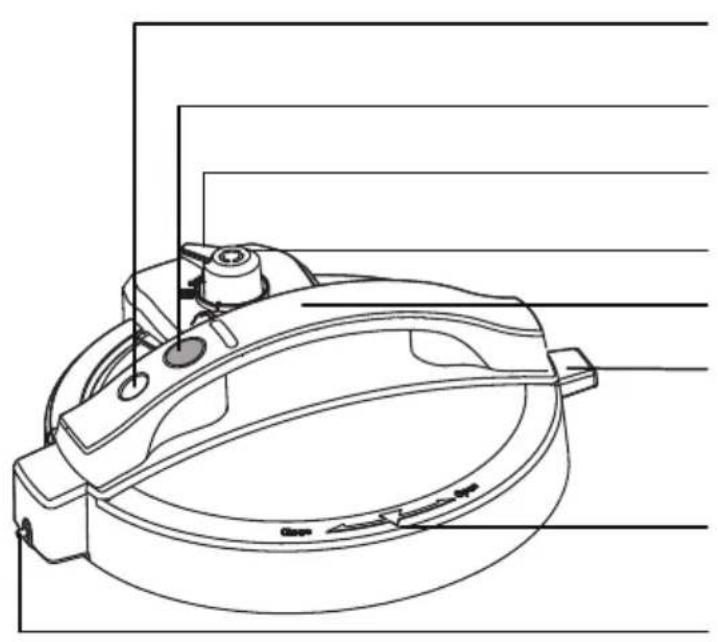
top of lid
natural_image
Technical line drawing of a mechanical component with no visible text or symbolsfloat valve
lid release button
steam release handle
pressure release valve
lid handle
lid fin
lid marker
locking pin
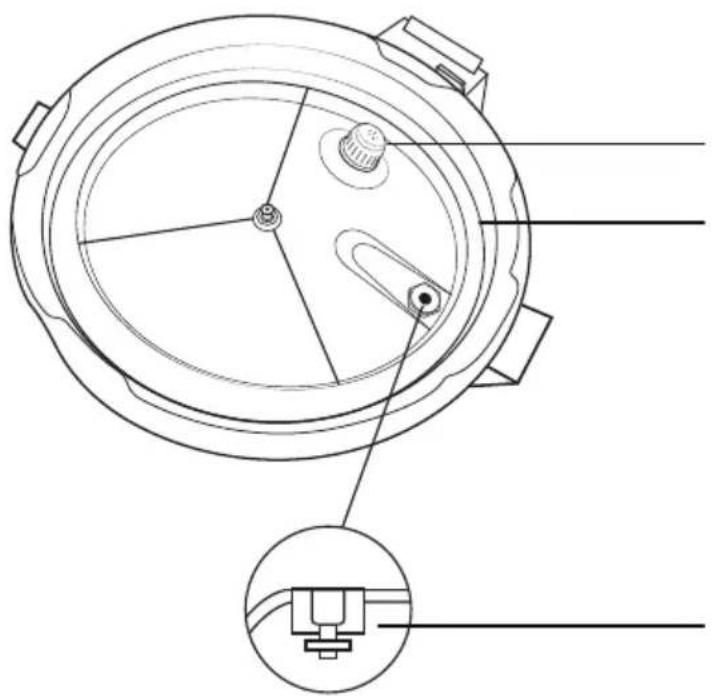
bottom of lid
natural_image
Technical line drawing of a mechanical component with cross-sectional view (no text or symbols)anti-block shield
sealing ring
float valve
silicone cap
*NOTE: Images are for visual representations only. Always refer to actual product.
NOTE: Unpack all listed contents from packaging. Varies by model. Please remove any clear or blue protective film on the components.
natural_image
Close-up of a black mechanical component with a circular annotation labeled '2' and 'THOMSON' at the base (no other text or symbols visible)Warning
Great care should be taken to avoid personal injury. Wear protective air fryer gloves.
Unit Specifications
Model Number
TFPC607
Supply Power
AC 120V 60Hz
Rated Power
Air fryer 1500W pressure cook 1000W
Function Temperature
150°F - 400°F (165°C - 200°C)
Display
LED Touch Screen
Unit dimension:
34×31×37cm
-
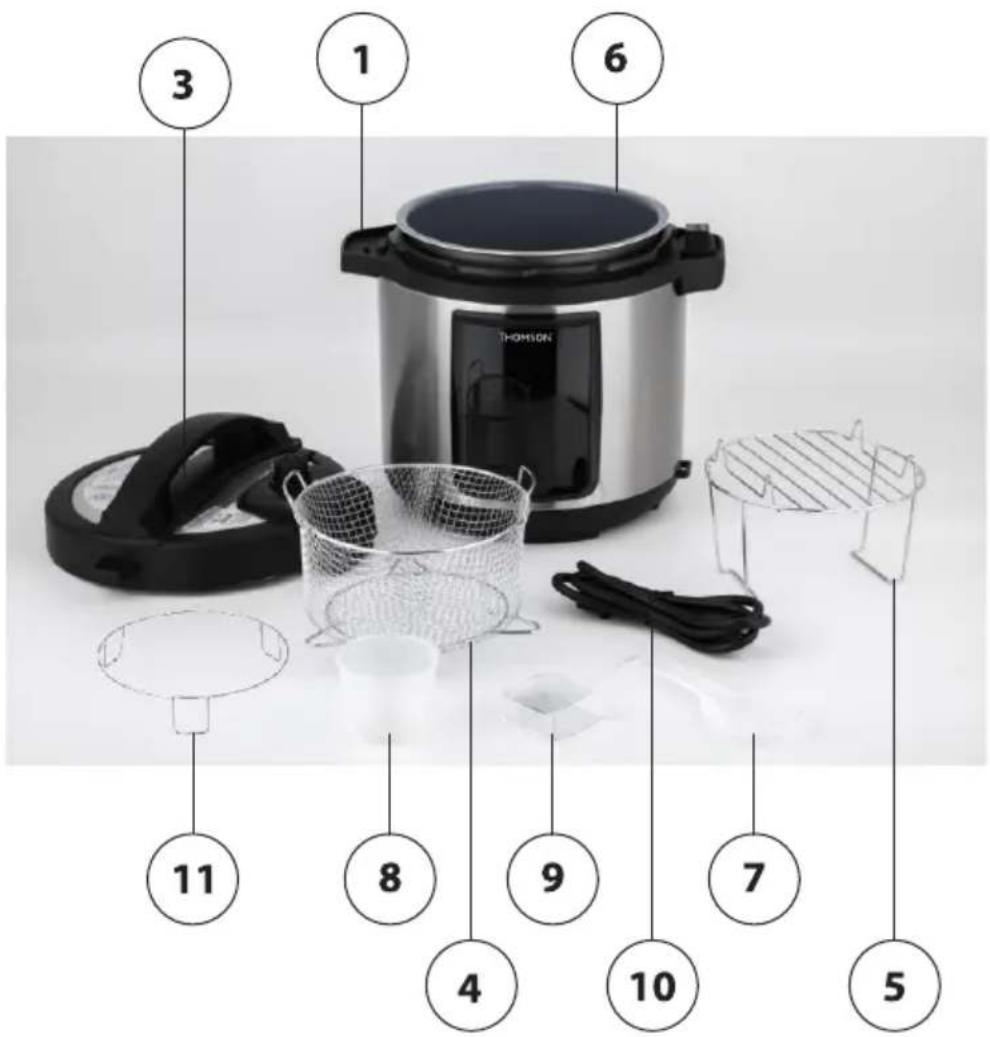
Main unit
-
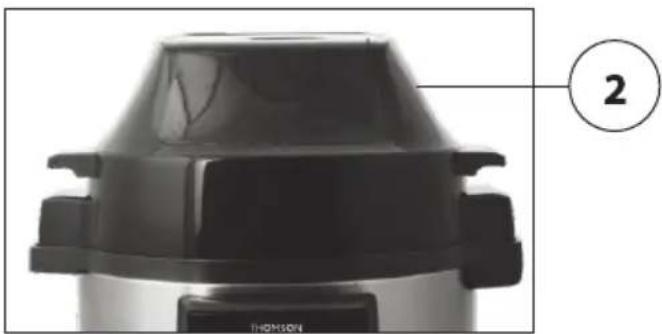
Air fryer unit
-
Pressure lid
-
Fry basket
-
Roast rack
-
6L pot
-
Spoon
-
Measuring cup
-
Water box
-
Power cable
-
Air fryer lid holder
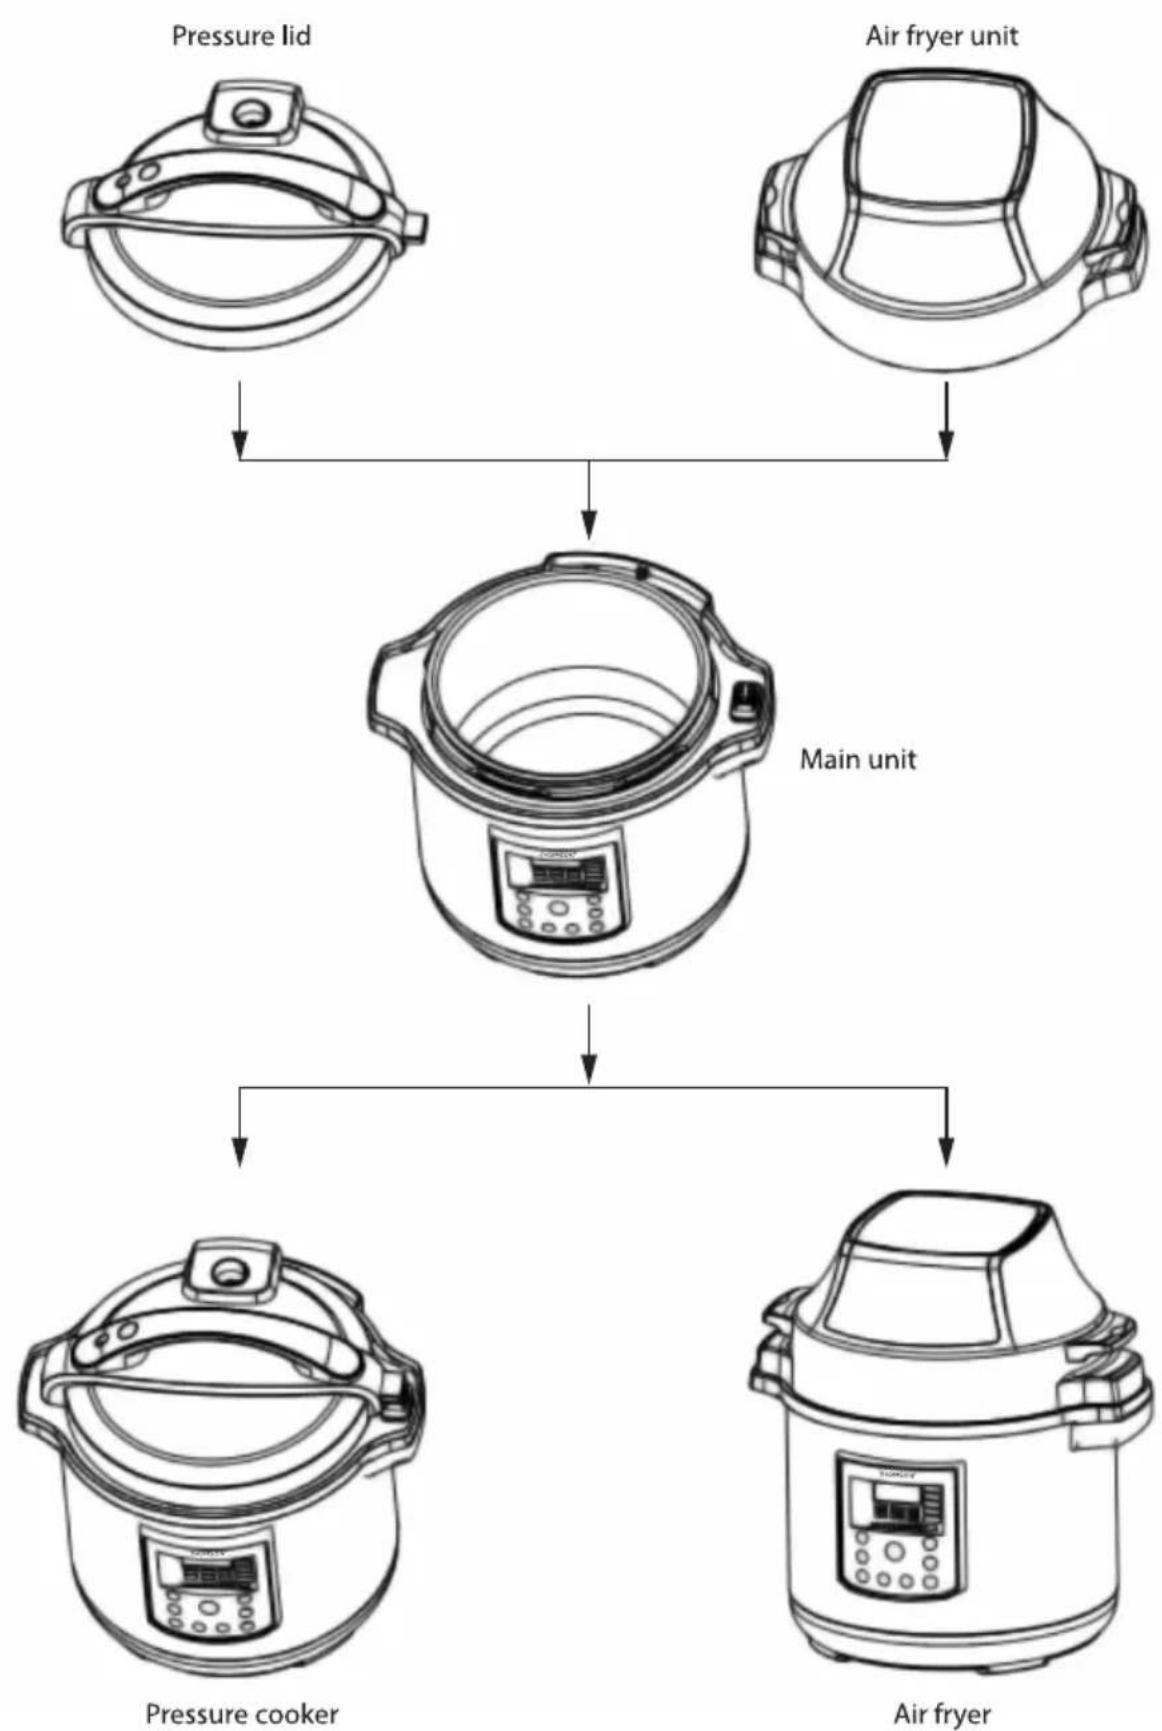
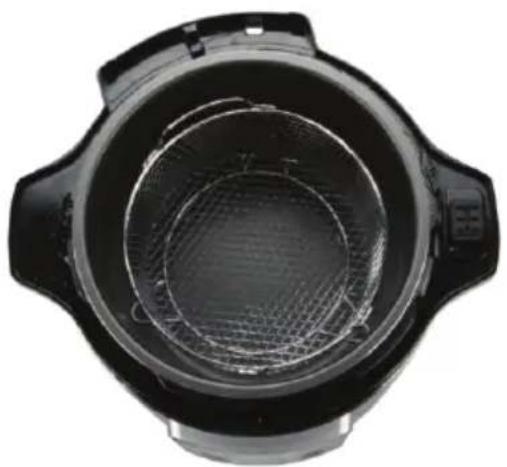
When using air fryer, the appliances will recognize the working state of the frying mode by placing frying basket or Roast rack in the pot with covering the overhead steam fryer unit.
natural_image
Top-down view of a black plastic or ceramic container with concentric circular patterns and a mesh inner layer (no text or symbols visible)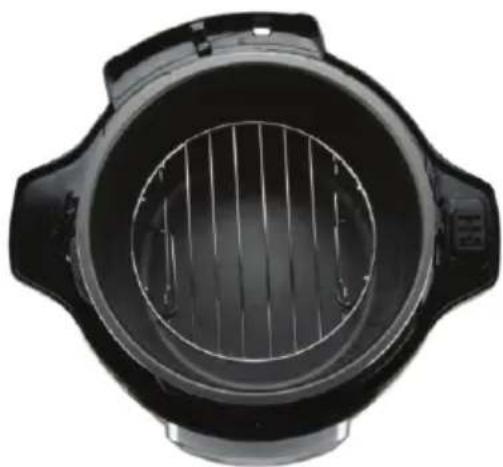
natural_image
Top-down view of a black plastic heat exchanger or vent with internal grating (no text or symbols visible)When using the pressure cooker, after placing the food in the pot, cover the pressure cooker lid the appliances will recognize the working state of the pressure cooker mode.
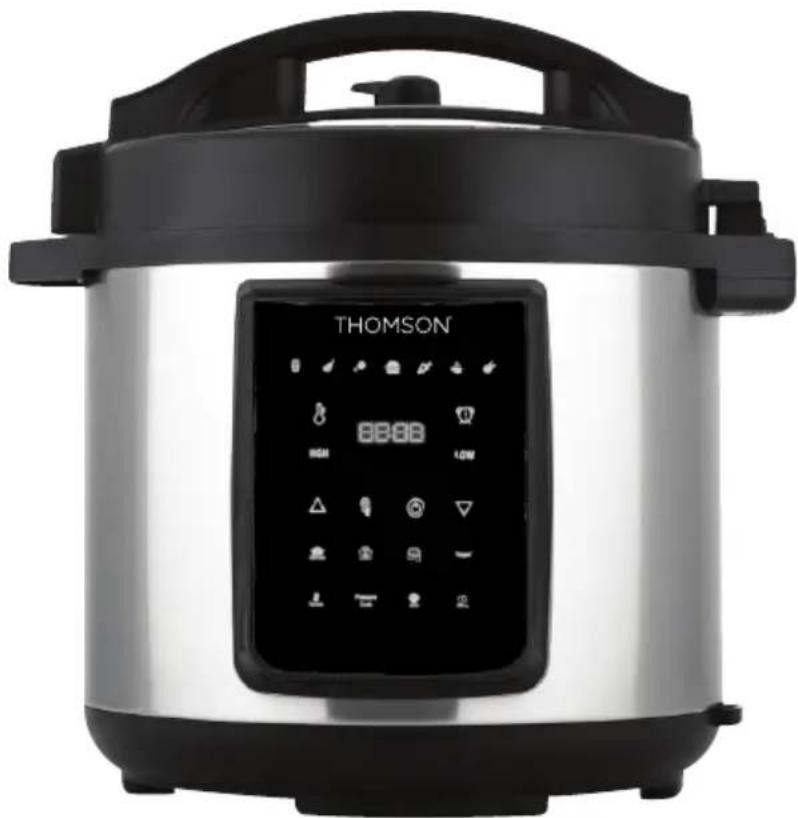
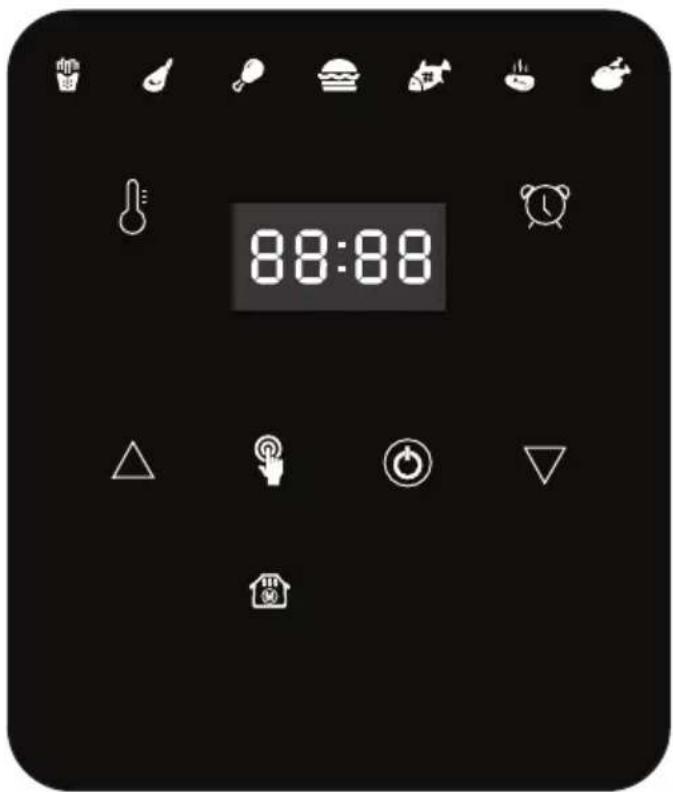
- Power button

- Air fryer menu button

- TIME&TEMP Control button

- Time&TEMP Adjust Buttons

- Temperature Control symbol

- Time Control Symbol

- Air fryer menu

- Frozen fries

,default work time 20min and TEMP 400° F.
- Lamb chops

,default work time 15min and TEMP 360° F.
- Chicken leg

,default work time 22min and TEMP 400° F.
- Hamburger

,default work time 30min and TEMP 350°F.
- Fish

,default work time 15min and TEMP 400° F.
- Steak

,default work time 15min and TEMP 360°F.
- Chicken

,default work time 40min and TEMP 360° F.
Air fryer Operation Method
- Assemble the air fryer lid correctly to the body.
- Press the power button ⏻ to begin air fryer operation.
- Press the menu button 📋 to select different air fryer model(flashing)
- Press the TIME&TEMP Control button 🔍, temperature will flash, then press Time&TEMP Adjust Buttons △ ▽ to increase or decrease the temperature.
- When temperature stop flashing, pressure the TIME&TEMP Control button twice, the time will flash, then press the Time&TEMP Adjust Buttons to change the time at your request.
- Finally press the power button Ⓞ to start air cooking the button will flash during working.
- If you want to stop cooking at any time, just re-press the power button Ⓞ, air fryer will stop working.
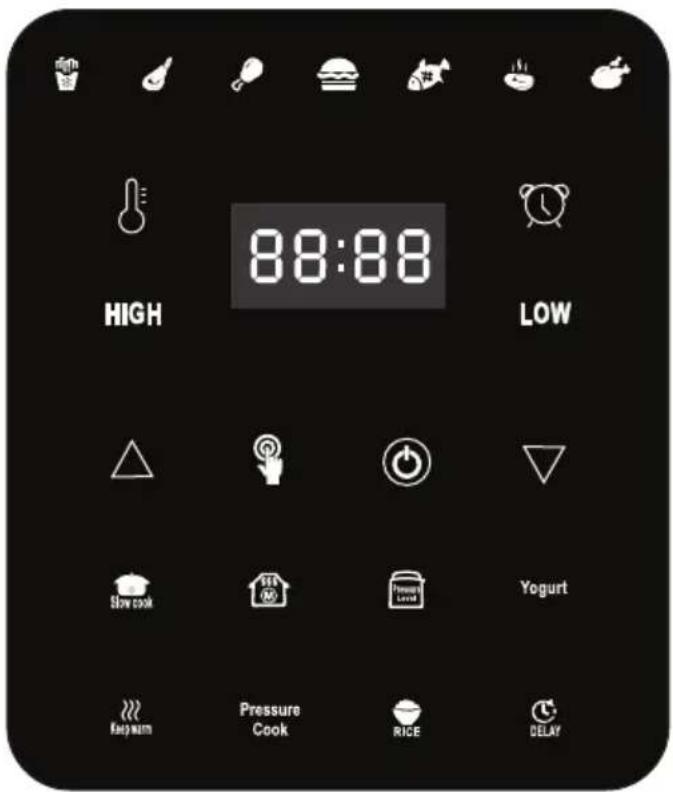
- Power button

- Slow cook button

- Keep warm button

- Pressure cooking button

- Time Adjust Buttons

- Pressure level button

- Yogurt button

- Delay button

- Rice cooking button

-
Assemble the pressure cooker lid correctly to the body by aligning the arrow both the lid and body, then turn right to clasp the lid. If the lid is not assembled correctly, the panel will show lid and can't work corporately.
-
Press the power button ⏻ to begin pressure cooker operation.
-
Select the Slow cook/Yogurt/Pressure cooking/Rice cooking button(flash), then press the Pressure level button to set the high or low pressure level.(For slow cook and Yogurt function, no need pressure level adjust)
-
Press the Time Adjust Buttons △ ▽ set the time at your request.
-
Then press the power button Ⓞ to start cooking, the panel will show "on". When inside pressure got the request, the set time will replace "on" and start count down.
-
When set time is over, it will show bb on the panel. Then you can release the pressure naturally or by manual with turning the steam release handle or pressure release valve to the VENTING position.
-
After pressure is released completely, then press the red "push to open" button (lid release button) and turn to left, lid will be open and can enjoy the food servings.
-
For slow cook function, can't adjust the pressure level, kindly be noted.
-
For the delay button, you set pre-set the time you needed for any function only for pressure cooker. Firstly to press the delay button ☐ to set a delayed cooking time in 30-minutes increments by pressing (+/-▲▼up to 24 hours) Then to press the desired function in panel, the indicator light is turned on, finally to press the start/Power button Ⓞ. The delay time will begin to count down.
-
When the pressure cooker is working, press the power button or the keep warm button, the cooker will stop working. Kindly be noted.
Cooking Chart for air fryer
| Food Item | Min - Max | Time* | Temperature | Comments |
| Thin Frozen Fries | 1 1/4 - 3 cups | 15 - 16 min. | 400^ F (200°C) | |
| Thick Frozen Fries | 1 1/4 - 3 cups | 15 - 20 min. | 400^ F (200°C) | |
| Homemade Fries | 1 1/4 - 3 1/4 cups | 10 - 16 min. | 400^ F (200°C) | Add 1/2 tbsp. oil |
| Homemade Potato Wedges | 1 1/4 - 3 1/4 cups | 18 - 22 min. | 360^ F (182°C) | Add 1/2 tbsp. oil |
| Homemade Potato Cubes | 1 1/4 - 3 cups | 12 - 18 min. | 360^ F (182°C) | Add 1/2 tbsp. oil |
| Hash Browns | 1 cup | 15 - 18 min. | 360^ F (182°C) | |
| Potato Gratin | 2 cup | 15 - 18 min. | 400^ F (200°C) | |
| Steak | 1/4 - 1.1 lb. | 8 - 12 min. | 360^ F (182°C) | |
| Pork Chops | 1/4 - 1.1 lb. | 10 - 14 min. | 360^ F (182°C) | |
| Hamburger | 1/4 - 1.1 lb. | 7 - 14 min. | 360^ F (182°C) | |
| Sausage Roll | 1/4 - 1.1 lb. | 13 - 15 min. | 400^ F (200°C) | |
| Chicken Drumsticks | 1/4 - 1.1 lb. | 18 - 22 min. | 360^ F (182°C) | |
| Chicken Breast | 1/4 - 1.1 lb. | 10 - 15 min. | 360^ F (182°C) | |
| Spring Rolls | 1/4 - 3/4 lb. | 15 - 20 min. | 400^ F (200°C) | |
| Frozen Chicken Nuggets | 1/4 - 1.1 lb. | 10 - 15 min. | 400^ F (200°C) | |
| Frozen Fish Sticks | 1/4 - 1.1 lb. | 6 - 10 min. | 400^ F (200°C) | |
| Mozzarella Sticks | 1/4 - 1.1 lb. | 8 - 10 min. | 360^ F (182°C) | |
| Stuffed Vegetables | 1/4 - 1.1 lb. | 10 min. | 320^ F (160°C) | |
| Cake | 1 1/4 cups | 20 - 25 min. | 320^ F (160°C) | |
| Quiche | 1 1/2 cups | 20 - 22 min. | 360^ F (182°C) | |
| Muffins | 1 1/4 cups | 15 - 18 min. | 400^ F (200°C) | |
| Sweet Snacks | 1 1/2 cups | 20 min. | 320^ F (160°C) | |
| Frozen Onion Rings | 1 lb. | 15 min. | 400^ F (200°C) |
Pressure Cooker Mode Parameters
| Functions | Default Minutes | Manual Setting | Pressure temperature | Pressure | Pre-set time (Y/N) | Keep warming time | Keep warming temperature | ||
| Default High | Default Low | ||||||||
| Rice | 12 | 1-99 min | 329°F | 50~60 kpa | 30-40KPa | Y | 0.5-24H | 24H | 140-176°F |
| Yogurt | 8:00 | 6-24 hour | 95~107°F | ||||||
| Slow cook | 6:00 | 0.5-9.5 hour | 190~209°F | Y | 0.5-24H | 24H | 140-176°F | ||
| Pressure cooking | 30 | 1-99 min | 329°F | 50~60 kpa | 30-40KPa | Y | 0.5-24H | 24H | 140-176°F |
Regular care or maintenance is essential in ensuring that this product is safe for use. If any of the following circumstances take place, please stop using the appliance immediately and contact Curtis support team.
• Power cord and plug suffer from expansion, deformation, discoloration, damages, etc.
• A portion of power cord or the plug gets hotter than usual.
• Electric pressure cooker heats abnormally, emitting a burnt smell.
- When powered on, there are unusual sounds or vibrations.
If there is dust or dirt on the plug or socket, please remove dust or dirt with a dry brush.
Cleaning
Caution: please make sure the appliance has cooled down and is unplugged before cleaning.
- Clean the product after each use. Wipe the black inner housing rim and slot dry with cloth to prevent rusting on the exterior pot rim.
- Remove the lid and take out the inner pot, wash them with detergent, rinse with clear water and then wipe dry with a soft cloth. The nonstick double coating aluminum inner pot is also dishwasher safe.
- Use water to clean the lid, including the sealing ring (which can be removed), exhaust valve, anti-block shield, and wipe them clean with dry soft cloth. Do not take apart the steam release pipe assembly.
- Clean the cooker body with clean damp cloth. Do not immerse the cooker into water. Do not use a wet cloth to clean the pot while the power cord is plugged into the power outlet.
Troubleshooting
If you experience any problem with the appliance, please DO NOT return the product to the retail store or online merchant.
For service assistance and product information, please call: 1-800-968-9853.
Curtis International Ltd.
7045 BECKETT DRIVE, UNIT 15, MISSISSAUGA, ON, L5S 2A3 www.curtisint.com
Troubleshooting Table
| Problem | Possible Reason | Solution |
| 1. Difficult to close the lid | Sealing ring not installed properly. | Position the sealing ring well. |
| Float valve in the popped-up position. | Press the float valve lightly downwards. | |
| 2. Difficult to open the lid | Pressure exists inside the cooker. | Use the steam release handle to reduce the internal pressure. Open the lid after the pressure is completely released. |
| Float valve stuck at the popped-up position. | Press the float valve lightly with a pen or chopstick. | |
| 3. Steam leaks from the side of the lid | No sealing ring. | Install the sealing ring. |
| Sealing ring damaged. | Replace the sealing ring. | |
| Food debris attached to the sealing ring. | Clean the sealing ring. | |
| Lid not closed properly. | Open then Close the lid again. | |
| 4. Steam leaks from float valve for over 2 minutes | Food debris on the float valve silicone seal. | Clean the float valve silicone seal. |
| Float valve silicone ring worn-out. | Replace the float valve silicone ring. | |
| 5. Float valve unable to rise | Too little food or water in inner pot. | Add water according to the recipe. |
| Float valve obstructed by the lid locking pin. | Close the lid completely, see “Cooking Preparation” section. | |
| 6. Steam comes out from exhaust valve non-stop | Steam release handle not in sealing position. | Turn the steam release handle to the sealing position. |
| Pressure control fails. | Contact support online. | |
| 7. Display flashes “Lid” | Lid is not at the correct position for the selected program. | Close lid for pressure cooking. |
Troubleshooting Table
| Problem | Possible Reason | Solution |
| 8. Display remains blank after connecting the power cord | Bad power connection or no power. | Inspect the power cord to ensure a good connection, check the power outlet is active. |
| Cooker's electrical fuse was blown. | Contact support online. | |
| 9. Rice half cooked or too hard | Too little water. | Adjust dry-rice and water ratio according to recipe. |
| Cover opened prematurely. | After cooking cycle completes, leave the cover on for 5 more minutes. | |
| 10. Rice too soft | Too much water. | Adjust dry-rice and water ratio according to recipe. |
| 11. Intermittent beeping after the cooker starts for a while | Indication of overheating. The cooker has reduced the heating temperature, and may not reach cooking pressure. | Possibly starch deposits at the bottom of the inner pot, which have clogged heat dissipation. Stop the cooker and inspect the bottom of the inner pot. |
| 12. Occasional ticking or light cracking sound | The normal sound of power switching and expanding pressure board in changing temperature. | Nothing to be worried about. |
| Wet inner pot bottom. | Wipe inner pot bottom dry before cooking. |
To make a warranty claim, do not return this product to the store. Please email support@curtiscs.com or call 1-800-968-9853.
1 Year Warranty
This product is warranted to be free from defects in material and workmanship for a period of one (1) year from the date of original purchase. During this period, your exclusive remedy is repair or replacement of this product or component found to be defective, at our option; however, you are responsible for all costs associated with returning the product to us. If the product or component is no longer available, we will replace with a similar one of equal or greater value. Prior to a replacement being sent, the product must be rendered inoperable or returned to us.
This warranty does not cover glass, filters, wear from normal use, use not in conformity with the printed directions., or damage to the product resulting from accident, alteration, abuse, or misuse. This warranty extends only to the original consumer purchaser or gift recipient. Keep the original sales receipt, as proof of purchase is required to make a warranty claim. This warranty is void if the product is used for other than single-family household use or subjected to any voltage and waveform other than as on the specified rating on the label (e.g., 120V\~60Hz).
We exclude all claims for special, incidental, and consequential damages caused by breach of express or implied warranty. All liability is limited to the amount of the purchase price. Every implied warranty, including any statutory warranty or condition of merchantability or fitness for a particular purpose, is disclaimed except to the extent prohibited by law, in which case such warranty or condition is limited to the duration of this written warranty. This warranty gives you specific legal rights. You may have other legal rights that vary depending on where you live. Some states or provinces do not allow limitations on implied warranties or special, incidental, or consequential damages, so the foregoing limitations may not apply to you.
For faster service, locate the model, type, and serial numbers on your appliance.
- THOMSON™
- MODEL:TFPC607
- PRESSURE COOKER
- Table of Contents
- Overheating Protection
- LED ERROR INDICATORS:
- Electric Power
- Precautions
- Special Cord Set Instructions
- Product Introduction
- Features
- Before the First Use
- Install the Condensation Collector
- Remove and Install the Anti-Block Shield
- Remove and Install the Sealing Ring
- Please note the following:
- Safe Lid Opening
- Quick Release:
- Caution:
- Natural Release:
- SAVE THESE INSTRUCTIONS - FOR HOUSEHOLD USE ONLY.
- top of lid
- bottom of lid
- Warning
- Unit Specifications
- Air fryer Operation Method
- Pressure Cooker Mode Parameters
- Cleaning
- Troubleshooting
- Year Warranty
Marque : THOMSON
Modèle : TFPC607
Catégorie : Friteuse