
EE171 - Commutateur HAGER - Notice d'utilisation et mode d'emploi gratuit
Retrouvez gratuitement la notice de l'appareil EE171 HAGER au format PDF.


| Type de produit | Commutateur électrique |
| Marque | Hager |
| Modèle | EE171 |
| Nombre de pôles | 1 pôle |
| Fonction | Simple allumage / Va-et-vient |
| Tension nominale | 250 V AC |
| Courant nominal | 10 A |
| Matériau de la plaque | Plastique thermodurcissable |
| Dimensions (H x L x P) | 80 x 80 x 40 mm |
| Poids | 70 g |
| Indice de protection | IP20 |
| Température de fonctionnement | -10 °C à +40 °C |
| Type de montage | Encastré ou saillie |
| Entretien et nettoyage | Nettoyer avec un chiffon doux sec. Ne pas utiliser de produits abrasifs. |
| Sécurité | Conforme aux normes NF C 61-314 et CEI 60669 |
| Réparabilité | Non réparable par l'utilisateur. Remplacer l'appareil complet. |
FOIRE AUX QUESTIONS - EE171 HAGER
Questions des utilisateurs sur EE171 HAGER
0 question sur cet appareil. Repondez a celles que vous connaissez ou posez la votre.
Poser une nouvelle question sur cet appareil
Téléchargez la notice de votre Commutateur au format PDF gratuitement ! Retrouvez votre notice EE171 - HAGER et reprennez votre appareil électronique en main. Sur cette page sont publiés tous les documents nécessaires à l'utilisation de votre appareil EE171 de la marque HAGER.
MODE D'EMPLOI EE171 HAGER
6E 7524.f

natural_image
Technical line drawing of an electrical contactor or relay device with multiple terminals and a central connector (no text or symbols visible)EE171

Programmable light sensitive switch
User instructions
Operating principle:
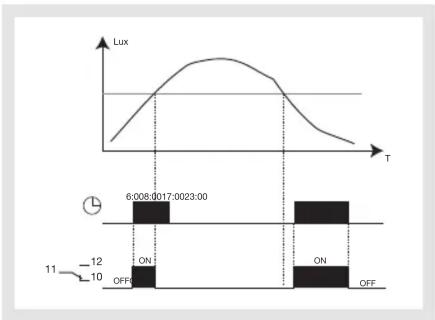
The EE171 programmable light sensitive switch controls light sytems according to a program set by the user, depending on natural illumination.
- during the work authorization period, depending on whether the measured light level is below or above the required level, it will be switched on or off.
- during the work banning period, the contact remains open, whatever the light level is.
The light sensitive switch includes a built in time delay which avoid unnecessary switching due to temporary factors such as car beams etc...
line
| Time | Lux | |------|-----| | 6:00:00 | ON | | 12:00:00 | ON | | 11:00:00 | OFF |
Description:
The programmable light sensitive switch EE171 has two main functions:
- a light sensitive switch comprising:
①Override selector switch to allow permanent setting ON or OFF, auto or test mode.
②Lighting range selector.
③Potentiometer to set light level.
④Indicator to show output switching.
- a programmer to establish the automatic operating cycle.
The programmer comprises 4 keys:
⑤on/off to choose whether the circuit is on or off
⑥Prog to set the program and scroll program steps
⑦reset
⑧+ and - to change settings
On the display are indicated :
A. the current time
B. the working status ON (authorization) or OFF (banning)
C. The days to which the program applies.
(1 = Monday, 2 = Tuesday ....7 = Sunday)
Setting time and day:
Press key + or -.
A continuous pressing on this keys will scroll up or down minutes, hours and then days.
Programming :
- To start programming, press key "Prog", the first program step flashes.

-
Set the first switching time with key “+” or “-”
-
Use the "on/off" button to choose between circuit: ON and circuit OFF. ON = work authorization period. OFF = work banning period.
-
Enter the settings by pressing "Prog" (short press). You must now choose the days of the week that the settings apply to.

-
With key “+” and “-”, display one after the other each day of the week and select with key “on/off” if the program applies to this day or not. Days to which the switching is to be applied must be visible at the bottom of the display e.g. 1 2 3 4 5 visible, means switching will be applied Monday to Friday.
-
Press "Prog" to enter this program step.
-
To adjust the time settings as well as the assignments to the days of the week; Repeat operation 2 to 6 for further programmes. (maximum 20)

If no buttons are pressed within 2 min., the device switches back to automatic mode without recording your settings.
- To record your settings and return to automatic mode press "Prog" for more than 2 seconds.

To check your settings :
In automatic mode :
Press "Prog" repeatedly to display the day, the time and the circuit status (ON or OFF). To switch back to automatic mode, press
"Prog" for more than 2 sec.
To reset the time switch :
Press the "reset" button, the program will be cancelled.

Make sure the light sensitive switch is unplugged before connecting the cell.
Permanent overrides
the override selector ① allows permanent overrides which have priority on programming and the measured light level.
permanent override "ON"


permanent override "OFF"
Setting of the working level:
The test position of the override selector ① makes easier the setting of the working level, it removes the ON and OFF delay.
Select the sensitivity range which suits with the application (selector ②):

5 to 100 lux (low light level) application examples: public lighting, shop windows, signals....

50 to 2000 lux (high light level) application examples : control of shades.
At the appropriate moment of the day, put the selector ① in “test” position ; turn the potentiometer ③ up to the switching point (the indicator ④ lights) ; put the selector back to position “auto”, the normal operating mode of the device.
Mounting of the cell:
To ensure a good working of the light sensitive switch, the cell must not be influenced by artificial light or direct solar radiation and has to be sheltered from dust and humidity.
In case of disconnection of the link between the cell and the light sensitive switch, the output of the device will be switched on.

Make sure the light sensitive switch is unplugged before connecting the cell.

natural_image
Exterior view of a white plastic enclosure with two screwdrivers (no text or symbols visible)
natural_image
Mechanical device with two adjustment knobs and a circular component, shown with a close-up of the lever (no text or symbols visible)
natural_image
Interior view of an electrical switchgear box with visible wiring and components (no text or symbols)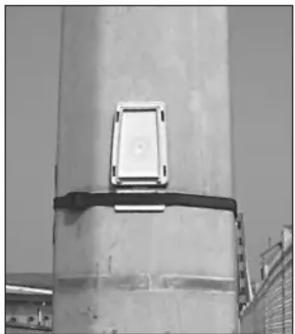
natural_image
Close-up of a concrete vertical structure with a rectangular component attached, showing no visible text or symbols.Technical specification:
Electrical specification
- Voltage rating : 230V \~+10/-15% 50 Hz
- Consumption : 1,5 VA max.
- Output : 1 voltage free changeover contact
Max. breaking capacity :
| AC1 | 16A 250V ~ |
| Incandescent lamp | 2000W 230V ~ |
| Halogen lamp | 1000W 230V ~ |
| Fluorescent lamp : | |
| uncompensated | 1000W 230V~ |
| compensated in series (10μF) | 1000W 230V ~ |
| // compensated (15μF) | 200W 230V ~ |
| duo | 1000W 230V ~ |
Functional characteristics
- 2 sensitivity ranges 5 to 100 lux
50 to 2000 lux
- weekly cycle
- 8 predefined programs
- program setting : 1 minute increments
- accuracy : ± 6 min./ annum
- operating reserve : lithium battery total of 3 years of supply failure
- on and off delay : 15 to 60 s.
- working temperature
-30 °C to +60 °C (cell),
-10 °C to +50 °C (Modular device)
- Storage temperature :
- 20 °C to +60 °C
- Protection class (cell) : IP54
- Insulation class (cell) : II
Connection capacity
- modular device : 0,5 to 4 mm ^2
- cell : 0,75 to 2,5 mm ^2
Max lenght between cell and modular device : 50 m
mounting of the cell with 2 screws ∅ 2,5 mm

Warranty
GB
A warranty period of 24 months is offered on hager products, from date of manufacture, relating to any material of manufacturing defect. If any product is found to be defective it must be returned via the installer and supplier (wholesaler). The warranty is withdrawn if :
- after inspection by hager quality control dept the device is found to have been installed in a manner which is contrary to IEE wiring regulations and accepted practice within the industry at the time of installation.
- the procedure for the return of goods has not been followed. Explanation of defect must be included when returning goods.
6E 7524.f

natural_image
Technical line drawing of an electrical contactor or relay device with multiple terminals and a central connector (no text or symbols visible)EE171
IT
Interruttore crepuscolare programmabile
Istruzioni d'uso
Principio di funzionamento:
L'interruttore crepuscolare programmabile EE171 permette di comandare automaticamente circuiti d'illuminazione secondo un programma stabilito dall'utente, in funzione della luce naturale.
- Durante il periodo di chiusura del contatto del temporizzatore, l'uscita è attiva o meno, a seconda del livello d'illuminazione misurato dalla fotocellula fotoresistente.
- Senza il consenso del temporizzatore, l'uscita è inattiva qualunque sia il livello di luminosità.
Un breve ritardo pre-impostato del contatto, alla chiusura e all'apertura, permette di evitare commutazioni intempestive in presenza di variazioni brutali di luminosità: lampi, fari d'auto, ecc...

line
| Time | Lux | |------|-----| | 6:00 | ON | | 8:00 | ON | | 17:00 | ON | | 23:00 | ON |
Descrizione del dispositivo:
L'interruttore crepuscolare programmabile EE171 si compone di due parti:
- Un interruttore crepuscolare costituito da:
① Commutatore per la selezione delle forzature permanentemente aperte o chiuse, della modalità automatico o del modo test.
② Commutatore per la selezione della gamma di luminosità.
③ Potenziometro per la regolazione della soglia di luminosità.
④ Spia luminosa per la visualizzazione dello stato dell'uscita. - un programmatore per stabilire il ciclo automatico di funzionamento.
E' dotato di 4 pulsanti:
⑤ on/off per selezionare lo stato dell'uscita
⑥ Prog per la programmazione e la visualizzazione dei passi di programma
⑦ reset per l'azzeramento del programmatore
⑧ + e - per lo scorrimento ore e minuti
Sul display sono evidenziate le seguenti indicazioni:
A. Visualizzazione delle ore e minuti attuali.
B.Periodo di autorizzazione (ON), o di divieto (OFF) di apertura.
C.Giorni ai quali il programma si applica: (1=lunedì, 2=martedì,......7=domenica)
Impostazione della data e dell'ora
La regolazione dell'ora avviene tramite pressione più o meno lunga sul pulsante "+" o "-". Una pressione lunga evidenzia rapidamente i minuti, le ore ed i giorni.
Programmazione:
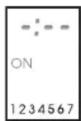
- Premere su “Prog” per iniziare la programmazione. Il primo comando lampeggia.
-
Con “+” e “-” regolare il primo orario di commutazione.
-
Con il pulsante "on/off", scegliere lo stato dei contatti: ON = abilitato OFF = disabilitato.
-
Memorizzare tramite il tasto "Prog" (breve pressione). Occorre ora definire i giorni ai quali applicare questo comando.
-
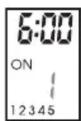
Con i pulsanti “+” e “-”, fare scorrere i giorni della settimana e selezionare con il pulsante “on/off” se attribuire o meno il comando al giorno selezionato.
-
Premere su "Prog" per confermare questo passo di programma.
-
Per impostare gli orari di commutazione e i giorni della settimana successivi, ripetere le operazioni da 2 a 6 (massimo 20 passi).
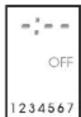
Se non sarà premuto alcun pulsante entro due minuti, il programmatore tornerà alla modalità automatico senza tenere conto delle vostre scelte.
- Per confermare la programmazione e passare alla modalità automatico, premere il pulsante "Prog" entro 2 secondi.

Per rileggere il vostro programma:
In modo automatico: tramite pressioni successive sul pulsante "Prog", si visualizzano i vari comandi: orari di commutazione, stato dei contatti e giorni scelti. Per ritornare al funzionamento automatico, premere il pulsante "Prog" per più di due secondi.
Per azzerare il programmatore :
Premere il pulsante “reset” per cancellare il programma.
⚠ Al momento del collegamento della fotocellula, o prima di qualsiasi intervento su di essa, interrompere l'alimentazione 230V dell'interruttore crepuscolare.
Forzature permanenti
Il commutatore ① permette di eseguire delle forzature permanenti, prioritarie sulla programmazione e sulla soglia di luminosità.

auto forzatura permanentemente chiuso


auto forzatura permanentemente aperto
Regolazione della soglia di luminosità:
La posizione “test” del commutatore ① facilita la regolazione della soglia d’illuminazione annullando il ritardo all’apertura e alla chiusura.
Selezionare la zona di sensibilità che corrisponde all'applicazione (commutatore ②):

5 a 100 lux (luminosità debole) esempio di applicazioni: comando d'illuminazione pubblica, d'insegne, di vetrine, ecc...

50 a 2000 lux (luminosità forte) esempio di applicazione: comando di tende....
Porre il commutatore ① in posizione “test”; nel momento della giornata scelto, ruotare il potenziometro di regolazione ③ fino alla soglia di commutazione (accensione della spia luminosa ④);
Rimettere il commutatore nella posizione "auto". E' la modalità normale di funzionamento dell'apparecchio.
Installazione della fotocellula:
Per un buon funzionamento dell'apparecchio, la fotocellula non deve essere direttamente esposta al sole o posta vicino a sorgenti luminose. Deve essere installata al riparo da polvere e umidità.
In caso d'interruzione del collegamento tra la fotocellula e l'interruttore crepuscolare, l'uscita è attiva in modo automatico.

Al momento del collegamento della fotolula, o prima di qualsiasi intervento su di sa, interrompere l'alimentazione 230V all'interruttore crepuscolare.

natural_image
Exterior view of a white plastic mechanical component with two screwdrivers (no text or symbols visible)
natural_image
Mechanical component with two hanging weights and a circular top, shown with a curved arrow indicator (no text or symbols)
natural_image
Interior view of a mechanical device with internal components and wiring (no visible text or symbols)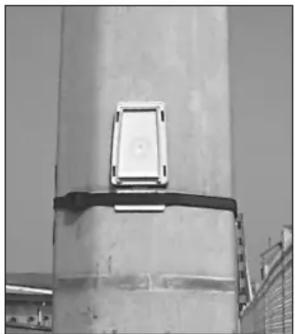
natural_image
Close-up of a concrete vertical structure with a rectangular bracket and black clamps, no visible text or symbols.Caratteristiche tecniche:
Caratteristiche elettriche:
- Alimentazione: 230V\~ +10/-15% 50 Hz
- Consumo: 1,5 VA max.
- Uscita: 1 contatto in scambio, potere d'interruzione max.: AC1 16A 250V\~
Lampada ad incandescenza 2000W 230V\~
Lampada alogena 1000W 230V\~
Tubi fluorescenti:
non compensato 1000W 230V\~
compensato in serie (10μF)
compensato // (15μF)
duo
1000W
200W
1000W
230V\~
230V\~
Caratteristiche funzionali:
- 2 scale di sensibilità: 5 a 100 lux
50 a 2000 lux
- ciclo settimanale
- 8 programmi pre-registrati
- precisione di programma: 1 min.
- precisione: ± 6 min/anno
- riserva di carica: 25000 h, pila al litio,
- ritardo all'accensione e all'estinzione: 15 s a 60 s.
- temperatura di funzionamento:
-30 °C a +60 °C (fotocellula),
-10 °C a +50 °C (apparecchio)
- temperatura di stoccaggio:
- 20 °C a +60 °C
- grado di protezione (fotocellula): IP54
- classe d'isolamento (fotocellula): II
Sezioni massime allacciabili:
- apparecchio modulare: 0,5 a 4 mm ^2
- fotocellula: 0,75 a 2,5 mm ^2
distanza tra l'interruttore e la fotocellula:
max. 50 m
fissaggio della fotocellula per mezzo di 2 viti ∅ 2,5 mm.

Garanzia

24 mesi contro tutti i difetti di materiale o di fabbricazione, a partire dalla data di produzione.
In caso di difetti, il prodotto deve essere restituito al grossista da cui è avvenuto l'acquisto.
La garanzia ha valore solo se viene rispettata la procedura di reso tramite installatore e grossista e se dopo la verifica del nostro servizio controllo qualità non vengono riscontrati, difetti dovuti ad una errata messa in opera e/o ad una utilizzazione non conforme alla regola dell'arte, ad una modifica del prodotto. Le eventuali note informative del difetto dovranno essere allegate al prodotto reso.
- Programmable light sensitive switch
- User instructions
- Operating principle:
- Description:
- Setting time and day:
- Programming :
- To check your settings :
- To reset the time switch :
- Permanent overrides
- Setting of the working level:
- Mounting of the cell:
- Technical specification:
- Electrical specification
- Functional characteristics
- Connection capacity
- Warranty
- Interruttore crepuscolare programmabile
- Istruzioni d'uso
- Principio di funzionamento:
- Descrizione del dispositivo:
- Impostazione della data e dell'ora
- Programmazione:
- Per rileggere il vostro programma:
- Per azzerare il programmatore :
- Forzature permanenti
- Regolazione della soglia di luminosità:
- Installazione della fotocellula:
- Caratteristiche tecniche:
- Caratteristiche elettriche:
- Caratteristiche funzionali:
- Sezioni massime allacciabili:
- Garanzia
Marque : HAGER
Modèle : EE171
Catégorie : Commutateur