
Rustiqe CRUB3216WH - Lavabo RANGEMASTER - Notice d'utilisation et mode d'emploi gratuit
Retrouvez gratuitement la notice de l'appareil Rustiqe CRUB3216WH RANGEMASTER au format PDF.


| Type de produit | Lavabo |
| Marque | Rangemaster |
| Modèle | Rustiqe CRUB3216WH |
| Matériau principal | Céramique |
| Couleur | Blanc |
| Forme | Rectangulaire |
| Type de montage | Sous-plan ou sur plan |
| Dimensions (L x l x H) | 60 x 45 x 15 cm |
| Poids | 15 kg |
| Capacité du bassin | 10 litres |
| Trou de vidange | Oui, diamètre standard 32 mm |
| Trop-plein | Intégré |
| Robinets inclus | Non |
| Alimentation | Aucune (élément non électrique) |
| Fonctions principales | Lavage des mains, vaisselle légère |
| Entretien et nettoyage | Nettoyer avec un chiffon doux et un détergent non abrasif |
| Sécurité | Résistant aux chocs thermiques (jusqu'à 100°C) |
| Pièces détachées disponibles | Bonde, siphon, trop-plein |
| Réparabilité | Garantie 2 ans, pièces disponibles |
| Informations générales | Conçu pour un usage résidentiel |
FOIRE AUX QUESTIONS - Rustiqe CRUB3216WH RANGEMASTER
Questions des utilisateurs sur Rustiqe CRUB3216WH RANGEMASTER
0 question sur cet appareil. Repondez a celles que vous connaissez ou posez la votre.
Poser une nouvelle question sur cet appareil
Téléchargez la notice de votre Lavabo au format PDF gratuitement ! Retrouvez votre notice Rustiqe CRUB3216WH - RANGEMASTER et reprennez votre appareil électronique en main. Sur cette page sont publiés tous les documents nécessaires à l'utilisation de votre appareil Rustiqe CRUB3216WH de la marque RANGEMASTER.
MODE D'EMPLOI Rustiqe CRUB3216WH RANGEMASTER
RUSTIQUE CERAMIC UNDERMOUNT SINK CERAMIC INSET SINK
RANGEmaster
Sinks & Taps

IMPORTANT!
- If you are mounting your sink into a granite or marble worktop you must have a fabricator cut the hole for you.
- Due to dimensional tolerances within all ceramic sinks these instructions should be used as guidelines only.
- The position of your sink will be determined by the relationship of the sink edges to cabinet gables, supports and tap location.
- Ensure current plumbing fixtures are long enough to reach the new sink and it's location.
- If unsure of fitting your sink we recommend seeking the advice of a professional fitter. Rangemaster will not accept responsibility for errors in countertop preparation or installation.
Preparation
-
Take great care when handling this sink, whilst every effort has been taken to remove sharp edges, the material by nature may be sharp. We recommend wearing gloves accordingly. DO NOT lift the product by the waste hole(s) or tap hole(s). We recommend 2 people should be used to handle this product.
-
Check the package for completeness, possible defects or any transport damage before installation commences. Installed faulty product will not be honoured by the warranty.
-
Check that the supporting carcass and worktop is level left to right and front to back to ensure correct drainage of water.
-
Check that the surrounding furniture is the correct size and shape to accept this product and that no plumbing or wiring may foul the installation.
-
If replacing an existing sink, remove this product and clean the surrounding area, ensure the new sink will suit the existing cut out size and position, otherwise amend the cut out size accordingly.
-
Before creating the cut out in the worktop, carefully plan the positioning of the sink. Ensure that the position of the bowl(s), tap and overflows will not interfere with surrounding units or appliances. Check that the fixing clips will not foul carcass walls or supporting braces.
-
Carefully mark out the cut out using the provided technical drawing or template for either the undermount installation or inset installation. Create the sink cut out in the worktop using a router or CNC cutter, follow the manufacturer's instructions taking care not to chip, crack or scratch the worktop. If preparing the cut out in situ cover any open pipework to avoid any debris contaminating the water supply feeds.
-
All ceramic products should be supported under the reverse face with a substantial braced shelf similar (Fig. 1.2). The shelf should be designed to allow for small adjustments in height at each corner and so that it could be disassembled from the underside in the event that the sink is accidentally damaged.
Parts and Contents
| Key Description Qty | ||
| a. Sink (may differ from model shown) | 1 | |
| b. Overflow pipework 1 | ||
| c. Care instructions and or template 1 | ||
| n/a. Basket strainer waste(s) | dependant on model | |
| n/a | Connecting pipework | dependant on model |
You will need:
Electric saw with jigsaw fitment or a router Translucent silicone sealant

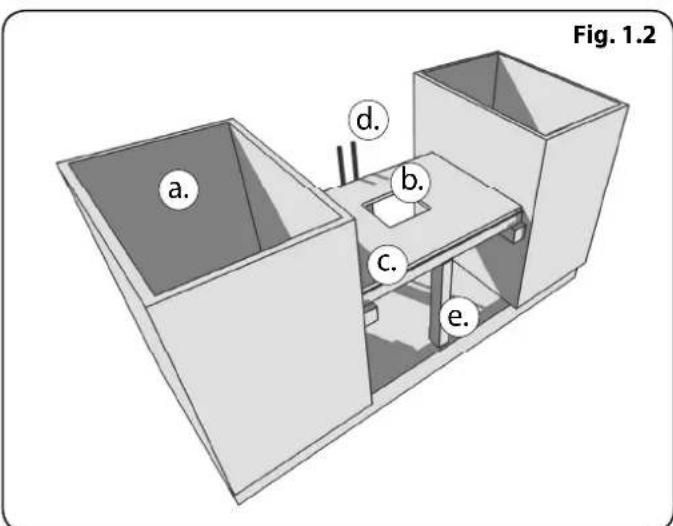
| Key Description |
| a. Surrounding cupboards or end panels |
| b. Hole for waste connections (min recommended dia. 150mm for each waste, centred to waste) |
| c. Supporting shelf (moisture resistant timber or similar, ensure framework sits directly under the product) |
| d. Incoming hot and cold supply pipes |
| e. Supporting uprights (front & back) |
Installation
IMPORTANT: Due to the larger dimensional tolerances on ceramic products we strongly recommend making the cut out in a scrap piece of material then checking it against the actual sink to be fitted. The cut out size should be adjusted to suit the sink tolerances and retested against the intended product before committing to cutting the final worksurface. The 'nominal' suggested cut out size will align the cut out edge with the bowl edge radius. The offset from the bowl can be adjusted to overhang or be set back according to personal taste but, this may interfere with installation or the correct usage of sink accessories.
Note: If the cut out is adjusted to either overhang or set back from the sink rim, sufficient surface area must be left to allow a water tight seal. Fig. 1.10 shows the cut out flush to the bowl radius.
Please do not over tighten any fittings as this may cause the surface of your ceramic sink to crack.
- Install the tap to the worktop according to the manufacturer's instructions. Ensure the tap is secure as later access may be obstructed by the sink or plumbing. We recommend using long flexible tap connectors to help.
- Install the basket strainer waste kit(s) and overflow according to the manufacturer's instructions.
- Clean the cut out perimeter of the worktop underside and the upper perimeter of the sink with a degreasing cleaning solvent and allow to dry.
- Apply a continuous generous bead of good quality silicone onto the rim around the upper perimeter of the sink (Fig. 1.9) or (Fig. 1.18).
- Gently lay the worksurface onto the sink, carefully align the sink rim with the cut out shape with equal spacing on all sides (Fig. 1.10).
Where possible apply a 2nd and 3rd bead of silicone around inside and outside of the adjoining sink and worktop. Any excess silicone can be cleaned away using a proprietary silicone cleaner. Allow the silicone to dry.
- Attach the sink connecting pipework to the waste kit(s) according to the manufacturer's instructions.
Undermount sink
CRUB3314WH/ (Fig. 1.3)
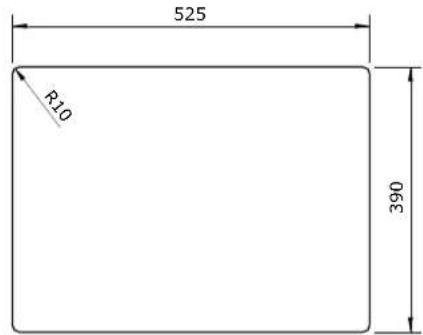
CRUB3216WH/ (Fig. 1.4)
CRUB4040WH/ (Fig. 1.5)
CRUB5340WH/ (Fig. 1.6)
CRUB385WH/ (Fig. 1.7)
CRUB1740WH/ (Fig. 1.8)
- To ensure perfect positioning of the product, the cutout details are shown below. The cutout template is also available online www.rangemaster.co.uk.
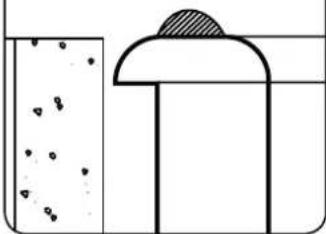
- The height of the shelf should be such that when the sink is placed on the shelf the top face rim of the sink is level with the underside face of the worktop, see (Fig. 1.9) and (Fig. 1.10).
Undermount sink cutout
Fig. 1.3 CRUB3314WH/
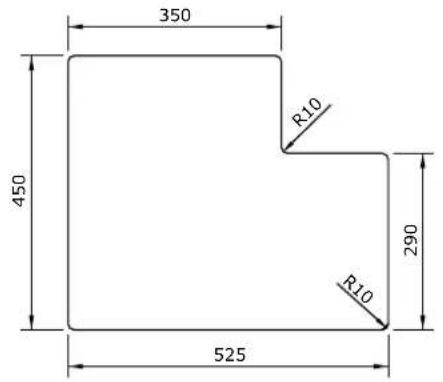
CRUB385WH/
Fig. 1.7

Fig.1.4 CRUB3216WH/
CRUB1740WH/
Fig. 1.8

Fig. 1.5 CRUB4040WH/

Fig. 1.9
Fig. 1.10
natural_image
Simple line drawing of a container with liquid and a lid, no text or symbols present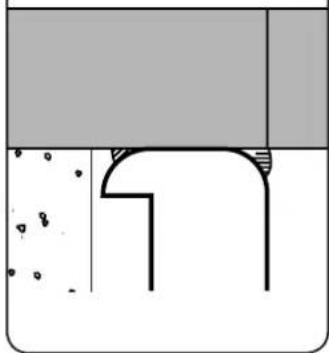
natural_image
Pure technical diagram of a mechanical or architectural component without any text, numbers, or symbolsFig. 1.6 CRUB5340WH/

Inset sink
CRUB3314WH/ (Fig. 1.11)
CRUB3216WH/ (Fig. 1.12)
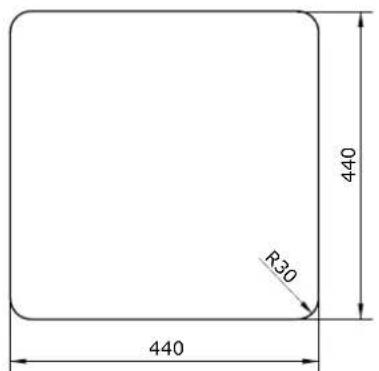
CRUB4040WH/ (Fig. 1.13)
CRUB5340WH/ (Fig. 1.14)
CRUB385WH/ (Fig. 1.15)
CRUB1740WH/ (Fig. 1.16)
- The cut out details are shown in (Fig. 1.11) or (Fig. 1.12) ensure perfect positioning of this product. The cutout template is also available online www.rangemaster.co.uk.
- When installing as an Inset Sink, a chamfer in the underside of the worktop may be required for the overflow body (Fig. 1.17).
Applying the Silicon sealant
- Apply silicone sealant (not supplied) to the underside of the sink rim (Fig. 1.18).
- Turn the sink over and feed into pre-prepared cut-out (Fig. 1.19).
- Remove any surplus sealing material or wipe away any excess sealant.
Inset sink cutout
Fig. 1.11 CRUB3314WH/

CRUB385WH/
Fig. 1.15

Fig. 1.12 CRUB3216WH/

CRUB1740WH/
Fig. 1.16
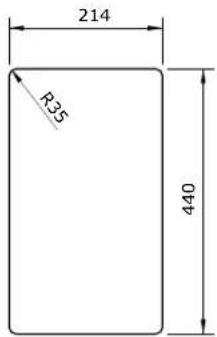
Fig. 1.13 CRUB4040WH/

natural_image
Technical line drawing of a mechanical joint or bracket with a dashed circular annotation, labeled Fig. 1.17 (no text or symbols on the diagram itself)Fig. 1.14 CRUB5340WH/


natural_image
Diagram of a tool tip applying material to a surface, labeled Fig. 1.18 (no text or symbols on the diagram itself)
natural_image
Technical line drawing of a mechanical assembly with no visible text or symbolsAfter installation
- Clean the sink using the attached care advice ready for use.
- Check the sink is flat to the worktop, straight and level; pour a small amount of water onto the drainer (if applicable) to check for drainage.
- Close the plug(s) in all bowls, fill the sink with water below the overflow and check the water does not leak through or around the waste(s).
- Close the plug(s) in all bowls fill the sink with water above the overflow, check the water exits though the overflow and does not leak from the overflow system.
- Open the plug(s) and let water drain from the bowls, check the connecting pipework does not leak.
- If the sink is not to be used for a period after installation, cover the sink and tap to protect them from accidental damage during further surrounding installation work.
- We recommend once fully set, the silicone seal should be checked for water tightness and rechecked periodically.
Care and Cleaning
To maintain the appearance of this product, ensure that it is regularly cleaned using only a clean, soft damp cloth. A solution of warm water and a mild liquid non-antibacterial detergent may be used where necessary, and then the product rinsed thoroughly and wiped dry. Any other cleaning action will invalidate your warranty.
No household or industrial chemicals should come into contact with this product to prevent damage.
To prevent staining or discolouration of the product always rinse the sink with water after use, if you live in a hard water area we suggest you also wipe the sink dry.
Do not cut, slice or chop directly onto the sink as you may mark the surface finish. Avoid the use of plastic washing up bowls as engrained grit on the bowl underside may mark the surface finish. Avoid impacting the product with sharp or heavy objects, such as knives, pans or cooking pots and also avoid contact with abrasives. No hot objects should be placed directly onto the sink surface. Avoid contact with cycles of very hot and cold substances.
For further care and maintenance advice on removing stubborn marks and more examples of objects or actions likely to artificially shorten the life of this product please visit our website.
Technical Data
Whilst every effort has been made to make these instructions comprehensive they may not be exhaustive, we strongly recommend that this product is installed by a skilled professional. This will ensure the best possible finished installation.
This product is made from high quality fireclay for the greatest possible durability, after the end of the lifecycle of this product it should be disposed of responsibly. Please be aware that fireclay is a natural material therefore variations in size, flatness and finish should be expected
Earth bonding: under current IET regulations there is no statutory requirement to earth bond sinks as most new wiring installations are protected with an RCD. If you are unsure if your wiring is protected by an RCD, contact a qualified electrician.
Maximum temperature +300°C* Note: If this temperature is exceeded, even for short periods, damage to the finish can result.
Waste disposers should be mounted in such a way that the weight of the unit is supported by the kitchen cabinet carcass, not just the sink. Faulty or damaged waste disposal units can cause vibration – this will damage the sink and can loosen connecting pipework or fixings causing water leaks.
All Rangemaster products are designed in accordance with recognised European or global standards. Please ensure that your Rangemaster product is fitted in accordance with localised legislation.
The installation should be periodically checked for damage to water sealing parts as described in the instructions to avoid accidental water damage.
A full technical specification and copies of these instructions are available for this product on our website. www.rangemaster.co.uk
10 Year Warranty Terms and Conditions
In the unlikely event that you should experience any defect in the materials or workmanship of your new Rangemaster sink within 10 years of purchase, the manufacturer will repair or replace all or any part of the product that is defective, at their discretion. The manufacturer will not be responsible for any other consequential costs such as labour, removal or reinstallation of the sink or any other connected or related products.
This is provided that the product has been used for normal domestic purposes in the UK & Eire, and that the care, installation and maintenance instructions have been observed. The warranty extends to the original purchaser only. You should retain a copy of your dated invoice as proof of purchase to validate any claims under this guarantee.
Please note that this product is manufactured using natural materials so slight shade variations can occur. Marks, scuffs and scratches caused during installation or accidental damage are not covered by this guarantee.
Neither are stains, discolouration or corrosion or any damage or defect caused by incorrect installation or abuse of the product.
We are continuously improving and developing our range of products, finishes & colours. Therefore, in the event of a valid claim, we may not be able to provide an identical replacement for the defective product throughout the guarantee period. Where an identical product is no longer available, we will supply the nearest equivalent from our then current product range. In assessing your claim, we must be given the opportunity to inspect the product as installed prior to removal. Any product returned to us must be securely packaged and adequately insured. We will not accept responsibility for any damage caused during transportation.
No installer, dealer, agent or employee of Rangemaster has the authority to modify the obligations or limitations of this warranty. This warranty does not affect your statutory rights.
| CE | |
| RANGEMasterMeadow Lane, Long Eaton,Nottingham, NG10 2GD, EnglandTel: +44 (0)800 804 6261 From a mobile: 0370 789 5107E-mail: consumers@agarangemaster.co.ukwww.rangemaster.co.uk | |
| 17EN 13310 : 2015Kitchen sink made of: Ceramic fireclayCleanability: PassLoad resistance: NPD / N/ADurability: Pass |
Due to our policy of continual improvement, we reserve the right to change specifications without prior notice.


- RUSTIQUE CERAMIC UNDERMOUNT SINK CERAMIC INSET SINK
- IMPORTANT!
- Preparation
- Parts and Contents
- You will need:
- Installation
- Undermount sink
- Undermount sink cutout
- Inset sink
- Applying the Silicon sealant
- Inset sink cutout
- After installation
- Care and Cleaning
- Technical Data
- Year Warranty Terms and Conditions
Marque : RANGEMASTER
Modèle : Rustiqe CRUB3216WH
Catégorie : Lavabo