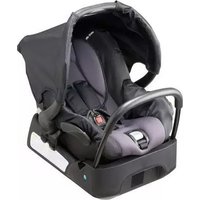
One Safe - Produits bébés SAFETY 1ST - Notice d'utilisation et mode d'emploi gratuit
Retrouvez gratuitement la notice de l'appareil One Safe SAFETY 1ST au format PDF.


| Type de produit | Babyphone avec vidéo |
| Marque | Safety 1st |
| Modèle | One Safe |
| Dimensions (écran parent) | 10 x 8 x 4 cm |
| Dimensions (caméra bébé) | 8 x 8 x 10 cm |
| Poids (unité parent) | 200 g |
| Poids (caméra) | 150 g |
| Alimentation | Adaptateur secteur (5V) ou batterie lithium-ion 3,7 V |
| Autonomie (batterie parent) | 8 heures en utilisation continue |
| Portée maximale | 300 mètres en champ libre |
| Fonctions principales | Audio bidirectionnel, vision nocturne, détection de mouvement, indicateur de température ambiante |
| Nettoyage et entretien | Essuyer avec un chiffon doux légèrement humide. Ne pas immerger dans l'eau. |
| Normes de sécurité | Conforme aux normes CE et RoHS |
| Pièces détachées et réparabilité | Adaptateurs et batteries disponibles auprès du fabricant. Indice de réparabilité : 7,0/10 |
| Garantie | 2 ans |
FOIRE AUX QUESTIONS - One Safe SAFETY 1ST
Questions des utilisateurs sur One Safe SAFETY 1ST
0 question sur cet appareil. Repondez a celles que vous connaissez ou posez la votre.
Poser une nouvelle question sur cet appareil
Téléchargez la notice de votre Produits bébés au format PDF gratuitement ! Retrouvez votre notice One Safe - SAFETY 1ST et reprennez votre appareil électronique en main. Sur cette page sont publiés tous les documents nécessaires à l'utilisation de votre appareil One Safe de la marque SAFETY 1ST.
MODE D'EMPLOI One Safe SAFETY 1ST
DOREL®
Australia
Instruction Manual
OS 2010 Infant Carrier
natural_image
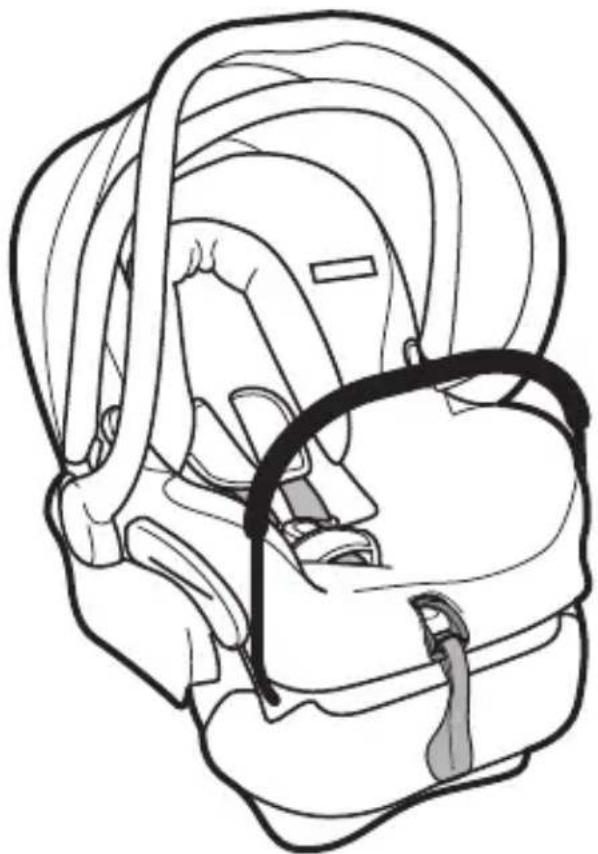
Line drawing of a car seat with visible seatbelt and seat, no text or symbols presentIllustrations are representative only.
Design and style may vary.
IMPORTANT: KEEP THIS BOOKLET IN THE PLACE PROVIDED ON THE CHILD RESTRAINT
Before You Start
Thank you for purchasing this child restraint. We welcome you as a valued customer, and trust that your child will enjoy many years of comfort and safety.
No child restraint can guarantee absolute protection from a crash. However proper use of this restraint may reduce the risk of serious injury or death!
Table of Contents
Page 2 - 4 Warnings (General)
Page 5 - 8 Anchorage fitting installation
Page 9 - 10 Vehicle seat location
Page 11 - 12 Infant carrier parts
Page 13 Shoulder height marker rearward facing
Page 14 - 16 Preparing infant seat to fit your child
Page 16 Adjusting the harness belt / carry handle
Page 17 Installation of the base
Page 17 Installation of infant seat with base
Page 18 Removing infant seat from the base
Page 19 The next seat for your child
Page 20 - 23 Removing trim and sunshade for cleaning
Page 24 Removing buckle for cleaning
Page 24 Assembling buckle after cleaning
Page 25 Accessories
Page 26 Care and maintenance (General)

WARNING
IMPORTANT: RETAIN FOR FUTURE REFERENCE
THESE INSTRUCTIONS DETAIL THE SAFE USE, FITMENT AND MAINTENANCE OF THE SEAT.
PLEASE READ THESE INSTRUCTIONS CAREFULLY AND ENSURE THAT THEY ARE FOLLOWED AT ALL TIMES.
NO SAFETY SEAT CAN GUARANTEE PROTECTION FROM INJURY HOWEVER, PROPER USE OF THIS SEAT REDUCES THE RISK OF SERIOUS INJURY OR DEATH TO YOUR CHILD.
Follow the manufacturer's instructions at all times.
GENERAL
- To be used only in a rearward-facing position for an infant until their shoulders reach the shoulder height marker (approximately 6 months of age).
Continue to use this infant restraint until the child reaches this limit.
Infants are at risk of serious injury if they face forward too early.
- Use the restraint exactly as shown in the instructions.
• DO NOT LEAVE CHILDREN UNATTENDED IN THE CAR.
- Never use this product if it has been in an accident, or has become badly worn.
- Periodically inspect the harness for wear, paying particular attention to attachment points, stitching and adjusting devices.
- In an emergency your child can be released quickly by pressing the red button on the harness buckle.
- In the event of an emergency it is important that the child can be released quickly. This means that the buckle is not fully tamperproof and therefore your child should be persuaded never to play with the buckle.
- Luggage and other heavy objects should be secured in the car. Loose objects are liable to cause injury in the event of an accident.

WARNING
- To help protect your vehicle seat's upholstery from damage, use a seat protector or a towel.
- Park in the shade or where sun does not directly hit the child restraint.
- Cover the child restraint with a sheet or blanket when not in use.
- Check for hot seat and buckles before placing child in child restraint.
- Check vehicle instructions for more information about air bag/child restraint use.
- Make sure the harness height is correct for your child's size.
• The harness must be snug. - The vehicle belt must stay tight at the belt path. If it's not, your child could be injured or killed.
- Do not alter or modify this child restraint.
- Check the vehicle belt before each use. Use only if the belt can be tightened properly and securely.
- This child restraint should be securely belted in the vehicle even when not in use. In a crash or sudden stop, an unsecured child restraint could injure other occupants.
- Never allow any child to play with this child restraint; it is not a toy.
- Do not lubricate buckles and fasteners.
- Do not remove any of the warning labels or other labels on the child restraint.
- Do not use this child restraint without the seat trim.
• Fit the restraint firmly to the car seat.
• Fit the harness firmly to the child. - Do not allow the restraint to come into contact with polishes, oils, bleach and other chemicals.
- A loose restraint or harness is dangerous.

WARNING
- Straps may be damaged by unsecured cargo in a collision. Secure or remove hazardous cargo before using this strap. Hatch-back or wagon: Do not use the child restraint where this strap may fall into a split in the seat back. Always attach hook and remove slack.
• Repairs must only be done by the manufacturer or agent. - Do not allow the restraint to come into contact with polishes, oils, bleach and other chemicals.
- Destroy the restraint if it has been in a severe crash, even if no damage is visible.
- To ensure baby's back is evenly supported, do not put more than one nappy on the baby and make sure the nappy is not thickly folded at the back.
• DO NOT USE A REAR FACING CHILD RESTRAINT WHERE AN AIRBAG IS FITTED IN FRONT OF THE SEATING POSITION. - THIS RESTRAINT MUST BE ATTACHED TO A CHILD RESTRAINT ANCHORAGE POINT IN THE CAR. REFER TO CAR OWNER'S HANDBOOK FOR LOCATION OF ANCHORAGE POINTS. REFER TO A CHILD RESTRAINT FITTING STATION IF NO ANCHORAGE POINTS ARE IN THE MOTOR CAR.
• TO BE USED WITH A LAP-SASH/LAP-ONLY SEAT BELT IN THE FRONT/BACK OF MOST CARS WITH FORWARD-FACING SEATS - Supervision of children is needed because they may be able to undo buckles.
- Care and attention shall be given to ventilation and shading of the occupant.
- Seat belt extenders should not be used if the seat belt is not long enough to secure the child restraint.
- If the baby's neck muscles are unable to support their head, then the child should remain rear facing.
ANCHORAGE FITTING INSTALLATION
Read and follow all of the installation instructions for maximum protection. If you have any questions regarding the installation or use of this restraint, please contact Dorel Australia or agent, or a child restraint fitting station authorised by the relevant transport authority, or in New Zealand, to consult the agent for the vehicle.

WARNING
THIS RESTRAINT MUST BE USED IN CARS WITH FORWARD FACING SEATS WITH A LAP-SASH SEAT BELT OR LAP BELT.
Do not modify or alter this restraint in any way. Use only Dorel Australia recommended parts and accessories.
Protect all webbing from possible damage by sharp edges and corners.
Check your vehicle owner's handbook for the location of correct anchorage points and possible need for spacers. If a suitable anchorage point cannot be found, contact a child restraint fitting station for recommendations about your vehicle.
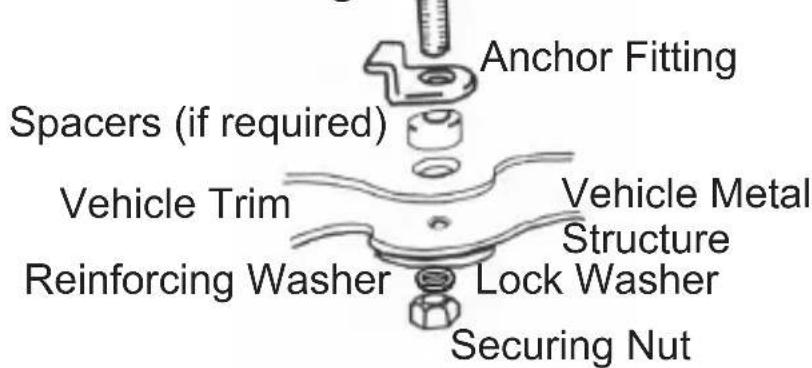
Some vehicles may have anchor points which are recessed below the vehicle trim, spacers are supplied to raise the anchor point if required.
Extension straps and extra fittings are available from various stores. An extension strap may be needed to fit this child restraint into the vehicle. extension straps 300mm (p/n 014398) and 600mm (p/n 014399) as well as additional anchorage kits (p/n 014400) are available from most retail outlets.
IMPORTANT
Child restraints must be used correctly to provide proper protection for your child. The new type of clip anchorage system on child restraint must be used in the correct way. Be especially careful to use the clip in the following way.
RIGHT
Make sure there is no slack in the top strap and the attachment clip is upright in the anchorage fitting.
WRONG
The clip must not lie flat on the anchorage fitting.

FLOOR MOUNTED ANCHORAGES

ANCHORAGES IN VERTICAL PANEL AT REAR OF VEHICLE
ANCHORAGE FITTING INSTALLATION
If the car is fitted with a child restraint anchorage point .
Locate the anchorage points behind the rear seating position (consult the car owner's handbook for the location of the anchorage point). Remove the thread plug from the parcel shelf / floor/ roof and install the attachment bolt as shown in Fig 1.

WARNING
CAUTION: DO NOT OVERTIGHTEN THE ATTACHMENT BOLT. MAXIMUM TORQUE 20 Newton
Metre.

Fig 1
Attachment Bolt
Lock Washer
Anchor Fitting
Spacers (if required)
Vehicle Trim
Vehicle Metal Structure
If the car is not fitted with a child restraint anchorage point.
For sedans only – Drill a 9mm diameter hole in the parcel shelf on the centre – line of the seating position as shown in Fig 2. Install the anchor bolt as shown in Fig 3.
For vehicles other than sedans – In Australia, consult your nearest child restraint fitting station or traffic authority for vehicle inspection to find the best, correct position for the placement of anchorage point, and for the correct attachment bolt length and use of spacers. In New Zealand, consult the agent for the vehicle.
WARNING: CHILD RESTRAINTS MUST NOT BE ATTACHED TO UNSOUND METAL OR TO WOOD OR SYNTHETIC STRUCTURES. WHEN DRILLING THE 9MM HOLE DO NOT DRILL THROUGH FUEL LINES, FUEL TANKS, ELECTRICAL WIRING, OR RADIO SPEAKERS. WEBBING STRAPS MUST BE PROTECTED FROM SHARP CORNERS AND EDGES.
THE ANCHOR FITTINGS MUST BE USED ONLY AS DESCRIBED ABOVE. IT MUST NOT BE HOOKED ONTO ANY OTHER OBJECT.

Centre-line of seating position

Fig 2
Front of vehicle
Fig 3 Attachment Bolt
VEHICLE SEAT LOCATION
WARNING
IMPROPER PLACEMENT OF THE SAFETY SEAT INCREASES THE RISK OF SERIOUS INJURY OR DEATH.
Some seating positions in your vehicle may NOT be safe for this safety seat. Some vehicles do not have any seating positions that can be used safely with the seat. If you are not sure where to place the infant seat in your vehicle, consult your vehicle's owner's handbook.
Vehicle Seat Location Requirements
Children are safer when properly restrained in rear vehicle seating positions. Whenever possible, secure the infant seat in the centre position of the seat directly behind the front seats.

Check the measurements between the front & rear seats in the car in which the child restraint is intended to be used, to ensure that the space is adequate.
CORRECT VEHICLE POSITION

ANGLE CONFIGURATION FOR SEAT

Position seat ensuring that the angle is no greater than 40irc from horizontal plane.
Angular adjustment is achieved by placing towel or similar object between seat and base as illustrated.
INFANT CARRIER PARTS
FRONT

- Shell/Seat
- Carrying handle
- Instruction manual (Pull trim back and insert instruction manual behind foam headrest)
- Slots for adjusting the shoulder belts
- 5 point harness
- Quick release buckle
- Adjuster button
- Adjusting belt
- Head insert
- Tether strap must be permanently attached
- Trim
- Push-button for adjusting the carrying handle
- Clip
- Buckle pad
- Shoulder pads


- Stabilising bar
- Belt guides
- Release button
- Locking hooks
- Sunshade
- Footcover (if fitted)
- Adjuster latch
- Hook
- Tether strap
- Plastic cable tie * DO NOT REMOVE
- Bracket
- Plastic hook keeper
BASE

Shoulder height marker rearward facing
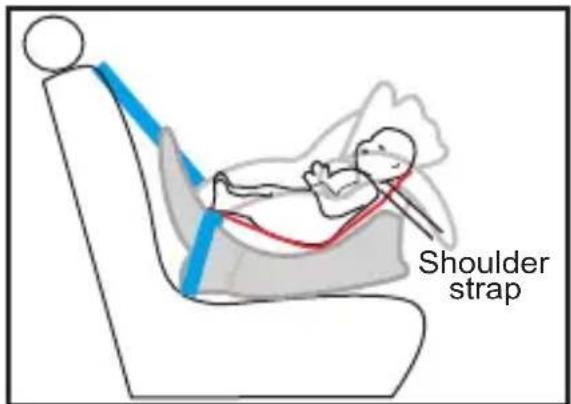
Shoulder strap:
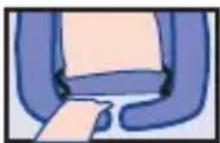
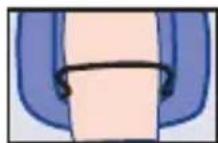
The shoulder straps must be in the slots which are nearest to the child's shoulders, but not lower than the child's shoulders.
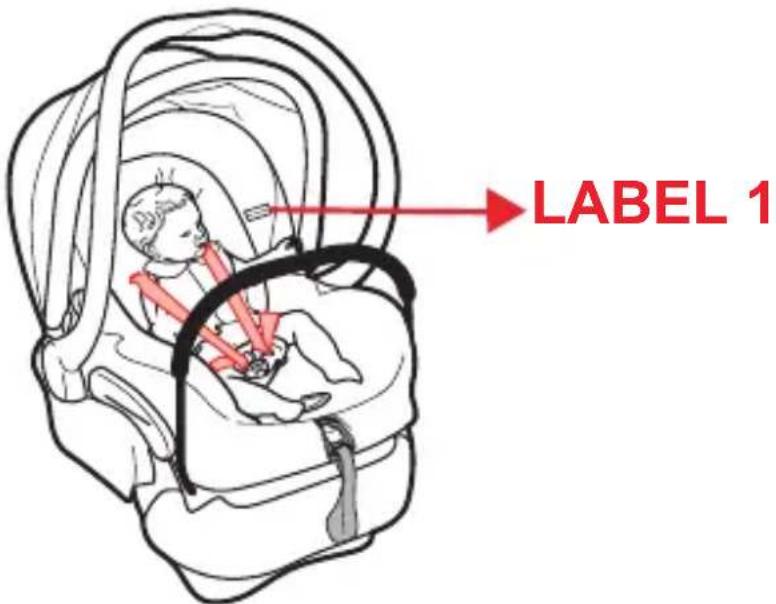
To be used only in a rearward-facing position until the infant's shoulders reach the shoulder height marker (approximately 6 months of age).
LABEL 1

Preparing Infant Seat to Fit Your Child
You MUST make these adjustments with your child before you install the child restraint in the vehicle.
TO ADJUST HARNESS:
To loosen:
• ① Press and hold down the adjuster button at the front of the seat
• ② Pull both harness shoulder belts simultaneously towards you.
• ③ Press red button to release buckle assembly for ease of child fitment. Place child in seat.

To tighten:
• 4 Fasten buckle assembly. Pull the adjuster belt at the front of the seat until the harness belt lies firmly against the child.
- 5 Place end of the adjuster belt on to the hook at the front of the seat for storage and safety. Please ensure adjuster strap is under clip.

natural_image
Illustration of a biological structure with a blue arrow pointing to a specific region, labeled with number 5 (no text or symbols beyond label)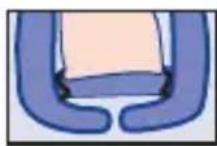

natural_image
Illustration of hands holding a red square object with blue bands, no text or symbols presentConfiguring the harness belt for shoulder height.
Press red button to release the buckle assembly. Pull harness straps over sides of infant seat.

natural_image
Illustration of a hand adjusting a car seatbelt with a red safety patch (no text or symbols)Locate splitter plate at back of seat.
Unfasten harness straps from splitter plate at rear of seat.


natural_image
Diagram showing two gray diagonal strips with red arrows indicating direction, no text or symbols presentPull harness through the harness slots from the front.
Rethread harness into new harness guide locations.
Do not use shoulder straps of unequal heights. Straps
must be threaded through the same slot level for the trim and seat.
Rethread harness to splitter plate.
Make sure harness is completely on splitter plate and is not twisted.

natural_image
Illustration of a hand holding red blocks with a tool, no text or symbols present
- The shoulder straps must be in the slots which are nearest to the child's shoulders, but not lower than the child's shoulders.
Adjusting the carrying Handle
• The carrying handle has 2 positions.
- Press the two buttons on either side of the carrying handle simultaneously and move the carrying handle forwards or backwards as required.
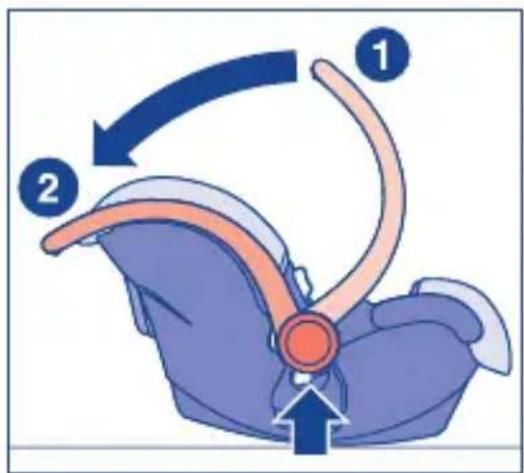
The buttons will pop out automatically when the carrying handle is in the correct position.
① Carrying position/car position,
② Sleeping position/rocking position,
Make sure the handle is securely locked in place before trying to carry the product by the handle.

natural_image
Illustration of a hand holding a small object, with a 'OK' button and checkmark symbol (no text or labels)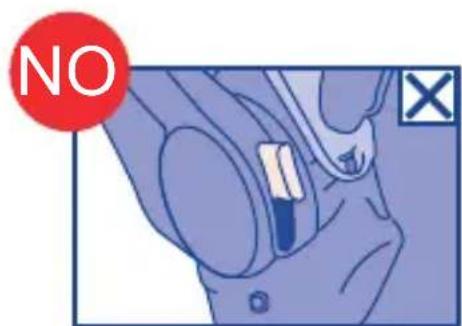

Installation of the base
Install the base facing backwards, with the stabilising bar against the back of the car seat. Insert the lap sash belt into the belt guides A & B respectively and lock tongue into buckle, listen
for the “click”. Pull on lap belt, remove slack. Gently place hand on base and remove remaining slack. Base should be firmly in place.
Note: Whilst inserting the lap sash belt into the guides, take care that it does not become twisted.
Installation of infant seat with base
Align the seat with the hooks in bottom of base. Push down gently to lock into place. You will hear a “click” when it is locked. Pull on handle to make sure it is locked in place.

natural_image
Illustration of a baby car seat with blue and red straps and orange straps (no text or symbols)
Note: Make sure the tether strap is not caught between infant seat and base.
Attach the hook to anchor in vehicle. Adjust tether strap to remove slack in strap (Pull on free end of webbing to tighten).

Press and hold the button on the base to unlock the carrier. Remove the carrier off the base.
Removing Infant seat from the base
Loosen tether strap by pressing on button and pull adjuster latch towards you. Unclip the hook from the bracket. Leave strap attached to vehicles anchorage.
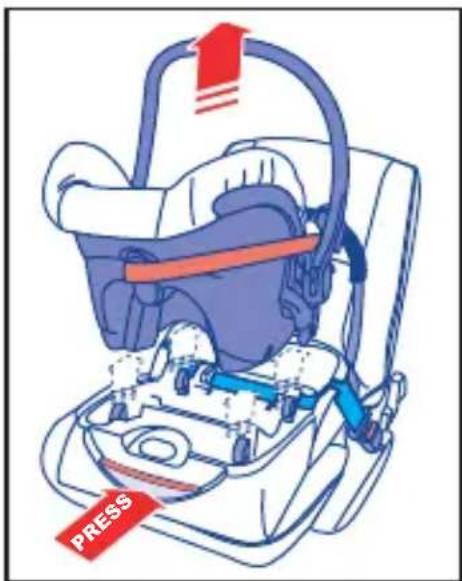

WARNING

natural_image
Illustration of a blue car seat with a red horizontal bar and curved handle (no text or symbols)Storage of webbing loop
Pull the loop webbing to the side of the capsule and wrap around the plastic guide as illustrated. Use the elastic on the trim to secure it .
The next seat for your child

natural_image
Line drawing of a baby in a car seat with red arrows indicating direction of movement (no text or symbols)To be used only in a rearward facing position until the infant's shoulders reach the shoulder height marker (approximately 6 months of age).
NOTE:
If the baby's neck muscles are unable to support their head, then the child should remain rear facing. Infants are at risk of serious injury if they face forward too early.
Infant Carrier
NOTE:
The Infant Carrier is unsuitable for occupant when the shoulders are above the marker.
The child needs to be moved into the next form of child restraint.
Forward Facing Car Seat 6 months to approximately 4 years.
NOTE: This illustration is representative only.
Design and style may vary.

natural_image
Line drawing of a car seat assembly with no text or symbolsForward Facing Car Seat

Fitting footcover (If fitted)
Pull footcover as shown and attach velcros 2 places around the carry handle. Make sure handle is in upright position.
Removing sunshade for cleaning (If fitted)
Remove sunshade. Undo velcro, 6 places.

natural_image
Illustration of a person performing a rope knotting technique (no text or symbols)
natural_image
Illustration of a person performing a medical or rehabilitation task on a blue and white seat (no text or symbols visible)Remove sunshade from the carry handle. Slide cover off seat.

natural_image
Illustration of a hand holding a medical device with red arrows indicating force or pressure points (no text or symbols present)Removing trim from the seat
Pull front trim from CFA (centre front adjuster). Unthread loop from seat.
Press the red button on buckle to release the buckle tongues.

natural_image
Illustration of hands holding a red square button with a knife, no text or symbols present
From the back of the restraint, remove both harness straps from splitter plate.

natural_image
Illustration of two vertical bars with red downward arrows indicating pressure or force, against a plain background (no text or symbols)Pull shoulder straps through the harness slots from the front. Then remove shoulder pads and head insert.
Gently feed strap and tongue through the slot provided in seat trim with one hand. With the other hand under the trim pull the tongue through. Repeat the same for the other side.


Remove side elastics 2 places. They are hooked underneath the side of the seat.


Remove the trim from the 4 tabs around the arms and 1 tab underneath the restraint. Remove buckle pad as illustrated. Then simply feed trim over buckle.

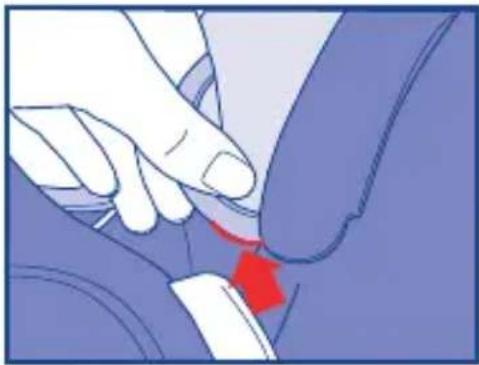
natural_image
Close-up of a hand adjusting a car seatbelt with a red arrow pointing to the belt (no text or symbols visible)Undo the trim from the upper side of the seat, 2 places. Pull the cover off. After cleaning the trim, reverse the steps to put it back on.
VERY IMPORTANT: Only use this child restraint with the cover supplied or a manufacturer-authorized replacement cover with identical shoulder height markers.
Removing buckle for cleaning

natural_image
Illustration of a hand adjusting a car seatbelt with a red arrow indicating the angle (no text or symbols present)From under seat shell, insert buckle's metal clip up through the shell and trim.
NOTE: For cleaning instructions, see page 25.
Assembling buckle after cleaning
To assemble, ensure that the RED button on the buckle is facing out.Push metal clip through trim and shell.

natural_image
Diagram of a hand using a belt switch to adjust a car seatbelt, with a red arrow indicating the mechanism (no text or symbols present)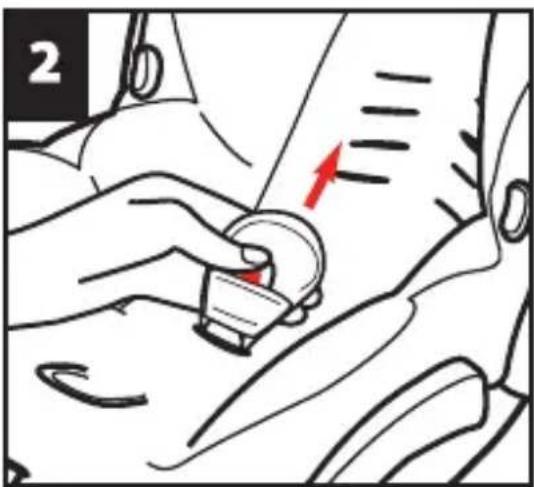
natural_image
Illustration of a car seatbelt buckle being adjusted for a seatbelt, showing a red arrow indicating the motion (no text or symbols present)From other side, pull on buckle to check to make sure buckle's metal plate is correctly inserted through the trim and shell.
Accessory (optional)

natural_image
Illustration of hands holding a mechanical clamp or clip (no text or symbols visible)Attach Locking Clip
NOTE: Locking clips are available from most speciality outlets or from our Customer Service team (1300 809 526)
NOTE: Locking clip can be fitted on either side depending on the vehicle seatbelt and child restraint configuration.
Hold the lap and sash straps together. Thread webbing (still pinched) into the locking clip, one side at a time. Repeat step 2 for the other slot in the locking clip. Feed the straps through the locking clip to remove any slack. If the locking clip is on correctly, it will hold the lap belt securely, if the lap belt slips repeat the previous steps.

natural_image
Line drawing of a baby car seat with red and blue straps and seatbelt (no text or symbols)CARE AND MAINTENANCE
Follow the manufacturer's instructions at all times.
- Before removal, ensure you have carefully noted the way which the various parts are attached to the seat so as to facilitate reassembly.
If buckles requires cleaning
- Place the buckle unit under running water (40 degree celcius) let the water flow through the mouth of the buckle for one minute.
- Immediately latch and unlatch the tongues into the buckle several times until a strong audible click is heard.
- DO NOT oil any part of the buckle.
- Allow buckle to dry.
- If the buckle does not work, contact our Customer Service team on 1300 809 526
GENERAL MAINTENANCE
- All other surface should be cleaned with a mild soap and water.
- Never clean with ammonia or bleach based cleaners.
- Clean the frame with a damp cloth.
- Do not use the restraint without the cover.
- Check the webbing for fraying.
- Ensure there are no cracks in the plastic moulding.
- Check the Harness Adjuster is operating and is clamping the webbing.
- If any part of the restraint is cracked or broken, seek repair immediately or replace the child restraint.
Washing instruction for trim :

Machine wash 30°

Tumble dry on low heat

Hand wash

Do not iron

Do not use bleach (Chlorine)

Do not dry clean
WARRANTY
Dorel Australia Pty Ltd warrants your new product to be free from defects in materials and workmanship for 6 years on the seat & 2 years on the trim, from the date of purchase, provided that the product is used in accordance with accompanying recommendations or instructions where provided. The benefit of this warranty is in addition to your rights under the Australian Consumer Law and to other rights and remedies of the consumer under a law in relation to the goods or services to which the warranty relates.
Dorel Australia Pty Ltd will provide you with your choice of a refund, repair, or exchange (where possible) for this product if it becomes defective within the warranty period. Dorel Australia Pty Ltd will bear the reasonable expense of claiming the warranty. This warranty will no longer apply where the defect is a result of alteration, accident, misuse, abuse, or neglect.
Please retain your receipt as proof of purchase and contact our Customer Service team on Ph: 1300 809 526 or alternatively, via our website at www.dorel.com.au for any difficulties with your product. Warranty claims and claims for expense incurred in returning this product can be addressed to our Consumer Service team at 655-685 Somerville Road, Sunshine West, VIC, 3020. Hours: 8:30 am to 5:00 pm, Monday to Friday.
For New Zealand please contact Customer Service Centre, 14 Sir William Avenue, East Tamaki, Auckland, 2013. Auckland: (09) 2741040 NZ wide: 0800 628 000 (Toll Free). Hours: 8:00 am - 4:00 pm, Monday to Friday.
Our goods come with guarantees that cannot be excluded under the Australian Consumer Law. You are entitled to a replacement or refund for a major failure and compensation for any other reasonably foreseeable loss or damage. You are also entitled to have the goods repaired or replaced if the goods fail to be of acceptable quality and the failure does not amount to a major failure.
IMPORTANT: KEEP THIS INSTRUCTION MANUAL IN THE SLOT PROVIDED BETWEEN SEAT AND FOAM
Ref # 013031A

Australian Standard AS/NZS 1754 Llc 1491 SAI Global
- DOREL®
- Instruction Manual
- Before You Start
- Table of Contents
- WARNING
- IMPORTANT: RETAIN FOR FUTURE REFERENCE
- GENERAL
- ANCHORAGE FITTING INSTALLATION
- IMPORTANT
- RIGHT
- WRONG
- VEHICLE SEAT LOCATION
- Vehicle Seat Location Requirements
- ANGLE CONFIGURATION FOR SEAT
- INFANT CARRIER PARTS
- FRONT
- Shoulder height marker rearward facing
- Shoulder strap:
- Preparing Infant Seat to Fit Your Child
- TO ADJUST HARNESS:
- To loosen:
- To tighten:
- Configuring the harness belt for shoulder height.
- Adjusting the carrying Handle
- Installation of the base
- Installation of infant seat with base
- Removing Infant seat from the base
- Storage of webbing loop
- The next seat for your child
- NOTE:
- Infant Carrier
- Fitting footcover (If fitted)
- Removing sunshade for cleaning (If fitted)
- Removing trim from the seat
- Removing buckle for cleaning
- Assembling buckle after cleaning
- Accessory (optional)
- Attach Locking Clip
- CARE AND MAINTENANCE
- If buckles requires cleaning
- GENERAL MAINTENANCE
- WARRANTY
- IMPORTANT: KEEP THIS INSTRUCTION MANUAL IN THE SLOT PROVIDED BETWEEN SEAT AND FOAM
Marque : SAFETY 1ST
Modèle : One Safe
Catégorie : Produits bébés