
TRIMLINE - Téléphone GEEMARC - Notice d'utilisation et mode d'emploi gratuit
Retrouvez gratuitement la notice de l'appareil TRIMLINE GEEMARC au format PDF.


| Type de produit | Téléphone fixe analogique |
| Marque | Geemarc |
| Modèle | TRIMLINE |
| Dimensions (L x l x h) | 20 x 15 x 10 cm |
| Poids | 500 g |
| Alimentation | 2 piles AAA ou adaptateur secteur (non inclus) |
| Touches | Grandes touches rétroéclairées |
| Écran | Écran LCD avec affichage de la date et de l'heure |
| Répertoire | Jusqu'à 20 numéros |
| Fonction mains-libres | Oui, haut-parleur intégré |
| Réglage du volume | Volume de sonnerie et d'écoute réglable |
| Indicateur visuel d'appel | LED clignotante pour les appels entrants |
| Compatible prothèses auditives | Oui, amplification sonore |
| Entretien et nettoyage | Nettoyer avec un chiffon doux et sec. Ne pas utiliser de produits liquides ou abrasifs. |
| Sécurité | Conforme aux normes européennes. Utiliser uniquement avec le bloc d'alimentation fourni ou piles adaptées. |
| Pièces détachées et réparabilité | Pièces disponibles sur le site du fabricant. Réparation par centre agréé. |
| Température de fonctionnement | 0°C à 40°C |
| Couleur | Blanc ou gris selon version |
| Garantie | 2 ans |
FOIRE AUX QUESTIONS - TRIMLINE GEEMARC
Questions des utilisateurs sur TRIMLINE GEEMARC
0 question sur cet appareil. Repondez a celles que vous connaissez ou posez la votre.
Poser une nouvelle question sur cet appareil
Téléchargez la notice de votre Téléphone au format PDF gratuitement ! Retrouvez votre notice TRIMLINE - GEEMARC et reprennez votre appareil électronique en main. Sur cette page sont publiés tous les documents nécessaires à l'utilisation de votre appareil TRIMLINE de la marque GEEMARC.
MODE D'EMPLOI TRIMLINE GEEMARC
GUARANTEE
From the moment your Geemarc product is purchased, Geemarc guarantee it for the period of one year. During this time, all repairs or replacements (at our discretion) are free of charge. Should you experience a problem then contact our helpline or visit our website at www.geemarc.com. The guarantee does not cover accidents, negligence or breakages to any parts. The product must not be tampered with or taken apart by anyone who is not an authorised Geemarc representative. The Geemarc guarantee in no way limits your legal rights.
IMPORTANT: YOUR RECEIPT IS PART OF YOUR GUARANTEE AND MUST BE RETAINED AND PRODUCED IN THE EVENT OF A WARRANTY CLAIM Please note: The guarantee applies to the United Kingdom only.
DECLARATION: Geemarc Telecom SA hereby declares that this product is in compliance with the essential requirements and other relevant provisions of the Radio and Telecommunications Terminal Equipment Directive 1999/5/EEC and in particular article 3 section 1a, 1b and section 2.
The declaration of conformity may be consulted at www.geemarc.com
Telephone connection : Voltages present on the telecommunication network are classified TNV-3 (Telecommunication Network Voltage) according to the EN60950 standard.
RECYCLING DIRECTIVES
The WEEE (Waste Electrical and Electronic Equipment) has been put in place for the products in end of life are recycled in the best way. When this product is out of order, please do not put it in your domestic waste bin. Please use one of the following disposal options:
- Remove the batteries and deposit them in an appropriate WEEE skip. Deposit the product in a appropriate WEEE skip.
- Or hand the old product to the retailer. If you purchase a new one, they should accept it.
Thus if you respect these instructions you ensure human health and environmental protection.
UGTRIMLINE_V1.2


natural_image
Black vintage telephone with rotary dial and cord (no visible text or symbols)USER GUIDE
Please read this User Guide carefully in order to get the very best results from your telephone.
SETTING UP

1 - CONNECTING TELEPHONE
The plug at the end of the lead should be connected to the telephone socket.
Voltages present on the telecommunication network Are classified TNV-3 (Telecommunication Network Voltage) according to the EN60950 standard.
2 – RINGER SETTING
The rotary volume control can be used to adjust the ringer level. Turn anti-clockwise to increase and clockwise to reduce the ringer volume. Turning to the extreme clockwise position switches the ringer OFF.
3 – WALL MOUNTING
To wall-mount your telephone, pull out the clip to the wall mounting position (located in the base unit, just below the ear piece). This will ensure that the handset stays firmly in position. Make 2 holes in the wall 135mm apart, insert the wall plugs and the wall mounting screws. The screws should protrude from wall by 10 mm. Place the phone onto the screw-heads and slide down to secure.
USING THE TELEPHONE:
1 - ANSWERING INCOMING CALLS
When an incoming call is received, the telephone will ring. To answer the call lift the handset and speak.
2- RECEIVER VOLUME SWITCH
The receiver volume switch can be used to Normal or increase the receiving level to High.
3- MAKING A CALL
Lift the handset, await the dial tone and dial the required number using the push button keypad. On completion of the call, carefully replace the handset in the cradle.
4- LAST NUMBER REDIAL
If the number you have dialled is engaged or if you want to repeat the call to the number you dialled previously, lift the handset, await dial tone and press the (redial) button. The previously dialled number will be AUTOMATICALLY RE-DIALLED.
5- R, \* & # BUTTONS
These are used with new services provided on digital exchanges. For details contact your network operator.

For product support and help visit our website
at www.geemarc.com
telephone 01707 384438
or fax 01707 832529
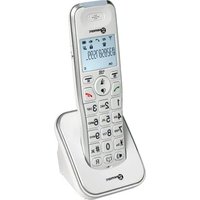


Marque : GEEMARC
Modèle : TRIMLINE
Catégorie : Téléphone