
DH-EAP6218-O - Point d'accès Dahua Technology - Notice d'utilisation et mode d'emploi gratuit
Retrouvez gratuitement la notice de l'appareil DH-EAP6218-O Dahua Technology au format PDF.


| Type de produit | Point d'accès sans fil extérieur |
| Marque | Dahua Technology |
| Modèle | DH-EAP6218-O |
| Dimensions (L x l x H) | 250 x 160 x 45 mm |
| Poids | 1,5 kg |
| Alimentation | PoE (Power over Ethernet) IEEE 802.3af/at |
| Consommation électrique | ≤ 15 W |
| Normes Wi-Fi | Wi-Fi 6 (802.11ax), double bande 2,4 GHz et 5 GHz |
| Débit maximal | Jusqu'à 1,8 Gbps |
| Antennes | Antennes omnidirectionnelles intégrées |
| Protection | Indice de protection IP67 (résistant à la poussière et à l'immersion) |
| Température de fonctionnement | -30 °C à +60 °C |
| Sécurité sans fil | WPA3, WPA2, 802.1X, filtrage MAC |
| Gestion | Interface web, SNMP, cloud Dahua |
| Fonctions principales | Point d'accès extérieur, mesh, VLAN, QoS, mode client |
| Entretien et nettoyage | Nettoyer avec un chiffon sec et doux. Ne pas utiliser de produits chimiques. |
| Pièces détachées et réparabilité | Kit de montage inclus. Pièces de rechange disponibles via le SAV Dahua. |
| Garantie | 2 ans |
| Contenu de l'emballage | Point d'accès, kit de montage, guide d'installation |
FOIRE AUX QUESTIONS - DH-EAP6218-O Dahua Technology
Questions des utilisateurs sur DH-EAP6218-O Dahua Technology
0 question sur cet appareil. Repondez a celles que vous connaissez ou posez la votre.
Poser une nouvelle question sur cet appareil
Téléchargez la notice de votre Point d'accès au format PDF gratuitement ! Retrouvez votre notice DH-EAP6218-O - Dahua Technology et reprennez votre appareil électronique en main. Sur cette page sont publiés tous les documents nécessaires à l'utilisation de votre appareil DH-EAP6218-O de la marque Dahua Technology.
MODE D'EMPLOI DH-EAP6218-O Dahua Technology

Outdoor Access Point
Quick Start Guide

ZHEJIANG DAHUA VISION TECHNOLOGY CO., LTD.
Address: No.1399 Binxing Road, Binjiang District, Hangzhou, P.R.China Pbstcode: 310053
Website: www.dahuasecurity.com | Email: dhoverseas@dhvisiontech.com
Tel:+86-571-87688888 28933188
Foreword
General
This manual introduces the installation, functions and operations of the
Outdoor Access Point (here in after referred to as "the AP"). Read
carefully before using the device, and keep the manual safe for future
referen
Safety Instructions
The following signal words might appear in the manual.
| Signal Words | Meaning |
| Indicates a high potential hazard which, if not avoided, will result in death or serious injury. | |
| Indicates a medium or low potential hazard which, if not avoided, could result in slight or moderate injury. | |
| Indicates a potential risk which, if not avoided, could result in property damage, data loss, reductions in performance, or unpredictable results. | |
| Provides methods to help you solve a problem or save time. | |
| Provides additional information as a supplement to the text. |
About the Manual
- The manual is for reference only. Slight differences might be found between the manual and the product.
- We are not liable for losses incurred due to operating the product in ways that are not in compliance with the manual.
-
The manual will be updated according to the latest laws and regulations of related jurisdictions. For detailed information, see the paper user's manual, use our CD-ROM, scan the QR code or visit our official website. The manual is for reference only. Slight differences might be found between the electronic version and the paper version.
-
All designs and software are subject to change without prior written notice. Product updates might result in some differences appearing between the actual product and the manual. Please contact customer service for the latest program and supplementary documentation.
- There might be errors in the print or deviations in the description of the functions, operations and technical data. If there is any doubt or dispute, we reserve the right of final explanation.
- Upgrade the reader software or try other mainstream reader software if the manual (in PDF format) cannot be opened.
- All trademarks, registered trademarks and company names in the manual are properties of their respective owners.
- Please visit our website, contact the supplier or customer service if any problems occur while using the device.
- If there is any uncertainty or controversy, we reserve the right of final explanation.
Important Safeguards and Warnings
This section introduces content covering the proper handling of the device, hazard prevention, and prevention of property damage. Read carefully before using the device, and comply with the guidelines when using it.
Transportation Requirements

Transport the device under allowed humidity and temperature conditions.
Storage Requirements

Store the device under allowed humidity and temperature conditions.
Installation Requirements

- Do not connect the power adapter to the device while the adapter is powered on.
- Strictly comply with the local electrical safety code and standards.
• Personnel working at heights must take all necessary measures to
ensure personal safety including wearing a helmet and safety belts.
- Do not leave outdoor models of the device hanging in the air or facing outwards when installing onto poles that are on top of buildings.

- Do not place the device in a place exposed to sunlight or near heat sources.
- Put the device in a well-ventilated place, and do not block its ventilation.
- Use an adapter or cabinet power supply provided by the manufacturer.
- Do not connect the device to two or more kinds of power supplies, to avoid damage to the device.
- The device is a class I electrical appliance. Make sure that the power supply of the device is connected to a power socket with protective earthing.
- The device must be grounded by a copper wire with a cross-sectional area of 2.5 mm ^2 and a ground resistance no more than 4 Ω.
- Voltage stabilizer and lightning surge protector are optional depending on the actual power supply on site and the ambient environment.
- To ensure heat dissipation, the gap between the device and the surrounding area should not be less than 10 cm on the sides and 10 cm on top of the device.
- When installing the device, make sure that the power plug and appliance coupler can be easily reached to cut off power.
- Outdoor models of the device must be securely installed on poles or brackets that are perpendicular to the ground. Make sure the entire surface of the device and all its related components are covered with anti-oxidation coating (such as rust preventive paint), and that the installation site and height of the device meet the requirements of the plan.
- Install outdoor models of the device on top of buildings where there is little to no direct sunlight to avoid the device becoming overheated. Make sure to take all necessary measures to protect the device.
- Face the side with the Ethernet port downwards, and arrange the wires in a downward direction when installing outdoor models of the device.
Operation Requirements

WARNING
- Do not disassemble the device without professional instruction.
- Operate the device within the rated range of power input and output.
- Make sure that the power supply is correct before running the device.
- When removing the cable device first to avoid personal injury.
- Do not unplug the power cord on the side of the device when the adapter is powered on.

• Use the device under allowed humidity and temperature conditions.
- This is a class B product. In a domestic environment this may cause radio interference in which case you may be required to take adequate measures.
Maintenance Requirements

WARNING
- Do not disassemble it unless necessary.
• Power off the device before maintenance - Mark key components on the maintenance circuit diagram with warning signs.
2 Connection
Step 1 The outdoor AP device is connected to the PoE port of the PoE power adapter through a network cable. (For non-standard network cables, it is necessary to ensure that the impedance of a single line in the required length of the network cable does not exceed 6 Ω).
Step 2 Connect the PC to the PoE power adapter LAN port through a network cable
Step 3 After the PoE power adapter is powered on, the power light of the outdoor AP device remains on, indicating that the device is powered on and running.
Step 4 Checking the network connection status on the PC can check whether the network connection between the PC and the outdoor AP is normal.
Figure 2-1 Network connection

1 Mounting
Step 1 Determine device processing power outage status.
Step 2 As shown in Figure 1, insert the hoop into the holding pole on the back of the casing.
Step 3 Use a hoop to attach the AP to the pole (applicable pole diameter range is 40 - 60mm ). After confirming the angle direction, use a flat screwdriver to tighten and fix the holding pole.
Figure 1-1 Installation
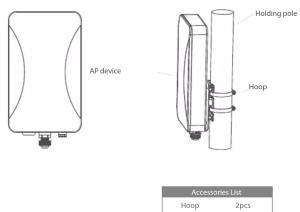
There are multiple specifications for AP antennas to choose from, and this guide takes the default model as an example.
3 Note
- The user's wireless terminal should be within the coverage range of the AP signal as much as possible.
- Connect the network cable of the AP to ensure that the eight cable cores are normal and in good contact with the crystal heads at both ends. Use CateSe or higher Ethernet cables, and after the production of the cables, use a cable tester for testing.
- The recommended installation height for AP is 2-3 meters above the ground to ensure optimal signal coverage.


- If the Outdoor AP adopts a power supply of PoE 48 V, use a switch with a power supply of IEEE802.3at standard.
- When the wireless scale is large and uses more Outdoor APs, we recommend using a AC wireless controller to manage all the APs.
4 Device Management
4.1 Management on Webpge
4.1.1 Wireless Connection
Procedure
Step 1 Set the IP address of the wireless adapter as 192.168.1.X (X ranges from 1 to 252), keep the network segment same as the AP's, and then set subnet mask as 255.255.255.0.
Step 2 Set wireless connection after setting IP address. Select Wireless 2.4G, click Connect, input your password, and then click OK.

4.1.2 Wired Connection
Set the IP address of the wired adapter as 192.168.1.X (X ranges from 1 to 252), and keep the network segment same as the AP.
4.2 AP Mode
Procedure
Step 1 Open the IE browser, enter the web address of 192.168.1.110, For the first login, it will enter the interface as shown in Figure 4-1. Please change the login password.

The defaulted login password is admin.
Figure 4-3 Login again

Step 4 After logging in, and then select the AP mode as the current working mode.
Figure 4-4 AP mode

Step 5 Select Country Region.
Figure 4-1 Login

Step 2 The default page is the fit AP mode, and you can click ↗ to switch to the fat AP mode.
Figure 4-2 Fit AP

Step 3 After converting to Fat AP, you need to login again
Figure 4-5 Country Region

Step 6 Select Get IP From AC from the Connection.
Figure 4-6 Connection method

Step 7 Enter 2G WiFi page, and then set the parameters.
Figure 4-7 2G WiFi

Step 8 Enter 5G WiFi page, and then set the parameters.
Figure 4-8 5G WiFi

4.3 IP Settings and Status checking
- IP Settings: Wireless AP will restart and enter the set working status after finishing IP settings. Set the IP address as automatic require, so that the computer and other wireless devices can connect to the previous-level router, and access network.
- Status Checking: Manually set the IP address of the computer as 192.168.1.X (X ranges from 1 to 252), and then realize the access and status checking of the wireless AP management.
Figure 4-9 Home page

4.4 Configuration Management
You can configure restore settings, backup and resetting to default. You can also set soft restart of the device, modify the web login password, upgrade the firmware, manage time, and count system logs.
Figure 4-10 Configuration management

4.5 Testing Wireless
Procedure
Step 1 Test the wireless network is available through laptop or phone, click to select the set wireless SSID. Enter the right password and test the network connection.
Step 2 Check whether the status, signal quality, signal speed, message sending and data of the wireless connection are normal. Click to view the detailed information, check whether the IP address and DNS server are correctly acquired to make sure the normal function of the device.
4.6 Others

Gateway Mode

AP Mode
- Gateway mode
Enable router functions. WAN port connects to modem (ADSL modem or optical fiber modem) to dial up to access Internet, or WAN port to access Internet through static IP or dynamic IP. - AP mode
Disable all the WAN functions, including NAT, DHCP, and firewall. All the wireless ports and wired ports are connected together.
Configuration method
Configure according to the setup wizard of all modes, set parameters and options, and then click Next to complete all the settings.
5 FAQ
| Questions | Solutions |
| Forget the login username and password. | Restore the device to default settings, press and hold the Reset button for over 10 s, and then release the pressing. The device will restart and restore to factory settings. |
| Cannot log in to the wireless AP management page through web. | 1. Check whether the IP address and the AP are on the same segment. Check whether the IP address is manually configured to other segment.2. Restore the wireless AP to the factory settings, and try connecting again.3. Make sure that the IP 192.168.1.110 of the wireless AP is not occupied by other devices.4. Check the computer of the network cable. We recommend using unshielded twisted pair as the network cable. |
| Forget the password of the wireless network. | 1. Connect wireless AP with cables, enter the web management page. Click wireless setting and basic setting. Enter the password again in the secret key.2. Restore to the factory settings, there is no password is by default. |
| Cannot acquire IP address. | 1. Check whether the device has enabled the DHCP server under the gateway and wireless ISP client modes.2. Check whether the upper network connection is normal or the DHCP server works normally in the LAN under the repeater and AP modes. |
| How to switch from fit AP to fat AP. | Click 📄 to switch between fit and fat AP. After switch, the device will restart automatically. After restarting, clear the IE browser cache and log in through web. |
| After switching to fat AP, EAC product cannot configure devices in batches. | |
| AC list cannot recognize the AP devices. | AC has different modes with AP. AC products are EAC series managing fat AP mode, or the BW series managing fit AP mode.AP adopts a fit and fat combined mode. The default mode is fit AP. |


- Outdoor Access Point
- ZHEJIANG DAHUA VISION TECHNOLOGY CO., LTD.
- Foreword
- General
- Safety Instructions
- About the Manual
- Important Safeguards and Warnings
- Storage Requirements
- Installation Requirements
- Operation Requirements
- WARNING
- Maintenance Requirements
- Connection
- Mounting
- Note
- Device Management
- Management on Webpge
- Procedure
- Wired Connection
- AP Mode
- Document
- IP Settings and Status checking
- Configuration Management
- Testing Wireless
- Others
Marque : Dahua Technology
Modèle : DH-EAP6218-O
Catégorie : Point d'accès