
VISION5 - Flash Neewer - Notice d'utilisation et mode d'emploi gratuit
Retrouvez gratuitement la notice de l'appareil VISION5 Neewer au format PDF.


| Type de produit | Flash cobra électronique |
| Marque | Neewer |
| Modèle | VISION5 |
| Dimensions (L x H x P) | 190 x 75 x 50 mm |
| Poids (sans piles) | 330 g |
| Alimentation | 4 piles AA (LR6) ou accumulateurs Ni-MH |
| Nombre guide (ISO 100, 105 mm) | 38 |
| Angle de couverture | 24-105 mm (équivalent 35 mm) |
| Temps de recyclage | Environ 4 s (piles alcalines neuves) |
| Nombre d'éclairs (piles alcalines) | Environ 200 |
| Durée d'éclair | 1/200s à 1/20000s |
| Modes de flash | M (manuel), S1/S2 (esclave optique), TTL (selon appareil) |
| Synchronisation haute vitesse (HSS) | Oui (selon appareil compatible) |
| Rotation et inclinaison | Rotation 270°, inclinaison -7° à 90° |
| Écran LCD | Oui, affichage des réglages |
| Zoom motorisé | Oui, de 24 à 105 mm |
| Entretien et nettoyage | Essuyer avec un chiffon doux et sec. Ne pas utiliser de produits abrasifs. |
| Sécurité | Ne pas exposer à l'humidité. Éteindre avant de changer les piles. Retirer les piles en cas de non-utilisation prolongée. |
| Pièces détachées et réparabilité | Contacter le service après-vente Neewer ou un réparateur agréé. Pièces détachées disponibles sur demande. |
| Informations générales | Flash compatible avec les reflex numériques et hybrides via la griffe standard. Utilisable en déporté avec câble ou déclencheur sans fil. |
FOIRE AUX QUESTIONS - VISION5 Neewer
Questions des utilisateurs sur VISION5 Neewer
0 question sur cet appareil. Repondez a celles que vous connaissez ou posez la votre.
Poser une nouvelle question sur cet appareil
Téléchargez la notice de votre Flash au format PDF gratuitement ! Retrouvez votre notice VISION5 - Neewer et reprennez votre appareil électronique en main. Sur cette page sont publiés tous les documents nécessaires à l'utilisation de votre appareil VISION5 de la marque Neewer.
MODE D'EMPLOI VISION5 Neewer
VISION5 Wireless TTL Flash Technical Data
| Model No. | VISION5 |
| Output power | 400Ws |
| Guide No.(2m, ISO100)1/60 reflector SF-610 | 70 |
| Output control range | 1/128-1/1 |
| LED modeling lamp | 13W |
| Color temperature (in constant color temperature mode) | 5600±200K |
| Flash duration (not in constant color temperature mode) | 1/650-1/10000s |
| Flash Mode | ETTL/M/Multi |
| Stroboscopic flash | Number of Flashes 20, Frequency 30Hz |
| Flash exposure compensation (FEC) | ±3-f-stops in 1/3 increment (in TTL model.) |
| Sync mode | High speed sync(up to 1/8000s),First curtain sync,Second curtain sync |
| 2.4G radio channel | Ch. 1 - 8 |
| Wireless radio ID | 1-30 |
| Controllable group | A, B, C three groups |
| Sync trigger | Φ3.5mm sync cord/VC-818TX (optional) |
| Fan | YES |
| Beep | YES |
| Lithium capacity | 11.1V, 6000mAh |
| Charging voltage | 100-240v~ 50/60Hz, 12VDC |
| Power indicator | YES |
| Full power flashes | 500 |
| Recycling time | 0.01-2.8s |
| Dimension (with battery) | 20*12*12cm |
| Weight (with battery) | 1850g |
| External port | PC port, USB port |
*Tested with SEKONIC L-758DR light meter. Using the included reflector.
*Due to our policy of constant product improvement, we receive the right
to change equipment specifications without notice
ROOM 1901-1903, Block A, LU SHAN BUILDING
NO.3023 CHUNFENG RD
LUO HU DISTRICT, SHENZHEN
GUANGDONG 518001,CHINA
TEL:086-0755-22954335
WEB:www.neewer.com
NEEWER

natural_image
Exterior view of a NEEWER VISIONS megaphone with control panel and display screen (no readable text or symbols)VISION5TTL
Wireless Location Shooting
TTL Auto Flash
1/8000s high sync speed
Lithium battery powered
Stroboscopic flash
NEEWER

natural_image
Close-up of a handheld electronic device with a green screen and control buttons (no visible text or symbols)NEEWER
DESCRIPTION PAGE
Introduction----1
Safety Note 2
Warning Sign----2
Content of Carton 2
Name of Parts----3
Operation Panel----4
LCD Screen 4
Prepare flash for use----5
Fix Flash on Light Stand----5
Release Protective Cap----5
Install Standard Reflector----5
Adjust Flash Light Angel----5
Install Battery 5
Switch on Flash Light----6
Power Level----6
Charging Battery----6
Battery Protective Maintenance--7
Operating Audible Beep 7
Operating Modeling Lamp----8
Select Triggering Ways ----8
Setting Channel, Group, and ID----9
Setting Channel 9
Setting Group 9
Setting ID----9
Flash Mode-TTL Auto Flash----10
Set Flash light in TTL Mode--10
Set Flash Exposure Compensation (FEC)--10
Flash Bracket Exposure(FEB)-11
High Speed Sync (HSS)----11
Flash Mode-Multi Stroboscopic Flash----12
Set Flash Mode
Set Flash Output----12
Set number of flashes----12
Set Flash Frequency----12
Flash Mode-M Manual Flash----14
Constant Color Mode ON/OFF----15
Use VISION5 with other flashes----16
Error codes----16
Installing Umbrella----17
Changing Flash Tube----18-19
Flash Capacitor Preventative Maintenance----20
USB Firmware Update----20
Main features----21
Technical Data----back cover
Introduction
Thank you very much for selecting VISION5 wireless TTL flash light. Please read these instruction carefully and keep them handy for your reference.
VISION5 TTL studio flash for location shoot, 400Ws (GN 70), 1/8000s high sync speed, with build-in TTL receiver. Locking VC-818TX transmitter on camera, you can total control with remote VISION5 studio flashes, such as TTL/M/ Multi, without leaving shooting place. Whether shoot in bright sunshine with wide open aperture, shoot during fast moving events, or shoot in scene where ambient light varies, the reliable TTL wireless trigger and 1/8000s high sync speed, makes photography with more flexibility, freedom and efficiency. VISION5 is perfect tool for shooting portraits, weddings and sports, allowing you to get perfect shot anytime and anyplace.

natural_image
Person mid-jump across a sandy beach under clear blue sky (no text or symbols visible)
natural_image
Athlete running on a grassy hill overlooking the sea under a bright sky with clouds (no text or symbols visible)WARNING: The light must work with the original power adapter within the product package, otherwise the product will be easily damaged.
NEEWER

natural_image
Close-up of a handheld electronic device with a central display and control buttons (no visible text or symbols)NEEWER
Safety Note
Do not use the unit in an environment where moisture or flammable vapor is likely to come in contact with the unit.
Do not explore any components in direct sun for a long time.
Do not restrict air vents while in use.
Do not use a unit with damaged covers, flash tubes, modeling lamps. If the unit is dropped or damaged in any way, always have it checked out before using it.
Do not place flammable materials close to either the flash tube or the modeling lamp when the unit is in use.
Do not attempt to disassemble or service the unit on your own to avoid shock hazard. Only flash tubes and batteries may be replaced on your own.
Do not drop foreign objectives inside the housing. There is a risk of electrical shock.
Always use a blower brush or clean facial tissue to remove dust and moisture from the modeling lamp and the flash tube.
Always turn off the unit whenever mounting or dismounting accessories.
Always turn off the unit and remove battery before maintenance.
Always keep out of reach of children.
Warning Sign
Prescription of this manual
- The manual is based on the assumption that both camera and flash light are powered on.
• The following alert symbol is used in this manual:
This Caution symbol indicates a warning to avoid shooting problem.
Content of Carton
Your VISION5 flash light should include the following items, please check carefully.
1x VISION5 studio flash
1x Lithium battery (included in VISION5 studio flash)
1x LED modeling lamp (included in VISION5 studio flash)
1x 100-240V charger for lithium battery
1x Standard reflector
1x Protective cover

Name of Parts

natural_image
Close-up of a handheld electronic device with a green screen and control buttons (no visible text or symbols)Operation Panel
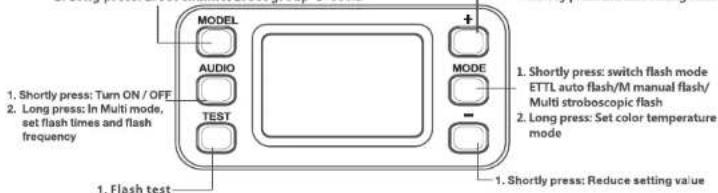
- Shortly press: Control modeling lamp turn
off/1/2/3/4/5/6 in sequence
- Long press: 1. set channel 2. set group 3. set ID 1. Shortly press: Increase setting value
LCD Screen

4
1/Prepare flash for use
1-1 Fix Flash on Light Stand
Select a light stand or support system of suitable weight and dimensions to ensure stable operation of the unit. Rotate knob clockwise to lock flash unit firmly on support system.
1-2 Release Protective Cap
To remove protective cap, push reflector release knob back towards the rear of the unit and rotate protective cap anti clockwise(Fig 1). Put the protective cap aside.
CAUTION: To avoid deformation of plastic protective cap, always cool down flash unit before fitting protective cap.
1-3 Install Standard Reflector
Install standard reflector where the protective cap was before. Align the three pegs on the reflector with the three slots, press the reflector in and rotate clockwise until it locks in place(Fig 2 & 3).
CAUTION: Always switch off the unit before fitting and changing reflectors.
1-4 Adjust Flash Light Angel
Rotate regulating screw anticlockwise, adjust the unit to appropriate angle. Rotate regulating knob clockwise to secure flash head.
1-5 Install Battery
Push battery forward until hear a clicking sound (Fig.4).
Switch off power before remove battery. Press down lock button and move it backward (Fig.5).

(Fig1)

(Fig2)

(Fig3)

(Fig4)

(Fig5)
5

natural_image
Close-up of a handheld electronic device with a green screen and control buttons (no visible text or symbols)2/ Swith on Flash Light
Press power switch to turn on Flash light.
When the flash is not operated, LCD screen is in standby state.
3/ Battery Level
| Battery level indicator | Battery level | |
| [B3XX] | full battery | |
| [A4ZZD] | medium battery | |
 | Lower battery | |
 | Charge battery before it runs out.Note: Use or stock battery only after charging. | |
4/ Charging battery
① AC charge: Battery charger is developed for international use within the range of AC 100-240V. Insert 5.5mm round terminal into charging socket of the battery, and insert the other end of the charger to a grounded outlet(Fig6). When the unit is in charging, LED indicator on the charge lights up red. When the unit is fully charged, LED indicator on the charge lights up green. A fully exhausted battery reaches full power after 5 hours' charging. Depending on the battery condition, charging hours may change.
WARNING: The light must work with the original power adapter within the product package, otherwise the product will be easily damaged.

(Fig6)
6
5/Battery protective maintenance
- Charge the battery fully before using the unit for the first time.
- If leave battery in studio flash, it will be consumed even without use. To prevent battery from excessive discharge, after you finished use the studio flash or before you store the studio flash, please switch off the unit and remove battery.
- The battery itself consume during stock, to keep good performance of battery and avoid exhausted, always charge battery from stock at least every three month.
- Do not drop the batteries onto hard surfaces, as this could expose the corrosive materials inside the battery case.
- Do not attempt to incinerate Lithium batteries or expose them to excessive heat. Batteries can explode if you toss them into a fire or place them near other extreme heat sources.
- Charging times and numbers of flashes may vary according to the condition of the battery.
6/ Operating Audible Beep
You can turn audible beeper "ON" and "OFF" by pressing the AUDIO button. The speaker symbol will display on screen when the beeper is on. When the beep is active, it will sound once the flash is recycled and ready to flash.
During recycling, the recycling state is indicated by a series of shaded bars. When the unit is completely recycled, the numbers of shaded bars reach at maximum.

natural_image
Close-up of a handheld electronic device with a screen and control buttons (no visible text or symbols)7/ Operating Modeling Lamp
Shortly press [Model], brightness of modeling lamp varies from 6 to 1 and "OFF" in sequence.
Brightness of modeling lamp is adjustable in

8/ Select Triggering Ways
1) Sync cord Connection
The 3.5mm Sync Cord Input on the flash may be used for direct connection to a camera set to synchronization. A radio slave receiver may also be plugged into the Input.
Supporting flash mode:
2) 2.4G wireless radio trigger
Use VC-818TX TTL radio transmitter to trigger synchronously. Supporting flash mode:
10/ Setting Channel / Group and ID
10-1/ Setting Channel
Long press [MODEL] button till

10-2/ Setting Group
Long press [MODEL] button till

10-3 Setting ID
Long press [MODEL] button till

Note: Model number of transmitter which matches with VISION5 studio flash is VC-818TX. VC-818TX transmitter works as a master unit, and VISION5 works as slave unit. In order to effectively trigger flash, you need to set VISION5 and VC-818TX at the same channel and ID. When adjust flash mode and parameters of studio flash, please set VISION5 and VC-818TX at the same group.

VC-B18TX
natural_image
Close-up of a handheld electronic device with a screen and control buttons (no visible text or symbols)11/ Flash Mode-TTL Auto Flash
VISION5 studio flash is integrated with TTL communication function. Mounting VC-818TX transmitter on camera, the camera and flash will work together to release proper exposure.
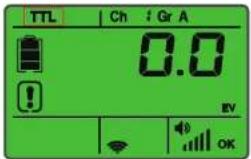
1) Set Flash light in TTL Mode
Shortly press [MODE] button, the flash will set as
2) Flash Exposure Compensation (FEC): The FEC range is adjustable from -3 to +3 in precision 1/3 f-stop increments. FEC is very useful to make quick minor adjustment of exposure of the TTL system, and create ideal exposure as you like.
Set Flash Exposure Compensation (FEC)
Shortly press [+] button or [-] button to set FEC value. 0.3 means 1/3 f-stop, 0.7 means 2/3 f-stop. In LCD screen, <+> means more exposure. <-> means less exposure. Cancel the flash exposure compensation, set the amount to <0>.
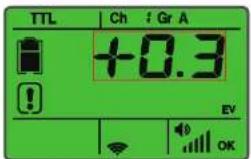
3) Flash exposure bracketing (FEB)
The flash supports FEB function. Set FEB on camera only. On the LCD screen, there is no signal.
4) High-Speed Sync
When use flash together with VC-818TX TTL radio transmitter, enable the flash to synchronize with certain camera in high-speed sync. The maximum sync speed is up to 1/8000s. Set high-speed sync on camera only. On the LCD screen, there is no signal. When photographers shoot outdoors in bright sun with wide open aperture, fast shutter speed can cut the ambient light, get amazing result as you want.
Caution:
-The camera and transceiver should support HSS function.
-The faster the shutter speed, the shorter the effective flash range
-Multi flash can't be used under high-speed sync mode.
-Overheating protection may be active after 50 successive high-speed sync flashes. Please turn off the flash and rest it for 30 minutes to cool down.
NEEWER

natural_image
Close-up of a handheld electronic device with a screen and control buttons (no visible text or symbols)NEEWER
12/ Flash Mode-Multi Stroboscopic Flash
According to one shutter signal, the flash will generate a series of fast flashes, and multiply images will be integrated in one picture. It is useful to capture trajectory of a moving object. You can set flash output power, flash frequency and number of flashes. Maximum number of flashes is 20 and maximum flash frequency is 30Hz.
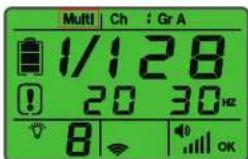
1) Set Flash Mode
Shortly press [Mode] button, the flash will set as
2) Set Flash Output
Shortly press [ + ] button or [ - ] button to set flash output power.
3) Set number of flashes
Long press [AUDIO] button till number of flashes parameter blinks. Press [ + ] button or [ - ] button to set number of flashes.
4) Set flash frequency
Long press [AUDIO] button till number of flashes blinks. Shortly press [AUDIO] button, flash frequency parameter blinks. Press [ + ] button or [ - ] button to set flash frequency. Press [ + ] button or [ - ] button to set flash frequency.

12
Caution: To prevent flash damage from overheating, don't continuously use stroboscopic flashes more than 10 times. After 10 times, please rest flash at least 15 minutes. If overheating protection is active, flash will stop firing, please cool down flash for 30 minutes.
Note:
Use stroboscopic flash in a dark environment is more effective.
Maximum output power of stroboscopic flash is 1/4 step.
Stroboscopic mode can be used with bulb.
To ensure shooting effect, you may use the formula below to calculate the shutter speed and set it with the camera.
Shutter Speed=Number of Flashes / Flash Frequency
Suggested Best Shooting Effect
| Output flash power | Optimum number of flashes | Optimum flash frequency |
| 1/4 | 3 | 3Hz |
| 1/8 | 8 | 10Hz |
| 1/16 | 10 | 10Hz |
| 1/32 | 10 | 15Hz |
| 1/64 | 10 | 20Hz |
| 1/128 | 12 | 20Hz |
13

natural_image
Close-up of a handheld electronic device with a screen and control buttons (no visible text or symbols)13/ Flash Mode-M Manual Flash
When use flash in manual mode, flash output power is adjustable from 1/1 to 1/128 (8 f-stop) with 1/3 f-stop increment.

1) Set flash mode
Shortly press [MODE] button, flash mode set as
2) Set flash output power
Press [ + ] button or [ - ] button to adjust and set flash output power.
14
14/ Constant Color Mode ON/OFF
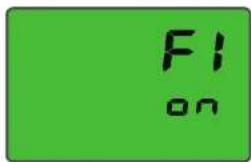
When constant color temperature mode is active
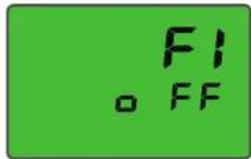
When constant color temperature mode is inactive
Setting color temperature
-
Long press [Mode] button till
shows on LCD screen. -
Press [ + ] button, constant color temperature is active
. Press [- ] button, constant color temperature is inactive .
15
NEEWER
natural_image
Close-up of a handheld electronic device with a screen and control buttons (no visible text or symbols)NEEWER
16/ How to useVISION5 flash with other flash light
- Match VISION5 with other series of studio flash(VCHHLR,VCHH,VE PLUS, VL PLUS,VISION4) from VISION :Use VC-816TX transmitter, connect VISION5 with VC-16RX radio receiver, realize flash trigger(Flash power and model lamp of VISION5 can't be controlled by VC-801TX).
- Match VISION5 with other series of studio flash (VCHHLR, VCHH, VE PLUS, VL PLUS,VISION4) fromVISION:Use VC-818TX transmitter, realize flash trigger and power adjustment together (modeling lamp of other series of studio flash fromVISION can't be controlled by VC-818TX).
17/ Error codes
E1: Temperature Transducer problem. Turn the unit OFF immediately and contact the place where you purchase the flash.
E2: This error code can display after a long shooting session at high output or rapid sequence. Flash will make alarm, reminding user to cool it before operate it again. Turn OFF the flash and allow it to rest 30 minute
E3: This error code will display when the internal voltage of the flash is too high. Turn OFF the power immediately. After a few minutes, turn on the flash again. If you still have the malfunction warning, turn OFF the unit and contact the place where you purchased the flash.
E4: Internal charging problem. Turn off flash light immediately, and contact the place where you purchased the flash.
E5: battery is in low power protection. Please charge the battery in time.
Low voltage protection: Before battery running out, battery signal on the LCD screen will blink. Please charge battery as soon as possible. If not charge the battery in time, power of the flash will cut off automatically when battery voltage is lower than 8.6V.
18/Installing Umbrella
An umbrella with a handle diameter of 8 mm can be firmly secured in the umbrella holder. When the standard reflector is used, fit the umbrella in the hole of the reflector(Fig8). Firmly press the umbrella shaft through the holder, the locking knob is located on the side(Fig9&Fig10).
Do not over tighten to avoid damaging the shaft of the umbrella.

Fig8
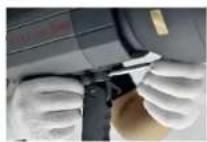
Fig9

Fig10
natural_image
Close-up of a handheld electronic device with a green screen and control buttons (no visible text or symbols)19/ Changing Flash Tube
19-1 Discharge the Flash Unit
The flash must be discharged before removing flash tube. To discharge the flash:
1. Make sure the Flash unit is ON
2.Push "TEST" button on the rear panel of the Flash.
3. Immediately turn off the power switch. Do not allow more than 1/2 second between pressing the "TEST" button and turning the flash off.
4. Remove battery. It is recommended to wait at least 30 minutes before touching /removing the flash tube.
Note: Use white cotton gloves or a clean cloth to prevent fingers from touching the flash tube.
19-2 Remove Old Flash Tube
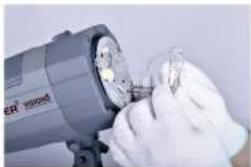
First, remove the reflector. You will need to remove the retention spring wrapped around the top of the flash tube. With needle-nose pliers, unhook the retention spring loop. Grip the base of the flash tube on each side. Carefully pull the flash tube from the flash unit.

natural_image
Close-up of a hand using a power tool to clean or inspect a circular component (no visible text or symbols)Fig11

natural_image
Close-up of a hand holding a flashlight with a small metallic object inserted (no visible text or symbols)Fig12
natural_image
Close-up of gloved hands holding a small mechanical component (no visible text or symbols)Fig13
18
19-3 Install New Flash Tube
Safety Note: Make sure the power switch is OFF and the flash is without battery on it.
- Align the pins on the flash tube with the pin receptacles. Push the pins into the receptacles using firm, even pressure at the base of the flashtube (Fig.14).
- Wrap wire on hook (Fig.15).
- Wrap wire around flash tube for one circle (Fig.16).
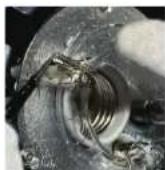
- Wrap wire on hook again. With needle-nose pliers, gently pull the wire upward until tighten (Fig17).
- With needle-nose pliers, cover retention spring over the wire, and hook the retention spring loop at the top of the flash tube (Fig.18&19).

(Fig14)

(Fig15)

(Fig16)

(Fig17)
(Fig18)

(Fig19)
19
20/Flash Capacitor Preventative Maintenance
One of the most important components of an electronic flash is the capacitor. Following the preventative maintenance below will increase the life and the reliability of your flash.
If the unit is left unused for 3 months or predominantly used at low power settings, it is recommended that the power be increased to maximum and the unit left switched on (modeling lamp OFF) occasionally for at least 30 minutes to help preserve the life of the capacitors.
21/USB Firmware Update
1) Visit VISION official website (www.neewer.com) to download the firmware upgrading drive and the firmware of the latest version.
2) Turn off the power, and press and hold [MODEL] button, meanwhile, switch on the power. Then, the screen will display an interface indicating firmware upgrade is accessible.
3) Connect the flash to PC with a USB cable (not included).
4) Follow the tips on the software to finish firmware upgrade.
Main features
Build---strong and sturdy, Light and handy, great features, highlight outdoors hooting quality
Lithium battery---Adapt high-performance and user replaceable Lithium battery, 2.8s fast charging recycling system, 500 full power shoots per charge.
Power---400Ws flash output, GN70, enough power for on-location shoot. Whether shoot in bright sunshine or low-light environment, VISION 5 allow you to get perfect image.
LED modeling lamp---VISION5 studio flash use advanced 13W LED modeling lamp. brightness adjustable in 6 steps,
1/8000s High speed sync---When High Speed Sync function is activated, the maximum sync speed is up to 1/8000s. When photographers shoot outdoors in bright sun with wide open aperture, fast shutter speed can cut the ambient light, get amazing result as you want
TT Lauto flash---VISION5 studio flash has build-in TTL receiver function. It is ready for TTL communication with camera attached with VC-818TX TTL transmitter.
Exposure compensation---Exposure compensation range is -3.0\~+3.0EV, increase or reduce by precision 1/3EV.
M Manual mode---Flash output power is adjustable from full to 1/128 (8 f-stops), increase or reduce by precision 1/3EV.
Multi stroboscopic mode---In Multi mode, VISION 5 studio flash release a rapid sequence of shots, can shooting motion trajectory by one shutter, and clearly catch object moving track.
Channel and Group---VISION5 studio flash adapts 2.4G wireless remote trigger system, Include 8 independent channels and 30 radio wireless ID. Under every channel, you can divide units in three groups (A,B,C).
1/10000S flash duration---1/10000s flash duration, capture splendid instant of fasting moving object.
Protection---Overheating/Overvoltage/Overcurrent/flash charging protection, ensure studio flash best performance.
Update---Support firmware upgrade.
- NEEWER
- VISION5TTL
- Wireless Location Shooting
- DESCRIPTION PAGE
- Introduction
- Safety Note
- Warning Sign
- Content of Carton
- Operation Panel
- LCD Screen
- 1/Prepare flash for use
- 1-1 Fix Flash on Light Stand
- 1-2 Release Protective Cap
- 1-3 Install Standard Reflector
- 1-4 Adjust Flash Light Angel
- 1-5 Install Battery
- 2/ Swith on Flash Light
- 3/ Battery Level
- 4/ Charging battery
- 5/Battery protective maintenance
- 6/ Operating Audible Beep
- 7/ Operating Modeling Lamp
- 8/ Select Triggering Ways
- 10/ Setting Channel / Group and ID
- 11/ Flash Mode-TTL Auto Flash
- 1) Set Flash light in TTL Mode
- Set Flash Exposure Compensation (FEC)
- 3) Flash exposure bracketing (FEB)
- 4) High-Speed Sync
- Caution:
- 12/ Flash Mode-Multi Stroboscopic Flash
- 13/ Flash Mode-M Manual Flash
- 14/ Constant Color Mode ON/OFF
- 16/ How to useVISION5 flash with other flash light
- 17/ Error codes
- 18/Installing Umbrella
- 19/ Changing Flash Tube
- 19-1 Discharge the Flash Unit
- 19-2 Remove Old Flash Tube
- 19-3 Install New Flash Tube
- 20/Flash Capacitor Preventative Maintenance
- 21/USB Firmware Update
- Main features
Marque : Neewer
Modèle : VISION5
Catégorie : Flash