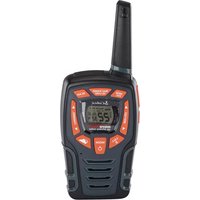
ACXT545 - Radio COBRA - Notice d'utilisation et mode d'emploi gratuit
Retrouvez gratuitement la notice de l'appareil ACXT545 COBRA au format PDF.


| Type de produit | Talkie-walkie PMR446 |
| Marque | Cobra |
| Modèle | ACXT545 |
| Dimensions (par appareil) | Environ 160 x 55 x 30 mm |
| Poids (sans piles) | Environ 100 g |
| Alimentation | 4 piles AAA (1,5 V) ou batterie rechargeable NiMH (non incluse) |
| Nombre de canaux | 16 canaux PMR446 |
| Portée maximale | Jusqu'à 10 km en champ libre |
| Fréquence | 446,00625 – 446,19375 MHz |
| Puissance d'émission | 500 mW ERP |
| Fonctions principales | Communication bidirectionnelle, squelch automatique, scan des canaux, fonction VOX (mains-libres), alertes sonores, voyant de batterie faible |
| Accessoires inclus | 2 talkies-walkies, 2 clips ceinture, 2 écouteurs, manuel d'utilisation |
| Entretien et nettoyage | Nettoyer avec un chiffon doux et sec. Ne pas immerger dans l'eau. Retirer les piles en cas de non-utilisation prolongée. |
| Sécurité | Ne pas utiliser dans des environnements explosifs. Ne pas exposer à des températures extrêmes. Tenir hors de portée des enfants. |
| Pièces détachées et réparabilité | Piles, écouteurs, clips ceinture disponibles en option. Réparation par centre agréé. |
| Informations générales | Conforme aux normes européennes PMR446. Usage libre sans licence. |
FOIRE AUX QUESTIONS - ACXT545 COBRA
Questions des utilisateurs sur ACXT545 COBRA
0 question sur cet appareil. Repondez a celles que vous connaissez ou posez la votre.
Poser une nouvelle question sur cet appareil
Téléchargez la notice de votre Radio au format PDF gratuitement ! Retrouvez votre notice ACXT545 - COBRA et reprennez votre appareil électronique en main. Sur cette page sont publiés tous les documents nécessaires à l'utilisation de votre appareil ACXT545 de la marque COBRA.
MODE D'EMPLOI ACXT545 COBRA

Nothing Comes Close to a Cobra*
Battery Low


Auto Battery Save

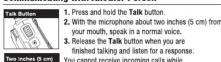
Communicating with Another Person


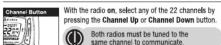
To Select a Channel



The Ground Truth image displays a single, solid horizontal line. According to Rule 2 (UNDERSCORE & LINE RULES), if the GT contains lines used for stylistic emphasis or as background (like ruled paper), the OCR result must ignore them. The line in the GT is clearly a stylistic or background line, not a placeholder for text. Therefore, the OCR should not have output any underscores. Outputting `____` constitutes an error under Rule 2, as it hallucinates placeholder symbols where none are semantically intended. Hence, the OCR result is inconsistent with the Ground Truth.
∴ m = 3/11
Making Life Easier and Safer
Staying in touch with your family and friends is convenient and easy when using your microTALK® radio. Some of the many uses you will discover include:

in discover includes: thers while hiking, biking, and working; keeping track of crowded public event; checking with travel companions with neighbors; arranging meeting spots with others mail.

Secure your microTALK® radio while on

the go. Carrying your microTALK® radio with you is easy when using the belt clip or optional wrist strap. The belt clip easily attaches to your belt, purse, or backpack.

Customer Assistance
Product Service & Support
In this user's guide, you should find all the information you need to operate your microTALK® radio. If you require further assistance after reading this guide, Cobra offers the following customer assistance services: For Assistance in The U.S.A.
For any questions about operating or installing this new Cobra product, PLEASE CONTACT COBRA FIRST... do not return this product to the retail store. The contact information for Cobra will vary depending on the country in which you purchased and uses the product. For the latest contact information, please go to www.cobra.com/support or call 1-800-543-1608.
If your product should require factory service, please go to www.cobra.com/support and follow the instructions.
©2022 Cobra Electronics Corporation www.cobra.com
Listening for a Response

release the Talk button to receive incoming transmissions. Your microTALK ® radio is always in Standby mode while the Talk or Call buttons are not pressed.
To Adjust Volume
Volume Button Press the Volume Up or Volume
| DE 42-1 DOWN BUTTON
A double beep sound is used to indicate the minimum and maximum volume levels (1 through 8).

[Non-Text]
[Non-Text]

press and release the Call button.

The other person will hear a three second call
The Ground Truth image displays a single, solid horizontal line. According to Rule 2 (UNDERSCORE & LINE RULES), if the GT contains lines used for stylistic emphasis or as background (like ruled paper), the OCR result must ignore them. The line in the GT is clearly a stylistic or background line, not a placeholder for text. Therefore, the OCR should not have output any underscores. Outputting \`____\` constitutes an error under Rule 2, as it hallucinates placeholder symbols where none are semantically intended. Hence, the OCR result is inconsistent with the Ground Truth.
LED/S.O.S. Flashlight
LED/S.O.S. Flashlight Press and release the LED flashlight button below the TALK button to use the LED flashlight located at the bottom of the radio.
To activate S.O.S. function, press and hold the LED flashlight button to turn on. Press and release to turn off the flashlight or S.O.S. function.
Auto Squelch/Maximum Range
Your microTALK ® radio will automatically shut off weak transmissions and unwanted noise due to terrain, conditions or if you've reached your Maximum Range limit.
You can temporarily turn off auto squich or turn on maximum range extender, allowing all signals to be received and extending the maximum range of your radio.

The Ground Truth image displays a single, solid horizontal line. According to Rule 2 (UNDERSCORE & LINE RULES), this is a stylistic or background line, not a placeholder underscore. Therefore, the OCR result must ignore it and output nothing or only meaningful text. The provided OCR content is "____", which consists of four underscores. This is an incorrect interpretation of the line as a placeholder, violating the rule that stylistic lines must be ignored. The OCR has hallucinated underscores where none should exist based on the GT's visual context. Hence, the OCR result is inconsistent with the Ground Truth.
Introduction
Product Features

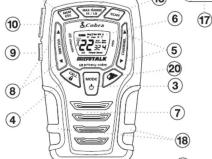
- Antenna
- External Speaker/Microphone/USB Charge Jack
- Mode/Power Button
- Call/Lock Button
- Channel Up/Down Buttons
- Backlit LCD Display
- Speaker/Microphone
- Volume Up/Down Buttons
- LED Light Button

A-2

To temporarily turn off auto squelch/ To turn
maximum range extender on:
- Press and hold the Max Range Hi/Lo button.
To turn maximum range extender off:
- Press and hold the Max Range Hi/Lo
button or change channels.

Lock Function
The Lock function locks the Channel Up, Channel Down, MEM/ESC, Scan, Volume Up, Volume Down, Mode/Power and Weather buttons to prevent accidental operation.
To turn the lo
Lock Icon - Press and hold the Call/Lock button for
n Ros→ 🔒 → two second:
A double beep sound is used to confirm your lock on
of all request. When in Lock mode, the Lock icon will be displayed
microTALK® Range
Your range will vary depending on terrain and conditions
Maximum Range In flat, open country your ra
operate at maximum range
Buildings and foliage in the path of the signal can reduce the range of the radio.
Reduced Range signal can reduce the range
Dense foliage and many terrains reduce the range of the radio
On Channels 8 through 14, your radio
Reduced Range automatically switches to low power, which will limit the range the radio can communicate
Remember, you can achieve maximum range by using maximum range extender. See page 4 for details.
Backlit LCD Display
[Non-Text]
Features • 22 Channels • 10 Channel Weather Radio • Weather Alert • 121 Privacy Codes (38 CTCSS codes, 83 DCS codes) • Hands-Free Operation (VDS) • VibrAlert Silent Paging • Scan Channels, privacy codes • Backlit LCD Display • LED Flashlight • Call Alert Ten selectable tanes • Button Lock Speaker/ Microphone/ Charge Jack • Roger Beep Selectable On/Off • Battery/Power Saver • Keystroke Tones • Battery Level Indicator • Low Battery Audible Alert • Auto Squelch Maximum Range Extender • Belt Clip
![COBRA ACXT545 - [Non-Text] - 1](/content/2026/06/1362981/images/a143a3111d050f42b86c9b1f1b59165ca645492c7db7e0982bd8224b22760235.jpg)
- Battery Level Indicator
- Roger Beep Icon
- VOX Icon
- Weather Icon
- Lock Icon
- Hi/Low Power Icon
- DCS/CTCSS Icons
- Scan Icon
- Memory Icon
- Weather Alert Icon
- DCS/CTCSS Privacy Code Numbers
- Power Saver Icon
- Channel Numbers
- Receive/Transmit Icon
- Memory Channel Number
- ViblAlert*/ Call Alert Icon
- Key Tone Icon
Caring for Your microTALK® Radio
Your microTALK® radio will give you years of trouble-free service if cared
for properly. Handle the radio gently. Keep the radio away from dust News put the radio in water or in a demo place. Avoid exposure to
Never put the radio in water or in a clamp place. Avoid exposure to extreme temperatures.
Installing Batteries
Remoxyx Beit Clin
- Remove belt clip by releasing belt clip latch and sliding clip up.
- Pull up on the battery door latch to remove the battery compartment cover.
- Insert the supplied three AA rechargeable batteries or non-rechargeable alkaline batteries. Position batteries according to pointarity markings.
- Replace battery compartment cover and belt clip.
- Do not attempt to charge alkaline batteries. • Do not mix oil and new batteries. • Do not mix alkaline, standard (carbon-zinc), or rechargeable (Ni-Gi, Ni-Mi, etc.) batteries. Bates Charger Jack To charge batteries in radio:
- Check to see that the batteries have been inserted properly.
- Insert the cable into the charge jack located at the top of the radio.
- Plug the cable into USB-compatible power port. Use only the supplied rechargeable batteries and charger for recharging your Coipa micro/Mi radio. Cob recommendations your radio is turned off while being charged. Non-rechargeable alkaline batteries can also be used in your radio.
A-3
Set CTCSS Privacy Codes
Made/Power


- Press using the Channel Up or Channel Down button to select a privacy code. You can hold the Up or Down button for fast advance.
- When your desired CTCSS privacy code is displayed, choose one of the following: a. Press the Mode/Power button to enter the new setting and proceed to other functions. b. Press the Talk or Call/Lock button to return to Standby mode. c. Do not press any buttons for 6 seconds to return to Standby mode.

Using Your Radio
Using Fear Hards

For charging microTALK radio(s) in desktop charger: 1. Insert radio(s) into desktop charger as shown. 2. Insert the micro-USB cable into jack on back of charger.
- Plug the cable into USB-compatible power port.
For pluggable equipment, the socket-outlet shall be
equipment and shall be easily accessible.
If charging light is not on, check position of radio. Radio should be upright. The charge indicator light will stay on or long on the radio.
upright. The charge indicator light will stay off as long as the radio is in the charging well, and the light will go off when the charging is complete
Note: To charge a single radio, you can bypass the desktop charger and
simply insert the micro-USB's connector directly into the charge jack located on the top of the radio.
The radio will display flashing battery icon while charging
Cobra recommends your radio be turned off while being
Non-rechargeable alkaline batteries can also be used in your radio


Turning on Your microTALK® Radio
Press and hold the Mode/Power button until you hear a series of audible tones indicating the radio is on. Your microTALK® radio is now in Standby mode, ready to receive transmissions. The radio is always in Standby mode except when the Talk, Call or Mode/Power buttons are pressed.
Mode Functions (continued on back side)
3
4
6
[Non-Text]
Set DCS Privacy Codes
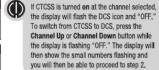
To select a DCS privacy code: 1. After selecting a channel, press the Mode/Power button until the DCS icon appears and the small numbers flash on the display (00 through 83).

-
Press using the Channel Up or Channel Down button to select a DCS privacy code. You can hold the Up or Down button for fast advance.
-
When DCS privacy code is displayed, choose one of the following:
- Pass the Mode iPayment button to enter the new setting and
a. Press the Model/Power button to enter the new setting and proceed to other functions.
b. Does the Talk or Call/ll on
b. Press the Talk of Call/Lock button to return to Standby mode.
c. Do not press any buttons for 6 seconds to enter the new settings and to return to Standby mode.
and to return to Sunday mode.
3
4
6
[Non-Text]
[Non-Text]
[Non-Text]
[Non-Text]
[Non-Text]
[Non-Text]
[Non-Text]
[Non-Text]
[Non-Text]
[Non-Text]
[Non-Text]
[Non-Text]
[Non-Text]
[Non-Text]
[Non-Text]
[Non-Text]
[Non-Text]
[Non-Text]
[Non-Text]
[Non-Text]
[Non-Text]
[Non-Text]
[Non-Text]
[Non-Text]
[Non-Text]
[Non-Text]
[Non-Text]
[Non-Text]
[Non-Text]
[Non-Text]
[Non-Text]
[Non-Text]
[Non-Text]
[Non-Text]
[Non-Text]
[Non-Text]
[Non-Text]
[Non-Text]
[Non-Text]
[Non-Text]
[Non-Text]
[Non-Text]
[Non-Text]
[Non-Text]
[Non-Text]
[Non-Text]
[Non-Text]
[Non-Text]
[Non-Text]
[Non-Text]
[Non-Text]
[Non-Text]
[Non-Text]
[Non-Text]
[Non-Text]
[Non-Text]
[Non-Text]
[Non-Text]
[Non-Text]
[Non-Text]
[Non-Text]
[Non-Text]
[Non-Text]
[Non-Text]
[Non-Text]
[Non-Text]
[Non-Text]
[Non-Text]
[Non-Text]
[Non-Text]
[Non-Text]
[Non-Text]
[Non-Text]
[Non-Text]
[Non-Text]
[Non-Text]
[Non-Text]
[Non-Text]
[Non-Text]
[Non-Text]
[Non-Text]
[Non-Text]
[Non-Text]
[Non-Text]
[Non-Text]
[Non-Text]
[Non-Text]
[Non-Text]
[Non-Text]
[Non-Text]
[Non-Text]
[Non-Text]
[Non-Text]
[Non-Text]
[Non-Text]
[Non-Text]
[Non-Text]
[Non-Text]
[Non-Text]
[Non-Text]
[Non-Text]
[Non-Text]
[Non-Text]
[Non-Text]
[Non-Text]
[Non-Text]
[Non-Text]
[Non-Text]
[Non-Text]
[Non-Text]
[Non-Text]
[Non-Text]
[Non-Text]
[Non-Text]
[Non-Text]
[Non-Text]
[Non-Text]
[Non-Text]
[Non-Text]
[Non-Text]
[Non-Text]
[Non-Text]
[Non-Text]
[Non-Text]
[Non-Text]
[Non-Text]
[Non-Text]
[Non-Text]
[Non-Text]
[Non-Text]
[Non-Text]
[Non-Text]
[Non-Text]

Voice Activated Transmit (VOX)
In VOX mode, your microTALK® radio can be used "hands-free," automatically transmitting when you speak. You can get the VOX sensitivity level to fit the
transmitting when you speak. You can set the VOA sensitivity level to fit the volume of your voice and avoid transmissions triggered by background noise.


Rog-Vox=X
DCS Scan
new setting and proceed to other functions.
b. Press the Talk or Call/Lock button to return to
民
To set VOX sensitivity:
10.47
MobilePower
2
[Non-Text]
VOY Sensitivity Level
Stockholders' Equity Equity Market 0
- 2017
1-053
-
Channel Button
53%
图2-1
[Unreadable]
[Non-Text]
[Non-Text]
[Non-Text]
Memory Scan continued
During scanning (while receiving an incoming transmission), you can
choose from the following:
a. Press and hold the Talk button to communicate on that channel
Your radio will
Standby mode
b. Press the Channel Up or Channel Down button to resume scanning channels
channels.
c. Press and hold the Scan button to return to Memory Standby.
Privacy Code Scan
Your microTALK® radio can automatically scan the Privacy Codes (either
CTCSS 01 through 38 or DCS 01 through 83) within one channel. Only
one set of privacy codes (CTCSS or DCS) can be scanned at a time.
Sean Button
1
VAB TAN
obra (DCS)until the CTCSS or DCS icon and numbers
Channel Button
- Press and hold the Scan button to begin scanning privacy code within the selected channel
EC(2017)
图 2-1
Select Channel
70 Low △ 7
[8] 39.5271 scan privacy codes and stop as an incoming transmission is detected. Your radio will remain on
that channel/privacy code for 6 seconds after the
Scan Privacy Codes last incoming transmission
K 1257
839
2059
9
10 Memory Location
Your microTALK® radio has 10 Memory Locations for storing your most
frequently used channels and channel/privacy code combinations.
These Memory Locations can be selected individually or can be scanned. (See page 18 for memory location scan.)
MEMESC Review To program a memory location:
- Press the MEM/ESC button. Memory icon and
the Memory Location show on the display.
- Press the Channel Up or Channel Down button
Channel Button to select the memory location (0 through 9).
Kuoha 2023
If a location has been programmed before its associated channel/privacy code will be
- It is associated with the privacy code which shown on the display.
MEMISO PR
MEM/ESC BUTTON 3. Press the MEM/ESC BUTTON to enter a new memory location or edit an already program
memory location of 241.2.1.3.2.2.2.2.2.2.2.2.2.2.2.2.
-
Cross the Channel Use or Channel Down button
-
Press the channel up of channel to select the memory location
-
Press the MEM/ESC button. The channel
22.04/1001 | 67. Press the MEMRLED button: The channel numbers will flash on the display.
- Press the Channel Up or Channel
to select a channel (1 through 22).
- Press the MEM/ESC button. The CTCSS icon and
privacy code numbers will flash on the display.
- Choose one of the following:
a. Press the Channel Up or Channel Down
Channel Button button to select a CTCSS privacy code (0)
through 38) for the channel
b. Press the MEM/ESC button to switch from
CTCSS to DCS. The DCS icon and privacy code
numbers will flash on the display. The Channel Up or Channel Down button can then be used
Up or Channel Down button can then be used to select a DCS privacy code (00 through \$3)
to select a bond private code (or through us) for the channel.
(五) 2017年1月1日
10
NOAA* All Hazards Radio Channels
You can use your microTALK ® radio to listen to NOAA All Hazards Radio
channels transmitting in your area.
Weather Button To listen to All Hazards Radio channels:
- Press the Weather button once until the
All Hazards Radio icon and the current
selected All Hazards Radio channel are displayed
Hazards Radio Icon
button to change All Hazards Radio channel
- The All Hazards Radio icon will continue to
be displayed when All Hazards Radio is on
Channel Button Note 10 4. To exit All Hazards Radio, press and hold the
Weather button until On or Off is displayed.
*National Oceanographic and Atmospheric Administration
Weather (WX) Alert Mode
Turning On the Weather Alert function will allow your radio to
automatically receive NOAA weather signals and warnings from
designated weather broadcast stations. In the radio is turned ON, it will start to Weather and other emergency alerts broadcast by NOAA.
alert to weather and other emergency alerts broadcast
This feature is set to OFF by default.
©
Make sure the strongest Weather channel is selected for your
area using the NOAA All Hazards Radio Channels selection in the previous menu.
the previous men.
Weather Button To turn Weather Alert On or Off:
- Press the Weather button twice until the
Weather Alert icon flashes on the display.
The current On or Off setting is displayed.
Channel Button 2. Press the Channel Up and Channel Down button
to turn Weather Alert On or Off
- Press and hold the Weather button again to save
the new setting and exit the Weather Alert Mode
and return to Standby mode
15
10
11
[Non-Text]
b
上
•
General Specifications
den
Frequency Allocation and Compatibility
A = Channel No. for 22 Channel Models
B = Frequency in MF G = Power Output
-
A B C 1 462 5825 High
1 462.5025 High 2 462.5875 High
3 4
4 462.6675 High 5 462.6625 High
6 462,6875 High 7 462,7125 High
8 467,5625 Low
9 467,5875 Low 10 467,6125 Low
10 11
12 467.6625 Low 13 467.6875 Low
16 14
15 462,5500 High 16 462,5750 Hiob
17 462.6000 High
18 462,6250 High 19 462,6500 High
20 462.6750 High
21 462,7000 High 22 462,7250 High
IMPORTANT NOTICE:
WARNING: Changes or modifications to this unit not expressly approved by the party
responsible for compliance could void the user's authority to operate the equipment. This device complies with and 15 of the FOG Drivers. Operation is subject to the following buy
This device complies with part 15 of the PCC Rules. Operation is subject to the following two conditions: 1) This device may not cause harmful interference, and 2) this device must
accept any interference received, including interference that may cause undesired operation. NOTE: This environment has been limited and found to comply with the limits for a Class II
NOTE: This equipment has been issued and bound to comply with the limits for a Class B digital device, pursuant to Part 15 of the FCC Rules. These limits are designed to provide
reasonable protection against harmful interference in a residential installation. This equipment operates, uses and can radiate radio frequency energy and, if not installed and
equipment generally, use and can raise radio frequency energy use; if not instance and used in accordance with the instructions, may cause harmful interference to radio
communications. However, there is no guarantee that interference will not occur in a particular installation. If
however, there is no guarantee that interferes can not occur in a particular intersection. In this equipment does cause harmful interference to radio or television reception, which can be used to reduce the impact of the effect on the equipment's role in the operation.
be determined by turning the equipment on and on, the user is encouraged to try to correct the interference by one or more of the following measures:
- Reorient or relocate the receiving antenna.
- Increase the separation between the equipment and receiver. 17
广力云智慧零售收银系统
17
广力云
12
Ten Call Tone Settings
You can choose between ten different Call Tone Settings to transmit
a call alert.
Made/Power
INDUSTRIAL
图 1
图 1
Call Tone Se
F
L01
- Choose one of the following:
Channel Blvd
Cafes
图号:2017
图2-1
- Do not press any buttons for 5 seconds to return to Standby mode.
(1) 2017年1月1日,公司与上海浦东发展银行股份有限公司签订了《关于使用部分闲置募集资金进行现金管理的协议》。
VibrAlert® and
Your MicroTALK ® radio can alert you to incoming signals by sounding an
audible call
Call Tone On! To change call settings:
Vibrate On
flashes on the display. The current setting ("01"
A
- Press the Channel Up or Channel Down button to
Call Tone Or Wibrate Off
- Choose one of the following
a. Press the Mode button to enter the new setting
A
b. Press Talk or Call/Lock button to return to
Standby mode.
c. Do not press any buttons for 6 seconds to
return to Standby mode
Roger Beep Confirmation Tone
Your listener will hear an audible tone when you release the Talk button.
This alerts the other party that you have finished talking and it is OK for
them to speak.
Mode/Power To turn roger beep on or off:
- Press the Mode/Power button until the
Roger Beep icon flashes. The
on or off setting is displayed.
Roger Beep Off 2. Press the Channel Up or Channel Down button to insert pages based on or off
Rog12 select roger beep off or off.
-
Choose one of the following: a. Press the Mode/Power b
-
Press the Model/Power Button to enter the new setting and proceed to other functions.
Channel Button b. Press Talk or Call/Lock button to return to
Standby mode.
e. Do not press any buttons for 6 seconds to
return to Standby mode.
广力云智慧零售收银系统
Yan Teng 2/19
Key Tone On/Off
When Key Tone is
pressed. To turn key tape on or off
Mode/Power 10 turn key to me off or off. 6 Current key type status On/Off vs (5 flash)
-
Current key tone status Off/Off will flash.
-
Press the Channel Up or Channel Down button to print key here on or off
Channel Button Select Key tone on or off.
- Choose one of the following: a. Pass the Mode/Power b
22"测 | 2. Press the Model Power Button to enter the Standby mode.
b. Praga Talk or C
Standby mode,
e. Do not press any buttons for 6 seconds to
return to Standby mode.
(1) 2017年1月1日至2018年1月1日,公司与关联方累计发生关联交易的总金额为人民币45,000万元。
[Non-Text]
13
[Non-Text]
1
4
-
Warrant 3. Top level Advanced Investment
Warranty & Trademark Acknowledgment
Limited One-Year Warranty
Cobra warrants your product against all defect
stand towards year, pressor against all costs of material and relationship for a gold of one (1) year from the date of original purchase.
Cobra, at our sole discretion, will repair or replace your product comprehens product free of shares.
comparable (product) free of charge.
Cobra will not pay shipping charges that you incur for sending your product to us. Products received COD will be refused.
To make a warranty claim, we will require proof or purchase in the form of an invoice or
receipt. No proof of purchase is required for factory direct purchases.
Warranty Exclusions: Warranty does not apply to your product under any of the following conditions: 1. The serial number has been removed or modified. 2. Your product has been
consultors. 1. The serial number had been removed or introduced. 2. Your product had been subjected to misuse or damage (including water damage, physical abuse, and/or improper
installation). 3. Your product has been modified in any way. 4. Your receipt or proof of purchase is from a non-authorized dealer or internet routine site including F. bay
U-bid, or other non-authorized resellers
LIMITATION OF WARRANTY: EXCEPT AS EXPRESSLY PROVIDED HEREIN, YOU ARE ACQUIRING
THE PRODUCT "AS IS" AND "WHERE IS", WITHOUT REPRESENTATION OR WARRANTY. CORRA SPECIFICALLY DISCLAIMS ANY REPRESENTATION OR WARRANTY INCLUDING, BUT
NOT LIMITED TO THOSE CONCERNING THE MERCHANTABILITY AND SUITABILITY OF THE
PRODUCT FOR A PARTICULAR PURPOSE. COBRA SHALL NOT BE LIABLE FOR CONSEQUENTIAL, SPECIAL OR INCIDENTIAL DAMAGES INCLUDING WITHOUT LIMITATION
CONSENSITIVE, OF LOCAL OR IMMOENTAL DAMAGES INCLUDING, WITHOUT DAMAGES ARISING OUT OF THE USE, MISUSE OR MOUNTING OF THE PRODU
The above limitations or exclusions shall be limited to the extent they violate the laws of any
particular state. Cobra is not responsible for products lost in shipment between the owner and our service center.
General Warranty Information
Each product we manufacture
Last product, we elaborate is covered by our factory Warrang. While clean product may fixe unique components and policy, the general guideline below will apply to most Cobra products.
All Cobra products purchased factory-direct or from our Authorized Resellers will come with a full one to three (1-7) year warranty from the date of the original retail purchase (see
a bid and to close (1-a) year warranty from the date of the original total purchase (see policy statement above for full warranty details and exclusions).
Standard accessories packaged with each model will have a one-year factory warranty
Accessory items have a one-year factory warranty.
Shipping to our facility is not covered in our warranty. Return shipping is included within the US
This warranty is non-transferrable. For the sale of clarity, impairment or re
For the sake of clarity, repair or replace the Product or its defective plant does not include removal or installation work, costs or expenses which include but are not limited to labor
costs or expenses.
Cobra will not be responsible for lost packages
13
Channel Scan
Your microTALK® ra
Sears Button To scan channels:
Stain Button 10 Seam of Mathematics 4. Dress and vials
SABET/10
obra
B. 2014
Scan Channels
173
-
V(x) A v 84
Channel Button
Coburn 78
22
图 1
(Continued)
During scanning (while receiving an incoming transmission), you can choose from the following:
you can choose from the following
a. Press the Talk button to stop the scan. Your radio will remain on that channel and return to Standby mode. Then press and hold th
Talk button to communicate on that channel.
b. Press the Channel Un or Channel Down button to resume
scanning channels.
c. Press and hold the Scan button to return to Standby
Memory foot
Memory Scan
Your microTALK® radio can automatically scan memory channels
Scan Button To scan Memory channels
- Press and release the Scan button while you are on Memory Standby mode until the Scan Mom
on memory 3 starts flashing
2.
Channel Button begin scanning memory channels
The Scan Mem will continue to be displayed when
scan is on. Your radio will continue to scan all
[EMPTY]


- BATTERY LOW
- AUTO BATTERY SAVE
- COMMUNICATING WITH ANOTHER PERSON
- TO SELECT A CHANNEL
- MAKING LIFE EASIER AND SAFER
- CUSTOMER ASSISTANCE
- PRODUCT SERVICE & SUPPORT
- LISTENING FOR A RESPONSE
- TO ADJUST VOLUME
- THE GROUND TRUTH IMAGE DISPLAYS A SINGLE, SOLID HORIZONTAL LINE. ACCORDING TO RULE 2 (UNDERSCORE & LINE RULES), IF THE GT CONTAINS LINES USED FOR STYLISTIC EMPHASIS OR AS BACKGROUND (LIKE RULED PAPER), THE OCR RESULT MUST IGNORE THEM. THE LINE IN THE GT IS CLEARLY A STYLISTIC OR BACKGROUND LINE, NOT A PLACEHOLDER FOR TEXT. THEREFORE, THE OCR SHOULD NOT HAVE OUTPUT ANY UNDERSCORES. OUTPUTTING \`____\` CONSTITUTES AN ERROR UNDER RULE 2, AS IT HALLUCINATES PLACEHOLDER SYMBOLS WHERE NONE ARE SEMANTICALLY INTENDED. HENCE, THE OCR RESULT IS INCONSISTENT WITH THE GROUND TRUTH
- LED/S.O.S. FLASHLIGHT
- AUTO SQUELCH/MAXIMUM RANGE
- LOCK FUNCTION
- MICROTALK® RANGE
- BACKLIT LCD DISPLAY
- [NON-TEXT]
- CARING FOR YOUR MICROTALK® RADIO
- INSTALLING BATTERIES
- REMOXYX BEIT CLIN
- SET CTCSS PRIVACY CODES
- MADE/POWER
- USING YOUR RADIO
- USING FEAR HARDS
- TURNING ON YOUR MICROTALK® RADIO
- SET DCS PRIVACY CODES
Marque : COBRA
Modèle : ACXT545
Catégorie : Radio