MODE D'EMPLOI IPTOUCH 300 MOBILE ALCATEL-LUCENT
Mobile IPTouch 300-600 Telephones
User Guide
Reference: GU-MIPT-300-600-USAB-ed02
We,
ALCATEL BUSINESS SYSTEMS
32, avenue Kleber
92707 Colombes Cedex-France
declare that the following products comply with the requirements of the Directive 1999/5/EC of the European Parliament and the Council
Alcatel Mobile IPTouch 300
Alcatel Mobile IPTouch 600
Any unauthorized modification of the products makes this declaration of conformity null and void. A copy of the original of this declaration can be obtained from your installer.
WARNING Changes or modifications to this equipment may cause this equipment to not comply with part 15 of the FCC rules and void the user's authority to operate this equipment.
NOTE CONCERNING THE WIRELESS TELEPHONES:
This device complies with part 15 of the FCC Rules. Operation is subject to the following two conditions: (1) This device may not cause harmful interference, and (2) this device must accept any interference received, including interference that may cause undesired operation.
This equipment has been tested and found to comply with the limits for a Class B digital device, pursuant to Part 15 of the FCC Rules. These limits are designed to provide reasonable protection against harmful interference in a residential installation. This equipment generates, uses and can radiate radio frequency energy and, if not installed and used in accordance with the instructions, may cause harmful interference to radio communications. However, there is no guarantee that interference will not occur in a particular installation. If this equipment does cause any interference, please contact your intaller.
Your wireless handheld portable telephone is a low power radio transmitter and receiver. When it is ON, it receives and also sends out radio frequency (RF) signals.
US
In August 1996, the Federal Communications Commissions (FCC) adopted RF exposure guidelines with safety levels for hand-held wireless phones. Those guidelines are consistent with the safety standards previously set by both U.S. and international standards bodies:
ANSI C95.1 (1992) American National Standards Institute
- NCRP - Report 86 (1986) National Council on Radiation Protection and Measurements
- ICNIRP (1996) International Commission on Non-Ionizing Radiation Protection;
DHWC - Safety Code 6 Department of Health and Welfare Canada
Those standards were developed by independent scientific organizations through periodic and thorough evaluation of scientific studies. The standards include a substantial safety margin designed to assure the safety of all persons, regardless of age and health. The exposure standard for wireless mobile phones employs a unit of measurement known as the Specific Absorption Rate, or SAR. The SAR limit set by the FCC is 1.6W / kg . Tests for SAR are conducted using standard operating positions specified by the FCC with the phone transmitting at its highest certified power level in all tested frequency bands. Although the SAR is determined at the highest certified power level, the actual SAR level of the phone while operating can be well below the maximum value. This is because the phone is designed to operate at multiple power levels so as to use only the power required to reach the network. In general, the closer you are to a wireless base station antenna, the lower the power output. Before a phone model is available for sale to the public, it must be tested and certified to the FCC that it does not exceed the limit established by the government-adopted requirement for safe exposure. The tests are performed in positions and locations (e.g., at the ear and worn on the body) as required by the FCC for each model. While there may be differences between the SAR levels of various phones and at various positions, they all meet the government requirement for safe exposure. The FCC has granted an Equipment Authorization for this model phone with all reported SAR levels evaluated as in compliance with the FCC RF emission guidelines. SAR information on this model phone is on file with the FCC and can be found under the Display Grant section of http://www.fcc.gov/oet/fcdcid after searching on FCC ID OLIPT300 for Mobile IPTouch 300 and FCC ID OL3IPT600 for Mobile IPTouch 600.
Europe and all other countries
For Europe the limit specified by Directive 1999/5/EC is 2W / kg (head and trunk). For all countries the value of 1,6W / kg can be considered as the overall limit.
The measured SAR values are:
0.061 W/kg @ 2462 MHz (head) 0.0379 W/kg @ 2412 MHz (body) for Mobile IPTouch 300.
0.166 W/kg @ 2462 MHz (head) 0.0199 W/kg @ 2412 MHz (body) for Mobile IPTouch 600.

Phone Operation Normal Position: Hold the phone as you would any other telephone, with the earpiece to your ear and speak into the microphone. The internal antenna is then positioned properly.
Electro Magnetic Interference/Compatibility:

Nearly every electronic device is susceptible to electromagnetic interference (EMI) if inadequately shielded, designed or otherwise configured for electromagnetic compatibility.
Facilities
To avoid electromagnetic interference and/or compatibility conflicts, turn off your radio product in any facility where posted notices instruct you to do so. Hospitals or health care facilities may be using equipment that is sensitive to external RF energy.
Medical Devices
Pacemakers: The Health Industry Manufacturers Association recommends that a minimum separation of 6 inches (15 cm) be maintained between a handheld wireless radio product and a pacemaker. These recommendations are consistent
with the independent research by, and recommendations of, Wireless Technology Research. Persons with pacemakers should:
- ALWAYS keep the radio product more than 6 inches (15 cm) from their pacemaker when the radio product is turned ON.
Not carry the radio product in a breast pocket.
- Use the ear opposite the pacemaker to minimize the potential for interference.
- Turn the radio product OFF immediately if you have any reason to suspect that interference is taking place.
Hearing Aids: Some digital wireless radio products may interfere with some hearing aids. In the event of such interference, you may want to consult your hearing aid manufacturer to discuss alternatives.
Other Medical Devices: If you use any other personal medical device, consult the manufacturer of your device to determine if it is adequately shielded from external RF energy. Your physician may be able to assist you in obtaining this information.
OperationalWarnings
Potentially Explosive Atmospheres: Turn off your radio product, prior to entering any area with a potentially explosive atmosphere, unless it is a radio product type especially qualified for use in such areas (for example, Factory Mutual Approved). Do not remove, install, or charge batteries in such areas. Sparks in a potentially explosive atmosphere can cause an explosion or fire resulting in bodily injury or even death.

The areas with potentially explosive atmospheres referred to above include fueling areas such as below decks on boats, fuel or chemical transfer or storage facilities, areas where the air contains chemicals or particles, such as grain, dust or metal powders, and any other area where you would normally be advised to turn off your vehicle engine. Areas with potentially explosive atmospheres are often but not always posted.
Batteries: All batteries can cause property damage and/or bodily injury, such as burns if a conductive material such as jewelry, keys, or beaded chains touches exposed terminals. The conductive material may complete an electrical circuit (short circuit) and become quite hot. Exercise care in handling any charged battery, particularly when placing it inside a pocket, purse, or other container with metal objects.
Cleaning and Drying Considerations Using a leather carry case may help protect the surfaces and help prevent liquids (e.g., rain) from entering into the interior of the radio product. This product is not waterproof, and exposing the unit to liquids may result in permanent damage to the unit.
If your Wireless Telephone interior gets wet, then do not try to accelerate drying with the use of an oven or a dryer as this will damage the Wireless Telephone and void the warranty. Instead, do the following: 1. Immediately power off the Wireless Telephone. 2. Remove Battery Pack from Wireless Telephone. 3. Shake excess liquid from Wireless Telephone. 4. Place the Wireless Telephone and Battery Pack in an area that is at room temperature and has good airflow. 5. Let the Wireless Telephone and Battery Pack dry for 72 hours before reconnecting the Battery Pack and/or powering on the Wireless Telephone. If the Wireless Telephone does not work after following the steps listed above, contact your dealer for servicing information.
See page 21 for cleaning instructions.
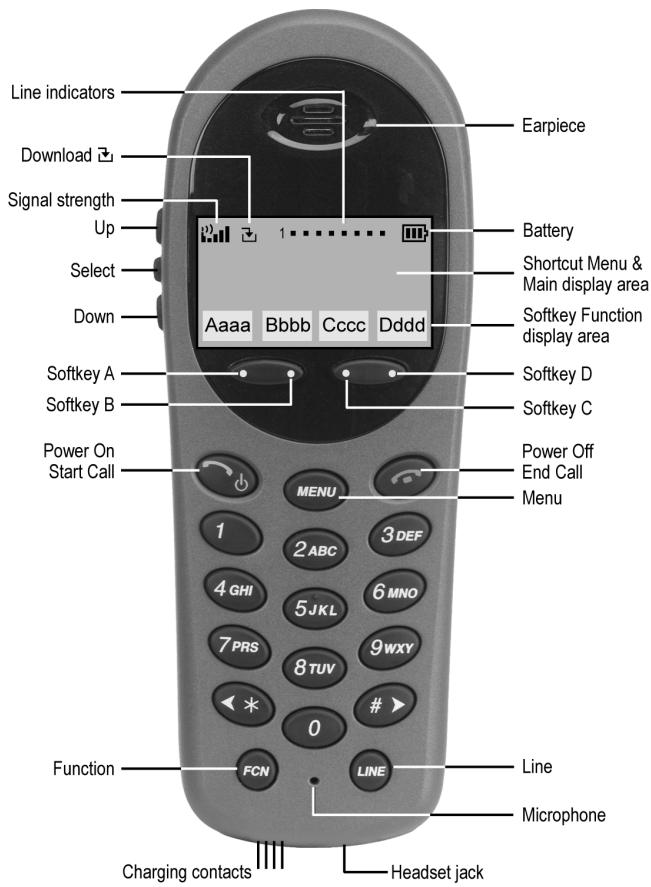
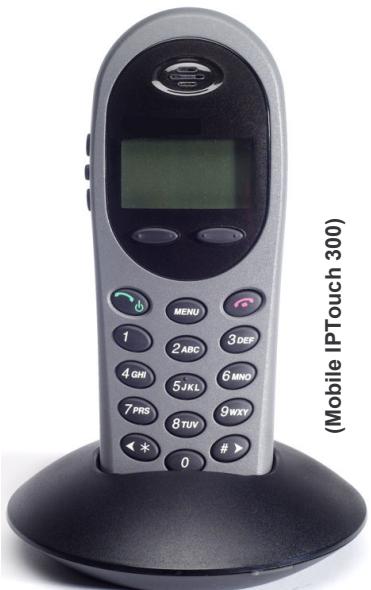
Mobile IPTouch 300
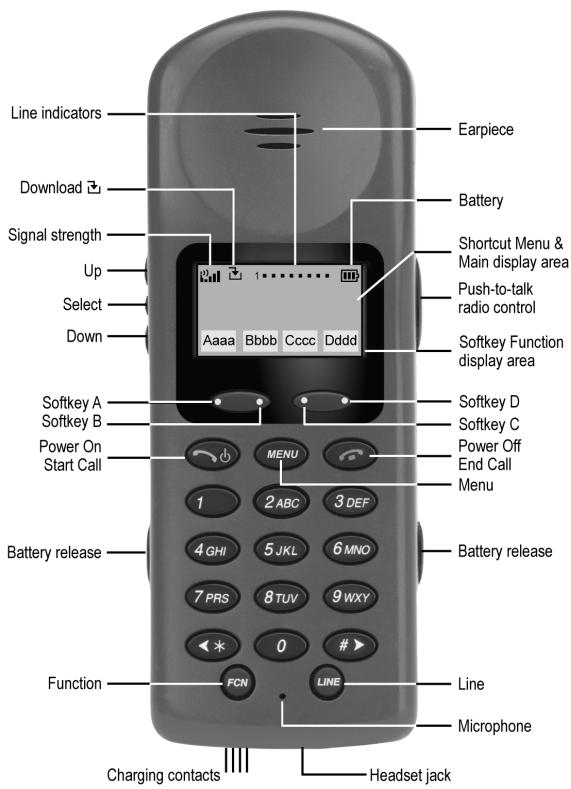
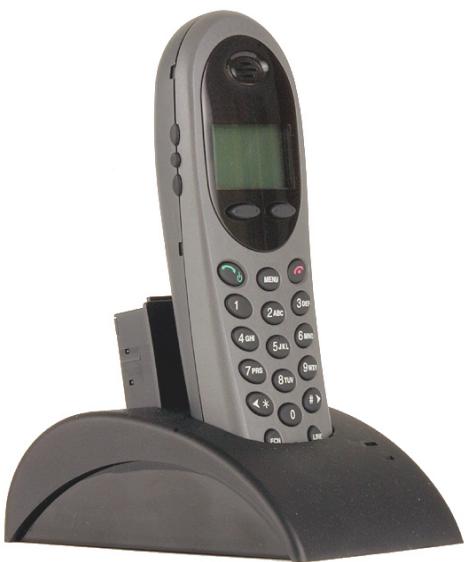
Mobile IPTouch 600
Status Indicators
| 1······ | The line indicators are associated with line access keys. In the preceding diagram, line 1 is active. |
| □□□□ | The battery icon indicates the amount of charge remaining in the Battery Pack. The level indications are approximations of the remaining Battery Pack life. They do not indicate equal amounts of Battery Pack Life. When only one level remains, the Battery Pack needs to be charged. |
| Battery Low | This message displays and an alarm sounds when the MIPT is in standby mode and the Battery Pack is critically low. The MIPT cannot be used until the Battery Pack is charged. |
| [No Service message] | If warning tones are not disabled, an alarm will sound and a descriptive message displays when the handset cannot receive or place calls. You may be outside of the covered area. Walk back into the covered area. The in-service tone indicates service is re-established. |
| P P A D | The signal strength icon indicates the strength of the radio signal and can assist the user in determining if the MIPT is moving out of range. |
| [Melody] | The download icon indicates that the MIPT is downloading code. This icon only appears while the MIPT is running the over-the-air downloader. |
| A melody is played after the MIPT is powered on for the first time following a completed charge (Charge Complete). |
Basic Operations
Turn the MIPT On
| Turn the MIPT Off |
| Press and hold the Power On / Start Call key for about one second. Two chirps will sound. When the key is released, the in-service tone sounds and the extension number will display after a few seconds. The MIPT is now in standby mode and ready to make and receive calls. |
| While in standby mode press and hold the Power Off / End Call key. One chirp will sound and the Wireless Telephone will turn off. The MIPT cannot be turned off during a call. End the call first and then turn the MIPT off. |
| Make a Call |
| Go Off Hook | Press the Power On / Start Call key. |
| Dial Number | Dial calls with the MIPT exactly as with your desk phone. You may dial extension numbers, internal numbers, or make external calls, depending on the setup of your PBX. After pressing Power On / Start Call, you may hear a dial tone, then press the number keys to dial the number. Or dial first (you can correct wrong input with the Back/Star key) and then press Power On / Start Call to send the call. |
| Answer A Call | |
| The MIPT will ring or vibrate to alert you to an incoming call. Additionally, a line number on the display may flash, and the display may show information about the call, such as caller's name and extension. |
| To answer a call, press the Power On / Start Call key. |
| Headset Answer | When a headset is plugged into the MIPT, any key other than the Power On / Start Call, Power Off / End Call, softkeys or side buttons may be pressed to answer a call. |
| Lock Keypad | Press FCN, then select Lock Keys and press OK to activate. Unlk appears on display. |
| Unlock Keypad | Press the Unlk softkey, then #, to unlock the keypad. |
| Hang Up | At the end of each call, press the Power Off / End Call key.
Be sure to do this at the end of each call. |
| Change Earpiece Volume | During a conversation you may increase or decrease the volume of the speaker by pressing the corresponding Up and Down buttons located on the left side of the MIPT. Selected level is memorized for next calls. |
| Change ring volume (MIPT 600 only) | You may increase or decrease the ringing volume on the MIPT 600 by pressing the corresponding Up and Down buttons located on the left side of the handset while it is ringing. |
| Silence while Ringing | If the ringing of the MIPT is not desired, you may silence the ring by pressing the Power Off / End Call button. This action does not interrupt the call. |
| Backlight | The backlight comes on when any key is pressed or when there is an incoming call and stays on for 10 seconds. It turns off after 10 seconds if another key is not pressed within that period. |
PBX Feature Activation
Communication services
MIPT is fully integrated with Alcatel PBX and offers a set of communication services. Available during conversations or from idle those services are very easily activated by the user in order to improve the communication capability in business environments.
Access to the PBX services
MIPT terminal integrates all facilities to access transparently to the services of Alcatel OmniPCX.
Built-in menus could be accessed by pressing the Menu key and enable the user to select and activate the communication services.
Press the Menu key during conversation, the following services are available:
| Service Description |
| Enquiry |
| Broker call |
| Three party conference |
| Transfer |
Press the Menu key from idle, the following services are available:
| Prefix Service Description |
| Immediate forward |
| Immediate forward on busy |
| Forward on no reply |
| Forward on busy or no reply |
| Forward cancel |
| Cancel remote forward |
| Overflow on no reply to associate |
| Last caller callback |
| Last number radial |
| Direct call pickup |
| Group call pickup |
| Call Park/Retrieve |
| Do not disturb |
| Wake up/Appointment reminder |
| Cancel Wake up |
| Remote forward |
| Cancel auto call back on busy |
| Password modification |
| Meet me conference |
| Hunting group entry |
| Hunting group exit |
| Voice mail consultation |
To use the Select key, press Up or Down to highlight an option, then press OK softkey to activate the feature.
Using the shortcut keys
Programmed features may have the number 1-9, 0, or # in the left column of the Menu. This is the shortcut key that activates that feature. To activate the feature using its shortcut key, press the shortcut key at any time while in the Menu. The feature will activate whether or not that feature is currently displayed or highlighted. No shortcut indicates that the feature does not have a shortcut.
Example: If the Transfer feature is programmed to shortcut key 2, the Menu will display
2 Transfer
To activate the Transfer feature press menu, then press 2. You may also press OK softkey after having scrolled through the services.
If you are not already scrolling through the Menu, simply press MEN + 2 to activate the Transfer feature.
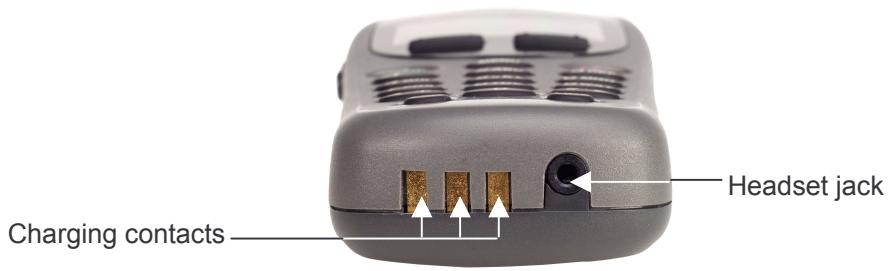
The Wireless Telephone Headset
To use the headset, simply plug it into the jack on the bottom of the MIPT.
Setting User Preferences
When the MIPT is in standby mode (on but not in use), press and briefly hold FCN to display the Standby menu which allows you to set user options. Check with your system administrator for specific features supported by your MIPT.
| Standby menu item | 2ndLevel | 3rdLevel | 4thLevel |
| Lock Keys | | | |
| Ring Options | Telephone Ring | Ring Cadence | Off*PBXContinuousShort PulseLong Pulse |
| Ring Tone | *Tone 1Tone 2Tone 3Tone 4Tone 5 |
| Ring Volume(MIPT 600 only) | Bars |
| Vibrate Cadence | *OffPBXContinuousShort PulseLong Pulse |
| Auxiliary Ring 1 | | |
| Auxiliary Ring 2 | | |
| Phone Options | Noise Mode | *NormalHighSevere | |
| Key Tones | *Enable TonesDisable Tones | |
| Warning Tones | *Enable warningsDisable warnings | |
| Display Contrast | Contrast % | |
| Keypad Autolock | *Disable5 seconds10 seconds20 seconds | |
| System Info | Phone IP Addr | | |
| Server IP Addr | | |
| Firmware Version | | |
| Gatekeeper IP | Address | | |
| Language | [List per download] | | |
| Push-to-talk1(MIPT 600 only) | Channel | Current Channel: X1 2 3 4 5 6 7 8New Channel = ? | |
| Enable/Disable | PTT Enabled*PTT Disabled | |
| Audio Volume | Bars | |
| Tone Volume | Bars | |
*default setting
Ring options
| Telephone ring | Allows the user to set the ring for three separate functions. Telephone Ring is used for usual telephony functions. The Auxiliary Rings may be used to set ringing patterns for OAI applications. |
| Ring cadence | Allows the user to set a distinctive ring style, volume and sequence. Select from an audible ring or a vibrate-only ring or a vibrate ring along with or followed by an audible ring. |
| The cadence is the rhythm of the ring. It may be set to a pre-programmed ring cadence or it may be set to obtain its cadence from the PBX. The PBX option is designed to utilize any distinctive rings sent by the PBX while allowing the user to set unique rings for auxiliary applications. Off: silentPBX: PBX determines ring cadence (e.g. the PBX may send rings that differentiate between internal and external calls.)Continuous: rings continually until answeredShort Pulse: rings in short burstsLong Pulse: rings in long bursts |
| Ring tone | The Play softkey allows the user to preview the tone before selecting. If Ring Cadence is turned off, the Ring Tone option will not appear on the menu. Select from five available tones (scroll to Tone 5 option). |
| Ring volume (MIPT 600 only) | The graduated volume bar indicates the levels. This setting may be overridden by adjusting volume while the handset is ringing. Select a volume level by pressing the Up and Down side buttons and then pressing the OK softkey. If Ring Cadence is turned off, the Ring Volume option will not display. |
| Vibrate cadence | The Vibrate cadence options are the same as for Ring Cadence. |
| Auxiliary ring 1 | Designed to be utilized by OAI applications, enabling the user to set a distinctive ring for these applications. Select the desired Auxiliary Ring |
| Auxiliary ring 2 |
Phone options
| Noise mode | Provides options that describe the noise level in your environment. Selecting the correct option will adjust the MIPT to account for background noise. Select Normal for most office environments; High for moderate background noise; or Severe for extremely noisy conditions. Use of the non-Normal modes is not recommended unless you are in a loud environment or you may find it difficult to be heard on your MIPT. |
| Key tones | Determine if tones play when keys are pressed. Key tones are enabled by default. Turn key tones on or off. |
| Warning tones: | Play to alert user to various conditions, such as system up or down, out of range, etc. These tones are enabled by default. Turn warning tones on or off. |
| Display contrast | Adjusts the display for different lighting situations. Set contrast by pressing the Up and Down side buttons until the desired contrast is displayed and then pressing the OK softkey. |
| Keypad autolock | Locks the keypad automatically when in standby mode. The automatic locking function of the keypad may be disabled (the default) or adjusted for a delay before locking. Select desired keypad autolock delay: |
| Disable: the keypad will not lock. |
| 5 seconds: the keypad will lock in five seconds |
| 10 seconds: the keypad will lock in ten seconds |
| 20 seconds: the keypad will lock in 20 seconds |
| System info | |
| Phone IP address | Displays the IP address currently assigned to the MIPT. This number may not be edited. |
| Server IP address | Displays the IP address currently assigned to the NL Telephony Gateway (in SRP) or the SVPServer IP (in other protocols—see appendices). |
| Firmware version | Displays the software version running the MIPT. |
| Gatekeeper | |
Displays the IP address.
Push to Talk (PTT) - only on MIPT 600
Overview
The push-to-talk feature allows MPT 600 to operate in a push-to-talk (PTT) group broadcast mode in addition to the standard telephone operation.
The MIPT 600 supports 8 multicast channels with the current channel saved in memory on the phone. A PTT call is initiated by pressing the Talk button located on the right side of the handset. All MIPT 600 that are monitoring that channel and that have enabled the PTT feature in the user preferences menu will hear the transmission through group listening.
PTT dialogue is interrupted when you answer a PBX call. When the PBX call is ended, PTT dialogue resumes if in an active call.
Selecting a channel
See Setting User Preferences.
The call period
The two-way radio operates on the concept of a push-to-talk session or call period. The push-to-talk call period begins with the first transmission and ends when there has been no traffic on the channel for 10 seconds.
It is not possible to use the keypad for any other function. However, it is possible to place a PBX call (see below).
Initiating a call
Press the Talk button, the "start transmit" sound will be played when you may begin talking.
Transmitting
Once a call has been initiated, hold the MIPT two inches from your mouth and talk into the microphone. When the Talk button is released, the "end transmit" sound is played. MIPT 600 then enters the waiting state where it monitors the channel for up to 10 seconds.
Initiate subsequent transmissions by pressing the Talk button on any MIPT 600 using the same channel. The "start transmit" sound is played immediately and the user can start talking. The display screen shows the current active channel. Since all phones on that channel are already in the receive state, there is no two-second delay.
If no transmission occurs during the 10-second countdown period, the MIPT 600 plays the "end call" sound and reverts to the idle state.
Push to Talk (PTT) - continued
| Receiving | Upon receiving a PTT transmission, the phone plays the “receiving alert” sound and enters the receive state. |
| In this state the phone receives all conversations on the selected channel. The phone will ignore the Talk key while in the receive state. The screen shows the current active channel, the caller ID information of the current transmitter, and an indication that the phone is receiving a broadcast transmission. During a “PBX” conversation, the MIPT 600 is not able to receive a PTT transmission. |
| At the end of a transmission, the phone enters the waiting state where it monitors the channel for up to 10 seconds and displays “Waiting” on the screen. If no other transmission occurs within 10 seconds the phone plays the “end call” sound and reverts to idle state. |
| Change PTT volume | Use the Up and Down buttons to raise or lower PTT volume. A separate volume is maintained for PTT calls with the current volume selection retained in memory. |
| Muting a PTT call | To mute a current call, the receiver can press the Mute soft key. This brings up a Mute prompt. Press the Yes or No soft key. The prompt disappears after 3 seconds if the user doesn’t confirm either Yes or No. |
| Mute only affects the current call and the phone will play subsequent PTT calls. Mute does not allow the user to use the MIPT’s keypad for anything else, including an OAI application. |
| The Mute soft key turns into an Unmute soft key while in the mute state and can be used to unmute the PTT call (the confirmation prompt is displayed first). |
| When the next PTT call period starts the audio is automatically unmuted. |
| Early termination of a PTT call | In order to terminate incoming broadcasts the receiver can press the Terminate soft key and answer Yes to the confirmation prompt. Push-to-talk audio is immediately stopped and the phone exits the PTT session. No other Wireless Telephone is affected. Only the current call is terminated for this handset. When the next PTT call period starts, the Wireless Telephone is again in the receive state. You may rejoin a still-active session by initiating a PTT call. |
| Users should disable the PTT feature in the on-hook user menu if it is desired to not receive any further PTT calls. |
Push to Talk (PTT) - continued
Incoming PBX call during a PTT call
A telephone call may be answered while in a PTT call session. To announce an incoming call, the Wireless Telephone will ring with a low-volume ring and display the caller ID.
To answer the call, press Power On / Start Call. The PTT call session will be pre-empted and no PTT audio will be heard.
After the PBX call is over, press Power Off / End Call as usual to go back on hook, at which time PTT goes out of pre-empted mode and becomes active again. If an already active PTT call has not ended, the PTT audio starts playing again.
If the user does not answer the telephone call by pressing Power On / Start Call, the PTT display will be shown after the ring has stopped.
Making a PBX call during a PTT call
To start a telephone call during a PTT call session, press the Power On / Start Call key. This causes the two-way radio to be pre-empted as described above.
Incoming PTT call during a PBX call
The PTT "receiving alert" sound will play softly in the speaker audio, if a PTT session is started during a PBX call. You may continue your PBX call normally, or you may switch to the PTT call by ending the PBX call by pressing the End Call button.
Battery Packs
| About Battery Packs | The MIPT will need to have its Battery Pack recharged periodically. The Nickel Metal Hydride (NiMH) rechargeable Wireless Telephone Battery Pack gives you four hours of talk time or 80 hours of stand-by time. Stand-by time is when the phone is turned on, but not in an active call. |
| Indications of Low Battery | The MIPT will notify you when the charge on the Battery Pack is low by displaying the battery icon. If you are in a call you will hear a soft beep through the earpiece every six seconds. User has 15–30 minutes of battery life left.
Not in call: The battery icon displays whenever the Battery Pack charge is low. The message Low Battery and a loud beep indicate a critically low Battery Pack charge. These occur when the user is not in a call. The Wireless Telephone will not work until the Battery Pack is charged. |
| Caution: | Take care not to short the battery contacts on the Battery Pack with metal objects such as coins, keys or paper clips. Shorting the contacts can cause permanent damage. |
Removing and Replacing the Battery Pack on the Wireless Telephone
Removing the Battery Pack
To remove the Battery Pack press both battery release buttons. The Battery Pack releases outward.
Replacing the Battery Pack
To replace the Battery Pack, slide the Battery Pack straight into the cavity. You should not have to force it against the Wireless Telephone.
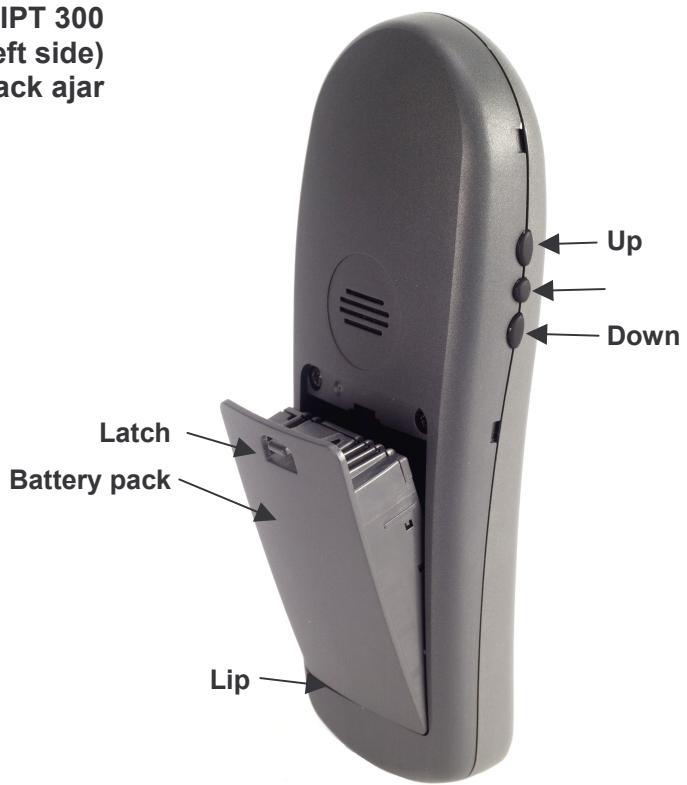
MIPT 300 (back and left side) with Battery Pack ajar
Desktop Charger
The Desktop charger is designed to charge the Nickel Metal Hydride (NiMH) Battery Packs. Full charging is accomplished in approximately one and a half hours. Chargers operate in a 50^ to 85^ F (10^ to 30^ C) environment. Do not expose them to freezing temperatures or direct sunlight.
Caution:
Do not place anything in the charger other than the MIPT. You might damage the contacts. Bent contacts can keep the MIPT from charging.
Using the desktop charger
Indicator light
The user must end any call in progress by pressing the Power Off/End Call button on the MIPT before placing the handset into the charger. The MIPT may be off or in standby mode during charging.
If the MIPT is placed correctly, the red indicator light will come on. The indicator light will not come on when the slot is empty, when the phone is improperly seated, or when the charger has no power applied.
Charging indicator
If the MIPT is in standby mode, it will display its extension number and Charging... If the MIPT is turned off, only Charging... will display. The dots will be racing during the charging cycle. It is normal for the Battery Pack to become warm when charging.
Charge Complete
When the MIPT is fully charged, Charge Complete will display. The indicator light will remain on until the Wireless Telephone is removed.
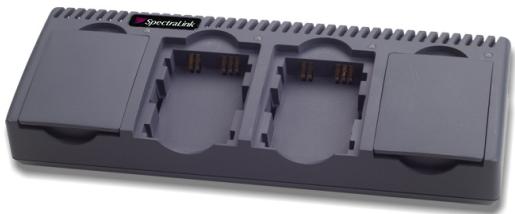
Dual Chargers
MIPT 300 in Dual Charge
Overview
The Dual Charger is a two-slot desktop charger. Two different models are available to charge MIPT 300 and MIPT 600. The Dual chargers are designed to charge the MIPT and a spare Battery Pack. The models are not interchangeable.
The user must end any call in progress by pressing the End Call key on the MIPT before placing it into the Dual Charger. Do not remove the Battery Pack. The MIPT may be off or in standby mode during charging.
Place the handset face forward into the Dual Charger front slot. Place a spare Battery Pack in the rear slot, charging contacts down. The front slot takes charging precedence; the Battery Pack in the rear slot will begin charging when the handset in the front slot is fully charged or when the front slot is empty.
Indicator light
When the handset or Battery Pack is seated correctly, the corresponding indicator light will come on. A bright indicator means the Battery Pack is charging, a dim indicator means the Battery Pack is waiting to charge. The indicator light will not come on when the handset is incorrectly seated, the slot is empty or when the Dual Charger has no power applied. If the indicator light is off or flashing, it means the handset or Battery Pack is incorrectly seated. Remove the handset or Battery Pack and reinsert. If the LED continues to blink or starts blinking at any time during the charging process, it indicates that there is a problem with the Battery Pack that makes it unusable. Do not continue to charge the Battery Pack. Dispose of it properly and do not attempt to use it in the MIPT. Do not attempt to open or repair a defective Battery Pack. Contact your service representative for assistance.
The indicator light will turn off when charging is complete. Full charging is accomplished in approximately two hours for either slot.
Charging indicator
While the MIPT is charging in standby mode, it will display its extension number and Charging.... The battery icon will show charging progress. The handset is fully operational and will ring if called. When the MIPT is charging while turned off, only Charging... will display and no calls will be received.
Charge Complete
When the MIPT is fully charged, Charge Complete will display. If the MIPT has been turned off, the charge complete melody will play when it is turned on.
The Gang Charger - only on Mobile IPTouch 600
(show with two empty charging bays)
The Gang Charger is designed to charge four Nickel Metal Hydride (NiMH) Battery Packs simultaneously. Full charging is accomplished in approximately one and a half hours. Chargers operate in a 50^ to 85^ F (10^ to 30^ C) environment. Do not expose them to freezing temperatures or direct sunlight.
The Gang Charger is shipped with the appropriate power supply for the site's location. Place the GC on a flat, horizontal surface. Plug the power supply into the GC and into an appropriate wall outlet.
Using the GC
Remove the Battery Pack from the Mobile IPTouch by depressing both battery release buttons. The Battery Pack will release.
Insert the Battery Pack into one of the four charging bays so that the Battery Pack contacts meet the charging bay contacts. The LED above the charging bay will turn on to indicate that charging is in progress. Complete charging occurs in one and a half to two hours. The Battery Pack is partially charged in five minutes.
When charging is complete, the LED will turn off. Lift the Battery Pack out of the charging bay.
Blinking LED
If the LED starts blinking as soon as the Battery Pack is inserted, the Battery Pack may be improperly seated. Lift it out and reinsert. If the LED continues to blink or starts blinking at any time during the charging process, it indicates that there is a problem with the Battery Pack that makes it unusable. Do not continue to charge the Battery Pack. Dispose of it properly and do not attempt to use it in the MIPT. Do not attempt to open or repair a defective Battery Pack. Contact your service representative for assistance.
Cleaning the Chargers
Clean the Chargers by wiping the surface with a clean, water-dampened cloth or paper towel. A mild detergent solution may be used. Be sure to wipe away any detergent residue with a plain water dampened cloth. DO NOT IMMERSE THE CHARGER IN WATER OR OTHER LIQUID. DO NOT POUR LIQUIDS INTO THE SLOT.
The Battery Pack contacts on the MIPT may be cleaned with isopropyl (rubbing) alcohol applied with a Q-tip, cloth, or paper towel. Do not push or pull the exposed Battery Pack contacts.
Important:
- Never use non-MIPT charging units as they could damage the Battery Pack.
- Only use the original plug-in power adapter for the Chargers.
- Do not dip the Battery Pack in water or throw into the fire.
- Do not throw away the Battery Pack with your domestic waste. Take used Battery Packs to an appropriate collection point for recycling or send them back to your supplier or servicing agent.
Replacement Battery Packs are available from your supplier or servicing agent.
General Care of the MIPT and Chargers
Do not drop
This section applies to the MIPT, the charger, and the GC equally.
Avoid dropping the MIPT or knocking it against hard surfaces. Carrying the Wireless Telephone in a holster or carrying case will help to protect it.
Do not disassemble
There are no serviceable parts in the MIPT or charger. You should not open the MIPT case nor disassemble the charger. Doing so will void your warranty.
Cleaning tips
Turn off the MIPT and unplug the charger before you clean them. Never immerse either in water. Clean the exterior surfaces, including the charging contacts, with a cloth that has been slightly moistened with water. Take care not to exert undue pressure on the charger electrical contacts while wiping.
Wiping the handset surface with a water-dampened cloth or paper towel will remove most films or residues. If the soiling is too stubborn for plain water, a mild detergent solution may be used. Be sure to wipe away any detergent residue with a clean water-dampened cloth.
The MIPT may be cleaned with any general-purpose household glass and surface-type cleaner. DO NOT SPRAY THE HANDSET DIRECTLY! Isopropyl alcohol may be used occasionally applied by a cloth or paper towel. When using alcohol, do not rub the keypad characters vigorously. Doing so will significantly degrade legibility.
Pre-treated cloths such as used for eyeglasses or cameras may be used to clean the phone. Pre-moistened towelettes may also be used to clean the phone, however, avoid those containing lanolin or aloe as it will leave a slippery residue.
The surface of the handset may be cleaned occasionally with disinfectants used for general cleaning in a medical environment. Isopropyl alcohol may be used occasionally applied by a damp cloth or paper towel. When using alcohol, do not rub the keypad characters vigorously. Doing so will significantly degrade legibility.
- Do not use furniture polishes, waxes or plasticizer-based cleaner (Armor All™, etc.)
- Do not use lanolin, aloe, glycerin or other skin care type products.
- Do not apply any solvent such as acetone, mineral spirits etc.
- Do not directly spray or immerse the handset.
Should the headset connector become dirty, a scratchy or intermittent signal may be experienced. To clean the connector, dip the non-padded end of either a wooden or paper handled cotton swab in isopropyl alcohol. Gently insert in the connector and twist, repeating several times. If available, blow compressed air into the connector to clear debris.
Tips For Use
Before you use the MIPT, the Battery Pack must be charged.
- You can only use the MIPT with your facility's telephone system. It is not a public cellular phone.
- Keep the MIPT away from your ear when it is ringing.
- The microphone is between the FCN and LINE keys. This is a sensitive microphone that works well when the MIPT is correctly positioned on your ear. There is no need to speak directly into the microphone, but do not cover it with your hand or cheek when talking.
- The LCD panel displays information about the status of your MIPT and prompts you about features.
If the Battery Pack is low, you will hear a soft beep and see the battery icon in the display.
- Improper disposal of Battery Packs can damage the environment. Dispose of batteries properly.
- You can control the MIPT volume level and the type of ring.
To protect the MIPT, use a carrying case.
NOTE:
It is recommended that standard acceptance procedures be followed prior to operating this equipment in proximity of life-support systems.
To minimize risk of interference, pacemaker users should not carry the Wireless Telephone next to the pacemaker.
Earpiece may retain magnetic objects.
Operation of the MIPT may produce an audible noise noticeable to hearing aid users. It is recommended that a hearing aid compatible headset be used by hearing aid users.

