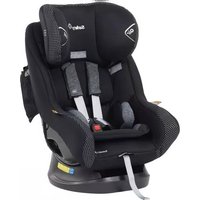
Summit ISO 30 - Siège auto SAFETY 1ST - Notice d'utilisation et mode d'emploi gratuit
Retrouvez gratuitement la notice de l'appareil Summit ISO 30 SAFETY 1ST au format PDF.


| Type de produit | Siège auto |
| Marque | Safety 1st |
| Modèle | Summit ISO 30 |
| Dimensions (L x l x H) | Environ 44 x 44 x 66 cm |
| Poids | Environ 5 kg |
| Poids maximal de l'enfant | 30 kg (environ) |
| Taille maximale de l'enfant | Environ 125 cm |
| Orientation | Dos à la route et face à la route |
| Installation | Isofix et ceinture de sécurité |
| Harnais | 5 points réglable en hauteur |
| Protection latérale | Intégrée |
| Réglage de l'inclinaison | Plusieurs positions |
| Lavable en machine | Oui, housse amovible |
| Nettoyage | À la main avec un chiffon humide pour les parties en plastique |
| Norme | ECE R44/04 ou R129 |
| Pièces détachées disponibles | Oui, via le service client |
| Garantie | 2 ans |
FOIRE AUX QUESTIONS - Summit ISO 30 SAFETY 1ST
Questions des utilisateurs sur Summit ISO 30 SAFETY 1ST
0 question sur cet appareil. Repondez a celles que vous connaissez ou posez la votre.
Poser une nouvelle question sur cet appareil
Téléchargez la notice de votre Siège auto au format PDF gratuitement ! Retrouvez votre notice Summit ISO 30 - SAFETY 1ST et reprennez votre appareil électronique en main. Sur cette page sont publiés tous les documents nécessaires à l'utilisation de votre appareil Summit ISO 30 de la marque SAFETY 1ST.
MODE D'EMPLOI Summit ISO 30 SAFETY 1ST
Safety
Discover life safely
SUMMIT ISO 30
CONVERTIBLE CAR SEAT
Suitable for newborn to 4 years


natural_image
Black and white photo of a Safety 1st car seat with gray trim, no visible text or symbols on the body.ISOFIX COMPATIBLE
IMPORTANT: KEEP THIS BOOKLET IN THE PLACE PROVIDED ON THE CHILD RESTRAINT.
Illustrations and designs may vary.
QUICK START INSTALLATION
REARWARD-FACING USING SEATBELT
NEWBORN UP TO 30 MONTHS, APPROX.

natural_image
Close-up of a black car seat with blue and yellow buttons, showing internal components and a magnified inset (no text or symbols visible)
natural_image
Interior view of a car showing a car seatbelt seat with yellow arrows pointing to the seat (no text or symbols visible)Front of vehicle
natural_image
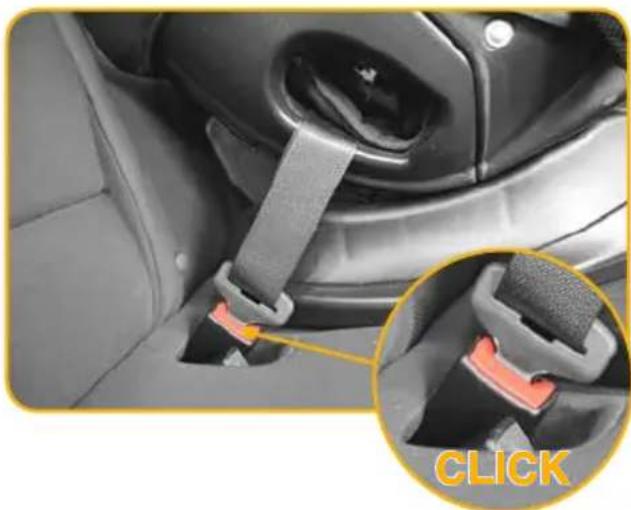
Close-up of a car seatbelt buckle with a highlighted click button (no text or symbols on the main subject)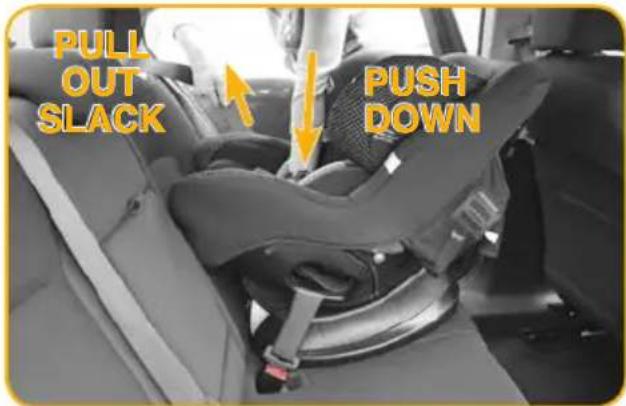

natural_image
Interior view of a car seatbelt buckle assembly with a magnified inset showing the clip attachment (no text or symbols visible)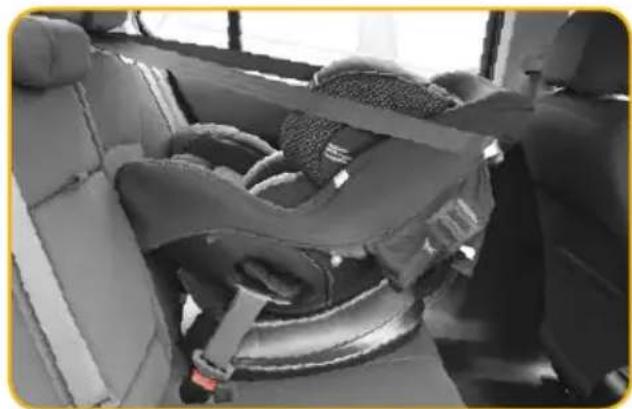
natural_image
Interior view of a car cab seatbelt with visible seatbelt and seatbelt (no text or symbols)QUICK START INSTALLATION
FORWARD-FACING USING SEATBELT
TODDLER (12 MONTHS, APPROX) UP TO 4 YEARS


natural_image
Interior view of a car seatbelt buckle assembly with a magnified inset showing the clasp mechanism (no text or symbols visible)QUICK START INSTALLATION
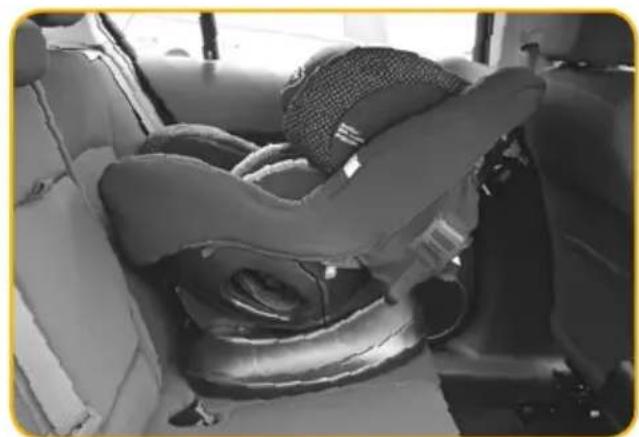
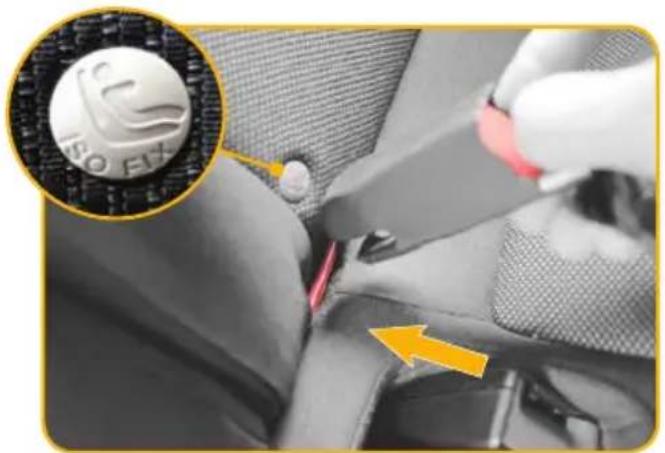
REARWARD-FACING USING ISOGO
NEWBORN UP TO 30 MONTHS, APPROX.

natural_image
Interior view of a car showing a car seat with mesh cushion and seatbelt (no visible text or symbols)Front of vehicle
natural_image
Close-up of a car seatbelt being adjusted, showing a hand adjusting the seatbelt with a magnified inset highlighting the component (no text or symbols visible)
Press the child restraint firmly down into the vehicle seat whilst pulling on the ISOGO straps.
Front of vehicle
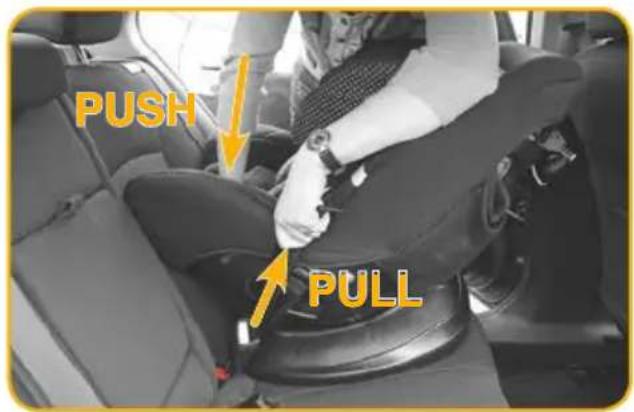
Pull loose end of the strap until you get a majority GREEN indication.

tip: Always check for GREEN at eye level.
ATTACH TOP TETHER STRAP

natural_image
Close-up of a car seatbelt buckle being held, with a magnified inset showing the device attachment (no text or symbols visible)
natural_image
Interior view of a car showing a car seatbelt and seatbelt (no text or symbols visible)Front of vehicle
QUICK START INSTALLATION
FORWARD-FACING USING ISOGO
TODDLER (12 MONTHS, APPROX) UP TO 4 YEARS


natural_image
Close-up of a black car seat with yellow cable and orange connector (no text or symbols visible)
natural_image
Interior view of a car showing a car seat with backrest and seatbelt, no visible text or symbols
natural_image
Close-up of a car seatbelt being adjusted, with a magnified inset showing a white object labeled 'SFO EX' (no text or symbols on the main subject)Front of vehicle
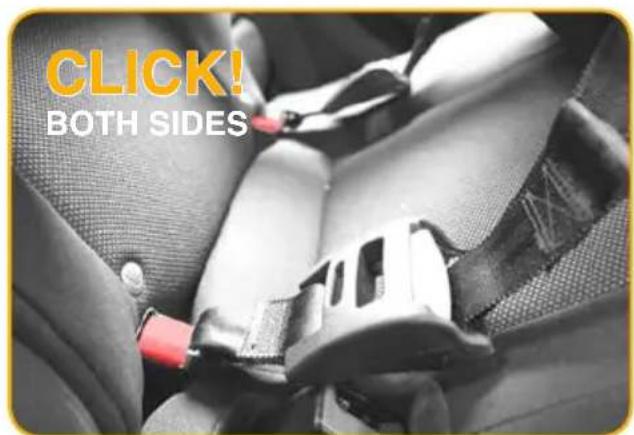
Press the child restraint firmly down into the vehicle seat whilst pulling on the ISOGO straps.
Front of vehicle

Pull loose end of the strap until you get a majority GREEN indication.
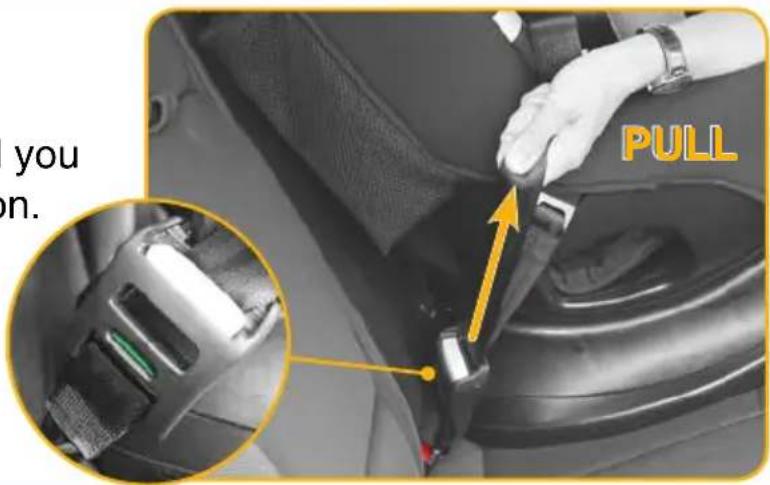
tip: Always check for GREEN at eye level.
ATTACH TOP TETHER STRAP

natural_image
Interior view of a car seatbelt buckle with a magnified inset showing the clip attachment (no text or symbols visible)CONTENTS
Quick Start Installation 2 - 7
Contents 8
Introductions 9
Warnings 10 - 12
VEHICLE INFORMATION
Correct Rearward-Facing Vehicle Position 13
Correct Forward-Facing Vehicle Position 14
Anchor Fitting Location 15
Anchor Fitting Installation 16-18
Angle Adjustment 19
Parts List 20 - 21
Transition Period From Infant To Toddler Use 22 - 23
INSTALLATION
Configuring Harness Straps 24
Adjusting Headrest Height and Harness Height 25
To Fasten Buckle Assembly 26
Adjusting Top Tether Strap 27
Rearward-Facing Installation Using Seatbelt 28
Forward-Facing Installation Using Seatbelt 29
Rearward-Facing Installation Using ISOGO 30 - 31
Forward-Facing Installation Using ISOGO 32 - 33
Next Seat For Your Child 34
CARE & MAINTENANCE
Cleaning Instructions For Buckle 35-36
Care Instructions 37
Removing Trim For Cleaning 37
Removing Accessories For Cleaning 38
Guarantee 39
Customer Service 40

BEFORE YOU START:
Thank you for purchasing this child seat. This product is suitable for newborn children to toddlers approximately 4 years old. We welcome you as a valued customer, and trust that your child will enjoy many years of comfort and safety.
No child restraint can guarantee absolute protection from a crash. However proper use of this restraint may reduce the risk of injury or death!
NEED ASSISTANCE?
Call our Customer Service Team: 1300 809 526
Monday to Friday (8:30am - 5:00pm AEST)
or send an email: customerservice@dorel.com.au
www.Safety1st.com.au Safety1stAustralia
ACCIDENT
EXCHANGE
www.Safety1st.com.au

WARNINGS
Read and follow all of the installation instructions for maximum protection. If you have any questions regarding the installation or use of this child restraint in Australia or New Zealand, please contact our customer service numbers provided. An alternative option is to also contact any registered child fitting station authorised by your local transport authority.
- To be used only in a rearward-facing position until the infant's shoulders either reach the lower shoulder height marker (approximately 12 months of age) or reach the middle height marker (approximately 2 to 3 years of age). Then to be used in a forward-facing position until the child's shoulders reach the upper shoulder height marker (approximately 4 years of age).
- Continue to use this child restraint until the child reaches this limit.
- Do not use forward facing until child's shoulders are above the lower shoulder height marker.
- Infants are at risk of serious injury if they face forward too early.
• Children are at risk of serious injury if they move to booster seats too early. - Children who have outgrown this restraint are safest in a larger child restraint with an in-built harness or a booster seat until their shoulders reach the upper shoulder height marker of the restraint.
GENERAL
- Use the restraint exactly as shown in the instructions.
- Supervision of children is needed because they may be able to undo the buckles.
• DO NOT LEAVE CHILDREN UNATTENDED IN THE CAR. - Do not alter or modify this restraint.
• Repairs must only be done by the manufacturers or agent. - Do not allow the restraint to come into contact with polishes, oils, bleach and other chemicals.
- Destroy the restraint if it has been in a severe crash, even if no damage is visible
• DO NOT USE THIS RESTRAINT WITHOUT THE COVER. - To ensure infant's back is evenly supported, do not put more than one nappy on the baby and make sure the nappy is not thickly folded at the back.
- DO NOT USE A REAR- FACING CHILD RESTRAINT WHERE AN AIRBAG IS FITTED IN FRONT OF THE SEATING POSITION.

WARNINGS
• Fit the restraint firmly to the car seat.
• Fit the harness firmly to the child.
- A loose restraint or harness is dangerous.
- Do not harness an infant wrapped in a blanket or swaddled. Any blanket or wrap must only be placed over the harness and infant.
- Seatbelt extenders are not recommended to be used if the seatbelt is not long enough to secure the child restraint. If seatbelts are too short then advice should be sought from a child restraint fitter and their recommendation be considered before using a seatbelt extender.
- Always secure the loose end of the top tether strap. Do not use the child restraint where this strap may fall into a split in the seat back or off the side of the seat.
• Always secure the loose end of the top tether strap to prevent it hanging out of the car or being accessible by the child.
- ALWAYS ATTACH HOOK AND REMOVE SLACK.
- THIS RESTRAINT IS NOT SUITABLE FOR USE WHERE THE TOP TETHER STRAP MAY FALL INTO A SPLIT IN THE SEAT BACK OR OFF THE SIDE OF THE SEAT.
- THIS RESTRAINT MUST BE ATTACHED TO A CHILD RESTRAINT UPPER ANCHORAGE POINT IN THE CAR. REFER TO CAR OWNER'S HANDBOOK FOR LOCATION OF UPPER ANCHORAGE POINTS. REFER TO A CHILD RESTRAINT FITTING STATION IF NO UPPER ANCHORAGE POINTS ARE IN THE MOTOR CAR.
- Always check the measurements between the front of the seat back of the rear seat and all front seats in the car in which the child restraint is intended to be used, to ensure that the space is sufficient.
- Care and attention be given to ventilation and shading of the occupant.
• TO BE USED WITH A LAP-SASH/LAP-ONLY SEATBELT OR ISOFIX LOW ANCHORAGES IN THE FRONT/BACK OF MOST CARS WITH FORWARD FACING SEATS.

WARNINGS
- The use of child restraints in the front seat may be restricted for children of specific ages by local legislation. Please check with your local legislation regarding any restriction for child restraint. If a car has two or more rows of seats, children under four must not travel in the front seat. If all seats, other than the front seats, are being used by children under seven years, children aged between four and six years (inclusive) may travel in the front seat, provided they use an approved child restraint or booster seat.
- Use of aftermarket accessories (i.e. items not provided in the box with the child restraint), can reduce the safety provided by child restraint and may cause injury or death. For approved aftermarket accessories please refer to page 15.
- Please contact Dorel Australia Customer Service with any questions or concerns.
Correct Rearward-Facing Vehicle Position
Some seating positions in your vehicle may NOT be safe for this safety seat. Some vehicles do not have any seating positions that can be used safely with the seat.
If you are not sure where to place the infant seat in your vehicle, consult your vehicle's owner's handbook.
Vehicle Seat Location Requirements
Children are safer when properly restrained in rear vehicle seating positions. Whenever possible, secure the infant seat in the centre position of the seat directly behind the front seats.


WARNING
IMPROPER PLACEMENT OF THE SAFETY SEAT INCREASES THE RISK OF SERIOUS INJURY OR DEATH.
Correct Forward-Facing Vehicle Position

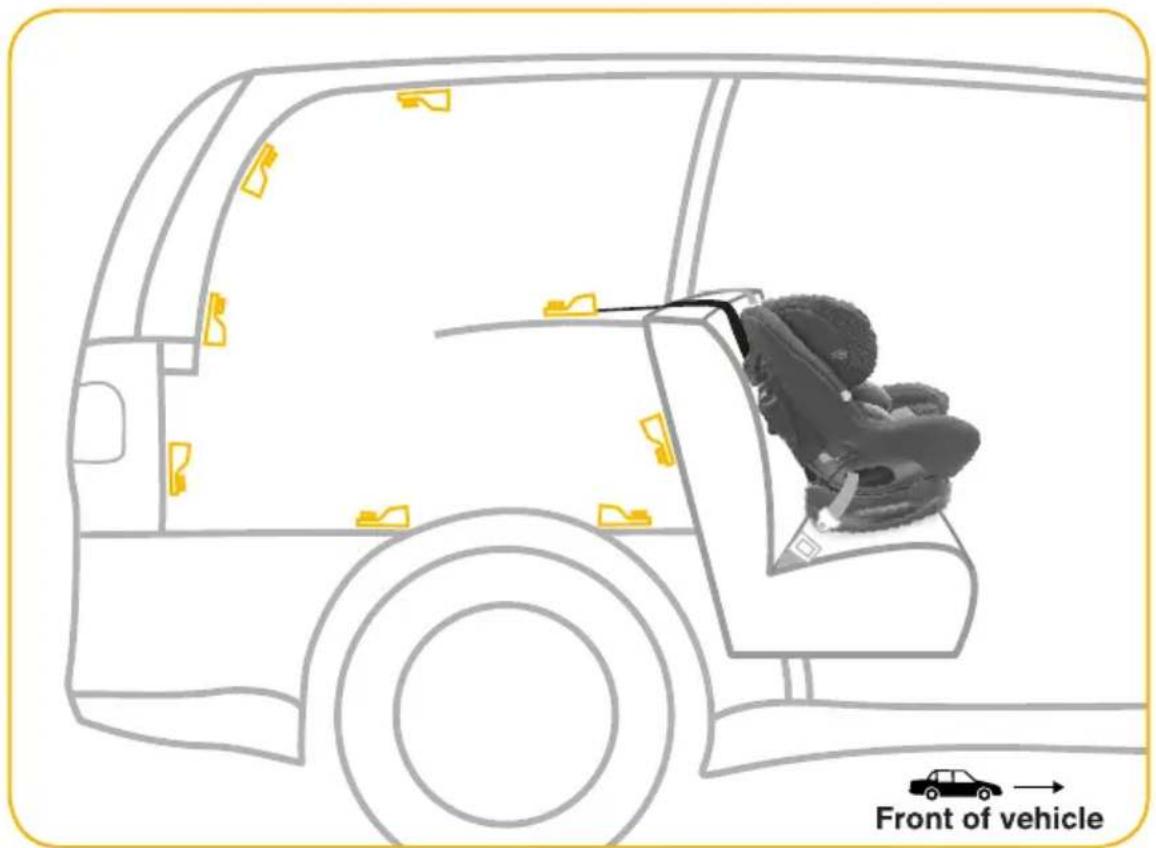
NOTE:
- The anchor point can be found in different locations in different car. The illustration above shows possible locations of anchor points. Sometimes it is on the parcel shelf in sedans, and on the floor area in station wagons, vans and hatchbacks. Make sure that you do not confuse the luggage hook in the back of a station wagon with anchor points. Refer to your owner's manual.
- An extension strap may be needed for vehicles without a fixed parcel shelf. Extension straps and extra fittings are available from various stores.
| Extension straps 300mm ref no. 014398 Extension straps 600mm ref no. 014399 |
| Anchor bolt kit ref no. 014400 Locking clip ref no. 014401 |
Child restraints must be used correctly to provide proper protection for your child. The anchorage system on child restraint must be used in the correct way.
CORRECT
Make sure there is no slack in the top strap and the attachment clip is upright in the anchorage fitting.
INCORRECT
The clip must not lie flat on the anchorage fitting.
| INSTALLATION | CORRECTMake sure there is no slack in the top strap and the attachment clip is upright in the anchorage fitting. | INCORRECTThe clip must not lie flat on the anchorage fitting. |
| FIGURE 1Anchoragees in vertical panel at rear of vehicle |  | X |
| FIGURE 2Floor mounted anchorages |  | X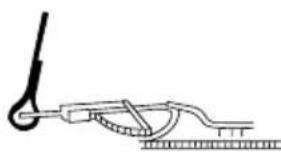 |
Upper Anchorage Fitting Installation

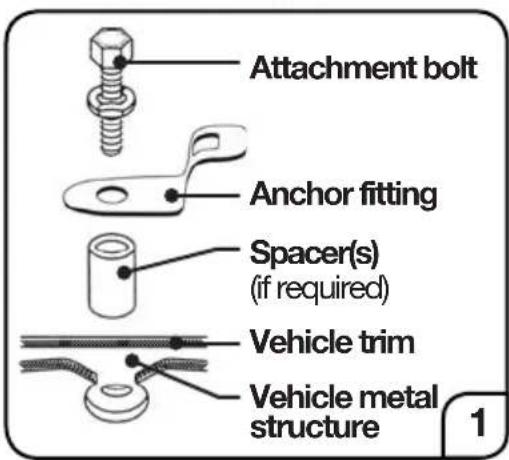


FOR CARS FITTED WITH A CHILD RESTRAINT UPPER ANCHORAGE POINT
Locate the upper anchorage point behind the rear seating position (consult the car owner's handbook for the location of the upper anchorage point).
Remove the thread plug from the parcel shelf/floor/roof and install the attachment bolt as shown in Figure 1.
CAUTION: DO NOT OVERTIGHTEN THE ATTACH-MENT BOLT. OVERTIGHTENING MAY FRACTURE OR BREAK BOLT. MAXIMUM TORQUE IS 20 Nm.
FOR CARS NOT FITTED WITH A CHILD RESTRAINT UPPER ANCHORAGE POINT
For sedans only
Drill a 9mm diameter hole in the parcel shelf on the centre-line of the seating position as shown in Figure 2. Install the anchor bolt as shown in Figure 3. It is recommended that this installation be carried out by a child restraint fitting station or licenced motor mechanic.
For vehicles other than sedans
In Australia, consult your nearest child restraint fitting station or traffic authority for vehicle inspection to find the best, correct position for the placement of the upper anchorage point, and for the correct attachment bolt length and use of spacers. In New Zealand, consult the agent for the vehicle.

WARNINGS
CHILD RESTRAINTS MUST NOT BE ATTACHED TO UNSOUND METAL OR TO WOOD OR SYNTHETIC STRUCTURES. WHEN DRILLING THE 9mm HOLE DO NOT DRILL THROUGH FUEL LINES, FUEL TANKS, ELECTRICAL WIRING, OR RADIO SPEAKERS. WEBBING STRAPS MUST BE PROTECTED FROM SHARP CORNERS AND EDGES.
THE ANCHOR FITTING MUST BE USED ONLY AS DESCRIBED ABOVE. IT MUST NOT BE HOOKED ONTO ANY OTHER OBJECT.
Seat Angle

natural_image
Interior view of a car seatbelt with 40-degree angle annotation (no text or symbols on the suit itself)Position seat ensuring that the angle is no greater than 40irc from horizontal plane.


WARNINGS
- DO NOT install convertible child restraints excessively reclined, ensure the angle is no greater than 40irc .
- DO NOT adjust harness or tether strap hardware such that it sits too close to the occupant.
- Ensure that correct seatbelt path is used and that the restraint is installed in the correct direction for rearward facing application (Refer to page 28).
- DO NOT wrap baby in a blanket or swaddled as infant can be ejected and killed in an accident.
- Ensure the harness fits the baby firmly.
- Ensure that any blanket or other covering may only be placed over the harness after the harness is adjusted firmly.
- The infant's legs are not be bound or wrapped together and the arms are not bound or wrapped together.
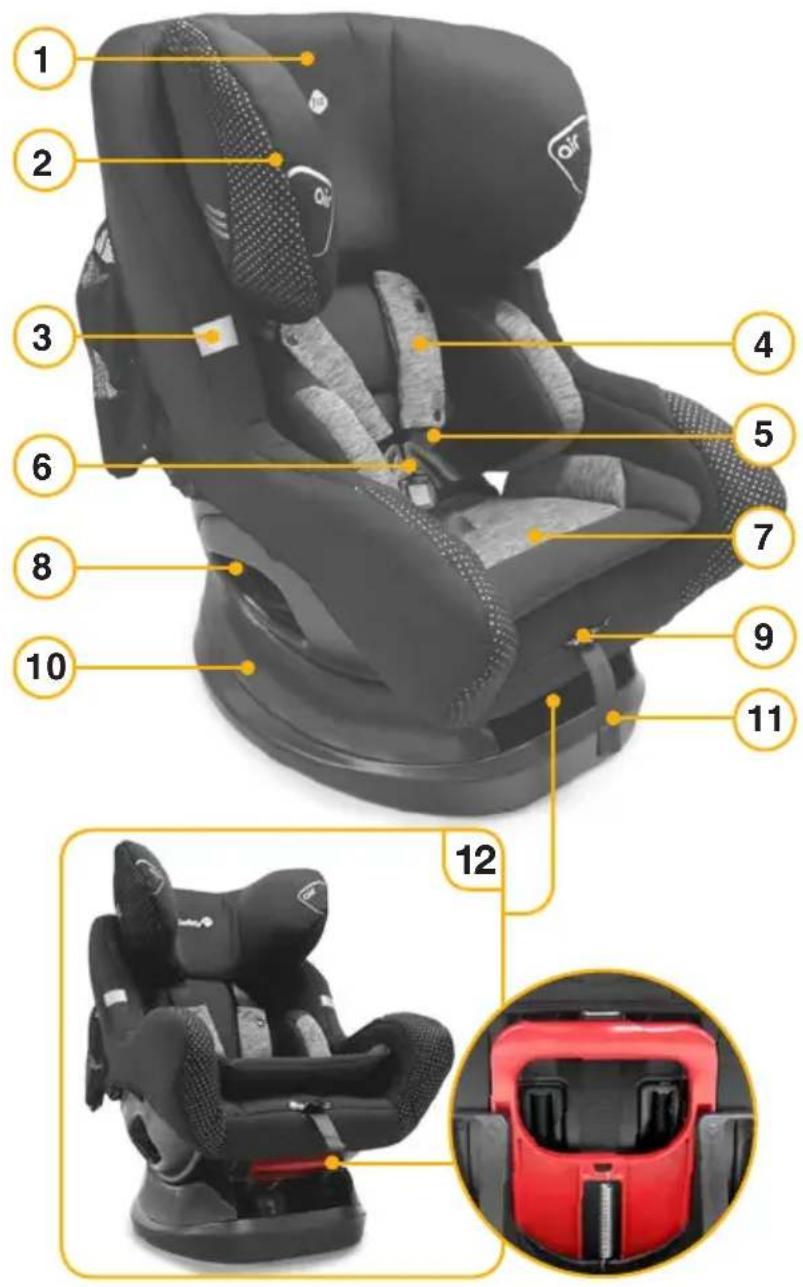
- Adjustable Headrest
- Air Protect Cell (x2)
- Multi-Purpose Utility Straps
- Belt Mates (x2)
- Harness
- Buckle
- Padded Insert
- Belt Path Opening (both sides)
- Centre Front Adjuster (under cover)
- Seat Base
- Adjuster Strap
- Base Recline Adjuster

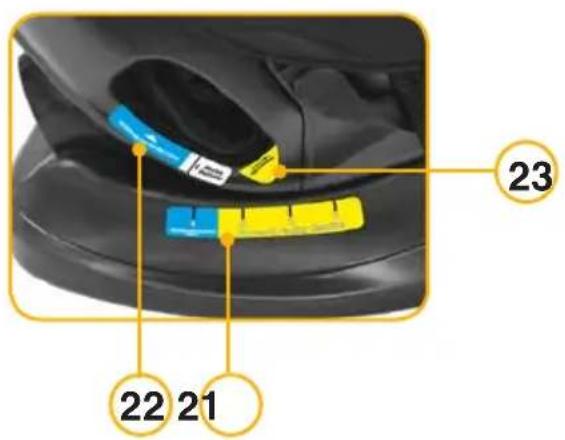
- Top Tether Strap Adjuster
- Top Tether Strap
- Headrest Adjuster
- Anchor Kit
- Instruction Manual / ISOGO storage pocket
- Top Tether / ISOGO storage pocket
- ISOGO Lower Connectors (x2, attached to shell)
- Splitter Plate
- Recline Indicator
- Rearward-Facing Belt Path
- Forward-Facing Belt Path

23
FORWARD-FACING BELT PATH

22
REARWARD-FACING BELT PATH
Transition Period From Infant To Toddler Use

MARKER A: OLDER CHILD

Upper Shoulder Height Marker
For toddler use up to approx 4 years old or when the child's shoulders reach the shoulder height marker at which point you must move to the next car seat.
NOTE: You can turn the restraint from rearward-facing to forward-facing anytime once your child's shoulders reach the lower height marker.
MARKER B: YOUNG TODDLER

MARKER C: NEWBORN
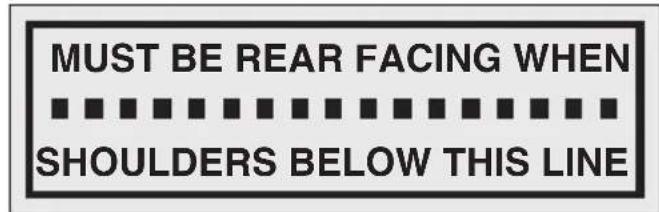
Middle Shoulder Height Marker
For toddler use up to approx 30 months old or when the child's shoulders reach the shoulder height marker at which point you must turn the seat forward-facing.
Lower Shoulder Height Marker
For newborn use up to approx 12 months old or when the child's shoulders reach the shoulder height marker at which point you can continue to use rearward-facing until the middle height marker, or turn the car seat forward-facing.
Transition Period From Infant To Toddler Use (cont'd)

WARNINGS
- Continue to use this child restraint until the child reaches this limit.
- Do not use forward facing until child's shoulders are above the lower shoulder height marker.
- Infants are at risk of serious injury if they face forward too early.
• Children are at risk of serious injury if they move to booster seats too early. - Children who have outgrown this restraint are safest in a larger child restraint with an in-built harness or a booster seat until their shoulders reach the upper shoulder height marker of the restraint.
- The child restraint is unsuitable for the occupant when the shoulders are below the lower marker or above the upper marker. The child needs to be moved into the next form of child restraint (booster seat) when they reach the top shoulder height marker.
NOTE :
- If the baby's neck muscles are unable to support their head, then the child should remain rear facing.
Preparing Infant Seat To Fit Your Child
You MUST make these adjustments with your child before you install the child restraint in the vehicle. Please adjust harness according to the infant's shoulder height prior to installation.

CONFIGURING THE HARNESS STRAPS FOR CORRECT CHILD FITMENT
- Push the harness release lever at the front of seat.
- Pull the shoulder strap to loosen
- Press red button to release buckle assembly for ease of child fitment. Pull harness straps over sides of infant seat. Place child in seat.
- Fasten buckle assembly. Listen for "click!".
- Pull strap to tighten.
IMPORTANT: ALWAYS ENSURE THAT THE HARNESS ADJUSTER IS FREE FROM ANY OBSTRUCTIONS TO AVOID HARNESS STRAPS LOOSENING.


REARWARD-FACING
(Newborn to approximately 30 months)
The shoulder straps must be in the slots which are nearest to the child's shoulders, but not lower than the child's shoulders.


FORWARD-FACING
(12 months to 4 years)
The shoulder straps must be in the slots which are nearest to the child's shoulders, but not more than 25 mm below the child's shoulders.
Preparing Infant Seat To Fit Your Child (cont'd)

ADJUSTING HEADREST AND HARNESS HEIGHT
-
Loosen harness straps to allow slack for headrest movement.
-
Lift handle to release, using one hand on the handle and one hand to guide the headrest. Move headrest up or down into position. Ensure bar is secured in slot.
BEFORE AFTER

natural_image
Two black safety car seats with yellow arrows indicating seat movement or pressure points (no text or symbols)NOTES:
- Moving the headrest will automatically adjust the harness height.
- While adjusting height, place a hand on headrest as a guide.
natural_image
Black car comfort seat with red seat cover diagram showing internal compartment alignment (no text or symbols)SQUEEZE LEVER
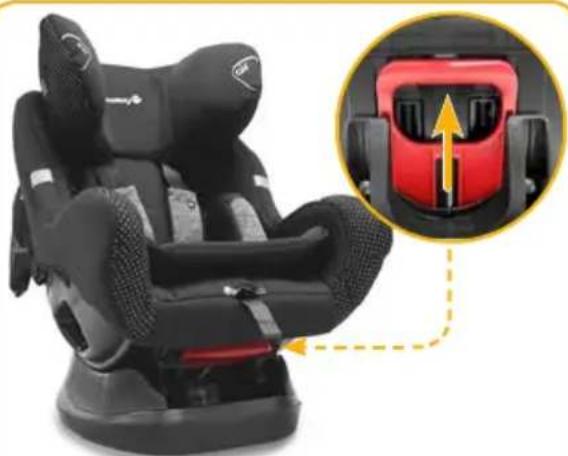
ADJUSTING SEAT RECLINE
The seat is fitted with 3 forward-facing recline positions. The 4th and most reclined position is for rearward-facing use ONLY.
To adjust, place hand under seat and squeeze the RED lever to select the desired position.
NOTE: Never use Position 4 for forward-facing.

WARNINGS
• Always adjust the height of the shoulder straps as the child grows.
- Failure to fasten and tighten the harness system correctly can result in serious injury or death.
Preparing Infant Seat To Fit Your Child
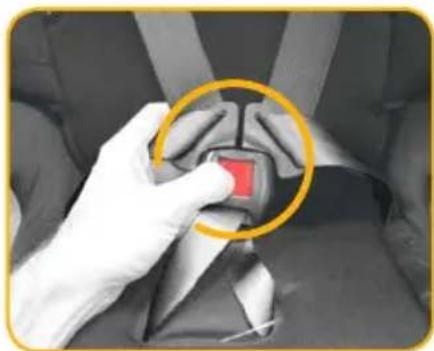
natural_image
Close-up of a hand holding a red square object on a dark fabric surface, with a yellow circle highlighting the area (no text or symbols visible)TO FASTEN BUCKLE ASSEMBLY
Release: Press the red button to release the buckle.
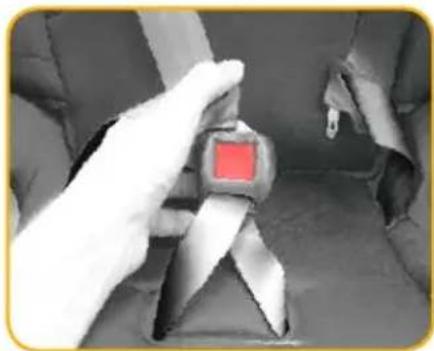
natural_image
Close-up of a gloved hand adjusting a red square buckle buckle (no text or symbols visible)- Insert one buckle tongue as shown in image. You will not hear a click.
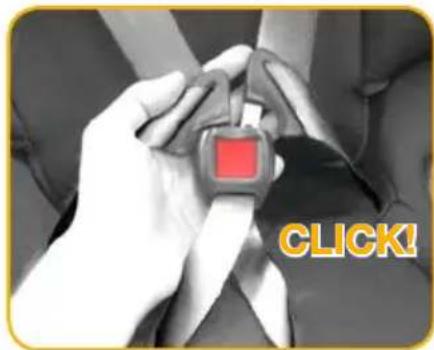
natural_image
Close-up of hands holding a red square button on a white object, with 'CLICK!' text overlay (no other readable symbols or text)- Insert the second buckle tongue as shown. Now listen for a "click!".
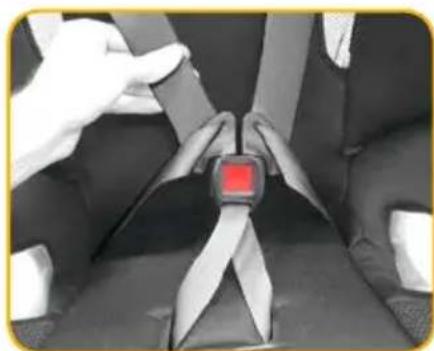
natural_image
Close-up of hands adjusting a car seatbelt buckle (no text or symbols visible)- Remember to always pull up on the harness straps to make sure buckle is locked tightly.

WARNING
DO NOT LEAVE CHILDREN UNATTENDED IN THE CAR.
Preparing Infant Seat To Fit Your Car
TO LOOSEN

TO TIGHTEN


natural_image
Close-up of a baby car seat with a highlighted section showing the neck area (no text or symbols visible)TO ADJUST TOP TETHER STRAP:
TO LOOSEN:
Press on the adjuster button with thumb and pull strap back through to loosen top tether strap using strap which is attached to the seat.
TO TIGHTEN:
Adjust top tether strap and remove slack. Pull loose end of strap to tighten.
NOTE: Store the excess webbing in the pocket provide on the side of the child restraint.

WARNINGS
CAUTION: CHILDREN CAN BE INJURED OR RESTRAINTS AND TOP TETHER STRAP DAMAGED BY UNSECURED CARGO IN A COLLISION. SECURE OR REMOVE HAZARDOUS CARGO BEFORE USING THIS CHILD RESTRAINT.
Always secure the loose end of the top tether strap to prevent it hanging out of the car or being accessible by the child.
When not in use, fold hanging tether strap and place in storage pocket provided.
Rearward-Facing Installation Using Seatbelt
-
Ensure ISOGO latches are secured into stowage bag location.
-
Set seat to position 4 (full recline) for rearward-facing.
-
Loosen full length of the top tether.
-
Place restraint facing rearwards on back seat of vehicle in line with a top tether strap anchorage point.
-
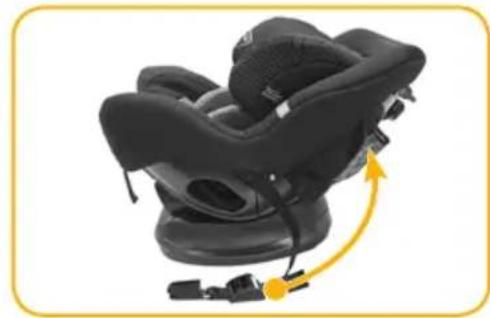
Thread the vehicle seat belt through the BLUE belt path at the bottom of the restraint and fasten buckle.
-
Press the child restraint firmly down into the vehicle seat and remove belt slack.
-
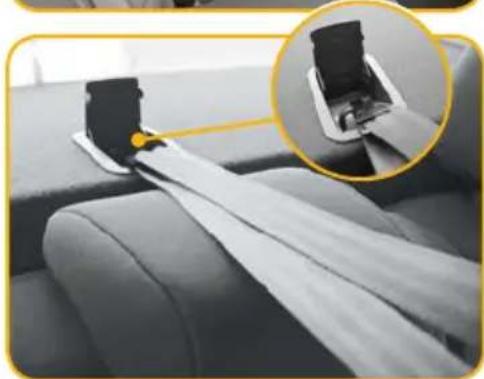
Attach the top tether strap to the anchorage point. Adjust until all the slack is removed. Ensure Base of seat is not lifted.
NOTE: There is an option to install seat using seat belt with accessory locking clip. Please see instructions provided with locking clip for installation.
natural_image
Close-up of a black car seat with attached straps and a yellow directional arrow indicating motion (no text or symbols)
natural_image
Close-up of a black car comfort seat with blue-labeled buttons and a magnified inset showing the seat detail (no text or symbols visible)
natural_image
Interior view of a car seat assembly with highlighted buttons and a 'CLICK' button (no text or symbols on the diagram itself)
natural_image
Close-up of a car seatbelt buckle with a magnified inset showing the side view (no text or symbols visible)
WARNING
DO NOT LEAVE CHILDREN UNATTENDED IN THE CAR.
Forward-Facing Installation Using Seatbelt
NOTE: Before you start installation, adjust the shoulder straps to fit your child. Refer to pages 24-25.
-
Ensure ISOGO latches are secured into stowage location.
-
Select the desired recline angle (1, 2 or 3).
NOTE: Never use position 4 for foward-facing.
-
Place restraint on back seat of vehicle in line with a top tether strap anchorage point.
-
Thread the vehicle seat belt through the back of the seat through the YELLOW forward-facing belt path.
-
Place one hand on seat and firmly press the child restraint down into the vehicle seat and pull on seatbelt to remove slack.
-
Attach the top tether strap to the anchorage point. Adjust until all the slack is removed. Ensure Base of seat is not lifted.
NOTE: If the car seatbelt is not long enough to secure the child restraint, DO NOT USE SEAT BELT EXTENDERS.

natural_image
Close-up of a black car seat with yellow directional arrows indicating motion (no text or symbols)


natural_image
Interior view of a car seatbelt buckle with a hand inserting a cable (no text or symbols visible)NOTE: There is an option to install seat using seat belt with accessory locking clip. Please see instructions provided with locking clip for installation.
Rearward Facing Installation Using ISOGO
NEWBORN UP TO 30 MONTHS, APPROX.
- Remove ISOGO latches from stowage bag location.

natural_image
Close-up of a black motorcycle seat with yellow cable and belt securing a yellow cable (no text or symbols visible)- Seat seat to position 4 (full recline) for rearward-facing.

natural_image
Close-up of a black car comfort seat with attached blue buttons and a yellow magnified inset showing the seat area (no text or symbols visible)- Place restraint facing rearwards on back seat of vehicle in line with a top tether strap anchorage point.

natural_image
Interior view of a car seatbelt with mesh cushion and textured grip (no visible text or symbols)Front of vehicle
- Locate low anchorage points. You can find this by looking for the ISOFIX logo located on the vehicle seat.

natural_image
Close-up of a car seatbelt with a magnified inset showing a car's license plate (no text or symbols on the main subject)- Attach the lower connector on both sides. Listen for a "click!"

tip: You can move the car seat out of the way to locate and attach the connectors, then place back into position before tightening.
Rearward Facing Installation Using ISOGO
NEWBORN UP TO 30 MONTHS, APPROX.
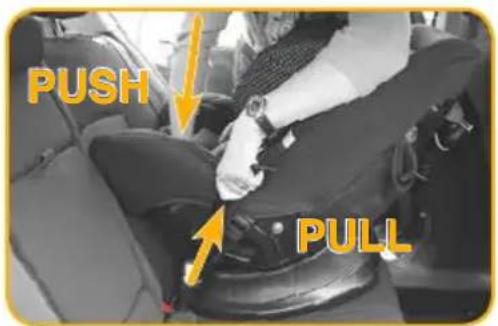
- Firmly push child restraint down into the vehicle seat whilst pulling on the ISOGO straps.
- Alternate removing the slack from side to side until you get a firm fitment and achieve a majority GREEN indication.
Front of vehicle
tip: Always check for GREEN at eye level.
Pull loose end parallel to the belt strap.
CHECK FOR GREEN ONCE CHILD IS SEATED AS THIS CAN CREATE ADDITIONAL SLACK IN SEAT. REMOVE EXCESS SLACK AS NEEDED.

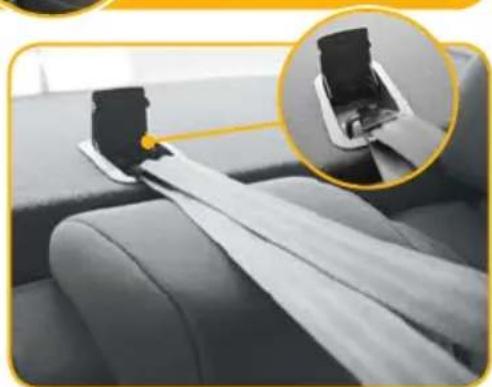
- Attach the top tether strap to the top anchorage point in the vehicle.
- Ensure there are no twists in the belt, and adjust until all slack is removed from top tether.
natural_image
Interior view of a car seatbelt buckle with a hand inserting a cable to the seat (no text or symbols visible)IMPORTANT
Do not attach the lower attachment connectors of two separate child restraints to the same ISOFIX low anchorages in your car.
Always attach the top tether strap to the child restraint upper anchorage in your car. Refer to your owner's manual.
Child restraint lower attachment connectors and the ISOFIX low anchorages in your car are designed to withstand only those loads imposed by a correctly fitted child restraint.

WARNING
DO NOT LEAVE CHILDREN UNATTENDED IN THE CAR.
Forward Facing Installation Using ISOGO TODDLER (12 MONTHS, APPROX) UP TO 4 YEARS
- Remove ISOGO latches from stowage bag location.
- Select the desired recline angle (1, 2 or 3).
NOTE: Never use position 4 for forward-facing.
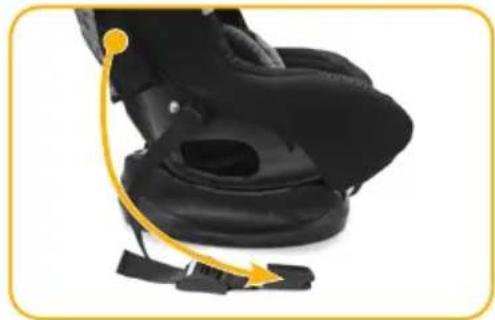
- Place restraint on back seat of vehicle in line with a top tether strap anchorage point.
natural_image
Close-up of a black car seat with yellow cable and orange connector (no text or symbols visible)
Front of vehicle

natural_image
Interior view of a car showing a car seat, rear seats, and dashboard (no visible text or symbols)- Locate low anchorage points. You can find this by looking for the ISOFIX logo located on the vehicle seat.

natural_image
Close-up of a car seatbelt being adjusted with a tool, showing the wheel and seat area (no text or symbols visible)- Attach the lower connector on both sides. Listen for a "click!"

natural_image
Close-up of a car seatbelt buckle with red clamps, no visible text or symbolstip: You can move the car seat out of the way to locate and attach the connectors, then place back into position before tightening.
Forward Facing Installation Using ISOGO TODDLER (12 MONTHS, APPROX) UP TO 4 YEARS
- Firmly push child restraint down into the vehicle seat whilst pulling on the ISOGO straps.
- Alternate removing the slack from side to side until you get a firm fitment and achieve a majority GREEN indication.
tip: Always check for GREEN at eye level.

Front of vehicle
Pull loose end parallel to the belt strap.
CHECK FOR GREEN ONCE CHILD IS SEATED AS THIS CAN CREATE ADDITIONAL SLACK IN SEAT. REMOVE EXCESS SLACK AS NEEDED.
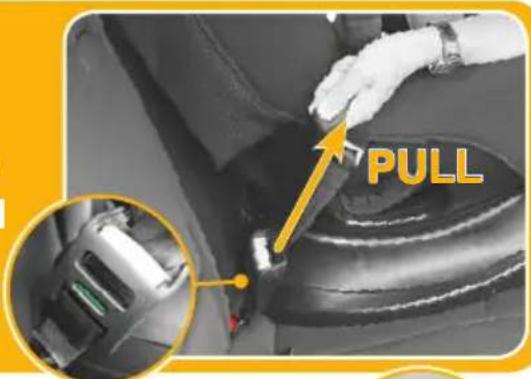
- Attach the top tether strap to the top anchorage point in the vehicle.
- Ensure there are no twists in the belt, and adjust until all slack is removed from top tether.

natural_image
Close-up of a car seatbelt buckle with a magnified inset showing the cable attachment (no text or symbols visible)IMPORTANT
Do not attach the lower attachment connectors of two separate child restraints to the same ISOFIX low anchorages in your car.
Always attach the top tether strap to the child restraint upper anchorage in your car. Refer to your owner's manual.
Child restraint lower attachment connectors and the ISOFIX low anchorages in your car are designed to withstand only those loads imposed by a correctly fitted child restraint.

WARNING
DO NOT LEAVE CHILDREN UNATTENDED IN THE CAR.

natural_image
Line drawing of a car seatbelt with no text or symbolsOption 1: HARNESSED FORWARD-FACING CAR SEAT
To be used only in a forward-facing position by a child whose shoulders are above the lower shoulder height marker (approximately 6 months of age) until the child's shoulders reach the upper shoulder height marker (approximately 8 years of age).

natural_image
Line drawing of a mechanical component or bracket (no text or symbols)Option 2: BOOSTER SEAT
To be used with a lap-sash seatbelt by a child whose shoulders are above the lower shoulder height marker (approximately 4 years of age) until the child's shoulders reach the upper shoulder height marker (approximately 6 to 8 years of age). Can also be used with child harness that is approved for use with this booster seat.

natural_image
Illustration of a car comfort seat with black and gray sections (no text or symbols)Option 3: LARGER BOOSTER SEAT
To be used with a lap-sash seatbelt by a child whose shoulders are above the lower shoulder height marker (approximately 4 years of age) until the child's shoulders reach the upper shoulder height marker (approximately 8 to 10 years of age). Can also be used with child harness that is approved for use with this booster seat.
for more information, visit
www.safety1st.com.au
Care and Maintenance

natural_image
Close-up of a black mechanical buckle with a red square marking on the side (no text or symbols visible)Follow the manufacturer's instructions at all times. Before removal, ensure you have carefully noted the way which the various parts are attached to the seat so as to facilitate reassembly.
Your child car seat is equipped with a buckle designed to give your child maximum protection during proper use (Figure 1). When working properly, your buckle should always fasten with an audible 'CLICK'.

natural_image
Black baby car seat with black mesh backrest and yellow measurement tape, labeled '1a' (no text or symbols on device)If sticky liquids (such as baby food, fruit juice, etc.) get into the buckle it may become sluggish and you will not hear a 'CLICK'.

natural_image
Close-up of a black automotive helmet with red adjustment knob and yellow arrow indicating rotation (no text or symbols)REMOVING BUCKLE:
-
Set seat in position 4 (full recline) (Figure 1a).
-
Lay seat on its back to access crotch adjustment (Figure 1b).
-
Using a flat object (such as a flat-head screw-driver, not included) gently lift one end of the Metal Plate to loosen (Figure 1c), repeat on the other side.
-
Push the metal plates through the top opening to release crotch buckle for cleaning (Figure 1d).

natural_image
Close-up of a red robotic car interior with a tool inserted, showing no visible text or symbols.
natural_image
Hand holding a black hard drive buckle with red square button (no text or symbols visible)
natural_image
Illustration of a hand holding a tool with a red square marker, no text or symbols presentCLEANING BUCKLE:
- Place the buckle unit under running water (40 degrees Celsius), (Figure 2). Let the water flow through the mouth of the buckle for one minute.
- Simultaneously latch and unlatch the tongues into the buckle several times until a strong audible click is heard (Figure 2a).
- If you still cannot hear a strong audible click after latching the buckle several times. Repeat steps above.
• DO NOT oil any part of the buckle. - Allow buckle to completely dry.


natural_image
Close-up of a mechanical component with a red square marking, showing internal structure and mounting holes (no text or symbols)REFITTING BUCKLE:
- Refit crotch buckle ensuring RED button is facing out (Figure 2b).
- Place the two metal plates back through openings.
- Pull up on each side of the crotch straps firmly to snap the metal plates back into place (Figure 2c).

natural_image
Top-down view of a red and black toy car with visible side brackets and wheels (no text or symbols)- If the buckle does not return to original working order, contact Dorel Australia Customer Service on 1300 809 526.
- If you are a New Zealand customer, please contact IGC Dorel New Zealand Customer Service on 0800 628 000.
Care and Maintenance
- Seat trim may be removed for cleaning. Don't forget to remove the instruction manual.
• Machine washable on lukewarm setting - delicate cycle.
• Tumble dry 10-15 minutes on low heat. - Do not dry clean.
• All other surfaces should be cleaned with a mild soap and water. - Never clean with bleach or spirit-type cleaners.
- Do not use the restraint without the cover.
- Check the webbing for fraying.

TO REMOVE SEAT TRIM:
- Loosen the harness by pressing down on centre front adjuster.
- Turn seat around and undo shoulder straps from the splitter plate (Figure 3a).
- Pull straps through the cover.
- Undo the buckle and remove the seat trim.
NOTE: Never wash air protect cells.

natural_image
Close-up of a mechanical component with two yellow arrows pointing to features, no visible text or symbolsTO REPLACE SEAT TRIM:
- Pull the seat trim on the seat.
- Feed the shoulder straps through the harness slots, over the top of the metal bar (Figure 3b).
- Attach the shoulder straps to the splitter plate.
FEED STRAPS OVER BAR
NOTE: ENSURE HARNESS IS NOT TWISTED
Take extra care to be sure the harness is reinstalled correctly and the shoulder straps are of equal height through both the trim and the harness slots of the seat.
Care and Maintenance

natural_image
Close-up of a black safety car seat with 'air' and 'Safety®' branding, showing seatbelt and seat padding (no text beyond branding)TO REMOVE HEADREST TRIM
To remove the headrest trim, simply undo the velcro at back of the headrest and pull the trim forward.
TO REPLACE HEADREST TRIM
Fit headrest trim to seat by pulling the trim over the headrest and push back into place, securing velcro at back. Ensure the harness straps are pulled to front.
natural_image
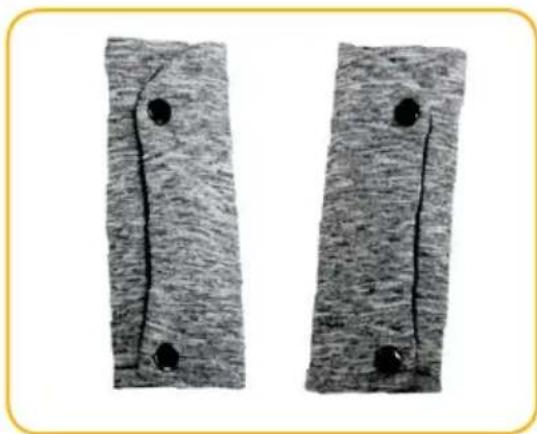
Two rectangular panels with black circular holes and a central vertical line, no text or symbols present.TO REMOVE BELT MATES
To remove the belt mates, simply undo press studs and unwrap from harness straps.
TO REPLACE BELT MATES
Fit belt mates to harness straps by wrapping around straps and closing press studs.

natural_image
Top-down view of a black and gray baby seatbelt device (no text or symbols visible)TO REMOVE SEAT INSERT
To remove the seat insert, undo the buckle and pull the insert out.
TO REPLACE SEAT INSERT
Feed the buckle through the opening slot in the seat insert and fasten buckle assembly.

WARNINGS
VERY IMPORTANT:
Only replace the cover with a manufacturer's supplied replacement cover with identical shoulder height markers or a replacement cover meeting AS/NZS 8005.
Guarantee
Dorel Australia Pty Ltd warrants your new product to be free from defects in materials and workmanship for 6 years on the seat & 3 years on the trim, from the date of purchase, provided that the product is used in accordance with accompanying recommendations or instructions where provided. The benefit of this warranty is in addition to your rights under the Australian Consumer Law and to other rights and remedies of the consumer under a law in relation to the goods or services to which the warranty relates.
Dorel Australia Pty Ltd will provide you with your choice of a refund, repair, or exchange (where possible) for this product if it becomes defective within the warranty period. Dorel Australia Pty Ltd will bear the reasonable expense of claiming the warranty. This warranty will no longer apply where the defect is a result of alteration, accident, misuse, abuse, or neglect.
Please retain your receipt as proof of purchase and contact our Customer Service team on Ph: 1300 809 526 or alternatively, via our website at www.dorel.com.au for any difficulties with your product. Warranty claims and claims for expense incurred in returning this product can be addressed to our Consumer Service team at 655-685 Somerville Road, Sunshine West, VIC, 3020. Hours: 8:30 am to 5:00 pm, Monday to Friday.
For New Zealand please contact Customer Service Centre, 14 Sir William Avenue, East Tamaki, Auckland, 2013. Auckland: (09) 2741040 NZ wide: 0800 628 000 (Toll Free). Hours: 8:00 am - 5:00 pm, Monday to Friday.
Our goods come with guarantees that cannot be excluded under the Australian Consumer Law. You are entitled to a replacement or refund for a major failure and compensation for any other reasonably foreseeable loss or damage. You are also entitled to have the goods repaired or replaced if the goods fail to be of acceptable quality and the failure does not amount to a major failure.
IMPORTANT: KEEP THIS INSTRUCTION MANUAL IN THE POCKET PROVIDED ON THE HEADREST.

Australian Standard
AS/NZS 1754 Lic 40071
SAI Global
safety1st.com.au
DOREL AUSTRALIA PTY LTD
655-685 Somerville Road
Sunshine West Victoria 3020
Email: customerservice@dorel.com.au
Phone: 1300 809 526
Hours: 8:30 am - 5:00 pm
Monday to Friday
IGC DOREL NEW ZEALAND LTD
14 Sir William Avenue
East Tamaki Auckland 2013
Email: customerservice@igc.co.nz
Phone: 0800 628 000 (toll free)
Hours: 8:00 am - 5:00 pm
Monday to Friday


- Safety
- QUICK START INSTALLATION
- REARWARD-FACING USING SEATBELT
- FORWARD-FACING USING SEATBELT
- REARWARD-FACING USING ISOGO
- ATTACH TOP TETHER STRAP
- FORWARD-FACING USING ISOGO
- CONTENTS
- VEHICLE INFORMATION
- INSTALLATION
- CARE & MAINTENANCE
- BEFORE YOU START:
- NEED ASSISTANCE?
- WARNINGS
- GENERAL
- Correct Rearward-Facing Vehicle Position
- Vehicle Seat Location Requirements
- WARNING
- Correct Forward-Facing Vehicle Position
- NOTE:
- CORRECT
- INCORRECT
- Upper Anchorage Fitting Installation
- FOR CARS FITTED WITH A CHILD RESTRAINT UPPER ANCHORAGE POINT
- FOR CARS NOT FITTED WITH A CHILD RESTRAINT UPPER ANCHORAGE POINT
- For sedans only
- For vehicles other than sedans
- Seat Angle
- Transition Period From Infant To Toddler Use
- MARKER A: OLDER CHILD
- Upper Shoulder Height Marker
- MARKER B: YOUNG TODDLER
- MARKER C: NEWBORN
- Middle Shoulder Height Marker
- Lower Shoulder Height Marker
- Transition Period From Infant To Toddler Use (cont'd)
- NOTE :
- Preparing Infant Seat To Fit Your Child
- CONFIGURING THE HARNESS STRAPS FOR CORRECT CHILD FITMENT
- REARWARD-FACING
- FORWARD-FACING
- Preparing Infant Seat To Fit Your Child (cont'd)
- ADJUSTING HEADREST AND HARNESS HEIGHT
- NOTES:
- ADJUSTING SEAT RECLINE
- TO FASTEN BUCKLE ASSEMBLY
- Preparing Infant Seat To Fit Your Car
- TO ADJUST TOP TETHER STRAP:
- TO LOOSEN:
- TO TIGHTEN:
- Rearward-Facing Installation Using Seatbelt
- Forward-Facing Installation Using Seatbelt
- Rearward Facing Installation Using ISOGO
- IMPORTANT
- Forward Facing Installation Using ISOGO TODDLER (12 MONTHS, APPROX) UP TO 4 YEARS
- Option 1: HARNESSED FORWARD-FACING CAR SEAT
- Option 2: BOOSTER SEAT
- Option 3: LARGER BOOSTER SEAT
- Care and Maintenance
- REMOVING BUCKLE:
- CLEANING BUCKLE:
- REFITTING BUCKLE:
- TO REMOVE SEAT TRIM:
- TO REPLACE SEAT TRIM:
- NOTE: ENSURE HARNESS IS NOT TWISTED
- TO REMOVE HEADREST TRIM
- TO REPLACE HEADREST TRIM
- TO REMOVE BELT MATES
- TO REPLACE BELT MATES
- TO REMOVE SEAT INSERT
- TO REPLACE SEAT INSERT
- VERY IMPORTANT:
- Guarantee
- safety1st.com.au
Marque : SAFETY 1ST
Modèle : Summit ISO 30
Catégorie : Siège auto