CR0232W - Réfrigérateur Emerson - Notice d'utilisation et mode d'emploi gratuit
Retrouvez gratuitement la notice de l'appareil CR0232W Emerson au format PDF.


| Marque | Emerson |
| Modèle | CR0232W |
| Type de produit | Radio réveil |
| Dimensions (L x H x P) | 15 x 10 x 5 cm |
| Poids | 0.5 kg |
| Alimentation | Secteur 230 V, 50 Hz |
| Consommation électrique | 5 W |
| Bandes radio | AM / FM |
| Affichage | LED numérique |
| Fonctions principales | Radio, alarme, snooze, veilleuse |
| Réglage de l'alarme | Progressif ou tonalité fixe |
| Graduation du volume | Oui, molette |
| Antenne | Antenne filaire FM |
| Bouton Snooze | Oui, 9 minutes |
| Prise casque | Jack 3,5 mm |
| Mémoire de sauvegarde | Pile de secours (non incluse) |
| Entretien et nettoyage | Nettoyer avec un chiffon doux et sec |
| Sécurité | Ne pas exposer à l'humidité |
| Pièces détachées et réparabilité | Contacter le service client |
FOIRE AUX QUESTIONS - CR0232W Emerson
Questions des utilisateurs sur CR0232W Emerson
0 question sur cet appareil. Repondez a celles que vous connaissez ou posez la votre.
Poser une nouvelle question sur cet appareil
Téléchargez la notice de votre Réfrigérateur au format PDF gratuitement ! Retrouvez votre notice CR0232W - Emerson et reprennez votre appareil électronique en main. Sur cette page sont publiés tous les documents nécessaires à l'utilisation de votre appareil CR0232W de la marque Emerson.
MODE D'EMPLOI CR0232W Emerson

Emerson™
DOUBLE DOOR COMPACT REFRIDGERATOR / FREEZER
OWNER'S MANUAL
CR0232W
Visit our web site at 'www.emersonradio.com'
UNAUTHORIZED MODIFICATIONS TO THIS DEVICE COULD VOID MANUFACTURER'S WARRANTY.
IMPORTANT SAFETY INSTRUCTIONS
Please follow the precautions below for your new refrigerator:
- This refrigerator must be properly installed and located in accordance with the Installation Instructions before it is used.
- Do not allow children to climb, stand or hang on the shelves in the refrigerator. They could damage the refrigerator and seriously injure themselves.
- Do not store or use gasoline or other flammable vapors and liquids in the vicinity of this or any other appliance.
- Keep fingers out of the clearances between the doors and cabinet. Be careful closing doors when children are in the area.
- Unplug the refrigerator before cleaning and making repairs.
- We strongly recommend that any servicing be performed by a qualified individual.
- Turning the temperature control dial to the "OFF" position stops cooling but does not shut off power to the refrigerator.
- Do not leave refrigerator in extreme cold or warm temperatures.
- Do not place refrigerator near heat sources or open flames.
- Clean the refrigerator with a soft, damp cloth. Remove stains with a mild soap. Do not clean the unit with industrial grade solvents, or abrasive chemicals.
- Do not place heavy items on top of the refrigerator.
- Never install the refrigerator where there is a lot of moisture and water can splash.
- Do not allow children to hang on the doors; the refrigerator may be tipped over and hurt children.
- Never eat spoiled food stored too long in the refrigerator or in an out-of-order refrigerator.
- Do not use sharp tools inside the refrigerator - for example - to remove ice as damage may occur.
- Unplug and remove food from the refrigerator if not used for a long period of time.
- Caution: flammable refrigerant used! When handing, moving and use of the refrigerator, make sure to avoid either damaging the refrigerant tubing, or increasing the risk of a leak.
- The refrigerant isobutene (R600a) is contained within the refrigerant circuit of the appliance, a natural gas with a high level of environmental compatibility, which is nevertheless flammable. During transportation and installation of the appliance, ensure that none of the components of the refrigerant circuit becomes damaged. The refrigerant (R600a) is flammable.
PROPER DISPOSAL
An empty refrigerator is an extremely dangerous attraction to children. If you are getting rid of your old refrigerator, please follow the instructions in the Child Entrapment Warning.
CHILD ENTRAPMENT WARNING:
Risk of child entrapment. Before you throw away your old refrigerator or freezer:
- Take off the doors.
- Leave the shelves in place so that children may not easily climb inside.
CAUTION: USE OF AN EXTENSION CORD IS NOT RECOMMENDED.
FOR HOUSEHOLD USE ONLY SAVE THESE INSTRUCTIONS
GROUNDING INSTRUCTIONS
This appliance must be grounded. In the event of an electrical short circuit, grounding reduces the risk of electric shock by providing an escape wire for the electric current. This appliance is equipped with a cord having a grounding wire with a grounding plug. The plug must be inserted into an outlet that is properly installed and grounded.
WARNING:
Improper use of the grounding plug can result in a risk of electric shock. Consult a qualified electrician or service person if the grounding instructions are not completely understood, or if doubt exists as to whether the appliance is properly grounded. If it is necessary to use an extension cord, use only a three wire extension cord that has a three blade grounding plug, and a three slot receptacle that will accept the plug on the appliance. The marked rating of the extension cord should be equal to or greater than the electrical rating of the appliance.
INSTALLATION
1. Steady, flat location:
If the refrigerator is not leveled during installation, the doors may not close or seal properly, causing cooling, frost, or moisture problems. It is very important for the refrigerator to be level in order to function properly.
To level your refrigerator, you may either turn the level leg clockwise to raise that side to the refrigerator or turn counter-clockwise to lower that side. Having someone push against the top of the refrigerator will take some weight off the leveling leg. This makes it easier to adjust the leveling leg.
- Ventilation: Place refrigerator approximately 5 inches from the wall to ensure proper airflow to the compressor. Do not place refrigerator near any heat resources such as a heater or stove as it will put a strain on the compressor.
3. Power supply:
- Check your local power source. This refrigerator requires a 115V, 60Hz power supply.
- Use a receptacle that will accept the ground prong. The power cord of this appliance is equipped with a 3-prong (grounding) plug which mates with a standard 3-prong (grounding) wall outlet to minimize the possibility of electric shock hazard from this appliance.
(a) Longer cord sets or extension cords are available and may be used if care is exercised in their use. (b) If a long cord or extension cord is used, (1) the marked electrical rating of the cord set or extension cord should be at least as great as the electrical rating of the appliance, (2) the extension cord must be a grounding-type 3-wire cord, and (3) the longer cord should be arranged so that it will not drape over the counter top or table top where it can be pulled on by children or tripped over unintentionally.
NOTES:
The refrigerator should always be plugged into its own individual electrical outlet which has a voltage rating that matches the rating plate.
If you have only a standard 2-prong wall outlet, it is your personal responsibility and obligation to have it replaced with a properly grounded 3-prong wall outlet.
Never unplug your refrigerator by pulling on the power cord. Always grip plug firmly and pull straight out from the outlet.
When using a 3-pronged plug
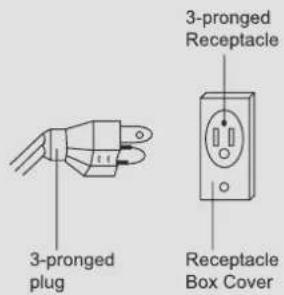
When using a grounding adapter, make sure the receptacle box is fully grounded.

LOCATION OF CONTROLS
DOOR CLOSED

- Freezer Door
- The Handle
- Refrigerator Door
- Leveling Feet
LOCATION OF CONTROLS (CONTINUED)
DOOR OPEN

- Freezer Compartment
- Thermostat Control Knob
- Light Bulb
- Shelf
- Half Size Shelf
- Crisper Drawer
- Frozen Food Storage
- Can Storage
- Can Dispenser
- Bottle Storage
OPERATION
USING THE THERMOSTAT
| Temp Control | The thermostat control knob for the refrigerator and freezer is located at the upper right hand corner of the refrigerator compartment.The first time you turn the unit on, adjust the thermostat control knob to “4” and give your refrigerator time to cool down completely before adding food; a full 24 hours is recommended.After it is fully cooled, test it and adjust towards “1” to make less cool or towards “7” to cool more to best suit your needs. However, the setting of “4” should be appropriate for home or office refrigerator use.NOTE:Turning the control knob to the “OFF” position will stop the cooling cycle. | |
| Thermostat control dial |  | |
DEFROSTING
| Temp Control | Refrigerator compartment: Defrosting process is automatic; melted frost flows into drip tray and automatically evaporates.Freezer compartment: Defrosting for the freezer must be performed manually.1. Turn the thermostat knob to the “OFF” position and leave the freezer door open.2. Remove all food and ice cube tray or transfer to refrigerator compartment.3. Place towel under compact refrigerator or move refrigerator outdoors where no water damage can occur.4. Clean and wipe out the melted frost with a cloth.NOTE: To avoid damaging the freezer compartment wall, do not use any sharp objects to remove the frost or to separate the frozen food. | |
| Thermostat control dial | 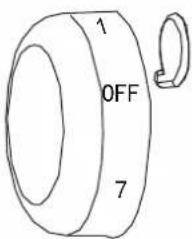 | |
OPERATION (CONTINUED)
REPLACING THE LIGHT BULB
 | 1. Unplug refrigerator or disconnect refrigerator from power supply before you remove the light bulb.2. Unscrew the middle parts of the thermostat holder assembly, marked by the arrows in the diagram.3. Pull the light bulb cover (thermostat holder assembly) outward to remove it.4. Unscrew the light bulb.5. Replace with a 15-watt 115V appliance bulb only. (Not all bulbs will fit your refrigerator. Be sure to replace the bulb with the same screw Type E-12 and shape. The T6 can be used.)6. Plug in refrigerator or reconnect refrigerator to power supply. |
OPERATION (CONTINUED)
REVERSING THE DOOR POSITION
CAUTION:
To avoid to injury yourself and/or property, we recommend someone assist you during the door reversal process.
- Ensure the Appliance is unplugged and empty.
- Adjust the two leveling feet to their highest position.
• We recommend you have someone to assist you.
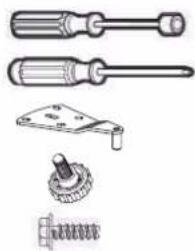
TOOLS REQUIRED
- 8mm socket screw driver
• Phillips style screw driver - Upper Hinge Bracket
- Adjustable Leveling Foot
- Machine Screw
natural_image
Illustration of various screwdriver and mechanical components (no text or labels)NOTE:
To take the door off it is necessary to tilt the Appliance backward. You should rest the Appliance on something solid, e.g. a chair just below the top panel.
DO NOT lay the Appliance completely flat as this may damage the coolant system.
- Bottom Hinge Bracket
- Middle door Hinge
- Self-locking block left
- Self-locking block right

natural_image
Technical line drawings of mechanical clamping components (no text or symbols)1

Open the upper hinge cover, remove the screws, and take out the upper hinge.
Remove the upper freezing door and remove the right door shaft self-locking block.
Remove the screw hole plug on the left side of the box and install it on the right side.
Remove the middle hinge screws and take out the middle hinge.
Remove the screw hole plug on the left side of the box and install it on the right side.
Remove the refrigeration door and remove the right door shaft self-locking block.
Remove the lower hinge screws and take out the lower hinge.
Unscrew the hinge shaft counterclockwise.
OPERATION (CONTINUED)
2

Turn the lower hinge over and install the hinge shaft clockwise.
Install the lower hinge onto the left side of the box and tighten the screws.
Install the self-locking block of the left door shaft onto the left side of the door body and tighten the screws, then install the hinge shaft hole of the door body into the lower hinge shaft.
Rotate the middle hinge, insert the hinge shaft into the hinge hole of the door body, and fix it on the middle beam with screws.
Install the self-locking block of the left door shaft onto the left side of the door body and tighten the screws, then install the hinge shaft hole of the door body into the middle hinge shaft.
Insert the upper hinge shaft into the door shaft hole and secure it to the box with screws, then cover the hinge cover.
TROUBLE SHOOTING GUIDE
The refrigerator will not operate
• The power supply cord is unplugged.
- The thermostat knob is set to the "OFF" position.
• A household fuse or circuit breaker has tripped.
The light does not work
• The power supply cord is unplugged.
• A household fuse or circuit breaker has tripped.
• The light bulb is loose in the socket.
• The light bulb has burned out.
Food in the refrigerator compartment is freezing
• The thermostat knob is set too cold.
• The position of food stored touches the refrigerator back wall.
Food in the refrigerator compartment is not cold
• The door is opened too often or not closed properly.
- A large amount of food has just been added to the refrigerator or freezer compartment.
• The position of thermostat knob is adjusted too low.
The refrigerator seems to make unusual noise
• The refrigerator is not leveled on the floor.
• The body of the refrigerator touches a wall.
• The drip tray is not placed properly.
There is interior moisture build-up
• The door is opened too often or not closed properly.
• The room is humid.
• The food is not packaged correctly.
The door will not close completely
- Food packages are keeping the door from closing properly.
• The shelves are out of position.
• The gaskets are dirty.
• The refrigerator is not level.
TECHNICAL SPECIFICATION
| Unit Dimension (WxDxH) (inches) | 17.5 x 19.3 x 31.5 |
| Power Supply | AC115V 60Hz |
| Current | 1.1A |
| Power consumption per year | 322 kwh |
LIMITED WARRANTY
Emerson Radio Corp. warrants this product to be free from manufacturing defects in original material, including original parts, and workmanship under normal home use and conditions ("manufacturing defect") for a period of one (1) year from date of original purchase in, and if used in the United States. Should service be necessary under this warranty, Emerson will provide the following at our Return Repair Facility provided the manufacturing defect is verified along with the date of purchase:
* Repair service for one (1) year from date of original purchase at no charge for labor and parts.
To Receive Authorization to Return a Defective Item, please contact Emerson Customer Service at 1-800-898-9020. Have your Model number, Serial Number and dated Proof of Purchase with you when you call.
In the event the product must be returned to Emerson:
* Pack the unit in a well-padded heavy corrugated box. Please insure the item is well padded to avoid damage while in transit back to our facility. If the item incurs damage, it will NOT be replaced and the consumer will be responsible for return freight costs to receive their same unit back.
* Enclose your check or money order payable to Emerson Radio in the amount of \$15 to cover return shipping and handling costs.
* Enclose a note with your name, address, phone number, Return Authorization number and brief reason for returning the unit.
* Enclose a copy of your proof of purchase (warranty service will not be provided without dated proof of purchase).
* Ship the unit prepaid via UPS or parcel post (SHIP INSURED and obtain a tracking number).
NOTE: This warranty does not cover:
(a) Damage to equipment not properly connected to the product.
(b) Cost incurred in the shipping of the product to and from Emerson's Return Facility.
(c) Damage or improper operation of unit caused by customer abuse, misuse, negligence or failure to follow operating instructions (including cleaning instructions) provided with the product.
(d) Ordinary adjustments to the product which can be performed by customer as outlined in the owner's manual.
(e) Products not purchased in the United States.
(f) Damage to product if used outside the United States.
THIS WARRANTY IS NON-TRANSFERABLE AND APPLIES ONLY TO THE ORIGINAL PURCHASER AND DOES NOT EXTEND TO SUBSEQUENT OWNERS OF THE PRODUCT. ANY APPLICABLE IMPLIED WARRANTIES, INCLUDING THE WARRANTY OF MERCHANTABILITY, ARE LIMITED IN DURATION TO A PERIOD OF THE EXPRESSED WARRANTY AS PROVIDED HEREIN BEGINNING WITH THE DATE OF ORIGINAL PURCHASE AT RETAIL AND NO WARRANTIES, WHETHER EXPRESSED OR IMPLIED, SHALL APPLY TO THE PRODUCT THEREAFTER. EMERSON MAKES NO WARRANTY AS TO THE FITNESS OF THE PRODUCT FOR ANY PARTICULAR PURPOSE OR USE.
THE EXTENT OF EMERSON RADIO CORP'S LIABILITY UNDER THIS LIMITED WARRANTY IS THE REPAIR OR REPLACEMENT PROVIDED ABOVE AND, IN NO EVENT, SHALL EMERSON RADIO CORP'S LIABILITY EXCEED THE PURCHASE PRICE PAID BY THE PURCHASER OF THE PRODUCT. UNDER NO CIRCUMSTANCES SHALL EMERSON RADIO CORP. BE LIABLE FOR ANY LOSS, DIRECT, INDIRECT, INCIDENTAL, SPECIAL, OR CONSEQUENTIAL DAMAGE ARISING OUT OF OR IN CONNECTION WITH THE USE OF THIS PRODUCT. THIS WARRANTY IS VALID ONLY IN THE UNITED STATES OF AMERICA.
THIS WARRANTY GIVES YOU SPECIFIC LEGAL RIGHTS. HOWEVER, YOU MAY HAVE OTHER RIGHTS WHICH MAY VARY FROM STATE TO STATE. SOME STATES DO NOT ALLOW LIMITATIONS ON IMPLIED WARRANTIES OR EXCLUSION OF CONSEQUENTIAL DAMAGE, THEREFORE THESE RESTRICTIONS MAY NOT APPLY TO YOU.
15-01-1402
The serial number can be found on the back cabinet. We suggest that you record the serial number of your unit in the space below for future reference.
Model Number: CR0232W
Serial Number:
Emerson™
SERVICE
FOR ADDITIONAL SET-UP OR OPERATING ASSISTANCE
PLEASE CALL:
1-800-898-9020
FOR CUSTOMER SERVICE, PLEASE E-MAIL TO:
internet@emersonradio.com
OR WRITE TO:
Emerson Radio Corp.
Consumer Affairs Dept.
959 ute 46 East
Suite 210, 2 ^nd Floor
Parsippany, NJ 07054
Emerson™
EMERSON
Part No.:CR0232W-20230615-01
Printed in China
- Emerson™
- DOUBLE DOOR COMPACT REFRIDGERATOR / FREEZER
- IMPORTANT SAFETY INSTRUCTIONS
- PROPER DISPOSAL
- CHILD ENTRAPMENT WARNING:
- FOR HOUSEHOLD USE ONLY SAVE THESE INSTRUCTIONS
- GROUNDING INSTRUCTIONS
- WARNING:
- INSTALLATION
- Steady, flat location:
- Power supply:
- NOTES:
- LOCATION OF CONTROLS
- LOCATION OF CONTROLS (CONTINUED)
- DOOR OPEN
- OPERATION
- USING THE THERMOSTAT
- DEFROSTING
- OPERATION (CONTINUED)
- REPLACING THE LIGHT BULB
- REVERSING THE DOOR POSITION
- CAUTION:
- TOOLS REQUIRED
- NOTE:
- TROUBLE SHOOTING GUIDE
- The refrigerator will not operate
- The light does not work
- Food in the refrigerator compartment is freezing
- Food in the refrigerator compartment is not cold
- The refrigerator seems to make unusual noise
- There is interior moisture build-up
- The door will not close completely
- LIMITED WARRANTY
Marque : Emerson
Modèle : CR0232W
Catégorie : Réfrigérateur