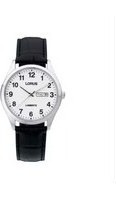
RJ647AX9 - Montre Lorus - Notice d'utilisation et mode d'emploi gratuit
Retrouvez gratuitement la notice de l'appareil RJ647AX9 Lorus au format PDF.


| Type de produit | Montre-bracelet à affichage analogique |
| Marque | Lorus |
| Modèle | RJ647AX9 |
| Mouvement | Quartz à pile |
| Alimentation | Pile bouton (type SR626SW ou équivalent) |
| Dimensions du boîtier | Environ 40 mm de diamètre, 10 mm d'épaisseur |
| Bracelet | En métal ou cuir selon version |
| Poids | Environ 80 g |
| Étanchéité | Résiste aux éclaboussures (3 ATM) |
| Fonctions principales | Heures, minutes, secondes, date (guichet à 3 heures) |
| Verre | Minéral |
| Matière du boîtier | Acier inoxydable |
| Entretien et nettoyage | Nettoyer avec un chiffon doux et sec. Éviter les produits chimiques. |
| Sécurité | Ne pas exposer à des températures extrêmes ni à des champs magnétiques puissants. |
| Pièces détachées et réparabilité | Remplacement de pile par un horloger professionnel. Bracelet adaptable. |
| Informations générales | Montre Lorus fiable et élégante pour un usage quotidien. |
FOIRE AUX QUESTIONS - RJ647AX9 Lorus
Questions des utilisateurs sur RJ647AX9 Lorus
0 question sur cet appareil. Repondez a celles que vous connaissez ou posez la votre.
Poser une nouvelle question sur cet appareil
Téléchargez la notice de votre Montre au format PDF gratuitement ! Retrouvez votre notice RJ647AX9 - Lorus et reprennez votre appareil électronique en main. Sur cette page sont publiés tous les documents nécessaires à l'utilisation de votre appareil RJ647AX9 de la marque Lorus.
MODE D'EMPLOI RJ647AX9 Lorus
NREAQ1
12-2011
Instruction Manual

LORUS
ANALOGUE QUARTZ

LORUS
■HOW TO USE NON-CALENDAR MODEL
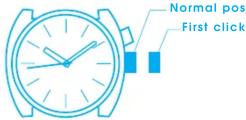
Pull the crown OUT to the FIRST click and set the time. Then push the crown IN.
Note: When you set the time, first set the minute hand to a properly advanced time, then return the minute hand to the correct time by turning it COUNTERCLOCKWISE.
■HOW TO USE DAY/DATE MODEL
The day of the week can be displayed bilingually (English/another language) and you can select either.
1. How to set the day and date

i □ →

(

Pull out the crown to the first click position. (The crown of this watch can be pulled out to the second click position.)
Turn the crown and set the previous day and date. (The day and date can be selected alternatively and displayed in English or the other language.) (For Cal. PC33, turn clockwise to set the date only.)
Pull out the crown to the second click position and set the present day and date by turning the minute hand.
Day setting for Cal. PC33
At the second click position, turn the hands clockwise and counterclockwise repeatedly between 11:15 pm and 3:45 am to select the desired day and language.
Note: Do not attempt to set the day and date between the times of 9:00 pm and 4:00 am as this may cause the day and date displays to change out of sequence.
2. How to set the time

11

■

Pull out the crown to the second click position and the second hand stops. The second hand should be stopped on 12 o'clock position.
Turn the crown and set the desired time.
Push the crown in to the normal position in accordance with a time signal.
- Be sure to check that the AM/PM is correctly set. (The day and date are designed to change once every 24 hours.)
• To adjust the correct time for a quartz watch, it is necessary to advance the minute hand 4 or 5 minutes ahead of the correct time and then turn it counterclockwise to set the designated time.
LUMIBRITE WATCH
*If your watch is a LORUS LUMIBRITE watch, it has following features.
LORUS LUMIBRITE watches absorb and store light energy from natural and artificial light sources and emit light in the dark. They are made of environmentally friendly material, and therefore, are harmless to human beings and the environment.
- With a
BATTERY CHANGE
As the battery is inserted at the factory to check the function and performance of the watch, its actual life once in your possession may be less than the specified period.
Be sure to replace the battery to prevent any possible malfunction as soon as it runs down. To replace the battery, we recommend taking the watch to a local watch retailer.
CARE OF YOUR LORUS WATCH
- BATTERY

CAUTION
Do not expose the old battery to fire or recharge it. Keep it at a place beyond the reach of children. If a child swallows it, consult a doctor immediately.
- WATER RESISTANT
| Indication on the dial/case back | Condition of use | Accidental contact with water such as splashes and rain | Swimming and taking a shower | Skin diving | Scuba diving |
| No Indication | NO | NO | NO | NO | |
| WATER RESISTANT | YES | NO NO | NO | ||
| WATER RESISTANT*(50M/5 BAR) | YES | YES NO | NO | ||
| WATER RESISTANT*(100M/10 BAR)or above | YES | YES YES | NO |
* If your watch is 200 M/20 BAR, 100 M/10 BAR or 50 M/5 BAR water resistant, it is so indicated on the dial/case back.
- Do not press the buttons or turn the crown when the watch is wet.
- If the watch is exposed to salt water, rinse it in fresh water and then wipe it thoroughly dry.
Caution:
Leather straps are not water resistant except so indicated, even if the watch head is water resistant.
• ALLERGIC REACTION
Because the case and band touch the skin directly, it is important to clean them regularly. If not, shirt sleeves may be stained and those with delicate skin may develop a rash. Please wear the watch with some play to avoid any possible allergic reaction. If you develop a rash on your wrist, stop wearing and consult a physician.
• MAGNETISM
Your watch will be adversely affected by strong magnetism. Keep it away from close contact with magnetic objects.
• SHOCKS AND VIBRATIONS
Your watch may be worn for normal sports activities, but be careful not to drop it or hit it on hard surfaces.
• TEMPERATURE
Your watch is preadjusted so that constant accuracy may be insured at normal temperature.
SERVICE
When your LORUS watch requires repair or sevicing, please see the enclosed WARRANTY/GUARANTEE.
■HOW TO ADJUST BAND LENGTH
Sliding clasp band


-
Pry up the adjusting flap with a small screwdriver or something with a sharpened tip.
-
Slide the clasp to adjust it to a desired size.
- The grooves on the Back side of the bracelet should fit into the convex portion on the clasp, then, close the adjust flap.
●Wrong method
If you do this way, the adjusting flap may be destroyed.

- ■HOW TO USE NON-CALENDAR MODEL
- ■HOW TO USE DAY/DATE MODEL
- How to set the day and date
- Day setting for Cal. PC33
- How to set the time
- LUMIBRITE WATCH
- BATTERY CHANGE
- CARE OF YOUR LORUS WATCH
- CAUTION
- Caution:
- • ALLERGIC REACTION
- • MAGNETISM
- • SHOCKS AND VIBRATIONS
- • TEMPERATURE
- SERVICE
- ■HOW TO ADJUST BAND LENGTH
- ●Wrong method
Marque : Lorus
Modèle : RJ647AX9
Catégorie : Montre