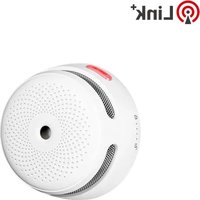
XS01-WR - Détecteur de fumée X-Sense - Notice d'utilisation et mode d'emploi gratuit
Retrouvez gratuitement la notice de l'appareil XS01-WR X-Sense au format PDF.


| Type de produit | Détecteur de fumée |
| Marque | X-Sense |
| Modèle | XS01-WR |
| Dimensions (approx.) | 10 cm x 10 cm x 4 cm |
| Poids (approx.) | 150 g |
| Alimentation | Pile 9V (incluse) |
| Fonctions principales | Détection de fumée, alarme sonore ≥85 dB, bouton test/silence, témoin lumineux |
| Type de capteur | Photodlectrique |
| Portée de détection | Environ 40 m² |
| Durée de vie de la pile | Environ 1 an |
| Entretien et nettoyage | Nettoyer avec un chiffon sec et doux ; aspirer doucement les ouvertures |
| Installation | Fixation au plafond avec vis et chevilles fournies |
| Température de fonctionnement | 0°C à 40°C |
| Humidité de fonctionnement | 10% à 90% HR |
| Certifications | CE, EN14604 |
| Garantie | 10 ans (détecteur) |
| Pièces détachées et réparabilité | Pile 9V remplaçable ; pas de pièces détachées disponibles |
| Informations générales | Détecteur de fumée autonome pour usage domestique |
FOIRE AUX QUESTIONS - XS01-WR X-Sense
Questions des utilisateurs sur XS01-WR X-Sense
0 question sur cet appareil. Repondez a celles que vous connaissez ou posez la votre.
Poser une nouvelle question sur cet appareil
Téléchargez la notice de votre Détecteur de fumée au format PDF gratuitement ! Retrouvez votre notice XS01-WR - X-Sense et reprennez votre appareil électronique en main. Sur cette page sont publiés tous les documents nécessaires à l'utilisation de votre appareil XS01-WR de la marque X-Sense.
MODE D'EMPLOI XS01-WR X-Sense


X-Sense Innovations Co., Ltd.
Email: support@x-sense.com

www.36016.com
X-SENSE®
Link +

User Manual
Wireless Interlinked Smoke Alarm
XS01-WR
This user manual contains important information regarding the operation of your X-Sense smoke alarm. Ensure you read this user manual fully before installing and operating the alarm. If you are installing this smoke alarm for use by others, you must leave this manual (or a copy of it) with the end user.
Package Contents

1 x Alarm Unit

1 × Mounting Bracket

2 × Screws

2 × Anchor Plugs

1 × User Manual
Safety Information
IMPORTANT
- DANGERS, WARNINGS, AND CAUTIONS ALERT YOU TO IMPORTANT OPERATING INSTRUCTIONS OR TO POTENTIALLY HAZARDOUS SITUATIONS. PAY SPECIAL ATTENTION TO THESE SITUATIONS.
- THIS ALARM IS NOT INTENDED TO ALERT HEARING IMPAIRED INDIVIDUALS. THE USE OF ALCOHOL OR DRUGS MAY ALSO IMPAIR ONE'S ABILITY TO HEAR THE SMOKE ALARM.
- FIRES IN CHIMNEYS, WALLS, ROOFS, DIFFERENT LEVELS OR BEHIND CLOSED DOORS MIGHT NOT BE DETECTED.
- THIS DEVICE DOES NOT DETECT FLAMES, HEAT, CARBON MONOXIDE OR OTHER HAZARDOUS GASES.
WARNING
- NEVER IGNORE ANY ALARM. FAILURE TO RESPOND CAN RESULT IN SERIOUS INJURY OR DEATH.
- THE SILENCE FEATURE IS ONLY FOR YOUR CONVENIENCE AND WILL NOT CORRECT A PROBLEM. ALWAYS CHECK YOUR HOME FOR A POTENTIAL PROBLEM AFTER ANY ALARM. FAILURE TO DO SO CAN RESULT IN INJURY OR DEATH.
- TEST THIS SMOKE ALARM ONCE A WEEK. IF THE ALARM EVER FAILS TO TEST CORRECTLY, REPLACE IT IMMEDIATELY! IF THE ALARM CANNOT WORK
PROPERLY, IT WILL NOT ALERT YOU TO A PROBLEM.
How to Set up and Interconnect Wireless Alarms
All X-Sense Link + wireless interlinked alarms contain a built-in RF module that enables you to wirelessly connect 2 or more interlinked alarms and create an interlinked network. When one unit is triggered, all interconnected alarms will sound. The X-Sense Link + series contain wireless interlinked smoke alarms, wireless interlinked carbon monoxide alarms, and wireless interlinked combination smoke and carbon monoxide alarms. This model is designed to be wirelessly interlinked with other X-Sense Link + alarms, but is not designed to communicate with wireless interlinked alarms from other manufacturers.
The X-Sense Link ® wireless interlinked alarms in one multi-pack have already been interconnected, and the alarms in each multi-pack have their own independent interlinked network. If you have more than one multi-pack, you will need to connect them all to the same network. Choose one multi-pack as your base network and connect the other multi-packs to it.
NOTE! The following instructions regarding wireless interconnection are applicable to the X-Sense Link + wireless interlinked alarms only.
How to Interconnect
- Make sure you only work with 2 units at a time, and make sure that they are both turned on to ensure successful connection.
NOTE: To turn on XS01-WR, remove the battery insulating film from the battery compartment. To learn how to turn on different models of wireless interlinked alarms, please refer to their specific user manual for more details.
- Quickly press the test/silence button on one of the 2 units 4 times; it will beep once and the red LED will flash slowly, indicating it has entered pairing mode and is waiting for a new unit to be added. Quickly press the test/silence button on the other unit twice; it will beep once and the red LED will flash rapidly, indicating it is searching for a device to connect to.
- After the search is successful and an interconnected group is created, both units will beep once and automatically exit the interconnection mode. At this point, both units will only flash once 60 seconds, indicating they are in normal standby mode.
- If you want to connect a third alarm to this group, first activate a new device according to its operating instructions and then quickly press the test/silence button on either of the 2 previously interconnected units 4 times. This unit will beep once, and the red LED will flash slowly, indicating it is ready to add a new device to the network. Next, quickly press the test/silence button on the new unit twice, and the red LED will flash rapidly as it searches for a network to connect to. After the third unit successfully joins the interconnected network, both units will beep once and automatically exit the interconnection mode.
- If you want to connect more units, simply repeat step 4. Up to 24 alarms can be interconnected this way. To ensure that all alarms enter the same interlinked network, make sure you only work with 2 units at a time one
unit enters the pairing mode and the other unit enters the searching mode.
- Test the alarms according to the steps in the section "Alarm Test."

NOTES
-
The alarm will enter the searching mode or the pairing mode for 60 seconds, during which the red LED light flashes. After 60 seconds, repeat step 2 to connect the alarms. If needed, press the test/silence button once while the alarm is in the searching mode or the pairing mode, and the red LED will stop flashing and the alarm will quit the pairing mode to enter normal status.
-
Test all wireless alarms to ensure they are interconnected before installation.
- A maximum of 24 wireless alarms can be interconnected on the same network.
- The model can only be interconnected with other X-Sense Link + wireless interlinked alarms.
How to Add X-Sense Link 1 Wireless Interlinked Alarms to the X-Sense XS01-WR Network
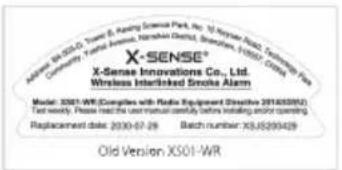
The XS01-WR model has 2 versions: the old version, XS01-WR, and the new version, X-Sense Link + XS01-WR, which have different interconnection methods. The new version belongs to the X-Sense Link + series and there is a "Link" icon on the label on the back of the unit. Check whether the "Link" icon is on the label to distinguish between these 2 versions.

NOTES:
-
The following instructions for wireless interconnection are only applicable to the old version of the X-Sense XS01-WR wireless interlinked smoke alarms, not the X-Sense Link + wireless interlinked alarms.
-
If you have purchased the old version of the XS01-WR alarms, you can add X-Sense Link ® wireless interlinked alarms into the existing XS01-WR interconnected network.
-
To ensure that an X-Sense Link® wireless interlinked alarm successfully connects to an X-Sense XS01-WR network, choose one of the previously interconnected XS01-WR smoke alarms, remove it from the mounting bracket, and keep this alarm at least 33 ft (10 m) away from the other alarms in the existing network.
- Turn on one X-Sense Link 1 wireless interlinked alarm according to its operating instructions. Quickly press its test/silence button twice; the alarm will beep once, and the LED will flash red rapidly as it searches for a network to connect to. Next, quickly press the test/silence button 4 times on the XS01-WR alarm that was removed from the mounting bracket; it will beep once and the LED will flash red rapidly, indicating it is ready to add a new device to the network.
- After the two units successfully pair, both units will beep once and automatically exit the interconnection mode. At this point, the X-Sense Link ® alarm has also joined the existing XS01-WR network. Both units will only flash once per minute, indicating they are in normal standby mode.
- If you want to connect more X-Sense Link + wireless interlinked alarms, simply repeat step 1-2. Up to 24 alarms can be interconnected this way. To ensure that all alarms enter the same interlinked network, make sure you add X-Sense Link + wireless interlinked alarms one at a time.
- Test the alarms according to the steps in the section "Alarm Test".

How to Disconnect
Quickly press the test/silence button 4 times; the smoke alarm will beep once. Then, hold down the button until it beeps once more to disconnect. After disconnecting, it can be reconnected to the same network, or added to a new network.
NOTE: The X-Sense Link + wireless interlinked alarms in one multi-pack have already been interconnected. To create a new network, you will first need to disconnect each alarm individually in this multi-pack to avoid having them all join the same network.
Alarm Test
Be sure to test your smoke alarms when you turn them on for the first time, or when the group configuration has changed. In addition to the weekly tests you should perform, it is recommended to test the alarm after returning from a long trip or vacation.
If your X-Sense Link' XS01-WR is interconnected to other wireless smoke alarms, we recommend that every individual smoke alarm is tested during the weekly test.
| Test a single alarm | Test all interconnected smoke alarms | |
| Action | Press the test/silence button. | Hold down the test/silence button. |
| Indication | The alarm will sound 3 short quick beeps.The red LED will flash once every second during the audible signal.After testing, the alarm will automatically enter standby mode. | The initiating smoke alarm will beep continuously with the red LED flashing.Other interconnected smoke alarms in the network will receive the signal after 5 seconds, and they will beep continuously with the red LED flashing. Release the test/silence button and all the smoke alarms will stop testing.The alarm testing should be completed within 3 minutes.After testing, the alarm will automatically enter standby mode. |
NOTE: The test function accurately tests the alarm's smoke sensing circuit without the need to test with smoke. If your smoke alarm fails to give an audible test signal, please refer immediately to the troubleshooting guide at the end of this manual. Never use an open flame to test this device.
Installation Positioning
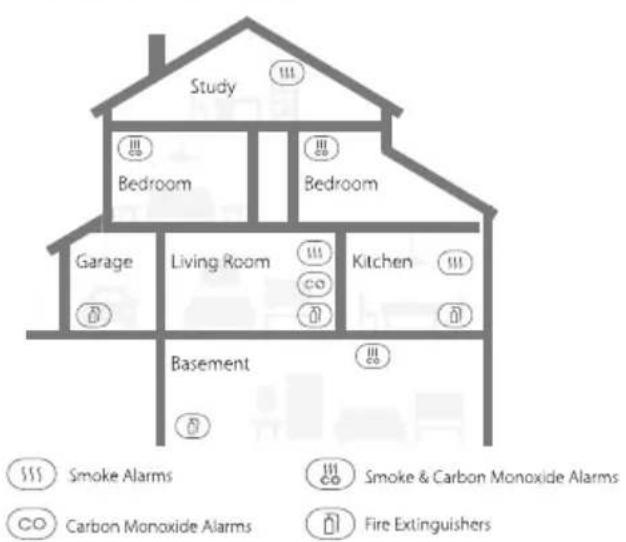
NOTE: If a smoke alarm is installed in a kitchen, ensure it has an accessible silence button, and install it as far away from the stove and sink as possible to avoid false alarms.
- Prioritize the installation of an alarm in the bedroom and walkways, and make sure you can hear the alarm from all sleeping areas. In a home with several bedrooms, install an alarm in every bedroom. If you install only one smoke alarm in your home, install the alarm near to all bedrooms where possible, and not in a basement or furnace room.
- Install an alarm above the stairway and on every floor of the house.
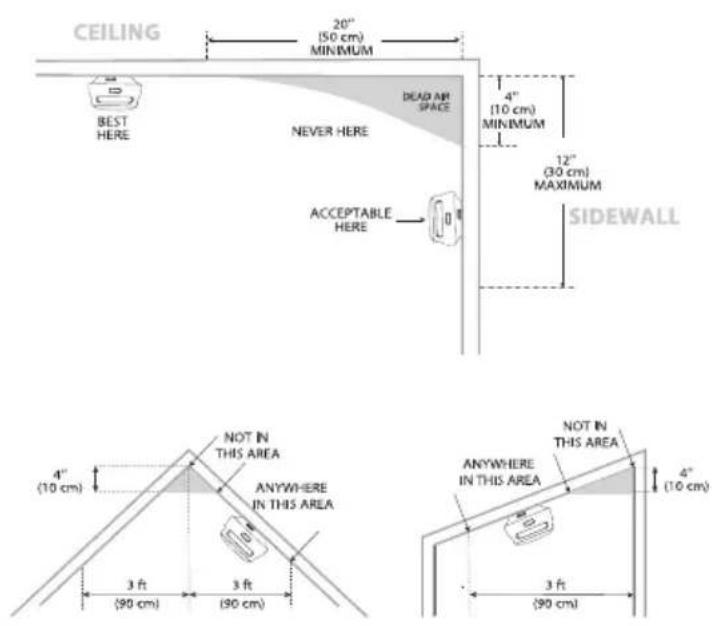
- Smoke, heat and anything burning will spread horizontally after rising to the ceiling, so install the alarm in the middle of the ceiling where possible. Ensure that the alarm is installed at the minimum distance away from corner.
- If an alarm cannot be installed in the middle of a ceiling, install it at a distance of 20 inches (50 cm) away from the corners of the room.
- If an alarm is installed onto a wall, a distance of 4-12 inches (10-30 cm) should be kept below the ceiling.
- If the length of a room or hall is beyond 30 feet (900 cm), several alarms should be installed in the same room.
- When the wall or ceiling is angled, the alarm needs to be installed within 3 feet (90 cm) of the highest wall or ceiling point (measured horizontally) in the room.
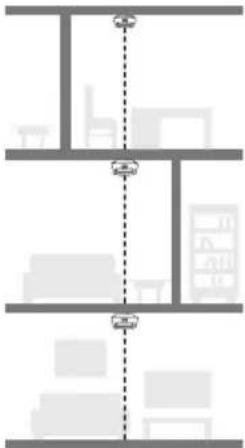
- In multi-level houses or apartments, install at least one wireless smoke alarm on each level and keep them installed in a straight vertical line (see diagram) with as few obstacles between each of the interconnected alarms as possible to ensure optimal signal transmission.
Locations to Avoid
- Near large metal surfaces and/or bundles of wire.
- Near fluorescent lights, amateur radios, electrical equipment, or other devices that may transmit an RF signal, as electronic "noise" may cause nuisance alarms.
WARNING
- THIS ALARM SHOULD BE INSTALLED BY A COMPETENT PERSON.
- ALARMS SHOULD NOT BE USED AS A SUBSTITUTE FOR PROPER INSTALLATION, USE AND MAINTENANCE OF FUEL BURNING APPLIANCES INCLUDING APPROPRIATE VENTILATION AND EXHAUST SYSTEMS.
Installation Method
NOTE: Before installation, it is recommended to test the interconnected smoke alarms in different rooms where you intend to install these alarms to ensure that they are within the transmission range.
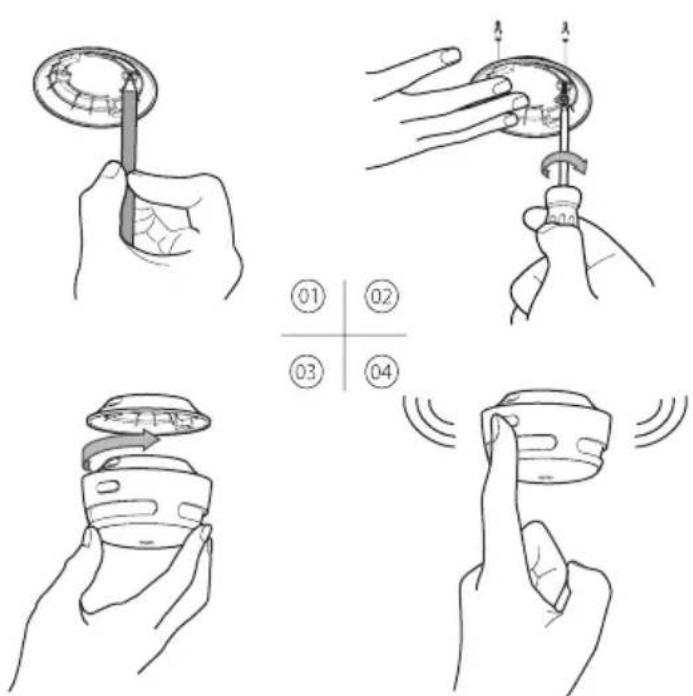
- Use the mounting bracket to mark the screw holes on the ceiling or the wall.
- Drill holes at the 2 marks using an appropriately-sized drill bit. Insert the anchor plugs and screw the mounting bracket using the screws provided.
- Attach the alarm to the mounting bracket and turn clockwise to lock the alarm.
- Test the smoke alarm according to the steps in the section "Alarm Test".
Battery Replacement
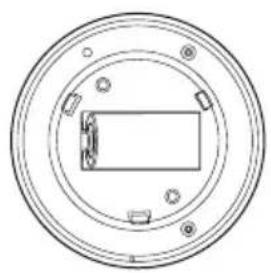
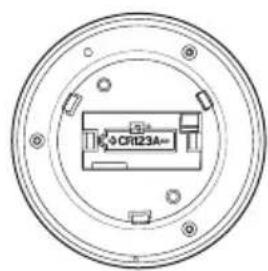
- To replace the battery, detach the smoke alarm from the mounting bracket by twisting counterclockwise.
- Pull the battery removal tab to remove the battery, and then install a new battery, matching the correct polarity markings.
- Test the alarm, and then mount the alarm onto the mounting bracket by twisting clockwise to lock the alarm.
LED Indicator and Audible Alarm
| Status | LED indicator | Audible alarm | Note | |
| Normal | Red LED flashes once every 60 seconds. | None | ||
| Alarm | Red LED flashes once every second. | Short quick beeps | All alarms in the interconnected network | |
| Test | Single Smoke Alarm | Red LED flashes once every second. | 3 short quick beeps | Press the test/silence button once. |
| All interconnected smoke alarms in the network | Red LED flashes once every second. | Continuous beeping until you release the test/silence button | Hold down the test/silence button. | |
| Silence Mode | Red LED flashes once every 5 seconds. | None | |
| Low Battery | Red LED flashes once every 60 seconds. | 1 beep every 60 seconds | Each alarm gives an independent warning. |
| Malfunction | Red LED flashes twice every 40 seconds. | 2 beeps every 40 seconds | Each alarm gives an independent warning. |
Silence Mode
If you press the silence button during an alarm state, the unit will be in the silence mode for 9 minutes. During the silence mode, the red LED will flash once every 5 seconds. The alarm will enter the normal mode after 9 minutes.
NOTES
-
You can silence all interconnected units by pressing the test/silence button on one of the smoke alarms. If one unit is still alarming, it is the initiating smoke alarm (the unit that detected the smoke); to silence all connected units, you must also press the test/silence button on the initiating smoke alarm.
-
While interconnected, the initiating smoke alarm cannot be triggered again during the 9-minute silence duration. However, all other interconnected alarms can be triggered again if they detect dangerous smoke levels during the silence mode.
Technical Specifications
| Power Supply | Replaceable 3 V CR123A lithium battery |
| Operating Life | 10 years |
| Battery Life | 5 years |
| Sensor Type | Photoelectric |
| Safety Standard | UL 217 |
| Standby Current | < 15 uA (avg.) |
| Alarm Current | < 150 mA (avg.) |
| Coverage Area | 215-430 ft 2 (20-40 m 2 ) |
| Best Operating Ambient Temperature | 40-100°F (4.4-37.8°C) |
| Operating Relative Humidity | ≤ 85% (non-condensing) |
| Alarm Loudness | ≥ 85 dB at 10 ft (3 m) @ 3.2 ± 0.3 kHz pulsing alarm |
| Silence Duration | About 9 minutes |
| Operating Frequency | 915 MHz |
| Maximum Number of Interconnected Units | 24 wireless units (only compatible with X-Sense wireless alarms) |
| Transmission Range | Over 820 ft (250 m) in open air |
NOTES
-
Battery life is calculated on the current ratings in the standby mode with weekly testings. If its operation mode changes to an alarming condition, the battery life will be decreased accordingly.
-
The smoke alarm functions between 40 and 100°F (4.4 and 37.8°C). Prolonged exposure to temperatures outside of this range can reduce battery life and affect accuracy. We do not recommend operating the device outside of this range.
Maintenance
To keep your smoke alarm in good working order, follow these simple steps:
- Verify the unit's alarm sound and indicator are working properly by testing the unit once a week.
- As a minimum your smoke alarm should be cleaned once every 3 months: Remove the unit from the ceiling and clean the alarm cover and vents with your vacuum cleaner fitted with the soft brush attachment to remove dust and dirt.
- Never use detergents or other solvents to clean the unit
- Avoid spraying air fresheners, hair spray or other aerosols near the alarm.
- Do not paint the unit. Paint will seal the vents and interfere with the sensor's ability to detect fire.
- Never attempt to disassemble the unit or clean inside. Doing so will void your warranty.
- When removed, place the smoke alarm back in its proper location as soon as possible, to assure continuous protection from fire.
- When household cleaning supplies or similar contaminants are used, the area should be ventilated.
Troubleshooting
| PROBLEM | SOLUTION |
| Your smoke alarm does not sound during testing. | Make sure you push the central test button firmly.Check the installation positioning. The wireless signal might be blocked or out of range. |
| False alarms triggered intermittently or when residents are cooking, taking showers, etc. | Check the location of your smoke alarm (see "Installation Positioning").Clean the smoke alarm (see "Maintenance"). |
| Red LED flashes and the alarm sounds one beep every 60 seconds. | The battery is low. Replace the battery immediately. |
| Red LED flashes and the alarm sounds two beeps every 40 seconds. | The alarm is malfunctioning. Please clean your smoke alarm and see if it is working normally. If not, replace the device immediately. |
FCC Statement
This equipment has been tested and found to comply with the limits for a Class B digital device, pursuant to Part 15 of the FCC Rules. These limits are designed to provide reasonable protection against harmful interference in a residential installation. This equipment generates uses and can radiate radio frequency energy and, if not installed and used in accordance with the instructions, may cause harmful interference to radio communications. However, there is no guarantee that interference will not occur in a particular installation. If this equipment does cause harmful interference to radio or television reception, which can be determined by turning the equipment off and on, the user is encouraged to try to correct the interference by one or more of the following measures:
- Reorient or relocate the receiving antenna.
- Increase the separation between the equipment and receiver.
- Connect the equipment into an outlet on a circuit different from that to which the receiver is connected.
- Consult the dealer or an experienced radio/TV technician for help.
This device complies with part 15 of the FCC Rules. Operation is subject to the following two conditions:
(1) This device may not cause harmful interference, and (2) this device must accept any interference received, including interference that may cause undesired operation.
Changes or modifications not expressly approved by the party responsible for compliance could void the user's authority to operate the equipment.
Environmental Protection
Waste electrical products should not be disposed of with household waste. Please recycle where facilities exist. Check with Local Authority or retailer for recycling advice.

Manufacturer and Service Information
X-Sense Innovations Co., Ltd.
Address: B4-503-D, Tower B, Kexing Science Park, No. 15 Keyuan Road, Technology Park Community, Yuehai Avenue, Nanshan District, Shenzhen, 518057, CHINA
Email: support@x-sense.com
- PACKAGE CONTENTS
- SAFETY INFORMATION
- IMPORTANT
- WARNING
- HOW TO SET UP AND INTERCONNECT WIRELESS ALARMS
- HOW TO INTERCONNECT
- NOTES
- HOW TO ADD X-SENSE LINK 1 WIRELESS INTERLINKED ALARMS TO THE X-SENSE XS01-WR NETWORK
- HOW TO DISCONNECT
- ALARM TEST
- LOCATIONS TO AVOID
- INSTALLATION METHOD
- BATTERY REPLACEMENT
- SILENCE MODE
- MAINTENANCE
- FCC STATEMENT
- ENVIRONMENTAL PROTECTION
- MANUFACTURER AND SERVICE INFORMATION
Marque : X-Sense
Modèle : XS01-WR
Catégorie : Détecteur de fumée