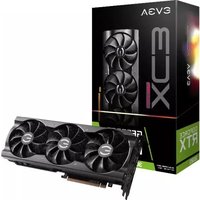
XC3 - Carte graphique EVGA - Notice d'utilisation et mode d'emploi gratuit
Retrouvez gratuitement la notice de l'appareil XC3 EVGA au format PDF.


| Type de produit | Carte graphique |
| Marque | EVGA |
| Modèle | XC3 |
| Processeur graphique | NVIDIA GeForce (selon variante) |
| Mémoire vidéo | GDDR6 (capacité selon variante) |
| Interface | PCI Express 4.0 |
| Dimensions | 285 mm x 112 mm x 45 mm (approx.) |
| Poids | Environ 1,2 kg |
| Alimentation recommandée | Alimentation 650W minimum |
| Connecteurs d'alimentation | 2 x 8 broches PCIe |
| Système de refroidissement | iCX3 avec ventilateurs à double roulement à billes |
| Sorties vidéo | 3 x DisplayPort 1.4a, 1 x HDMI 2.1 |
| Résolution maximale | 7680 x 4320 (8K) |
| Fonctions principales | Gaming, création de contenu, overclocking via Precision X1 |
| Garantie | 3 ans (extensible avec enregistrement) |
| Entretien et nettoyage | Dépoussiérage régulier avec air comprimé, éviter l'humidité |
| Sécurité | Débrancher l'alimentation avant manipulation, utiliser une bracelet antistatique |
| Pièces détachées | Ventilateurs, pâte thermique, câbles (contactez EVGA) |
| Compatibilité logicielle | Windows 10/11, Linux (pilotes NVIDIA) |
FOIRE AUX QUESTIONS - XC3 EVGA
Questions des utilisateurs sur XC3 EVGA
0 question sur cet appareil. Repondez a celles que vous connaissez ou posez la votre.
Poser une nouvelle question sur cet appareil
Téléchargez la notice de votre Carte graphique au format PDF gratuitement ! Retrouvez votre notice XC3 - EVGA et reprennez votre appareil électronique en main. Sur cette page sont publiés tous les documents nécessaires à l'utilisation de votre appareil XC3 de la marque EVGA.
MODE D'EMPLOI XC3 EVGA
EVGA
HYBRID
C O O L I N G
XC3
Installation Guide
The following instructions and pictures are provided to assist your installation of the EVGA XC3 Hybrid Cooling Kit to the EVGA GeForce RTX™ 3090 and 3080 graphics cards. Please be careful installing the Kit; there are several very small fasteners used that can be stripped if you are not careful.
Please be sure to keep your original shroud, heatsink, and screws so your card can be returned to its original condition in case you ever need to submit for warranty.
All steps include removing the original shroud, heatsink, and screws, and then replacing those with the included new shroud, heatsink, waterblock, and provided screws, with a few exceptions. The number of provided screws used will vary depending on whether the card uses a backplate. Several included accessories may include extras. EVGA recommends a Phillips #1 screwdriver for all screws.
All suitable P/N for HYBRID installation are listed below. Please refer to the following table.
Graphics Cards Part Number
| RTXTM 3090 XC3 ULTRA | 24G-P5-3975-KR |
| RTXTM 3090 XC3 | 24G-P5-3973-KR |
| RTXTM 3090 XC3 BLACK | 24G-P5-3971-KR |
| RTXTM 3080 XC3 ULTRA | 10G-P5-3885-KR |
| RTXTM 3080 XC3 | 10G-P5-3883-KR |
| RTXTM 3090 XC3 BLACK | 10G-P5-3881-KR |
Included Accessories:
1 EVGA HYBRID Shroud with VRM Heatsinks/Fan Bracket
2 GPU & Memory Baseplate
3 EVGA HYBRID Pump and Radiator
4 M2.5 x 6.9mm spring screws (GPU). 7 pcs. PN: BAA125069001
5 M2 x 8.5mm Backplate screws (BP). 10 pcs. PN: BAA120085039
6 Mylar washers for spring screws. 5 pcs. PN: BGD100000003
7 M2 x 5mm screws (PCB). 15pcs. PN: BAA120050054
8 Rubber plugs. 3 pcs. PN: BGB030007002
9 Tube Bracket. 1 pc. PN: BJD243038000
10 M2 x 7mm tube bracket screws. 2 pcs. PN: BAA120070024
11 Zip ties 4pcs and EVGA Cable ties 2pcs
12 8pcs screws and 8pcs washers to mount radiator
13 Thermal Grease 1 pack

Instructions:
- Remove the 8 BP screws circled in red and carefully remove the backplate (if present). Next, remove the 4 GPU screws circled in blue and remove the GPU bracket.
For RTX 3090 XC3 ULTRA and XC3 cards: Removing the backplate may require some force to loosen up the thermal pads. Make sure to place the thermal pads on the backplate as shown in the image below, as you will reuse the backplate and thermal pads.

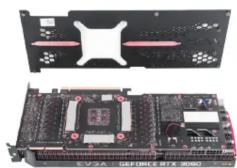
natural_image
Two electronic circuit boards showing internal components and a central processor (no visible text or symbols)-
Turn the card over and remove the heatsink from the card. Remove the fan connectors (blue, beige, and black) first, and then the LED connector (black) as you lift the heatsink off the card.
-
Remove the 3 screws on the I/O bracket and set them aside. You will reuse them later.
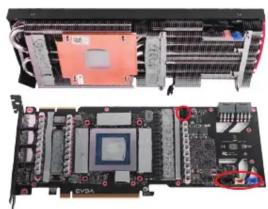
natural_image
Two views of a computer motherboard showing CPU socket, heatsink, and circuit board (no text or symbols visible)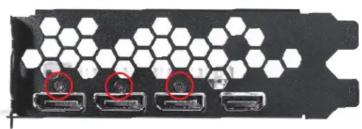
natural_image
Close-up of a black electronic device with hexagonal circuitry and three connected ports (no visible text or symbols)- Using a lint-free cloth and high-percentage isopropyl alcohol, carefully clean the GPU and remove any leftover thermal putty on the graphics card in the regions marked below. Try to replace any loose thermal pads back onto the original heatsink/cooler in case you need to restore the card to its original condition.

natural_image
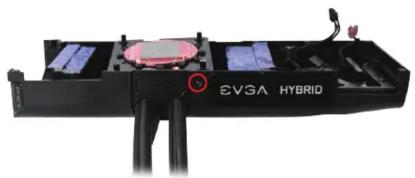
Close-up of a computer motherboard with visible CPU socket and drive slots (no text or symbols)- Set the card aside for now, and remove the shroud, pump/waterblock, and the tube bracket from the HYBRID kit. Place the pump in the notched locations in the shroud, then secure the tubing with the tube bracket. Use one tube bracket screw in the location marked below. Remove the plastic cover over the pump/waterblock before proceeding to the next step.
natural_image
Close-up of a black electronic device labeled 'SV3A HYBRID' with visible ports and cables (no readable text beyond label)
natural_image
Exploded view of a computer motherboard showing CPU socket, drive bays, and heatsink (no text or labels visible)-
Remove the GPU/Memory baseplate from the HYBRID kit and place it over the 4 mounting holes over the pump/waterblock as seen in the image below. At this time, remove any protective covering/tape over the thermal pads before moving to the next step.
-
At this time, you will install the PCB onto the HYBRID cooler. First, you will need to reconnect the fans and LED connector. Connect the LED connector first, then connect the beige and black fan connectors to their respective headers. The blue header will remain empty. Lastly, line up the screw holes and lower the PCB onto the HYBRID cooler.
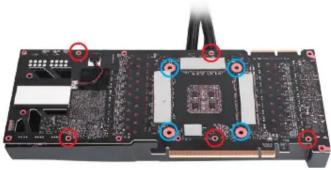
8a. For all models, except for the 3080 XC3 BLACK, place a paper washer under the 4 GPU screws, circled in blue, and fasten them loosely. Next, fasten the 5 PCB short screws, circled in red. Fully fasten the GPU screws at this time. Next, complete Step 8b., then skip to Step 9.
8b. Reinstall the I/O bracket and loosely fasten the 3 screws you removed earlier.
natural_image
Close-up of a circuit board with electronic components and connectors (no visible text or symbols)
8c. For the RTX 3080 XC3 BLACK, place a paper washer under the 4 GPU screws, circled in blue, and fasten them loosely. Next, fasten 11 short PCB short screws, circled in red. Fully fasten the GPU screws at this time. Lastly, fully fasten the 3 screws on the I/O bracket to complete this installation.
- For cards with a backplate, line up the screw holes and place the backplate on the card. Fasten the 6 BP screws, circled in red. Next, fasten the 3 screws on the I/O bracket. Lastly, install the rubber plugs into the holes designed for the NVIDIA support bracket, circled in blue.

natural_image
Close-up of a computer motherboard with visible circuitry and mounting points (no text or symbols)
Mounting the Radiator
- To mount the radiator, it is recommended that the radiator be installed at a level above the HYBRID graphics card. This will reduce pump noise and the potential to create an air bubble in the loop.
- The radiator will fit mounting holes designed for a 120mm x 120mm case fan, but the radiator will need a mounting area of 120mm x 240mm (approximately two 120mm case fans).
- The default setting for the HYBRID's radiator/fan is to blow through the radiator and outside the chassis. For that reason, we recommend installing the radiator at the top of the chassis. If you plan to mount the radiator at the front of the chassis, you may wish to consider moving the fans to the opposite side of the radiator before mounting.
- Make sure that you leave some slack in the tubing lines to prevent damage to the tubing or internal fittings. If the tubes are twisted too much or pulled too tightly, you may cause damage to the pump/radiator or cause the HYBRID kit to begin leaking.
- When ready, line-up the radiator with the mounting holes on the chassis. On the outside of the chassis use #12 washers and screws to fasten the radiator to the chassis.
Important Information
EVGA XC3 HYBRID Kit is an AIO Water Cooling System. You do not need to add any coolant, and the system is completely self-contained. EVGA XC3 HYBRID Kits have been leak-tested at the factory before shipping to customers.
EVGA XC3 HYBRID Kits are exclusive only to EVGA GeForce RTX 3090 and 3080 graphics cards and were not designed to fit on any other graphics cards.
Important Information
Your EVGA XC3 HYBRID Kit comes with a 1 (one) year warranty. Refer to your EVGA GeForce RTX™ 3090 or 3080 graphics card manufacturer's warranty information before installing the EVGA XC3 HYBRID Kit. Should you damage your EVGA GeForce RTX™ 3090 or 3080 during the installation process, EVGA will not be held responsible for any physical damage of your EVGA XC3 HYBRID Kit, case, motherboard or any associated hardware when damage is caused by improper installation.


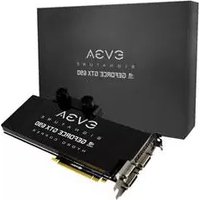
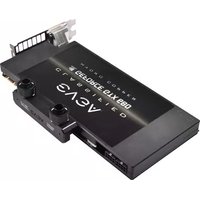
Marque : EVGA
Modèle : XC3
Catégorie : Carte graphique