
IAN 271531 - Trancheuse POWERFIX - Notice d'utilisation et mode d'emploi gratuit
Retrouvez gratuitement la notice de l'appareil IAN 271531 POWERFIX au format PDF.


| Type de produit | Trancheuse électrique |
| Marque | Powerfix |
| Modèle | IAN 271531 |
| Puissance | 150 W |
| Type de lame | Acier inoxydable dentelé |
| Diamètre de la lame | 170 mm |
| Épaisseur de coupe | Réglable de 0 à 15 mm |
| Dimensions (L × l × h) | Environ 35 × 25 × 20 cm |
| Poids | Environ 2,5 kg |
| Matériau du boîtier | Plastique ABS et acier inoxydable |
| Capacité max. de produit | Jusqu'à 15 cm de hauteur |
| Fonctions principales | Trancher viande, pain, légumes, fromage |
| Sécurité | Interrupteur marche/arrêt, blocage de sécurité |
| Pieds antidérapants | Oui |
| Accessoires inclus | Guide de coupe, support de produit, poussoir |
| Entretien et nettoyage | Lame amovible pour nettoyage, boîtier nettoyable avec chiffon humide |
| Pièces détachées et réparabilité | Lame de rechange disponible, réparable par centre agréé |
| Alimentation | 220-240 V ~ 50 Hz |
| Classe de protection | II (double isolation) |
FOIRE AUX QUESTIONS - IAN 271531 POWERFIX
Questions des utilisateurs sur IAN 271531 POWERFIX
0 question sur cet appareil. Repondez a celles que vous connaissez ou posez la votre.
Poser une nouvelle question sur cet appareil
Téléchargez la notice de votre Trancheuse au format PDF gratuitement ! Retrouvez votre notice IAN 271531 - POWERFIX et reprennez votre appareil électronique en main. Sur cette page sont publiés tous les documents nécessaires à l'utilisation de votre appareil IAN 271531 de la marque POWERFIX.
MODE D'EMPLOI IAN 271531 POWERFIX


natural_image
Illustration of hands using a tool to cut or apply a component (no text or symbols visible)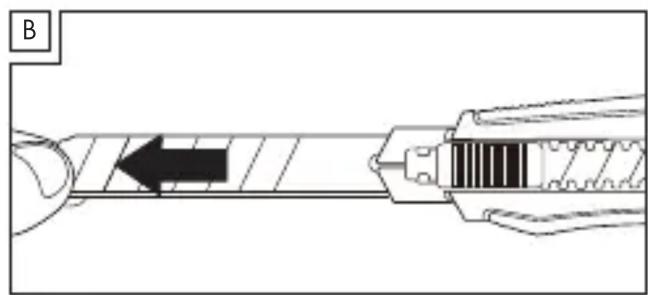
natural_image
Diagram of a mechanical or electrical component with directional arrow and internal structure (no text or symbols)
natural_image
Diagram of a mechanical component with internal grooves and mounting holes, showing directional arrow (no text or symbols)


natural_image
Illustration of hands using scissors to cut a piece of paper or tape (no text or symbols present)
natural_image
Technical line drawing of a mechanical assembly or tool (no text or symbols visible)GB IE
Method for easily replacing the blade
■ Push the switch 1 to the front and completely pull out the blade (Figure A and B)
■ Then pull the switch ^1 backwards until the end (Figure C)
■ And push the switch 1 forward again to connect the new blade (Figure D)
Method for refilling spare blades
■ Push the switch 1 to the front and pull out the blade completely. (Figure A and B)
■ Release the red button ^2 at the back (Figure E) and pull out the spare blade tray (Figure F)
Place the blade correctly in the blade tray (Figure G), then insert this blade tray back into the cutter.
Before inserting this tray, please ensure the switch ^1 is in the middle position (Figure H), then you can insert the spare blade tray into the full apparatus (Figure I)
Pull the switch ^1 backwards in order to connect to the new blade (Figure C). Now the cutter is ready for use.
Method for removing one section of the blade
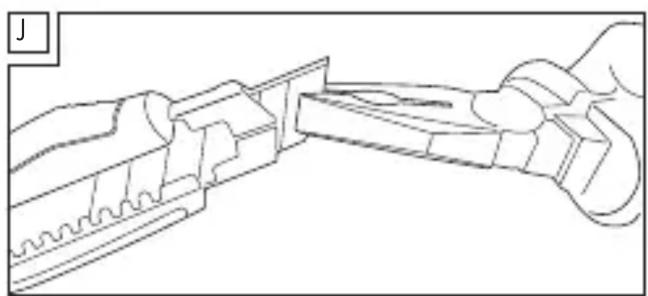
To remove the blade, you should have one section of the blade sticking out. Tools like pliers should firmly put the blade in place. Do not pull it towards yourself. (Figure J)
Warning :
* Please keep out of the reach of children.
*Caution: There is a risk of injury due to sharp blades.
*Wear protective gloves.
* Do not use the cutter/blade if it is defective.
*Place the blade after use back into its sheath after use.
* Dispose of the blades in a safe manner. Place them in a puncture resistant container.

IAN 271531 OWIM GmbH & Co. KG
Stiftsbergstraße 1
D-74167 Neckarsulm
Model No.: HG00239A
Version: 11/2015


Marque : POWERFIX
Modèle : IAN 271531
Catégorie : Trancheuse