
ST-16A - Support d'enceintes TOA - Notice d'utilisation et mode d'emploi gratuit
Retrouvez gratuitement la notice de l'appareil ST-16A TOA au format PDF.


| Type de produit | Support d'enceintes |
| Marque | TOA |
| Modèle | ST-16A |
| Matériau | Acier robuste avec revêtement noir |
| Dimensions (pliée) | Environ 100 x 30 x 10 cm |
| Hauteur réglable | De 120 à 200 cm |
| Capacité de charge maximale | 50 kg |
| Poids de l'appareil | 8,5 kg |
| Compatibilité | Enceintes TOA série H, F, et autres avec fixation standard |
| Type de montage | Pied déployable avec embouts antidérapants |
| Fonctions principales | Support vertical robuste pour enceintes de sonorisation |
| Sécurité | Verrouillage par goupille élastique, base large et anti-basculement |
| Entretien et nettoyage | Essuyer avec un chiffon humide, ne pas utiliser de solvants |
| Pièces d'origine | Embouts en caoutchouc et goupilles disponibles séparément |
| Réparabilité | Pièces détachées disponibles via service après-vente TOA |
| Couleur | Noir |
| Garantie | 2 ans (hors usage intensif) |
FOIRE AUX QUESTIONS - ST-16A TOA
Questions des utilisateurs sur ST-16A TOA
0 question sur cet appareil. Repondez a celles que vous connaissez ou posez la votre.
Poser une nouvelle question sur cet appareil
Téléchargez la notice de votre Support d'enceintes au format PDF gratuitement ! Retrouvez votre notice ST-16A - TOA et reprennez votre appareil électronique en main. Sur cette page sont publiés tous les documents nécessaires à l'utilisation de votre appareil ST-16A de la marque TOA.
MODE D'EMPLOI ST-16A TOA
1. SAFETY PRECAUTIONS
- Before installation or use, be sure to carefully read all the instructions in this section for correct and safe operation.
- Be sure to follow all the precautionary instructions in this section, which contain important warnings and/or cautions regarding safety.
• After reading, keep this manual handy for future reference.

WARNING
Indicates a potentially hazardous situation which, if mishandled, could result in death or serious personal injury.
- Do not mount the speaker of 7 kg or more. The stand or its internal pipe may fall down or drop, resulting in personal injury. Even though the speaker weight is below 7 kg, do not use that speaker if the stand is made unstable.
- Do not extend the internal pipe beyond the MAXIMUM point marked in red. Doing so may make the stand unstable, and cause the stand or its internal pipe to fall down or drop, resulting in personal injury.
- Avoid installing the stand in the following locations. Otherwise, the mounted speaker may drop or the stand may fall, resulting in personal injury.
- Doorway or other high traffic area where people may trip on the stand.
- Locations where the unit is exposed to a strong wind.
- Unstable locations, such as on a rickety table or a slanted surface.
Important: Even in locations other than the above, if the unit may fall down, take appropriate fall preventive measures.
- When adjusting the stand height with the speaker mounted, hold the speaker firmly. Doing otherwise may cause the stand to fall, resulting in personal injury and/or property damage.
- Fully expand the legs. If the legs are not fully expanded, the stand may fall down, resulting in personal injury.
2. HOW TO USE
Attach the bracket to the speaker
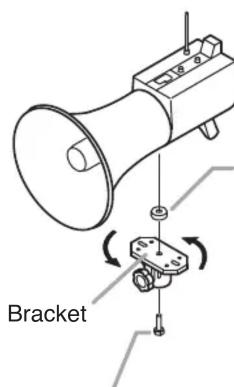
Step 1. Attach the bracket to the speaker as shown below.
Attachment to the horn speaker Attachment to the megaphone Attachment to the FGM speaker

Hexagon bolt
Insert the hexagon bolt into the hexagonal hole located inside the bracket and tighten the bolt to attach the bracket.
Hexagon bolt
Insert the hexagon bolt into the hexagonal hole located inside the bracket and tighten the bolt rotating the bracket in the direction of the arrow to secure the bracket.
If not used, the thread in the megaphone may be destroyed.
Do not use this spacer for the megaphones ER-2230W and WR-2930W.
Spacer
Be sure to use the spacer.
Note
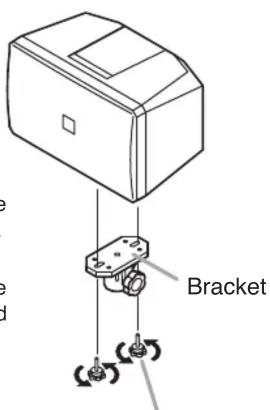
Speaker
mounting screw
Put up the stand
Step 2. Loosen the leg locking knob to fully expand the legs. Lowering the slide leg adjustment till it hits the stopper in the center of the external pipe permits maximum leg expansion.
Step 3. Tighten the leg locking knob to secure the legs.
Step 4. Loosen the internal pipe locking knob to raise the internal pipe to the desired height.
Step 5. Tighten the internal pipe locking knob to secure the pipe.
Mount the speaker on the stand
Step 6. Insert the bracket onto the top of the internal pipe, and mount the speaker on the stand.
Step 7. After determining the orientation of the speaker, secure the speaker by tightening the bracket fixing knob.
Note: After installation completion, ensure again that every knob is tightened.
Put away the stand after use
Step 8. After use, reverse the procedures 1 – 7 above to detach the speaker and fold the stand.
Note: Be sure to fold the stand after detaching the speaker from the stand.
[Storing mounting screws]
Speaker mounting screws for installing the FGM speakers can be stored by mounting them into the storage holes provided in the bracket.
Use these holes to prevent the loss of screws while putting away the equipment.

3. PART NAMES


Marque : TOA
Modèle : ST-16A
Catégorie : Support d'enceintes