
IAN 291542 - Joint d'isolation automatique pour porte POWERFIX - Notice d'utilisation et mode d'emploi gratuit
Retrouvez gratuitement la notice de l'appareil IAN 291542 POWERFIX au format PDF.


| Type de produit | Appareil électronique multiusage |
| Marque | Powerfix |
| Modèle | IAN 291542 |
| Dimensions (L x l x h) | 20 x 15 x 10 cm |
| Poids | 0,5 kg |
| Alimentation | Secteur 230 V ~ 50 Hz |
| Consommation électrique | 50 W |
| Matériau du boîtier | Plastique ABS |
| Couleur | Blanc et gris |
| Fonctions principales | Utilisation domestique, fonctionnement simple |
| Température de fonctionnement | 0 °C à 40 °C |
| Humidité admissible | 20 % à 80 % HR |
| Entretien et nettoyage | Nettoyer avec un chiffon doux et sec ; ne pas utiliser de produits abrasifs |
| Sécurité | Ne pas immerger dans l'eau ; débrancher avant nettoyage |
| Pièces détachées | Disponibles sur demande auprès du fabricant |
| Réparabilité | Réparation par un professionnel recommandée |
| Garantie | 2 ans |
| Pays d'origine | Chine |
| Informations générales | Modèle IAN 291542, compatible avec les prises européennes |
FOIRE AUX QUESTIONS - IAN 291542 POWERFIX
Questions des utilisateurs sur IAN 291542 POWERFIX
0 question sur cet appareil. Repondez a celles que vous connaissez ou posez la votre.
Poser une nouvelle question sur cet appareil
Téléchargez la notice de votre Joint d'isolation automatique pour porte au format PDF gratuitement ! Retrouvez votre notice IAN 291542 - POWERFIX et reprennez votre appareil électronique en main. Sur cette page sont publiés tous les documents nécessaires à l'utilisation de votre appareil IAN 291542 de la marque POWERFIX.
MODE D'EMPLOI IAN 291542 POWERFIX

DRAUGHTEXCLUDER
IAN 270107
HR RO BG


natural_image
Two-panel grayscale image showing a hand reaching toward a wall and a panel with texture, labeled 'J' (no text or symbols on the panels themselves)Draught Excluder
- Introduction

Congratulations on the purchase of your new product. You have selected a high
quality product. The instructions for installation and use are part of this
GB
product. Please read through all of these instructions and take note of the advice they contain before starting with assembly. These instructions contain important assembly and care information. Keep these instructions safe and also include them if you pass the product on to others.
- Technical Data
For gaps up to max. 14 mm
- Installation
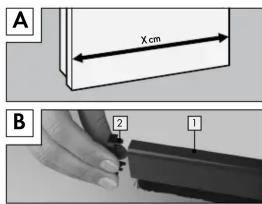
□ Measure door width (see Fig. A).
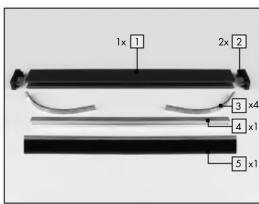
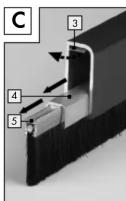
□ Remove end cap 2 and disassemble door sweep 1 (see Fig. B and C
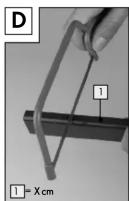
□Sawcomponents 1, 4 and 5 to size (see Fig. D to F).
Important! The element 4 must be 2 cm shorter than the door measurement!
☐ Assemble automatic door sweep. Insert the included springs 3 and attach end cap 2 (see Fig. G).
□ Clean bottom edge of door well (see Fig. H).
□ Remove protective film from adhesive strip (see Fig. I).
☐ Press on seal applying even pressure (see Fig. J).
- Cleaning and Care
The automatic door bottom sweep is maintenance-free.
☐ If necessary, remove any dirt with warm soapy water.
GB GB GB GB GB
- Service
Importer + service address suki.international GmbH Suki-Straße 1 · D-54526 Landscheid Tel.: +49-6575-710
E-Mail: info@suki.com
IAN 270107
Please have your receipt and the item number (e.g. IAN 12345) ready as your proof of purchase when enquiring about your product.
- Disposal
Please observe the regulations applicable in your area.
Zaštitna podloga za vrata
• Uvod

Čestitamo vam na kupnji novog proizvoda. Ovom kupnjom odlučili ste se za visoko-
kvalitetan proizvod. Upute za montažu / korištenje su sastavni dio proizvoda.
Molimo da prije montaže pažljivo i potpuno pročitate ove upute i pridržavajte se napomena. Ove upute za uporabu sadrže važne informacije za montažu i njegu. Stoga dobro sačuvajte ove upute za uporabu i predajte ih mogućim kasnijim vlasnicima.
● Tehnički podaci
Za otvore do maks. 14 mm
- Postavljanje
□ Izmjeriti širinu vrata (vidi sl. A).
Otklonitipoklopac 2 i razgraditi brtvilo 1 (vidi sl. B i C).
GB
HRGB
HR
HR
Komponente 1, 4 i 5 odrezati po mjeri (vidi sl. D do F).
Važno! Element 4 mora biti 2 cm kraći nego izmjerene dimenzije vrata!
□ Automatsko brtvilo za vrata sastaviti. Ugurati isporučene opruge 3 i nataknuti pokopac 2 (vidi sl. G).
□ Donji rub vrata dobro očistiti (vidi sl. H).
□ Odvojiti zaštitni papir od ljepljive trake (vidi sl. I).
□ Brtvilo ravnomjerno čvrsto pritisnuti (vidi sl. J).
- Čišćenje i održavanje
Automatsko brtvilo za dno vrata se ne treba održavati.
□ Uklonite eventualnu prljavštinu s malo tople vode sa sapunicom.
- Servis
Uvoznik + adresa servisa
suki.international GmbH
Suki-Straße 1 · D-54526 Landscheid
Tel.: +49-6575-710
E-Mail: info@suki.com
IAN 270107
Za sve upite pripremite račun i broj artikla (npr. IAN 12345) kao dokaz o kupnji.
- Zbrinjavanje
Molimo vodite računa o lokalnim propisima.
Garnitură de izolare automată pentru partea de jos a ușii
- Introducere

Vă felicităm pentru achizițio- narea noului dumneavoastră produs. Ați ales un produs de
Înaltă calitate. Manualul de montaj și utilizare face parte din acest produs. Înainte de montare vă rugăm să citiți acest manual în întregime și să respectați indicațiile. Acest manual conține informații importante de montare și de întreținere. În consecință, păstrați acest manual și predați-l eventualilor proprietari ulteriori.
- Date tehnice
Pentru distante de până la max. 14 mm
- Montare
□ Măsurati lățimea ușii (vedeți fig. A).
Scoateți capacul de acoperire 2 și demontați garnitura 1 (vedeți fig. B și C).
Tăiațicomponentele 1, 4 și 5 în funcție de dimensiune (vedeți fig.D până la F).
Important! Elementul 4 trebuie să fie cu 2 cm mai scurt decât dimensiunea uşii măsurate!
Montați garnitura automată a ușii. Introduceți arcurile livrate 3 și așezați capacul 2 (vedeți fig. G).
□ Curățați marginea de jos a ușii (vedeți fig. H).
□ Desfaceți hârtia de protecție de pe benzile adezive(vedeți fig. I).
□ Apăsați pe garnitură în mod egal (vedeți fig. J).
ROROR
- Curățare și întreținere
Garnitura ușă podea nu necesită întreținere. Îndepărtați depunerile de murdărie cu soluție cu apă caldă cu săpun.
- Service
Importator + adresă service suki.international GmbH Suki-Straße 1 · D-54526 Landscheid Tel. : +49-6575-710 E-Mail: info@suki.com
IAN 270107
Pentru orice solicitare, vă rugăm să aveți la îndemână bonul de casă și numărul de articol (de exemplu IAN 12345) ca dovadă de achiziție.
- Înlăturare
Vă rugăm să respectați prevederile locale.
Уплътнител за врата
• Увод

Поздравяваме Ви с покупката на този нов продукт. Вие избрахте висококачест-
вен продукт. Упътването за монтаж/ употреба е неразделна част от
продукта. Моля, преди монтажа про- четете изяло настоящото упътване и спазвайте указанията. Това упътване съдържа важна информация за мон- тажа и поддръжката. Затова го съхран- явайте грижливо и го предайте на евентулните следващи собственици.
RO RO RO
BG BG
● Технически данни
За процепи до макс. 14 mm
● Монтаж
Измерете ширината на вратата (виж фиг. А).
Отстранетекапачката разглобете уплътне (виж фиг. В и С).
Скъсетекомпоненти 1, 4 и 5 до необходимия размер (виж фиг. D до F).
ВАЖНО! Елемент 4 трябва да е с 2 см по-къс от измерения размер на вратата!
Сглобете автоматичното уплътнение за врата. Вкарайте доставените пружини 3 и поставете капачката 2 (виж фиг. G).
☐ Почистете добре долния кант на вратата (виж фиг. Н).
Изтеглете предпазната хартия от залепващата лента (виж фиг. I).
□ Притиснете равномерно уплътне- нието (виж фиг. J).
●Почистванеи поддръжка
Автоматичното долно уплътнение за врата не изисква поддръжка.
□ Почиствайте евентуалните замърсявания с малко топла сапунена вода.
- Сервиз
Вносител + Адрес на сервиса: suki.international GmbH Suki-Straße 1 · D-54526 Landscheid
BGBGBC
Тел.: +49-6575-710
Имейл:info@suki.com
IAN 270107
Моля, при всички запитвания дръжте на разположение касовия бон и номера на артикула (напр. IAN 12345) като доказателство за покупката.
●Отстраняване като отпадък
Моля, съблюдавайте местните разпоредби.
Automatik-Türbodendichtung
- Einleitung

Wir beglückwünschen Sie zum Kauf Ihres neuen Produkts. Sie haben sich damit für ein ges Produkt entschieden. Die
Montage-/Bedienungsanleitung ist Bestandteil dieses Produkts. Bitte lesen Sie vor der Montage diese Anleitung vollständig durch und beachten Sie die Hinweise. Diese Anleitung enthält wichtige Montage- und Pflegeinformationen. Bewahren Sie die Anleitung deshalb gut auf und geben Sie diese auch an eventuelle Nachbesitzer weiter.
- Technische Daten
Für Spalten bis max. 14 mm
- Montage
□ Türbreite ausmessen (s. Abb. A).
BG
DE/AT/CHDE/A
□Abdeckkappe
Dichtung 1
ls Abb Bu
2 entfernen und
useinanderbauen
C)
Komponenten
Maß absäg
Maß absag aktial D.
1, 4 und 5 auf
(s. Abb. D bis F).
Wichtig! Das
2 cm kürzer sein als das gemessene
2 cm körzer sein als das gemessene Türmaß!
□Automatik-Türdichtungzusammenbauen. Die mitgelieferten Federn 3 einschieben und Abdeckkappe 2 aufstecken (s. Abb. G).
□ Untere Türkante gut reinigen (s. Abb. H).
□ Schutzpapier vom Haftklebestreifen abziehen (s. Abb. I).
☐ Dichtung gleichmäßig fest andrücken (s. Abb. J).
● Reinigung und Pflege
Die Automatik-Türbodendichtung ist wartungsfrei.
☐ Entfernen Sie eventuelle Schmutzab- lagerungen mit etwas warmer Seifenlauge.
- Service
Importeur + Serviceadresse suki.international GmbH Suki-Straße 1 · D-54526 Landscheid
Tel.: +49-6575-710
E-Mail: info@suki.com
IAN 270107
Bitte halten Sie für alle Anfragen den Kassenbon und die Artikelnummer (z. B. IAN 12345) als Nachweis für den Kauf bereit.
DE/AT/CH DE/AT/CH
DE/AT/CHDE/AT/CH
DE/AT/CH
- Entsorgung
Bitte beachten Sie die örtlichen Vorgaben.

suki.international GmbH
Suki-Straße 1
54526 Landscheid
Last Information Update - Stanje informacija
Versiunea informațiilor · Актуалност на
информацияta · Stand der Informationen:
06 / 2015 · Ident.-No.: 8096098062015-HR/RO/BG
DE/AT/CH
- IAN 270107
- Draught Excluder
- - Introduction
- - Technical Data
- - Installation
- - Cleaning and Care
- - Service
- - Disposal
- Zaštitna podloga za vrata
- • Uvod
- ● Tehnički podaci
- - Postavljanje
- - Čišćenje i održavanje
- - Servis
- - Zbrinjavanje
- Garnitură de izolare automată pentru partea de jos a ușii
- - Introducere
- - Date tehnice
- - Montare
- - Curățare și întreținere
- - Înlăturare
- Уплътнител за врата
- • Увод
- ● Технически данни
- ● Монтаж
- ●Почистванеи поддръжка
- - Сервиз
- ●Отстраняване като отпадък
- Automatik-Türbodendichtung
- - Einleitung
- - Technische Daten
- - Montage
- ● Reinigung und Pflege
- - Entsorgung
Marque : POWERFIX
Modèle : IAN 291542
Catégorie : Joint d'isolation automatique pour porte