
Camedia E-20N - Appareil photo OLYMPUS - Notice d'utilisation et mode d'emploi gratuit
Retrouvez gratuitement la notice de l'appareil Camedia E-20N OLYMPUS au format PDF.


| Type de produit | Appareil photo numérique reflex |
| Marque | Olympus |
| Modèle | Camedia E-20N |
| Capteur | CCD 5 mégapixels |
| Objectif | Zoom optique 4x (équivalent 35-140 mm) |
| Écran | LCD 1,8 pouces |
| Stockage | CompactFlash Type I/II et SmartMedia |
| Alimentation | 4 piles AA ou adaptateur secteur (en option) |
| Dimensions (L x H x P) | 117 x 70 x 55 mm |
| Poids | 350 g (sans piles ni carte mémoire) |
| Fonctions principales | Modes automatique, manuel, priorité vitesse/ouverture, rafale, vidéo (320x240) |
| Entretien et nettoyage | Nettoyer le boîtier avec un chiffon doux sec ; éviter l'humidité ; utiliser un soufflet pour l'objectif |
| Sécurité | Ne pas exposer à l'eau, aux chocs ou à la poussière ; ranger dans un étui |
| Pièces détachées et réparabilité | Batteries, chargeur, câble USB, étui ; réparation par un service agréé Olympus |
| Informations générales | Notice d'utilisation disponible en PDF gratuit sur notice-facile.com |
FOIRE AUX QUESTIONS - Camedia E-20N OLYMPUS
Questions des utilisateurs sur Camedia E-20N OLYMPUS
0 question sur cet appareil. Repondez a celles que vous connaissez ou posez la votre.
Poser une nouvelle question sur cet appareil
Téléchargez la notice de votre Appareil photo au format PDF gratuitement ! Retrouvez votre notice Camedia E-20N - OLYMPUS et reprennez votre appareil électronique en main. Sur cette page sont publiés tous les documents nécessaires à l'utilisation de votre appareil Camedia E-20N de la marque OLYMPUS.
MODE D'EMPLOI Camedia E-20N OLYMPUS
OLYMPUS®
CAMEDIA Digital Camera
€-20
Quick Start Guide
Follow these simple instructions to start using your camera in minutes. Read the other instructions provided with the camera for detailed descriptions of all the exciting features that the Olympus E-20 packs into its compact design.
Important Parts and Names
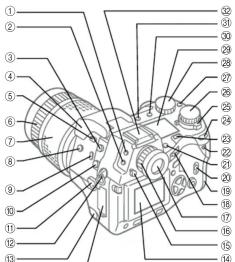

Ready!
You have to complete several important tasks before you can use the camera.
1 Attach the strap.
- Thread the ends of the strap through the eyelets on both sides of the camera. Slide the ends of the straps through the sleeve and frame, and then pull them tight. Slide the sleeve up the eyelets on both sides.
2 Load the lithium battery packs provided with the camera.
- On the bottom of the camera, turn the battery compartment knob to the open position , open the compartment, and then remove the battery case.
- With the +/- polarities aligned correctly, insert the battery packs into the battery, taking care not to reverse the +/- polarity.
- Load the case in the camera. Push down lightly on the compartment case, and then move the battery compartment knob to the close position Ⓔ.
Note:
Your camera can also use the following types of batteries: AA (R6) Ni-MH ( ×4 ), AA (R6) Ni-Cd ( ×4 ), B-12LPB/B-10LPB (included in the optional B-32LPS/B-30LPS lithium polymer battery sets), and AA (R6) Alkaline ( ×4 ).
Caution:
Never use AA (R6) zinc-carbon (manganese) or AA (R6) lithium batteries with this camera. These batteries could overheat and seriously damage the camera.
3 Insert the memory cards.
- The camera can hold one SmartMedia® and one CompactFlash®/Microdrive* (CF Type II standard) memory card. Either card can be installed alone or both can be installed together, but at least one memory card of either type must be installed in the camera before you take pictures.
*Use of the Microdrive card requires the B-32LPS/B-30LPS lithium polymer battery set due to the power requirements of the Microdrive. - Hold the camera with the lens facing away from you. Lift up the card cover lock (㉑) up while pressing the round release button under it to open the card cover.
- To install a SmartMedia card, hold it with its notched corner down, and insert it into the thinner slot closest to the back of the camera. Gently push the card completely into the slot. (Insert the SmartMedia card until you can see about 2mm of the card above the edge of the slot.)
• To remove the SmartMedia card, push it in gently to release and then pull it out of the slot. - To install the CompactFlash/Microdrive card, hold the card so that the arrow on the card can be seen and points into the slot, then insert it straight into the wider slot. Gently push in the card until it stops.
- To remove the CompactFlash/Microdrive card, gently press the eject button below the slot.
Caution:
Careful! If you press the eject button too hard, the CompactFlash/Microdrive card could pop out of the slot.
4 Switch the camera on.
- The power switch (25) is underneath the mode dial (26). Move the power switch toward you to the ON position. The control panel on top of the camera comes on.
- The battery check mark in the control panel on top of the camera tells you that the batteries are fully charged. When this mark begins to blink, the batteries are low and you should replace them as soon as possible. If this mark goes off, the batteries are dead and the camera cannot be used unless you replace the batteries.
- The large number to the right of the battery check tells you the approximate capacity of the selected card. As each picture is taken, this number will decrease until it reaches 0 and the card is full.
- To switch the camera off, move the power switch forward to the OFF position.
5 Set the date and time.
- On the top right corner of the camera, set the mode dial to the setup/connection mode mark
- Press the menu button (41). The menu appears in the monitor.
- On the arrow pad, press ▼ once to move the green highlight to the time setting mark Ⓔ.
- With the time setting mark highlighted, press ▶ once to move the green highlight to the ▶ mark. Below the date, the date format, Y-M-D for example, where Y, M, D stand for the Year, Month Day, is displayed
- Press △ or ▽ to select the date format (Y-M-D, M-D-Y, etc.), and then press ▶. Two pointers appear above and below the first setting.
- Now you can set the date. On the arrow pad, press ▲ or ▼ to increase or decrease the 2-digit number. With the desired number displayed (12 for example) press ▶ to move the pointers to the next position. (To return to the previous position, press ◀.) Repeat this until you finish setting the date and time. Note that the 24-hour system is used for the hours.
- When you finish the settings, press the 🔒 button. The green highlight returns to the time setting mark ▪. Press the 🔒 button again to close the menu.
Get Set!
1 If the lens cover is on the lens, remove it.
2 Select the shooting mode.
- Move the mode dial to the P (Program mode) setting. With the mode dial set to P, the camera automatically selects the correct aperture and shutter speed for the best exposure. This is the best setting if you are just getting started. Four shooting modes are available. For details, refer to the Reference Manual.
| P Program mode Camera selects the correct aperture and shutter speed automatically. |
| A Aperture priority mode Camera sets the correct shutter speed for the aperture that you select by moving the sub dial left or right. |
| S Shutter priority mode Camera sets the correct aperture for the shutter speed that you select by moving the sub dial left or right. |
| M Manual mode You select the aperture with the main dial and the shutter speed with the sub dial. |
3 Adjust the viewfinder for your eyes. If you wear eyeglasses, you may need to sharpen the viewfinder display.
- If the AF target mark in the center of the viewfinder is not sharp, turn the diopter adjustment ring around the viewfinder left or right until the AF target mark is sharp.
4 Select the memory card.
- If only one memory card is installed in the camera, the card is selected automatically for storing pictures that you take. If both cards are installed, the control panel display will tell you which card is currently selected for storing pictures.
SM SmartMedia memory card selected.
CF CompactFlash/Microdrive memory card selected.
- If you want to switch the selection, press and hold the SM/CF memory card button (20), then turn the main dial until it clicks. In the control panel you should see SMr dFP ayed.
Go!
1 Make sure that the lens cover has been removed.
2 Take a picture.
- Point the camera at the subject that you want to take a picture, and look through the viewfinder to compose the picture.
- Turn the zoom ring to enlarge or reduce the size of the subject in the viewfinder.
- With the picture composed in the viewfinder, use the flat of your index finger to half-press the shutter button (43) and wait for the AF correct mark light in the lower left corner of the viewfinder to light. When you see the AF correct mark light, the picture is correctly focused and exposure is calculated.
- Fully-press the shutter button to take the picture. After the shutter releases, the monitor on the back of the camera briefly displays the image of the picture you have just taken and then goes off.
- If you see the \$mark blinking in the viewfinder, this means that you should use the flash.
- On the left side of the camera, near the top, press the flash button to raise the built-in flash unit. The flash will fire automatically to ensure correct exposure of the picture.
3 Repeat from Step 2 to take a few more pictures.
4 View the pictures that you have just taken.
- Set the mode dial to playback. The monitor on the back of the camera switches on and you will see the last picture taken.
- On the arrow pad, press ◀ or ▶ to display the other shots one by one.
- If you want to display several images at once so you can quickly locate a picture, turn the main dial to the left. Every time you move the dial left you will see 4, 9, then 16 frames in the monitor. This is called the index display where each set of 4, 9, or 16 frames are displayed as an index.
- Press ▼ or ▲ to display the next index. On the arrow pad, press ▶ or ◀ to move the green highlight within the displayed index to select the picture that you want to display
- If you want to enlarge the display so you can check the focus of the picture, turn the main dial clockwise to enlarge the display in steps. As you enlarge the display, the view becomes smaller. Press △▽◀▶ on the arrow pad to scroll around the enlarged image. Turn the main dial counterclockwise until the original display is restored.
5 Delete a picture.
- With the frame that you want to delete displayed in the monitor, press the erase button on the back of the camera near the bottom edge. If you are using the index display, use △▼◀▶ on the arrow pad to select the picture that you want to erase, and press the
erase button
• To switch off playback, set the mode dial to P, A, S, or M.
More...
Important Points to Remember
- If the camera is left with the power on and not used for a specified amount of time (1 minute unless you have changed this setting), it will enter the sleep mode and automatically switch off the control panel and other displays to conserve battery power. To restore the camera to normal operation, half-press the shutter button, or turn the zoom ring one position left or right and then back to its original position.
- If the camera remains idle in the sleep mode for 1 hour, it will switch itself off automatically. To restore full operation, you must move the power switch to the OFF position and then back to the ON position.
- To conserve battery power, we recommend that you purchase an optional Olympus CAMEDIA-brand AC adapter and use it for long shooting sessions indoors. The camera never enters the sleep mode while the AC adapter is connected to the camera and a power outlet. You can power the camera with the AC adapter without removing the batteries. - The amount of data required to store a picture depends on the subject, so you may be able to store more or fewer images on a card. Because of this difference in size, you may not be able to store another picture, even after you delete one image from the card with single-frame delete.
Storage capacity of a 16MB and 32MB memory card
The numbers of images per 16MB and 32MB memory are only approximate estimations.
| Quality | Resolution (pixels) | Compression File Size(Default settings) (Reference value) | Images per Card (Reference value) | |||
| 16 MB 32 MB | ||||||
| RAW* | 2560 x 1920 (FULL) | 1:1 (not compressed) | 10 MB 1 shot | 3 shots | ||
| TIFF | 2560 x 1920 (FULL) | 1:1 (not compressed) | 15 MB 1 shot | 2 shots | ||
| SHQ | 2560 x 1920 (FULL) | 1:2.7 | 3.9 MB 4 shots | 8 shots | ||
| HQ | 2560 x 1920 (FULL) | 1:8 | 1.5 MB | 10 shots | 21 shots | |
| SQ | 1280 x 960 (SXGA) | 1:8 | 320 KB | 49 shots | 99 shots | |
Because of the difference in memory partitions on the SmartMedia, CompactFlash, and Microdrive cards, the number of images stored may vary due to the differences between the card formats. When using a CompactFlash card, the actual capacity of the card will be slightly more or less than the capacity indicated.
*To display RAW data files on a PC, CAMEDIA Master software or Adobe Photoshop is required (Photoshop requires the Olympus RAW data plug-in software.)
What's on the menu?
This is a brief summary of the menus and how to use them. The menus are used to select special settings for taking pictures. Use this summary as a quick reference. Detailed explanations about these settings are provided in the Instructions.
Restoring the Default Settings
The default settings are the settings in effect when you purchased the camera. Some menu settings are not released after the camera is switched off and switched on again so you may need to do this occasionally to restore the camera to its original operating status, especially when you are experimenting with the camera to learn how to use it.
The current settings are displayed in the control panel.

Some settings are also displayed in the viewfinder when you take a picture.

1 The flash mode button Ⓥ and record mode button ⏻ are on top of the camera, just above the control panel.
2 To restore the default settings, press and hold down the flash mode button and the record mode button together.
That is all there is to it!
How to Use the Menus
Four menus are provided: Shooting Mode, Playback Mode, Print Reserve Mode, and Setup/Connection Mode.
1 To open a menu, set the mode dial on top of the camera to the appropriate setting, and then press the menu button ☺ in the center of the back panel of the camera.
| P, A, S, M | Shooting Mode Menu |
| Playback Mode Menu | |
| Print Reserve Mode Menu | |
| Setup/Connection Mode Menu |
2 Press or to move the green highlight in the left column to select the icon for the setting that you want to change.
- Some Shooting Mode Menu and Setup/Connection Mode Menu have more than one page. The notation in the upper right corner of the menu display tells you which page you are on (1/3, 2/3, and so on.)
- If you press ▼ with the highlight at the last icon, the next page of the menu is displayed.
- If you press with the highlight at the first icon, the previous page of the menu is displayed.
3 With the desired icon selected, press ▶ or ◀ to move the green highlight right or left to the setting that you want to select.
- If the setting requires a number selection, press or to increase or decrease the number.
4 Click the OK button to save your selection. The green highlight returns to the icon on the left.
5 Click the OK button to close the menu and return to normal operation.
Shooting Mode Menu
Set the mode dial to P, A, S, or M, press the menu button ☑, and then press ▼ or △ to move the green highlight. The Shooting Mode Menu has 3 pages.
| 1/3 | |
| Delete all images from selected SmartMedia or CompactFlash card, and format a card. | |
| ISO (sensitivity) setting. | |
| Bracket same subject with 3 rapid shots with different exposures. | |
| Flash intensity control. | |
| 2/3 | |
| Sharpness. | |
| Overall image contrast. | |
| Record mode customization (resolution, compression). | |
| Set interval time (specify time interval between shots during automatic time lapse photography). | |
| 3/3 | |
| Shutter sound setting (high, low, OFF). | |
| Warning sound (ON, OFF). | |
| Image display after shooting. | |
| Select IS mode/PS mode/Noise Reduct. | |
Playback Mode Menu
Set the mode dial to ▶, then press the menu button ⏻, and then press ▼ or ▲ to move the green highlight. The Playback Mode Menu has only 1 page.
| Slide show (Automatic playback). | |
| OP 1 | Copy images card-to-card. |
| CPD S-5-M | Delete all images from card, format card. |
| Monitor brightness. |
Print Reserve Mode Menu
Set the mode dial to ☐, press the menu button ⊙, and then press ▼ or △ to move the green highlight. The Print Reserve Mode Menu has only 1 page.
| Select or cancel all pictures for printing. | |
| Set date or time stamping on prints. | |
| Select or cancel all pictures for index printing. |
Setup/Connection Mode Menu
Set the mode dial to ↗, press the menu button Ⓗ, and then press ▼ to move the green highlight. The Setup/Connection Mode Menu has only 2 pages.
| 1/2 | ||
| Determines whether conversion lens ⚙ is selected when macro button ⚙ is pressed. | ||
| Set year/month/day format, and set current date and time. | ||
| After you replace a memory card, you can restart file numbering (RESET) or continue sequential file numbering (AUTO). | ||
| Monitor preview mode.When shooting in the M(manual) mode, select:• MANUAL to check the image to be shot with the monitor, or• AUTO to gain the best monitor image. | ||
| 2/2 | ||
| Switches histogram on and off. | ||
| Pixel mapping.Checks the image processing circuit and adjusts the CCD. | ||
| Sleep mode timer setting. | ||
Where to Go from Here
Read the Instructions. The Instructions provide details about all the exciting features of your camera. Simple step-by-step instructions describe how to not only use the camera, but show you how to download data from the memory cards to your computer for further processing with a graphics software application, and so on. If you are new to digital photography, a detailed glossary at the end of the Instructions explains many terms that are not explained here or in the Instructions.
Visit us on-line. You can contact us at www.olympus.com or contact your local Olympus authorized digital camera dealer.
| OLYMPUS AMERICA INC.Two Corporate Center Drive, Melville, NY 11747-3157, U.S.A. Tel: 631-844-5000 | |
| Technical Support (USA)247 online automated help: http://support.olympusamerica.com/Phone customer support: Tel. 1-888-553-4448 (Toll-free)Our phone customer support is available from 8 am to 10 pm (Monday to Friday) ETCmail: distoc@olympus.comOlympus software updates can be obtained at: http://olympus.com/digital/.OLYMPUS OPTICAL CO. (EUROPA) GMBH _+ Premises/Goods delivery: Wendenstrasse 14-18, 20097 Hamburg, GermanyTel. 049-237730Letters: Postfach 10 49 08, 20034 Hamburg, Germany. | |
| Hotline Numbers for customers in Europe:Tel. 01805-67 10 83 for GermanyTel. 00800-67 10 83 00 for Austria, Belgium, Denmark, France, Netherlands, Norway, Sweden, Switzerland, United KingdomTel. +49 180 5-67 10 83 for Finland, Italy, Luxembourg, Portugal, Spain, Czech RepublicTel. +49 40-237 73 899 for Greece, Croatia, Hungary and the Rest of EuropeOur Hotline is available from 9am to 6pm (Monday to Friday)E-Mail: di.support@olympus-europa.com |
© 2001 OLYMPUS OPTICAL CO., LTD Printed in Japan
- CAMEDIA Digital Camera
- €-20
- Quick Start Guide
- Ready!
- Note:
- Caution:
- Insert the memory cards.
- Switch the camera on.
- Set the date and time.
- Get Set!
- If the lens cover is on the lens, remove it.
- Select the memory card.
- Go!
- Make sure that the lens cover has been removed.
- Take a picture.
- Repeat from Step 2 to take a few more pictures.
- Delete a picture.
- More...
- Important Points to Remember
- What's on the menu?
- Restoring the Default Settings
- How to Use the Menus
- Shooting Mode Menu
- Playback Mode Menu
- Print Reserve Mode Menu
- Setup/Connection Mode Menu
- Where to Go from Here
Marque : OLYMPUS
Modèle : Camedia E-20N
Catégorie : Appareil photo