121PBC - Climatisation SVAN - Notice d'utilisation et mode d'emploi gratuit
Retrouvez gratuitement la notice de l'appareil 121PBC SVAN au format PDF.


| Type de produit | Climatisation mobile monobloc |
| Marque | SVAN |
| Modèle | 121PBC |
| Puissance frigorifique | 12 000 BTU/h (environ 3,5 kW) |
| Consommation électrique | 1200 W en mode refroidissement |
| Alimentation | 220-240 V ~ 50 Hz |
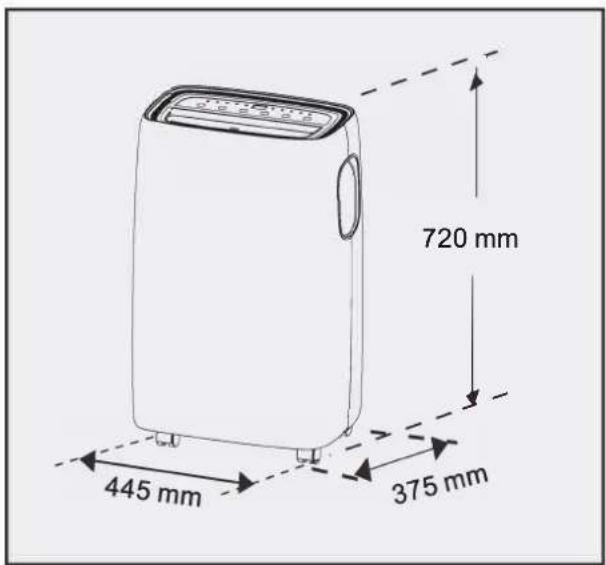
| Dimensions (L × P × H) | 45 × 38 × 70 cm |
| Poids net | 25 kg |
| Niveau sonore | 52 dB(A) en mode normal |
| Réfrigérant | R290 (propane), 150 g |
| Fonctions principales | Refroidissement, ventilation, déshumidification, mode nuit, minuterie |
| Capacité du bac de condensation | 1,5 L (vidange manuelle ou continue) |
| Classe énergétique | A (refroidissement) |
| Surface recommandée | Jusqu'à 30 m² |
| Entretien et nettoyage | Nettoyer le filtre à air toutes les 2 semaines ; vider le bac de condensation régulièrement |
| Sécurité | Protection antigel, arrêt automatique en cas de surchauffe, détection de niveau d'eau |
| Pièces détachées et réparabilité | Filtre à air, télécommande, kit d'évacuation disponibles en SAV |
| Informations générales | Notice d'utilisation téléchargeable sur notice-facile.com |
FOIRE AUX QUESTIONS - 121PBC SVAN
Questions des utilisateurs sur 121PBC SVAN
0 question sur cet appareil. Repondez a celles que vous connaissez ou posez la votre.
Poser une nouvelle question sur cet appareil
Téléchargez la notice de votre Climatisation au format PDF gratuitement ! Retrouvez votre notice 121PBC - SVAN et reprennez votre appareil électronique en main. Sur cette page sont publiés tous les documents nécessaires à l'utilisation de votre appareil 121PBC de la marque SVAN.
MODE D'EMPLOI 121PBC SVAN
svan
AIRE ACONDICIONADO PORTÁTIL MANUAL DE INSTRUCCIONES
SVAN121PBC

natural_image
Line drawing of a portable air conditioner unit with control panel and side door (no text or symbols)Gracias por seleccionar nuestro electrodoméstico de calidad. Por favor, asegúrese de leer este manual de usuario con cuidado antes de usar. Cualquier duda, contacte con el servicio profesional para obtener ayuda.
- Este aparato puede ser utilizado por niños de 8 años en adelante y personas con capacidades físicas, sensoriales o mentales reducidas o falta de experiencia y conocimiento si han recibido supervisión o instrucciones sobre el uso del aparato en un lugar seguro y han entendido los peligros implicados.
- Los niños no deben jugar con el aparato.
- La limpieza y el mantenimiento del usuario no deben ser realizados por niños sin supervisión.
- Desconecte el aparato de su fuente de energía durante el servicio y cuando reemplace partes.
- Advertencia: antes de obtener acceso a los terminales, todos los circuitos de alimentación deben estar desconectados.
- Si el cable de alimentación está dañado, debe ser reemplazado por el fabricante, su agente de servicio o una persona igualmente calificada para evitar un peligro.
- Desconecte la fuente de alimentación antes de la limpieza y el mantenimiento.
- El aparato no debe instalarse en la lavandería.
- Tenga en cuenta: Revise la placa de identificación para el tipo de gas refrigerante utilizado en su aparato.
- Información específica sobre los aparatos con gas refrigerante.
R410A, R134a, R290 es un refrigerante que cumple con las normas ecológicas europeas; sin embargo, se recomienda no perforar el circuito de refrigeración de la máquina. En el
- Al final de su vida útil, entregue el aparato a un centro especial de recolección de residuos para su eliminación.
- Este sistema herméticamente cerrado contiene gases fluorados de efecto invernadero.
- INFORMACIÓN AMBIENTAL: Esta unidad contiene gases fluorados de efecto invernadero. cubierto por el Protocolo de Kyoto.
- Las operaciones de mantenimiento y eliminación deben ser realizadas únicamente por personal cualificado.
(Para más detalles sobre el refrigerante, vea la contraportada).
GWP (potencial de calentamiento global): R410A: 2088, R134a: 1430, R290: 3.
- No utilice esta unidad para otras funciones que no sean las descritas en este manual de instrucciones.
- Si el cable de alimentación se desgasta o se daña, el cable solo debe ser reemplazado por un técnico calificado.
- Servicio técnico con repuestos originales.
- Asegúrese de que el enchufe esté enchufado firmemente y completamente en el tomacorriente.
- Puede resultar en el riesgo de choque eléctrico o fuego.
- No enchufe otros aparatos en el mismo tomacorriente, ya que podría provocar una descarga eléctrica.
- No desmonte ni modifique el aparato o el cable de alimentación, ya que puede provocar el riesgo de
- Choque eléctrico o fuego. Todos los demás servicios deben ser referidos a un técnico calificado.
- No coloque el cable de alimentación o el aparato cerca de un calentador, radiador u otra fuente de calor.
- Puede provocar riesgo de descarga eléctrica o incendio.
PRECAUCIONES IMPORTANTES
- Esta unidad está equipada con un cable que tiene un cable a tierra conectado a una clavija a tierra o pestaña de puesta a tierra. El enchufe debe estar enchufado en un enchufe que esté correctamente instalado y conectado a tierra.
- No corte ni quite, bajo ninguna circunstancia, la clavija a tierra ni la pestaña de conexión a tierra de este enchufe.
- La unidad debe utilizarse o almacenarse de manera que esté protegida de la humedad. p.ej. condensación, agua salpicada, etc. Desenchufe la unidad inmediatamente si esto ocurre.
- Siempre transporte su aparato en posición vertical y colóquelo en una superficie estable y nivelada durante el uso Si la unidad se transporta acostada de lado, debe pararse y dejarse desenchufada. durante 6 horas
- Utilice siempre el interruptor del panel de control para apagar la unidad o el control remoto, y no comience o detenga la operación enchufando o desenchufando el cable de alimentación. Puede resultar en el riesgo de electrochoque.
SALVAGUARDIAS IMPORTANTES
No presione los botones en el panel de control con nada que no sea húmedo o mojado dedos. No utilice productos químicos peligrosos para limpiar o entrar en contacto con la unidad. Para prevenir daños en el acabado de la superficie, use solo un paño suave para limpiar el aparato. No utilice cera, diluyente, o un detergente fuerte. No utilice la unidad en presencia de sustancias inflamables.
o vapores como alcohol, insecticidas, gasolina, etc.
Los niños pequeños deben ser supervisados para asegurarse de que no jueguen, operen o suban en el aparato.
Si el aparato está haciendo sonidos inusuales o está emitiendo humo o un olor inusual, desenchúfelo de inmediato
No limpie la unidad con agua. El agua puede entrar en la unidad y dañar el aislamiento, creando un peligro de choque. Si entra agua en la unidad, desenchúfela inmediatamente y póngase en contacto con Servicio al cliente.
Utilice dos o más personas para levantar e instalar la unidad.
Asegúrese de que todos los accesorios se retiren del embalaje antes del uso.
Para evitar posibles cortes, evite tocar las partes metálicas del aparato al retirar o reinstalar el filtro. Puede resultar en el riesgo de lesiones personales.
No bloquee la entrada o salida de aire del aparato. El flujo de aire reducido dará como resultado una mala rendimiento y podría dañar la unidad.
Sujete siempre el enchufe al enchufar o desenchufar el aparato. Nunca desenchufe tirando en el cable. Puede resultar en riesgo de descarga eléctrica y daños.
Instale el aparato en un piso resistente y nivelado capaz de soportar hasta 110 lb (50 kg).
La instalación en un piso débil o sin nivel puede resultar en el riesgo de daños a la propiedad y lesiones personales.
Cierre todas las puertas y ventanas de la habitación para un funcionamiento más eficiente.
IMPORTANTE - MÉTODO DE CONEXIÓN A TIERRA
Este producto viene equipado de fábrica con un cable de alimentación que tiene tres clavijas. enchufe a tierra. Debe enchufarse en un receptáculo de conexión a tierra de acuerdo con con el Código Eléctrico Nacional y los códigos y ordenanzas locales aplicables. Si el circuito no tiene un receptáculo de tipo de puesta a tierra, es responsabilidad y obligación de la cliente para cambiar el receptáculo existente de acuerdo con el National Electrical Código y códigos y ordenanzas locales aplicables. El tercer diente de tierra no debería, Bajo cualquier circunstancia, ser cortado o eliminado. Nunca utilice el cable, el enchufe o el aparato cuando muestren algún signo de daño. No utilice su aparato con un cable de extensión a menos que haya sido revisado y probado por un proveedor de electricidad calificado. Incorrecto la conexión del enchufe a tierra puede provocar un incendio, descarga eléctrica y / o lesiones a personas asociadas al aparato. Consulte con un representante de servicio calificado si duda que el aparato esté correctamente conectado a tierra.
CONEXIONES ELÉCTRICAS
Antes de enchufar el aparato a la toma de corriente, compruebe que:
La fuente de alimentación principal corresponde al valor indicado en la placa de características en La parte posterior del aparato.
La toma de corriente y el circuito eléctrico son adecuados para el aparato.
La toma de corriente coincide con el enchufe. Si este no es el caso, reemplace el enchufe.
La toma de corriente está adecuadamente conectada a tierra. No seguir estas importantes medidas de seguridad.
Las instrucciones absolvieron al fabricante de toda responsabilidad.
Información importante para la correcta eliminación del producto de acuerdo con la Directiva de la CE 2012/19 / UE.

natural_image
Symbol of a trash bin crossed with a diagonal line, no text or numbers presentAl final de su vida útil, el producto no debe desecharse como Residuos urbanos. Debe ser llevado a una autoridad local especial, centro de recogida de residuos diferenciados o a un distribuidor que proporciona este Servicio. La eliminación de un electrodoméstico evita por separado Posibles consecuencias negativas para el medio ambiente y la salud.
Derivado de la disposición inadecuada y habilita al constituyente materiales a recuperar para obtener importantes ahorros en energía y recursos. Como recordatorio de la necesidad de disponer del hogar aparatos por separado, el producto está marcado con un tachado cubo de basura con ruedas.
Información específica sobre aparatos con gas refrigerante R290.
- Lea detenidamente todas las advertencias.
- Al descongelar y limpiar el aparato, no utilice ninguna otra herramienta. que los recomendados por la empresa fabricante.
- El aparato debe colocarse en un área sin fuentes continuas. de ignición (por ejemplo: llamas, gas o aparatos eléctricos en operación).
- No pinchar y no quemar.
- Los gases refrigerantes pueden ser inodoros.
- El aparato debe ser instalado, usado y almacenado en un área que es mayor que 13 m².
- R290 es un gas refrigerante que cumple con las directivas europeas sobre el entorno. No pinche ninguna parte del circuito de refrigerante.
- Si el aparato se instala, opera o almacena en un área no ventilada, La habitación debe estar diseñada para evitar la acumulación de refrigerante. fugas que ocasionen un riesgo de incendio o explosión debido a la ignición del refrigerante causada por calentadores eléctricos, estufas u otras fuentes de ignición.
- El aparato debe almacenarse de forma que se evite fracaso.
Las personas que operan o trabajan en el circuito de refrigerante deben tener la certificación apropiada emitida por una organización acreditada que
- Asegura la competencia en el manejo de refrigerantes de acuerdo a una evaluación reconocida por asociaciones del sector.
- Las reparaciones deben realizarse en base a las recomendaciones del empresa de fabricación.
- Mantenimiento y reparaciones que requieran la asistencia de otros calificados.
- El personal debe ser realizado bajo la supervisión de un individuo.
- Se especifica en el uso de refrigerantes inflamables.


natural_image
Simple line drawing of an open book with no text or symbols visible
- Deflector
- panel de control
- Mango (ambos lados)
- Ruedas
- cable de alimentación
- Rejilla de admisión
- Rejilla de salida de aire
- Rejilla de admisión
- Drenaje del condensador
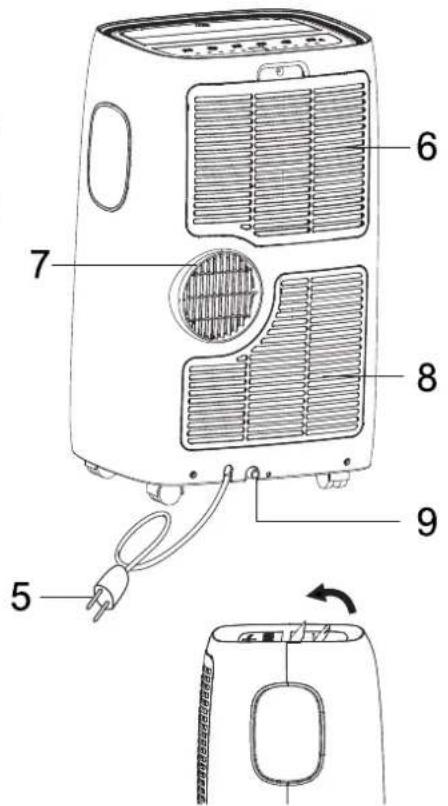
* Abra la rejilla antes de usar la unidad.
ACCESORIOS
| PIEZAS | NOMBRE DE LAS PIEZAS | CANTIDAD | ||
 |  |  | Manguera de escapeEntrada de la mangueraSalida de manguera | 1 set |
 | Kit de ventana deslizante | 1 set | ||
 | Control remotoBatería | 1 set | ||
 | Manguera de drenaje * | 1 set | ||
“*” Significa que solo el modelo de bomba de calor tiene esta función. Nota: Todas las ilustraciones de este manual son solo para fines explicativos. Su aparato puede ser ligeramente diferente.
INSTRUCCIONES DE INSTALACIÓN
ESCAPE DE AIRE CALIENTE
En el modo Cool el aparato debe colocarse cerca. A una ventana o abertura para que el aire de escape caliente. Puede ser conducido al exterior.
Coloque la unidad de primera en un piso plano y asegúrese de que haya un espacio mínimo de 12" (30 cm) alrededor de la unidad, y está dentro de las proximidades de un solo circuito de salida fuente de alimentación.
- Extienda ambos lados de la manguera (Fig.1) y el tornillo La entrada de la manguera (Fig.2).
- Extienda el otro lado de la manguera y atorníllela a la Salida de la manguera (Fig.3).
- Instale la entrada de la manguera en la unidad (Fig.4).
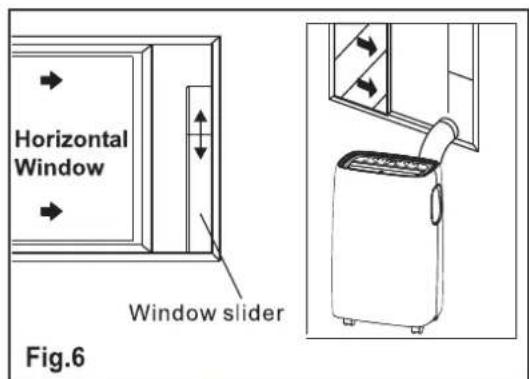
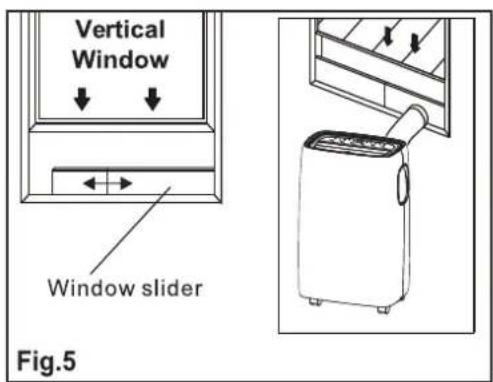
- Acople la salida de la manguera en el kit deslizante de la ventana y sello. (Fig. 5 y 6).


El kit de control deslizante de su ventana ha sido diseñado para adaptarse a la mayoría de los modelos verticales y verticales.
aplicaciones de ventana horizontal, sin embargo, puede ser necesario que modifique Algunos aspectos de los procedimientos de instalación para ciertos tipos de ventanas. los El kit deslizante para ventana se puede fijar con tornillos.
NOTA: Si la abertura de la ventana es menor que la longitud mínima de la ventana kit deslizante, corte el extremo sin la sujeción lo suficientemente corta como para caber en el Apertura de la ventana. Nunca corte el agujero en el kit deslizante de la ventana.

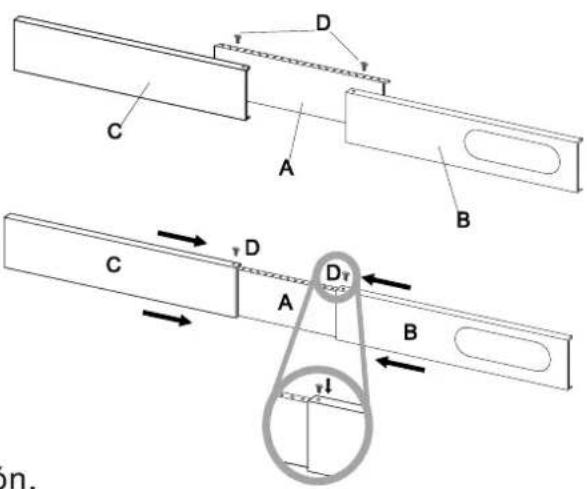
INSTALACIÓN DEL KIT DESLIZANTE DE VENTANA
1: Partes:
Un panel
B) Panel con un agujero.
C) Panel sin agujero (tal vez no suministrado)
D) Tornillo para bloquear el kit de ventana en su lugar
2: Ensamblaje:
Deslice los paneles B y C en el panel A y Tamaño al ancho de viuda. Tamaños de ventanas variar. Al dimensionar el ancho de la ventana, asegúrese de que el conjunto de kit de ventana Está libre de huecos por huecos y / o aire. Bolsillos a la hora de tomar medidas.
3: Fije el tornillo en los agujeros que corresponder. Con el ancho que su ventana requiere para asegurarse de que hay no hay huecos o bolsas de aire en el montaje de kit de ventana después de la instalación.
UBICACIÓN
La unidad debe colocarse sobre una base firme para minimizar el ruido y la vibración. Para un posicionamiento seguro. coloque la unidad en un piso liso y nivelado lo suficientemente fuerte como para sostener la unidad.
La unidad tiene ruedas para facilitar la colocación, pero solo debe rodarse sobre superficies lisas y planas.
Tenga cuidado al rodar sobre superficies alfombradas.
Tenga cuidado y proteja los pisos al rodar sobre pisos de madera. No intente enrollar la unidad sobre objetos.
La unidad debe colocarse al alcance de una toma de tierra debidamente clasificada.
Nunca coloque ningún obstáculo alrededor de la entrada o salida de aire de la unidad.
Deje al menos 45 cm de espacio alejado de la pared para un aire acondicionado eficiente.
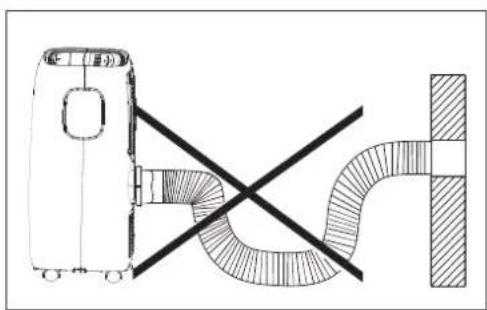
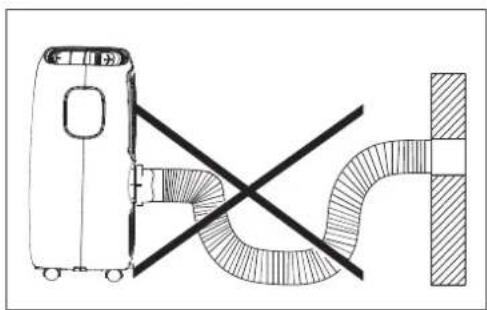
La manguera se puede extender, pero es lo mejor para mantener la longitud al mínimo requerido. también asegúrese de que la manguera no tenga curvas o hundimientos pronunciados.

natural_image
Diagram of a device with a pipe and cross-shaped component, no text or symbols presentPANEL DE CONTROL

“*” Significa que solo el modelo de bomba de calor tiene esta función.
FUNCIONAMIENTO DESDE EL PANEL DE CONCTROL
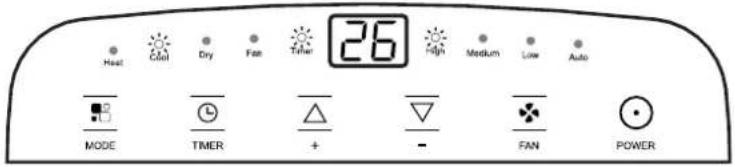
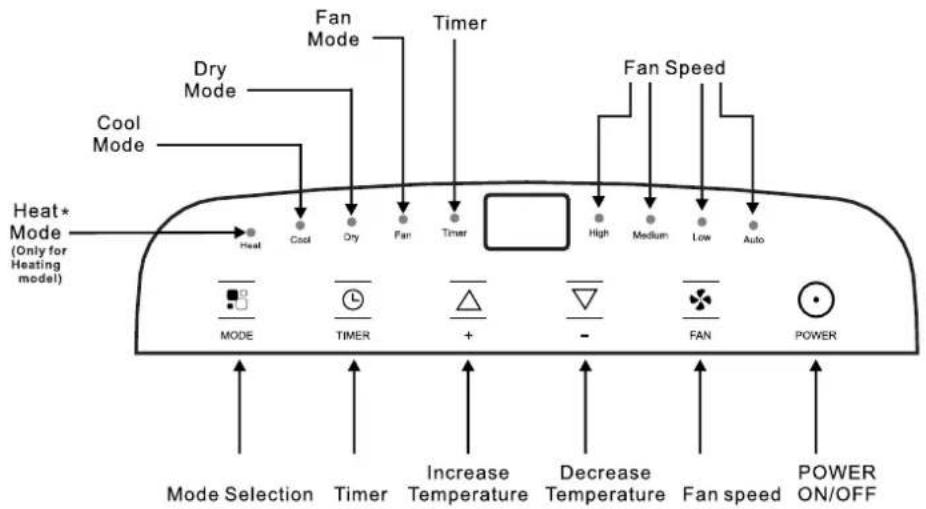
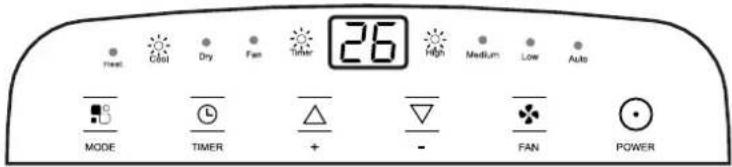
El panel de control se encuentra en la parte superior del dispositivo, le permite administrar las funciones de las piezas sin el control remoto, pero para aprovechar al máximo su potencial, debe usar el mando a distancia.
ENCENDER EL APARATO
Enchufe en la toma de corriente, luego el aparato está en espera.
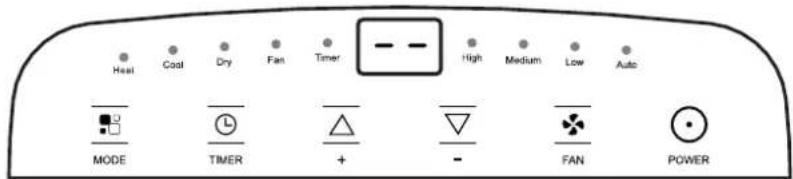
Presione el ⊙ botón para hacer que el aparato se encienda. Aparecerá la última función activa cuando se apagó.
√ Nunca apague el aparato desconectándolo de la red eléctrica. Siempre presione el ⊙ botón, luego espere unos minutos antes de desenchufar. Esto permite la Dispositivo para realizar un ciclo de verificaciones para verificar la operación.
DESCRIPCIÓN DE LA PANTALLA DE VISUALIZACIÓN
1) Modo COOL
Ideal para el clima húmedo cuando necesita enfriar y deshumidificar la habitación. Para configurar este modo correctamente:
- Presione el botón varias veces hasta que aparezca el símbolo Cool.
- Seleccione la temperatura objetivo18°C-32°C(64°F-90°F)presionando el botón ▲ o ▼ hasta que se muestre el valor correspondiente.
- Seleccione la velocidad requerida del ventilador presionando el ♣ botón. Hay cuatro velocidades disponibles: Alta / Media / Baja / Auto.

La temperatura más adecuada para la habitación durante el verano varía de 24 °C a 27 °C (75 °F a 81 °F). Sin embargo, se recomienda que no ajuste una temperatura muy por debajo de la temperatura exterior. La diferencia de velocidad del ventilador es más notoria cuando el dispositivo está en modo FAN pero puede no serlo en modo COOL.
2) Modo de CALOR \*
“*” Significa que solo el modelo de bomba de calor tiene esta función.
Para configurar este modo correctamente:
- Presione el botón varias veces hasta que aparezca el símbolo de Calor.
- Seleccione la temperatura objetivo 13°C-27°C(55°F-81°F) presionando el botón ▲ o ▼ hasta que se muestre el valor correspondiente.
- Seleccione la velocidad requerida del ventilador presionando el botón. Hay cuatro velocidades disponibles: Alta / Media / Baja / Auto.

El agua se elimina del aire y se recoge en el tanque.
Cuando el tanque está lleno, el aparato se apaga y aparece " F E " (tanque lleno) en la pantalla. La tapa del tanque debe ser extraída y vaciada. Escurra toda el agua que queda en una cuenca. Cuando se haya drenado toda el agua, vuelva a colocar la tapa en su lugar.
Cuando el tanque se ha vaciado, el aparato vuelve a arrancar.
N.B.: - Al operar en cuartos muy fríos, el aparato se descongela automáticamente, Interrumpiendo momentáneamente el funcionamiento normal. "L E" aparece en la pantalla. Durante esta operación, es normal que el ruido producido por el aparato cambio.
- En este modo, es posible que tenga que esperar unos minutos antes de que el aparato Comienza a emitir aire caliente.
- En este modo, el ventilador puede funcionar durante períodos cortos, aunque el conjunto La temperatura ya se ha alcanzado.
DESCRIPCIÓN DE LA PANTALLA DE VISUALIZACIÓN
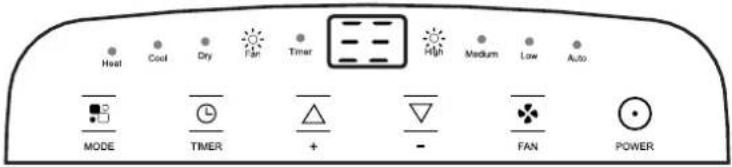
3) Modo VENTILADOR
Cuando se utiliza el aparato en este modo, no es necesario conectar la manguera de aire.
Presione el botón varias veces hasta que aparezca el símbolo de Ventilador.
Seleccione la velocidad requerida del ventilador presionando el ♣ botón.
Tres velocidades están disponibles: Alta / Media / Baja.
"____" como velocidad alta, "____" como velocidad media, "____" como velocidad baja.
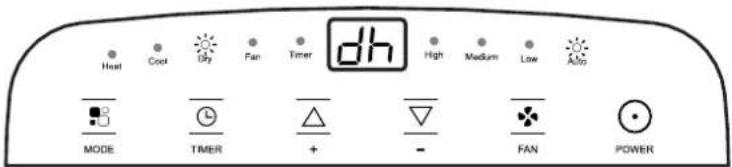
4) Modo SECO
Ideal para reducir la humedad de la habitación (primavera y otoño, habitaciones húmedas, períodos de lluvia, etc.).
En modo seco, el aparato debe prepararse de la misma manera que para el modo frío, con la manguera de escape de aire conectada para permitir que la humedad se descargue afuera.
Para configurar este modo correctamente:
- Presione el botón varias veces hasta que aparezca el símbolo Seco.
- En este modo, la velocidad del ventilador es seleccionada automáticamente por el dispositivo y no se puede configurar manualmente.
5) AJUSTE DEL TEMPORIZADOR
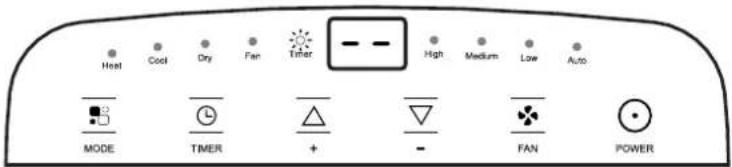
-Este temporizador puede usarse para retrasar el inicio o apagado del dispositivo, esto evita el desperdicio
Electricidad optimizando los periodos de operación.
Programación puesta en marcha.
Encienda el aparato, elija el modo que desee, por ejemplo, frío, 24°C, alta velocidad del ventilador. Apague el aparato.
Presione el botón Temporizador, el Ⓤ símbolo y el número de horas parpadean.
Presione el botón ▲ o ▼ para establecer el número de horas de retraso antes de que el aparato se presenta. El temporizador se puede configurar en intervalos de 0,5 horas hasta 10 horas, en intervalos de 1 hora a 24 horas.
Unos segundos después de la configuración, el ajuste se memoriza, el indicador del temporizador se ilumina y la pantalla muestra que el aparato está en espera.
DESCRIPCIÓN DE LA PANTALLA DE VISUALIZACIÓN
Presione nuevamente el botón Temporizador o el ⚙ botón, el temporizador se cancelará, y el Ⓛ símbolo desaparecerá de la pantalla.
Programación apagada
Cuando el aparato esté funcionando, presione el Ⓛ botón, el indicador del temporizador y el horas de flash.
Presione los botones ▲ o ▼ para establecer el número de horas de retraso antes de que la unidad se apague.
Unos segundos después del ajuste, el ajuste se memoriza, el indicador del temporizador se enciende y La pantalla muestra el modo actual. Al final del tiempo establecido la unidad pasa automáticamente al modo de espera.
Presione nuevamente el ⊙ botón Temporizador o el botón, el temporizador se cancelará, y El Ⓛ símbolo desaparecerá de la pantalla.
AUTO DIAGNÓSTICO
El aparato tiene un sistema de autodiagnóstico para identificar una serie de fallos de funcionamiento.
Los mensajes de error se muestran en la pantalla del dispositivo.
| SI SE MUESTRA | ¿Qué TENGO QUE HACER? |
 BAJOTEMPERATURA(prevención de heladas) BAJOTEMPERATURA(prevención de heladas) | El aparato está equipado con una escarcha.Dispositivo de protección para evitar el exceso.formación de hielo.El aparato arranca de nuevo.automáticamente cuando la descongelaciónproceso se completa. |
 FALLA DE LA SONDA(sensor dañado) FALLA DE LA SONDA(sensor dañado) | Si se muestra esto, contacte a su localCentro de servicio autorizado. |
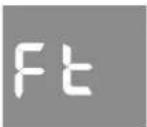 TANQUE LLENO(tanque de seguridad lleno) TANQUE LLENO(tanque de seguridad lleno) | Vaciar el tanque de seguridad interno, siguiendoLas instrucciones en el "Fin de temporada.apartado de operaciones". |
CONTROL REMOTO

Apunte el control remoto al receptor del aparato.
El control remoto no debe estar a más de 7 metros del aparato.
(sin obstáculos entre el mando a distancia y el receptor).
El control remoto debe manejarse con sumo cuidado. No lo dejes caer o expóngalo a la luz solar directa o fuentes de calor. Si el mando a distancia no funciona, por favor, trate de sacar la batería y volver a colocarla.

INSERTAR O REEMPLAZAR LAS BATERÍAS
Retire la cubierta en la parte trasera del control remoto;
Inserte dos baterías "AAA" de 1.5V en la posición correcta
(vea las instrucciones dentro del compartimiento de la batería);
Vuelva a colocar la cubierta.

natural_image
Illustration of hands holding a mobile phone with an arrow indicating the right-hand rule (no text or symbols present)NOTA:
Si se reemplaza o desecha la unidad de control remoto, las baterías de batería deben ser eliminados y descartados de acuerdo con la legislación vigente tal como están perjudicial para el medio ambiente.
No mezcle pilas viejas y nuevas. No mezclar alcalino, estándar (carbono-zinc) o Baterías recargables (níquel-cadmio).
No arroje las baterías al fuego. Las baterías pueden explotar o tener fugas.
Si el control remoto no se utiliza durante un período de tiempo determinado, retire el baterias
MANUAL DE CONTROL REMOTO
Modo COOL
Ideal para el clima húmedo cuando necesita enfriar y deshumidificar la habitación. Para configurar este modo correctamente:
Presione el botón varias veces hasta que ◀ aparezca el * símbolo siguiente. Seleccione la temperatura objetivo18°C-32°C(64°F-90°F)presionando ▲ o ▼ hasta que aparezca el valor correspondiente.
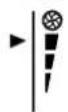
Seleccione la velocidad requerida del ventilador presionando el 📍 botón.
Hay cuatro velocidades disponibles: Alta / Media / Baja / Auto.
High
Medium

Low

Auto


La temperatura más adecuada para la habitación durante el verano varía de 24°C to 27°C(75°F to 81°F). Se recomienda, sin embargo, no establecer una temperatura. muy por debajo de la temperatura exterior. La diferencia de velocidad del ventilador es más notable cuando el aparato está en modo FAN, pero puede que no se note en modo COOL.
Modo calor\*
“*” Significa que solo el modelo de bomba de calor tiene esta función.
Para configurar este modo correctamente:
Presione el 🔒 botón varias veces hasta que ◀ aparezca el ❄ símbolo siguiente. Seleccione la temperatura objetivo13°C-27°C(55°F-81°F) presionando ▲ o ▼ hasta que aparezca el valor correspondiente.
Seleccione la velocidad requerida del ventilador presionando el Ⓧ botón.
Hay cuatro velocidades disponibles: Alta / Media / Baja / Auto.
El agua se elimina del aire y se recoge en el tanque.
Cuando el tanque está lleno, el aparato se apaga y aparece " F E " (tanque lleno) en la pantalla. La tapa del tanque debe ser extraída y vaciada. Escurra toda el agua que queda en una cuenca. Cuando se haya drenado toda el agua, vuelva a colocar la tapa en su lugar.
Cuando el tanque se ha vaciado, el aparato vuelve a arrancar.
N.B.: - Al operar en cuartos muy fríos, el aparato se descongela automáticamente, Interrumpiendo momentáneamente el funcionamiento normal. "L E" aparece en la pantalla. Durante esta operación, es normal que el ruido producido por el aparato cambio.
- En este modo, es posible que tenga que esperar unos minutos antes de que el aparato Comienza a emitir aire caliente.
- En este modo, el ventilador puede funcionar durante períodos cortos, aunque el conjunto La temperatura ya se ha alcanzado.
MANUAL DE CONTROL REMOTO
Modo de ventilador
Cuando se utiliza el aparato en este modo, no es necesario conectar la manguera de aire.
Presione el 🔒 botón varias veces hasta que el ◀ símbolo
Aparece el siguiente símbolo.
Seleccione la velocidad requerida del ventilador presionando el ⚙ botón.
Tres velocidades están disponibles: Alta / Media / Baja.

Modo de secado
Ideal para reducir la humedad de la habitación (primavera y otoño, habitaciones húmedas, períodos de lluvia, etc.).
En modo seco, el aparato debe prepararse de la misma manera que para el modo frío, con la manguera de escape de aire conectada para permitir que la humedad se descargue afuera.
Para configurar este modo correctamente:
Presione el botón varias veces hasta que el ◀ símbolo Aparece el siguiente símbolo. La pantalla muestra "dh".
En este modo, la velocidad del ventilador se selecciona automáticamente por Aparato y no se puede configurar manualmente.

Modo automático
El aparato elige automáticamente si funciona en modo frío, ventilador o calor. (Algunos modelos determinados no tienen modo calor).
Para configurar este modo correctamente:
Presione el 🔊 botón varias veces hasta que ◀ aparezca el Ⓕ símbolo siguiente. La pantalla muestra " dh ".
Seleccione la velocidad requerida del ventilador presionando el botón. Hay cuatro velocidades disponibles: Alta / Media / Baja / Auto.
Si el aparato solo está enfriando el modelo, la unidad funciona en Modo de ventilador cuando la temperatura ambiente es inferior a 23°C (73°F), y Modo frío cuando la temperatura ambiente es superior a 23°C (73°F). Si la unidad está enfriando y calentando el modelo, la unidad funciona en Modo de calor cuando la temperatura ambiente es inferior a 20°C(68°F), y el modo Ventilador cuando la temperatura ambiente es de 20°C(68°F) a 23°C (73°F) y Modo frío cuando la temperatura ambiente es superior a 23°C (73°F).

Visualización en el panel de control:

flowchart
graph LR
    A["Step 1: Left loop with arrow"] --> B["Step 2: Center with arrow"]
    B --> C["Step 3: Right loop with arrow"]
    C --> D["Step 4: Left loop with arrow"]
Es el modo AUTO cuando la pantalla estará circulando.
Función de dormir
Esta función es útil para la noche, ya que reduce gradualmente el funcionamiento del aparato.
Para configurar esta función correctamente:
Seleccione el modo frío o calor como se describe anteriormente.
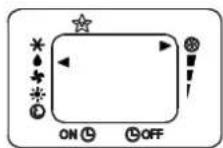
Presione el ☆ botón y el ▲ símbolo debajo del ☆ símbolo.

El aparato funciona en el modo previamente seleccionado.
Cuando elige la función de reposo, la pantalla reducirá el brillo.
La función SLEEP mantiene la habitación a una temperatura óptima sin excesos.
Fluctuaciones en temperatura o humedad con funcionamiento silencioso. La velocidad del ventilador es siempre a bajo, mientras que la temperatura y la humedad de la habitación varían gradualmente para garantizar la más cómodo.
Cuando está en el modo FRÍO, la temperatura seleccionada aumentará en 1°C(1°F) por hora en un periodo de 2 horas. Esta nueva temperatura se mantendrá durante las próximas 6 horas. Entonces el aparato lo apaga.
Cuando está en modo CALOR, la temperatura seleccionada disminuirá en 1°C(1°F) por hora en un periodo de 3 horas. Esta nueva temperatura se mantendrá durante las próximas 5 horas. Entonces el aparato lo apaga.
La función SLEEP se puede cancelar en cualquier momento durante la operación presionando el botón "Dormir", "Modo" o "Velocidad del ventilador".
En modo FAN o DRY, la función SLEEP no se puede configurar.
Switch the unit of temperature
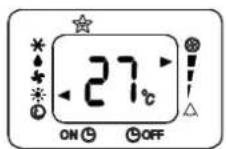
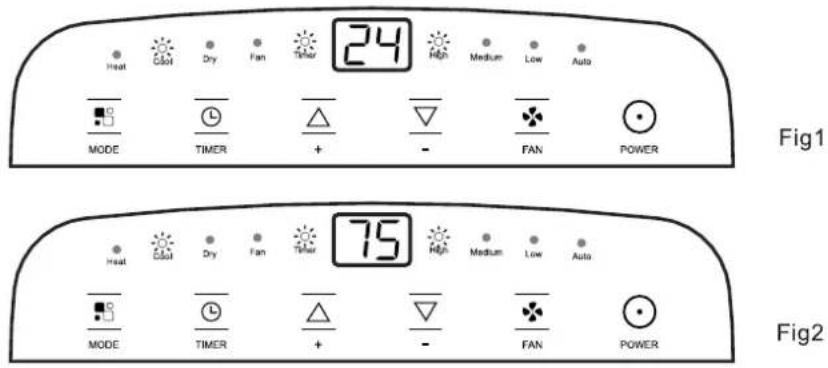
Cambia la unidad de temperatura Cuando el aparato está en espera, presione el botón, luego puede cambiar la unidad de la temperatura.
Por ejemplo:
Antes del cambio, en modo frío, la pantalla se muestra como fig1.
Después del cambio, en modo frío, la pantalla se muestra como fig2.

AJUSTE DEL TEMPORIZADOR
-Este temporizador se puede usar para retrasar el inicio o el apagado del dispositivo, esto evita el desperdicio de electricidad al optimizar los períodos de operación.
Programación puesta en marcha.
Encienda el aparato, elija el modo que desee, por ejemplo, frío, 24°C, alta velocidad del ventilador. Apague el aparato.
Presione el botón dos veces, la pantalla mostrará de 0.5 a 24 horas, y el ▼ símbolo aparecerá el siguiente símbolo y el ON ⊙ símbolo "h" parpadeará.

Presione el botón ▲ o ▼ varias veces hasta que aparezca el tiempo correspondiente.
Presione el Ⓤ botón nuevamente, el ▼ temporizador estará activo, luego aparecerá el ON Ⓑ símbolo
El siguiente símbolo y la hora se muestran en la pantalla.
Presione nuevamente el Ⓐ botón o el ⏻ botón, se cancelará el temporizador y El ▼ símbolo desaparece el siguiente ON Ⓑ símbolo.
Programación apagada
Cuando el aparato esté funcionando, presione el Ⓛ botón, la pantalla mostrará de 0.5 a 24 horas, y el ▼ símbolo aparece el siguiente ⓍOFF símbolo y el símbolo "h" es flash.
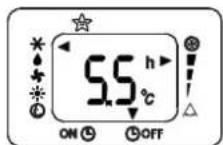
Presione el botón ▲ o ▼ varias veces hasta que aparezca el tiempo correspondiente.
Presione el Ⓤ botón nuevamente, el temporizador estará activo, luego aparecerá el ▼ símbolo
El siguiente símbolo y la hora se muestran en la pantalla.
Presione nuevamente el Ⓧ botón o el Ⓧ botón, se cancelará el temporizador y el ▼ símbolo desaparece el siguiente ⓍOFF símbolo.
Función de swing
Esta función no se usa para este modo de serie, por favor ajuste las aspas manualmente.

Para obtener lo mejor de su aparato, siga estas recomendaciones:
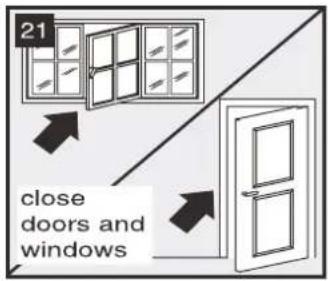
Cierre las ventanas y puertas de la habitación para que tengan aire acondicionado (fig. 21). Al instalar el aparato de forma semipermanente, debe dejar una puerta ligeramente abierta (tan solo 1 cm) para garantizar una ventilación correcta;
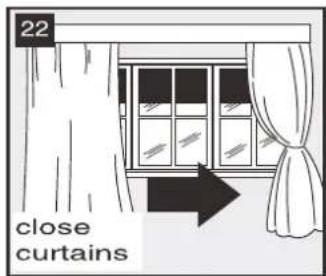
Proteja la habitación de la exposición directa al sol cerrando parcialmente las cortinas y / o persianas para que el aparato sea mucho más económico de ejecutar (fig. 22);
Nunca apoye objetos de ningún tipo sobre el aparato; No obstruya la entrada y salida de aire (fig. 23).
Deja las rejillas libres;
Asegúrese de que no haya fuentes de calor en la habitación;
Nunca utilice el aparato en habitaciones muy húmedas (por ejemplo, lavanderías).
Nunca utilice el aparato al aire libre.
Asegúrese de que el aparato esté parado sobre una superficie nivelada.
Si es necesario, coloque los seguros de ruedas debajo de las ruedas delanteras.


MÉTODO DE DRENAJE DE AGUA
Cuando hay un exceso de condensación de agua dentro de la unidad, el aparato deja de funcionar y muestra " Ft " (TANQUE COMPLETO como se menciona en AUTODIAGNÓSTICO).
Esto indica que es necesario drenar la condensación de agua mediante los siguientes procedimientos:
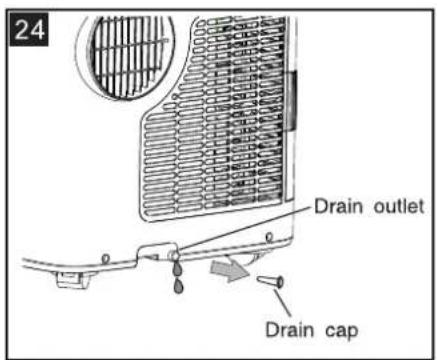
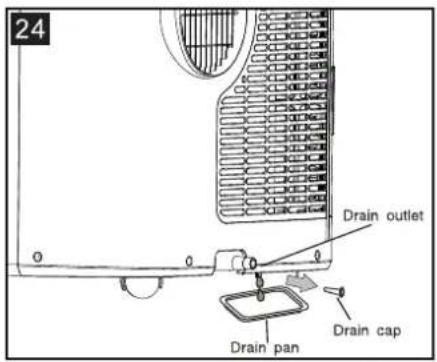
Drenaje manual (fig.24)
El agua puede necesitar ser drenada en áreas de alta humedad
- Desenchufe la unidad de la fuente de alimentación.
- Coloque una bandeja de drenaje debajo del tapón de drenaje inferior. Ver diagrama.
- Retire el tapón de drenaje inferior.
- El agua se drenará y se acumulará en la bandeja de drenaje (tal vez no suministrada).
- Después de drenar el agua, vuelva a colocar firmemente el tapón de drenaje inferior.
- Encienda la unidad.
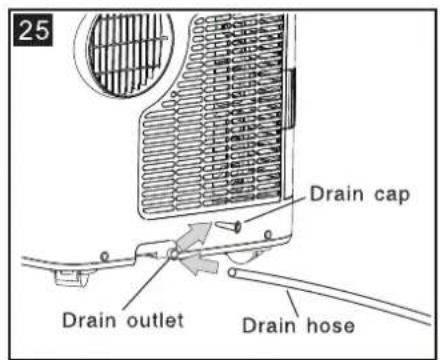
Drenaje continuo (fig.25)
Mientras utiliza la unidad en modo deshumidificador, se recomienda un drenaje continuo.
- Desenchufe la unidad de la fuente de alimentación.
- Retire el tapón de drenaje. Mientras se realiza esta operación, se puede derramar un poco de agua residual, así que tenga un recipiente para recoger el agua.
- Conecte la manguera de drenaje (1/2 "o 12.7 mm, tal vez no se suministre).
Vea el diagrama.
-
El agua se puede drenar de forma continua a través de la manguera hasta un desagüe o cubeta.
-
Encienda la unidad.
NOTA
Asegúrese de que la altura y la sección de la manguera de desagüe no deben más alto que el de la salida de drenaje, o el tanque de agua no puede ser drenado. (fig.26 y fig.27)

natural_image
Simple line drawing of a vertical device with a checkmark symbol, no text or labels present
natural_image
Illustration of a portable air conditioner unit next to a large 'X' symbol and wavy line, with no visible text or labels.LIMPIEZA
Antes de la limpieza o el mantenimiento, apague el aparato presionando el ⏻ botón en el panel de control o el control remoto, espere unos minutos y luego desenchúfelo de la toma de corriente.
LIMPIEZA DEL GABINETE
Debe limpiar el aparato con un paño ligeramente húmedo y luego seque con un paño seco.
Nunca lave el aparato con agua. Podría ser peligroso.
Nunca utilice gasolina, alcohol o disolventes para limpiar el aparato.
Nunca rocíe líquidos insecticidas o similares.
LIMPIEZA DE LOS FILTROS DE AIRE
Para mantener su aparato funcionando eficientemente, debe limpiar el filtro cada semana de operación.
El filtro del evaporador puede sacar como abajo la fig.

natural_image
Line drawing of a car door with handle and side arm, showing front and rear views (no text or symbols)Use una aspiradora para eliminar las acumulaciones de polvo del filtro. Si está muy sucio, sumérjalo en agua tibia y enjuague varias veces. El agua nunca debe estar a más de 40°C(104°F). Después de lavar, dejar secar el filtro y luego colocar el Rejilla de admisión al aparato.
INICIO DE LOS CONTROLES DE TEMPORADA
Asegúrese de que el cable de alimentación y el enchufe no estén dañados y que el sistema de tierra esté eficiente. Siga las instrucciones de instalación con precisión.
OPERACIONES DE FIN DE TEMPORADA
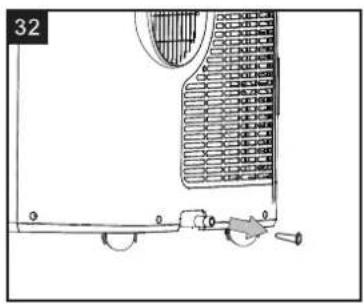
Vaciar completamente el circuito interno de agua, quitar la tapa (fig. 32).
Escurra toda el agua que quede en un recipiente.
Cuando toda el agua
Se ha drenado, vuelva a colocar la tapa en su lugar.
Limpie el filtro y seque completamente antes de volver a colocarlo.
natural_image
Technical diagram of a mechanical assembly with no visible text or symbolsCondiciones de limite
Temperatura de la habitación
Temperatura de la habitación
18°C-35°C (64°F-95°F)(refrigeración)
10°C-25°C (50°F-77°F)(calefacción)
TAMAÑO DEL APARATO
Ancho 445 mm
Altura 720 mm
Profundidad 375 mm

| PROBLEMA | CAUSA | SOLUCIÓN |
| El aparato no funciona | - No hay corriente- No está enchufado a la red.- El dispositivo de seguridad interno se ha disparado. | - Espere- Enchufe a la red.- Espere 30 minutos, si el problema persiste, póngase en contacto con su centro de servicio |
| El aparato solo trabaja por un corto tiempo | - Aquí hay curvas en la manguera de escape de aire.- Algo está impidiendo. el aire de ser descargado | - Coloque la manguera de escape de aire correctamente, manteniéndola lo más corta y sin curvas como sea posible para evitar cuellos de botella- Comprobar y eliminar cualquier obstáculo que obstruya la descarga de aire. |
| El aparato funciona, pero no enfría la habitación | - Ventanas, puertas y / o cortinas abiertas | - Cierre puertas, ventanas y cortinas, teniendo en cuenta los "consejos para el uso correcto" que se indican arriba. |
| - Hay fuentes de calor en el habitación (horno, secador de pelo, etc) | - Eliminar las fuentes de calor. | |
| - La manguera de escape de aire está separada del aparato. | - Coloque la manguera de escape de aire en el alojamiento en la parte posterior del aparato | |
| - La especificación técnica del aparato no es adecuada para la habitación en la que se encuentra. | ||
| Durante la operación, hay un olor desagradable en la habitación | - Filtro de aire obstruido. | - Limpie el filtro como se describe arriba |
| El aparato no opera por alrededor de tres minutos después de reiniciando | - El dispositivo de seguridad interno del compresor evita que el aparato se reinicie hasta tres minutos.han transcurrido desde que se apagó por última vez | - Espere. Este retraso es parte del funcionamiento normal. |
| El seguimiento aparece un mensaje en la pantalla: Lt / PF/ Ft | - El aparato tiene un sistema de autodiagnóstico para identificar una serie de fallos de funcionamiento. | - Ver el capítulo de autodiagnóstico. |
PORTABLE TYPE AIR CONDITIONER USER MANUAL

natural_image
Line drawing of a portable air conditioner unit with control panel and wheels (no text or symbols)Thank you for selecting our quality appliance. Please be sure to read this user manual carefully before using. Any question, please contact the professional service for help.
- This appliance can be used by children aged from 8 years and above and persons with reduced physical, sensory or mental capabilities or lack of experience and knowledge if they have been given supervision or instruction concerning use of the appliance in a safe way and understand the hazards involved.
• Children shall not play with the appliance. - Cleaning and user maintenance shall not be made by children without supervision.
- Disconnect the appliance from its power source during service and when replacing parts.
- Warning: before obtaining access to terminals, all supply circuits must be disconnected.
- If the supply cord is damaged, it must be replaced by the manufacturer, its service agent or a similarly qualified person in order to avoid a hazard.
- Disconnect the power supply before cleaning and maintenance.
- The appliance shall not be installed in the laundry.
- Please note: Check the nameplate for the type of refrigerant gas used in your appliance.
- Specific information regarding appliances with refrigerant gas.
R410A, R134a, R290 is a refrigerant that complies with European ecological standards; nevertheless, it is recommended not to pierce the cooling circuit of the machine. At the end of its useful life, deliver the appliance to a special waste collection centre for disposal.
- This hermetically sealed system contains fluorinated greenhouse gases.
- ENVIRONMENTAL INFORMATION: This unit contains fluorinated greenhouse gases covered by the Kyoto Protocol.
- The maintenance and disposal operations must be carried out by qualified personnel only. (For more details on the refrigerant, see back cover).
GWP(Global Warming Potential): R410A: 2088, R134a: 1430, R290: 3.
- Do not use this unit for functions other than those described in this instruction manual.
- If the power cord becomes worn or damaged, the cord should only be replaced by a qualified service technician using genuine replacement parts.
- Make sure the plug is plugged firmly and completely into the outlet. It can result in the risk of electric shock or fire.
- Do not plug other appliances into the same outlet, it can result in the risk of electric shock.
- Do not disassemble or modify the appliance or the power cord, it can result in the risk of electric shock or fire. All other services should be referred to a qualified technician.
- Do not place the power cord or appliance near a heater, radiator, or other heat source. It can result in the risk of electric shock or fire.
- This unit is equipped with a cord that has a earthed wire connected to an earthed pin or grounding tab. The plug must be plugged into a socket that is properly installed and earthed. Do not under any circumstances cut or remove the earthed pin or grounding tab from this plug.
- The unit should be used or store in such a way that it is protected from moisture e.g. condensation, splashed water, etc. Unplug unit immediately if this occurs.
- Always transport your appliance in a vertical position and place on a stable, level surface during use. If the unit is transported laying on its side it should be stood up and left unplugged for 6 hours.
-
Always use the switch on the control panel to turn the unit or r remote control off, and do not start or stop operation by plugging in or unplugging the power cord. It can result in the risk of electric shock.
-
Do not press the buttons on the control panel with anything other than your wet or damp fingers.
- Do not use hazardous chemicals to clean or come into contact with the unit. To prevent damage to the surface finish, use only a soft cloth to clean the appliance. Do not use wax, thinner, or a strong detergent. Do not use the unit in the presence of inflammable substance or vapour such as alcohol, insecticides, gasoline, etc.
- Young children should be supervised to ensure that they do not play with, operate or climb on the appliance.
- If the appliance is making unusual sounds or is emitting smoke or an unusual odor, unplug it immediately.
- Do not clean the unit with water. Water can enter the unit and damage the insulation, creating a shock hazard. If water enters the unit, unplug it immediately and contact Customer Service.
- Utilize two or more people to lift and install the unit.
- Be sure all accessories are removed from the packing before use.
- To avoid possible cuts, avoid contacting the metal parts of the appliance when removing or re-installing the filter. It can result in the risk of personal injury.
- Do not block the air inlet or outlet of the appliance. Reduced air flow will result in poor performance and could damage the unit.
• Always grasp the plug when plugging in or unplugging the appliance. Never unplug by pulling on the cord. It can result in the risk of electrical shock and damage.
• Install the appliance on a sturdy, level floor capable of supporting up to 110lbs(50kg). Installation on a weak or unlevel floor can result in the risk of property damage and personal injury. - Close all doors and windows to the room for most efficient operation.
IMPORTANT - GROUNDING METHOD
This product is factory equipped with a power supply cord that has a three-pronged grounded plug. It must be plugged into a mating grounding type receptacle in accordance with the National Electrical Code and applicable local codes and ordinances. If the circuit does not have a grounding type receptacle, it is the responsibility and obligation of the customer to exchange the existing receptacle in accordance with the National Electrical Code and applicable local codes and ordinances. The third ground prong should not, under any circumstances, be cut or removed. Never use the cord, the plug or the appliance when they show any sign of damage. Do not use your appliance with an extension cord unless it has been checked and tested by a qualified electrical supplier. Improper connection of the grounding plug can result in risk of fire, electric shock and/or injury to persons associated with the appliance. Check with a qualified service representative if in doubt that the appliance is properly grounded.
ELECTRICAL CONNECTIONS
Before plugging the appliance into the mains socket, check that:
- The mains power supply corresponds to the value indicated on the rating plate on the back of the appliance.
- The power socket and electrical circuit are adequate for the appliance.
- The mains socket matches the plug. If this is not the case, have the plug replaced.
- The mains socket is adequately earthed. Failure to follow these important safety instructions absolves the manufacturer of all liability.
Important information for correct disposal of the product in accordance with EC Directive 2012/19/EU.

natural_image
Symbol of a trash bin crossed out by two crossed lines, with a blank rectangular base below (no text or symbols)At the end of its working life, the product must not be disposed of as urban waste. It must be taken to a special local authority differentiated waste collection centre or to a dealer providing this service. Disposing of a household appliance separately avoids possible negative consequences for the environment and health deriving from inappropriate disposal and enables the constituent materials to be recovered to obtain significant savings in energy and resources. As a reminder of the need to dispose of household appliances separately, the product is marked with a crossed-out wheeled dustbin.
SOME NOTIONS ON HUMIDITY
Air always contains a certain amount of water in the form of vapour. This determines the level of humidity in an atmosphere. The capacity of the air to hold water vapour increases with temperature. This is why in our homes, as soon as the temperature decreases, the vapour contained in the air condenses, as is evident on the colder surfaces in the room, such as the windows, walls etc. The purpose of a dehumidifier is to remove the excess moisture from the air, avoiding the damage caused by condensation.
Experts have established that the optimum environmental conditions for our well being and for the home are obtained between 40% and 60% relative humidity. With very low temperatures, you are recommended to heat the room even minimally. This considerably increases the dehumidifying power of the appliance. With heating, the condensation formed by the water vapour on windows and other cold surfaces evaporates into the air to be collected by the dehumidifier. Air leaving the dehumidifier is usually about 1°C-2°C warmer than room temperature.
Specific information regarding appliances with R290 refrigerant gas
• Thoroughly read all ofthe warnings.
- When defrosting and cleaning the appliance, do not use any tools other than those recommended by the manufacturing company.
- The appliance must be placed in an area without any continuous sources of ignition (for example: open flames, gas or electrical appliances in operation).
- Do not puncture and do not burn.
- Refrigerant gases can be odourless.
- The appliance must be installed, used and stored in an area that is greater than 13 m ^2
- R290 is a refrigerant gas that complies with the European directives on the environment. Do not puncture any part of the refrigerant circuit.
- If the appliance is installed, operated or stored in a non-ventilated area, the room must be designed to prevent the accumulation of refrigerant leaks resulting in a risk of fire or explosion due to ignition of the refrigerant caused by electric heaters, stoves, or other sources of ignition.
- The appliance must be stored in such a way as to prevent mechanical failure.
- Individuals who operate or work on the refrigerant circuit must have the appropriate certification issued by an accredited organisation that ensures competence in handling refrigerants according to a specific evaluation recognized by associations in the industry.
- Repairs must be performed based on the recommendations from the manufacturing company.
- Maintenance and repairs that require the assistance of other qualified personnel must be performed under the supervision of an individual specified in the use of flammable refrigerants.

natural_image
Simple line drawing of an open book with no text or symbols visible
- Deflector
- Control panel
- Handle (both sides)
- Castors
- Power cable
- Intake grille
- Air outlet grille
- Intake grille
- Condenser drain
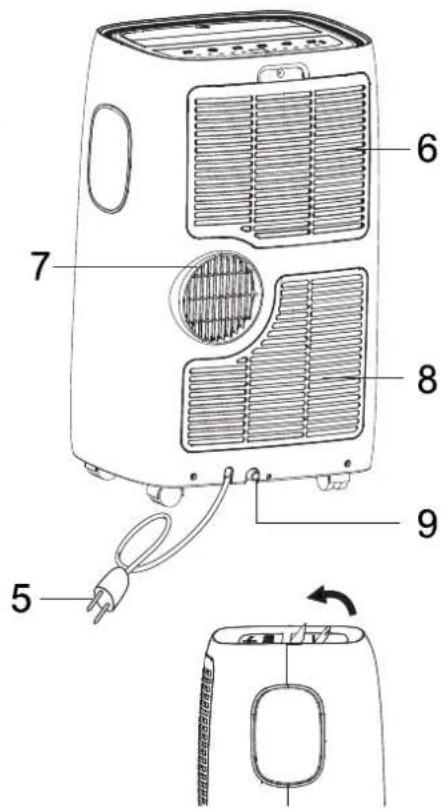
* Open the louver before use the unit.
ACCESSORIES
| PARTS | PARTS NAME | QUANTITY | ||
 |  | 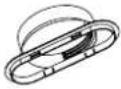 | Exhaust hoseHose inletHose outlet | 1 set |
 | Window slider kit | 1 set | ||
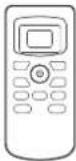 | Remote ControlBattery | 1 set | ||
 | Drainage hose* | 1 set | ||
“*” means only the heat pump model have this function.
Note: All the illustrations in this manual are for explanatory purposes only.
Your appliance may be slightly different.
EXHAUSTING HOT AIR
In the Cool Mode the appliance must be placed close to a window or opening so that the warm exhaust air can be ducted outside.
First position unit on a flat floor and make sure there's a minimum of 12" (30cm) clearance around the unit, and is within the vicinity of a single circuit outlet power source.
- Extend either side of the hose (Fig.1) and screw the hose inlet (Fig.2).
- Extend the other side of the hose and screw it to the hose outlet (Fig.3).
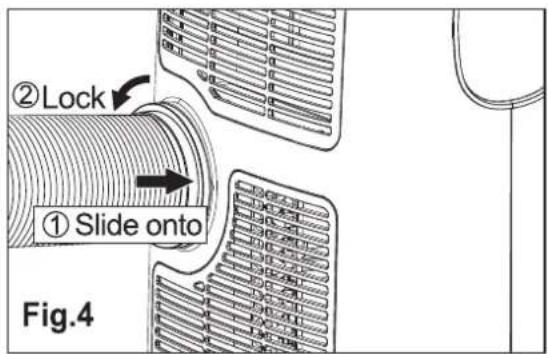
- Install the hose inlet into the unit (Fig.4).
4 .Affix the hose outlet into the window slider kit and seal. (Fig.5 &6).

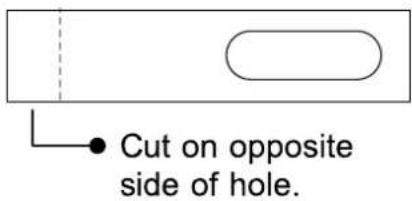
Your window slider kit has been designed to fit most standard vertical and horizontal window applications, however, it may be necessary for you to modify some aspects of the installation procedures for certain types of windows. The window slider kit can be fastened with screws.
NOTE: If the window opening is less than the minimum length of the window slider kit, cut the end without the hold in it short enough to fit in the window opening. Never cut out the hole in window slider kit.

1:Parts:
A) Panel
B) Panel with one hole
C) Panel without hole (maybe not supplied)
D) Screw to lock window kit in place
2: Assembly:
Slide Panel B and C into Panel A and size to widow width. Windows sizes vary. When sizing the window width, be sure that the window kit assembly is free from gaps from gaps and/or air pockets when taking measurements.
3: Lock the screw into the holes that correspond. With the width that your window requires to ensure that there are no gaps or air pockets in the window kit assembly after installation.

LOCATION
- The unit should be placed on a firm foundation to minimize noise and vibration. For safe and secure positioning, place the unit on a smooth, level floor strong enough to support the unit.
- The unit has casters to aid placement, but it should only be rolled on smooth, flat surfaces. Use caution when rolling on carpeted surfaces. Use caution and Protect floors when rolling over wood floors. Do not attempt to roll the unit over objects.
- The unit must be placed within reach of a properly rated grounded socket.
- Never place any obstacles around the air inlet or outlet of the unit.
- Allow at least 45cm of space away from the wall for efficient air conditioning.
- The hose can be extended, but it is the best to keep the length to minimum required. Also make sure that the hose does not have any sharp bends or sags.

natural_image
Diagram of a vehicle with a curved pipe and diagonal line crossing, no text or symbols presentCONTROL PANEL
“*” means only the heat pump model have this function.
OPERATING FROM THE CONCTROL PANEL
The control panel is on the top of the appliance, enables you to manage part functions without remote controller, but to fully exploit its potential, you must use the remote controller.
TURNING THE APPLIANCE ON
Plug into the mains socket, then the appliance is standby.

Press the ⏻ button to make the appliance turn on. The last function active when it was turned off will appear.
√ Never turn the appliance off by unplugging from the mains. Always press the button ⏻, then wait for a few minutes before unplugging. This allows the appliance to perform a cycle of checks to verify operation.
1) COOL mode
Ideal for hot muggy weather when you need to cooling and dehumidify the room.
To set this mode correctly:
- Press the 📁 button a number of times until the Cool symbol appears.
- Select the target temperature 18^ C - 32^ C(64^ F - 90^ F) by pressing the ▲ or ▼ button until the corresponding value is displayed.
- Select the required fan speed by pressing the ✧ button.
Four speeds are available: High / Medium / Low / Auto.
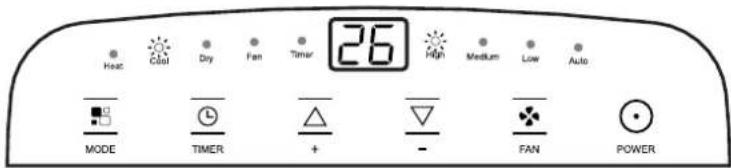
The most suitable temperature for the room during the summer varies from 24^ C to 27^ C ( 75^ F to 81^ F). You are recommended, however, not to set a temperature much below the outdoor temperature. The fan speed difference is more noticeable when the appliance is under FAN mode but may not be noticeable under COOL mode.
2) HEAT mode \*
“*” means only the heat pump model have this function.
To set this mode correctly:
- Press the 📁 button a number of times until the Heat symbol appears.
- Select the target temperature 13^ C - 27^ C(55^ F - 81^ F) by pressing the ▲ or ▼ button until the corresponding value is displayed.
- Select the required fan speed by pressing the ✧ button.
Four speeds are available: High / Medium / Low / Auto.

• Water is removed from the air and collected in the tank.
- When the tank is full, the appliance shuts down and "Ft" (full tank) appears on the display. The tank cap must be extracted and emptied. Run off all water left into a basin. When all the water has been drained, put the cap back in place.
- When the tank has been emptied, the appliance starts up again.
N.B.: - When operating in very cold rooms, the appliance defreezes automatically, momentarily interrupting normal operation. " L E " appears on the display. During this operation, it is normal for the noise made by the appliance to change.
- In this mode, you may have to wait for a few minutes before the appliance starts giving out hot air.
- In this mode, the fan may operate for short periods, even though the set temperature has already been reached.
3) FAN mode
When using the appliance in this mode, the air hose does not need to be attached.
- Press the 📁 button a number of times until the Fan symbol appears.
- Select the required fan speed by pressing the ♣ button.
Three speeds are available: High / Medium / Low.
The screen display "≡≡" as high speed, "≡≡" as medium speed, "____" as low speed.

4) DRY mode
Ideal to reduce room humidity (spring and autumn, damp rooms rainy periods, etc). In dry mode, the appliance should be prepared in the same way as for cool mode, with the air exhaust hose attached to enable the moisture to be discharged outside.
To set this mode correctly:
- Press the 📁 button a number of times until the Dry symbol appears.
The screen display "DH".
- In this mode, fan speed is selected automatically by the appliance and can not be set manually.

5) SETTING THE TIMER
-This timer can be used to delay the appliance startup or shutdown, this avoids wasting electricity by optimising operating periods.
Programming start up
- Turn on the appliance, choose the mode you want, for example cool, 24°C, high fan speed. Turn off the appliance.
- Press the Timer button, the ⏻ symbol and number of hours flash.
- Press the ▲ or ▼ button to set the number of hours delay before the appliance comes on. The timer can set in intervals of 0.5 hours up to 10 hours, the in intervals of 1 hour to 24 hours.
- A few second after set, the setting is memorized, the timer indicator is light and the display shows that the appliance is in standby.

- Press again the Timer button or the ⏻ button, the timer will be canceled, and the Ⓛ symbol will disappear from screen.
Programming shut down
- When the appliance is running, press the ⏻ button, the Timer indicator and the hours flash.
- Press the ▲or▼buttons to set the number of hours delay before the unit turns off.
- A few second after set, the setting is memorized, the timer indicator is light and the display shows the current mode. At the end of the set time the unit automatically turns to standby mode.
- Press again the Timer button or the ⏻ button, the timer will be canceled, and the Ⓛ symbol will disappear from screen.
SELF-DIAGNOSIS
The appliance has a self diagnosis system to identify a number of malfunctions. Error messages are displayed on the appliance display.
| IF IS DISPLAYED | WHAT SHOULD I DO? |
 LOW TEMPERATURE (frost prevention) LOW TEMPERATURE (frost prevention) | The appliance is fitted with a frost protection device to avoid excessive formation of ice.The appliance starts up again automatically when the defrosting process is completed. |
 PROBE FAILURE (sensor damaged) PROBE FAILURE (sensor damaged) | If this is displayed, contact your local authorised service centre. |
 FULL TANK (safety tank full) FULL TANK (safety tank full) | Empty the internal safety tank, following the instructions in the "End of season operations" paragraph. |
REMOTE CONTROLLER

√ Point the remote control at the receiver on the appliance.
√ The remote control must be no more than 7 meters away from the appliance (without obstacles between the remote control and the receiver).
√ The remote control must be handled with extreme care. Do not drop it or expose it to direct sunlight or sources of heat. If the remote control do not work, please try to take out the battery, and put it back.

INSERTING OR REPLACING THE BATTERIES
- Remove the cover on the rear of the remote control;
- Insert two "AAA" 1.5V batteries in the correct position (see instructions inside the battery compartment);
- Replace the cover.

natural_image
Illustration of hands holding a mobile phone with a device, no text or symbols visibleNOTE:
- If the remote control unit is replaced or disposed of, the batte-batteries must be removed and discarded in accordance with current legislation as they are harmful to the environment.
- Do not mix old and new batteries. Do not mix alkaline, standard (carbon-zinc) or rechargeable (nickel-cadmium) batteries.
- Do not dispose of batteries in fire. Batteries may explode or leak.
- If the remote control is not be used for a certain length of time, remove the batteries.
COOL mode
Ideal for hot muggy weather when you need to cooling and dehumidify the room. To set this mode correctly:
- Press the 📁 button a number of times until the ◀ symbol appears next ✱ symbol.
- Select the target temperature 18^ C - 32^ C(64^ F - 90^ F) by pressing the ▲ or ▼ button until the corresponding value is displayed.
- Select the required fan speed by pressing the ⚙ button.
Four speeds are available: High / Medium / Low / Auto.
High
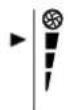
Medium

Low

Auto

The most suitable temperature for the room during the summer varies from 24^ C to 27^ C ( 75^ F to 81^ F). You are recommended, however, not to set a temperature much below the outdoor temperature. The fan speed difference is more noticeable when the appliance is under FAN mode but may not be noticeable under COOL mode.
HEAT mode \*
“*” means only the heat pump model have this function.
To set this mode correctly:
- Press the 📁 button a number of times until the ◀ symbol appears next ⚙ symbol.
- Select the target temperature 13^ C - 27^ C(55^ F - 81^ F) by pressing the ▲ or ▼ button until the corresponding value is displayed.
- Select the required fan speed by pressing the ⚙ button.
Four speeds are available: High / Medium / Low / Auto.

• Water is removed from the air and collected in the tank.
- When the tank is full, the appliance shuts down and "F£"(full tank) appears on the display. The tank cap must be extracted and emptied. Run off all water left into a basin. When all the water has been drained, put the cap back in place.
- When the tank has been emptied, the appliance starts up again.
N.B.: - When operating in very cold rooms, the appliance defreezes automatically, momentarily interrupting normal operation. " L E " appears on the display. During this operation, it is normal for the noise made by the appliance to change.
- In this mode, you may have to wait for a few minutes before the appliance starts giving out hot air.
- In this mode, the fan may operate for short periods, even though the set temperature has already been reached.
FAN mode
When using the appliance in this mode, the air hose does not need to be attached.
- Press the 🔊 button a number of times until the ◀ symbol appears next ❖ symbol.
- Select the required fan speed by pressing the ⚙ button.
Three speeds are available: High / Medium / Low.
DRY mode
Ideal to reduce room humidity (spring and autumn, damp rooms rainy periods, etc). In dry mode, the appliance should be prepared in the same way as for cool mode, with the air exhaust hose attached to enable the moisture to be discharged outside. To set this mode correctly:
- Press the 🔊 button a number of times until the ◀ symbol appears next ♠ symbol. The screen display "DH".
- In this mode, fan speed is selected automatically by the appliance and can not be set manually.
AUTO mode
The appliance chooses automatically whether to operate in cool, fan or heat mode (some certain models have not heat mode).
To set this mode correctly:
- Press the 🔊 button a number of times until the ◀ symbol appears next ⓣ symbol. The screen display "DH".
- Select the required fan speed by pressing the button.
Four speeds are available: High / Medium / Low / Auto.

If the appliance is cooling only model, the unit operates in Fan mode when the room temperature is below 23^ C ( 73^ F), and Cool mode when the room temperature is above 23^ C ( 73^ F).
If the unit is cooling and heating model, the unit operates in Heat mode when the room temperature is below 20^(68^) , and Fan mode when the room temperature is from 20^(68^) to 23^(73^) , and Cool mode when the room temperature is above 23^(73^) .
Display on the control panel:

flowchart
graph LR
    A["Step 1: Square with arrowheads and dashed outline"] --> B["Step 2: Square with arrowheads and dashed outline"]
    B --> C["Step 3: Square with arrowheads and dashed outline"]
    C --> D["Step 4: Square with arrowheads and dashed outline"]
It is AUTO mode when the display will be running circulating.
SLEEP function
This function is useful for the night as it gradually reduces operation of the appliance. To set this function correctly:
- Select the cool or heat mode as described above.
- Press the ☆ button, and the ▲ symbol under ☆ symbol.

The appliance operates in the previously selected mode.
When you choose the sleep function, the screen will reduce the brightness. The SLEEP function maintains the room at optimum temperature without excessive fluctuations in either temperature or humidity with silent operation. Fan speed is always at Low, while room temperature and humidity vary gradually to ensure the most comfortable.
When in COOL mode, the selected temperature will increase by 1^ C( 1^ F) per hour in a 2 hour period. This new temperature will be maintained for the next 6 hours. Then the appliance turn it off.
When in HEAT mode, the selected temperature will decrease by 1^ C( 1^ F) per hour in a 3 hour period. This new temperature will be maintained for the next 5 hours. Then the appliance turn it off.
The SLEEP function can be canceled at any time during operation by pressing the "Sleep", "Mode" or "fan speed" button.
In FAN or DRY mode, SLEEP function cannot be set.
Switch the unit of temperature
When the appliance is standby, press the button, then you can change the unit of temperature.
For example:
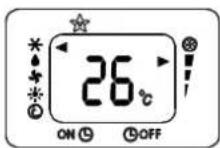
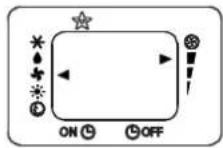
Before change, in cool mode, the screen display like fig1.
After change, in cool mode, the screen display like fig2.
SETTING THE TIMER
-This timer can be used to delay the appliance startup or shutdown, this avoids wasting electricity by optimising operating periods.
Programming start up
- Turn on the appliance, choose the mode you want, for example cool, 24°C, high fan speed. Turn off the appliance.
- Press the ⏻ button twice, the screen will display 0.5-24 hours, and the ▼ symbol appears next ON Ⓑ symbol and "h" symbol is flash.

- Press the ▲ or ▼ button several times until the corresponding time is displayed. Press the ⏻ button again, the timer will be active, then the ▼ symbol appears next ON ⏱ symbol and time are displayed on screen.
- Press again the ⏻ button or the ⏻ button, the timer will be canceled, and the ▼ symbol disappear next ON ⏻ symbol.
Programming shut down
- When the appliance is running, press the Ⓛ button, the screen will display 0.5-24 hours, and the the ▼ symbol appears next ⒶOFF symbol and "h" symbol is flash.

- Press the ▲ or ▼ button several times until the corresponding time is displayed. Press the ⏻ button again, the timer will be active, then the ▼ symbol appears next ⏱ OFF symbol and time are displayed on screen.
- Press again the ⏻ button or the ⏻ button, the timer will be canceled, and the ▼ symbol disappear next Ⓓ OFF symbol.
To get the best from your appliance, follow these recommendations:
- Close the windows and doors in the room to be air conditioned (fig. 21). When installing the appliance semi-permanently, you should leave a door slightly open (as little as 1 cm) to guarantee correct ventilation;
- Protect the room from direct exposure to the sun by partially closing curtains and/or blinds to make the appliance much more economical to run (fig. 22);
- Never rest objects of any kind on the appliance;
- Do not obstruct the air intake and outlet (fig. 23). Leave the grilles free;
- Make sure there are no heat sources in the room;
- Never use the appliance in very damp rooms (laundries for example).
- Never use the appliance outdoors.
- Make sure the appliance is standing on a level surface. if necessary, place the castor locks under the front wheels.


WATER DRAINAGE METHOD
When there is excess water condensation inside the unit, the appliance stops running and shows “Ft”(FULL TANK as mentioned in SELF-DIAGNOSIE). This indicates that the water condensation needs to be drained using the following procedures:
Manual Draining (fig.24)
Water may need to be drained in high humidity areas
- Unplug the unit from power source.
- Place a drain pan under the lower drain plug. See diagram.
- Remove the lower drain plug.
- Water will drain out and collect in the drain pan (maybe not supplied).
- After the water is drained, replace the lower drain plug firmly.
- Turn on the unit.
Continuous Draining (fig.25)
While using the unit in dehumidifier mode, continuous drainage is recommended.
- Unplug the unit from the power source.
- Remove the drain plug. While doing this operation some residual water may spill so please have a pan to collect the water.
- Connect the drain hose (1/2" or 12.7mm, maybe not supplied). See diagram.
- The water can be continuously drained through the hose into a floor drain or bucket.
- Turn on the unit.

NOTE
Please be sure that the height of and section of the drain hose should not be higher than that of the drain outlet, or the water tank may not be drained. (fig.26 and fig.27)

natural_image
Simple line drawing of a vertical air conditioner unit with a checkmark symbol (no text or labels)
natural_image
Simple line drawing of a portable air conditioner unit and a cross symbol (no text or labels)CLEANING
Before cleaning or maintenance, turn the appliance off by pressing the ⏻ button on the control panel or remote control, wait for a few minutes then unplug from the mains socket.
CLEANING THE CABINET
You should clean the appliance with a slightly damp cloth then dry with a dry cloth.
- Never wash the appliance with water. It could be dangerous.
- Never use petrol, alcohol or solvents to clean the appliance.
- Never spray insecticide liquids or similar.
CLEANING THE AIR FILTERS
To keep your appliance working efficiently, you should clean the filter every week of operation.
The evaporator filter can take out like below fig.

natural_image
Line drawing of a car interior with door, handle, and seat (no text or symbols)Use a vacuum cleaner to remove dust accumulations from the filter. If it is very dirty, immerse in warm water and rinse a number of times. The water should never be hotter than 40^(104^) . After washing, leave the filter to dry then attach the intake grille to the appliance.
START OF SEASON CHECKS
Make sure the power cable and plug are undamaged and the earth system is efficient. Follow the installation instructions precisely.
END OF SEASON OPERATIONS
To empty the internal circuit completely of water, remove the cap(fig. 32).
Run off all water left into a basin. When all the water has been drained, put the cap back in place.
Clean the filter and dry thoroughly before putting back.

natural_image
Technical line drawing of a mechanical component with no visible text or symbolsTECHNICAL SPECIFICATIONS
| Mains voltage | see rating label |
| Maximum power in cooling mode | -- |
| Refrigerant | -- |
| Cooling capacity | -- |
LIMIT CONDIT IONS
Temperature of room 18°C-35°C (64°F-95°F)(Cooling)
Temperature of room 10°C-25°C (50°F-77°F)(Heating)
SIZE OF APPLIANCE
Width 445 mm
Height 720 mm
Depth 375 mm
| PROBLEM | CAUSE | SOLUTION |
| The appliance does not come on | There is no currentIt is not plugged into the mainsThe internal safety device has tripped | WaitPlug into the mainsWait 30 minutes, if the problem persists, contact your service center |
| The appliance works for a short time only | Here are bends in the air exhaust hoseSomething is preventing the air from being discharged | Position the air exhaust hose correctly, keeping it as short and free of curves as possible to avoid bottlenecksCheck and remove any obsta-cles obstructing air discharge |
| The appliance works, but does not cool the room | Windows, doors and/or curtains open | Close doors, windows and curtains, bearing in mind the "tips for correct use" given above |
| There are heat sources in the room (oven, hairdryer, etc) | Eliminate the heat sources | |
| The air exhaust hose is detached from the appliance | Fit the air exhaust hose in the housing at the back of the appliance | |
| The technical specification of the appliance is not adequate for the room in which it is located | ||
| During operation, there is an unpleasant smell in the room | Air filter clogged | Clean the filter as described above |
| The appliance does not operate for about three minutes after restarting it | The internal compressor safety device prevents the appliance from being restarted until three minutes have elapsed since it was last turned off | Wait. This delay is part of normal operation |
| The following message appears on the display: Lt / PF/ Ft | The appliance has a self diagnosis system to identify a number of malfunctions | See the SELF-DIAGNOSIS Chapter |
SVAN TRADING S.L.
C/ Ciudad de Cartagena, 20.
Paterna (46988). SPAIN.
info@svanelectro.com
960600034

- svan
- AIRE ACONDICIONADO PORTÁTIL MANUAL DE INSTRUCCIONES
- PRECAUCIONES IMPORTANTES
- SALVAGUARDIAS IMPORTANTES
- IMPORTANTE - MÉTODO DE CONEXIÓN A TIERRA
- CONEXIONES ELÉCTRICAS
- Información específica sobre aparatos con gas refrigerante R290.
- INSTRUCCIONES DE INSTALACIÓN
- ESCAPE DE AIRE CALIENTE
- INSTALACIÓN DEL KIT DESLIZANTE DE VENTANA
- UBICACIÓN
- FUNCIONAMIENTO DESDE EL PANEL DE CONCTROL
- ENCENDER EL APARATO
- DESCRIPCIÓN DE LA PANTALLA DE VISUALIZACIÓN
- 1) Modo COOL
- 2) Modo de CALOR \*
- 3) Modo VENTILADOR
- 4) Modo SECO
- 5) AJUSTE DEL TEMPORIZADOR
- Programación puesta en marcha.
- Programación apagada
- AUTO DIAGNÓSTICO
- INSERTAR O REEMPLAZAR LAS BATERÍAS
- NOTA:
- MANUAL DE CONTROL REMOTO
- Modo COOL
- Modo calor\*
- Modo de ventilador
- Modo de secado
- Modo automático
- Función de dormir
- Switch the unit of temperature
- AJUSTE DEL TEMPORIZADOR
- Función de swing
- MÉTODO DE DRENAJE DE AGUA
- Drenaje continuo (fig.25)
- NOTA
- LIMPIEZA
- LIMPIEZA DEL GABINETE
- LIMPIEZA DE LOS FILTROS DE AIRE
- INICIO DE LOS CONTROLES DE TEMPORADA
- OPERACIONES DE FIN DE TEMPORADA
- Condiciones de limite
- PORTABLE TYPE AIR CONDITIONER USER MANUAL
- IMPORTANT - GROUNDING METHOD
- ELECTRICAL CONNECTIONS
- SOME NOTIONS ON HUMIDITY
- Specific information regarding appliances with R290 refrigerant gas
- EXHAUSTING HOT AIR
- LOCATION
- OPERATING FROM THE CONCTROL PANEL
- TURNING THE APPLIANCE ON
- 1) COOL mode
- 2) HEAT mode \*
- 3) FAN mode
- 4) DRY mode
- 5) SETTING THE TIMER
- Programming start up
- Programming shut down
- SELF-DIAGNOSIS
- REMOTE CONTROLLER
- INSERTING OR REPLACING THE BATTERIES
- NOTE:
- COOL mode
- HEAT mode \*
- FAN mode
- DRY mode
- AUTO mode
- SLEEP function
- SETTING THE TIMER
- WATER DRAINAGE METHOD
- Manual Draining (fig.24)
- Continuous Draining (fig.25)
- NOTE
- CLEANING
- CLEANING THE CABINET
- CLEANING THE AIR FILTERS
- START OF SEASON CHECKS
- END OF SEASON OPERATIONS
Marque : SVAN
Modèle : 121PBC
Catégorie : Climatisation