
SX-PX334 - Piano TECHNICS - Notice d'utilisation et mode d'emploi gratuit
Retrouvez gratuitement la notice de l'appareil SX-PX334 TECHNICS au format PDF.


| Type de produit | Piano numérique |
| Marque | Technics |
| Modèle | SX-PX334 |
| Clavier | 88 touches pondérées avec vélocité |
| Polyphonie | 32 notes |
| Nombre de sons | 8 sons intégrés (piano, orgue, cordes, etc.) |
| Effets | Réverbération, chorus |
| Pédales | 1 pédale sustain |
| Métronome | Intégré avec réglage de tempo |
| Transposition | Oui, par demi-tons |
| Enregistrement | 1 piste, jusqu'à 2 500 notes |
| Connectique | Sortie casque (jack 6,35 mm), sortie ligne (RCA), MIDI In/Out |
| Dimensions (L x P x H) | 1400 x 400 x 800 mm |
| Poids | 50 kg |
| Alimentation | Adaptateur secteur 12 V DC (fourni) |
| Consommation électrique | 15 W |
| Entretien | Nettoyer avec un chiffon doux et sec. Éviter les solvants. |
| Sécurité | Ne pas exposer à l'humidité, débrancher avant nettoyage. |
| Pièces détachées | Disponibles auprès des revendeurs agréés Technics |
| Réparabilité | Faire appel à un technicien qualifié pour toute réparation |
FOIRE AUX QUESTIONS - SX-PX334 TECHNICS
Questions des utilisateurs sur SX-PX334 TECHNICS
0 question sur cet appareil. Repondez a celles que vous connaissez ou posez la votre.
Poser une nouvelle question sur cet appareil
Téléchargez la notice de votre Piano au format PDF gratuitement ! Retrouvez votre notice SX-PX334 - TECHNICS et reprennez votre appareil électronique en main. Sur cette page sont publiés tous les documents nécessaires à l'utilisation de votre appareil SX-PX334 de la marque TECHNICS.
MODE D'EMPLOI SX-PX334 TECHNICS
Technics
DIGITAL PIANO
sx-PX332/M
sx-PX334/M


CAUTION:
TO REDUCE THE RISK OF
ELECTRIC SHOCK, DO NOT
REMOVE SCREWS.
NO USER-SERVICEABLE
PARTS INSIDE.
REFER SERVICING TO QUALIFIED
SERVICE PERSONNEL.

The lightning flash with arrowhead symbol, within an equilateral triangle, is intended to alert the user to the presence of uninsulated "dangerous voltage" within the product's enclosure that may be of sufficient magnitude to constitute a risk of electric shock to persons.

The exclamation point within an equilateral triangle is intended to alert the user to the presence of important operating and maintenance (servicing) instructions in the literature accompanying the appliance.
FOR YOUR SAFETY PLEASE READ THE FOLLOWING TEXT CAREFULLY. (for UNITED KINGDOM)
This appliance is supplied with a moulded three-pin mains plug for your safety and convenience.
A 5 amp fuse is fitted in this plug.
Should the fuse need to be replaced please ensure that the replacement fuse has a rating of 5 amps and that it is approved by ASTA or BSI to BS1362.
Check for the ASTA mark or the BSI mark on the body of the fuse.

If the plug contains a removable fuse cover you must ensure that it is refitted when the fuse is replaced.
If you lose the fuse cover the plug must not be used until a replacement cover is obtained.
A replacement fuse cover can be purchased from your local Panasonic/Technics Dealer.
IF THE FITTED MOULDED PLUG IS UNSUITABLE FOR THE SOCKET OUTLET IN YOUR HOME THEN THE FUSE SHOULD BE REMOVED AND THE PLUG CUT OFF AND DISPOSED OF SAFELY.
THERE IS A DANGER OF SEVERE ELECTRICAL SHOCK IF THE CUT-OFF PLUG IS INSERTED INTO ANY 13 AMP SOCKET.
If a new plug is to be fitted please observe the wiring code as shown below.
If in any doubt please consult a qualified electrician.
IMPORTANT: —The wires in this mains lead are coloured in accordance with the following code:—
Blue:
Neutral
Brown:
Live
As the colours of the wires in the mains lead of this appliance may not correspond with the coloured markings identifying the terminals in your plug, proceed as follows.
The wire which is coloured BLUE must be connected to the terminal in the plug which is marked with the letter N or coloured BLACK.
The wire which is coloured BROWN must be connected to the terminal in the plug which is marked with the letter L or coloured RED.
Under no circumstances should either of these wires be connected to the earth terminal of the three-pin plug, marked with the letter E or the Earth Symbol ± .
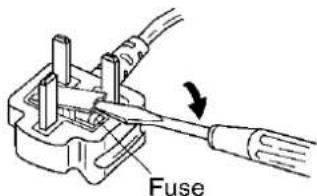
How to replace the fuse. Open the fuse compartment with a screwdriver and replace the fuse and fuse cover.
Technics
OWNER'S MANUAL
Caution
Voltage (except North America, Mexico, Europe, Australia, New Zealand, Singapore and Philippines)
Be sure the voltage adjuster located on the back of piano is in accordance with local voltage in your area before using this unit. Use a screwdriver to set the voltage adjuster to the local voltage.
Before you play, please read the cautionary copy appearing on page 4.
Contents
Cautions for safest use of this unit 4
Getting started 5
Listen to the demonstration 6
Sounds and effects 8
Organ Presets (PX334) 10
Mixing two sounds 11
Transpose 12
Tuning 12
Reverb depth 13
String resonance 13
Metronome 14
Sequencer 15
Setting the functions 18
MIDI 19
Connections 23
Symptoms which appear to be signs of trouble 24
Assembly 25
MIDI Implementation Chart 26
Specifications 27
Demo Performance List ....Back cover
Cautions for safest use of this unit
Installation location
- A well-ventilated place.
Take care not to use this unit in a place where it will not receive sufficient ventilation, and not to permit the ventilation holes to be covered by curtains, or any similar materials. - Place away from direct sunlight and excessive heat from heating equipment.
- A place where humidity, vibration and dust are minimized.
Power source
- Be sure the line voltage selector is in accordance with local voltage in your area before connecting the plug to the socket.
- DC power cannot be used.
Handling the power cord
- Never touch the power cord, or its plug, with wet hands.
- Don't pull the power cord.
Metal items inside the unit may result in electric shock or damage.
Do not permit metal articles to get inside the unit.
Be especially careful with regard to this point if children are near this unit. They should be warned never to try to put anything inside.
If, nevertheless, some such article does get inside, disconnect the power cord plug from the electrical outlet, and contact the store where the unit was purchased.
If water gets into the unit
Disconnect the power cord plug from the electrical outlet, and contact the store where it was purchased.
As a precaution, it is suggested that flower vases and other containers which hold liquids not be placed on the top of this unit.
If operation seems abnormal
Immediately turn off the power, disconnect the power cord plug from the electrical outlet, and contact the store where it was purchased.
Discontinue using the unit at once. Failure to do so may result in additional damage or some other unexpected damage or accident.
- Because the power source is located inside the unit, it is normal for the cabinet to become warm.
A word about the power cord
If the power cord is scarred, is partially cut or broken, or has a bad contact, it may cause a fire or serious electrical shock if used. NEVER use a damaged power cord for any appliance. Moreover, the power cord should never be forcibly bent.
Don't touch the inside parts of this unit.
Some places inside this unit have high voltage potential. Never try to remove the top or back panels of this unit, or to touch inside parts by hand or with tools.
Contact someone who is qualified in order to inspect the inside, or to replace a fuse, if such becomes necessary. Never attempt to do these things yourself.
Maintenance
The following suggestions will assist you in keeping the unit in top condition.
- Be sure to switch the instrument off after use, and do not switch the unit on and off in quick succession, as this places an undue load on the electronic components.
- To keep the luster of the surface and buttons, simply use a clean, damp cloth; polish with a soft, dry cloth. Polish may be used but do not use thinners or petro-chemical-based polishes.
- A wax-based polish may be used on the cabinet, although you will find that rubbing with a soft cloth will suffice.
SERVICE MUST BE CARRIED OUT BY DEALER OR OTHER QUALIFIED PERSON
Getting started
11 Plug the power cord into an outlet.
21 Press the POWER button to turn it on.

- The power indicator in the left front of the body is lit.
21 Play the keyboard.
- Set the MAIN VOLUME to an appropriate level with the sliding control.
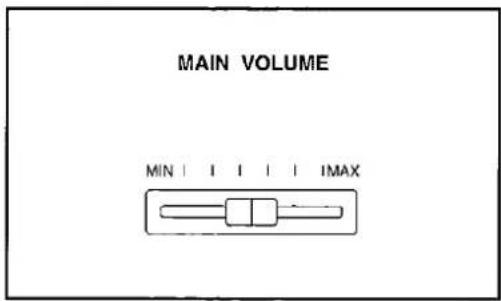
- No sound will be heard when the sliding control is set to MIN.
Keyboard cover
Open and close the cover slowly.

natural_image
Illustration of hands operating a piano keyboard with an arrow indicating press or motion (no text or symbols present)Tuning
Unlike an acoustic piano, your Digital Piano never needs tuning.
- The pitch of this instrument can be adjusted when playing along with other instruments. (Refer to page 12.)
Music stand (PX332)
Insert the music stand in the two holes as shown in the diagram.

natural_image
Simple line drawing of a curved object above a flat base with two downward arrows indicating force or movement (no text or symbols)Music stand (PX334)
To set up the music stand, gently raise it from its folded down position. It will lock into place automatically.
To lower the music stand, first fold in the metal support at the rear of the stand and then lower the stand gently, as shown in the figure.

natural_image
Simple line drawing of a mechanical component with curved arrows indicating motion (no text or symbols)Listen to the demonstration
Automatic performances which introduce you to the sounds are stored in the memory of this piano.
Grand piano demonstration performance
1
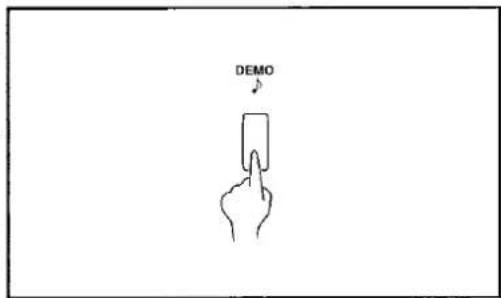
Press the DEMO button.

• The indicators for the SOUND buttons flash.
- The display changes to the [--] display.
2
Select GRAND (PX332)/ CONCERT GRAND (PX334).

- The SOUND buttons which contain GRAND piano demonstration tunes are shown by the flashing indicators.
3
Select a SOUND button (other than GRAND) whose indicator is flashing.

• The demonstration tune starts.
• The indicator of the selected SOUND button flashes.
- If the button for the current demonstration tune is pressed, the demonstration performance stops.
- Listen to the other GRAND piano demonstration tunes in the same way.
4
When you are finished listening to the demonstration tunes, press the DEMO button again.

• The display turns off.
Demonstration performances for other sounds
1
Press the DEMO button.
- The indicators for the SOUND buttons flash.
- The display changes to the [--] display.
3
When you have finished listening to the demonstration performances, press the DEMO button again.

• The display turns off.
Listen to all the demonstration tunes in order.
2
Select a sound (other than GRAND) you wish to hear.

• The demonstration tune starts.
- The indicator of the selected SOUND button flashes and the other indicators go out.
- If the button for the current demo is pressed, the demonstration performance stops.
- Listen to the demonstration tunes for the other sounds in the same way.
- PX334: Two different demonstration tunes are available for the ORGAN PRESETS. Press the ORGAN PRESETS button and select one of the buttons with a flashing indicator.
Press and hold the DEMO button for a few seconds.
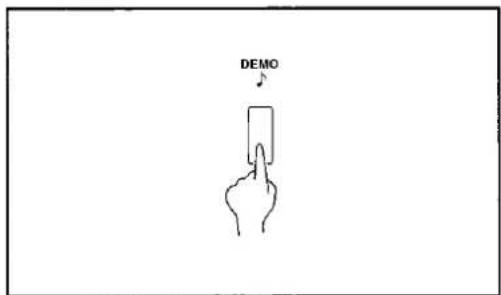
- All the demonstration tunes are automatically played in order.
- If you press the button with the flashing indicator during the demonstration performance, the current tune stops and the next tune begins.
- You can also first press the DEMO button and then the START/STOP button to play the tunes in order.
-
The tunes are repeated in order until the DEMO button or START/STOP button is pressed again.
-
You can play the keyboard while the demonstration performances are playing.
- Some of the buttons do not function while the demonstration performances are being played.
- Demonstration performances are listed on page 94.
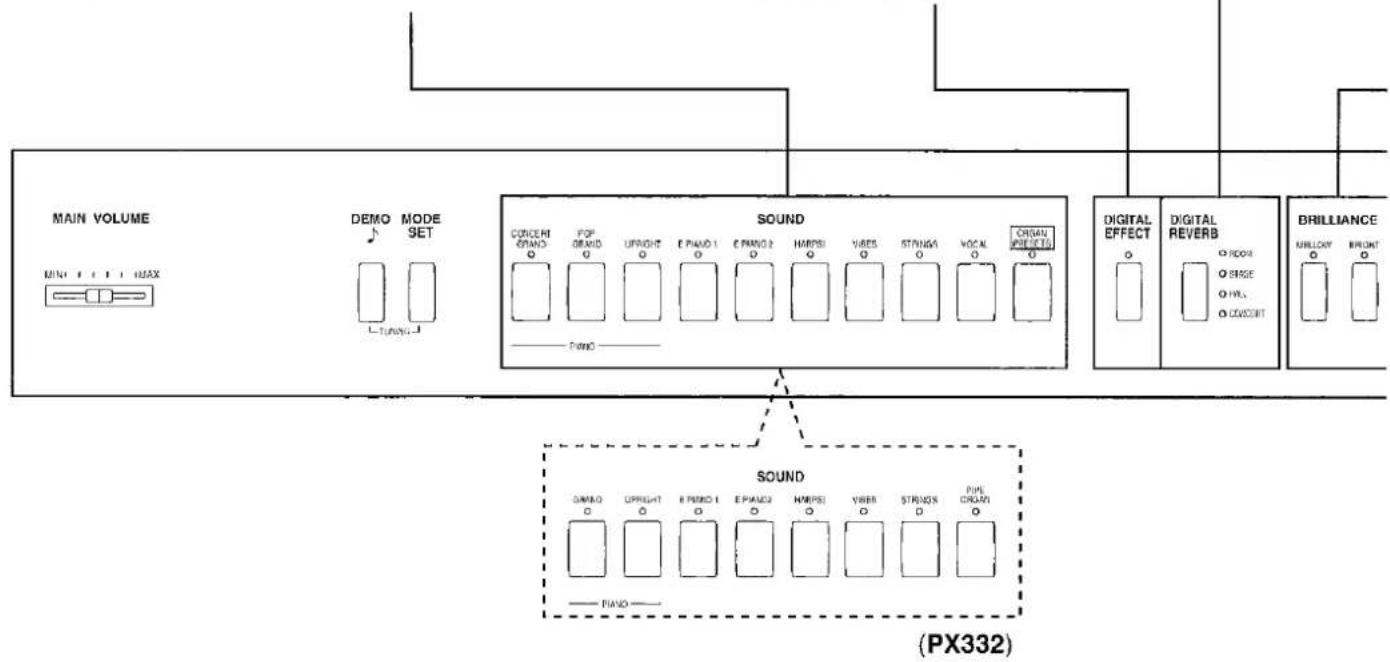
SOUND
Press one of the SOUND buttons to select the desired sound.
Each sound features Touch Response, which increases the volume when the keyboard is played harder.
- The sounds can be mixed when two SOUND buttons are pressed simultaneously. (Refer to page 11.)
- PX334: If the ORGAN PRESETS button is pressed, organ sounds are produced. (Refer to page 10.)
- On this piano, the maximum number of notes which can sound simultaneously is 32 (PX332)/64 (PX334). (Lower range notes have priority over higher range notes.)
DIGITAL REVERB
DIGITAL REVERB applies a reverberation effect to the sound. Select from four echo types—ROOM, STAGE, HALL and CONCERT.
- The type and depth of the DIGITAL REVERB can be set for each sound. (Refer to page 13.)
DIGITAL EFFECT
A celeste effect can be applied to give the sound greater depth.
Sostenuto pedal
The middle pedal is used as a sostenuto pedal. If the pedal is pressed while the keys are pressed, a sustain effect is applied to those notes only.
- For sustained-type sounds (ORGAN, STRINGS and VOCAL [PX334]), the notes sound for as long as the pedal is depressed.
Soft pedal
The left pedal can be used as a soft pedal. When the pedal is depressed, the sound is softer.
BRILLIANCE
The BRILLIANCE allows you to select the brightness of the sound from 5 settings.
If either of the buttons is pressed once, the current setting value will appear on the display, and it can then be changed.
Pressing the BRIGHT button increases the brightness; when the MELLOW button is pressed, the sound becomes mellower. During setting the brightness is shown on the display (-2 to 2).
- Press both buttons at the same time to return the brightness to 0.
- A short time after the setting is completed, the display will return to the turned-off condition.
- If the BRILLIANCE has been set to a number other than 0, one of the indicators remains lit.
TOUCH SENSITIVITY
The keyboard touch (Touch Response) can be changed to match your type of playing.
- Choose from LIGHT, NORMAL and HEAVY.

(PX334)
Display
The display shows a variety of different setting values, and also the SEQUENCER and METRONOME tempos.
- During normal playing, it is turned off.
SEQUENCER
Record your performance and have it automatically played back. (Refer to page 15.)
Sustain pedal
The right pedal allows you to use sustain. When a key is released while this pedal is depressed, the sound is sustained so that it lingers and slowly fades out.
- String resonance is added to some sounds. (Refer to page 13.)
Setting the effects for each sound The DIGITAL EFFECT, BRILLIANCE and DIGITAL REVERB are stored independently for each sound. When a SOUND button is pressed, the effect settings for the selected sound are recalled.
Organ Presets (PX334)
You can produce organ sounds when the ORGAN PRESETS button in the SOUND section is on. There are 9 different organ sounds provided for you to choose from.
To produce organ sounds
- Turn on the ORGAN PRESETS button.
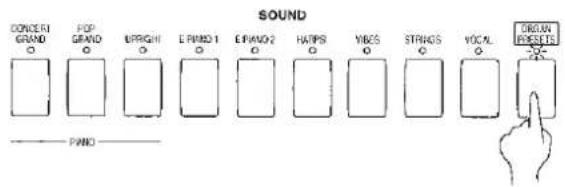
- Press any key on the keyboard to hear the organ sound.
To select a sound
- Press and hold the ORGAN PRESETS button for about 3 seconds.
• The indicator flashes.
- Use the TEMPO buttons to select an organ sound.

- The name of the sound is shown on the display.
C-1 to C-4: CLASSICAL (PIPE) ORGAN sounds
J-1 to J-5: JAZZ ORGAN sounds
- Play the keyboard to hear the selected sound.
- To quickly select a sound, while pressing the ORGAN PRESETS button, use the TEMPO buttons to select the sound.
- When a JAZZ ORGAN sound is selected, the DIGITAL EFFECT button is used to switch the tremolo speed (on=fast; off=slow).
Mixing two sounds
You can play two different sounds at the same time, thus obtaining a composite sound having a depth not possible in a single sound. The volume balance for each of the sounds can also be adjusted.
Mixing sounds
- Press two SOUND buttons at the same time.

- Press any key on the keyboard to hear the mixed sound.
- The on/off status of the DIGITAL EFFECT is effective for each sound. In addition, the BRILLIANCE and DIGITAL REVERB settings are memorized for each combination of sounds.
Volume balance
- Press the two SOUND buttons continuously for 2 or 3 seconds.
- The indicators for the two sounds flash, and the current volume balance is shown on the display.
- Use the TEMPO buttons to adjust the volume balance.

- Each time the ▲ button is pressed, the volume of the right-side sound increases, and each time the ▼ button is pressed, the volume of the left-side sound increases. Play the keyboard to hear the volume balance.
- If the two TEMPO buttons are pressed at the same time, the volume is equally balanced.
- On the display, the right-side sound is louder when a number 1 to 10 is shown, and the left-side sound is louder when a number -1 to -10 is shown.
- When you have finished adjusting the volume balance, press any SOUND button.
Transpose
Suppose you learn to play a song—in the key of C, for example—and decide you want to sing it, only to find it's either too high or too low for your voice. Your choice is to either learn the song all over again, in a different key, or to use the TRANSPOSE feature.
Use the TRANSPOSE buttons to adjust the key.

- If the two buttons are pressed at the same time, the key returns to C.
- If either of the TRANSPOSE indicators remains lit, it indicates that the piano is set to a key other than C.
- If either of the buttons is pressed once, the current setting value will appear on the display, and it can then be changed.
- When setting the key, the current key is shown on the display.
| Each press of the DOWN button: | Each press of the UP button: | |
| G[-C]←Ab[-Bb]←A[-R]←Bb[-bb]←B[-b]← | C[C] | →Db[Db]→D[C']→Eb[Eb]→E[E']→F[F]→F[F][FS] |
[ ] shows the indication on the display.
Tuning
The pitch of the instrument can be adjusted. This capability is useful, for example, for ensemble playing.
- Press the DEMO and MODE SET buttons simultaneously.

- The current tuning is shown on the display.
- Use the TEMPO buttons to adjust the pitch.

- Press the ▲ button to raise the pitch and press the ▼ button to lower the pitch (427.3–440.0–453.0 Hz).
- Press and hold either TEMPO button to change the pitch quickly.
- The 100's digit (4) is not shown on the display. The decimal can be set to 0, 3 or 6.
-
If both TEMPO buttons are pressed at the same time, the pitch returns to 440.0 Hz.
-
When you have finished adjusting the pitch, press either the DEMO button or the MODE SET button.
Reverb depth
The type and depth of the DIGITAL REVERB can be adjusted for each sound.
- Select a sound.
- Select a type of DIGITAL REVERB.
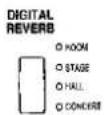
- While pressing the MODE SET button, press the DIGITAL REVERB button.

• The indicator for the selected type flashes.
- Use the TEMPO buttons to adjust the depth of the reverb.

- The current reverb depth (1–10) is shown on the display.
- Each press of the ▲ button increases the reverb depth, and each press of the ▼ button decreases the reverb depth.
- To return instantaneously to the standard reverb depth, press the two TEMPO buttons at the same time.
- When you have finished adjusting the reverb depth, press either the MODE SET button or the DIGITAL REVERB button.
String resonance
String resonance is the sound heard in an acoustic piano when the struck strings produce a sympathetic resonance of the other unstruck strings. For the GRAND (PX332)/CONCERT GRAND (PX334), UPRIGHT and POP GRAND (PX334) sounds, string resonance is produced as long as the sustain pedal is depressed. The amount of string resonance can be adjusted, and is common for all the sounds.
- When the DIGITAL REVERB is on, there is no string resonance.
- Press and hold the GRAND (PX332)/ CONCERT GRAND (PX334) button for about 3 seconds.

- Use the TEMPO buttons to adjust the amount of resonance (0–10).

• Each time the ▲ button is pressed, the resonance increases. Each time the ▼ button is pressed, the resonance decreases.
- When set to 0, there is no string resonance.
- Pressing both buttons at the same time will return the instrument to the standard resonance.
3. When you have finished adjusting the string resonance, press the GRAND button again.
Metronome
You can play in time with the metronome sound, and you can add an accent to the metronome sound.
METRONOME sound
- Press the METRONOME button to turn it on.

• The metronome sound begins.
- Adjust the tempo with the TEMPO buttons.
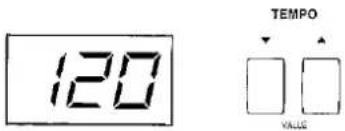
• Each time the ▼ button is pressed, the tempo slows down, and each time the ▲ button is pressed, the tempo speeds up.
- The tempo can be adjusted to J = 40 - 300 and is shown on the display.
- Press and hold either TEMPO button to change the tempo quickly.
- Pressing both TEMPO buttons at the same time returns the tempo to the standard J = 120 .
- Press the METRONOME button again to turn off the metronome sound.
METRONOME volume
- Press the VOLUME BEAT button so that the VOLUME indicator lights.

- Use the TEMPO buttons to adjust the volume.
• Each press of the ▲ button increases the volume, and each press of the ▼ button decreases the volume.
- The volume can be adjusted to a setting from 1 to 9.
- If the two buttons are pressed at the same time, the volume returns to the standard setting.
- When you have finished making the setting, press the VOLUME BEAT button twice so that the indicators go out.
Accented METRONOME sound
- Press the VOLUME BEAT button so that the BEAT indicator lights.

- Use the TEMPO buttons to select the time signature.
- Select a time signature from OFF, 2/4 [2-4], 3/4 [3-4], 4/4 [4-4], 5/4 [5-4] and 6/8 [6-8].
- An accent is added to the first beat of each measure of the selected time signature.
• The accent is shown on the display.

- If OFF is selected, the beat is not accented.
- Pressing both TEMPO buttons at the same time returns the time signature to the standard 4/4 time.
- When you have finished making the setting, press the VOLUME BEAT button once so that the indicators go out.
Sequencer
You can store your performance in the SEQUENCER and have it played back. There are two SEQUENCER tracks, each of which can be recorded independently (multi-track recording) and played back separately or together.
How to use the SEQUENCER
■ Record your performance just as you play it.
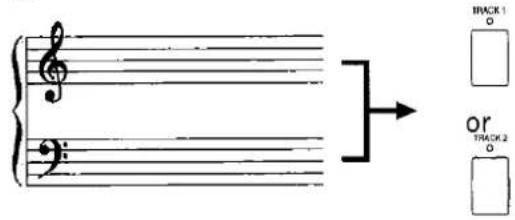
The performance data, pedal operation, beginning sound and sound selection changes (for both the left and right parts), DIGITAL EFFECT on/off operation and the volume balance of mixed sounds are all recorded in the SEQUENCER.
■ Record each of the two parts separately (multi-track recording).
- Record part 1 in TRACK 1.
Part 1

- While playing back part 1, record part 2 in TRACK 2.
Part 2

- Record, for example, the right-hand part in TRACK 1 and left-hand part in TRACK 2.
Recording
Follow these step-by-step instructions to record the example below in the SEQUENCER.


■ Record TRACK 1.
-
Select the sound and set the DIGITAL EFFECT to on or off.
-
Press the RECORD button to turn it on.
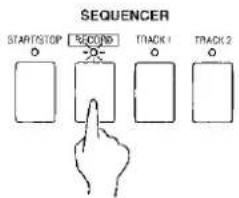
• The TRACK 1 and 2 indicators flash rapidly.
- The tempo setting will appear on the display.
- Press the TRACK 1 button.
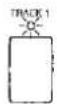
- The TRACK 2 indicator goes out and the TRACK 1 indicator flashes slowly.
■ Record TRACK 2.
- Select the sound and set the DIGITAL EFFECT to on or off.
- Confirm that the TRACK 1 indicator is lit.
- If it is not lit, press the TRACK 1 button to turn it on.
- Press the RECORD button to turn it on.

• The TRACK 2 indicator flashes rapidly.
- Press the TRACK 2 button.

• The TRACK 2 indicator flashes slowly.
- Play the TRACK 1 part.

- Recording starts when you begin to play the keyboard.
-
Recording will also begin if the START/STOP button is pressed. In this case recording begins after a one-measure count.
-
When you have completed recording the TRACK 1 part, press the RECORD button to turn it off.

- Recording will also stop if the START/STOP button is pressed.
-
The indicator for the recorded track changes from flashing to the lit condition.
-
Play the TRACK 2 part.

- Because the part already recorded in TRACK 1 is played back automatically, you can play the TRACK 2 part in time with it.
-
Recording will also begin if the START/STOP button is pressed. In this case recording begins after a one-measure count.
-
When you have completed recording the TRACK 2 part, press the RECORD button to turn it off.

■ More about SEQUENCER recording
- Expressed in terms of notes, the total number of notes which can be recorded in both SEQUENCER tracks is about 4500. (The number of notes may be reduced if operations such as depressing the pedal are carried out.)
- When the remaining SEQUENCER storage capacity becomes 20% or less, it is indicated on the display as %.
- When an error tone sounds and "FuL" appears on the display, the memory is full and the recording mode stops automatically.
-
If you perform the procedure to record on a track that is already recorded, the previous contents of the track will be erased.
-
You cannot record both tracks at the same time.
- The VOLUME and BEAT settings of the count are those which are set for the METRONOME. (Refer to page 14.)
- You can use the METRONOME while recording.
- For difficult tunes, for example, you can record at a slow speed and play back at a higher speed without changing the pitch.
Playback
- Confirm that the indicators are lit for the tracks you wish to have played back.
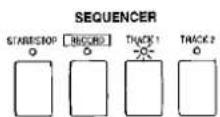
- Tracks whose indicators are not lit will not be played back.
-
The tempo setting will appear on the display.
-
Press the START/STOP button.

- The recorded tune is played back from the beginning.
- If the METRONOME is on, playback begins with a one-measure count.
- You can adjust the playback speed with the TEMPO buttons.
- If the recording procedure was not performed correctly, "Err" will appear on the display when you attempt to play back the tune.
Erasing a track
While pressing the MODE SET button, press the button for the track you wish to erase until a beep tone sounds (about 2 or 3 seconds).

- The contents of the track are erased, and "cLr" appears on the display.
- You can erase both tracks at the same time by pressing the two track buttons simultaneously.
- You cannot erase a track by this method when the RECORD button is on.
The contents of the SEQUENCER remain in the memory for about one week after the POWER is turned off.
Setting the functions
You can set various functions, for example, the type of tuning, or how the sound is produced when the keys are pressed very slowly.
Settings which can be adjusted
| Function | on (when indicator is lit) | off (when indicator is not lit) |
| PIANO TUNING | Standard acoustic piano tuning, in which the lower pitches are tuned slightly lower and the higher pitches are tuned slightly higher (default setting). | Standard equal temperament. |
| MINIMUM RANGE | No sound is produced when a key is played extremely softly (default setting). | Sound is produced regardless of how softly the keys are pressed. |
Procedure
While pressing the MODE SET button, turn the desired function on or off by pressing the relevant button.
- When changing the settings, the panel buttons function as shown in the illustrations.

- While the MODE SET button is depressed, the keyboard keys do not produce sound.
- When the MODE SET button is pressed, the MIDI CHANNEL number (refer to page 19) is shown on the display.
■ Initialization
If the INITIAL key on the keyboard is pressed while the MODE SET button is depressed, all settings return to their default status.
- The TRANSPOSE indicators will flash at this time.
- Note that when you perform the initialization procedure, the tracks which have been memorized by the SEQUENCER will also be cleared.
MIDI
MIDI (Musical Instrument Digital Interface) is the international standard for digital communication of electronic musical instrument data. This means that any equipment which has a MIDI terminal—such as electronic musical instruments and personal computers—can easily exchange digital data with other MIDI equipment without resorting to complicated conversions or connections.
About the MIDI terminals

IN: The terminal by which this instrument receives data from other equipment.
OUT: The terminal that transmits data from this instrument to other equipment.
- For these connections, use a commercially available MIDI cable. Contact your Technics dealer for more information.
- Exchange of normal data through these terminals is enabled only when the COMPUTER terminal switch is set to MIDI. (Refer to page 23.)
The following kinds of data can be transmitted/received.
■ Key note on/off data (keyboard performance data)
■ Pedal on/off data
■ DIGITAL EFFECT on/off data
■ PROGRAM CHANGE (sound selection change) data*, etc.
* Refer to page 22 regarding data transmission.
- SEQUENCER and DEMO performance data cannot be transmitted.
Assigning the MIDI CHANNEL (MIDI CH)
You can assign a MIDI CHANNEL number (1–16) to this instrument.
- Data can be exchanged only when the channel on the transmitting side matches the channel on the receiving side.
- The default channel setting is 1.
While pressing the MODE SET button, use the 16 lowermost keys (see illustration) to assign the desired MIDI CHANNEL number.

- The selected MIDI CHANNEL number is shown on the display.
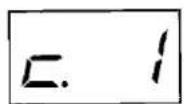
The following MIDI functions can be set.
The DIGITAL EFFECT button and some of the SOUND buttons, when used in conjunction with the MODE SET button, serve to set the following MIDI functions.
| Function | on (when indicator is lit) | off (when indicator is not lit) |
| MULTI TIMBRE | The piano can be used as a multiple sound generator, and data can be received on each MIDI channel. | This piano cannot be used as a multiple sound generator. Data can be received only on the set MIDI basic channel. In this case, the produced sound corresponds to the selected sound as indicated on the panel (default status). |
| •In the initialized state, the MIDI channel and sound assignment that can be used on this instrument is as shown below (PX334: the ORGAN PRESETS becomes the sound that is selected at that time). | ||
PX332 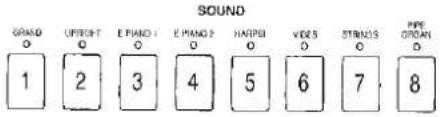 | ||
PX334  | ||
| •When the power is turned on or when this instrument is initialized, the sounds for each channel that were changed by receiving PROGRAM CHANGE numbers return to the sounds indicated on the panel. | ||
| OMNI ON | Data is received for all MIDI channels. | Data is received only on MIDI channels which are matched (default status). •For assigning this instrument's MIDI channels, refer to page 19. |
| PROGRAM CHANGE | PROGRAM CHANGE data is transmitted/received (default status). •You can also transmit data for any PROGRAM CHANGE number. (Refer to page 22.) •Please refer to page 22 for information about the program change number of each sound button. | PROGRAM CHANGE data is not transmitted/received. |
| PEDAL | Pedal operation data is transmitted/received (default status). | Pedal operation data is not transmitted/received. |
| EFFECT | The DIGITAL EFFECT on/off status is transmitted/received (default status). | The DIGITAL EFFECT on/off status is not transmitted/received. |
| TRANSPOSE | When this instrument's TRANSPOSE function is active, note numbers of the transposed notes are transmitted. | When this instrument's TRANSPOSE function is active, note numbers of the played keys (non-transposed notes) are transmitted (default status). |
| LOCAL CONTROL | The performance from this instrument also sounds from this instrument (default status). •When the POWER is turned on, the LOCAL CONTROL is set to on. | The performance from this instrument does not sound from this instrument. Set to off when this instrument is to be used only to transmit data to connected equipment. |
- MULTI TIMBRE and OMNI ON cannot both be turned on at the same time.
Procedure
While pressing the MODE SET button, turn the desired function on or off by pressing the relevant button.
- When using the MIDI functions, the panel buttons function as shown in the illustrations.

- While the MODE SET button is depressed, the keyboard keys do not produce sound.
■ Initialization
If the INITIAL key on the keyboard is pressed while the MODE SET button is depressed, all settings return to their default status.
• The TRANSPOSE indicator flashes.
- Note that when you perform the initialization procedure, the recorded contents of the SEQUENCER are erased.
Keyboard and MIDI note number

line
| Note Number | MIDI Note Number | | ----------- | ---------------- | | 21 | 21 | | 24 | 24 | | 28 | 28 | | 36 | 36 | | 48 | 48 | | 60 | 60 | | 72 | 72 | | 84 | 84 | | 96 | 96 | | 103 | 103 | | 108 | 108 |Transmitting PROGRAM CHANGE numbers
This piano can be used to transmit desired PRO-GRAM CHANGE numbers to the connected instrument.
While pressing the MODE SET button, using the numbers on the keyboard illustration below for reference, press a black key to specify the BANK and a white key to specify the NUMBER. (Refer to the PROGRAM CHANGE number table.)

- PROGRAM CHANGE numbers are transmitted by combining a BANK and NUMBER to specify the desired PROGRAM CHANGE number 0–127.
- The selected PROGRAM CHANGE number is shown on the display.
PROGRAM CHANGE number table
| BANK\NUMBER | 1 | 2 | 3 | 4 | 5 | 6 | 7 | 8 | 9 | 10 | 11 | 12 | 13 | 14 | 15 | 16 |
| 1 | 0 | 1 | 2 | 3 | 4 | 5 | 6 | 7 | 8 | 9 | 10 | 11 | 12 | 13 | 14 | 15 |
| 2 | 16 | 17 | 18 | 19 | 20 | 21 | 22 | 23 | 24 | 25 | 26 | 27 | 28 | 29 | 30 | 31 |
| 3 | 32 | 33 | 34 | 35 | 36 | 37 | 38 | 39 | 40 | 41 | 42 | 43 | 44 | 45 | 46 | 47 |
| 4 | 48 | 49 | 50 | 51 | 52 | 53 | 54 | 55 | 56 | 57 | 58 | 59 | 60 | 61 | 62 | 63 |
| 5 | 64 | 65 | 66 | 67 | 68 | 69 | 70 | 71 | 72 | 73 | 74 | 75 | 76 | 77 | 78 | 79 |
| 6 | 80 | 81 | 82 | 83 | 84 | 85 | 86 | 87 | 88 | 89 | 90 | 91 | 92 | 93 | 94 | 95 |
| 7 | 96 | 97 | 98 | 99 | 100 | 101 | 102 | 103 | 104 | 105 | 106 | 107 | 108 | 109 | 110 | 111 |
| 8 | 112 | 113 | 114 | 115 | 116 | 117 | 118 | 119 | 120 | 121 | 122 | 123 | 124 | 125 | 126 | 127 |
- You can also use the sound buttons to specify the PROGRAM CHANGE number.
PX334: The ORGAN PRESETS are assigned numbers 9 to 17 in the CLASSICAL, JAZZ numerical order and change depending on the sound selected at that time.

Connections
(On the back of piano)

PEDAL IN
Connect the cord from the included stand to this terminal.
AUX IN (input level 0.5 Vrms, 6 kΩ)
Other instruments such as a rhythm machine or sound module can be connected to the piano so that the sound is output from the piano. To receive monaural sound, connect instruments to the R/R+L terminal.
LINE OUT (output level 1.5 Vrms, 600 Ω)
By plugging into a high-power amplifier, the sound can be reproduced at high volume. (Use the R/R+L terminal when outputting monaural sound. However, there are some cases where the sound quality may deteriorate depending on the sound.)
HEADPHONES (phones) ×2
(Beneath the keyboard, on the left side)
For silent practice headphones may be used. When plugged in, the speaker system is automatically switched off, and sound is heard only through the headphones.

COMPUTER
By connecting this terminal to the serial port of a computer, performance data can be exchanged. Use the switch to select the type of computer.
- Be sure that the power to this instrument is turned off when connecting to a computer or when changing the switch setting.
- The new switch setting will be effective when the power is turned on again.
Caution: Failure to turn off the power before changing the switch setting may result in malfunction.
- When no computer is connected, or when a MIDI interface is used, the switch should be set to MIDI.
Connection to a Macintosh series computer
Use an ACCESSORY CABLE (SZ-JJAP1, sold separately) to connect the COMPUTER terminal of this instrument to the modem port or printer port of a Macintosh Series computer. Set the switch to MAC.
- Set the MIDI interface clock of the Macintosh software to 1 MHz.
- Do not remove the core at either end of the cable.
Connection to a PC
Use an ACCESSORY CABLE (SZ-JJAT1, sold separately) to connect the COMPUTER terminal of this instrument to the RS232C terminal of a PC. Set the switch to PC2.
- The MIDI driver included with the cable should be installed in the computer. (Refer to the manual accompanying the cable.)
- Do not remove the core at either end of the cable.
* All product and company names are trademarks or registered trademarks of their respective owners.
Symptoms which appear to be signs of trouble
| Phenomenon | Remedy |
| No sound is produced when the keyboard is played. | • No sound is produced if the MAIN VOLUME is set to MIN.Use the sliding control to set the volume to an appropriate level.• If the MIDI LOCAL CONTROL is set to off, set it to on. (Refer to page 20.) |
| Nothing is shown on the display. | • The metronome, SEQUENCER tempo, etc. are indicated on the display. During normal performance, however, the display is off. |
| Data cannot be exchanged through MIDI terminals. | • The switch for the COMPUTER terminal is not set to MIDI.Turn off the power to this instrument and set the switch to MIDI. (Refer to page 23.)• Match the channels on the transmitting side and the receiving side. (Refer to page 19.) |
| The sound quavers or is distorted. | • When the COMPUTER terminal or both the MIDI IN and OUT terminals are connected to a computer, depending on the computer software the received data may be sent back to the instrument just as it is. Because of this the sound generated from the keys and the sound generated from the returned data are both produced, causing undesirable effects, such as the sounds canceling each other out, for example. In this case, either change the software settings to prevent received data from being returned, or set the MIDI LOCAL CONTROL to off. |
■ About the backup memory
The selected sound and various functions, MIDI settings and SEQUENCER contents remain in the memory for about one week after the POWER is turned off.
- The backup memory will not function until the POWER has been on for about 10 minutes.
- If you wish to return all memories and settings to their initialized status, while pressing the MODE SET button, press the INITIAL key on the keyboard. Or you can turn on the POWER while pressing the INITIAL key.
- When the POWER is turned on, the MIDI LOCAL CONTROL is set to on.
- If you wish to retain the memory for longer than one week, before one week has elapsed, turn on the power and leave it on for about 10 minutes before turning it off again. The settings will remain in the memory for about one week from this time.
Assembly
Follow the steps below to assemble your Technics piano. Make sure you are using the correct parts and that they are in the correct direction.
-
At least 2 people are required for assembly.
• To disassemble the piano, reverse the procedure. -
Remove the packing and take the parts out of the carton. Confirm that all the parts on the printed list are present.

- Affix the right and left side planks to the pedal box.
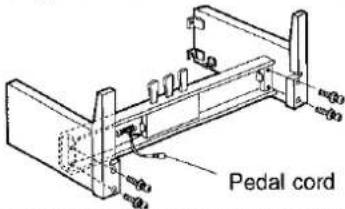
(1) Use the 4 brass-colored screws to secure the planks.
(2) Be sure to insert the screws straight.
- If a screw is inserted crookedly, it may be damaged.
(3) Insert each of the 4 screws partway, lightly securing each one little by little. After confirming that the screws are all correctly inserted, tighten each one securely.
- If each screw is tightened securely before all the screws are inserted, the last screw may be very difficult to insert.
(4) Loosen the pedal cord, stowed on the inner side of the pedal box, and extend it.
- Affix the rear panel.

(1) Insert the 2 black screws (A) partway in the upper part of the rear panel, securing them only lightly. Do not tighten the screws completely at this time.
- If the screws are tightened securely at this time, it may be difficult to affix the lower part of the rear panel.
(2) Insert the 4 black screws (B) through the mounting holes in the lower part of the rear panel and tighten the screws fully. -
Run the screws directly into the pedal box as there are no rough holes in the pedal box.
(3) Tighten the 2 black screws (A) in the upper part of the rear panel completely. -
Place the piano body on the stand.
WARNING:
Avoid pinching your fingers.
Note 1
Holding the piano body at least 10 cm in from the edge, place it on the stand so that it does not fall off.
Note 2
If the piano body is placed too far to the right or left, or to the front or back, it will become unstable.

natural_image
Technical line drawing of two mechanical components with no visible text or symbols- Secure the piano body to the stand.

natural_image
Technical line drawing of a mechanical device with an inset showing a close-up of a component (no text or symbols present)(1) Insert 2 black screws (A) in the 2 rear screw holes on the underside of the piano body, and turn each screw 5 or 6 times. Push the piano body forward so that the screws are fully inserted in the cutout of the metal piece on either side plank. (This enables you to easily position the piano body on the stand.)
(2) Adjust the piano body so that the right and left sides project evenly over the stand.

(3) Positioning the piano body on the stand, confirm that the 4 balck screws (A) can easily be inserted.
(4) Tighten the 4 screws securely.
- Connect the pedal cord and power cord to the terminals.

(1) Plug the pedal cord and power cord into the terminals on the rear of the piano.
(2) Remove the backing from the clamps and affix them as shown in the figure. Secure the pedal cord to the clamps.
Confirm: After assembling, check these points.
- Are any parts left over?
→ Check the assembly procedure again. - Does the piano rattle when it is rocked?
→ Make sure all the screws are securely tightened.
• Is the power cord firmly inserted?
→ Check again. - Is the plug of the pedal cord inserted as far into the connector terminal as it will go?
→ If it is not completely inserted, the sustain and other pedal functions may not work.
When the piano has been moved or transported, retighten the screws securely.
MIDI Implementation Chart
Digital piano [ SX-PX332/M ] [ SX-PX334/M ]
| Function | Transmitted | Recognized | Remarks | |
| Basic Channel | Default Changed | 1-16 1-16 | 1-16 1-16 | memorized |
| Mode | Default Messages Altered | 3 × — | 1,3 × — | memorized |
| Note Number | True voice | *21-108 — | 0-127 *0-127 | |
| Velocity | Note ON Note OFF | ○ × (9nH: V=0) | ○ × | |
| After Touch | Key's Ch's | × × | × × | |
| Pitch Bend | × | ○ | ||
| Control Change | 01 06,38 07 10 11 64 66 67 91 93 98, 99 100,101 | × × × × × ○× ○× ○× × × × | **○ **○ **○ **○ ○× ○× ○× **○ **○ | modulation data entry volume (part) pan part expression sustain pedal sostenuto pedal soft pedal reverb depth digital effect NRPN LSB, MSB RPN LSB, MSB |
| Prog Change | True # | ○× 0-127 | ○× 0-7 (PX332) 0-17 (PX334) | |
| System Exclusive | × | × | ||
| System Common | Song Pos Song Sel Tune | × × × | × × × | |
| System Real Time | Clock Commands | × × | × × | |
| Aux Messages | Local ON/OFF All Notes OFF Active Sense Reset | × × ○ × | ○ ○ ○ × | |
| Notes | ○× ...... Whether or not the data for each of these items is transmitted or received can be set. * Changes depending on the TRANSPOSE setting. ** Effective only in the MULTI TIMBRE mode. | |||
Mode 1: OMNI ON, POLY
Mode 2: OMNI ON, MONO
○: Yes
Mode 3: OMNI OFF, POLY
Mode 4: OMNI OFF, MONO
×: No
Specifications
| SX-PX332/SX-PX332M | SX-PX334/SX-PX334M | |
| KEYBOARD | 88 KEYS | |
| MAX. POLYPHONY | 32 NOTES | 64 NOTES |
| SOUND | 8 SOUNDS: GRAND, UPRIGHT, E PIANO 1, E PIANO 2, HARPSI, VIBES, STRINGS, PIPE ORGAN | 18 SOUNDS: CONCERT GRAND, POP GRAND, UPRIGHT, E PIANO 1, E PIANO 2, HARPSI, VIBES, STRINGS, VOCAL, ORGAN PRESETS |
| PEDAL | SOFT, SOSTENUTO, SUSTAIN | |
| BRILLIANCE | MELLOW, BRIGHT (5 STEPS) | |
| DIGITAL EFFECT | ○ | |
| DIGITAL REVERB | ○ (ROOM, STAGE, HALL, CONCERT) | |
| TOUCH SENSITIVITY | LIGHT, NORMAL, HEAVY | |
| TRANSPOSE | G-C-FI | |
| TUNING | 427.3 Hz-440.0 Hz-453.0 Hz | |
| METRONOME | ○ (TIME SIGNATURE: OFF, 2/4, 3/4, 4/4, 5/4, 6/8) | |
| SEQUENCER | TRACK (1, 2), STORAGE CAPACITY: APPROX. 4500 NOTES, RECORDING MODE: REAL TIME | |
| DISPLAY | ○ | |
| DEMO | ○ | |
| MIDI | MULTI TIMBRE, LOCAL CONTROL, OMNI ON, PROGRAM CHANGE, PEDAL, EFFECT, TRANSPOSE | |
| MODE SET | PIANO TUNING, MINIMUM RANGE | |
| OTHERS | POWER SWITCH, MAIN VOLUME, MIDI TERMINALS (IN, OUT), PEDAL IN, AUX IN (R/R+L, L), LINE OUT (R/R+L, L), COMPUTER, HEADPHONES×2, AC IN, INITIAL KEY | |
| OUTPUT | 80 W (40 W × 2) | 120 W (60 W × 2) |
| SPEAKERS | 14 cm × 2 | 14 cm × 2, 6.5 cm × 2 |
| POWER REQUIREMENT | 100 W110 W (NORTH AMERICA AND MEXICO) | 160 W |
| AC 120/220/240 V 50/60 HzAC 120 V 60 Hz (NORTH AMERICA AND MEXICO)AC 230-240 V 50/60 Hz (EUROPE, AUSTRALIA, NEW ZEALAND, SINGAPORE AND PHILIPPINES) | ||
| DIMENSIONS(W×H×D) | 138.7 cm × 103.2 cm × 48.5 cm(54-19/32" × 40-5/8" × 19-3/32") | 138.7 cm × 106.4 cm × 52 cm(54-19/32" × 41-7/8" × 20-15/32") |
| NET WEIGHT | 47 kg (103.6 lbs.) | 56 kg (123.5 lbs.) |
| ACCESSORIES | AC CORD, MUSIC STAND | AC CORD |
• In some markets, one of the models may not be available.
- Design and specifications are subject to change without notice.
Demo Performance List
■ PX332
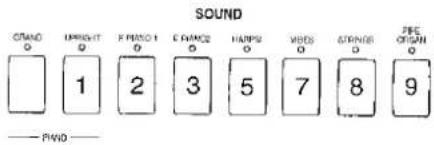
■ PX334

| SOUND NAME | SONG TITLE | COMPOSER | |
| GRAND (PX332)/CONCERT GRAND(PX334) | 1 | Polonaise Heroique | Chopin |
| 2 | Clair de Lune (Suite bergamasque) | Debussy | |
| 3 | from Sonata A major (K.331) | Mozart | |
| 4 | Military March | Schubert | |
| 5 | Technics Original | ||
| 6 | Maple Leaf Rag | Joplin | |
| 7 | Danny Boy | Traditional | |
| 8 | Beautiful Dreamer | Foster | |
| 9 | Swannee River | Traditional | |
| 10 | Loch Lomond | Traditional | |
| POP GRAND (PX334) | Beautiful Dreamer | Foster | |
| UPRIGHT | My Lady's-Ride (25 Easy Studies Op.100) | Burgmuller | |
| E. PIANO 1 | Amazing Grace | Traditional | |
| E.PIANO 2 | Technics Original | ||
| HARPSI | Prelude in C#majorNo.3 from Book 1 of 48 Preludes & Fugues (BWV.848) | Bach | |
| VIBES | La Paloma | Traditional | |
| STRINGS | Technics Original | ||
| VOCAL (PX334) | Ave Maria | Burgmuller | |
| PIPE ORGAN (PX332) | Courante from Suite No.5 in G major (BWV.816) | Bach | |
| ORGAN PRESETS(PX334) | A | Courante from Suite No.5 in G major (BWV.816) | Bach |
| B | The House of the Rising Sun | Traditional | |
- Technics
- FOR YOUR SAFETY PLEASE READ THE FOLLOWING TEXT CAREFULLY. (for UNITED KINGDOM)
- OWNER'S MANUAL
- Caution
- Contents
- Cautions for safest use of this unit
- Installation location
- Power source
- Handling the power cord
- Metal items inside the unit may result in electric shock or damage.
- If water gets into the unit
- If operation seems abnormal
- A word about the power cord
- Don't touch the inside parts of this unit.
- Maintenance
- SERVICE MUST BE CARRIED OUT BY DEALER OR OTHER QUALIFIED PERSON
- Getting started
- Keyboard cover
- Tuning
- Music stand (PX332)
- Music stand (PX334)
- Listen to the demonstration
- Grand piano demonstration performance
- 1
- 2
- 3
- 4
- Demonstration performances for other sounds
- Listen to all the demonstration tunes in order.
- SOUND
- DIGITAL REVERB
- DIGITAL EFFECT
- Sostenuto pedal
- Soft pedal
- BRILLIANCE
- TOUCH SENSITIVITY
- Display
- SEQUENCER
- Sustain pedal
- Organ Presets (PX334)
- To produce organ sounds
- To select a sound
- Mixing two sounds
- Mixing sounds
- Volume balance
- Transpose
- Reverb depth
- String resonance
- Metronome
- METRONOME sound
- METRONOME volume
- Accented METRONOME sound
- How to use the SEQUENCER
- Recording
- ■ Record TRACK 1.
- ■ Record TRACK 2.
- ■ More about SEQUENCER recording
- Playback
- Erasing a track
- Setting the functions
- Settings which can be adjusted
- Procedure
- ■ Initialization
- MIDI
- About the MIDI terminals
- The following kinds of data can be transmitted/received.
- Assigning the MIDI CHANNEL (MIDI CH)
- The following MIDI functions can be set.
- Transmitting PROGRAM CHANGE numbers
- Connections
- PEDAL IN
- AUX IN (input level 0.5 Vrms, 6 kΩ)
- LINE OUT (output level 1.5 Vrms, 600 Ω)
- HEADPHONES (phones) ×2
- (Beneath the keyboard, on the left side)
- COMPUTER
- Connection to a Macintosh series computer
- Connection to a PC
- Symptoms which appear to be signs of trouble
- ■ About the backup memory
- Assembly
- WARNING:
- Note 1
- Note 2
- MIDI Implementation Chart
- Demo Performance List
Marque : TECHNICS
Modèle : SX-PX334
Catégorie : Piano