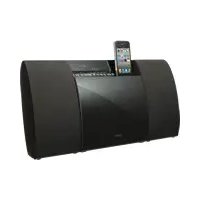
CMT-CX4iP - Système Hi-Fi SONY - Notice d'utilisation et mode d'emploi gratuit
Retrouvez gratuitement la notice de l'appareil CMT-CX4iP SONY au format PDF.


| Marque | Sony |
| Modèle | CMT-CX4iP |
| Catégorie | Système Hi-Fi micro |
| Type de produit | Mini-chaîne avec dock iPod/iPhone |
| Dimensions (L x H x P) | Environ 200 x 250 x 300 mm |
| Poids | Environ 3,5 kg |
| Alimentation | Secteur 230 V ~ 50 Hz |
| Puissance de sortie | 2 x 10 W RMS |
| Lecteur CD | Compatibilité CD, CD-R/RW, MP3 |
| Tuner | FM/AM avec 30 présélections |
| Dock iPod/iPhone | Connecteur 30 broches, charge et lecture |
| Entrée auxiliaire | Mini-jack 3,5 mm |
| Sortie casque | Mini-jack 3,5 mm |
| Télécommande | Incluse (RM-SCX4iP) |
| Fonctions horloge/minuterie | Horloge intégrée, minuterie de sommeil et d'éveil |
| Entretien et nettoyage | Nettoyer avec un chiffon doux et sec. Ne pas utiliser de solvants. |
| Sécurité | Ne pas exposer à l'humidité, aux chocs ou à une chaleur excessive. |
| Pièces détachées et réparabilité | Disponibilité des pièces via réseau Sony. Télécommande de remplacement possible. |
FOIRE AUX QUESTIONS - CMT-CX4iP SONY
Questions des utilisateurs sur CMT-CX4iP SONY
0 question sur cet appareil. Repondez a celles que vous connaissez ou posez la votre.
Poser une nouvelle question sur cet appareil
Téléchargez la notice de votre Système Hi-Fi au format PDF gratuitement ! Retrouvez votre notice CMT-CX4iP - SONY et reprennez votre appareil électronique en main. Sur cette page sont publiés tous les documents nécessaires à l'utilisation de votre appareil CMT-CX4iP de la marque SONY.
MODE D'EMPLOI CMT-CX4iP SONY
SONY.
4-278-002-13 (1)
Micro HI-FI Component System
GB Operating Instructions
[Barcode]
4 2 7 8 0 0 2 1 3 (1) ©2011 Sony Corporation Printed in China
CMT-CX4IP
http://www.sony.net/
S-MASTER
DIGITAL AVIORS Digital Amplifier

WARNING
To reduce the risk of fire or electric shock,
do not expose this apparatus to rain or
To reduce the risk of fire, do not cover the ventilation opening of the apparatus with newspapers, tablecloths, curtains, etc. Do not place the naked flame sources such as lighted candles on the apparatus.
To reduce the risk of fire or electric shock, do not expose this apparatus to dripping or splashing, and do not place objects filled with liquids, such as vases, on the apparatus. Do not install the appliance in a confined space, such as a bookcase or built-in cabinet.
As the main plug is used to disconnect the unit from the mains, connect the unit to an easily accessible AC outlet. Should you notice an abnormality in the unit, disconnect the main plug from the AC outlet immediately. Do not expose batteries or apparatus with battery-
installed to excessive heat such as sunshine, fire or the
The unit is not disconnected from the mains as long as it is connected to the AC outlet, even if the unit itself has been turned off.
Notice for the customers in the U.S.A.
The dating code and the nameplate are located on the
bottom character of the main unit.
These following indications are located on the bottom exterior of the main unit.

Notice for the customers in the Canada
The nialeplate is located on the bottom exterior of the main unit.
WARNING
To prevent injury, this apparatus must be securely
attached to the wall in accordance with the installation instructions.
CAUTION
The use of optical instruments with this product will
increase eye hazal

This symbol is intended to alert the user to the presence of unipulated
"dangerous voltage" within the
product's enclosure that may be of sufficient magnitude to constitute a risk
of electric shock to persons.

This symbol is intended to alert th
user to the presence of important
operating and multisensized (321 Rating), instructions in the literature
accompanying the appliance
Owner's Record
The model and serial numbers are located on the bottom exterior of the unit. Record these numbers in the space provided below. Refer to them whenever you call upon your Sony dealer regarding this product.
Model No.
Sertzel No.
Important Safety Instructions
1) Read these instructions. 2) Keep these instructions.
b) Keep these misaccess
3) Heed all warnings.
4) Follow all instructions. 5) Do not use this answer.
6) Clean only with dry cloth
7) Do not block any ventilation openings. Install in
accordance with the manufacturer's instructions.
6) DO NOT INSTALL NEAR ALL NEAT SOURCES SUCH AS NIDUALS, heat registers, stoves, or other apparatus (including
amplifiers) that produce heat.
9) Do not defeat the safety purpose of the polarized or
grounding-type plug. A polarized plug has two blades with one wide than the other. A grounding type
plug has two blades and a third grounding prong.
The wide blade or the third prong are provided for
your safety. If the provided plug does not fit into your outlet, consult an electrician for replacement of the
obsolete outlet
10) Protect the power cord from being walked on or
pinched particularly at plugs, convenience receptacles and the point where they quit from the apparatus.
11) Only use attachments/accessories specified by the
manufacturer.
12) Use only with the cart, stand, trip
bracket, of table specified by the manufacturers, or sold with the sp
When a cart is used, use caution v
moving the cart/apparatus combination to
avoid injury from tip-over
15) Compuging this apparatus during lightning seconds of when unused for long periods of time.
14) Refer all servicing to qualified service
Servicing is required when the apparatus has been
damaged in any way, such as power supply cord or plug is damaged. liquid has been spilled or objects
have fallen into the apparatus, the apparatus has
been exposed to rain or moisture,
normally, or has been dropped.
The following FCC statement applies only
to the version of this model manufactured
for sale in the U.S.A. Other versions may not comply with 566 technical regulations
not co
NOTE:
This equipment has been tested and found to comply with the limit of a Glu, P. divital during management.
to Part 15 of the FCC Rules. These limits are designed
to provide reasonable protection against harmful
interference in a residential installation. This equipment generates, uses and can radiate radio frequency energy.
and, if not installed and used in accordance with the
instructions, may cause harmful interference to radio communications. However, there is no warranty that
interference will not occur in a particular installation.
If this equipment does cause harmful interference to
Radio of television reception, which can be determined by turning the equipment off and on, the user is encouraged
to try to correct the interference by one or more of the
following
— Reorient or relocate the receiving antenna.
— Increase the separation between the equipment and
- Connect the equipment into an outlet on a circuit.
different from that to which the receiver is connected
— Consult the dealer or an experienced radio/TV
technician for help.
CAUTION
You are cautioned that any changes or modifications
not expressly approved in this manual could vote your authority to operate this equipment.
Note on DualDiscs
A DualDisc is a two sided disc product which mates
DVD recorded material on one side with digital audio material on the other sides. However, since the
audio material side does not conform to the Compact
Disc (CD) standard, playback on this product is not
Guarantee
Music discs encoded with copyright
protection technologies
This product is designed to playback discs that conform to the Compact Disc (CD) standard. Recently, various
music discs encoded with copyright protection
technologies are marketed by some record companies. Please be aware that among those discs, there are some that do not conform to the CD standard and may not be playable by this product.
License and Trademark Notice
- iPhone, iPod, iPod classic, iPod nano, and iPod touch
are trademarks of Apple Inc. Registered in the USA and other countries.
•MPEG Layer-3 audio coding technology an
licensed from Fraunhoter IIS and Thomson.
Trademark of Microsoft Corporation in the United
States and/or other countries.
•This product is protected by certain intellectual
property Rights of Microsoft Corporation Use of distribution of such technology outside of this pro
is prohibited without a license from Microsoft or an
- All other trademarks and registered trademarks are of
their respective holders. In this manual,™ and ® marks
are not specified.
Location of Controls
Unit (Top)

Unit (Front)


Remote
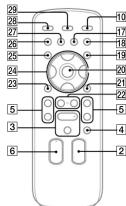
This manual mainly explains operations using the
remote, but the same operations can also be performed
using
Theorem 2.1. (Theorem 2.2.)
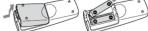
To use the remote
Slide and remove the battery compartment lid, and insert
the two KO (H2O AX) batteries (NO supplied), ● side first, matching the polarities shown below.
•
[Non-Text]
Notes on using the remote
- With normal use, the batteries should last for about six months.
- Not mix all old bilanziy with a new out of mixed children (types of better)
• If you do not use the remote for a long period of time, remove the
batteries to avoid damage from battery leakage and corrosion.
[Non-Text]
[Non-Text]

flowchart
graph TD
    A["Component ①"] --> B["Component ②"]
    B --> C["Component ③"]
    C --> D["Component ④"]
    D --> E["Component ⑤"]
    E --> F["Component ⑥"]
    F --> G["Component ⑦"]
    G --> H["Component ⑧"]
    H --> I["Component ⑨"]
    I --> J["Component ⑩"]
    J --> K["Component ⑪"]
    K --> L["Component ⑫"]
    L --> M["Component ⑬"]
    M --> N["Component ⑭"]
    N --> O["Component ⑮"]
    O --> P["Component ⑯"]
    P --> Q["Component ⑰"]
    Q --> R["Component ⑱"]
    R --> S["Component ⑲"]
    S --> T["Component ⑳"]
    T --> U["Component ㉑"]
    U --> V["Component ㉒"]
    V --> W["Component ㉓"]
    W --> X["Component ㉔"]
    X --> Y["Component ㉕"]
    Y --> Z["Component ㉖"]
Ⓐ FM lead antenna (Extend it
horizontally.)
(4) Speaker cord (ng
© Speaker cord (lef
⑥ To AC Adapter
When not using an iPod/iPhone, keep the panel closed.
To remove the Dock Adapter, pull it up with your
Figmerhall of a that object using the 50c inside the double
About Dock Adapters for iPhone models
The adapter number is shown on the bottom of Dock A dantea.
For iPod models, use the Dock Adapter supplied with
your iPod, or p
Apple Inc.
-
④: For iPhone ⑤: For iPhone 2C and iPhone 3CS
For iPhone
。
[Non-Text]
[Non-Text]

Installations
Attaching the stand to the system
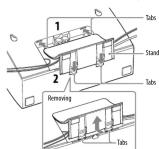
1 Insert the tabs of the stand into the grooved section
of the unit.
2 While holding down bottom of the stand, insert the
tabs of the stand into the grooved section.
To remove the stand from the system
while holding down bottom of the stand, pull up the tabs of the stand from the unit.
- 2017年公司实现盈利
Hanging the system on a wall
You can install the system on a wall. Before installing
remove the stand from the unit.
Notes
• Make sure that the power cord is disconnected from the wall outlet.
• Use screws that are suitable for the wall material and strength
Contact a screw shop or professional installer regarding the
In particular, will arise of the
the system to fall and be damaged and may result in personal injury
1 Attach the
and unit.

2 Prepare screws (not supplied) that are suitable for
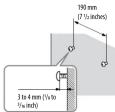
the holes on the back of the unit and speakers. See the illustrations below.

the species
3 Fasten the screws to the wall. The commercially
available screws should provide 5 to 4 mm (7/8 to 3/4+ inch).
Install the system on a vertical and flat reinforced area
of the wall.
Tips
- When installing the speakers and unit close together, listen the access to the wall according to the ▼ marks on the lower side, as
illustrated in this manual.
- The distance between the slope of the line and a speaker is 90 nm (3.21/4+ inches) minimum. To install the system lekring
space between the unit and speakers, adjust the length of the
- You can wrap the speaker cord around the protruding on the
near of the unit, as illustrated

A FM antenna
Find a location and an orientation that provide good
reception, and then set up the antenna.
keep the unmetted way from the spanelle cords and the power cord to avoid picking up noise.
Speakers
Connect the speaker cords to the SPEAKERS jacks on
the unit.
C Power
1 Connect the power cord to the AC adapter
2 Connect the AC adapter to the unit, and then plug
the power cord in to a wall outlet.
The demonstration appears in the display. When
you press to like, the system turns on and the demonstration automatically ends. When you turn off
the system, the demonstration appears again on the
display.
When you set the clock, the system goes to Power
Saving mode and the demonstration is canceled.
[Non-Text]
[Non-Text]
[Non-Text]
To eat the dish
-
Draw 1/①: 57 to turn on the system
-
Press TIMER MENU 50 to select the clock set mode
If "PLAY SET?" flashes press ♦/♦ □, respectively to
select "CLOCK SET?," and then press@center) 20.
3 Press ♦/♦ 24 repeatedly to set the hour, then pres
⊕(enter) [20].
4 Use the same procedure to set the minutes.
Note
The clock settings are reset when you disconnect the power cord or if
Systemable data
To display the clock when the system is off
Press DISPLAY (2). The clock is displayed for about
8 seconds
[Non-Text]
ystem onto the screws.
toes the back of the system to the screws,
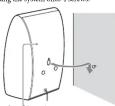
that is the spoken
Notes
- Make sure the screws are properly aligned, with their heads evenly
postdruding enough to engage the moves on the back of the unit and speakers.
- Be aware that is a person or object happens to hit the system hangi.
on a wall, it may fall. ■Do not hang or put anything on the system housing on a wall.
•Depending on the materials of the wall, heat from the system or da
- Sorry is not responsible for accidents or demands caused by improvement.
installation, insufficient wall strength or improper screw installation
National University, Inc.
To enjoy better sound quality You can get better sound meal
The speakers.
For better sound quality, install the system according to
the reference below.
- it is better to arrange left-right placement of the
speakers according to the usual orientation of the listener in the room.
- Speakers are better installed at usual ear level in a room.
[Non-Text]
[Non-Text]
[Non-Text]
[Non-Text]
[Non-Text]
Notes on playing multisession discs *If the first session on the disc is a CD:D
on the disc cannot be recognized regardless of the session.
•If the session format for the first session is CD-ROM and
following sessions are recorded in the same format, the system will continue to play hard NPD live second-line in multiple versions.
until the system encounters another session recorded in a different
[Non-Text]
OperationsGetting Started
Playing a CD/MP3 disc
- Select the CD function
Press FUNCTION +/− 2 repeatedly
- Insert a disc
Insert a disc in the disc slot with the label ride facing
forward

[Non-Text]
3 Start playback
Press ▶ (play) 3
Notes
- When you turn on the system, the disc is not pulled into the disc slot, and "No. Dus" remains in the middle. This button is set to be
disc until "No Disc" appears.
*Do not insert a disc with non-standard shapes (e.g., heart, square, star). The disc may fall into the system and space imperceptible.
ейгласс.
*When pressing ▲ (eject) on the unit and then reinserting the disc
that appears in the disc slot, so not largely paid in the disk. There is the disc from the disc slot and then reinsert it.
- Do not turn off the system with a disc halfway inserted in the disc slot. Drving up may save the disc to fall.
- Do not use a disc with tape, seals or paste on it as this may cause
- When run einct a disc, handle the disc by its edge. Do not touch the
surface.
- All the patent and law, the use and trust the system is our living to may cause the system to malfunction.
- Do not insert an 8 cm disc with an adapter. Doing so may cause the
Systems to database
Other operations
To Pr
Pause playback ■ (pause) 3. To resume play, press
the button aga
Stop playback ■ (stop) 4.
Select a folder on (select folder) +/ = 22
Playing the iPod/iPhone
1 Select the iPod function.
Press FUNCTION +/- 2 repeatedly.
2 Place the iPod/iPhone
3 Start playback
Press ▶ 3.
To control the iPod/iPhone
To control the iPod/ iPhone
to Press Pause playback ■ (pause) 2 ■ (stop) 4
Pause playback ▪ (pause) [3] ▪ (stop) [4]. Select a track ▶◀◀ (go back)/▶▶◀ (go forward)
or chapter of ⑤. To fast-forward or fast-rewind,
audiobook/ hold down the button.
podcast
Find a point in a track or charter. Hold down ◀◀ (rewind)/▶▶ (fast forward) [5] during playback, and
crack of chapter/ forward) (2) during playback, and of audiobook/ release the button at the desired
podcast
Choose the ④ (enter)20
selected item
Scroll up/down
the iPod menus
Return to the TOOL MENU 21/RETURN a • previous menu or (return)
previous menu select a menu
The Ground Truth image displays a single, solid horizontal line. According to Rule 2 (UNDERSCORE & LINE RULES), if the GT contains lines used for stylistic emphasis or as background elements (like ruled paper), the OCR result must ignore them. The line in the GT is clearly a stylistic or background line, not a placeholder for text. Therefore, the OCR should not have output any underscores. Outputting `____` constitutes an error under Rule 2, as it hallucinates placeholder symbols where none are semantically intended. Hence, the OCR result is inconsistent with the Ground Truth.
To use the system as a battery charger
You can use the system as a battery charger for an iPod/iPhone whether the system is on an off
iPhone whether the system is on or off. The charging begins when the iPod/iPhone is placed on
the iPod/iPhone connector 9. The charge status appear
in the iPod/iPhone display. When charging the iPod/
iPhone, place the iPod/iPhone on the connector with the iPod/iPhone places stopped.
For details, see the user's guide of your iPod/iPhone.
To stop charging an iPod/iPhone
Remove the iPod/iPhone
Notes on charging an iPod iPhone
Notes on charging an if available notice *If the display mode is Demonstration of
an iPod/iPhone even if the system is off. *If charging an iPod/iPhone when the system is off, after charging is
complete the system automatically enters Power Saving mode. The
maximum charging time while the system is off is about 4 hours. If you press DISPLAY ☐ while charging when the system is off,
the system stops charging an iPod/iPhone. To restart charging of an iPod/iPhone, reconnect the iPod/iPhone when the display mode is
Power Saving mc
Notes
- If the battery of the iPod/iPhone is empty, the system may not
recognize it. In such a case, recharge it with a computer, etc. then connect it to the system.
*The performance of the system may be
specifications of your iPod/iPhone. When placing or removing the iPod/iPhone, handle the iPod/iPhone.
in the same angle as that of the iPod/iPhone connector on the unit
and do not twist or sway the iPod/iPhone to prevent connector damage.
Do not carry the unit with an iPod/iPhone set on the connector.
Doing so may cause a malfunction. *When placing or removing the iPod/iPhone, brace the unit with one
hand and take care not to press the controls of the iPod/iPhone by
■Before discorps
*Hold down ◄◀/▶◀ 5 to fast-forward (fast-rewind) while
playing video if ◀◀▶▶ [5] does not function ▪than the iPhone is connected to the system on
When the trifle is connected to the system and you receive a can during playback, playback will pause and you can take an incoming
call. To change the volume level, me VOLUME +/-(E). The volume level
To change the volume level, the VOD/SiC 75 (M) that volume K is does not change if you adjust it on the iPod/iPhone.
This system is designed for iPod/iPhone only. You cannot connect any other portable audio players.
*To use an iPod/iPhone, refer to the user's guide of your iPod/iPhone.
- Sony cannot accept responsibility in the event that data recorded to iPod iPhone is last as demanded when coming up iPod iPhone with
this unit.
[Non-Text]
The Ground Truth image displays a single, solid horizontal line. According to Rule 2 (UNDERSCORE & LINE RULES), if the GT contains lines used for stylistic emphasis or as background (like ruled paper), the OCR result must ignore them. The provided OCR content is "____", which consists of four underscores. This is incorrect because underscores are not equivalent to a solid line and are not permitted under the “Stylistic/Background Lines (Ignore)” rule. Outputting underscores for a stylistic line violates the rule and constitutes an error. Therefore, the OCR result is inconsistent with the Ground Truth.
Using optional audio components
- Prepare the sound source
- Prepare the sound source
Connect additional audio component to the AUDIO IN jack 55 on the unit using an audio analog cord.
IN jack □ on the u (not supplied)
(see 52)
2 Turn down the volume
Press VOLUME = [6].
3 Select the AUDIO IN function.
Press FUNCTION +/- 2 repeatedly.
4 Start playback
Start playback
the volume.
Note
The system may enter Standby mode automatically if the volume level of the connected component is too low. Adjust the component's
volume accordingly. See "To turn off the Automatic Standby function
[Non-Text]
Adjusting the sound
Adjusting the sound
To Press
Adjust the volume VOLUME +/- 6.
Generate a more DSGX 1 on the uni
dynamic sound
(Dynamic Sound)
Generator X-tra)
Set the sound EQ 18 repeatedly to select "BASS"
effect or "TREBLE," and then press ♦/♦ Ⓦ to adjust the level
24 to adjust the level.
Changing the display
To Press
Change DISPLAY ^29 repeatedly when the
information on system is on.
the display
Change Display DISPLAY29 repeatedly when the mode (see below) system is off).
mode (see below.) system is on.
"For example, you can view CD1/MP3 disc information, such as
- track or file number = track or file name (♪)
- artist name (重)
- album or folder name (图片) = total playing time and total number of tracks on the CD-DA
disc (only when Normal Play mode is selected and the player is
stopped). — total number of followers (albums) on the MRI disc (only when
— total number of players (in millions) on the MFS line (only when Normal Play mode is selected and the player is stepped).
= volume label if it exists on the MP3 disc (only when Normal Play
mode is selected and the player is stopped).
The STANDBY indicator on the unit lights up when the system is o
The system offers the following display modes.
Display mode When the system is off 1)
Demonstration The demonstration is turned on.
Power Saving The display is turned off to conserve
mode ^1) power. The timer and clock continue
to operate.
Clock ^1 The clock is displayed.
^17 The STANDBY indicator ^22 on the unit lights up when the system is o
^1) You cannot set the clock in Power Saving mode. ^2) The clock display automatically turns to Power Saving mode after
8 seconds.
Notes on the display information
Notes on the display information *Characters that cannot be displayed appear as “_”.
- The following are not displayed:
- total playing time for an MP3 disc. - remaining playing time, except in the case of CTIDA.
•The following are not displayed correctly:
— elapsed playing time of an MP3 file encoded using VBR (variable
bit rate).
– folder and file names that do not follow either the ISO9660 1 and 1, 1 and 2 or bblot in the conversion format.
- Level 1, Level 2 of Jones in the expansion formal. *The following are displayed;
- remaining playing time for a CDDA disc track.
— ID3 tag information for MP3 files when ID3 version 1 and version 2 tags are need /ID3 version 2 tag information display bus
version 2 tags are used (ID3 version 2 tag information) display this priority when both ID3 version 1 and version 2 tags are used for a
single MP3 file).
[Non-Text]
[EMPTY]
Using the timers
The system offers 2 timer functions. If you use both
timers, the Sleep Timer has priority.
61.10.11
Sleep Timer:
You can fall asleep to music. This function works even if the clock is not set.
the clock is not
Press SLEEP 28 Repeatedly.
Play Timer:
You can wake up to CD, FM reception or iPod/iPhone at
a preset time. Make sure you have set the clock.
- Prepare the sound source
Prepare the sound source. Prepare the sound source, and then press VOLUME
+(-[6] to adjust the volume
To start from a specific CP track or audio file create
To start from a specific CD track of audio mix, create YOUR OWN PROGRAM.
your own program?
2 Select the timer set mode.
Press TIMER MENU 19.
3 Set the play timer.
Press ♦/♦ 24 repeatedly to select "PLAY SET?" then
Press 24. Repeatedly to select TEXT SET up their press © 20
- For the time to start a schedule
4 Set the time to start playback.
Press ♦/♦ 📋 repeatedly to set the hour, then press ⊕
Use the procedure above to set the minutes.
5 Use the same procedure as in step 4 to set the time
to stop playback.
- Select the sound s
Does / ^2M respectively until the desired sound
Press repeatedly which the desired sound
source appears, then press ⊕ ≡.
7 Turn off the system.
Press I/10. The system automatically turns on
before the preset time.
If the system is on at the preset time, the Play Timer
will not play. Do not operate the system from the time
the system turns on until the playback starts.
To check the setting
To check the setting
1 Press TIMER MENU 19.
- Press ♦/♦ 📂 repeatedly to select "TIMER SEL 7" and
■ Press 17. □ repeatedly to select them clearly and then press Ⓐ 20.
- Page A/8 □40 reports data select 40% AX165125 and
3 Press ▼/▼ 24 repeatedly to select PLAY SEL?, and then press Ⓞ 50
then press ⊕ 20.
To cancel the timer
Repeat the same procedure as above until "TIMER OFF?"
appears in step 3, and then press ⊕ 20.
-
-
-
-
-
-
-
-
-
-
-
-
-
-
-
-
-
-
-
-
-
-
-
-
-
-
-
-
-
-
-
-
-
-
-
-
-
-
-
-
-
-
-
-
-
-
-
-
-
-
-
-
-
-
-
-
-
-
-
-
-
-
-
-
-
-
-
-
-
-
-
-
-
-
-
-
-
-
-
-
-
-
-
-
-
-
-
-
- 90.
-
-
-
-
-
-
-
-
-
-
-
-
-
-
-
-
-
-
-
-
-
-
-
-
-
-
-
-
-
-
-
-
-
-
-
-
-
-
-
-
-
-
-
-
-
-
-
-
-
-
-
-
-
-
-
-
-
-
-
-
-
-
-
-
-
-
-
-
-
-
-
-
-
-
-
-
-
-
-
-
-
-
-
-
-
-
-
To change the setting
Start over from step 1.
Notes for the iPod/iPhone user
*Make sure the iPod/iPhone is not playing when using the Play
Timer.
The Play Timer may not be activated depending on the status of the connected iPod/iPhone.
The following is the same:
Tip The P#x Time setting remains as long as the setting is not needed
the Play Timet Setting Remains as long as the setting is not cancelled manually.
Troubleshooting
- Make sure the www.sundand.com/are
1 Make sure the power cord and speaker cords are
correctly and firmly connected.
2 Find your problem in the checklist below, and tal
the indicated corrective action.
If the issue persists, contact your nearest Sony dealer.
(No text)
If the STANDBY indicator flashes
Immediately unplug the power cord, and check the
following items.
- Are the + and - speaker cords short-circuited?
• Is anything blocking the ventilation holes of the
system?
• Is the iPod(iPhone connector 9 short-circuited?
After the STANDBY indicator 12 stops flashing.
reconnect the power cord, and turn on the system.
the issue persists, contact your nearest Sony dealer.
(1) 12 (2) 13 (3) 14 (4) 15
2.1.3 《中国证券报》、《上海证券报》、《证券时报》和巨潮资讯网(www.cninfo.com.cn)
General
The demonstration process in the display of
The demonstration appears in the display area
plugging in the power cord even though the
system is not turned on.
- Press DISPLAY once while the system is off. The
demonstration disappears.
The system does not turn on-
- Is the power cord planned in?
Is the power cord plugged in.
The system has entered Standby mode
unexpectedly.
• This is not a malfunction. The system enters Standby
mode automatically in about 30 minutes when there is
no operation or audio signal output. See "To turn o
the Automatic Standby function."
The clock setting on the Play Times operation
The clock setting of the Play Time has been cancelled unexpectedly.
- If about a minute elonce with no argument, the clock
- If about a minute elapses with no operation, the clock setting or Pio: Times setting is cancelled automatic.
Setting of Play Timet setting is cancelled automatic. Perform the operation again from the beginning.
Perforin the operation again from the beginning.
There is no sound.
- Are the + and - speaker cords short-circuited?
• Are you using only the supplied speakers?
• Is anything blocking the ventilation holes of the
• The specified station may have temporarily stop
broadcastas
2.1.1 2017年1月1日
Sound comes from one channel, or the left a
right volumes are unbalanced.
- Place the speakers as symmetrically as possible.
- Connect only the supplied speakers.
(1) 12 (2) 13 (3) 14 (4) 15 (5) 16 (6) 17 (7) 18 (8) 19 (9) 110
Severe hum or noise.
- Move the system away from sources of noise.
- Connect the system to a different wall outlet.
• Install a noise filter (not supplied) to the power cor
The remote does not function
The remote does not function
- Remove any obstacles between the remote and the remote sensors [56] on the unit, and position the unit
remote sensor (R) on the unit, and position the unit over from fluorescent lights.
away from fluorescent nights.
- Point the remote at the system's sensor - More the remote closer to the system
- Move the remote closer to the system.
The STANDBY indicator 12 remains lit after
unplugging the power cord.
The STANDBY indicator 12 may not turn off
THE STANDARD indicator (M) may not turn off immediately after unplugging the power cord.
indicator will turn off after about 40 seconds.
a malfunction.
[Non-Text]
CD/MP3 player
32, 107-2 play, 2
The sound skips, or the disc will not play.
• Wipe the disc clean, and replace it
- Move the system to a location away from vibrat
example, on top of a stable stand).
- Move the speakers away from the system, or pla
on separate stands. At high volume, speaker vib
may cause the sound to skip.
Play does not start from the first track
Play does not start from the first track.
- Return to normal play by pressing PLAY MOD.
repeatedly until both PGM and SHOF cheap
Starting playback takes more time than u
• The following discs can increase the time it take
start playback:
- a disc recorded with a complicated tree struct
— a disc recorded in multisession mode
- a disc that has not been finalized (a disc to ad
a list that has not been influenced (a list to be, can be added).
— a disc that has many folders.
iPod/iPhone
There is no sound
• Make sure the iPod/iPhone is connected securely
• Make sure the iPod/iPhone is playing music.
• Make sure the iPod/iPhone is undated with the lo
Must save the iPod/iPhone is updated with the iSoftware. If not, update the iPod/iPhone before u
with the system.
- Adjust the volume
(1) 2017年1月1日
The sound is distorted.
• Make sure the iPod/iPhone is connected securely
- Turn down the volume.
- Set the "EQ" setting of the iPod/iPhone to "Off"
"Flat."
The iPod/iPhone does not function
The iPod/IPhone does not function
- If the battery of the iPod/iPhone is empty, it may not work with this system. In such a case, perhaps it with a
work with this system. In such a case, recharge it with a computer, etc. then connect it to the system.
- Shut down another/OF applications running on the
- Shut down any other IOS applications running on the iPod/iPhone. For details, refer to the operation manual
If our phone? For emails, refer to the operation if supplied with the iPod/iPhone.
- Make sure the iPod/iPhone is connected securely.
- Make sure the iPod/iPhone is undated with the lo
- Make sure the iPod/iPhone is updated with the softears. If not, undate the iPod/iPhone before us
software: If also, update the if our phone before it with the system.
• Because the operation of the system and the iPod
Marque : SONY
Modèle : CMT-CX4iP
Catégorie : Système Hi-Fi