
KV-32XBR400 - Téléviseur SONY - Notice d'utilisation et mode d'emploi gratuit
Retrouvez gratuitement la notice de l'appareil KV-32XBR400 SONY au format PDF.


| Type de produit | Téléviseur couleur cathodique |
| Marque | Sony |
| Modèle | KV-32XBR400 |
| Taille de l'écran | 32 pouces (81 cm de diagonale) |
| Technologie d'affichage | Trinitron (tube cathodique à grille d'ouverture) |
| Résolution maximale | 480i (standard definition) |
| Tuner | Analogique NTSC |
| Dimensions (L x H x P) | 762 x 610 x 533 mm |
| Poids | 68 kg |
| Consommation électrique | 150 W (max) |
| Alimentation | 120 V, 60 Hz |
| Entrées vidéo | Composite, S-Vidéo, Composante (YUV) |
| Sortie audio | 2 x 10 W (stéréo) |
| Fonctions spéciales | Image dans l'image (PIP), télétexte (si disponible), son stéréo MTS |
| Entretien et nettoyage | Chiffon doux et sec ; ne pas utiliser de liquides abrasifs |
| Sécurité | Ne pas obstruer les fentes de ventilation ; ne pas exposer à l'humidité |
| Pièces détachées et réparabilité | Disponibles par le service agréé Sony ; réparation par technicien qualifié |
| Informations générales | Téléviseur haut de gamme Sony XBR, série Trinitron, années 1990 |
FOIRE AUX QUESTIONS - KV-32XBR400 SONY
Questions des utilisateurs sur KV-32XBR400 SONY
0 question sur cet appareil. Repondez a celles que vous connaissez ou posez la votre.
Poser une nouvelle question sur cet appareil
Téléchargez la notice de votre Téléviseur au format PDF gratuitement ! Retrouvez votre notice KV-32XBR400 - SONY et reprennez votre appareil électronique en main. Sur cette page sont publiés tous les documents nécessaires à l'utilisation de votre appareil KV-32XBR400 de la marque SONY.
MODE D'EMPLOI KV-32XBR400 SONY
FD Trinitron
WEGA ^TM
XBR
DRC-MF
Digital Reality Creation
Operating Instructions
KV-32XBR400 KV-36XBR400
WARNING
To reduce the risk of fire or shock hazard, do not expose the TV to rain or moisture.


This symbol is intended to alert the user to the presence of uninsulated "dangerous voltage" within the product's enclosure that may be of sufficient magnitude to constitute a risk of electric shock to persons.
This symbol is intended to alert the user to the presence of important operating and maintenance (servicing) instructions in the literature accompanying the appliance.
CAUTION
TO PREVENT ELECTRIC SHOCK, MATCH WIDE BLADE OF PLUG TO WIDE SLOT, FULLY INSERT.
CAUTION
When using TV games, computers, and similar products with your TV, keep the brightness and contrast functions at low settings. If a fixed (non-moving) pattern is left on the screen for long periods of time at a high brightness or contrast setting, the image can be permanently imprinted onto the screen. Continuously watching the same program can cause the imprint of station logos onto the TV screen. These types of imprints are not covered by your warranty because they are the result of misuse.
Note on Caption Vision
This television receiver provides display of television closed captioning in accordance with §15.119 of the FCC rules.
Note on Cleaning the TV
Clean the TV with a soft dry cloth. Never use strong solvents such as thinner or benzine, which might damage the finish of the cabinet.
Note to CATV System Installer
This reminder is provided to call the CATV system installer's attention to Article 820-40 of the NEC that provides guidelines for proper grounding and, in particular, specifies that the cable ground shall be connected to the grounding system of the building, as close to the point of cable entry as practical.
Use of this television receiver for other than private viewing of programs broadcast on UHF or VHF or transmitted by cable companies for the use of the general public may require authorization from the broadcaster/cable company and/or program owner.
NOTIFICATION
This equipment has been tested and found to comply with the limits for a Class B digital device pursuant to Part 15 of the FCC Rules. These limits are designed to provide reasonable protection against harmful interference in a residential installation. This equipment generates, uses, and can radiate radio frequency energy and, if not installed and used in accordance with the instructions, may cause harmful interference with radio communications. However, there is no guarantee that interference will not occur in a particular installation. If this equipment does cause harmful interference to radio or television reception, which can be determined by turning the equipment off and on, the user is encouraged to try to correct the interference by one or more of the following measures:
Reorient or relocate the receiving antennas.
Increase the separation between the equipment and receiver.
Connect the equipment into an outlet on a circuit different from that to which the receiver is connected.
Consult the dealer or an experienced radio/TV technician for help.
You are cautioned that any changes or modifications not expressly approved in this manual could void your authority to operate this equipment.
Safety
Operate the TV only on 120 V AC.
☐ The plug is designed, for safety purposes, to fit into the wall outlet only one way. If you are unable to insert the plug fully into the outlet, contact your dealer.
☐ If any liquid or solid object should fall inside the cabinet, unplug the TV immediately and have it checked by qualified service personnel before operating it further.
Installing
☐ To prevent internal heat buildup, do not block the ventilation openings.
☐ Do not install the TV in a hot or humid place, or in a place subject to excessive dust or mechanical vibration.
☐ The AC power cord is attached to the rear of the TV with hooks. Do not attempt to remove the cord from these hooks. Doing so could cause damage to the TV.

ENERGY STAR® is a U.S. registered mark.
XBR
TruSurround is a trademark of SRS Labs, Inc. SRS and the SRS symbol are registered trademarks of SRS Labs, Inc. in the United States and selected foreign countries. SRS and TruSurround are incorporated under license from SRS Labs, Inc. and is protected under United
(●) TruSurround
States Patent Nos. 4,748,669 and 4,841,572 with numerous additional issued and pending foreign patents. Purchase of this product does not convey the right to sell recordings made with the TruSurround technology.
FD Trinitron and the Wega logo are trademarks of Sony Corporation.
Owner's Record
The model and serial numbers are provided on the front of this instruction manual and at the rear of the TV. Refer to them whenever you call upon your Sony dealer regarding this product.
Important Safeguards
For your protection, please read these instructions completely, and keep this manual for future reference.
Carefully observe and comply with all warnings, cautions and instructions placed on the set, or described in the operating instructions or service manual.
WARNING
To guard against injury, the following basic safety precautions should be observed in the installation, use, and servicing of the set.
Use
Power Sources
This set should be operated only from the type of power source indicated on the serial/model plate. If you are not sure of the type of electrical power supplied to your home, consult your dealer or local power company. For those sets designed to operate from battery power, refer to the operating instructions.

Grounding or Polarization
This set is equipped with a polarized AC power cord plug (a plug having one blade wider than the other), or with a three-wire grounding type plug (a plug having a third pin for grounding). Follow the instructions below:
For the set with a polarized AC power cord plug
This plug will fit into the power outlet only one way. This is a safety feature. If you are unable to insert the plug fully into the outlet, try reversing the plug. If the plug should still fail to fit, contact your electrician to have a suitable outlet installed. Do not defeat the safety purpose of the polarized plug by forcing it in.
Alternate Warning
For the set with a three-wire grounding type AC plug
This plug will only fit into a grounding-type power outlet. This is a safety feature. If you are unable to insert the plug into the outlet, contact your electrician to have a suitable outlet installed. Do not defeat the safety purpose of the grounding plug.
Overloading
Do not overload wall outlets, extension cords or convenience receptacles beyond their capacity, since this can result in fire or electric shock.
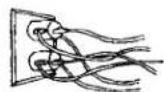
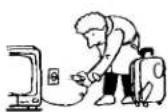
Always turn the set off when it is not to be used. When the set is left unattended and unused for long periods of time, unplug it from the wall outlet as a precaution against the possibility of an internal malfunction that could create a fire hazard.
Object and Liquid Entry
Never push objects of any kind into the set through the cabinet slots as they may touch dangerous voltage points or short out parts that could result in a fire or electric shock. Never spill liquid of any kind on the set.

Attachments
Do not use attachments not recommended by the manufacturer, as they may cause hazards.
Cleaning
Unplug the set from the wall outlet before cleaning or polishing it. Do not use liquid cleaners or aerosol cleaners.

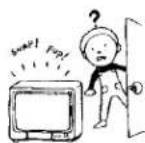
Use a cloth lightly dampened with water for cleaning the exterior of the set. If a snapping or popping sound from a TV set is continuous or frequent while the TV is operating, unplug the TV and consult your dealer or service technician. It is normal for some TV sets to make occasional snapping or popping sounds, particularly when being turned on or off.
Installation
Water and Moisture
Do not use power-line operated sets near water — for example, near a bathtub, washbowl, kitchen sink, or laundry tub, in a wet basement, or near a swimming pool, etc.

Accessories
Do not place the set on an unstable cart, stand, table or shelf. The set may fall, causing serious injury to a child or an adult, and serious damage to the set. Use only a cart or stand recommended by the manufacturer for the specific model of TV. An appliance and cart combination should be moved with care. Quick stops, excessive force, and uneven surfaces may cause the appliance and cart combination to overturn.


Ventilation
The slots and openings in the cabinet and in the back or bottom are provided for necessary ventilation. To ensure reliable operation of the set, and to protect it from overheating, these slots and openings must never be blocked or covered.
☐ Never cover the slots and openings with a cloth or other materials.
☐ Never block the slots and openings by placing the set on a bed, sofa, rug or other similar surface.
☐ Never place the set in a confined space, such as a bookcase, or built-in cabinet, unless proper ventilation is provided.
Do not place the set near or over a radiator or heat register, or where it is exposed to direct sunlight.
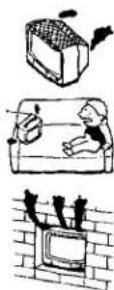

Power-Cord Protection
Do not allow anything to rest on or roll over the power cord, and do not place the set where the power cord is subject to wear or abuse.
Antennas
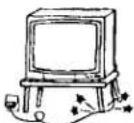
Outdoor Antenna Grounding
If an outdoor antenna is installed, follow the precautions below. An outdoor antenna system should not be located in the vicinity of overhead power lines or other electric light or power circuits, or where it can come in contact with such power lines or circuits.
WHEN INSTALLING AN OUTDOOR ANTENNA SYSTEM, EXTREME CARE SHOULD BE TAKEN TO KEEP FROM CONTACTING SUCH POWER LINES OR CIRCUITS AS CONTACT WITH THEM IS ALMOST INVARIABLY FATAL. Be sure the antenna system is grounded so as to provide some protection against voltage surges and built-up static charges. Section 810 of the National Electrical Code (NEC) in USA and Section 54 of the Canadian Electrical Code in Canada provides information with respect to proper grounding of the mast and supporting structure, grounding of the lead-in wire to an antenna discharge unit, size of grounding conductors, location of antenna discharge unit, connection to grounding electrodes, and requirements for the grounding electrode.
Antenna Grounding According to the NEC
Refer to section 54-300 of Canadian Electrical Code for Antenna Grounding.

Lightning
For added protection for this television receiver during a lightning storm, or when it is left unattended and unused for long periods of time, unplug it from the wall outlet and disconnect the antenna. This will prevent damage to the receiver due to lightning and power-line surges.
Service
Damage Requiring Service
Unplug the set from the wall outlet and refer servicing to qualified service personnel under the following conditions:
When the power cord or plug is damaged or frayed.
If liquid has been spilled into the set.
If the set has been exposed to rain or water.
If the set has been subject to excessive shock by being dropped, or the cabinet has been damaged.
If the set does not operate normally when following the operating instructions. Adjust only those controls that are specified in the operating instructions. Improper adjustment of other controls may result in damage and will often require extensive work by a qualified technician to restore the set to normal operation.
When the set exhibits a distinct change in performance — this indicates a need for service.
Servicing
Do not attempt to service the set yourself since opening the cabinet may expose you to dangerous voltage or other hazards. Refer all servicing to qualified service personnel.

Replacement Parts
When replacement parts are required, be sure the service technician certifies in writing that he has used replacement parts specified by the manufacturer that have the same characteristics as the original parts.
Unauthorized substitutions may result in fire, electric shock, or other hazards.
Safety Check
Upon completion of any service or repairs to the set, ask the service technician to perform routine safety checks (as specified by the manufacturer) to determine that the set is in safe operating condition, and to so certify. When the set reaches the end of its useful life, improper disposal could result in a picture tube implosion. Ask a qualified service technician to dispose of the set.


Contents
Introducing the FD Trinitron Wega
Overview....1
Presenting the FD Trinitron Wega....2
Using the Remote Control ....3
Installing the TV
Overview....5
Connecting a Cable or Antenna....6
Connecting a VCR and Cable....9
Connecting a VCR and Cable Box ....10
Connecting Two VCRs for Tape Editing......11
Connecting a Satellite Receiver....12
Connecting a Satellite Receiver with a VCR ...13
Connecting an Audio Receiver....14
Connecting a DVD Player with Component Video Connectors....15
Connecting a DVD Player with A/V Connectors ....16
Connecting a Digital TV Receiver ....17
Connecting a Camcorder 17
Using the CONTROL S Feature....18
Setting Up the TV Automatically ....18
Using the Features
Overview....19
Using Favorite Channels....20
Using Twin View 21
Using the Freeze Function 23
Using the Menus
Overview....25
Using the Video Menu 26
Using the Audio Menu 28
Using the Channel Menu....30
Using the Parent Menu ....31
Using the Timer Menu 34
Using the Setup Menu....35
Other Information
Overview....37
TV Controls and Connectors....38
Using the Remote Control 40
Troubleshooting....46
Specifications....48
Index 51
Introducing the FD Trinitron Wega
Overview
This chapter defines the contents of your Wega TV, and provides an overview of how to set up and use basic features.
| Topic | Page |
| Presenting the FD Trinitron Wega | 2 |
| Using the Remote Control | 3 |
Introducing the FD Trinitron Wega
Presenting the FD Trinitron Wega
The FD Trinitron Wega (pronounced VAY-GAH) is characterized by outstanding contrast, uncompromising accuracy, and corner-to-corner detail.
You'll recognize the superiority of Wega technology almost immediately. The first thing you'll notice is minimal glare from the flat picture tube. This flat-screen technology improves picture detail without distortion, unlike conventional curved screens. The FD Trinitron delivers outstanding image detail not only at the screen center, but also at the corners — so you can enjoy a bright, clear picture from any location in a room.
Features
Some of the features that you will enjoy with your new TV include:
☐ DRC-MF (Digital Reality Creation, Multi Function): Unlike conventional line doublers, the DRC feature doubles vertical and horizontal lines, resulting in four times the density for quality sources such as DVD, Satellite and Digital camcorder.
☐ Twin View™: Using Multi-Image Driver (MIDX), Twin View allows you to watch two programs side by side with the ability to zoom in one picture. You can watch pictures from two different sources (1080i, 480p and 480i) simultaneously.
☐ 16:9 Enhancement: Vertical Compression technology that maximizes picture resolution on "anamorphic" or "enhanced for widescreen" sources, including selected DVDs.
☐ Velocity Modulation: Vertical line enhancement that sharpens picture definition.
☐ Steady Sound: Equalizes volume levels so there is consistent output between programs and commercials.
☐ Parental Control: V-Chip technology allows parents to block unsuitable programming for younger viewers.
☐ Component Video Inputs: Offers the best video quality for DVD, (480p, 480i) Digital Set-top box (HD1080i) connections.
☐ S-VIDEO Inputs: Provides a high-quality image for connected equipment.
☐ Favorite Channel Preview: Preview up to eight favorite channels without leaving the current channel.
Using the Remote Control
Inserting Batteries
Insert two size AA (R6) batteries (supplied) by matching the + and - on the batteries to the diagram inside the battery compartment.

Remove the batteries to avoid damage from possible battery leakage whenever you anticipate that the remote control will not be used for an extended period.
Handle the remote control with care. Avoid dropping it, getting it wet, or placing it in direct sunlight, near a heater, or where the humidity is high.
Remote Control Overview
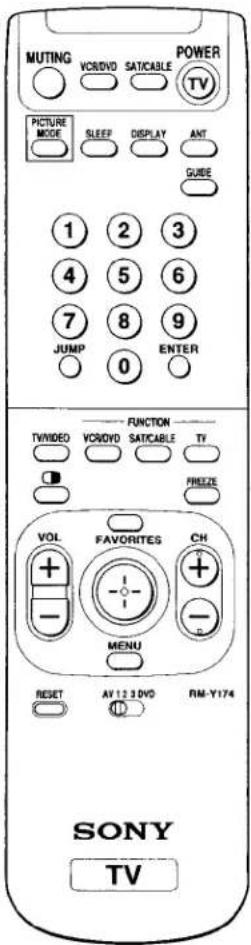
Here's an overview of the buttons on the remote control you will probably use most often. For a complete description of the remote control, see "Using the Remote Control" on page 40.
| To Do This ... | Use This Button | |
| Turn the TV on and off | TV (POWER) | |
| Select channels directly | 0 – 9 and ENTERPress 0 – 9 to select a channel, the channel changes after 2 seconds. Press ENTER for immediate selection. | |
| Scan through channels | CH +/-To scan rapidly through the channels, press and hold down the CH+ or CH- button. | |
| Adjust the volume | VOL +/- | |
| Switch video inputs (such as a VCR) | TV/VIDEOPress repeatedly to toggle through all video inputs. | |
| Display the Menu to make changes to the TV | MENUFor details, see “Using the Menus” on page 25. | |
| View the Favorite Channels list | FAVORITESFor details, see “Using Favorite Channels” on page 20. | |
| Using the on-screen functions |  | MoveSelect |
Installing the TV
Overview
This chapter includes illustrated instructions for setting up your TV:
| Topic | Page |
| Connecting a Cable or Antenna | 6 |
| Connecting a VCR and Cable | 9 |
| Connecting a VCR and Cable Box | 10 |
| Connecting Two VCRs for Tape Editing | 11 |
| Connecting a Satellite Receiver | 12 |
| Connecting a Satellite Receiver with a VCR | 13 |
| Connecting an Audio Receiver | 14 |
| Connecting a DVD Player with Component Video Connectors | 15 |
| Connecting a DVD Player with A/V Connectors | 16 |
| Connecting a Digital TV Receiver | 17 |
| Using the CONTROL S Feature | 18 |
| Setting Up the TV Automatically | 18 |
Note About the AC Power Cord
The AC power cord is attached to the rear of the TV with hook. Use caution when removing the AC plug from its holder. Gently slide the plug in the upward direction to remove from hook. Once removed, the AC power plug should automatically disengage from its stored location.

Installing the TV
Connecting a Cable or Antenna
Connecting Directly to Cable or an Antenna
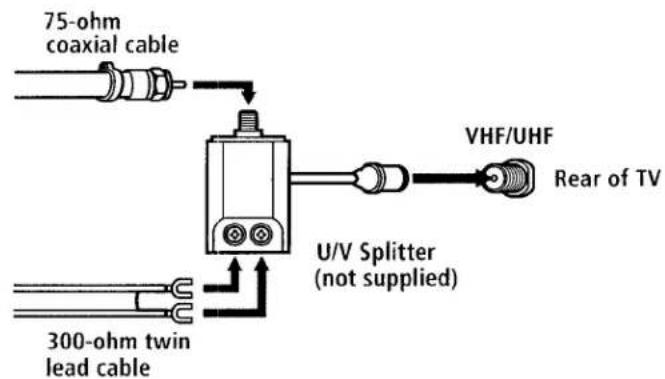
The connection you choose depends on the cable found in your home. Newer homes are equipped with standard coaxial cable (see A); older homes probably have 300-ohm twin lead cable (see B); still other homes may contain both (see C).
A VHF Only or VHF/UHF or Cable

B VHF Only or UHF Only or VHF/UHF

C VHF and UHF
Cable and Antenna
If your cable provider does not feature local channels, you may find this set up convenient.

Select CABLE or antenna (ANT) mode by pressing ANT on the remote control.
In order to receive channels with an antenna, you need to turn your Cable to OFF and perform the Auto Program function (see page 30).
Cable Box Connections
Some pay cable TV systems use scrambled or encoded signals that require a cable box to view all channels.
Cable Box
1 Connect the coaxial connector from your cable service to the cable box's IN jack.
2 Using a coaxial cable, connect the cable box's OUT jack to the TV's VHF/UHF jack.

If you will be controlling all channel selection through your cable box, you should consider using the Channel Fix feature (see page 30).
Installing the TV
Cable Box and Cable
For this set up, you can switch between scrambled channels (through your cable box), and normal (CATV) channels by pressing ANT on the remote control.

flowchart
graph TD
    A["Cable box"] --> B["IN"]
    A --> C["OUT"]
    B --> D["AUX"]
    C --> D
    D --> E["Rear of TV"]
    A --> F["75-ohm coaxial cable (not supplied)"]
    F --> G["TO CONVERTER"]
    G --> H["Signal"]
    H --> I["VHF/UHF"]
    A --> J["CATV cable (unscrambled channels)"]
Your Sony remote control can be programmed to operate your cable box (see "Programming the Remote Control" on page 42).
When using Favorite Channel or Twin View, you cannot view the AUX input in the window picture.
Pressing ANT switches between these inputs.
If you are connecting a cable box through the AUX input and would like to switch between the AUX and normal (CATV) input you should consider using the Channel Fix feature (see page 30).
Connecting a VCR and Cable
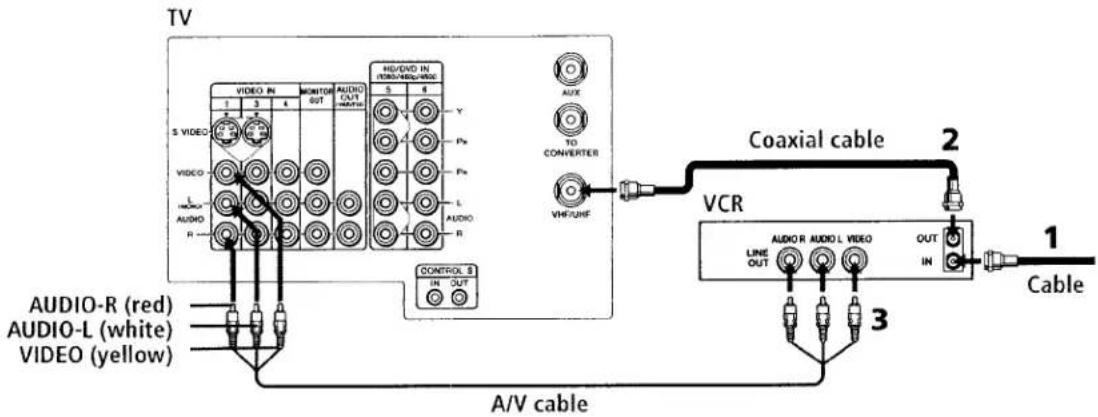
1 Connect the cable TV cable to the VCR's IN jack.
2 Using a coaxial cable, connect the VCR's OUT jack to the TV's VHF/UHF jack.
3 Using an A/V cable, connect the VCR's A/V OUT jacks to the TV's A/V IN jacks.
If your VCR has an S VIDEO jack: For best picture quality, use an S VIDEO connection instead of the yellow video cable on your combined A/V cable. Using an S VIDEO cable, connect the VCR's S VIDEO OUT jack to the TV's S VIDEO IN jack. S VIDEO does not provide audio, so audio cables must still be connected to provide sound.
Installing the TV
Connecting a VCR and Cable Box
1 Connect the single (input) jack of the splitter to your incoming cable connection, and connect the other two (output) jacks (using coaxial cable) to IN on your cable box and VHF/UHF on your TV.
2 Using a coaxial cable, connect the cable box's OUT jack to the VCR's VHF/UHF IN jack.
3 Using an A/V cable, connect the VCR's A/V OUT jacks to the TV's A/V IN jacks.
If your VCR has an S VIDEO jack: For best picture quality, use an S VIDEO connection instead of the yellow video cable on your combined A/V cable. Using an S VIDEO cable, connect the VCR's S VIDEO OUT jack to the TV's S VIDEO IN jack. S VIDEO does not provide audio, so audio cables must still be connected to provide sound.

flowchart
graph TD
    A["TV"] --> B["A/VO"]
    A --> C["VIDEO"]
    A --> D["VIDEO"]
    A --> E["VIDEO"]
    A --> F["VIDEO"]
    A --> G["VIDEO"]
    A --> H["VIDEO"]
    A --> I["VIDEO"]
    A --> J["VIDEO"]
    A --> K["VIDEO"]
    A --> L["VIDEO"]
    A --> M["VIDEO"]
    A --> N["VIDEO"]
    A --> O["VIDEO"]
    A --> P["VIDEO"]
    A --> Q["VIDEO"]
    A --> R["VIDEO"]
    A --> S["VIDEO"]
    A --> T["VIDEO"]
    A --> U["VIDEO"]
    A --> V["VIDEO"]
    A --> W["VIDEO"]
    A --> X["VIDEO"]
    A --> Y["VIDEO"]
    A --> Z["VIDEO"]
    A --> AA["VIDEO"]
    A --> AB["VIDEO"]
    A --> AC["VIDEO"]
    A --> AD["VIDEO"]
    A --> AE["VIDEO"]
    A --> AF["VIDEO"]
    A --> AG["VIDEO"]
    A --> AH["VIDEO"]
    A --> AI["VIDEO"]
    A --> AJ["VIDEO"]
    A --> AK["VIDEO"]
    A --> AL["VIDEO"]
    A --> AM["VIDEO"]
    A --> AN["VIDEO"]
    A --> AO["VIDEO"]
    A --> AP["VIDEO"]
    A --> AQ["VIDEO"]
    A --> AR["VIDEO"]
    A --> AS["VIDEO"]
    A --> AT["VIDEO"]
    A --> AU["VIDEO"]
    A --> AV["VIDEO"]
    A --> AW["VIDEO"]
    A --> AX["VIDEO"]
    A --> AY["VIDEO"]
    A --> AZ["VIDEO"]
    A --> BA["VIDEO"]
    A --> BB["VIDEO"]
    A --> BC["VIDEO"]
    A --> BD["VIDEO"]
    A --> BE["VIDEO"]
    A --> BF["VIDEO"]
    A --> BG["VIDEO"]
    A --> BH["VIDEO"]
    A --> BI["VIDEO"]
    A --> BJ["VIDEO"]
    A --> BK["VIDEO"]
    A --> BL["VIDEO"]
    A --> BM["VIDEO"]
    A --> BN["VIDEO"]
    A --> BO["VIDEO"]
    A --> BP["VIDEO"]
    A --> BQ["VIDEO"]
    A --> BR["VIDEO"]
    A --> BS["VIDEO"]
    A --> BT["VIDEO"]
    A --> BU["VIDEO"]
    A --> BV["VIDEO"]
    A --> BW["VIDEO"]
    A --> BX["VIDEO"]
    A --> BY["VIDEO"]
    A --> BZ["VIDEO"]
    A --> CA["VIDEO"]
    A --> CB["VIDEO"]
    A --> CC["VIDEO"]
    A --> CD["VIDEO"]
    A --> CE["VIDEO"]
    A --> CF["VIDEO"]
    A --> CG["VIDEO"]
    A --> CH["VIDEO"]
    A --> CI["VIDEO"]
    A --> CJ["VIDEO"]
    A --> CK["VIDEO"]
    A --> CL["VIDEO"]
    A --> CD
    A --> CD
    A --> CD
    A --> CD
    A --> CD
    A --> CD
    A --> CD
    A --> CD
    A --> CD
    A --> CD
    A --> CD
    A --> CD
    A --> CD
    A --> CD
    A --> CD
    A --> CD
    A --> CD
    A --> CD
    A --> CD
    A --> CD
    A --> CD
Connecting Two VCRs for Tape Editing
If you connect two VCRs, you can use the TV's MONITOR OUT feature to perform tape-to-tape editing. In the connection shown below, the TV functions as a monitor and sends the program being played by the playback VCR to the recording VCR.
1 Connect the VCR intended for playback using the connection instructions on page 10 of this manual.
2 Using A/V connectors, connect AUDIO and VIDEO IN on the VCR intended for recording to MONITOR AUDIO and VIDEO OUT on your TV.
You cannot record signals from equipment connected to the Y, PB, PR input.

flowchart
graph TD
    A["VCR (playback)"] -->|1 A/V cable| B["TV"]
    B --> C["VIDEO IN 1-3 OUT 4"]
    B --> D["VIDEO OUT 5-6"]
    B --> E["HD/DVD IN 5-6"]
    B --> F["CONTROL S IN OUT"]
    G["VCR (recording)"] --> H["VIDEO IN LINE OUT OUT"]
    G --> I["VIDEO OUT IN"]
    G --> J["VIDEO OUT OUT"]
    style A fill:#f9f,stroke:#333
    style B fill:#ccf,stroke:#333
    style G fill:#cfc,stroke:#333
    style C fill:#ffc,stroke:#333
    style D fill:#ffc,stroke:#333
    style E fill:#ffc,stroke:#333
    style F fill:#ffc,stroke:#333
    style G fill:#ffc,stroke:#333
    style H fill:#fcc,stroke:#333
    style I fill:#fcc,stroke:#333
    style J fill:#fcc,stroke:#333
To perform tape editing, set the TV to the video input intended for playback by pressing the TV/VIDEO button on the remote control.
Installing the TV
Connecting a Satellite Receiver
1 Connect the satellite antenna cable to the satellite receiver's SATELLITE IN jack.
2 Using an A/V cable, connect the satellite receiver's A/V OUT jacks to the TV's A/V IN jacks.
3 Connect a coaxial cable from your cable or antenna to the TV's VHF/UHF jack.
If your satellite receiver has an S VIDEO jack: For best picture quality, use an S VIDEO connection instead of the yellow video cable on your combined A/V cable. Using an S VIDEO cable, connect the satellite receiver's VIDEO OUT jack to the TV's S VIDEO IN jack. S VIDEO does not provide audio, so audio cables must still be connected to provide sound.

Connecting a Satellite Receiver with a VCR
1 Connect the satellite antenna cable to the satellite receiver's SATELLITE IN jack.
2 Connect the CATV cable to the VCR's VHF/UHF IN jack.
3 Using a coaxial cable, connect the VCR's OUT jack to the TV's VHF/UHF jack.
4 Using an A/V cable, connect the satellite receiver's A/V OUT jacks to the VCR's A/V IN jacks.
5 Using an A/V cable, connect the VCR's A/V OUT jacks to the TV's A/V IN jacks.

flowchart
graph TD
    TV["TV"] -->|A/D/A| AudioR["VIDEO (red)"]
    TV --> AudioL["VIDEO (white)"]
    TV --> AudioVideo["VIDEO (yellow)"]
    AudioR --> Video1["VIDEO IN 1-5"]
    AudioL --> Video2["VIDEO OUT 1-4"]
    AudioVideo --> Video3["VIDEO OUT 5-6"]
    Video1 --> AudioV["VIDEO OUT 1-4"]
    Video2 --> AudioV
    Video3 --> AudioV
    AudioV --> AudioVOut["VIDEO OUT 1-5"]
    AudioVOut --> VCR["Satellite receiver"]
    VCR --> AudioR1["VIDEO OUT 2-4"]
    VCR --> AudioR2["VIDEO OUT 2-5"]
    AudioR1 --> AudioR2
    AudioR2 --> AudioR1
    AudioV --> AudioVOut
    AudioVOut --> AudioR2
    AudioVOut --> AudioL1["Satellite receiver"]
    AudioVOut --> AudioL2["Satellite receiver"]
    AudioVOut --> AudioR1
    AudioVOut --> AudioL2
    AudioVOut --> AudioR1
    AudioVOut --> AudioL1
    AudioVOut --> AudioR1
    AudioVOut --> AudioL2
    AudioVOut --> AudioR1
    AudioVOut --> AudioL2
    AudioVOut --> AudioR1
    AudioVOut --> AudioL1
    AudioVOut --> AudioR1
    AudioVOut --> AudioL2
    AudioVOut --> AudioR1
    AudioVOut --> AudioL2
    AudioVOut --> AudioR1
    AudioVOut --> AudioL2
    AudioVOut --> AudioR1
    AudioVOut --> AudioL1
    AudioVOut --> AudioL2
    AudioVOut --> AudioR1
    AudioVOut --> AudioL2
    AudioVOut --> AudioR1
    AudioVOut --> AudioL2
    AudioVOut --> AudioR1
    AudioVOut --> AudioL2
    AudioVOut --> AudioR1
    AudioVOut --> AudioL2
    AudioVOut --> AudioR1
    AudioVOut --> AudioL2
    AudioVOut --> AudioR1
    AudioVOut --> AudioL1
    AudioVOut --> AudioL2
    AudioVOut --> AudioR1
    AudioVOut --> AudioL2
Installing the TV
Connecting an Audio Receiver
1 Using audio cables, connect the TV's AUDIO OUT jacks to the audio receiver's audio LINE IN jacks.

Connecting a DVD Player with Component Video Connectors
1 Using three separate component video cables, connect the DVD player's Y, PB, and PR jacks to the Y, PB, and PR jacks on the TV.
The Y, PB, and PR jacks on your DVD player are sometimes labeled Y, CB, and CR, or Y, B-Y, and R-Y. If so, connect the cables to like colors.
The Y, PB, and PR jacks do not provide audio, so audio cables must be connected to provide sound.
2 Using an audio cable, connect the DVD player's audio OUT jacks to the TV's audio IN jacks.

Installing the TV
Connecting a DVD Player with A/V Connectors
If your DVD player has video component output connectors: for best picture quality use the connection described on page 15.
1 Using audio cables, connect the DVD player's audio OUT jacks to the TV's audio IN jacks.
2 Using an S VIDEO cable, connect the DVD player's S VIDEO jack to the TV's S VIDEO jack.

Connecting a Digital TV Receiver

Be sure to read the
manual for the Set-top box.
1 Using three separate component video cables, connect the Digital TV Set-top box's Y, PB, and PR jacks to the TV.
The Y, PB, and PR jacks do not provide audio, so audio cables must be connected to provide sound.
Component input (Y, PB, and PR) is recommended for optimum picture quality. You may also use component video or S Video connections.
2 Using an audio cable, connect the DTV Set-top box's audio OUT jacks to the TV's audio IN jacks.

Connecting a Camcorder
1 Using A/V cables, connect the camcorder's A/V OUT jacks to the TV's A/V IN jacks.
If you have a mono camcorder, connect its left audio output to the TV's AUDIO L jack.
For easy connection of the camcorder, the TV has front A/V inputs (shown below).
However, if you prefer, you can also connect the camcorder to the TV's rear A/V IN jacks.

Installing the TV
Using the CONTROL S Feature
CONTROL S allows you to control your TV system and other Sony equipment with one remote control.
To control your other Sony equipment with your TV's remote control, use a CONTROL S cable (not supplied) to connect the equipment's CONTROL S IN jack to the TV's CONTROL S OUT jack.

Setting Up the TV Automatically
After you finish connecting your TV, you need to run Auto Setup to set up your channels.
The Auto Setup feature does not apply for installations that use a cable box for all channel selection.
Using Auto Setup
1 Press POWER to turn on the TV.
The first time you turn on the TV, the Auto Setup screen appears.
2 Press CH+ to run Auto Setup or press CH- to exit.
You can run Auto Program by selecting it in the Channel menu, as described on page 30.
Using the Features
Overview
This chapter describes how to use new features of your TV, including:
| Topic | Page |
| Using Favorite Channels | 20 |
| Using Twin View | 21 |
| Using the Freeze Function | 23 |
Using the Features
Using Favorite Channels
The Favorite Channel feature lets you select programs from a list of favorite channels that you specify.
To display a list of your favorite channels:
You must specify your favorite channels before you can display them. See the Favorite Channel description under "Selecting Channel Options" on page 30.
1 Press FAVORITES.
The Favorite Channel options appear.

2 Move the joystick or to access the channel you want to watch, and press .
Using Twin View
Twin View enables you to watch two programs at the same time. You can also change the size of both the left and right pictures.
Displaying Twin Pictures
To display twin pictures
Press □.

natural_image
Two black-and-white photos showing a person with two adults, separated by arrows indicating transformation (no text or symbols)To cancel twin pictures
Press □ again (or press the ◆ button).
Activating the Picture
Although two pictures appear on the screen at the same time, only one picture is active. For an active picture, you can:
□ Change channels
□ Adjust the volume
☐ Switch the input sources from VHF/UHF to cable by pressing ANT or TV/VIDEO to switch the video input.
To activate the right picture
□ Move the joystick to the right.

natural_image
Two black-and-white photos showing a person with two adults, each paired with an arrow indicating direction (no text or symbols)To activate the left picture
□ Move the joystick to the left.
A blue highlight indicates which is the active picture.
Changing the Picture Size
The zoom feature lets you change the size of the left and right pictures.
To enlarge the left picture (reduce the right):
1 Move the joystick left to activate the left picture (if not already activated).
2 Move the joystick up to enlarge the picture.

natural_image
Black-and-white photo of two individuals in front of a building (no visible text or symbols)
natural_image
Black-and-white photo of two individuals, one smiling and the other looking down, with no visible text or symbols.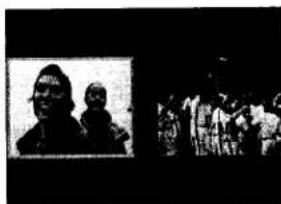
natural_image
Black-and-white photo of two individuals in front of a wall, with a group of people in the background (no visible text or symbols)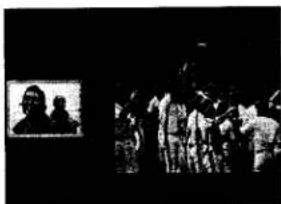
natural_image
Black-and-white photo of a group of people in front of a large screen, no visible text or symbols
natural_image
Black-and-white photo of a group of people gathered in a dimly lit room, possibly at night or night (no visible text or symbols)To enlarge the right picture (reduce the left)
1 Move the joystick right to activate the right picture (if not already activated).
2 Move the joystick up to enlarge the picture.
Using the Freeze Function
The FREEZE button allows you to temporarily capture a program's picture. You can use this feature to write down information such as phone numbers, recipes, etc.
To use the FREEZE function
1 When the program information you want to capture is displayed, press the FREEZE button.
2 The TV switches to Twin View mode and displays the "frozen" picture on the right, while the current program continues on the left.
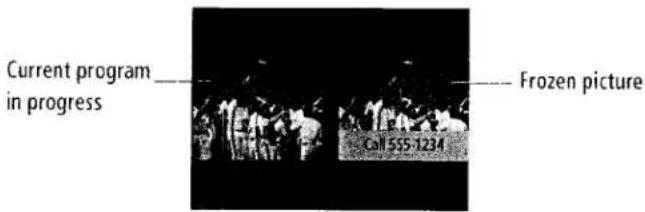
3 To cancel and return to normal viewing, press the FREEZE button.
Freeze feature is not available if you are already in Twin View mode.
Using the Menus
Overview
The Menu gives you access to the following features:
| Menu Icon | Description | Page |
 | Allows you to make adjustments to your picture settings. It also allows you to customize the Picture Mode based on the type of program you are viewing. | 26 |
 | Offers enhanced audio options such as listening to second audio programming (SAP), or customizing the Effect of the sound on your TV. | 28 |
 | Allows you to set up a Favorite Channel list, run the Auto Program function, and more. | 30 |
 | Lets you control the viewing of programs based on their ratings. | 31 |
 | Lets you set the clock on your TV and allows you to program your TV for scheduled viewing using the Timers. | 34 |
 | Provides several options for setting up your channels, labeling your VIDEO inputs, and selecting the Language of the on-screen menus. | 35 |
Using the Menus

Using the Video Menu
To select the Video Menu
1 Press MENU.
2 Select

To restore the factory default settings for Picture, Brightness, Color, Hue, and Sharpness
☐ Press RESET on the remote control when in the Video menu.
Selecting Video Options
As a shortcut to using the menus, use the PICTURE MODE button on the remote control to select video modes.
The Video Menu includes the following options.
| Option | Description | |
| ModeCustomizedpictureviewing | Vivid | Select for enhanced picture contrast and sharpness. |
| Standard | Recommended for Normal viewing conditions. | |
| Movie | Select for soft, film like, picture. | |
| Pro | Select for professional monitor like appearance. | |
| You can alter the Video Menu settings (Picture, Brightness, Color, etc.) for each Mode. | ||
| Picture | Adjust to increase picture contrast and deepen the color or decrease picture contrast and soften the color. | |
| Brightness | Adjust to brighten or darken the picture. | |
| Color | Adjust to increase or decrease color intensity. | |
| Hue | Adjust to increase or decrease the green tones. | |
| Sharpness | Adjust to sharpen or soften the picture. | |
| Color TempWhiteintensityadjustment | Choose from three color temperatures: | |
| Cool | Select to give the white colors a blue tint. | |
| Neutral | Select to give the white colors a neutral tint. | |
| Warm | Select to give the white colors a red tint (NTSC-Standard). | |
| VM | Sharpens picture definition to give every object a sharp, clean edge. Select from High, Medium, Low, Off. | |
| Velocity Modulation | ||
| DRC-MF | Creates a high-resolution picture with 4x density, for high quality sources (i.e. DVD, Satellite). | |
| Digital Reality | Select from Interlaced, Progressive. | |
| Creation-Multi Function | Interlaced | Recommended for moving pictures. |
| Progressive | Recommended for still images and text. | |
Using the Menus
Using the Audio Menu
To select the Audio Menu
1 Press MENU.
2 Select Audio.

To restore the factory default settings for Treble, Bass, and Balance
☐ Press RESET on the remote control when in the Audio menu.
Selecting Audio Options
The Audio Menu includes the following options:
| Option | Description | |
| Treble | Adjust to decrease or increase higher-pitched sounds. | |
| Bass | Adjust to decrease or increase lower-pitched sounds. | |
| Balance | Adjust to emphasize left or right speaker balance. | |
| Steady Sound | ON | Select to stabilize the volume. |
| OFF | Select to turn off Steady Sound. | |
| Effect | TruSurround | Select for surround sound. (for stereo programs only) |
| Simulated | Adds a surround-like effect to mono programs. | |
| OFF | Normal stereo or mono reception. | |
Using the Menus
| Option | Description | |
| MTSEnjoy stereo,bilingual andmono programs | Stereo | Select for stereo reception when viewing a program broadcast in stereo. |
| Auto-SAP | Select to automatically switch the TV to second audio programs when a signal is received. (If no SAP signal is present, the TV remains in Stereo mode.) | |
| Mono | Select for mono reception. (Use to reduce noise during stereo broadcasts.) | |
| Speaker | ON | Select to turn on the TV speakers. |
| OFF | Select to turn off the TV speakers and listen to the TV's sound only through your external audio system speakers. | |
| Audio OutEasy control of volumeadjustments | This option can be set only when the Speaker option is set to OFF. | |
| Variable | Sound output varies according to the TV settings. Useful when you want to use the TV's remote control to adjust the output through a separate audio system. | |
| Fixed | Sound output is held at a fixed level. Use your audio receiver's remote control to adjust the volume. | |
Using the Menus

Using the Channel Menu
To select the Channel Menu
1 Press MENU.
2 Select Channel.

Selecting Channel Options
The Channel Menu includes the following options:
| Option | Description | |
| Favorite Channel | Program up to eight of your favorite channels to appear in your Favorite Channel list. To use Favorite Channels, see page 20. | |
| Cable | ON | Select if you are receiving cable channels with a CATV cable. |
| OFF | Select if you are using an antenna. | |
| You should run Auto Program after changing the Cable setting. | ||
| Channel FixUseful when you have a cable box or satellite receiver connected | 2-6 | Select to control all channel selection through a cable box or satellite receiver. Select the appropriate channel number (usually 3 or 4) and use the cable box or satellite receiver's remote control for channel selection. |
| AUX 2-6 | Select when a cable box or satellite receiver is connected to the AUX input (see page 8). Press the ANT button to alternate between. | |
| VIDEO 1 | Select from available video inputs when you have video equipment connected (e.g. satellite receiver) and you want your TV fixed to it. | |
| Auto Program | Automatically programs the TV for all receivable channels. | |
| ChannelSkip/Add | Select to remove or add channels from the channel list when using the CH+/- buttons. | |
| Channel Label | Label up to 20 channels with their station call letters. | |
Channels that you set to be skipped can be accessed only with the 0-9 buttons.

Using the Parent Menu
The Parent Menu allows you to set up the TV to block programs according to their content and rating levels.
To select the Parent Menu
1 Press MENU.
2 Select Parent

3 When prompted, use the 0-9 buttons on the remote control to enter a four-digit password.
4 Confirm your password by entering it again.
You need this password for any future access into the Parental Control Menu. If you lose your password, see "Lost password" on page 47.
Using the Parent Menu
If you are not familiar with the Parental Guideline rating system, you should select Child, Youth, or Young Adult to help simplify the rating selection. To set more restrictive ratings, select Custom.
For descriptions of Child, Youth, and Young Adult ratings, see page 32.
The Parent Menu includes the following options.
| Option | Description | |
| Parental LockTurn ratings on/off and select a rating system | OFF | Parental lock is off. No programs are blocked from viewing. |
| Child | Maximum ratings permitted are:☐ US: TV-Y, TV-G, G☐ Canada: TV-Y, C, G | |
| Youth | Maximum ratings permitted are:☐ US: TV-PG, PG☐ Canada: TV-PG, PG, 8 ans+ | |
| Young Adult | Maximum ratings permitted are:☐ US: TV-14, PG-13☐ Canada: TV-14, 14+, 13 ans+ | |
| Custom | Select to set ratings manually.☐ US: See page 32 for details.☐ Canada: See page 33 for details. |
Change Password For changing your password.
US Models: Selecting Custom Rating Options
The content ratings will increase depending on the level of the age-based rating. For example, a program with a TV-PG V (Violence) rating may contain moderate violence, while a TV-14 V (Violence) rating may contain more intense violence.
To ensure maximum blocking capability, the age-based ratings should be blocked.
If you choose to block unrated TV programs, please be aware that the following programs may be blocked: emergency broadcasts, political programs, sports, news, public service announcements, religious programs and weather.
For US models, the Custom Rating Menu includes the following options. For Canadian models, see page 33.
| Option | Description | |
| Movie Rating | G | All children and General Audience. |
| PG | Parental Guidance suggested. | |
| PG-13 | Parental Guidance for children under 13. | |
| R | Restricted viewing, parental guidance is suggested for children under 17. | |
| NC-17 and X | No one 17 and under allowed. | |
| TV Rating | Age-Based Options | |
| Block programs by their rating, content or both | TV-Y | All children. |
| TV-Y7 | Directed to older children. | |
| TV-G | General Audience. | |
| TV-PG | Parental Guidance suggested. | |
| TV-14 | Parents Strongly cautioned. | |
| TV-MA | Mature Audience only. | |
| Content-Based Options | ||
| FV | Fantasy Violence. | |
| D | Suggestive Dialogue. | |
| L | Strong Language. | |
| S | Sexual situations. | |
| V | Violence. | |
| Unrated Block programs or movies that are broadcast without a rating | Block | Blocks all programs and movies that are broadcast without a rating. |
| Allow | Allows programs and movies that are broadcast without a rating. | |
Canadian Models: Selecting Custom Rating Options
For Canadian models, the Custom Rating Menu includes the following options. For US models, see page 32.
| Option | Description | |
| English Rating | C | All children. |
| C8+ | Children 8 years and older. | |
| G | General programming. | |
| PG | Parental Guidance. | |
| 14+ | Viewers 14 and older. | |
| 18+ | Adult programming. | |
| French Rating | G | General programming. |
| 8 ans+ | Not recommended for young children. | |
| 13 ans+ | Not recommended for ages under 13. | |
| 16 ans+ | Not recommended for ages under 16. | |
| 18 ans+ | Programming restricted to adults. | |
| USA Rating | See “TV Rating” on page 32 for details. | |
Viewing Blocked Programs
You can view a blocked program by entering the password. Press the ENTER button when tuned to a blocked program. This temporarily switches off the Parental Lock. To reactivate the Parental Lock settings, turn off the TV. When the TV is turned on again, your Parental Controls settings are reactivated.
Using the Menus
Using the Timer Menu
To select the Timer Menu
1 Press MENU.
2 Select

To reset the Clock or Timers
☐ Press RESET on the remote control when in the adjustment menu.
Selecting Timer Options
The Timer Menu includes the following options:
| Option | Description | |
| Timer 1 | Program | Select to set the Timer by day, time, duration, and channel. |
| Timer 2 | ||
| OFF | Select to turn off the Timer. (Your previous settings will be saved.) | |
| Current Time | Set the current time. | |
| Daylight Savings | ON | Select in the spring to adjust the time during Daylight Saving Time. |
| OFF | Select in the fall to adjust the time at the end of Daylight Saving Time. | |
Current time must be set before programming timers.
Using the Setup Menu
To select the Setup Menu
1 Press MENU.
2 Select

Selecting Setup Options
The Setup Menu includes the following options:
| Option | Description | |
| Caption Vision | Allows you to select from three closed caption modes (for programs that are broadcast with closed caption). | |
| CC1, CC2, CC3, CC4 | Displays a printed version of the dialog or sound effects of a program. (Should be set to CC1 for most programs.) | |
| TEXT1, TEXT2, TEXT3, TEXT4 | Displays network/station information presented using either half or the whole screen (if available). | |
| XDS(Extended Data Service) | Displays a network name, program name, program length, and time of the show if the broadcaster offers this service. | |
| OFF | Turns off Caption Vision. | |
| Video Label | Allows you to label your inputs so that you can identify connected equipment. Press TV/VIDEO to cycle through the inputs. | |
| VIDEO 1/2/3/4 | VHS, 8mm, Beta, LD, Game, SAT, DVD, Web, Receiver, DTV, Skip | |
| VIDEO 5/6 | HD, DVD, DTV, Skip | |
| If you select Skip, your TV skips this connection when you press the TV/VIDEO button. | ||
| Tilt Correction | Allows you to correct any tilt of the picture. | |
| Language | Select from available languages to display all menus in your language of choice. | |
Using the Menus
To use this feature with widescreen DVDs, set your DVD player to 16:9 aspect ratio.
| Option | Description | |
| 16:9 Enhanced | Provides enhanced picture resolution for widescreen sources, such as DVD (only available when the TV is in VIDEO mode). Press TV/VIDEO and select from one of the following options: | |
| AUTO | To activate automatically when a 16:9 signal is received. | |
| ON | To activate manually. | |
| OFF | To deactivate. | |
| Demo | Runs a demonstration of on-screen menus. | |
AUTO/ON will appear when TV is in video mode 1-6. ON/OFF will appear when TV is in VIDEO mode 5-6 and the 480p signal occurs.
Other Information
Overview
This chapter includes the following topics:
| Topic | Page |
| TV Controls and Connectors | 38 |
| Using the Remote Control | 40 |
| Troubleshooting | 46 |
| Specifications | 48 |
| Index | 51 |
Other Information
TV Controls and Connectors
Front Panel Menu Controls
The front panel menu controls allow access to the on-screen menus without the use of a remote control. Pressing the MENU button brings up the on-screen menus. The arrow buttons move the on-screen cursor in the menus and the (+) button selects the menu item.
For a description see TV Rear Panel below and Remote Control on page 40

TV Rear Panel

| Connection | Description |
| AUX | Allows you to view local (terrestrial) and cable channels if your cable provider does not feature local channels. You can switch between local and cable channels easily by pressing ANT on the remote control. |
| TO CONVERTER | Lets you set up your TV to switch between scrambled channels (through a cable box), and normal cable channels (CATV). |
| VHF/UHF | Connects to your VHF/UHF antenna or cable. |
| S VIDEO | Connects to the S VIDEO OUT jack of your VCR or other S VIDEO equipped video component. |
| MONITOR OUT | Lets you record the program you're watching to a VCR. When two VCRs are connected, (see page 11), you can use your TV as a monitor for tape to tape editing. (Not available with 480p, 1080i when input to VIDEO 5, 6) |
| VIDEO (L/R)/AUDIO | Connects to the audio and video OUT jacks on your VCR or other video component. A third video input (VIDEO 2) is located on the front panel of the TV. |
| AUDIO OUT (VAR/FIX) L (MONO)/R | Connects to the right and left audio inputs of your audio or video component. |
| CONTROL-S IN/OUT | Allows the TV to receive (IN) and send (OUT) remote control signals to other Sony infrared-controlled audio or video components. |
| HD/DVD IN (1080i, 480p, 480i) | Connects to your DVD player's or Digital Set-top box's component video (Y, PB, PR) and audio (L, R) jacks. |
Other Information
Using the Remote Control
The following table describes the buttons on the remote control that are for more advanced functions.
Main Power button must be turned ON to activate the Remote Control.
Button Descriptions

| Outside Panel | |
| Button | Description |
| MUTING | Press to mute the sound. Press again or press VOL + to restore the sound. |
| VCR/DVD (POWER) | Turns the DVD player, MDP player, or VTR (VCR) on and off. |
| SAT/CABLE (POWER) | Turns the satellite receiver or cable box on and off. |
| TV (POWER) | Turns the TV on and off. |
| PICTURE MODE | Press repeatedly to step through the available video picture modes: Vivid, Standard, Pro, Movie. Also available in the Video menu. For details, see “Selecting Video Options” on page 26. |
| SLEEP | Press repeatedly until the TV displays the time in minutes (15, 30, 45, 60, or 90) that you want the TV to remain on before shutting off automatically. Cancel by pressing until SLEEP OFF appears. While Sleep feature is set, press once to view remaining time |
| DISPLAY | Press once to display the current time and channel label (if set) and channel number. Press again to turn Display off. See page 34 for details on setting the time. |
| ANT | Changes the VHF/UHF input to the AUX input. |
| GUIDE | Displays the program guide of your satellite antenna. |
| 0 – 9 and ENTER | Press 0 – 9 to select a channel, the channel changes after 2 seconds. Press ENTER for immediate selection. |
| JUMP | Press to jump back and forth between two channels. The TV alternates between the current channel and the last channel that was selected. |
| TV/VIDEO | Cycles through available video inputs: TV, VIDEO 1, VIDEO 2, VIDEO 3, VIDEO 4, VIDEO 5, VIDEO 6. |
| VCR/DVD (FUNCTION) | Activates the remote control for use with a DVD player, MDP, or VTR (VCR). |
| SAT/CABLE (FUNCTION) | Activates the remote control for use with a satellite receiver or cable box. |
| TV (FUNCTION) | Activates the remote control for use with the TV. |
To scan rapidly through the channels, press and hold down the CH+ or CH- button.
| Button | Description |
| Turns on/off Twin Mode. For details, see “Using Twin View” on page 21. | |
| FREEZE | Freezes the window picture. Press again to restore the picture. |
| VOL +/- | Adjusts the volume. |
| FAVORITES | Displays the Favorite Channels list. For details, see “Using Favorite Channels” on page 20. |
| CH +/- | Scan through channels. |
| Joystick allows for movement of the on-screen cursor. Pressing down on the center of the joystick selects the item. | |
| MENU | Press to display the TV menu. Press again to exit from the menus. |
| RESET | Resets the TV to the factory default settings for the Video and Audio menus. (Clears setting on Channel and Timer) |
| AV123DVD | Use to switch control for connected video equipment. You can program one video source for each switch position (see page 42). |

| Inside Panel | |
| TV/VCR | Changes the VHF/UHF output of the VCR. |
| Rewind | |
| Play | |
| Fast-forward | |
| DVD MENU | Displays the DVD menu. |
| REC | Record |
| Displays the DVD menu. | |
| ▶▶ or ◀◀ during playback(release to resume normal playback) | |
| 0 – 9 and ENTER | Press 0 – 9 to select a VCR channel, the channel changes after 2 seconds. Press ENTER for immediate selection. |
| CODE SET | Used for programming the remote control to operate non-Sony video equipment. For details, see “Programming the Remote Control” on page 42. |
Programming the Remote Control
The remote control is preset to operate Sony brand video equipment.
| Sony Equipment | Switch Position on Remote Control | Programmable Code Number |
| Beta, ED Beta VCRs | VTR1 | 303 |
| 8 mm VCR | VTR2 | 302 |
| VHS VCR | VTR3 | 301 |
| DVD Player | DVD/MDP | 751 |
If you have video equipment other than Sony brand that you want to control with the TV's remote control, use the following procedures to program the remote control.
The equipment must have infrared (IR) remote capability in order to be used with the remote control.
1 Turn to "Programmable Codes" on page 43, and find the three-digit code number for your equipment. If more than one code number is listed, use the number listed first to complete the following procedure.
You must perform step 3 within 10 seconds of step 2, or you must start again from step 2.
To check if the code number works, after step 5 aim the TV's remote control at the component and press the POWER button that corresponds with that component. If it responds, you're done. If not, try using the other codes listed for your component.
2 Press CODE SET.
3 Move the slide switch to the desired input.
4 Enter the three-digit code number.
5 Press ENTER.
Tips
☐ If more than one code number is listed, try entering them one by one until you come to the correct code for your equipment.
☐ If you enter a new code number, the code number you previously entered at that setting is erased.
☐ In some rare cases, you may not be able to operate your equipment with the supplied remote control. In this case, use the equipment's own remote control unit.
☐ Whenever you remove the batteries to replace them, the code numbers may revert to the factory setting and must be reset.
Programmable Codes
| VCRs | |
| Manufacturer | Code |
| Sony | 301 |
| Admiral (M. Ward) | 327 |
| Aiwa | 338, 344 |
| Audio Dynamic | 314, 337 |
| Broksonic | 319, 317 |
| Canon | 309, 308 |
| Citizen | 332 |
| Craig | 302, 332 |
| Criterion | 315 |
| Curtis Mathes | 304, 338, 309 |
| Daewoo | 341, 312, 309 |
| DBX | 314, 336, 337 |
| Dimensia | 304 |
| Emerson | 319, 320, 316, 317, 318, 341 |
| Fisher | 330, 335 |
| Funai | 338 |
| General Electric | 329, 304, 309 |
| Go Video | 322, 339, 340 |
| Goldstar | 332 |
| Hitachi | 306, 304, 305,338 |
| Instant Replay | 309, 308 |
| JC Penney | 309, 305, 304, 330, 314, 336, 337 |
| JVC | 314, 336, 337, 345, 346, 347 |
| Kenwood | 314, 336, 332, 337 |
| LXI (Sears) | 332, 305, 330, 335, 338 |
| Magnavox | 308, 309, 310 |
| Marantz | 314, 336, 337 |
| Marta | 332 |
Manufacturer Code
| Memorex | 309, 335 |
| Minolta | 305, 304 |
| Mitsubishi/MGA | 323, 324, 325, 326 |
| Multitech | 325, 338, 321 |
| NEC | 314, 336, 337 |
| Olympic | 309, 308 |
| Optimus | 327 |
| Panasonic | 308, 309, 306, 307 |
| Pentax | 305, 304 |
| Philco | 308, 309 |
| Philips | 308, 309, 310 |
| Pioneer | 308 |
| Quasar | 308, 309, 306 |
| RCA/PROSCAN | 304, 305, 308, 309, 311, 312, 313, 310, 329 |
| Realistic | 309, 330, 328, 335, 324, 338 |
| Sansui | 314 |
| Samsung | 322, 313, 321 |
| Sanyo | 330, 335 |
| Scott | 312, 313, 321, 335, 323, 324, 325, 326 |
| Sharp | 327, 328 |
| Shintom | 315 |
| Signature 2000(M. Ward) | 338, 327 |
| SV2000 | 338 |
| Sylvania | 308, 309, 338, 310 |
| Symphonic | 338 |
| Tashiro | 332 |
| Tatung | 314, 336, 337 |
| Teac | 314. 336, 338, 337 |
| Technics | 309, 308 |
| Toshiba | 312, 311 |
Manufacturer Code
| Wards | 327, 328, 335, 331, 332 |
| Yamaha | 314, 330, 336, 337 |
| Zenith | 331 |
Laserdisc Players
| Manufacturer | Code |
| Panasonic | 704, 710 |
| Pioneer | 702 |
DVD Players
| Manufacturer | Code |
| Sony | 751 |
| Panasonic | 753 |
| Pioneer | 752 |
| RCA | 755 |
| Toshiba | 754 |
Cable Boxes
| Manufacturer | Code |
| Hamlin/Regal | 222, 223, 224, 225, 226 |
| Jerrold/G. I. | 201, 202, 203, 204, 205, 206, 207, 208, 218 |
| Oak | 227, 228, 229 |
| Panasonic | 219, 220, 221 |
| Pioneer | 214, 215 |
| Scientific Atlanta | 209, 210, 211 |
| Tocom | 216, 217 |
| Zenith | 212, 213 |
Satellite Receivers
| Manufacturer | Code |
| Sony | 801 |
| General Electric | 802 |
| Hitachi | 805 |
| Hughes | 804 |
| Panasonic | 803 |
| RCA/ PROSCAN | 802, 808 |
| Toshiba | 806, 807 |
Operating a VCR
| To Do This ... | Press |
| Turn on/off | VTR/DVD (POWER) |
| Change channels | CH +/- |
| Record | ▶ and REC simultaneously. |
| Play | ▶ |
| Stop | ■ |
| Fast forward | ▶▶ |
| Rewind the tape | ◀◀ |
| Pause | ■ (press again to resume normal playback) |
| Search the picture forward or backward | ▶▶ or ◀ during playback (release to resume normal playback) |
| Change input mode | TV/VCR |
Operating an MDP (Laserdisc Player)
| To Do This ... | Press |
| Turn on/off | VCR/DVD (POWER) |
| Play | ▶ |
| Stop | ■ |
| Pause | II (press again to resume normal playback) |
| Search the picture forward or backward | ▶▶ or ◀◀ during playback (release to resume normal playback) |
| Search a chapter forward or backward | CH +/- |
Operating a Satellite Receiver
| To Do This ... | Press |
| Turn on/off | SAT/CABLE (POWER) |
| Select a channel | 0-9 buttons, ENTER |
| Change channels | CH +/- |
| Back to previous channel | JUMP |
| Display channel number | DISPLAY |
| Display DBS guide | GUIDE |
| Display DBS menu | MENU |
| Move highlight (cursor) | Joystick or arrows |
| Select item | ◆ button |
Operating a DVD Player
| To Do This ... | Press |
| Turn on/off | VTR/DVD (POWER) |
| Play | ▶ |
| Stop | ■ |
| Pause | II (press again to resume normal playback) |
| Step through different tracks of an audio disc | ▶ to step forward or ◀ to step backward |
| Step through different chapters of a video disc | CH+ to step forward or CH- to step backward |
| Display the DVD menu | DVD MENU |
| Select tracks directly | 0-9 buttons |
| Display the menu (Setup) | MENU |
Operating a Cable Box
| To Do This ... | Press |
| Turn on/off | SAT/CABLE (POWER) |
| Select a channel | 0-9 buttons, ENTER |
| Change channels | CH +/- |
| Back to previous channel | JUMP |
Troubleshooting
| Problem | Possible Remedies |
| No picture (screen not lit), no sound | If your TV does not turn on, and a red light keeps flashing, your TV may need service. Call your local Sony Service Center.Make sure the power cord is plugged in.Push the power button on the front of the TV.Check to see if the TV/VIDEO setting is correct: when watching TV, set to TV, and when watching connected equipment, set to VIDEO 1, 2, 3, 4, 5 or 6.Try another channel. It could be station trouble. |
| Remote control does not operate | Batteries could be weak. Replace the batteries.Press TV (FUNCTION) when operating your TV.Make sure the TV's power cord is connected securely to the wall outlet.Locate the TV at least 3-4 feet away from fluorescent lights.Check the orientation of the batteries. |
| Dark, poor or no picture (screen lit), good sound | Adjust the Picture setting in the Video menu (see page 26).Adjust the Brightness setting in the Video menu (see page 26).Check antenna/cable connections. |
| Good picture, no sound | Press MUTING so that "MUTING" disappears from the screen (see page 40).Make sure Speaker is set to ON in the Audio menu (see page 28). |
| Cannot receive upper channels (UHF) when using an antenna | Change Cable to OFF (see page 30).Use Auto Program in the Channel menu to add receivable channels that are not presently in TV memory (see page 30). |
| No color | Adjust the Color settings in the Video menu (see page 26). |
| Only snow and noise appear on the screen | Check the antenna/cable connections.Make sure the channel is broadcasting programs.Press ANT to change the input mode (see page 40). |
| Dotted lines or stripes | Adjust the antenna.Move the TV away from noise sources such as cars, neon signs, or hair-dryers. |
| TV is fixed to one channel | Use Auto Program in the Channel menu to add receivable channels that are not presently in TV memory (see page 30).Check your Channel Fix settings (see page 30). |
| Double images or ghosts | Use a highly directional outdoor antenna or a cable (when the problem is caused by reflections from nearby mountains or tall buildings). |
| Cannot operate menu | If the item you want to choose appears in gray, you cannot select it. |
| Cannot receive any channels when using cable TV | Use Auto Program in the Channel menu to add receivable channels that are not presently in TV memory (see page 30).Check your cable settings.Make sure Cable is set to ON in the Channel menu (see page 30). |
| Cannot gain enough volume when using a cable box | Increase the volume of the cable box using the cable box's remote control. Then press TV (FUNCTION) and adjust the TV's volume. |
| Cannot receive channels | Use Auto Program in the Channel menu to add receivable TV channels that are not presently in TV memory (see page 30). |
| Unable to select a channel | Use Auto Program in the Channel menu to add receivable TV channels that are not presently in TV memory (see page 30). |
| Lost password | In the password screen (see page 31), enter the following master password: 4357. The master password clears your previous password; it cannot be used to temporarily unblock channels. |
If, after reading these operating instructions, you have additional questions related to the use of your Sony television, please call our Customer Information Services Center at 1-800-222-SONY (7669) (U.S. residents only) or (416) 499-SONY (7669) (Canadian residents only).
Specifications
| All Models (General) | ||
| Picture Tube | FD Trinitron® tube | |
| Antenna | 75 ohm external terminal for VHF/UHF | |
| Television System | NTSC, American TV Standard | |
| Channel Coverage | ||
| VHF | 2-13 | |
| UHF | 14-69 | |
| CATV | 1-125 | |
| Power Requirements | 120V, 60 Hz | |
| Number of Inputs / Outputs | ||
| Video (IN) | 4 | 1 Vp-p, 75 ohms unbalanced, sync negative |
| S Video (IN) | 3 | Y: 1 Vp-p, 75 ohms unbalanced, sync negativeC: 0.286 Vp-p (Burst signal), 75 ohms |
| Audio (IN) | 6 | 500 mVrms (100% modulation)Impedance: 47 kilohm |
| Audio (OUT) | 1 | More than 408 mVrms at the maximum volume setting (Variable)More than 408 mVrms (Fixed)Impedance (output): 2 kilohms |
| Monitor Out | 1 | 1 Vp-p, 75 ohms unbalanced, sync negative |
| CONTROL S (IN/OUT) | 1 | |
| Component Video Input | 2 (Y, PB, PR) | Y: 1.0 Vp-p, 75 ohms unbalanced, sync negative; PB: 0.7 Vp-p, 75 ohmsPR: 0.7 Vp-p, 75 ohms |
KV-32XBR400
| Supplied Accessories | |
| Remote Control | RM-Y174 |
| AA (R6) Batteries | 2 supplied for remote control |
| Optional Accessories | |
| AV Cable | VMC-810/820/830 HG |
| Audio Cable | RKC-515HG |
| S-LINK Cable | RK-G69HG |
| Component Video Cable | VMC-10/30 HG |
| TV Stand | SU-32XBR4A |
| Visible Screen Size | 32 in (812.8 mm) picture measured diagonally |
| Actual CRT Size | 34 in (863.4 mm) picture measured diagonally |
| Speaker Output | 15 x 2 |
| Dimensions (W x H x D) | 898.0 x 678.0 x 579.5 mm (35 3/8 x 26 3/4 x 27 7/8 in) |
| Mass | 84 kg (185 lbs) |
| Power Consumption | |
| In Use | 245 W |
| In Standby | 2 W |
KV-36XBR400
| Supplied Accessories | |
| Remote Control | RM-Y174 |
| AA (R6) Batteries | 2 supplied for remote control |
| Optional Accessories | |
| AV Cable | VMC-810/820/830 HG |
| Audio Cable | RKC-515HG |
| Component Video Cable | VMC-10/30 HG |
| TV Stand | SU-36XBR4A |
| Visible Screen Size | 36 in (914 mm) picture measured diagonally |
| Actual CRT Size | 38 in (965.2 mm) picture measured diagonally |
| Speaker Output | 15 x 2 |
| Dimensions (W x H x D) | 994 x 754.5 x 622 mm (39 1/4 x 29 3/4 x 24 1/2 in) |
| Mass | 108 kg (238 lbs) |
| Power Consumption | |
| In Use | 245 W |
| In Standby | 2 W |
Design and specifications are subject to change without notice.
Index
16:9 (widescreen) 2, 36
3-D sound, adjusting 28
A
Antenna, connecting
Audio menu 25, 28
Audio receiver, connecting 14
Auto Program (channel setup) 18, 30
B
Balance, adjusting 28
Bass, adjusting 28
Batteries
Inserting in remote 3
Bilingual audio 29
Blocking programs. See ratings.
Brightness, adjusting 26
C
Cable
Box, connecting 7
Box, connecting with VCR 10
Connecting
Setting ON/OFF 30
With VCR, connecting 9
Cable box, using with TV remote control 44
Camcorder, connecting 17
Caption Vision 35
CATV. see cable
Channel menu 25
Channel Setup menu 30
Channels
Creating labels 30
Setting up 18
Closed caption modes 35
Color temperature, adjusting 26
Color, adjusting 26
CONTROL S 18
D
Demo, menus 36
Digital Reality Creation 27
DVD player
Using with TV remote control 45
With A/V connectors, connecting 16
With component video connectors, connecting 15
E
Enlarging pictures, in Twin View 22
Extended Data Service 35
F
Favorite Channel
Setting up 30
Using 20
Features 2
Freeze, using 23
H
Hue, adjusting 26
|
Inputs, labeling 35
L
Label
Channels 30
Video inputs 35
Languages, setting for menus 35
M
MDP, using with TV remote control 44
Menus
Audio 25, 28
Channel 25
Channel Setup 30
Parent 25
Parental Control 31
Setup 25, 35
Timer 25, 34
Video 25, 26
P
Parent menu 25, 31
Index
Parental control, described 2
Password
Changing 31
Setting 31
Picture contrast, adjusting 26
Picture definition, adjusting 27
Power cord, removing from holder 5
Presetting channels 30
Problems, troubleshooting 46-47
R
Ratings, setting 31-33
Ratings, viewing blocked programs 33
Remote control
Described 40
Inserting batteries 3
Overview 3
Programming 42-43
Resetting
Audio options 28
Timer options 34
Video options 26
S
Satellite receiver, using with TV remote control 44
Setting up channels 18
Setup menu 25, 35
Sharpness, adjusting 26
Sound effect (3-D), adjusting 28
Speakers
Turning on/off 29
Using external speakers 29
Specifications 48-49
Steady Sound, described 2
Surround sound 28
T
Tape-to-tape editing 11
Tilt, correcting 35
Timer menu 25, 34
Treble, adjusting 28
Troubleshooting 46-47
Twin View 21
v
VCR
Connecting two, for tape editing 11
Using with TV remote control 44
With cable box, connecting 10
With cable, connecting 9
With satellite receiver, connecting 13
Velocity Modulation 2, 27
Video inputs, labeling 35
Video menu 25, 26
Video Modes, selecting 26
W
Wega, described 2
Widescreen 36
Widescreen, described 2
Z
Zoom feature, with Twin View 22
- FD Trinitron
- WEGA TM
- WARNING
- CAUTION
- Note on Caption Vision
- Note on Cleaning the TV
- Note to CATV System Installer
- NOTIFICATION
- Safety
- Installing
- XBR
- (●) TruSurround
- Owner's Record
- Important Safeguards
- Power Sources
- Grounding or Polarization
- For the set with a polarized AC power cord plug
- Alternate Warning
- For the set with a three-wire grounding type AC plug
- Overloading
- Object and Liquid Entry
- Attachments
- Cleaning
- Installation
- Water and Moisture
- Accessories
- Ventilation
- Power-Cord Protection
- Antennas
- Outdoor Antenna Grounding
- Antenna Grounding According to the NEC
- Lightning
- Service
- Damage Requiring Service
- Servicing
- Replacement Parts
- Safety Check
- Contents
- Introducing the FD Trinitron Wega
- Installing the TV
- Using the Features
- Using the Menus
- Other Information
- Overview
- Presenting the FD Trinitron Wega
- Features
- Using the Remote Control
- Inserting Batteries
- Remote Control Overview
- Connecting a Cable or Antenna
- A VHF Only or VHF/UHF or Cable
- B VHF Only or UHF Only or VHF/UHF
- C VHF and UHF
- Cable and Antenna
- Cable Box Connections
- Cable Box
- Cable Box and Cable
- Connecting a VCR and Cable
- Connecting a VCR and Cable Box
- Connecting Two VCRs for Tape Editing
- Connecting a Satellite Receiver
- Connecting a Satellite Receiver with a VCR
- Connecting an Audio Receiver
- Connecting a DVD Player with Component Video Connectors
- Connecting a DVD Player with A/V Connectors
- Connecting a Digital TV Receiver
- Connecting a Camcorder
- Using the CONTROL S Feature
- Setting Up the TV Automatically
- Using Favorite Channels
- Using Twin View
- Changing the Picture Size
- Using the Freeze Function
- To use the FREEZE function
- Using the Video Menu
- Selecting Video Options
- Using the Audio Menu
- Using the Channel Menu
- Selecting Channel Options
- Using the Parent Menu
- US Models: Selecting Custom Rating Options
- Canadian Models: Selecting Custom Rating Options
- Viewing Blocked Programs
- Using the Timer Menu
- Using the Setup Menu
- TV Controls and Connectors
- Programming the Remote Control
- Tips
- Index
- A
- B
- C
- D
- E
- F
- H
- |
- L
- M
- P
- R
- S
- T
- v
- W
- Z
Marque : SONY
Modèle : KV-32XBR400
Catégorie : Téléviseur