
KV-24FV10 - Téléviseur SONY - Notice d'utilisation et mode d'emploi gratuit
Retrouvez gratuitement la notice de l'appareil KV-24FV10 SONY au format PDF.


| Type de produit | Téléviseur CRT 24 pouces |
| Marque | Sony |
| Modèle | KV-24FV10 |
| Dimensions (L × H × P) | Environ 63 cm × 54 cm × 50 cm |
| Poids | Environ 30 kg |
| Alimentation | 220-240 V AC, 50/60 Hz |
| Consommation électrique | 120 W (max) |
| Résolution d'affichage | 480i (standard SD) |
| Entrées vidéo | Péritel (SCART), Composite (RCA), S-Vidéo |
| Sorties audio | Prise casque 3,5 mm, haut-parleurs stéréo intégrés |
| Fonctions principales | Télécommande, menu OSD, réglages image/son, minuterie, verrouillage parental |
| Entretien et nettoyage | Débrancher avant nettoyage. Utiliser un chiffon doux et sec. Ne pas utiliser de produits chimiques. |
| Sécurité | Ne pas ouvrir le châssis. Risque de choc électrique. Placer sur une surface stable. |
| Pièces détachées et réparabilité | Pièces disponibles auprès de revendeurs agréés Sony. Réparation par technicien qualifié recommandée. |
| Température de fonctionnement | 5 °C à 35 °C |
| Humidité de fonctionnement | 20 % à 80 % sans condensation |
FOIRE AUX QUESTIONS - KV-24FV10 SONY
Questions des utilisateurs sur KV-24FV10 SONY
0 question sur cet appareil. Repondez a celles que vous connaissez ou posez la votre.
Poser une nouvelle question sur cet appareil
Téléchargez la notice de votre Téléviseur au format PDF gratuitement ! Retrouvez votre notice KV-24FV10 - SONY et reprennez votre appareil électronique en main. Sur cette page sont publiés tous les documents nécessaires à l'utilisation de votre appareil KV-24FV10 de la marque SONY.
MODE D'EMPLOI KV-24FV10 SONY
Trinitron® Color TV
Operating Instructions
KV-20FV10
KV-24FV10
WARNING
To reduce the risk of fire or shock hazard, do not expose the TV to rain or moisture.


This symbol is intended to alert the user to the presence of uninsulated "dangerous voltage" within the product's enclosure that may be of sufficient magnitude to constitute a risk of electric shock to persons.
This symbol is intended to alert the user to the presence of important operating and maintenance (servicing) instructions in the literature accompanying the appliance
Note to the CATV Installer
This reminder is provided to call the CATV system installer's attention to Article 820-40 of the NEC that provides guidelines for proper grounding and, in particular, specifies that the cable ground shall be connected to the grounding system of the building as close to the point of cable entry as practical.
SAFETY PRECAUTIONS
☐ Operate the TV only on 120 V AC.
☐ One blade of the power plug is wider than the other for safety purposes and will fit into the power outlet only one way. If you are unable to insert the plug fully into the outlet contact your dealer.
☐ If any liquid or solid object falls into the TV, unplug it and have it checked by qualified personnel before operating it further.
For more safety information, see the "IMPORTANT SAFEGUARDS" leaflet packed with your TV.
CAUTION
When using TV games, computers, and similar products with your TV, keep the brightness and contrast functions at low settings. If a fixed (non-moving) pattern is left on the screen for long periods of time at a high brightness or contrast setting, the image can be permanently imprinted onto the screen. Continuously watching the same channel can cause the imprint of station logos onto the TV screen. These types of imprints are not covered by your warranty because they are the results of misuse.

To reduce the risk of electric shock, do not use this polarized plug with an extension cord, receptacle, or other outlet unless the blades can be fully inserted to prevent blade exposure.
You are cautioned that any changes or modifications not expressly approved in this manual could void your authority to operate this equipment.
NOTIFICATION
This equipment has been tested and found to comply with the limits for a Class B digital device pursuant to Part 15 of the FCC Rules. These limits are designed to provide reasonable protection against harmful interference in a residential installation. This equipment generates, uses, and can radiate radio frequency energy and, if not installed and used in accordance with the instructions, may cause harmful interference with radio communications. However, there is no guarantee that interference will not occur in a particular installation. If this equipment does cause harmful interference to radio or television reception, which can be determined by turning the equipment off and on, the user is encouraged to try to correct the interference by one or more of the following measures:
☐ Reorient or relocate the receiving antennas.
☐ Increase the separation between the equipment and receiver.
☐ Connect the equipment into an outlet on a circuit different from that to which the receiver is connected.
Consult the dealer or an experienced radio/TV technician for help.
Protecting the TV
☐ To prevent internal heat build-up, do not block the ventilation openings.
☐ Do not install the TV in a hot or humid place, or in a place subject to excessive dust or mechanical vibration.
Note on CAPTION VISION
This television receiver provides display of television closed captioning in accordance with § 15.119 of the FCC rules. Use of this television for other than private viewing of programs broadcast on UHF or VHF or transmitted by cable companies for the use of the general public may require authorization from the broadcaster-cable company and/or program owner.
Owner's Record
The model and serial numbers are located on the front cover of this instruction manual.
Trademarks and Copyrights
ENERGY STAR ^® is a registered mark.

As an ENERGY STAR™ Partner, Sony has determined that this product or product models meets the ENERGY STAR™ guidelines for energy efficiency.
(●)® SRS (SOUND RETRIEVAL)
The (●) SRS (SOUND RETRIEVAL SYSTEM) is manufactured by Sony Corporation under license from SRS Labs, Inc. It is covered by U.S. Patent No. 4,748,669. Other U.S. and foreing patents pending.
The word 'SRS' and the SRS symbol (●) are registered trademark of SRS Labs, Inc.
Licensed by BBE Sound, Inc. under USP 4638258.4482866. BBE and BBE symbol are trademarks of BBE Sound, Inc.
Contents
Introduction
Trinitron® Color TV Features .... 1
Batteries for the Remote Control....2
About this Manual 2
Connecting Your TV
Basic Connections....3
Connecting Additional Equipment 4
Using the Remote Control and Basic Functions
Setting up the TV Automatically 13
Quick Start to the Menus....14
Using the Menus
Using the VIDEO menu 15
Using the AUDIO ♪ menu 16
Using the TIMER menu 18
Using the SET UP menu 19
Using PARENTAL CONTROL 22
Other Information
Programming the Remote Control 29
Troubleshooting 32
Specifications....34
Index 35
Introduction
Congratulations on your purchase of the Sony Trinitron® Color TV. Before you begin using this manual, please check the model number located on the front cover of this instruction manual.
The menu and illustrations used in these instructions are for KV-24FV10 to show the maximum number of features available. Differences in operation or features will be indicated in the text, for example, "KV-24FV10 only."
Trinitron® Color TV Features
Depending on your TV, some of the features you will enjoy include:
☐ Flat CRT — For optimal picture quality.
☐ PARENTAL CONTROL — A tool for parents to help monitor what their children watch on TV by establishing rating limits.
☐ FAVORITE CHANNEL — Instant access to your favorite channels with the touch of a button.
☐ Universal Remote Control — Program your remote control to operate your connected cable box, VCR, digital satellite receiver or DVD player.
Trilingual Menus — Choose English, French or Spanish menus.
☐ Energy Star — A recognized symbol of energy efficiency.
☐ S VIDEO — A video input that offers enhanced picture quality.
☐ Direct MTS — Allows direct access to changing your Multi-Channel TV Sound: STEREO, SAP (Second Audio Program), or MONO, with the touch of a button.
☐ Front Panel Controls — Allows for access to the on-screen menus without the use of a remote control.
☐ Front A/V inputs — A quick connection for video games, camcorders or stereo equipment.
Batteries for the Remote Control
Insert two AA (R6) batteries (supplied) into the remote control using the following illustration as a guide.

natural_image
Two-step diagram showing a device with a scroll and a bracket, no text or symbols presentUnder normal conditions, batteries will last up to six months. If the remote control does not operate properly, the batteries might be worn out.
Remove the batteries to avoid possible damage from battery leakage if you will not be using the remote control for an extended period of time.
Your remote control can be programmed to operate most video equipment, (see page 29).
About this Manual
This manual provides instructions to help you enjoy your new TV. It shows you how to connect to an antenna or cable, cable box, VCR, DVD, satellite receiver, stereo system or camcorder. Once you're connected, follow the instructions to learn how to use the remote control to access the on-screen menus.
Connecting Your TV
Read this chapter before setting up your TV for the first time. This section covers basic connections in addition to any optional equipment you may be connecting.
Basic Connections
TV with indoor or outdoor antenna, or CATV cable
Depending on the cable available in your home, choose one of the connections below:


If you are connecting to an indoor or outdoor antenna, it will be necessary to adjust the orientation of the antenna for best reception.
Connecting Additional Equipment
TV and VCR

1 Connect the coaxial cable from your TV antenna or cable TV to the IN jack on your VCR.
2 Connect a coaxial cable (not supplied) from the OUT jack on your VCR to the VHF/UHF IN jack on the TV.
To watch video programs from your VCR, tune your TV to channel 3 or 4 (as set on the rear of your VCR).
(Optional connection)
3 If your VCR is equipped with video inputs, for better picture quality you should connect A/V cables from AUDIO and VIDEO OUT on your VCR to AUDIO/VIDEO IN on your TV. You can use the TVVIDEO button to switch between the TV and VCR inputs.
For optimum picture quality, use S VIDEO instead of the yellow A/V cable. S VIDEO does not provide sound, the audio cables must still be connected.
TV and Cable Box

flowchart
graph TD
    A["1 From Cable"] --> B["Cable Box"]
    B --> C["OUT IN"]
    B --> D["2"]
    D --> E["TV"]
    E --> F["VIDEO IN"]
    F --> G["S VIDEO"]
    F --> H["AUDIO OUT (VAR/FIX)"]
    F --> I["VIDEO"]
    F --> J["L"]
    F --> K["AUDIO R"]
1 Connect the coaxial cable from the wall to the IN jack on your cable box.
2 Connect a coaxial cable (not supplied) from the OUT jack on your cable box to the VHF/UHF IN jack on the TV.
To view channels from your cable box, tune your TV to channel 3 or 4 (as set on the rear panel of your cable box).
If you will be controlling all channel selection through your cable box, you should consider using the CHANNEL FIX feature on page 20.
TV, VCR, and Cable box
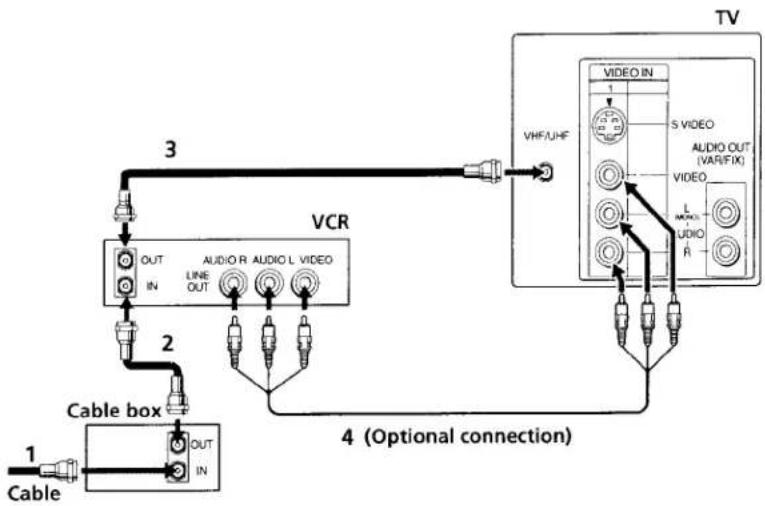
flowchart
graph TD
    A["Cable"] -->|1| B["OUT IN"]
    B --> C["Cable box"]
    C -->|2| D["VCR"]
    D --> E["3"]
    E --> F["TV"]
    F --> G["VIDEO IN"]
    G --> H["S VIDEO"]
    H --> I["VIDEO OUT (VAR/FIX)"]
    I --> J["L MODE"]
    J --> K["L AUDIO R"]
    K --> L["4 (Optional connection)"]
1 Connect the coaxial cable from the wall to the IN jack on your cable box.
2 Connect a coaxial cable (not supplied) from the OUT jack on your cable box to the IN jack on your VCR.
3 Connect a coaxial cable (not supplied) from the OUT jack on your VCR to the VHF/UHF IN jack on the TV.
If you will be controlling all channel selection through your cable box, you should consider using the CHANNEL FIX feature on page 20.
(Optional connection)
4 If your VCR is equipped with video inputs, for better picture quality you should connect A/V cables from AUDIO and VIDEO OUT on your VCR to AUDIO/VIDEO IN on your TV. You can use the TV/video button to switch between the TV and VCR inputs.
For optimum picture quality, use S VIDEO instead of the yellow A/V cable. S VIDEO does not provide sound, the audio cables must still be connected.
TV and Digital Satellite Receiver
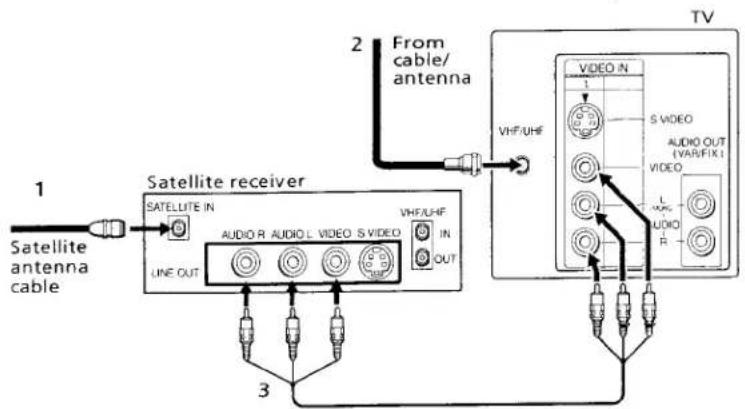
1 Connect the cable from your satellite antenna to SATELLITE IN on the satellite receiver.
2 Attach the coaxial connector from your cable or antenna to VHF/UHF on your TV.
3 Using A/V connectors, connect AUDIO and VIDEO OUT on your satellite receiver to AUDIO and VIDEO IN on your TV.
You can use the TVVIDEO button to switch between the satellite receiver and TV.
For optimum picture quality, use S VIDEO instead of the yellow A/V cable. S VIDEO does not provide sound, your audio connectors must still be connected.
TV, Digital Satellite Receiver and VCR

flowchart
graph TD
    A["Satellite antenna"] -->|1| B["SATellite IN"]
    A -->|4| C["VCR"]
    A -->|2| D["TV"]
    B --> E["AUDIC R AUDIO VIDEO S VIDEO"]
    B --> F["LINE OUT"]
    C --> G["AVIO LIME"]
    C --> H["OUT"]
    D --> I["VIDEO IN"]
    D --> J["AVIO O GAREL"]
    D --> K["VIDEO"]
    D --> L["AVIO LIME"]
    D --> M["OUT"]
    style A fill:#f9f,stroke:#333
    style B fill:#ccf,stroke:#333
    style C fill:#cfc,stroke:#333
    style D fill:#fcc,stroke:#333
    style E fill:#ffc,stroke:#333
    style F fill:#ffc,stroke:#333
    style G fill:#ffc,stroke:#333
    style H fill:#ffc,stroke:#333
    style I fill:#ffc,stroke:#333
    style J fill:#ffc,stroke:#333
    style K fill:#ffc,stroke:#333
    style L fill:#ffc,stroke:#333
    style M fill:#ffc,stroke:#333
1 Connect the cable from your satellite antenna to SATELLITE IN on the satellite receiver.
2 Attach the coaxial connector from your cable or antenna to VHF/UHF IN on your VCR.
3 Using a coaxial cable, connect VHF/UHF OUT on your VCR to VHF/UHF on your TV.
4 Using A/V connectors, connect AUDIO and VIDEO OUT on your satellite receiver to AUDIO and VIDEO IN on your VCR.
5 Using A/V connectors, connect AUDIO and VIDEO OUT on your VCR to AUDIO and VIDEO IN on your TV.
To view from the satellite or VCR, select the video input to which your satellite receiver or VCR is connected by pressing TVVIDEO on the remote control.
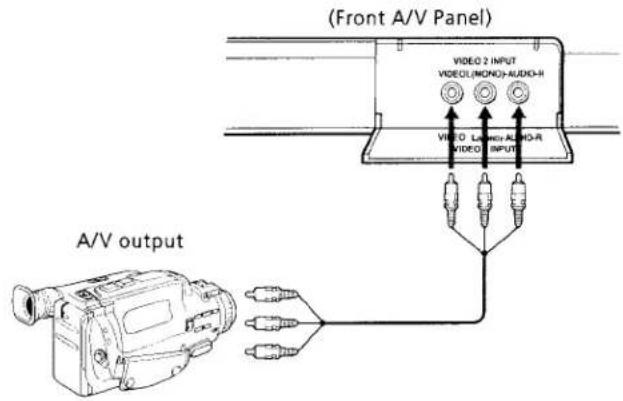
Connecting a Camcorder
Using A/V cables, connect AUDIO and VIDEO OUT on your camcorder to AUDIO and VIDEO IN on your TV.
Connecting a DVD Player
Using A/V connectors, connect LINE OUT on your DVD to VIDEO IN on your TV.

For optimum picture quality, use S VIDEO instead of the yellow A/V cable. S VIDEO does not provide sound, your audio connectors must still be connected.
Connecting an audio system
Using audio connectors, connect AUDIO OUT on your TV to one of the unused line inputs (e.g. TV, AUX, TAPE 2) on your stereo.
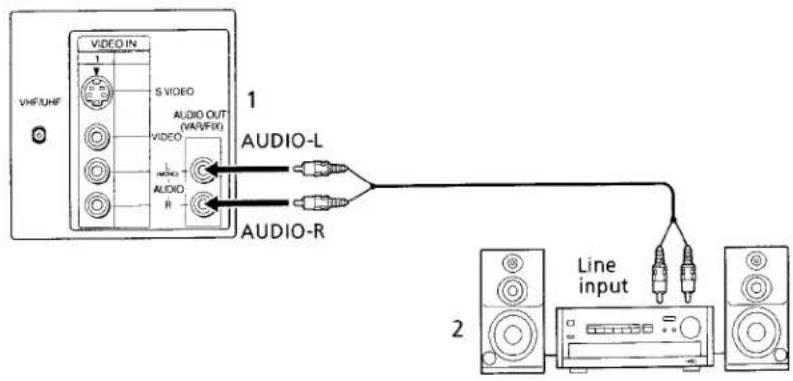
Set your stereo to the chosen line input. See page 16 for additional audio setup instructions.
Using the Remote Control and Basic Functions
This section shows you how to use more advanced buttons on the remote control and how to use the on-screen menus.
 | Button | Description |
| POWER | Press when you want to turn connected equipment on and off. | |
| FUNCTION | Press when you want to control connected equipment with your remote control. | |
| MUTING | Instantly turns off the sound. Press again or press VOL to restore sound. | |
| SYSTEM OFF | Powers off all Sony equipment at once. | |
| TV/VIDEO | Cycles through available video inputs. | |
| Moves the cursor in the on-screen menus. Press the arrow buttons to move the cursor, press the center button to select or access an option. | ||
| PICTURE MODE | Cycles through the available VIDEO MODE settings. | |
| SLEEP | Turns the TV off automatically in approximately 30, 60 or 90 minutes. Cancel by pressing until SLEEP OFF appears. | |
| MTS/SAP | Cycles through the Multi-channel TV Sound (MTS) options: STEREO, SAP (Second Audio Programming), MONO. | |
| DISPLAY | Press once to show current time, (if set) and channel number. Press again to activate CAPTION VISION settings, if available. To cancel, press again until DISPLAY OFF appears. |

JUMP
Cycles through available AUTO VOLUME settings (see page 16).
Alternates back and forth between the last two channels selected with the ①-⑨ buttons.
GUIDE
Brings up the custom guide of your satellite receiver.
MENU
Displays the on-screen menu. Press again to exit the menu at any time.
RESET
Press to return to factory settings while in the on-screen menu.
CODE SET
Use to program your remote control to operate connected video equipment, (see page 29).
Setting Up the TV Automatically
After you have finished connecting your TV, you will want to run AUTO PROGRAM to set up your channels.
1 Press Ⓞ to turn on the TV, the initial setup screen appears.
AUTO PROGRAM [CH+] EXIT [CH-]
First please connect cable/antenna
2 Press ⊕ to AUTO PROGRAM or ⊖ to exit.
Quick Start to the Menus
The following settings are available in your on-screen menus:
Menu

Make adjustments to your picture settings.
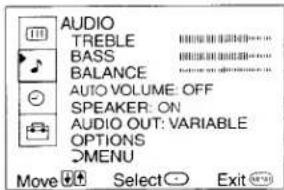

Change your audio settings.
The OPTIONS menu offers customized audio features.
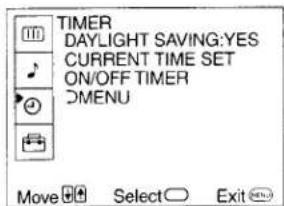
Set the clock on your TV, (CURRENT TIME SET) and program scheduled viewing using the ON/OFF TIMER.


Program your channels.
The CHANNEL SET UP provides further options for setting up your channels.
- Menus shows are for KV-24FV10, your menus may not look exactly like those illustrated.
Using the Menus
This chapter shows the options available for setting up and adjusting your TV.
To access a menu
1 Press MENU.
2 Use the ♘ or ♘ buttons to highlight an option.
3 Press ⊕ to access the menu.
Using the VIDEO menu

MODE: VIVID: Select for enhanced picture and contrast. Custom picture settings STANDARD: Select for a standard picture. MOVIE: Select for a darker picture for movie viewing.
Item Press to Press to PICTURE Decrease picture contrast Increase picture contrast BRIGHTNESS Darken the picture Brighten the picture COLOR Decrease color intensity Increase color saturation HUE Increase the red tones Increase the green tones SHARPNESS Soften the picture Sharpen the picture
Using the AUDIO ♪ menu

TREBLE
BASS
BALANCE
AUTO VOLUME
Stabilizes volume
Adjust left or right to adjust higher pitched sound.
Adjust left or right to adjust low pitched sound.
Adjust left or right to emphasize speaker balance.
ON: Select to stabilize the volume when changing channels.
OFF: Select to turn AUTO VOLUME off.
SPEAKER
Custom selection of audio output source
AUDIO OUT
ON: Select to listen to the sound from the TV speakers with or without a separate stereo system.
OFF: Select to turn off the TV speakers and listen to the TV's sound only through external audio system speakers.
AUDIO OUT can only be set when SPEAKER is set to OFF.
VARIABLE: Adjust the volume through your TV.
FIXED: Adjust the TV volume through a connected stereo.
Press TV/SAT for a direct selection of AUTO VOLUME settings.
OPTIONS menu

MTS
Multi-Channel TV Sound
EFFECT
Custom audio settings
STEREO: Select when viewing a broadcast in stereo.
SAP: Listen to bilingual broadcast or other Second Audio Programs (SAP).
MONO: Select to reduce noise in areas of poor reception.
SRS: Produces a dynamic three dimensional sound for stereo audio signals, (KV-24FV10 only).
SURROUND: Simulates theater quality sound for stereo programs, (KV-20FV10 only).
SIMULATED: Adds a surround-like effect to mono programs.
If your TV is set to SAP, all non-SAP programs will be muted. If your TV does not have sound, check your AUDIO settings.
For direct MTS settings, press the MTS/SAP button on your remote control.
Using the TIMER menu

DAYLIGHT SAVING CURRENT TIME SET
YES: Select in spring to compensate for Daylight Savings. NO: Select in fall at the end of Daylight Savings.
With the menu open:
1 Press ⊕.
2 Press ♠ or ♦ to cycle through the days, then press ⊕.
3 Press ♦ or ♦ until the current hour is displayed, then press ⊕.
4 Press ♦ or ♦ until the current minute is displayed, then press ⊕.
ON/OFF TIMER Scheduled viewing
CURRENT TIME SET must be programmed before the ON/OFF TIMER menu is available.
With the menu open:
1 Press ⊕.
2 Press ♦ or ♦ until the desired day or range of days is displayed, then press ⊕.
3 Indicate the time that you want the TV to turn on by pressing or and the , (for hour and minutes).
4 Press ♦ or ♦ to set the duration, up to 6 hours, then press ⊕.
5 Press ♠ or ♦ to set the channel and press ⊕.
When you perform AUTO PROGRAM, all ON/OFF TIMER settings will be cleared.
Any loss of power will cause the ON/OFF TIMER settings to be cleared.
Using the SET UP menu

PARENTAL CONTROL The PARENTAL CONTROL feature provides parents several options for programming the TV to block shows based on their rating, (see page 22).
VIDEO LABEL With the VIDEO LABEL window open:
Label connected equipment 1 Press ♦ or ♦ to access the input you want to label and press ⊕.
2 Press ⇧ or ⇧ to choose a label and press ⊕.
CAPTION CC1, 2, 3, 4: Displays printed dialogue of a program.
VISION TEXT1, 2, 3, 4: Displays network/station information.
Closed-Captioning XDS (Extended Data Services): Displays information about the network and current program, if available.
Press the DISPLAY button to activate your CAPTION VISION setting.
LANGUAGE Display all menus in your language of choice.
1 Point cursor at LANGUAGE and press ⊕.
2 Using the ♘ or ♦ buttons, highlight desired language and press ⊕.
TILT Press ♦ or ♦ to correct any tilt of the picture by -5 and +5, CORRECTION press ⊕ to activate.
DEMO Select to run a demonstration of the on-screen menus.
CHANNEL SET UP menu
| CHANNEL SET UP |
| FAVORITE CHANNEL |
| CABLE: OFF |
| CHANNEL FIX: OFF |
| AUTO PROGRAM |
| CHANNEL SKIP/ADD |
| CHANNEL CAPTION |
| DMENU |
| Move Select Exit |
FAVORITE CHANNEL
Quick access to favorite channels
With the FAVORITE CHANNEL menu open:
1 Use the ◊ or ◎ buttons to select AUTO or MANUAL, (selecting AUTO will display the last five channels accessed by the ①-⑨ buttons).
2 Select the position (1-5) where you want to program a channel.
3 Using the ♘ or ♘ buttons, select the desired channel.
4 Press ⊕, the TV will change to the channel entered.
To use FAVORITE CHANNEL: Exit all menus and press ⭕. Press ♦ or ♦ to move the cursor to the desired channel number and press ⊕.
CABLE
ON: Select if you are receiving cable channels with a CATV cable.
OFF: Select if you are using an antenna.
After changing your CABLE settings, you will need to run AUTO PROGRAM.
CHANNEL FIX
2-6: Select when you want to control all channel selection through a cable box.
VIDEO: Select from available video inputs when you have connected video equipment (e.g. satellite receiver) and you want your TV fixed to it.
FAVORITE CHANNEL cannot be used when CHANNEL FIX is set.
AUTO PROGRAM
Run AUTO PROGRAM whenever setting up your TV. It will cycle through all available channels and program any receivable channels.
CHANNEL SKIP/ADD
Use this feature after you run AUTO PROGRAM to skip unwanted channels or add new ones.
1 Use the ◇ or ◇ buttons to access the desired channel.
2 Press ⊕ to SKIP or ADD (only one option will be available).
CHANNEL
CAPTION
Label up to 12 channels with their call letters
With the CHANNEL CAPTION window open:
1 Press ⊕, then press ◊ or ◇ until you reach the desired channel number.
2 Press ⊕ to activate the channel.
3 Press ♦ or ♦ to display the first call letter or number of the caption and press ⊕ to select it. When finished, press ⊕ to activate.
Using PARENTAL CONTROL
The PARENTAL CONTROL feature is designed to help parents monitor what their children watch on television. This section shows you the different rating systems available and shows you how to set your TV's rating.
Overview of the Ratings
Once you have become familiar with these rating systems, you should be ready to set your TV's rating.
TV RATINGS
The TV ratings are divided into two groups: age-based and content-based.

| Age | Defined as | Contents | Defined as |
| TV-Y | All children | FV | Fantasy Violence |
| TV-Y7 | Directed to older children | D | Suggestive dialogue |
| TV-G | General audience | ||
| TV-PG | Parental Guidance suggested | L | Strong language |
| S | Sexual situations | ||
| TV-14 | Parents Strongly cautioned | V | Violence |
| TV-MA | Mature Audience only |
The content ratings will increase depending on the level of the age-based rating. For example, a program with a TV-PG V (Violence) rating may contain moderate violence, while a TV-14 V (Violence) rating may contain intense violence.
MOVIE RATINGS
(U.S. models only)
This system defines the rating levels of movies shown on the big screen and those on prime cable channels.
Rating Defined as
| G | General audience |
| PG | Parental Guidance suggested |
| PG-13 | Parents strongly cautioned |
| R | Restricted |
| NC-17 | No one 17 and under admitted |
| X | No one 17 and under admitted |
| MOVIE RATINGS | ||
| G: | — | |
| PG: | — | |
| PG-13: | — | |
| R: | — | |
| NC-17: | — | |
| X: | — | |
| DMENU | ||
| Select rating | ||
| Move | Select | Exit |
UNRATED
(U.S. models only)
You have the option of blocking TV programs or movies that are not rated.
| VIEW ALL | View all unrated programs |
| BLOCK TV | Block all unrated TV program |
| BLOCK | Block all unrated movies |
| MOVIE | |
| BLOCK | Block all unrated |
| BOTH | programming |
| CUSTOM RATINGS | ||
| TV RATINGS | ||
| MOVIE RATINGS | ||
| UNRATED: VIEW ALL | ||
| DMENU | ||
| Select category | ||
| Move | Select | Exit |
! If you choose to block unrated TV programs, please be aware that the following programs may be blocked: emergency broadcasts, political programs, sports, news, public service announcements, religious programs and weather.
ENGLISH RATINGS
(Canadian models only)
These ratings are for Canadian programs that are broadcast in English.
Rating Defined as
| C | Children |
| C8+ | Children 8 years and older |
| G | General programming |
| PG | Parental Guidance |
| 14+ | Viewers 14 and older |
| 18+ | Adult programming |
| ENGLISH RATINGS | ||
| C: | _ | |
| C8+: | _ | |
| G: | _ | |
| PG: | _ | |
| 14+: | _ | |
| 18+: | _ | |
| DMENU | ||
| Select rating | ||
| Move | Select | Exit |
FRENCH RATINGS
(Canadian models only)
These ratings are for Canadian programs that are broadcast in French.
Rating Defined as
| C | General |
| 8 ans+ | Not recommended for younger children |
| 13 | Not recommended for children |
| ans+ | under age 13 |
| 16 | Not recommended for ages |
| ans+ | under 16 |
| 18 | This program is restricted to adults |
| ans+ |
| FRENCH RATINGS | ||
| G: | - | |
| 8 ans+: | - | |
| 13 ans+: | - | |
| 16 ans+: | - | |
| 18 ans+: | - | |
| DMENU | ||
| Select rating | ||
| Move | Select | Exit |
U.S.A RATINGS
(Canadian models only)
For programs from the United States. Please see, "TV RATINGS" on page 22 for information on U.S.A. RATINGS.
Initial access into PARENTAL CONTROL
1 In the SET UP ☐ menu, point the cursor to PARENTAL CONTROL and press ⊕, (you will be asked to set a 4-digit password for any future access into PARENTAL CONTROL).
2 Press ⊕, then use the ①-⑨ buttons to enter a 4-digit password.
![PARENTAL CONTROL PASSWORD: Use [0-9] buttons to enter new four-digit password Move Select Exit](/content/2026/06/1337494/images/b21399fa62d293119ea9ebee0b7fa2db5eb4634d606f71ef14e0b6ac5c9020bd.jpg)
Keep this instruction manual in a safe place. In the event that you forget your password, please see page 33.
3 Confirm your password by entering it again.
Once your password is set correctly, you will be taken into the PARENTAL CONTROL menu.
Activating PARENTAL LOCK
In order to change the RATING, you will need to set PARENTAL LOCK to ON.
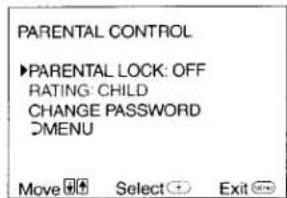
1 Point the cursor to PARENTAL LOCK and press ⊕.
2 Using the ◊ or ◇ buttons, highlight ON and press ⊕ to activate.
Setting the RATING
If you are not familiar with the Parental Guidelines rating system, you may use one of the following preselected categories to simplify the rating selections: CHILD, YOUTH or YOUNG ADULT.
1 Point the cursor to RATING and press ⊕.
2 Using the or buttons, select the desired rating and press .

| Rating | TV will allow a maximum rating of: |
| CHILD | TV-Y, TV-G, G (U.S. models only), G (Canadian models only) |
| YOUTH | TV-PG, PG (U.S. models only), PG (Canadian models only) |
| YOUNG ADULT | TV-14, PG-13 (U.S. models only), 14+ (Canadian models only) |
| CUSTOM | Select to set more restrictive ratings. |
Using the CUSTOM menu
You should be familiar with the rating systems before attempting to set CUSTOM ratings. Refer to pages 22-24, "Overview of the Ratings," for a description of the available rating systems.
1 In the RATING option, use or to highlight CUSTOM and press ⊕.
2 Using the ◊ or ◇ buttons, select the desired rating category and press ⊖.
3 Use ♦ or ♦ to select the maximum rating or content and press ⊕.
4 Press or to block (☑) or unblock (_ ) the rating or content and press ⊕.
Once you have blocked a rating or content, all higher ratings or contents will be automatically blocked.
Resetting your password
1 Use the ♘ or ♘ buttons to move the cursor to CHANGE PASSWORD and press ⊕.
2 Follow the directions for, "Initial Access into Parental Control," on pages 24-25, for information on changing your password.
Information for Parents
To view a program that exceeds the TV rating
☐ Press ☐ on the remote control, then use the ①-⑨ buttons to enter your password.
Entering your password to view a blocked program will temporarily turn PARENTAL LOCK to OFF. To reactivate your PARENTAL LOCK settings, turn the TV off then back on; the TV will return to the settings that you have selected.
1
-
Other Information
Programming the Remote Control
You can use the supplied remote control to operate Sony or non-Sony video equipment.
1 Press CODE SET.
2 Press VTR/DVD or SAT/CABLE (FUNCTION).
3 Use the ①-⑨ buttons to key in the code number from the following chart.
4 Press ENTER O.
VCR codes
| Sony | 301, 302, 303 | JC Penney | 309, 305, 304, 330, 314, 336, 337 |
| Admiral (M.Ward) | 327 | JVC | 314, 336, 337, 345, 346, 347 |
| Aiwa | 338, 344 | Kenwood | 314, 336, 332, 337 |
| Audio Dynamic | 314, 337 | LXI (Sears) | 332, 305, 330, 335, 338 |
| Broksonic | 319, 317 | Magnavox | 308, 309, 310 |
| Canon | 309, 308 | Marantz | 314, 336, 337 |
| Citizen | 332 | Marta | 332 |
| Craig | 302, 332 | Memorex | 309, 335 |
| Criterion | 315 | Minolta | 305, 304 |
| Curtis Mathis | 304, 338, 309 | Mitsubishi/MGA | 323, 324, 325, 326 |
| Daewoo | 341, 312, 309 | Multitech | 325, 338, 321 |
| DBX | 314, 336, 337 | NEC | 314, 336, 337 |
| Dimensia | 304 | Olympic | 309, 308 |
| Emerson | 319, 320, 316, 317, 318, 341 | Optimus | 327 |
| Fisher | 330, 335 | Panasonic | 308, 309, 306, 307 |
| Funai | 338 | Pentax | 305, 304 |
| General Electric | 329, 304, 309 | Philco | 308, 309 |
| Go Video | 322, 339, 340 | Philips | 308, 309, 310 |
| Goldstar | 332 | Pioneer | 308 |
| Hitachi | 306, 304, 305, 338 | Quasar | 308, 309, 306 |
| Instant Replay | 309, 308 | RCA/PROSCAN | 304, 305, 308, 309, 311, 312, 313, 310, 329 |
VCR codes
| Realistic | 309, 330, 328, 335, 324, 338 | Symphonic | 338 |
| Sansui | 314 | Tashiro | 332 |
| Samsung | 322, 313, 321 | Tatung | 314, 336, 337 |
| Sanyo | 330, 335 | Teac | 314, 336, 338, 337 |
| Scott | 312, 313, 321, 335, 323, 324, 325, 326 | Technics | 309, 308 |
| Sharp | 327, 328 | Toshiba | 312, 311 |
| Shintom | 315 | Wards | 327, 328, 335, 331, 332 |
| Signature 2000 (M.Ward) | 338, 327 | Yamaha | 314, 330, 336, 337 |
| SV2000 | 338 | Zenith | 331 |
| Sylvania | 308, 309, 338, 310 |
Cable box codes
| Hamlin/Regal | 222, 223, 224, 225, 226 | Sony | 801 (preset code for remote control |
| Jerrold/G. I. | 201, 202, 203, 204, 205, 206, 207, 208, 218 | General Electric | 802 |
| Oak | 227, 228, 229 | Hitachi | 805 |
| Panasonic | 219, 220, 221 | Hughes | 804 |
| Pioneer | 214, 215 | Panasonic | 803 |
| Scientific Atlanta | 209, 210, 211 | RCA/PROSCAN | 802, 808 |
| Tocom | 216, 217 | Toshiba | 806, 807 |
| Zenith | 212, 213 |
Laser Disc Player codes
| Sony | 701 | Sony | 751 |
| Panasonic | 704, 710 | Panasonic | 753 |
| Pioneer | 702 | Pioneer | 752 |
| RCA | 755 | ||
| Toshiba | 754 |
If more than one code number is listed, try entering them one by one until you come to the correct code for your equipment.
Whenever you remove the batteries, the code numbers may revert to the factory setting and must be reset.
In some rare cases, you may not be able to operate your equipment with the supplied remote control. In this case, use the equipment's supplied remote control.
Operating a VCR
| Press | To |
| VTR/DVD | Power on the VCR |
| 0-9 | Select channels directly |
| CH CH+ ○ | Change channels |
| ▶ | Play video tape |
| ■ | Stop |
| ◄◄ or ►► | Search forward or backward |
| II | Pause |
| ● and ▶at the same time | Record |
| TV/VTR+○ | Change between VCR and TV inputs |
Operating a DVD
| Press | To |
| VTR/DVD | Power on the DVD |
| 0-9 | Select chapters directly |
| CH CH4 | Search chapters forward or backward |
| ▶ | Play DVD |
| ■ | Stop |
| II | Pause |
| ∅, ∅, ⇔, ⇌ | Move the cursor in the menu |
| MENU | Display the DVD menu |
Operating a Laser Disc
| Press | To |
| VTR/DVD | Power on the laser disc |
| CH CH | Search chapters forward or backward |
| ▶ | Play disc |
| ■ | Stop |
| II | Pause |
Troubleshooting
If you are having a problem with your TV, try the suggestions below. If the problem persists, contact your nearest Sony dealer.
| No picture, no sound | Make sure the power cord is plugged in.If a red light is flashing on the front of your TV for more than a few minutes, call your local service center.Check your PARENTAL CONTROL settings, (pages 25-26).Check the TV/VIDEO settings: when watching TV, set to TV; when watching video equipment, set to VIDEO (page 15).Make sure the batteries have been inserted correctly into the remote control.Try another channel, it could be station trouble. |
| Poor or no picture, good sound | Adjust PICTURE in the VIDEO menu (page 15).Adjust BRIGHTNESS in the VIDEO menu (page 15).Check the antenna and/or cable connections (page 3). |
| Good picture, no sound | Press MUTING so that MUTING disappears from the screen (page 11).Check your AUDIO settings. Your TV may be set to SAP (page 16). |
| No color | Adjust COLOR in the VIDEO menu (page 15). |
| Only snow appears on the screen | Check the CABLE setting in the SET UP menu (page 20).Check the antenna and/or cable connections (page 3).Make sure the channel selected is currently broadcasting. |
| Dotted lines or stripes | Adjust the antenna.Move the TV away from other electronic equipment. Some electronic equipment can create electrical noise, which can interfere with TV reception. |
| Double images or ghosts | Check your outdoor antenna or call your cable service. |
| Cannot receive higher number channels (UHF) when using an antenna | Make sure CABLE is set to OFF in the SET UP menu (page 20).Use AUTO PROGRAM to add channels that are not presently in the memory (page 20). |
Cable stations don't seem to work
☐ Make sure CABLE is set to ON in the SET UP menu (page 20).
☐ Use AUTO PROGRAM to add channels that are not presently in the memory (page 20).
☐ Batteries could be weak. Replace them (page 2).
☐ Move the TV 3-4 feet away from fluorescent lights.
☐ Clean the TV with a soft dry cloth. Never use strong solvents such as thinner or benzine, which might damage the finish of the cabinet.
☐ In the password screen, enter the following master password: 4357. After using the master password, you must create a new password.
Remote Control does not operate
The TV needs to be cleaned
Lost password for PARENTAL CONTROL
If, after reading these operating instructions, you have additional questions related to the use of your Sony television, please call our Direct Response Center at 1-800-222-SONY (7669) (U.S. residents only). (416) 499-SONY (7669) (Canadian residents only).
Specifications
For all models (except as noted)
| Television system | American TV standard/NTSC |
| Channel coverage | VHF: 2-13/UHF: 14-69/CATV: 1-125 |
| Antenna | 75-ohm external antenna terminal for VHF/UHF |
| Picture tube | FD Trinitron® |
| Power requirements | 120 V, 60 Hz |
| Supplied Accessories | Size AA (R6) batteries (2)Remote Control RM-Y168 |
| Optional Accessories | Antenna dipoleConnecting cables VMC-810S/820S, VMC-720M,YC-15V/30V, RK74AU/V mixer EAC-66 |
KV-20FV10
| Screen size | Visible screen size: 20 inch measured diagonallyActual tube size: 21 inch measured diagonally |
| Inputs/outputs | 2 video, 2 audio1 S VIDEO1 AUDIO OUT1 headphone jack |
| Speaker output | 5 W x 2 |
| Power Consumption | 125 W when in use1 W in standby |
| Dimensions(W/H/D) | 562 x 466 x 503 mm(22 ^1/_8 x 18 ^3/_8 x 19 ^3/_4 in.) |
| Mass | 27 kg (59 lbs.) |
KV-24FV10
| Screen size | Visible screen size: 24 inch measured diagonallyActual tube size: 25 inch measured diagonally |
| Inputs/outputs | 2 video, 2 audio1 S VIDEO1 AUDIO OUT1 headphone jack |
| Speaker output | 10 W x 2 |
| Power Consumption | 150 W when in use1 W in standby |
| Dimensions(W/H/D) | 652 x 524.3 x 467.3 mm(25 ^3 / _4 x 20 ^11 / _16 x 18 ^7 / _16 in.) |
| Mass | 37 kg (87 lbs. 9oz) |
| Design and specifications are subject to change without notice. | |
Index
A
AUDIO ♪ menu 16 AUTO PROGRAM 20 AUTO VOLUME CONTROL 16
B
Battery Installation 2 BRIGHTNESS 15
C
Cable box codes 30 CAPTION VISION 19 CHANNEL CAPTION 21 CHANNEL FIX 20 CHANGE PASSWORD 27 CHANNEL SET UP 20 COLOR 15 Code numbers Cable box 30 Satellite Receiver 30 DVD 30 Laser Disc Player 30 VCR 29 Connections Connecting a Camcorder 9 Connecting a DVD player 9 Connecting and audio system 10 TV and Cable Box 5 TV and VCR 4 TV and Satellite Receiver 7 TV, Satellite Receiver and VCR 8 TV, VCR, and Cable box 6 CURRENT TIME SET 18
D
DAYLIGHT SAVING 18 DEMO 19 DVD codes 30
E
ENGLISH RATINGS 24
F
FAVORITE CHANNEL 1, 20 FRENCH RATINGS 24
H
HUE 15
L
LANGUAGE 19 Laser Disc Player codes 30
M
Menus AUDIO 16 SET UP 19 TIMER 18 VIDEO 15 MOVIE RATING 2 MTS 17 MONO 17 SAP 17 STEREO 17
0
ON/OFF TIMER 1,18
P
PARENTAL CONTROL 22 Password Entering 24 Lost 33 PICTURE 15
R
RATINGS ENGLISH 24 FRENCH 24 MOVIE 23 TV 22 UNRATED 23 U.S.A. 24 Remote Control 1
S
SET UP menu 19
Index
SHARPNESS 15
Specifications 34
T
TIMER · menu 18
Troubleshooting 32
TV Features 1
TV RATING 22
TILT CORRECTION 19
U
U.S.A. RATINGS 24
UNRATED 23
v
VCR codes 29
VIDEO □ menu 15
VIDEO MODE 15
VIVID 15
STANDARD 15
MOVIE 15
VIDEO LABEL 19
- Trinitron® Color TV
- WARNING
- Note to the CATV Installer
- SAFETY PRECAUTIONS
- CAUTION
- NOTIFICATION
- Protecting the TV
- Note on CAPTION VISION
- Owner's Record
- Trademarks and Copyrights
- (●)® SRS (SOUND RETRIEVAL)
- Contents
- Introduction
- Connecting Your TV
- Using the Remote Control and Basic Functions
- Using the Menus
- Other Information
- Trinitron® Color TV Features
- Batteries for the Remote Control
- About this Manual
- Basic Connections
- TV with indoor or outdoor antenna, or CATV cable
- Connecting Additional Equipment
- (Optional connection)
- TV and Digital Satellite Receiver
- TV, Digital Satellite Receiver and VCR
- Connecting a Camcorder
- Connecting a DVD Player
- Connecting an audio system
- JUMP
- GUIDE
- MENU
- RESET
- CODE SET
- Setting Up the TV Automatically
- Quick Start to the Menus
- To access a menu
- Using the VIDEO menu
- Using the AUDIO ♪ menu
- TREBLE
- BASS
- BALANCE
- AUTO VOLUME
- SPEAKER
- AUDIO OUT
- OPTIONS menu
- MTS
- EFFECT
- Using the TIMER menu
- DAYLIGHT SAVING CURRENT TIME SET
- ON/OFF TIMER Scheduled viewing
- Using the SET UP menu
- CHANNEL SET UP menu
- FAVORITE CHANNEL
- CABLE
- CHANNEL FIX
- AUTO PROGRAM
- CHANNEL SKIP/ADD
- CHANNEL
- CAPTION
- Using PARENTAL CONTROL
- Overview of the Ratings
- TV RATINGS
- MOVIE RATINGS
- (U.S. models only)
- UNRATED
- ENGLISH RATINGS
- (Canadian models only)
- FRENCH RATINGS
- U.S.A RATINGS
- Initial access into PARENTAL CONTROL
- Activating PARENTAL LOCK
- Setting the RATING
- Using the CUSTOM menu
- Resetting your password
- Information for Parents
- To view a program that exceeds the TV rating
- Programming the Remote Control
- Troubleshooting
- Cable stations don't seem to work
- Remote Control does not operate
- The TV needs to be cleaned
- Lost password for PARENTAL CONTROL
- Index
- A
- B
- C
- D
- E
- F
- H
- L
- M
- 0
- P
- R
- S
- T
- U
- v
Marque : SONY
Modèle : KV-24FV10
Catégorie : Téléviseur