
Home Bakery Maestro BB-SSC10 - Machine à pain Zojirushi - Notice d'utilisation et mode d'emploi gratuit
Retrouvez gratuitement la notice de l'appareil Home Bakery Maestro BB-SSC10 Zojirushi au format PDF.


| Marque | Zojirushi |
| Modèle | Home Bakery Maestro BB-SSC10 |
| Type de produit | Machine à pain |
| Capacité de pain | Jusqu'à 1 livre (450 g) |
| Dimensions (L x l x h) | 30 x 24 x 31 cm |
| Poids net | Environ 5 kg |
| Alimentation | 220-240 V, 50/60 Hz, 600 W |
| Matériau de la cuve | Acier inoxydable avec revêtement antiadhésif |
| Nombre de programmes | 12 programmes préréglés (pain blanc, complet, sans gluten, pâte à pizza, confiture, etc.) |
| Taille du pain | 3 tailles (petit, moyen, grand) selon recette |
| Couleur de croûte | 3 réglages (pâle, moyen, foncé) |
| Minuterie différée | Oui, jusqu'à 13 heures |
| Maintien au chaud | Oui, jusqu'à 1 heure |
| Écran d'affichage | LCD rétroéclairé |
| Fonction cuisson rapide | Oui, programme de cuisson accélérée |
| Fonction mémoire | Mémorise le dernier programme utilisé |
| Fonction d'arrêt automatique | Oui |
| Nettoyage de la cuve | Amovible et lavable au lave-vaisselle |
| Nettoyage du boîtier | Essuyer avec un chiffon humide |
| Sécurité | Fusible thermique, arrêt en cas de surchauffe |
| Pièces détachées disponibles | Cuve, pétrisseur, couvercle, joint |
| Accessoires inclus | Cuve de cuisson, pétrisseur, cuillère doseuse, gobelet doseur, manuel d'utilisation |
| Garantie | 1 an (pièces et main-d'œuvre) |
FOIRE AUX QUESTIONS - Home Bakery Maestro BB-SSC10 Zojirushi
Questions des utilisateurs sur Home Bakery Maestro BB-SSC10 Zojirushi
0 question sur cet appareil. Repondez a celles que vous connaissez ou posez la votre.
Poser une nouvelle question sur cet appareil
Téléchargez la notice de votre Machine à pain au format PDF gratuitement ! Retrouvez votre notice Home Bakery Maestro BB-SSC10 - Zojirushi et reprennez votre appareil électronique en main. Sur cette page sont publiés tous les documents nécessaires à l'utilisation de votre appareil Home Bakery Maestro BB-SSC10 de la marque Zojirushi.
MODE D'EMPLOI Home Bakery Maestro BB-SSC10 Zojirushi

ZQJIRUSHI
USA CAN
HOME BAKERY MAESTRO™
BREADMAKER
OPERATING INSTRUCTIONS
BB-SSC10
INDEX
BEFORE USE
IMPORTANT SAFEGUARDS 2
SPECIFICATIONS 5
FEATURES 6
TIPS ON MAKING BREAD 7
PARTS NAMES AND FUNCTIONS ....8
HOW TO SET THE CLOCK 12
ALERT TONES AND HOW TO CHANGE THEM ....12
TOOLS AND UTENSILS TO USE 13
INGREDIENTS TO USE 14
COURSE LIST 16
HOW TO USE
MAKING VARIOUS TYPES OF BREAD
HOW TO MAKE BASIC BREAD ....18
USEFUL FUNCTIONS
CRUST CONTROL/ADD INGREDIENTS.....21
SETTING THE TIMER 23
MAKING DOUGH
HOW TO MAKE DOUGH
(BREAD/PIZZA DOUGH AND
PASTA DOUGH) 24
MAKING SWEETS
HOW TO MAKE CAKES....25
HOW TO MAKE JAM 28
MAKING BREAD WITH YOUR OWN RECIPES
OVERVIEW OF THE HOMEMADE COURSE .....30
BASICS OF USING THE HOMEMADE COURSE .....31
Q&A FOR HOMEMADE COURSE ....35
TIPS ON USING THE PRODUCT
CLEANING AND MAINTENANCE ....36
REPLACEMENT PARTS 37
Q&A FOR BAKING BREAD....38
WHEN THE RESULTS ARE NOT SATISFACTORY...39
TROUBLESHOOTING GUIDE ....41
ZOJIRUSHI CORPORATION
WHEN USING ELECTRICAL APPLIANCES, BASIC SAFETY PRECAUTIONS SHOULD ALWAYS BE FOLLOWED, INCLUDING THE FOLLOWING:
1 Read all instructions thoroughly.
2 Avoid touching hot surfaces and do not close or clog the steam vent opening under any circumstance. The handles and knobs are provided for your safety and protection.
3 To prevent hazardous operation or electrical shock, do not immerse power cord, power plug, or baking machine in water or other liquids.
4 Close supervision is recommended when the appliance is used by or near children.
5 Unplug from outlet when the appliance is not in use and before cleaning. Allow the appliance to cool before adding or removing parts, and before cleaning the appliance.
6 Do not use or operate the appliance with a damaged cord or plug. If the appliance malfunctions or has been damaged in any manner, unplug the appliance and return it to the nearest authorized service facility or dealer for examination, repair or adjustment.
7 The use of accessories or attachments not recommended by the appliance manufacturer may be hazardous or may cause malfunction.
8 Do not use outdoors.
9 Keep the power cord away from hot surfaces and do not let the cord hang over the edge of tables or counters.
10 Do not place the appliance on or near a heated surface such as a gas or electric stove, or in a heated oven.
11 Always use extreme caution when moving appliances containing hot contents or liquids.
12 To disconnect, press and hold CANCEL and remove plug from wall outlet. Never pull on the cord.
13 Do not use the appliance for other than intended or specified purposes.
SAVE THESE INSTRUCTIONS
THIS APPLIANCE IS FOR HOUSEHOLD USE ONLY.
NOTE:
A. A short power cord is provided to reduce the risk of becoming entangled in or tripping over it.
B. Extension cords may be used if care is exercised in their use.
C. When an extension cord is used:
(1) the marked electrical rating of the extension cord should be at least as great as the electrical rating of the appliance, and
(2) the longer cord should be arranged so that it will not drape over the countertop or tabletop where it can be pulled on by children or tripped over unintentionally.
This appliance has a polarized plug (one blade is wider than the other). As a safety feature, this plug will fit in a polarized outlet only one way. If the plug does not fit fully in the outlet, reverse the plug. If it still does not fit, contact a qualified electrician. Do not attempt to defeat this safety feature.
IMPORTANT SAFEGUARDS (cont.)
These WARNINGS and CAUTIONS are intended to prevent property damage or personal injury to you and others.
■The degree of danger or damage by the misuse of this product is indicated as follows:

Indicates risk of serious injury or death.

Indicates risk of injury, household or property damage if mishandled.
■Prohibited or required actions are indicated as follows:


WARNING

Do not modify the product. Only a repair technician may disassemble or repair this product.
Attempting to do so may cause fire, electric shock or injury. Make any repair inquiries to Zojirushi Customer Service.

Do not immerse in water or splash with water.
Doing so may cause short circuit or electric shock.

Do not plug or unplug the Power Plug if your hands are wet.
Doing so may cause electric shock or injury.

Do not touch the Steam Vent.
Doing so may cause burns or scalding. Take special precautions with children and infants.

Do not allow children to use the product unsupervised. Keep it out of the reach of infants.
Children and infants are at risk of burns, electric shock or injury.
Do not use a power source other than 120V AC.
Using any other power supply voltage may cause fire or electric shock.
Do not use the product if the Power Cord or Power Plug is damaged or if the Power Plug is loosely inserted into the electrical outlet.
Doing so may cause electric shock, short circuit or fire.
Power Plug Electrical outlet
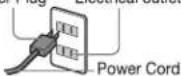
Do not damage the Power Cord. Do not bend, pull, twist, fold, or attempt to modify the Power Cord. Do not place it on or near high temperature surfaces or appliances, under heavy items or between objects.
A damaged Power Cord can cause fire or electric shock.

Use only an electrical outlet rated at 15 amperes minimum, and do not plug other devices into the same outlet.
Plugging other devices into the same outlet may cause the electrical outlet to overheat, resulting in fire.
Insert the Power Plug completely and securely into the electrical outlet.
A loosely inserted Power Plug may cause electric shock, short circuit, smoke or fire.
Stop using immediately if you notice any of the following symptoms indicating malfunction or breakdown.
Continued use of the product may cause smoke, fire, electric shock or injury.
●The Power Plug or Power Cord has become very hot.
- The Power Cord is deeply damaged or deformed.
●There is a burning smell.
●A part is cracked, rattling or loose.
- You feel a tingle or slight electrical shock.
●The electricity turns on and off when the Power Cord is touched or moved.
If any of the above occurs, unplug the product immediately and return to Zojirushi Customer Service for check-ups and/or repairs.
This product is not intended for use by persons (including children) with reduced physical, sensory or mental capabilities, or lack of experience and knowledge, unless they have been given supervision or instruction concerning use of the product by a person responsible for their safety. Children should be supervised to ensure that they do not play with the product.
IMPORTANT SAFEGUARDS (cont.)

CAUTION

Do not touch hot surfaces such as the Main Body, Baking Pan, Kneading Blade, inside of the Main Body, or the inside of the Lid during or for a while after use. Touching hot surfaces may cause burns.

Unplug the Power Plug from the electric outlet when the product is not in use. Leaving the Power Plug in an outlet may cause the insulation to become damaged, resulting in electric shock, short circuit or fire.

Do not use the product near walls or furniture. Place the product at least 2" (5cm) away from walls or furniture. Steam or heat may damage, discolor or deform walls or furniture.

Always unplug the product by holding the Power Plug, not by pulling the Power Cord. Pulling the Power Cord to unplug the product may cause electric shock, short circuit or fire.
Do not place or use the product on unstable surfaces or on surfaces that are vulnerable to heat. Doing so may cause fire.
Allow the product to cool down before cleaning. Touching hot surfaces may cause burns.
If the Power Cord is damaged, it must be replaced by the manufacturer, its service agent or similarly qualified persons to avoid hazards.
IMPORTANT
■ If the blades or surface of the Power Plug become soiled, wipe them clean.
A dirty Power Plug may cause fire.
As the Main Body, Baking Pan, inside of the Main Body, Kneading Blade and inside of the Lid become hot after baking completes, be sure to use oven mitts when removing the Baking Pan. Not doing so may cause burns or scalding.
■ When removing bread from the Baking Pan, hold the Baking Pan Handle against the Baking Pan. Not holding the Baking Pan securely may cause it to slip and may cause burns.
■ Do not use the product in the following locations:
- Where fire is being used or in damp locations.
(Doing so may cause product deformation.)
• In direct sunlight.
(Doing so may cause malfunction.)
- Where steam or heat builds up inside, such as kitchen storage cabinets.
(Doing so may cause product deformation and discoloration.)
■ Do not move the product while it is in use. Doing so may cause burns or injury.
■ Do not put your fingers into the Baking Pan Receptacle.
Doing so may cause injury.
■ Do not cover the Lid or the Steam Vent.
Doing so may cause the Lid to deform or cause malfunction.
■ Be sure to remove foreign matter adhering to the inside of the Baking Pan and on the surface of the Kneading Blade.
Not doing so may cause malfunction.
■ Do not use the product for purposes other than making bread, cake, jam, and dough (or the recipes listed in the Recipe Book or on Zojirushi.com). Doing so may cause malfunction.
■ Do not put more ingredients in the product than the set capacity.
Doing so may cause malfunction.
■ Do not submerge the bottom of the Baking Pan where the Coupling Wing Nut is located under water. Doing so may cause corrosion or the Rotating Shaft may fail to turn properly.
■ Make sure that all detachable parts such as the Auto Add Dispenser, Baking Pan, etc. are securely attached before use.
■ Be sure to keep the inside of the Main Body clean. Leaving food scraps and crumbs inside of the Main Body may cause scorching.
■ Do not deform the Baking Pan.
Doing so may cause malfunction.
■ Do not place the product over direct flame (such as a gas stove top), or on top of electric or induction heating (IH) cookers.
Doing so may cause fire, breakdown or damage to the product.
This product is not intended to be operated by means of an external timer or separate remote-control system.
■ This product is intended for household use and similar applications listed below:
●Staff (employee) kitchen areas in shops, offices and other working environments.
* This product is not intended for use by many unspecified people for a long period of time.
This product must not be used in the following areas:
• Farm houses.
- By clients in hotels, motels and other residential type environments.
• Bed and breakfast type environments.
SPECIFICATIONS
| Model No. | BB-SSC10 | |
| Electrical Rating | AC 120V 60Hz | |
| Electric Consumption | Heater | 450W |
| Motor | 83W | |
| External Dimensions | (approx. inches) | 8-7/8 (W) × 12-1/2 (D) × 13-5/8 (H) |
| (approx. cm) | 22.5 (W) × 31.5 (D) × 34.5 (H) | |
| Weight | Approx. 16 lbs. (7.0kg) | |
| Timer | Maximum approx. 13 hours | |
| Length of the Power Cord | 3'3" (1.0m) | |
● Even when the product is not operating, about 0.5W of power is consumed if the Power Plug is plugged into an electrical outlet.
● This product is not suitable for use in countries or regions with different power supply voltages or frequencies.
Make bread just the way you like it!
Wide Selection of 14 Courses
This product offers a wide selection of courses. There are 14 courses, including 10 bread courses (such as WHOLE WHEAT and MULTIGRAIN), CAKE, and JAM courses. Easily expand your baking repertoire by simply selecting a course.
Superb HOMEMADE Course
The HOMEMADE course allows you to set the time flexibly, from the KNEAD to BAKE cycle. You can use the HOMEMADE course for a variety of purposes, including making bread to your preference, making gluten free dough, or baking meatloaf. The optional SHAPE cycle allows you to shape the dough by hand during dough preparation, which is useful for making unique recipes like Cinnamon Roll Bread.
Color Recipe Book (Separate Volume)
A user-friendly color Recipe Book with 50 Zojirushi-recommended recipes is provided with this Home Bakery.
Various Useful Functions
Auto Add Dispenser (Detachable)
No need to wait for an alert tone to add extra ingredients to the dough manually. Simply place the extra ingredients in the Auto Add Dispenser before starting the course. The ingredients are dispensed automatically during the KNEAD cycle. The Auto Add Dispenser is detachable, making filling easy and allowing the entire dispenser to be washed. Not available for all courses.

Walnuts

Raisins

Nuts
Safety Mechanism
The Kneading Blade will temporarily stop rotating when the Lid is opened during operation, so ingredients can be added safely. The Kneading Blade will start again when the Lid is closed. (All operations such as Kneading Blade rotation, rising, and baking will stop, and total baking time will be delayed for the period of time during which the Lid is opened.)
Crust Color Selection
Select the crust color for bread and cakes from two options, MEDIUM or DARK. Not available for all courses.
Delay Timer
Use the timer function to complete the bread at a later time (max approx. 13 hours). Not available for all courses.
The height and shape of finished bread will differ each time, even when using the same course. For the best results, follow these guidelines.

Use fresh ingredients.
- Select ingredients with the most recent manufacturing dates and use them as soon as possible after opening.
● Always store yeast in the refrigerator. (→P. 14)


Measure ingredients accurately.
- Ingredients are most accurately measured by weight. If possible, we recommend the use of a kitchen scale.
- We recommend using a digital scale (that measures in 0.1g increments).
- Do not use the supplied Liquid Measuring Cup to measure flour and other dry ingredients. The supplied Liquid Measuring Cup is for liquids only.
- When using the supplied Measuring Spoon, make sure to fill to the brim with the ingredient and level off. Do not tap or tightly pack ingredients into the spoon. Doing so will cause inaccurate measurement.


Adjust the water temperature in accordance with season or room temperature.
- If the bread rises too high or collapses (causing a dent in the center) due to high room temperatures (77°F/25°C or higher), use colder water (about 41°F/5°C). (Use water chilled in the refrigerator.)
- If the bread does not rise as desired due to low room temperatures (50°F/10°C or lower), use warmer water (about 68°F/20°C).


Remove the bread from the Baking Pan immediately after baking completes.
- Be sure to wear oven mitts to remove the bread, and place it on a cooling rack to cool down. If the bread is not removed immediately after baking completes, the sides of the bread may collapse or the crust may become thick or dark.
● Since it is difficult to slice bread immediately after baking, allow it to cool before slicing.
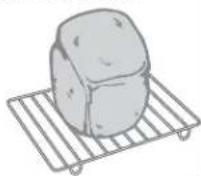

Store bread and dough properly.
- If the bread will not be consumed immediately after baking, store in a plastic bag to prevent from drying out.
■ Storing in the freezer:
Bread Loaf
Slice loaf, wrap each slice in plastic wrap to freeze.
Freeze the bread as soon as possible after it cools.
Bread Dough
After shaping the dough and allowing to rise, place the dough on a tray, cover with plastic wrap, and place in the freezer. After the dough is frozen, put in a plastic bag before storing in the freezer again. Before baking the frozen dough, thaw at room temperature of 86° F- 95° F ( 30° C- 35° C) and brush the loaf with egg glaze. (Dough that has been stored in the freezer may not rise as high as fresh dough.)
Pizza Dough
After rolling the dough into a circle, wrap it in plastic wrap and store in the freezer.
When using the frozen dough to bake a pizza, put the topping ingredients on the pizza crust while it is still frozen.
PARTS NAMES AND FUNCTIONS
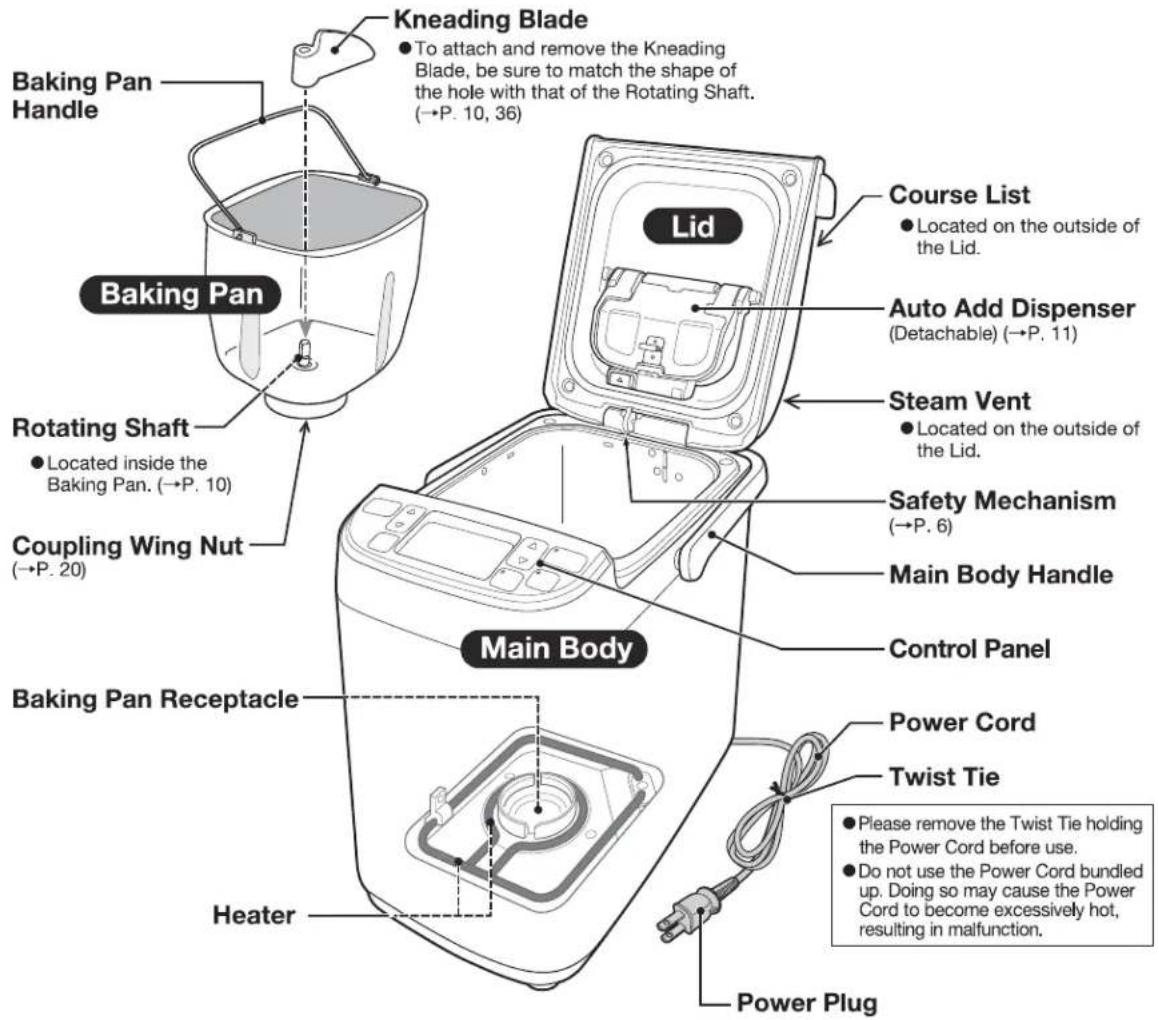
Accessories
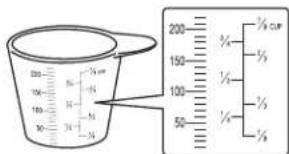
Liquid Measuring Cup
Use to measure water and other liquids.
- Do not use Liquid Measuring Cup to measure flour or other dry ingredients.
● 1 cup measures approx. 8 fl. oz. (approx. 240mL).
● Measures in approx. 10mL increments.
Measuring Spoon
Use to measure dry yeast, salt, sugar, and other ingredients.
● The size of the Measuring Spoon is slightly different from that of commercially available measuring spoons.
| The tablespoon measures approx. 14mL | Dry Milk | Approx. 4g |
| Sugar | Approx. 12g | |
| The teaspoon measures approx. 4.5mL | Dry Yeast | Approx. 3g |
| Salt | Approx. 5g |
Recipe Book
PARTS NAMES AND FUNCTIONS (cont.)
Control Panel
- Press buttons firmly to register selections.

Course List
List of courses that can be selected using the COURSE button.
| COURSES | ||
| BREAD | DOUGH | |
| 1 WHITE | 6 MULTIGRAIN | 11 BREAD / PIZZA |
| 2 EUROPEAN | 7 GLUTEN FREE | 12 PASTA |
| 3 QUICK WHITE | 8 SALT FREE | |
| 4 WHOLE WHEAT | 9 SUGAR FREE | OTHER |
| 5 QUICK WHOLE WHEAT | 10 VEGAN | 13 CAKE |
| 14 JAM | ||
HOMEMADE
15 HOMEMADE MEMORY 1 / MEMORY 2 / MEMORY 3
PARTS NAMES AND FUNCTIONS (cont.)
Baking Pan
How to Remove the Baking Pan
Turn the Baking Pan in the direction of the arrow to release and remove it.

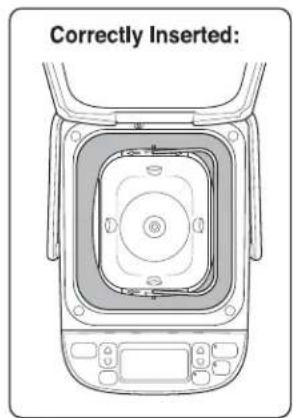
How to Insert the Baking Pan
1 Place the Baking Pan in the Baking Pan Receptacle.
● Be careful not to hit the Heater.

2 Turn the Baking Pan in the direction of the arrow to lock it in position.

Kneading Blade
How to Attach the Kneading Blade
Match the shape of the Kneading Blade's hole with that of the Rotating Shaft to attach.
- Be sure to attach the Kneading Blade securely.
If attached loosely, the Kneading Blade will not knead properly.
●Refer to P. 36 for how to detach the Kneading Blade.

PARTS NAMES AND FUNCTIONS (cont.)
Auto Add Dispenser
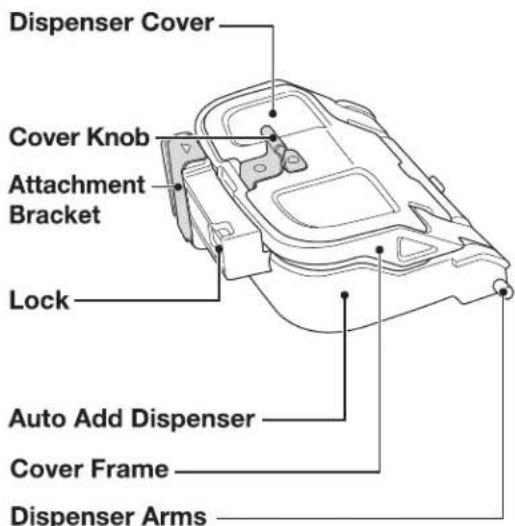
(Located at 2 positions: left and right sides) Install the Auto Add Dispenser by placing the Dispenser Arms into the brackets on the Lid.
How to Detach the Auto Add Dispenser
① Push the Attachment Bracket in the direction of the arrow.
② While holding the Attachment Bracket, lift the Auto Add Dispenser a little and then slide it upward.

● The Auto Add Dispenser will be hot right after baking is completed. Make sure that the Auto Add Dispenser has cooled down before detaching it.
How to Open the Dispenser Cover
To Add Ingredients
Press the Cover Knob to open the Dispenser Cover.
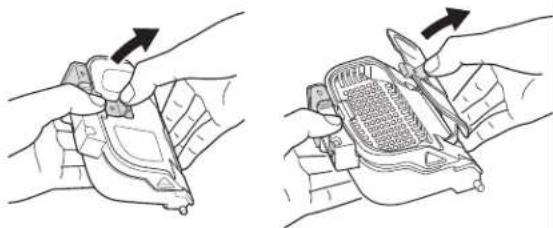
- Open the Dispenser Cover by pressing the Cover Knob, except when cleaning.
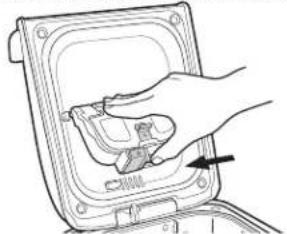
How to Attach the Auto Add Dispenser
① Install the Dispenser Arms on the left and right sides of the Auto Add Dispenser into the brackets on the Lid.

② Press the bottom of the Auto Add Dispenser in the direction of the arrow until it clicks.
To Clean
Push the right side of the Lock to open the Dispenser Cover and Cover Frame.
- Please keep in mind that it springs open with some force.

- If the Auto Add Dispenser contains any ingredients, make sure not to press the Lock. If you press the Lock, the Cover Frame will open and the ingredients will fall out of the Auto Add Dispenser.
- When attaching the Auto Add Dispenser, do not apply excessive force to the Lid.
HOW TO SET THE CLOCK
1 Insert the Power Plug into an electrical outlet.
The current time appears on the Display.
●The clock displays time in a 24-hour format. There may be slight variations in the time display, depending on different room temperature and other factors.
2 Press the TIME SETTING button (▲▼) to set the current time on the Display.
The time display will start to blink.
e.g.: If the current time is 15:01 but displays 14:58.
▲ button: Each press advances the time in 1-minute increments.
▼ button: Each press moves the clock in reverse by 1 minute.
● Press and hold either button to quickly adjust in 10-minute increments.
3 The time display will stop blinking after 3 seconds, indicating the Time Setting is completed.

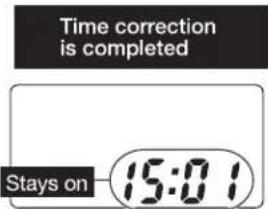
- If the display shows a blinking "7:00" when the Power Plug is inserted, the built-in lithium battery has run out. You may continue using the product and readjust the time each time the Power Plug is plugged in. (To replace the battery → P. 41)
ALERT TONES AND HOW TO CHANGE THEM
●This product has a melody signal feature. This feature uses melodies to notify the start of operation, completion of the timer setting, and completion of operation.
Types of Alert Tones
- Select the alert tones from the following.
| When\Type | MelodyDefault alert tone. This setting is the default at the time of purchase. | Beep | Silent *2 |
| When the operation starts | Oh! Susanna | Short single beep | |
| When the timer is set | Oh! Susanna | Short single beep | |
| When extra ingredients are to be added | Short double beeps x 10 *1 | No alert sound | |
| When the dough is ready to be shaped by hand (HOMEMADE course) | Short single beeps x 10 | No alert sound | |
| When the operation completes | On the Bridge of Avignon | Long beep x 5 | No alert sound |
★1: No alert sound when the timer is set.
★2: Silent is useful to mute the alert tone for adding extra ingredients, shaping the dough by hand, and when a course completes. However, a beep will sound to notify when a button is pressed.
To Change:
① Insert the Power Plug into an electrical outlet.
②Hold the TIMER button for more than 3 seconds.
③When the setting completion tone for the newly selected alert tone is played, the setting is complete.
Setting Completion Tones:
● The alert tone cannot be changed during operation.
- If unable to change the alert tone, retry from step ①.
●Every time the TIMER button is pressed and held for more than 3 seconds, the alert tone will change.
![graph LR A[""Melody\n" Oh! Susanna" is played when the setting is completed."] --> B["Beep\nThree long beeps are heard when the setting is completed."] B --> C["Silent\nOne long beep is heard when the setting is completed."] C --> A](/content/2026/06/1337004/images/d9009378aee8cb1946de73fb11285bb29e538597751a8d1a65df856d353cbcef.jpg)
●The alert tone you select is stored in memory even after the product is unplugged.
TOOLS AND UTENSILS TO USE


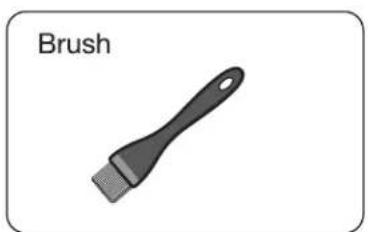
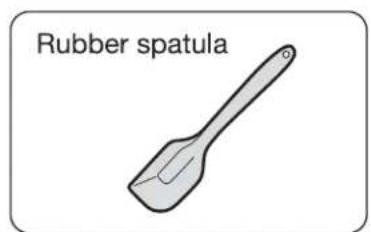


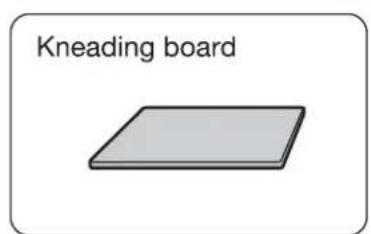


When Making and Baking Dough
Sprinkling Flour
Sprinkle a small amount of bread flour on the kneading board, rolling pin, and dough so that dough can be divided and shaped more easily. (If the dough is sticky, use slightly more flour.)
Oven
The approximate baking temperature is supplied in each shaped bread recipe. Adjust the temperature in accordance with the operating instructions of your oven. (There may be differences in the baked bread depending on the oven.)
INGREDIENTS TO USE
 | Dry yeast feeds on sugar and ferments it, thus causing dough to rise. Dry yeast (simply dried granules of yeast) is made of tiny plants that change food (especially gluten and sugar) into bubbles of carbon dioxide. As these bubbles expand, the bread rises. Dry yeast should be kept in the refrigerator. Please be sure that fresh yeast is used. Using old yeast is not recommended and may adversely affect the outcome of your bread. |  | Cake flour contains less protein than all purpose flour, and is ideal for cake recipes. When used, it yields a soft, fine and even crumb. |
 | Vital wheat gluten is a powdered additive useful for improving the elasticity of flours low in protein, such as whole wheat flour. If excluded (in recipes that call for it), the bread may not rise as well, may have poorer crumb or have a less chewy texture. | ||
| Bread flour is a type of wheat flour made from hard wheat that includes all of the gluten from the grain. Since bread flour has a higher gluten and protein content than all purpose flour, it is well-suited for use in yeast breads. Gluten gives structure and height to the loaf, thus bread flour rises better than other flours. It produces a higher loaf and bread that has a coarser texture. |  | Sugar is important for the color and flavor of breads, and for feeding the yeast. Recipes that call for sugar require granulated sugar. Do not substitute with powdered sugar, brown sugar or other sweeteners unless indicated. | |
| Gluten is an elastic protein found mainly in wheat flour (all wheat flour contains some gluten). Gluten is an important element in all yeast breads, as it gives bread its structure or framework. Flours with a high gluten content make the best bread flours. |  | Salt adds flavor and stabilizes the gluten in the dough. It also controls the growth of yeast. | |
 | Butter makes breads soft and glossy. Measure and cut into small pieces. The recipes in this manual were developed using unsalted butter. Salted butter and margarine may be used, but we recommend the use of unsalted butter. | ||
| Gluten free flour can be milled from a variety of products that lack gluten, such as brown rice. Without gluten, additives like the binding agent xanthan gum are useful for creating elasticity in gluten free doughs, and providing structure for the baked bread. |  | Dairy (milk, dry milk, etc.) adds texture and flavor, and helps keep breads softer. You may substitute milk or buttermilk for dry milk, but the loaf may come out shorter and the crust may be darker than dry milk breads. The Timer cannot be used if milk or buttermilk is substituted for dry milk. | |
| Whole wheat flour is ground from the entire wheat kernel and is heavier and richer in nutrients. | |||
| All purpose flour is a blend of refined wheat flour especially suitable for making tortillas. |  | Eggs add richness and velvety texture to bread dough. Use large-size eggs in these recipes. |
TIPS
Measure ingredients using a kitchen scale.
● A kitchen scale measures ingredients accurately for better baking results.
- We recommend using a digital scale (that measures in 0.1g increments).

Follow the recipes in the supplied Recipe Book as much as possible. Results may not be satisfactory if you deviate from the prescribed ingredients and their amount.
If you do not have a kitchen scale:
For measuring liquids (such as water):
Use the supplied Liquid Measuring Cup.

(Supplied Liquid Measuring Cup)
For measuring dry ingredients (such as flour):
Use a nested measuring cup. (1 cup = 240mL)

(Nested measuring cups are not supplied)
Do not measure dry ingredients using the supplied Liquid Measuring Cup.

Do not measure dry ingredients using measuring cups with lines.

For measuring small amounts:
Use the supplied Measuring Spoon. (Can be used for both liquids and dry ingredients.)

(Supplied Measuring Spoon)
Ingredients That CAN Be Placed in the Auto Add Dispenser (Auto Add Function)
For further information on the function for automatic dispensing of ingredients, please refer to P. 22.
●Ingredients that are dry and do not melt easily.
| Ingredients | Preparation | Notes | Maximum Amount (Make sure to limit.) |
| Dried fruitRaisins, prunes, etc. | Dice into 3/8 " (approx. 1cm) cubes | ●When the room temperature is high or the timer is being used, sugar-coated dried fruit may not dispense automatically because the sugar has melted. ●Remove seeds from dried fruit before putting them into the Auto Add Dispenser.(Not doing so may cause malfunction.) | 70g |
| NutsWalnuts, cashew nuts, etc. | Cut into 1/4 " (approx. 6mm) pieces | ●Large, hard nuts may damage the nonstick coating of the Baking Pan or Kneading Blade. | 60g |
| SeedsSunflower seeds, etc. | Use seeds that are smaller than 3/8 " (approx. 1cm) pieces | ●Large, hard seeds may damage the nonstick coating of the Baking Pan or Kneading Blade. | 20g |
Ingredients That CANNOT Be Put in the Auto Add Dispenser (Ingredients to Be Added Manually)
● Moist and sticky ingredients (fresh fruits, alcohol-soaked fruits, etc.)
● Ingredients that melt easily (cheese, chocolate, etc.)
● Small ingredients (sesame seeds, etc. → Place small ingredients in the Baking Pan with the flour.)
■ Make sure to observe the maximum capacity and size of ingredients that go into the Baking Pan and Auto Add Dispenser. If exceeded, the ingredients may overflow out of the Baking Pan, causing them to be burned by the heater and produce a burning odor or smoke.
■ Large, hard ingredients may damage the nonstick coating of the Baking Pan or Kneading Blade.
A portion of the ingredients may be stuck in the Auto Add Dispenser and not dispensed properly to the dough depending on the type of ingredients and the temperature and humidity conditions. (To enable proper dispensing of ingredients, sprinkle flour to evenly coat all surfaces of the ingredients before putting them into the Auto Add Dispenser. Do not add flour other than the small amounts sprinkled over ingredients in the Auto Add Dispenser.)
When measuring dry ingredients in a nested measuring cup (not supplied):
① Loosely fill the measuring cup
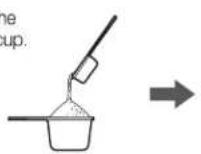
② Level off with the back of a knife, etc.

Do not tap.

Do not shake.

Do not scoop directly with the measuring cup.

When using the supplied Measuring Spoon:
① Scoop a heaping spoonful.


② Level off with the back of a knife, etc.

COURSE LIST
● The "Time Required" does not include keeping the bread warm after baking has completed.
- The time indicated in parentheses for the "Time Required" column indicates the time required when DARK is selected for the crust color.
| Course | Course No. | Available Functions | ||||
| Auto Add Dispenser | Crust Control | Timer | ||||
| BREAD | WHITE | 1 | ● | ● | ● | |
| EUROPEAN | 2 | ● | — | ● | ||
| QUICK WHITE | 3 | ● | ● | — | ||
| WHOLE WHEAT | 4 | ● | — | ● | ||
| QUICK WHOLE WHEAT | 5 | ● | — | — | ||
| MULTIGRAIN | 6 | ● | ● | ● | ||
| GLUTEN FREE | 7 | ● | ● | — | ||
| SALT FREE | 8 | ● | ● | ● | ||
| SUGAR FREE | 9 | ● | — | ● | ||
| VEGAN | 10 | ● | ● | — | ||
| DOUGH | BREAD/PIZZA | 11 | ● | — | — | |
| PASTA | 12 | — | — | — | ||
| OTHER | CAKE | 13 | ● | ● | — | |
| JAM | 14 | — | — | — | ||
| HOMEMADE | 15 | ● | — | ●(When the SHAPE cycle is set to "OFF") | ||
COURSE LIST (cont.)
| Course Overview | Time Required | Keep Warm | |
 | 3:35(3:45) | 1:00 | |
 | 3:00 | 1:00 | |
 | 2:20(2:30) | 1:00 | |
 | 3:35 | 1:00 | |
 | 2:20 | 1:00 | |
 | 3:25(3:35) | 1:00 | |
 | 2:30(2:40) | 1:00 | |
 | 3:15(3:25) | 1:00 | |
 | 4:25 | 1:00 | |
 | 3:45(3:55) | 1:00 | |
 | 2:05 | — | |
 | 0:40 | — | |
 | *1 When the add beep sounds for adding extra ingredients, scrape down the flour and add the extra ingredients, then press the START button to re-start.*2 The "Time Required" does not include the time needed to scrape down flour from the sides of the Baking Pan into the dough. | 1:38*(1:48) | — |
 | 1:20 | — | |
| ●Allows you to customize the knead, rise and bake time.●3 Homemade Memory settings (1, 2, 3).●Refer to P. 30. | |||
- Allows you to customize the knead, rise and bake time.
●3 Homemade Memory settings (1, 2, 3).
●Refer to P. 30.
Learn how to bake a Basic White Bread using the WHITE course as an example.
Basic White Bread
| Ingredients | ||
| 180g (Approx. 180mL) | 3/4 cup | Water |
| 260g | 2 cups | Bread Flour |
| 18g | 1-1/2 Tbsp. | Sugar |
| 6g | 1-1/2 Tbsp. | Dry Milk |
| 5g | 1 tsp. | Salt |
| 14g | 1 Tbsp. | Unsalted Butter |
| 3g | 1 tsp. | Active Dry Yeast |
- "1 Tbsp." means 1 tablespoon of an ingredient filled to the brim of the supplied Measuring Spoon (L) and then leveled off. "1 tsp." means 1 teaspoon of an ingredient filled to the brim of the supplied Measuring Spoon (S) and then leveled off.
● The instructions on how to bake other types of basic bread and bread with extra ingredients are provided in the Recipe Book (separate volume).
How to Prepare
1
Remove the Baking Pan from the Main Body and attach the Kneading Blade to the Rotating Shaft in the Baking Pan.
(→ P. 10)
- Match the shape of the Kneading Blade's hole with that of the Rotating Shaft, and then securely attach the blade. If attached loosely, the Kneading Blade will not knead properly.

2
Add the ingredients to the Baking Pan.
① First add water (liquids).
- Add liquid ingredients such as water.
Add the ingredients in the order listed.

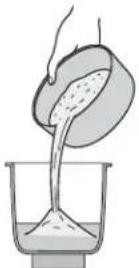
② Next, add bread flour, sugar, dry milk, salt and butter.
- Add all ingredients other than water (liquids) and dry yeast. - Make sure to measure the ingredients precisely and add them to the Baking Pan piled up in the center.
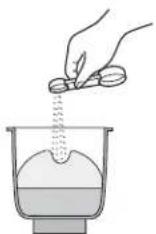
③ Add the dry yeast last.
- Make a depression in the middle of the flour and sprinkle the yeast in it so that the yeast does not come into contact with water or any liquid. If the dry yeast comes in contact with water (liquids), the bread may not bake as intended.
HOW TO MAKE BASIC BREAD (cont.)
3
Set the Baking Pan into the Main Body and close the Lid. ( → P. 10)
● Fold down the Baking Pan Handle.
● To use the auto add function ( → P. 22).
- If you are not using the auto add function, do not attach the Auto Add Dispenser to the Lid.

4
Insert the Power Plug into an electrical outlet.

5
Press the | COURSE button and select Course 1 (WHITE course).
Each press of ▲ or ▼ changes the course number, and the course number and its completion time will be displayed.
![▲ [1→2→3···15(Memory 2)→15(Memory 3)] ▼ [1→15(Memory 3)→15(Memory 2)···3→2]](/content/2026/06/1337004/images/5b9f4ecbf70ba2f6d2a6df5cb3f1f03e613948f758da4a898192d61ab95c5486.jpg)
●The course used last is stored in memory even after the product is unplugged.
![COURSE Blinks COMPLETE TIME [CRUST CONTROL] MEDIUM 16:00 The completion time is displayed.](/content/2026/06/1337004/images/2e7aabc52a05e5222e38ddcf263eb4d8c22f5a438335ef84672543c8d29b0ae8.jpg)
To change the crust color
Press the

button (→P. 21)
6
Press the START button.
The START light turns on, the start melody sounds, and the course starts.
- Close the Lid completely. If the Lid is open, "LID" blinks on the Display and operation is interrupted. If the Lid is left open for a long period to add ingredients or for other reasons, the completion time may be delayed.
● During BAKE, the Main Body and Lid will become extremely hot. Be careful not to burn yourself.

The remaining time until completion is displayed, counting down in 1-minute increments beginning 30 minutes before completion time.
To cancel during operation
Press and hold the CANCEL button for more than 1 second. (The current time appears on the Display.)
● After the course starts, beeps will sound to let you know when to add extra ingredients. (→ P. 22)
7
When the completion melody sounds, press and hold the CANCEL button for more than 1 second to end the operation.
![graph TD A["Start"] --> B{CANCEL} B -->|Press and hold for more than 1 second.| C["START light will turn off, and the current time appears on the Display."] C --> D["16:00 Display Time is displayed."] D --> E["Turns off"] E --> F["START"] G["Turns on"] --> H["COURSE"] I["Blinks"] --> J["KEEP WARM"]…](/content/2026/06/1337004/images/686989048afd5d96954118c73c35f428a75e43933f0e8ed14333e27021a06654.jpg)
- If the CANCEL button is not pressed, the product automatically keeps the bread warm for 1 hour. If the bread is not removed immediately after it completes baking, the sides of the bread may collapse or the crust may become thick or dark. To prevent this, press the CANCEL button as quickly as possible and remove the bread from the Baking Pan immediately after baking completes. ("COMPLETE" will turn on and "KEEP WARM" will blink on the Display while the bread is being kept warm after baking has completed.)
- When the keep warm period (1 hour) has elapsed, "KEEP WARM" will turn off and only "COMPLETE" will be displayed. Press and hold the CANCEL button for more than 1 second until the current time appears on the Display.
8
Open the Lid and remove the bread.
① Remove the Baking Pan from the Main Body.
● Be sure to wear oven mitts, etc. when removing the Baking Pan.

② Secure the Baking Pan Handle as shown in the illustration and shake a few times to remove the bread.

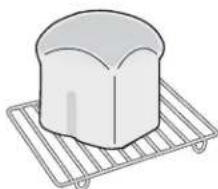
③ Place the bread on a cooling rack or something similar to cool and release moisture from the bottom of the bread.
- Depending on the baking conditions, it may be difficult to remove the bread from the Baking Pan. In this case, rotate the Coupling Wing Nut under the Baking Pan slightly in both directions as shown in the illustration. (Do not rotate the Coupling Wing Nut excessively. Doing so can create a large hole in the bottom of the bread.)
- Do not use rigid utensils such as knives, forks, or chopsticks to remove the bread from the Baking Pan, or the nonstick coating may be damaged.
- When removing the bread, the Kneading Blade may be stuck in the bread and come out of the Baking Pan with the bread. Check if the Kneading Blade is in the Baking Pan. If the Kneading Blade is stuck in the bread, use chopsticks or a plastic or rubber utensil to extract it. (Be careful not to burn yourself as the Kneading Blade may still be hot.)
Be careful not to burn yourself since the Baking Pan may be hot.

9
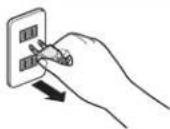
After use, unplug the Power Plug from the electrical outlet.
After selecting a course, adjust your settings before pressing the START button.
CRUST CONTROL
To change the crust color of the bread
Press the

button.
Each press of the CRUST CONTROL button switches the indicator between "MEDIUM" and "DARK" on the Display.
●The default crust color is "MEDIUM".

■ Courses for which the crust color can be changed to "DARK":
| BREAD | WHITE, QUICK WHITE, MULTIGRAIN, GLUTEN FREE, SALT FREE, VEGAN |
| OTHER | CAKE |
●The crust color cannot be changed for EUROPEAN, WHOLE WHEAT, QUICK WHOLE WHEAT and SUGAR FREE courses.
ADD INGREDIENTS
Adding extra ingredients during the KNEAD cycle, such as dried fruit or nuts.
Adding Ingredients Automatically
Auto Add Function
No need to wait for the add beep to add extra ingredients to the dough manually. Simply place the extra ingredients in the Auto Add Dispenser before starting the course. The ingredients are dispensed automatically during the KNEAD cycle.
The Auto Add Dispenser is detachable, making filling easy and allowing the entire dispenser to be washed.
Attach the Auto Add Dispenser before pressing the START button.
1 Place extra ingredients into the Auto Add Dispenser.
Press the Cover Knob to open the Dispenser Cover and fill with extra ingredients.
● Filling the Auto Add Dispenser with too much extra ingredients may prevent the ingredients from being dispensed properly to the dough and may burn.
● After filling with extra ingredients, close the Dispenser Cover.
● For the type of ingredients and the maximum amount that can be placed into the Auto Add Dispenser, refer to P. 15.
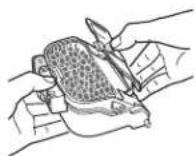
2 Attach the loaded Auto Add Dispenser to the Lid, then close the Lid.
- Securely attach the Auto Add Dispenser. (→P. 11)


When it is time to add the extra ingredients, the Auto Add Dispenser opens automatically and the ingredients are dispensed to the dough.
Adding Extra Ingredients Manually
1 During the KNEAD cycle, the product will beep to alert you to add extra ingredients, and "ADD" will blink on the Display. Open the Lid and add the extra ingredients to the dough.
● While the Lid is open, the dough kneading (Kneading Blade) will stop and "LID" will blink on the Display.

2 Close the Lid.
● "LID" on the Display will turn off and the dough kneading (Kneading Blade) will restart.
SETTING THE TIMER
Use the timer function to complete baking at a certain time.
The timer function is convenient for having freshly baked bread at a certain time, such as for breakfast.
● The timer function allows you to set the completion time up to 13 hours in the future.
- Do not use the timer function if the recipe includes ingredients that can spoil such as milk, fresh cream, juice, vegetables, and eggs.
●The add beep will not sound when the timer function is set.
● To see the current time when the timer function is set, press the TIME SETTING button ( ▲ or ▼ ).
1 Prepare the ingredients and select the desired course and crust color.
■Courses for which the timer function can be set:
| BREAD | WHITE, EUROPEAN, WHOLE WHEAT,MULTIGRAIN, SALT FREE, SUGAR FREE |
| To change the crust color | |
| Press the CRUST CONTROL button (→P. 21) |
2 Press the ○TIMER button.
The minimum required time for completion and the START light will blink.
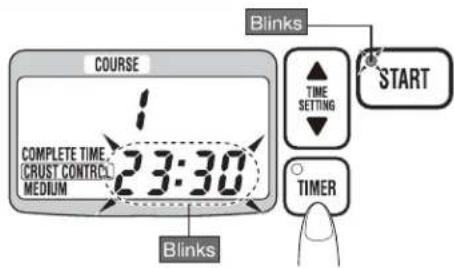
3 Press the TIME SETTING button (▲or▼) to set the time at which you want baking to be completed.
▲ button: Each press advances the time in 10-minute increments.
▼ button: Each press moves the clock in reverse by 10 minutes.
- Press and hold either button to quickly adjust in 10-minute increments.

4 Press the ° START button.
The TIMER light turns on, the START light turns off, and a melody sounds.
The course completion time appears on the Display.
● Make sure to press the START button. Otherwise, the timer function will not be activated.
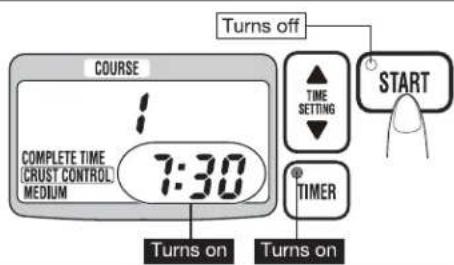
To cancel the timer function
Press and hold the CANCEL button for more than 1 second. (The TIMER light turns off and the current time appears on the Display.)
Learn how to make dough.
How to Prepare
- The timer function is not available for the BREAD/PIZZA DOUGH and PASTA DOUGH courses. - The ingredient amounts required for making dough are provided in the Recipe Book (separate volume).
For steps 1 - 6, please refer to "HOW TO MAKE BASIC BREAD" (P. 18-19).
- In step 2, when adding ingredients, make sure to add the ingredients in the order listed, as some recipes require the flour to be added first.
- In step 5, press the COURSE button (▲ or ▼) and then select Course 11 (BREAD/PIZZA DOUGH course) or 12 (PASTA DOUGH course).
● Dough completion time appears on the Display.
To cancel during operation
Press and hold the CANCEL button for more than 1 second. (The current time appears on the Display.)

7
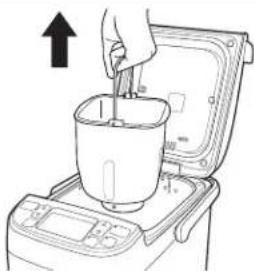
When the completion melody sounds, press and hold the CANCEL button for more than 1 second, open the Lid and remove the Baking Pan.
The current time appears on the Display.
8
Remove the dough from the Baking Pan.
① Prepare a lightly floured kneading board.
② Gather the dough in the center of the Baking Pan, then remove it and place it on the kneading board.
- Remove the dough carefully by placing your hand beneath it and gently lifting it out of the Baking Pan.
- If the Kneading Blade comes out along with the dough, remove the Kneading Blade.

9
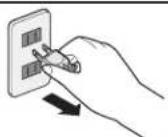
After use, unplug the Power Plug from the electrical outlet.
10
Use the prepared dough to make bread, pizza, pasta, etc., as you like.
● Shape the bread dough as you like and let it rise and bake.
● Shape the pizza or pasta dough into the desired shape and cook.
Learn how to bake a cake using the Pound Cake as an example.
Pound Cake
| Ingredients | ||
| 114g | 4 oz. | Unsalted Butter (Dice into 1/4" [approx. 6mm] cubes.) |
| 100g | 2 | Large Eggs (beaten) |
| 42g (Approx. 42mL) | 3 Tbsp. | Milk |
| 4.5g (Approx. 4.5mL) | 1 tsp | Vanilla Extract |
| 103g | 1/2 cup | Sugar |
| 195g | 1-1/2 cups | Cake Flour |
| 6g | 2 tsp. | Baking Powder |
●Sift ingredients from Ⓐ together.
● Make sure to add the ingredients in the order listed.
- "1 Tbsp." means 1 tablespoon of an ingredient filled to the brim of the supplied Measuring Spoon (L) and then leveled off. "1 tsp." means 1 teaspoon of an ingredient filled to the brim of the supplied Measuring Spoon (S) and then leveled off.
How to Prepare
●The timer function is not available for the CAKE course.
1
Remove the Baking Pan from the Main Body and attach the Kneading Blade to the Baking Pan.
(→P. 10)
- Match the shape of the Kneading Blade's hole with that of the Rotating Shaft, and then securely attach the blade. If attached loosely, the Kneading Blade will not mix the cake ingredients properly.

2
Cut the unsalted butter (softened to room temperature) into 1/4" (approx. 6mm) cubes and add.

3
Add the eggs, milk, and vanilla extract.
![graph TD A["Eggs"] --> B["Box with milk carton"] C["Milk"] --> B B --> D["Vanilla extract"] D --> E["Box with Vanilla extract"]](/content/2026/06/1337004/images/d894f1a4a154bf71d75a68191000500371db80d0bfe3baec1a835c7ef7ad9f42.jpg)
4
Add sugar and the sifted ingredients from Ⓐ.

HOW TO MAKE CAKES (cont.)
5
Set the Baking Pan in the Main Body and close the Lid. (→P. 10)
●Fold down the Baking Pan Handle.

6
Insert the Power Plug into an electrical outlet.

7
Press the

button and then select Course 13
(CAKE course).
● The completion time does not appear on the Display.

8
Select the crust color.
Each press of the CRUST CONTROL button switches the indicator between "MEDIUM" and "DARK" on the Display.
●The default crust color is "MEDIUM". For a darker crust color, press the CRUST CONTROL button to select "DARK".

9
Press the
START
button.
The START light turns on, the start melody sounds and the course starts.
● The remaining time until the add beep sounds for adding extra ingredients (13 minutes) will blink on the Display.
- Close the Lid completely. If the Lid is open, "LID" blinks on the Display and operation is interrupted. If the Lid is left open for a long period to add ingredients or for other reasons, the completion time may be delayed.
- When the add beep sounds 13 minutes after pressing the START button, scrape down the flour that is stuck on the sides of the Baking Pan. (→ P. 27)

10
When the add beep sounds for adding extra ingredients, open the Lid and scrape down the flour.
13 minutes after pressing the START button, the add beep sounds for adding extra ingredients, the START light will blink and "ADD" and "SHAPE" will blink on the Display.
① Open the Lid.
② Thoroughly scrape down the flour and other ingredients from the sides of the Baking Pan to the bottom using a rubber spatula or other utensil.
③ Close the Lid.
- Do not use rigid utensils such as metal spatulas or knives. (Using rigid utensils may damage the nonstick coating of the Baking Pan.)
● Before adding extra ingredients, make sure to scrape down the flour on the sides of the Baking Pan.
● Make sure to thoroughly scrape down the flour, so that the sides of the baked cake will have a smooth finish.

11
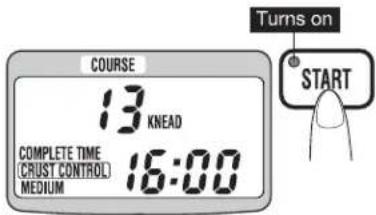
After scraping down the flour and adding extra ingredients, press the START button to resume kneading.
The START light turns on.
The completion time appears on the Display.
- If the START button is not pressed, the product automatically resumes operation after 20 minutes.
● The remaining time until completion is displayed, counting down in 1-minute increments beginning 30 minutes before completion time.
● During BAKE, the Main Body and Lid will become extremely hot. Be careful not to burn yourself.
To cancel during operation
Press and hold the CANCEL button for more than 1 second. (The current time appears on the Display.)
12
When the completion melody sounds, press and hold the CANCEL button for more than 1 second, open the Lid and remove the Baking Pan.
The current time appears on the Display.
- Be sure to wear oven mitts, etc. when removing the Baking Pan.
13
Remove the cake from the Baking Pan.
● Carefully remove the cake from the Baking Pan. If shaken forcefully, the cake may break or crumble.
● Place the cake on a cooling rack or something similar to cool and release moisture from the bottom.
14
After use, unplug the Power Plug from the electrical outlet.

Learn how to make jam using Strawberry Jam as an example.
Strawberry Jam
| Ingredients | ||
| 300g | 3 cups | Strawberries ※ (net weight) |
| 103g | 1/2 cup | Sugar |
| 14g (Approx. 14 mL) | 1 Tbsp. | Lemon juice |
- "1 Tbsp." means 1 tablespoon of an ingredient filled to the brim of the supplied Measuring Spoon (L) and then leveled off.
※ Remove the stem, quarter or halve the strawberries, then lightly mash before adding to the Baking Pan.
How to Prepare
● The timer function is not available for the JAM course.
1
Remove the Baking Pan from the Main Body and attach the Kneading Blade to the Baking Pan.
(→ P. 10)
- Match the shape of the Kneading Blade's hole with that of the Rotating Shaft, and then securely attach the blade. If attached loosely, the Kneading Blade will not mix the jam ingredients properly.
2
Add ingredients.
● Make sure to add the ingredients in the order listed.
3
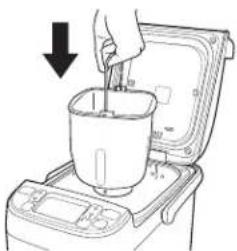
Set the Baking Pan in the Main Body and close the Lid. (→ P. 10)
● Fold down the Baking Pan Handle.
4
Insert the Power Plug into an electrical outlet.

5
Press the

button and then select Course 14
(JAM course).
● The completion time appears on the Display.

HOW TO MAKE JAM (cont.)
6
Press the

button.
The START light turns on, the start melody sounds and the course starts.
- Close the Lid completely. If the Lid is open, "LID" blinks on the Display and operation is interrupted. If you leave the Lid open for a long period, the completion time may be delayed.

The remaining time until completion is displayed, counting down in 1-minute increments beginning 30 minutes before completion time.
To cancel during operation
Press and hold the CANCEL button for more than 1 second. (The current time appears on the Display.)
7
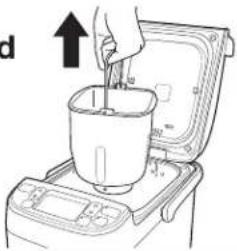
When the completion melody sounds, press and hold the CANCEL button for more than 1 second, open the Lid and remove the Baking Pan.
The current time appears on the Display.
- Be sure to wear oven mitts, etc. when removing the Baking Pan.

8
Remove the jam from the Baking Pan.
● Carefully remove the jam from the Baking Pan using a rubber spatula or another plastic or rubber utensil.
9
After use, unplug the Power Plug from the electrical outlet.

TIPS
●After washing the fruit, wipe off all excess moisture.
●To store: Place in a clean container and store in the refrigerator. Consume within one week.
●The finished jam may be softer than the jam found in stores. For a thicker jam, add about 3g of pectin with the other ingredients.
What is pectin?
Pectin is a type of sugar contained in fruits that jells the jam (adds thickness).
OVERVIEW OF THE HOMEMADE COURSE
HOMEMADE course
- Allows you to customize the knead, rise and bake time.
●3 Homemade Memory settings (1, 2, 3).
Programming the HOMEMADE course
● The values indicated within brackets are the programmable range for each cycle.
● The cycle set to 0:00 or OFF is skipped and the next cycle is performed automatically.
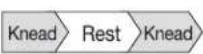
KNEAD 1
Kneads the dough. [0:00-0:15]

REST
Lets the dough rest. [0:00-0:20]
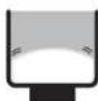
KNEAD 2
Kneads the dough for a second time. [0:00 or 0:05-0:15]
Add Ingredients
5 minutes before completion of the KNEAD ② cycle, the add beep sounds, and the product automatically dispenses extra ingredients.

SHAPE\*
Remove the dough and shape it by hand. [OFF or 1:00]

RISE
The activity of the yeast is enhanced by maintaining the dough at a fixed temperature.
[RISE 123 0:00-2:00 each]
Punch Down

Purges gas trapped in the dough during RISE. ●This step is performed at the beginning of the RISE ② and ③ cycles. (The Kneading Blade rotates several times.)


BAKE
Bakes to finish the bread. [0:00-1:10]

KEEP WARM
Keeps the finished bread warm for 1 hour.

\*SHAPE
When the SHAPE cycle is turned on, the bread-making operation is temporarily interrupted after kneading has completed, allowing you to remove the dough from the Baking Pan and shape it before rising.
When shaping is completed, return the dough to the Baking Pan, and press the START button again. The remaining cycles (RISE to BAKE) already programmed are performed automatically.
This unique cycle allows you to get creative and impart a genuine handmade quality to your bread. (Refer to the Recipe Book [separate volume].)

● To shape the dough by hand, set SHAPE cycle to "1:00".
1:00
SHAPE cycle ON
OFF
SHAPE cycle OFF
The product will automatically resume operation after 1 hour.
- If you are not going to shape the dough by hand, set the SHAPE cycle to "OFF".
Learn the basics of using the HOMEMADE course.
BASICS OF USING THE HOMEMADE COURSE
Using the HOMEMADE Course for the First Time (Setting the Cycle Times)
First, learn how to bake a Basic White Bread by recreating the WHITE course by programming the cycle times.
Recreating cycle times for a Basic White Bread for WHITE course
| KNEAD1 | REST | KNEAD2 | SHAPE | RISE1 | RISE2 | RISE3 | BAKE | TOTAL |
| 0:12 | 0:10 | 0:10 | OFF | 1:08 | 0:30 | 0:40 | 0:45 | 3:35 |
1
Prepare ingredients.
Refer to steps 1-4 of "HOW TO MAKE BASIC BREAD" (P. 18-19).
2
Press the

button and select Course 15
(HOMEMADE course, MEMORY 1).


1→…15(MEMORY 1)→15(MEMORY 2)→15(MEMORY 3)

1→15(MEMORY 3)→15(MEMORY 2)→15(MEMORY 1)……
The total course time of "0:00", which is the default at the time of purchase, appears on the Display and the CYCLE light turns on.
● The HOMEMADE course has 3 programmable memories. You can program cycle times in these memories by selecting HOMEMADE course MEMORY 2 or MEMORY 3.
To cancel the setting:
Press the CANCEL button. (The current time appears on the Display.)
3
Set the time (0:12) for "KNEAD ①".
① Press the CYCLE button. The "KNEAD 1" time setting appears.
② Press the TIME SETTING button (▲ or ▼) to change the time to "0:12".
![MEMORY 1 15 HOMEMADE KNEAD [1] 0:12 Blinks](/content/2026/06/1337004/images/f716a627aedcbebf1453463ddfbd8e847de90aafbbbac4eca298b1aba9b690fc.jpg)
4
Set the time (0:10) for "REST".
① Press the CYCLE button. The "REST" time setting appears.
② Press the TIME SETTING button (▲or▼) to change the time to "0:10".

5
Set the time (0:10) for "KNEAD ②".
① Press the CYCLE button. The "KNEAD 2" time setting appears.
② Press the TIME SETTING button (▲ or ▼) to change the time to "0:10".

BASICS OF USING THE HOMEMADE COURSE
(cont.)
6
Set the "SHAPE" cycle to "OFF".
① Press the CYCLE button. The SHAPE time setting appears.
② Press the TIME SETTING button (▲ or ▼) to set the SHAPE cycle to "OFF".
● The default setting of the SHAPE cycle is "OFF".
● The SHAPE cycle can be set to "1:00" or "OFF".

7
Set the time (1:08) for "RISE ①".
① Press the CYCLE button. The "RISE 1" time setting appears.
② Press the TIME SETTING button (▲ or ▼) to change the time to "1:08".

8
Set the time (0:30) for "RISE 2".
① Press the CYCLE button. The "RISE ②" time setting appears.
② Press the TIME SETTING button (▲ or ▼) to change the time to "0:30".
![MEMORY 1 15 HOMEMADE RISE [2] 0:30 Blinks](/content/2026/06/1337004/images/4c1a14a7d2500fb6f1f2aa9bd1b2cd895702ec6ad933eb6f1b8e76db5fadc13f.jpg)
9
Set the time (0:40) for "RISE ③".
① Press the CYCLE button. The "RISE 3" time setting appears.
② Press the TIME SETTING button (▲ or ▼) to change the time to "0:40".

10
Set the time (0:45) for "BAKE".
① Press the CYCLE button. The "BAKE" time setting appears.
② Press the TIME SETTING button (▲ or ▼) to change the time to "0:45".

11
Check the total course time (3:35).
Press the CYCLE button.
The total time you have just set for the course is displayed.
If the display shows "3:35", the settings were entered correctly.
- If the display does not show "3:35", press the CYCLE button again and retry from the KNEAD ① cycle.

12
Press the | START | button.
The START light turns on, the start melody sounds and the course starts.
- When the course starts, the completion time (total course time added plus the current time) will appear on the Display. (The illustration on the right shows the completion time when the total course time is 3 hrs. and 35 min. and the course starts at 9 o'clock.)
- Close the Lid completely. If the Lid is open, "LID" blinks on the Display and operation is interrupted. If the Lid is left open for a long period to add ingredients or for other reasons, the completion time may be delayed. - During baking, the Main Body and Lid will become extremely hot. Be careful not to burn yourself.
- The remaining time until completion is displayed, counting down in 1-minute increments beginning 30 minutes before completion time. (When the total course time is less than 30 min., the remaining time is displayed in 1-minute increments from the beginning of operation.)
- For steps for what to do after baking is complete, refer to steps 7-9 of "HOW TO MAKE BASIC BREAD" (P. 20). - For steps for what to do after dough making is complete, refer to steps 7-10 of "HOW TO MAKE DOUGH" (P. 24).
![graph TD A["The completion time is displayed."] --> B["15 HOMEMADE KNEAD\nCOMPLETE TIME 12:35"] B --> C["The remaining time is displayed."] C --> D["15 HOMEMADE\nCOMPLETE IN 30 MIN"]](/content/2026/06/1337004/images/a45b6ff0389863abe8afc3837e55b9b46f47fc4fd6a9c70042f6deab16d0a664.jpg)
To cancel during operation
Press and hold the CANCEL button for more than 1 second. (The current time appears on the Display.)
To shape the dough manually using the SHAPE cycle:
For Steps 1-12, refer to "BASICS OF USING THE HOMEMADE COURSE" (P. 31-33).
- In Step 6, set the SHAPE cycle to "1:00" (SHAPE cycle on). Although the SHAPE cycle is set to "1:00", pressing the START button will allow you to move on to the next cycle even if it has been less than 1 hour.
- In Step 11, if "SHAPE" appears on the Display, the SHAPE cycle has been programmed correctly (turned on). If "SHAPE" does not appear on the Display, readjust the settings.
●The total course time does not include the time for the SHAPE cycle.
●In Step 12, the Display will show the countdown time until the SHAPE cycle.
13
Alert beeps (10 short beeps) will notify you when the course has reached the SHAPE cycle. Open the Lid, remove the Baking Pan and shape the dough.
"SHAPE" on the Display starts blinking.
- When the KNEAD ② cycle is programmed, the add beep (10 short double beeps) will sound before the SHAPE beeps. Be sure not to confuse the two.
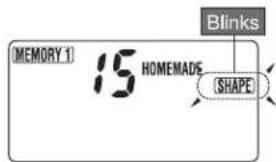
● Do not press the CANCEL button when the SHAPE alert beeps sound.
● Finish the SHAPE process within 1 hour. When the SHAPE process is finished, press the START button. (If the START button is not pressed, the product automatically resumes operation after 1 hour.)
- Close the Lid after removing the Baking Pan.
14
Place the Baking Pan into the Main Body and close the Lid.
Press the

button again.
When operation is resumed, the completion time will appear on the Display.
- For steps for what to do after baking is complete, refer to steps 7-9 of "HOW TO MAKE BASIC BREAD" (P. 20).
Setting Cycle Times for Future Use
1 Prepare ingredients.
Press the

button and select Course 15
(HOMEMADE course, MEMORY 1).
- Selecting the HOMEMADE course MEMORY 2 or MEMORY 3, will display the previously set total course time for that memory.

To bake bread using the same settings as last time
To change the settings
2 Press the START button.
2 Set the desired cycle times.
Refer to steps 3-11 of "BASICS OF USING THE HOMEMADE COURSE" (P. 31-32) to set the desired time for each cycle.
- The product stores the previously-programmed cycle times in its memory and will recall these settings when they are selected again. To change the settings, program the desired time for all cycles again. If there is a particular cycle you do not wish to reprogram the time for, press the CYCLE button to skip to the next cycle.
3 Press the START button.
Using the Timer
- You can use the timer function only when the SHAPE process is set to "OFF".
1 - 11 Prepare the ingredients and set the desired time for each cycle.

Refer to steps 1-11 of "BASICS OF USING THE HOMEMADE COURSE" (P. 31-32).
12 Press the TIMER button.
Press the TIME SETTING button (▲ or ▼) to change the time at which you want the course to be completed.
(For details on how to set the timer, refer to P. 23.)
● To cancel the timer, press the CYCLE button.
- Press the TIMER button when the total operation time is shown in the Display.
13 Press the START button.
The TIMER light will turn on and a melody will sound. The course completion time appears on the Display.
● Make sure to press the START button. Otherwise, the timer function will not be activated.
Q&A FOR HOMEMADE COURSE
Q1 What is the maximum setting time for each cycle?
A1 The range of the setting time for each cycle is indicated below.
| KNEAD1 | REST | KNEAD2 | SHAPE | RISE1 | RISE2 | RISE3 | BAKE |
| 0:00-0:15 | 0:00-0:20 | 0:00 or 0:05-0:15 | OFF or 1:00 | 0:00-2:00 | 0:00-2:00 | 0:00-2:00 | 0:00-1:10 |
For tips on making adjustments to cycle times, refer to "Guidelines for Cycle Time Adjustment" below.
●Press and hold the TIME SETTING button to advance or reverse the time in either 5- or 10-minute increments.
●The KNEAD ② cycle cannot be set between 1-4 minutes.
Q2 What will happen if I set 0:00 for a cycle?
A2 The cycle set to 0:00 or OFF is skipped and the next cycle is performed automatically.
Q3 I want to bake bread that contains extra ingredients. Can I use the auto add function?
A3 Yes. When baking bread with extra ingredients, make sure to set the KNEAD ② cycle to more than 5 minutes. (The add beep will sound 5 minutes before completion of the KNEAD ② cycle.)
Q4 Can I use the timer function?
A4 You can use the timer function only when the SHAPE cycle is set to OFF.
Q5 What is the maximum amount of dough that can be kneaded?
A5 Do not use more than 300g of flour. Doing so may cause flour and dough to spill outside the Baking Pan.
Q6 The cycle times I programmed last time were not stored in the memory. Is there something wrong with my Home Bakery?
A6 If the CANCEL button is pressed while the cycle times are being set, the settings are not stored. (The programmed settings are stored in the memory only when the course is started after programming.)
Q7 The Kneading Blade does not move during the KNEAD cycle. Is there something wrong with my Home Bakery?
A7 If the KNEAD cycle is used repeatedly, a safety mechanism will stop the motor. Allow the motor to rest for about 1 hour before restarting.
Q8 I wanted to just make dough, but the product performed all cycles including the BAKE cycle. Is there something wrong with my Home Bakery?
A8 Was time set for the BAKE cycle? The product stores the programmed HOMEMADE course memory settings you set last time for future use. When changing a setting that was previously set, double check that all cycles are set to your desired time.
Guidelines for Cycle Time Adjustment
●Changing the time for each cycle allows you to change baking results.
| Decrease the time | Cycle | Increase the time |
| When you want a shorter breadWhen bread is rising too much due to high room or water temperatures | KNEAD1-2 | When you want to increase the rise of breadWhen the room or water temperature is low and the bread does not rise well |
| When you want to knead dough continuously for a long period | REST | When you want to allow the dough to rest during the KNEADCycle |
| When you want a shorter breadWhen bread is rising too much due to high room or water temperatures | RISE1-3 | When you want to increase the rise of breadWhen the room or water temperature is low and the bread does not rise well |
| When you want bread with a lighter crust color | BAKE | When you want bread with a darker crust color |
●This table is intended only as a guideline to help you adjust the cycle times. How a loaf of bread bakes varies depending on the ingredients used and their amount, and room and water temperatures.
CLEANING AND MAINTENANCE
● Unplug the Power Plug and allow the Main Body, Baking Pan and Auto Add Dispenser to cool before cleaning.
IMPORTANT
● Clean the product after every use.
● Do not splash the product or immerse it in water. Doing so may cause an electric shock or malfunction.
● Do not use the following:
- Detergents other than mild kitchen detergent, such as thinner, benzene and bleach. Doing so may cause discoloration, cracks, degradation or corrosion.
- Polishing powder, nylon brushes, scrub brushes, anything made with metal, eraser pads, hard nylon sponges and abrasive cleaners. Doing so may cause corrosion.
- When using chemically treated cloths, do not rub too hard or leave them on the product for a long time as the surface of the product may become damaged from chemical reactions.
● Do not use a dishwasher or a dish-dryer.
Main Body and Lid
Wipe with a well-wrung soft cloth.
- Remove or wipe off breadcrumbs or any other debris remaining inside the Main Body as quickly as possible.
Baking Pan
1 Fill the Baking Pan with room temperature or warm water to soften the dough stuck to the Rotating Shaft and Kneading Blade.
- Do not leave water inside the Baking Pan for too long or immerse the Baking Pan in water. (Doing so may cause corrosion or cause the Kneading Blade to cease turning.)

Room temperature or warm water
2 Dispose of the water and remove the Kneading Blade.
- If it is difficult to remove the Kneading Blade, hold the Coupling Wing Nut under the Baking Pan and rotate the Kneading Blade in both directions. Then, rotate it fully clockwise and pull off.
3 Use a mild kitchen detergent and soft sponge.
- Do not use hard nylon sponges or brushes to clean the Baking Pan. - Do not immerse the outside bottom housing of the Baking Pan containing the Coupling Wing Nut in water. (Doing so may cause corrosion or malfunction.) Wipe the Coupling Wing Nut with a well-wrung soft cloth.

If the Kneading Blade does not come off easily, pull on the Kneading Blade while rotating it in both directions.
4 Use a soft sponge to carefully remove baked crumbs stuck to the Rotating Shaft. Make sure not to damage the seal.

Rotating Shaft Seal
Kneading Blade
Use a mild kitchen detergent and soft sponge to wash the Kneading Blade.
● Do not use hard nylon sponges or brushes to clean the Baking Pan.
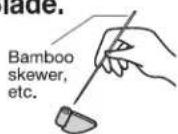
- If the hole is clogged, soak in room temperature or warm water, and remove the debris with a bamboo skewer or similar utensil.
● Be sure to attach the Kneading Blade in the Baking Pan after every cleaning so that you will not lose it.
Auto Add Dispenser, Measuring Cup and Measuring Spoon
Use a mild kitchen detergent and soft sponge.
● Completely remove water trapped in gaps in the Auto Add Dispenser and fully dry.
Nonstick Coating of the Baking Pan, Kneading Blade, and Auto Add Dispenser
To protect the nonstick coating from damage:
- Do not use rigid utensils such as metal spatulas, knives, or forks.
- Do not use abrasive cleaners, polishing powders, scrubbing brushes, hard nylon sponges, or metal brushes.
- Do not use detergents other than mild kitchen detergent, such as alkaline detergent (chlorine, etc.) or acid detergent. (Doing so may cause corrosion.)
● Be sure to clean after every use.
● Do not leave baked-on ingredients or other debris inside the Baking Pan.
REMARKS:
The nonstick coating may wear out with use.
● The nonstick coating may eventually discolor or peel off. This will not affect the product performance or sanitary properties, and is harmless to your health.
To Store the Product
● Always close the Lid. Do not place any object on the Lid.
● Dry the Baking Pan, Kneading Blade, and Auto Add Dispenser well before storing.
REPLACEMENT PARTS
● Replacement parts may be available for an additional charge. Please replace damaged parts only with new parts.
- When replacing parts, please record the model number and part name beforehand. Parts can be purchased through Zojirushi.com, by contacting Zojirushi Customer Service, or the store where you purchased the product.
Zojirushi Customer Service
1-800-733-6270 www.zojirushi.com
| Parts Names | Parts No. |
| Baking Pan | BG483815A-00 |
| Kneading Blade | BG305045G-00 |
| Auto Add Dispenser | BG483819A-01 |
| Liquid Measuring Cup | BX165086L-00 |
| Measuring Spoon | BX136085L-00 |
Q&A FOR BAKING BREAD
Baking Results
| Q1 | Why do the loaves sometimes vary in height and shape? | A1 | Bread is very sensitive. Even if you bake bread using the same ingredients and recipe, the way the bread rises and the crust color will vary slightly. Bread shape can also be affected by various factors such as room temperature, ingredient proportions, types and temperature of ingredients, and timer settings. |
| Q2 | How do the loaves vary in shape depending on the season? | A2 | If the room temperature is high, loaves may sometimes rise too much or collapse, causing a depression in the top center of the baked bread. If the room temperature is low, you may have trouble getting the bread to rise. This problem can be solved by adjusting the water temperature. (→P. 7) |
| Q3 | Why does flour occasionally stick to the side of the bread? | A3 | During the initial mixing period, small amounts of flour may sometimes stick to the sides of the Baking Pan. If this happens, scrape off that portion of the outer crust with a sharp knife. |
| Q4 | Why is the dough sometimes very sticky and difficult to work with? | A4 | Dough may sometimes be sticky (too wet) depending on the room and water temperatures. Try using colder water (approx. 41°F/5°C) when making the dough, and apply flour to the kneading surface and your hands more frequently. |
| Q5 | Why does the top of the bread sometimes look torn? | A5 | Sometimes the dough rises too much and the top of the bread can develop tears. The finished bread may not have a satisfying appearance, however, the bread will have a very soft texture. |
| Q6 | Why does my bread have a large hole on the bottom? | A6 | Your bread will have a hole in the shape of the Kneading Blade on the bottom of your baked loaf. Also, if you rotate the Kneading Blade too much when removing the bread, a large hole is made on the bottom of the baked loaf. |
Ingredients
| Q7 Can I make bread using eggs? | A7 Yes. Reduce the amount of water and replace it with eggs. Put the eggs in the Liquid Measuring Cup first and then add water in order to measure accurately. Do not use the timer function when using eggs, as they may spoil. |
| Q8 Can I make breads using substitutes for butter and dry milk? | A8 Yes. You may use the same amount of solid fats such as margarine or shortening as substitutes for butter. You may substitute dry milk with milk. If you substitute liquid milk for dry, make sure to reduce the amount of water by the amount of milk used. The crust may be darker when you use milk than when you use dry milk. Also, note that the bread may not rise properly if you use old milk from an open carton. |
Other
| Q9 | Can I use this product to make my favorite bread recipes from other cookbooks? | A9 | As much as possible, use the ingredient amounts indicated for each recipe in the Recipe Book (separate volume) supplied with this product. If you bake bread with ingredient amounts unsuitable for this product, the results may not be satisfactory. |
| Q10 | Why can't I set the timer for more than 13 hours? | A10 | Ingredients may spoil and affect the quality of the dough if left sitting for an extended period of time. |
| Q11 | Why does the bread sometimes have a strange odor? | A11 | Using too much dry yeast, flour that is not fresh, or water that smells may cause odors. Always use fresh ingredients and clean water for the best results. |
| Q12 | Can I store bread or dough in the freezer? | A12 | Refer to “Store bread and dough properly.” under “TIPS ON MAKING BREAD” on P. 7. |
| Q13 | Can I use decorative sugar, rock sugar, or low-calorie sweetener (artificial sweetener) as a substitute for sugar? | A13 | Do not use coarse sugar such as decorative sugar or rock sugar. Using these types of sugar can damage the nonstick coating of the Baking Pan or cause it to peel off. Bread made using a low-calorie sweetener (artificial sweetener) may not rise well. |
WHEN THE RESULTS ARE NOT SATISFACTORY
Baking Results
Crust color
The crust is dark.
Causes
Did you select DARK?
- Did you use too much sugar? Try reducing the amount of sugar or ingredients with sugar content. (Raisins, dried fruits, etc.)
- Did you remove the bread from the Baking Pan immediately after it was baked? If the bread is kept warm after baking is complete, the crust may darken. Be sure to remove the bread from the Baking Pan immediately after it has been baked.
- If milk or eggs are used as a substitute for water, the crust may be darker.
Sunken loaves
The sides of the loaves are sunken.
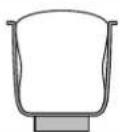
●Did you leave the bread in the Baking Pan after it was baked? Be sure to remove the bread from the Baking Pan immediately after it has been baked.
Short loaves
The entire loaf is whitish and has a ball-like shape.

- Did you forget to add dry yeast? - Did a power failure occur during operation?
The bread is covered with flour all over.

- Did you forget to attach the Kneading Blade? - Did the Kneading Blade come off during operation because it was not securely attached?
The bread does not rise sufficiently
The bread is not tall.
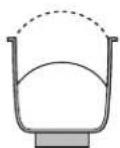
●Did you use enough water?
●Did you use enough flour?
- Did you use bread flour? Bread made with whole wheat flour or rye flour will have a denser texture and will not be as tall as bread made with bread flour.
●Was the flour you used old?
●Did you use enough dry yeast? Check the amount of dry yeast.
●Did you use dry yeast that did not require proofing?
●Was the dry yeast you used old?
●Did you use a low-calorie sweetener (artificial sweetener)?
●Was the water temperature too high? If the temperature of the water is higher than 122° F/50°C, the yeast will not ferment as much.
● Using fruits with a strong proteolytic enzyme (fig, kiwi, pineapple, etc.) produces small loaves.
●The QUICK WHITE course produces smaller loaves than the WHITE course.
●The EUROPEAN, GLUTEN FREE, SALT FREE, SUGAR FREE and VEGAN course produces smaller loaves than the WHITE course.
● The top of the bread is uneven.
● The shape of the bread is poor.

- Did you use enough water? - Did you use too much flour? (When the dough shifts to one side during kneading, the shape may be lopsided.)
WHEN THE RESULTS ARE NOT SATISFACTORY
(cont.)
Baking Results
The bread rises too much
● The bread is too tall.
● The bread has a coarse texture.
● The top of the bread is mushroom-shaped.
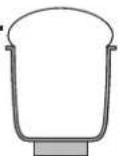
The bread has a depression on top
The outside is baked, but the bread has a large depression on top.

The top of the bread is white, too soft, and has a depression.
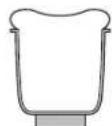
Other
●The bread is heavy.
●The bread is dense.
The surface texture of the sliced bread is not smooth.

● Did you use too much water?
● Did you use too much dry yeast?
● Was there too much dough?
● Did you leave out the salt?
● Did you use too much sugar?
● Were the ingredients warm or was the room temperature too high?
Use cold ingredients and water (approx. 41°F/5°C) chilled in the refrigerator.
● Bread can rise too much at high altitudes (more than 3,280'/1,000m).
● Did you use high gluten bread flour?
● Did you use too much water?
● Did you use bread flour?
● Did you use too much dry yeast?
● Did you use dry yeast that did not require proofing?
● Was the dry yeast you used old?
● Were the ingredients warm or was the room temperature too high?
Use cold ingredients and water (approx. 41°F/5°C) chilled in the refrigerator.
● Baking results may not be satisfactory, depending on the ingredients used. Try decreasing the amount of water by about 10mL.
● Was there too much dough?
Use the ingredient amounts indicated for each recipe in the Recipe Book (separate volume) supplied with this product.
● Did you use too much water?
● Baking results may not be satisfactory, depending on the ingredients used. Try decreasing the amount of water by about 10mL.
● Did you use enough water?
● Did you use too much flour?
● Did you use the right amount of dry yeast?
- Did you use whole wheat flour or rye flour, or add excessive amounts of dried fruits or other ingredients?
Use the ingredient amounts indicated for each recipe in the Recipe Book (separate volume) supplied with this product.
- It is difficult to slice the bread immediately after baking. Slice the bread with a bread knife after it cools.
Other
Cake and Jam Results
Cake
The cake does not rise sufficiently.
There is flour on the sides of the baked cake.
The butter is on top of the cake, unmelted.
The top of the cake was uneven.
Jam
The jam is watery.
Causes
● Did you use the right amount of the ingredients?
● Did you use baking powder?
● Did you sift the cake flour?
● Did you use too much of the extra ingredients?
● Did you scrape the flour down from the sides of the Baking Pan using a rubber spatula?
● Did you add the ingredients in the order listed?
● Did you add the ingredients in the order listed?
● Did you cut the butter into 1/4" (approx. 6mm) cubes?
● Did you soften the butter to room temperature?
● The finished jam may be softer than the jam found in stores. If you prefer thicker jam, add about 3g of pectin with the other ingredients. (→P. 29)
Causes
TROUBLESHOOTING GUIDE
| Problem | Areas to Check |
| The buttons do not operate. | ●Is the Power Plug disconnected from the electric outlet?→ Insert the Power Plug securely into the electric outlet. |
| “LID” is blinking on the Display. | ●Is the Lid open?→Close the Lid. (If the Lid is open, operation will be interrupted. If interruption is long, the course completion time may be delayed or the results may not be satisfactory.) |
| “LID” and “H:02” are blinking on the Display. | ●If you leave the Lid open for 3 hours or longer, “H:02” appears on the Display, and operation is canceled. →Press the CANCEL button to clear the error status, and start from the beginning with new ingredients. |
| The motor does not operate during the KNEAD cycle. | ●The product stops the motor to perform a temperature adjustment when the room temperature or dough temperature is low.→This is not a malfunction. |
| A beep sounds and “HOT” appears on the Display. | ●Is the temperature inside the Main Body 104°F (40°C) or higher due to continuous use?→Open the Lid and allow the inside of the Main Body to cool. |
| When I press the START button, the product does not operate (kneading does not start). | ●While “REST” is displayed, kneading is not performed as the temperature of the ingredients is being adjusted.→This is not a malfunction. |
| I cannot set the timer to a desired time. | ●Are you attempting to set the timer to a time that cannot be set?→You can set a time up to 13 hours from the current time. |
| During operation, only the current time is displayed. | ●Was the power supply discontinued for more than about 5 minutes during operation due to a power failure?→Start from the beginning with new ingredients. |
| There is a discrepancy between the displayed completion time and the actual completion time. | ●If the power supply was interrupted for less than about 5 minutes during operation due to a power failure, the actual completion time will be delayed. (The product will automatically resume operation after recovery from a power failure, although the results may not be satisfactory.)●If you open the Lid during operation, the operation will be interrupted and the completion time may be delayed. |
| The product makes noise during operation or when the timer is being used. | ●The motor makes noise while kneading and shaping the dough.●The Kneading Blade intermittently rotates when kneading begins. At that time, the product may produce a rattling sound.●When the Auto Add Dispenser opens, there is a clunking noise.→This is not abnormal. |
| The product rattles during operation. | ●Is the Baking Pan installed securely?→Attach the Baking Pan securely. |
| Smoke comes from the Steam Vent and there is a burning smell. | ●Are ingredients or breadcrumbs stuck to the Heater or elsewhere inside the product?→This is not a malfunction. Be sure to clean the product after each use. (Unplug the Power Plug and allow it to cool before cleaning.) |
| The Auto Add Dispenser is stuck. | ●Did you attach the Auto Add Dispenser correctly?→Attach the Auto Add Dispenser correctly. (→P. 11) |
| “7:00” blinks on the Display when I insert the Power Plug into an electrical outlet. | ●The built-in lithium battery has run out.→Adjust the time. You can use the product in the usual manner. Please contact Zojirushi Customer Service to have the lithium battery replaced. The lithium battery must be replaced by an authorized service personnel. (Fees will apply.) |
| The Display shows “E:01”. | ●This indicates a malfunction of the temperature sensor.→Please contact Zojirushi Customer Service. |

ZOJIRUSHI
www.zojirushi.com
FOR CALIFORNIA USA ONLY
This product contains a CR Coin Lithium Battery which contains Perchlorate Material - special handling may apply. See www.dtsc.ca.gov/hazardouswaste/perchlorate
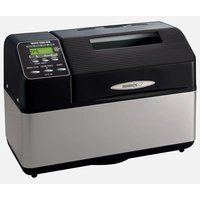


- ZQJIRUSHI
- BB-SSC10
- INDEX
- BEFORE USE
- HOW TO USE
- MAKING VARIOUS TYPES OF BREAD
- MAKING DOUGH
- MAKING SWEETS
- MAKING BREAD WITH YOUR OWN RECIPES
- TIPS ON USING THE PRODUCT
- WHEN USING ELECTRICAL APPLIANCES, BASIC SAFETY PRECAUTIONS SHOULD ALWAYS BE FOLLOWED, INCLUDING THE FOLLOWING
- SAVE THESE INSTRUCTIONS
- NOTE
- IMPORTANT SAFEGUARDS (CONT.)
- WARNING
- CAUTION
- IMPORTANT
- SPECIFICATIONS
- MAKE BREAD JUST THE WAY YOU LIKE IT
- WIDE SELECTION OF 14 COURSES
- SUPERB HOMEMADE COURSE
- COLOR RECIPE BOOK (SEPARATE VOLUME)
- VARIOUS USEFUL FUNCTIONS
- AUTO ADD DISPENSER (DETACHABLE)
- SAFETY MECHANISM
- CRUST COLOR SELECTION
- DELAY TIMER
- USE FRESH INGREDIENTS
- MEASURE INGREDIENTS ACCURATELY
- ADJUST THE WATER TEMPERATURE IN ACCORDANCE WITH SEASON OR ROOM TEMPERATURE
- REMOVE THE BREAD FROM THE BAKING PAN IMMEDIATELY AFTER BAKING COMPLETES
- STORE BREAD AND DOUGH PROPERLY
- STORING IN THE FREEZER
- BREAD LOAF
- BREAD DOUGH
- PIZZA DOUGH
- PARTS NAMES AND FUNCTIONS
- ACCESSORIES
- LIQUID MEASURING CUP
- MEASURING SPOON
- RECIPE BOOK
- PARTS NAMES AND FUNCTIONS (CONT.)
- CONTROL PANEL
- COURSE LIST
- BAKING PAN
- HOW TO REMOVE THE BAKING PAN
- HOW TO INSERT THE BAKING PAN
- 1 PLACE THE BAKING PAN IN THE BAKING PAN RECEPTACLE
- 2 TURN THE BAKING PAN IN THE DIRECTION OF THE ARROW TO LOCK IT IN POSITION
- KNEADING BLADE
- HOW TO ATTACH THE KNEADING BLADE
- AUTO ADD DISPENSER
- HOW TO DETACH THE AUTO ADD DISPENSER
- HOW TO OPEN THE DISPENSER COVER
- TO ADD INGREDIENTS
- HOW TO ATTACH THE AUTO ADD DISPENSER
- TO CLEAN
- HOW TO SET THE CLOCK
- 1 INSERT THE POWER PLUG INTO AN ELECTRICAL OUTLET
- 2 PRESS THE TIME SETTING BUTTON (▲▼) TO SET THE CURRENT TIME ON THE DISPLAY
- 3 THE TIME DISPLAY WILL STOP BLINKING AFTER 3 SECONDS, INDICATING THE TIME SETTING IS COMPLETED
- ALERT TONES AND HOW TO CHANGE THEM
- TO CHANGE
- SETTING COMPLETION TONES
- TOOLS AND UTENSILS TO USE
- WHEN MAKING AND BAKING DOUGH
- SPRINKLING FLOUR
- OVEN
- INGREDIENTS TO USE
- TIPS
- MEASURE INGREDIENTS USING A KITCHEN SCALE
- IF YOU DO NOT HAVE A KITCHEN SCALE
- FOR MEASURING LIQUIDS (SUCH AS WATER)
- FOR MEASURING DRY INGREDIENTS (SUCH AS FLOUR)
- FOR MEASURING SMALL AMOUNTS
- INGREDIENTS THAT CAN BE PLACED IN THE AUTO ADD DISPENSER (AUTO ADD FUNCTION)
- INGREDIENTS THAT CANNOT BE PUT IN THE AUTO ADD DISPENSER (INGREDIENTS TO BE ADDED MANUALLY)
- WHEN MEASURING DRY INGREDIENTS IN A NESTED MEASURING CUP (NOT SUPPLIED)
- WHEN USING THE SUPPLIED MEASURING SPOON
- COURSE LIST (CONT.)
- HOW TO PREPARE
- 1
- REMOVE THE BAKING PAN FROM THE MAIN BODY AND ATTACH THE KNEADING BLADE TO THE ROTATING SHAFT IN THE BAKING PAN
- 2
- ADD THE INGREDIENTS TO THE BAKING PAN
- HOW TO MAKE BASIC BREAD (CONT.)
- 3
- 4
- 5
- 6
- 7
- 8
- OPEN THE LID AND REMOVE THE BREAD
- 9
- CRUST CONTROL
- PRESS THE
- ADD INGREDIENTS
- ADDING INGREDIENTS AUTOMATICALLY
- AUTO ADD FUNCTION
- ATTACH THE AUTO ADD DISPENSER BEFORE PRESSING THE START BUTTON
- 1 PLACE EXTRA INGREDIENTS INTO THE AUTO ADD DISPENSER
- 2 ATTACH THE LOADED AUTO ADD DISPENSER TO THE LID, THEN CLOSE THE LID
- ADDING EXTRA INGREDIENTS MANUALLY
- 1 DURING THE KNEAD CYCLE, THE PRODUCT WILL BEEP TO ALERT YOU TO ADD EXTRA INGREDIENTS, AND "ADD" WILL BLINK ON THE DISPLAY. OPEN THE LID AND ADD THE EXTRA INGREDIENTS TO THE DOUGH
- 2 CLOSE THE LID
- SETTING THE TIMER
- 1 PREPARE THE INGREDIENTS AND SELECT THE DESIRED COURSE AND CRUST COLOR
- 2 PRESS THE ○TIMER BUTTON
- 3 PRESS THE TIME SETTING BUTTON (▲OR▼) TO SET THE TIME AT WHICH YOU WANT BAKING TO BE COMPLETED
- 4 PRESS THE ° START BUTTON
- 10
- REMOVE THE BAKING PAN FROM THE MAIN BODY AND ATTACH THE KNEADING BLADE TO THE BAKING PAN
- HOW TO MAKE CAKES (CONT.)
- WHEN THE ADD BEEP SOUNDS FOR ADDING EXTRA INGREDIENTS, OPEN THE LID AND SCRAPE DOWN THE FLOUR
- 11
- AFTER SCRAPING DOWN THE FLOUR AND ADDING EXTRA INGREDIENTS, PRESS THE START BUTTON TO RESUME KNEADING
- 12
- WHEN THE COMPLETION MELODY SOUNDS, PRESS AND HOLD THE CANCEL BUTTON FOR MORE THAN 1 SECOND, OPEN THE LID AND REMOVE THE BAKING PAN
- 13
- REMOVE THE CAKE FROM THE BAKING PAN
- 14
- AFTER USE, UNPLUG THE POWER PLUG FROM THE ELECTRICAL OUTLET
- SET THE BAKING PAN IN THE MAIN BODY AND CLOSE THE LID. (→ P. 10)
- HOW TO MAKE JAM (CONT.)
- BUTTON
- OVERVIEW OF THE HOMEMADE COURSE
- HOMEMADE COURSE
- PROGRAMMING THE HOMEMADE COURSE
- KNEAD 1
- REST
- KNEAD 2
- SHAPE
- RISE
- PUNCH DOWN
- BAKE
- KEEP WARM
- BASICS OF USING THE HOMEMADE COURSE
- USING THE HOMEMADE COURSE FOR THE FIRST TIME (SETTING THE CYCLE TIMES)
- PREPARE INGREDIENTS
- BUTTON AND SELECT COURSE 15
- TO CANCEL THE SETTING
- SET THE TIME (0:12) FOR "KNEAD ①
- SET THE TIME (0:10) FOR "REST
- SET THE TIME (0:10) FOR "KNEAD ②
- SET THE "SHAPE" CYCLE TO "OFF
- SET THE TIME (1:08) FOR "RISE ①
- SET THE TIME (0:30) FOR "RISE 2
- SET THE TIME (0:40) FOR "RISE ③
- SET THE TIME (0:45) FOR "BAKE
- CHECK THE TOTAL COURSE TIME (3:35)
- PRESS THE | START | BUTTON
- TO SHAPE THE DOUGH MANUALLY USING THE SHAPE CYCLE
- FOR STEPS 1-12, REFER TO "BASICS OF USING THE HOMEMADE COURSE" (P. 31-33)
- ALERT BEEPS (10 SHORT BEEPS) WILL NOTIFY YOU WHEN THE COURSE HAS REACHED THE SHAPE CYCLE. OPEN THE LID, REMOVE THE BAKING PAN AND SHAPE THE DOUGH
- BUTTON AGAIN
- SETTING CYCLE TIMES FOR FUTURE USE
- TO CHANGE THE SETTINGS
- USING THE TIMER
- Q&A FOR HOMEMADE COURSE
- CLEANING AND MAINTENANCE
- MAIN BODY AND LID
- WIPE WITH A WELL-WRUNG SOFT CLOTH
- AUTO ADD DISPENSER, MEASURING CUP AND MEASURING SPOON
- NONSTICK COATING OF THE BAKING PAN, KNEADING BLADE, AND AUTO ADD DISPENSER
- TO PROTECT THE NONSTICK COATING FROM DAMAGE
- REMARKS
- TO STORE THE PRODUCT
- REPLACEMENT PARTS
- Q&A FOR BAKING BREAD
- WHEN THE RESULTS ARE NOT SATISFACTORY
- BAKING RESULTS
- CRUST COLOR
- CAUSES
- SUNKEN LOAVES
- SHORT LOAVES
- THE BREAD DOES NOT RISE SUFFICIENTLY
- THE BREAD RISES TOO MUCH
- THE BREAD HAS A DEPRESSION ON TOP
- OTHER
- CAKE AND JAM RESULTS
- CAKE
- JAM
- TROUBLESHOOTING GUIDE
- ZOJIRUSHI
- FOR CALIFORNIA USA ONLY
Marque : Zojirushi
Modèle : Home Bakery Maestro BB-SSC10
Catégorie : Machine à pain