
Pro DH-HAC-HFW2241E-A - Caméra de surveillance Dahua Technology - Notice d'utilisation et mode d'emploi gratuit
Retrouvez gratuitement la notice de l'appareil Pro DH-HAC-HFW2241E-A Dahua Technology au format PDF.


| Type de produit | Caméra de surveillance extérieure |
| Marque | Dahua Technology |
| Modèle | Pro DH-HAC-HFW2241E-A |
| Résolution | 2 mégapixels (1080p) |
| Type de capteur | CMOS 1/2.7" |
| Angle de vue | 90° (horizontal) |
| Vision nocturne | Infrarouge jusqu'à 30 mètres |
| Alimentation | 12 V CC, consommation 5,5 W |
| Dimensions (L x l x H) | 191 x 85 x 80 mm |
| Poids | 500 g |
| Indice de protection | IP67 (résistant à l'eau et à la poussière) |
| Type de montage | Mural ou au plafond (support inclus) |
| Sortie vidéo | HD-CVI (coaxial), 1080p à 25/30 ips |
| Fonctions principales | Détection de mouvement, mode jour/nuit, réduction de bruit numérique (2D/3D-DNR), WDR (grande plage dynamique) |
| Entretien et nettoyage | Nettoyer le dôme avec un chiffon doux et sec ; éviter les solvants ; vérifier les câbles périodiquement |
| Sécurité | Installation à au moins 2 mètres du sol ; utiliser un transformateur certifié ; couper l'alimentation avant maintenance |
| Pièces détachées et réparabilité | Disponibles : câbles, supports, blocs d'alimentation ; réparation par un technicien qualifié recommandée |
| Informations générales | Garantie 2 ans ; température de fonctionnement : -30°C à +60°C ; humidité max 90% |
FOIRE AUX QUESTIONS - Pro DH-HAC-HFW2241E-A Dahua Technology
Questions des utilisateurs sur Pro DH-HAC-HFW2241E-A Dahua Technology
0 question sur cet appareil. Repondez a celles que vous connaissez ou posez la votre.
Poser une nouvelle question sur cet appareil
Téléchargez la notice de votre Caméra de surveillance au format PDF gratuitement ! Retrouvez votre notice Pro DH-HAC-HFW2241E-A - Dahua Technology et reprennez votre appareil électronique en main. Sur cette page sont publiés tous les documents nécessaires à l'utilisation de votre appareil Pro DH-HAC-HFW2241E-A de la marque Dahua Technology.
MODE D'EMPLOI Pro DH-HAC-HFW2241E-A Dahua Technology
HDCVI IR Bullet Camera
1.2.51.32.13027-000
User's Manual
V1.0.2
Foreword
General
This user's manual (hereinafter referred to be "the Manual") introduces the functions, installation and operations of the camera.
Safety Instructions
The following categorized signal words with defined meaning might appear in the Manual.
| Symbol | Note |
| DANGER | Indicates a high potential hazard which, if not avoided, will result in death or serious injury. |
| WARNING | Indicates a medium or low potential hazard which, if not avoided, could result in slight or moderate injury. |
| CAUTION | Indicates a potential risk which, if not avoided, may result in properly damage, data loss, lower performance, or unpredictable result. |
| ELECTRICITY | Indicates dangerous high voltageTake care to avoid coming into contact with electricity. |
| LASER BEAM | Indicates a laser radiation hazard.Take care to avoid exposure to a laser beam. |
| ESD | Electrostatic Sensitive Devices,Indicates a device that is sensitive to electrostatic discharge. |
| TIPS | Provides methods to help you solve a problem or save you time. |
| NOTE | Provides additional information as the emphasis and supplement to the text. |
About the Manual
- The Manual is for reference only. If there is inconsistency between the Manual and the actual product, the actual product shall govern.
- All the designs and software are subject to change without prior written notice. The product updates might cause some differences between the actual product and the Manual. Please contact the customer service for the latest program and supplementary documentation.
- There still might be deviation between the actual value of some data and the value provided, if there is any doubt or dispute, please refer to our final explanation.
- Please contact the supplier or customer service if there is any problem occurred when using the device.
- We are not liable for any loss caused by the operations that do not comply with the Manual.
- All trademarks, registered trademarks and the company names in the Manual are the properties of their respective owners.
- Please visit our website or contact your local service engineer for more information.
- If there is any uncertainty or controversy, please refer to our final explanation.
1 Introduction
1.1 General
This series of products comply with the HDCVI standard and support the transmission of audio, video and control signal over coaxial cable. They produce video signal with up to 6MP and 4K resolution and require XVR device that comply with HDCVI standard to achieve high speed, long distance and zero lag transmission of the signal. They are applicable to cover the high definition monitoring needs for locations with complex lighting conditions, such as financial center, telecom site, supermarket, hotel, government, school and factory.
1.2 Features
- Support over 300 meter real-time transmission of audio, video and control signal from RG59 cable.
- Excellent low-light performance with 2D/3D noise reduction.
- Adopt motorized vari-focal lens, support zoom/focus adjustment on XVR device (available on select models).
- Auto switch from vivid color images by day and black-and-white images at night with ICR.
- Provide clear IR imaging by adjusting IR light to moving objects with smart IR.
- Configuring devices easily with OSD, the OSD supports various customized effects.
- Support switching output mode between CVI/CVBS/AHD/TVI through DIP switch.
- Operate on DC 12V ± 30%/AC24V ± 30% with wide voltage range (available on select models).
- Serve as a DC 12V 2W power source (available on select models)
- IP67 rated.
2 Design
2.1 Dimension

Figure 2-1 Model A (mm [in])
![244.1 [9.61°] 153.1 [6.03°] 79.0 [3.11°] 75.9 [2.99°]](/content/2026/06/1331658/images/f691daa0c2115cdefc144a3f9c4e4918cf636875c962494b839e5fb26708ec9a.jpg)
Figure 2-2 Model B (mm [in]) and Model C (mm [in])
2.2 Cable

For more information about cable ports, see Table 2-1; for the operation method of ©(DIP switch), see Table 2-2.
| No. | Port Name | Function |
| 1 | DC 12VPower Input | Inputs DC 12V power. Please be sure to supply power as instructed in the Manual.CALONDevice abnormality or damage could occur if power is not supplied correctly. |
| 2 | DC 12V or AC 24V PowerInput | Inputs DC 12V or AC 24V power. Please be sure to supply power as instructed in the Manual.CALONDevice abnormality or damage could occur if power is not supplied correctly. |
| 3 | Video Output | Connects to XVR to output video signal. |
| 4 | Audio Input | Connects to sound–pick–up devices to receive audio signal. |
| 5 | Power Output | Supplies DC12V 2W power. |
| 6 | DIP Switch | Dial switches to change output mode. Switch up indicates “ON”, switch down indicates “OFF”. |
Table 2-1
| Switch1 | Switch2 | Output Mode |
| OFF | OFF | CVI |
| ON | ON | CVBS |
| ON | OFF | AHD |
| OFF | ON | TVI |
Table 2-2
3 Installation
CAUTION
- Make sure the mounting surface is strong enough to hold at least three times of the camera weight.
- The following figure is for reference only, actual product shall prevail.
For the installation diagram and item list of model A, see Figure 3-1 and Table 3-1, for those of model B and model C, see Figure 3-2 and Table 3-2.
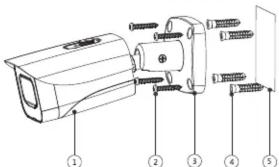
Figure 3-1
| No. | Item | No. | Item | No. | Item | No. | Item |
| 1 | Device | 2 | Self-tappingscrew | 3 | Bracket | 4 | Expansion bolt |
| 5 | Mounting surface |
Table 3-1

Figure 3-2
| No. | Item | No. | Item | No. | Item | No. | Item |
| 1 | Device | 2 | Self-tapping screw | 3 | Bracket | 4 | Expansion bolt |
| 5 | Mounting surface |
Table 3-2
Step 1 Find the mounting template sticker from the accessory pack and stick it to the mounting surface ⑤ Drill screw holes (and the cable outlet hole if it needs to go through the mounting surface) on the mounting surface as indicated on the mounting template.
Step 2 Different approaches required according to different mounting surfaces.
- For masonry mounting surface, insert expansion bolts④ from the accessory pack in the screw holes.
- For wooden mounting surface, expansion bolts are optional.
Step 3 Adjust the location of the bracket③ according to cable outlet requirement (top out or side out), then pull the cable out through mounting surface or the side wire tray. Align the screw holes on the bracket③ to those on the mounting surface, then put in and fasten the supplied self-tapping screws② to attach the device① to the mounting surface.
Step 4 Connect the camera to power source and the XVR device, and the live view screen will be displayed.
Step 5 Loosen the locking screw first, aim the lens to the ideal angle and adjust the focus until you get clear image (see Figure 3-3 or Figure 3-4), and then fasten the locking screw.
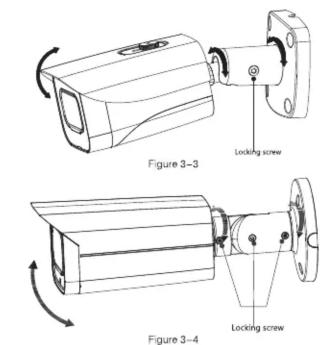
©-4 TIPS
For the models with vari-focal lens, you can also adjust the focus through XVR device.
4 Configuration
Power up the camera and connect it to XVR device with coaxial cable, then the live view screen is displayed. The following instructions will guide you to configure your camera.
NOTE
The number of the coaxial port on XVR will display at the lower left corner of the live view window to indicate the corresponding camera.
4.1 Opening Main Menu
Step 1 In the live view screen interface, right-click anywhere on the screen. The shortcut menu is displayed. See Figure 4-1.
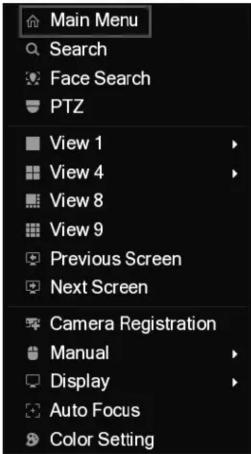
Figure 4-1
Step 2 Click Main Menu.
The Main Menu interface is displayed. See Figure 4-2.

Figure 4-2
NOTE
Right-click anywhere on the screen to return to the previous menu until you go back to the live view screen interface.
4.2 Setting Audio Input
Step 1 In the Main Menu interface (Figure 4–2), select CAMERA > ENCODE > Encode. The Encode setting interface is displayed. See Figure 4–3.
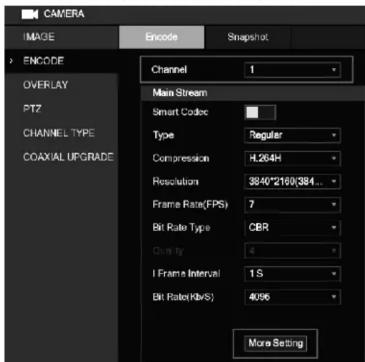
Figure 4-3
Step 2 In the Channel list, select the camera that you want to configure according to the coaxial port number.
Step 3 In the Main Stream column, click More Setting. The More Setting interface is displayed. See Figure 4-4
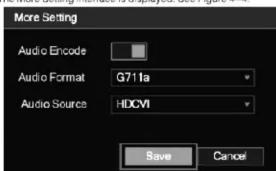
Figure 4-4
Step 4 In the More Setting interface, you can configure the audio settings.
- Enable Audio Encode function.
• In the Audio Format list, leave to the default.
• In the Audio Source list, select HDCVI
Step 5 Click Save to save the settings
The Encode setting interface is displayed.
Step 6 In the Encode setting interface (Figure 4–3), click Apply
4.3 Operating OSD Menu
Step1 In the live view screen interface, right-click within the live view window of the camera that you want to configure.
The shortcut menu (Figure 4-1) is displayed.
Step 2 Click PTZ.
The PTZ setting interface is displayed. See Figure 4-5.
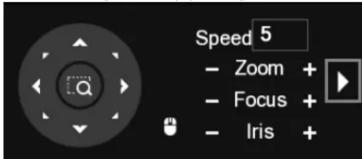
Figure 4-5
Step 3 Click ▶ to see more options. See Figure 4–6.

Figure 4-6
Step 4 Click
The MENU OPERATION panel is displayed. See Figure 4-7.
The OSD menu of the corresponding camera is displayed on the live view screen.
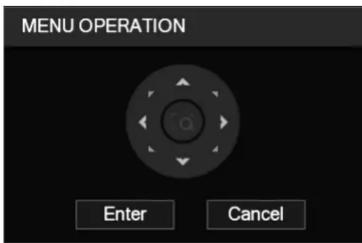
Figure 4-7
For the function of the buttons in the MENU OPERATION panel, see Table 4-1

Table 4-1
If there is "←" as the value of an OSD item, click Enter to go to the next level of this item. Click Return to go back to the previous level. Clicking Cancel is to exit OSD menu without saving the modifications.
NOTE
Interfaces of different XVR may vary, the actual product shall prevail.
The OSD menus of different cameras may vary, the actual product shall prevail.
5 Maintenance
CAUTION
In order to maintain the image quality and proper functioning of the device, please read the following maintenance instructions carefully and hold rigid adherence.
Maintaining Lens and Mirror Surface
Do not touch the image sensor directly. The lens and mirror surface are covered with antireflection coating, which could be contaminated or damaged and result in lens scratches or haze image when being touched with dust, grease, fingerprints and other similar substances. Dust and dirt could be removed with air blower, or you can wipe the lens gently with soft cloth that moistened with alcohol.
Maintaining Device Body
Device body can be cleaned with soft dry cloth, which can also be used to remove stubborn stains when moistened with mild detergent. To avoid possible damage on device body coating which could cause performance decrease, do not use volatile solvent such as alcohol, benzene, diluent and so on to clean the device body, nor can strong, abrasive detergent be used.
Marque : Dahua Technology
Modèle : Pro DH-HAC-HFW2241E-A
Catégorie : Caméra de surveillance