EL 0601 - Lave-linge BRU - Notice d'utilisation et mode d'emploi gratuit
Retrouvez gratuitement la notice de l'appareil EL 0601 BRU au format PDF.


| Type de produit | Lave-linge frontal |
| Marque | BRU |
| Modèle | EL 0601 |
| Capacité de lavage | 7 kg |
| Vitesse d'essorage maximale | 1200 tours/min |
| Classe énergétique | A+++ |
| Consommation d'eau par cycle | 45 L |
| Niveau sonore (lavage/essorage) | 56 dB / 76 dB |
| Dimensions (H x L x P) | 85 x 60 x 55 cm |
| Poids net | 68 kg |
| Alimentation électrique | 230 V, 50 Hz, 10 A |
| Programmes de lavage | Coton, Synthétiques, Délicats, Rapide 30 min, Laine, Jeans, Rinçage+Essorage, Vidange |
| Options supplémentaires | Départ différé, Prélavage, Niveau de salissure, Sécurité enfants |
| Type de tambour | Inox |
| Affichage | LED, temps restant |
| Entretien | Nettoyage régulier du filtre, du tambour et du tiroir à lessive |
| Sécurité | Sécurité enfants, anti-débordement, système anti-balourd |
| Pièces détachées disponibles | Filtre, courroie, résistance, pompe, joints |
| Réparabilité | Indice de réparabilité : 8,2/10 |
FOIRE AUX QUESTIONS - EL 0601 BRU
Questions des utilisateurs sur EL 0601 BRU
0 question sur cet appareil. Repondez a celles que vous connaissez ou posez la votre.
Poser une nouvelle question sur cet appareil
Téléchargez la notice de votre Lave-linge au format PDF gratuitement ! Retrouvez votre notice EL 0601 - BRU et reprennez votre appareil électronique en main. Sur cette page sont publiés tous les documents nécessaires à l'utilisation de votre appareil EL 0601 de la marque BRU.
MODE D'EMPLOI EL 0601 BRU

Manual de instrucciones
lavadora automatica
EL 0601
EL 1001
Estimado cliente,
Garantizamos que este producto, está diseñado y fabricado con el objetivo de obtener la calidad total y las mejores prestaciones posibles.
Para que esto sea posible, le rogamos lea atentamente este manual de instrucciones y consérvelo para ulteriores usos.

BRU
TABLA DE TEMAS
Parte 1:
Etapas previas a la utilización de vuestra lavadora y precauciones de seguridad.
Parte 2:
Características técnicas.
Parte 3:
Determinación de la colocación y preparación.
Rev 3 2810540005
Parte 4:
Elección del programa y funciones de lavado.
Parte 5:
Mantenimiento y conservación.
Parte 6:
Consejos prácticos.
Parte 7:
Antes de llamar al servicio de posventa.
Parte 1: | Etapas previas a la utilización de vuestra lavadora y precauciones de seguridad.

Su lavadora está prevista para una alimentación de 230 Volts/50 Hz.
El amperaje necesario para el funcionamiento de su lavadora es de 16 amperios. Si la capacidad de los enchufes de vuestra instalación son insuficientes, llame a un electricista cualificado para que haga los cambios necesarios.
No olvide de verificar la toma de tierra, con o sin la utilización de un transformador. Nuestra empresa no se podrá considerar responsable de los eventuales deterioros provocados por conexiones incorrectas.
El primer lavado hágalo sin ropa solo con detergente. Esto le asegurará que quedará limpia de cualquier tipo de suciedad que pueda tener la lavadora.
La eficiencia de su máquina dependen de la eficacia del factor lavado. Si usted utiliza productos de lavado de mala calidad, las manchas presentes en la ropa puede que no desaparezcan. Si las prendas están manchadas, por favor proceda a limpiarlas como indicamos en las páginas siguientes, antes de lavarlas a máquina.
Esta lavadora está diseñada para uso doméstico.
Para instalar la lavadora, póngase en contacto con el servicio técnico o con un fontanero autorizado.
Si el cable de alimentación o el enchufe están dañados, avise a un técnico autorizado.
No conecte su lavadora a la toma de agua con un tubo usado.
Haga un primer lavado con detergente pero sin ropa seleccionando el programa A (70°). De esta forma, se garantiza que el interior de la lavadora quede limpio de cualquier residuo producido durante la fabricación.
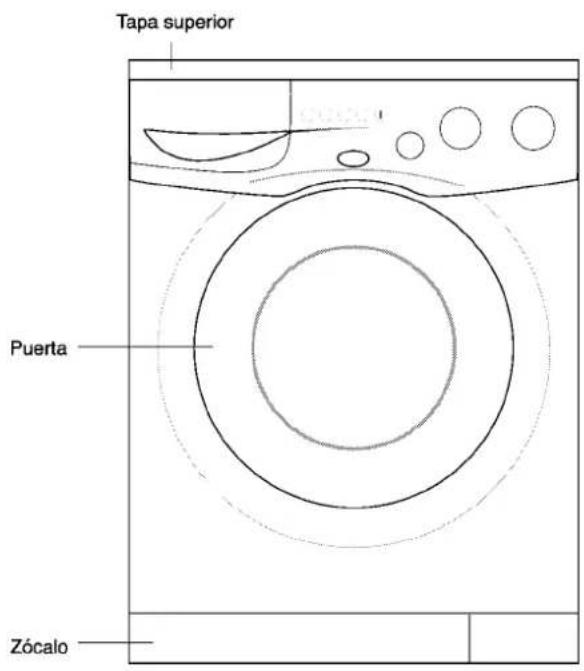
Apertura de la puerta delantera
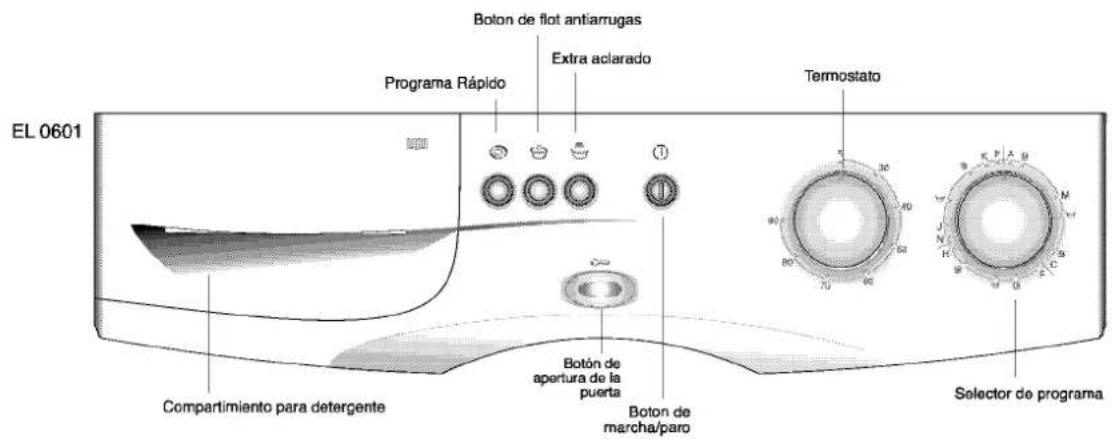
Asegurarse que el boton de encendido/ apagado esté siempre apagado y dejar pasar 2 minutos para que se desbloquee el sistema de seguridad. Apretar el boton de apertura de la puerta se abrirá. Mientras la lavadora esté en marcha, puede abrir la puerta solo cuando el piloto del botón de apertura esté encendido.

natural_image
Hand pressing a button on a device (no text or symbols visible)
natural_image
Cross-sectional diagram of a mechanical component with no visible text or symbols
Después de los controles de calidad efectuados durante la producción, puede ser que quede un poco de agua en el fondo de su lavadora. Esto no causará ningún tipo de deterioro en la misma.
Parte 2: Características técnicas.
Capacidad (ropa seca) (kg.) 5
Alto (cm) 85
Ancho (cm) 60
Fondo (cm) 54
Peso (Kg) 61
Alimentación 230/50
Corriente nominal (A) 10
Potencia (W) 2350
Velocidad de lavado (r.p.m.) 52
Velocidad de centrifugado (r.p.m.)
EL 0601 600
EL 1001 1000

Las especificaciones técnicas están sujetas a
cambio, sin previo aviso por mejoras del producto.
Los gráficos mostrados en el manual son esquemas
y es posible que no coincidan con su lavadora.
Parte 3: Determinación de la colacación y preparación.
1. Desmontaje de los anclajes de seguridad utilizados para el transporte


natural_image
Mechanical diagram showing a hand operating a rotating shaft with directional arrows indicating motion (no text or symbols)
natural_image
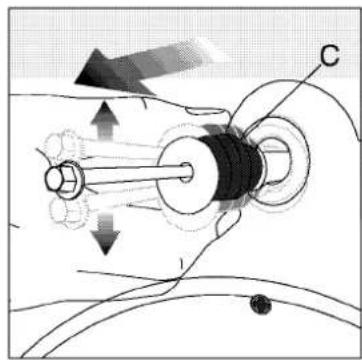
Illustration of a hand holding a circular object with a pointer labeled 'P' above, against a grid background (no text or symbols on the object itself)Los anclajes de seguridad utilizados para el transporte deben ser desmontados antes de cualquier uso de la máquina. Gire las cabezas de los pernos marcados con "C", en sentido contrario al de las agujas del reloj y aflójelos con una llave apropiada.
Después extráigalos tirando de ellos hacia el exterior

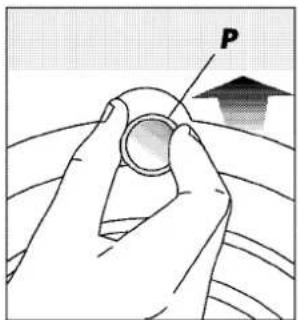
Los tapones de plástico que se dan en dotación dentro de un paquete y marcados con una "P" deben ser colocados en los agujeros que ocupaban los anclajes de seguridad, tal como se indica. Atención! Conserve los tornillos para cualquier transporte ulterior, y colóquelos antes de desplazar su lavadora.
Atención!
No colocar la maquina sobre una moqueta. Evita la libre circulación del aire. Los componentes électricos podrían sobre calentarse y ser causa de avería.
2. Regulación de los pies
Para obtener un funcionamiento silencioso y estable, el aparato debe estar colocado correctamente en posición horizontal y apoyada sobre sus pies, Su máquina dispone de dos pies regulable. Si la máquina está inestable, afloje la tuerca de plástico, o destornille el pie regulable hasta que la máquina esté perfectamente horizontal. Después de la regulación, apriete la tuerca para asegurar su estabilidad.

natural_image
Illustration of a hand holding a small black knob next to a curved surface (no text or symbols)3. Conexión de los tubos de agua
a) Tubo de entrada de agua
Para obtener un funcionamiento correcto, la presión del agua debe estar situada entre1 y 10 bar(1 bar corresponde a más de 8 litros por minuto de capacidad de agua cuando el grifo está completamente abierto.)
Para evitar cualquier fuga de agua, hay las juntas necesarias con el tubo de entrada de agua colocado en el interior del aparato, coloque estas juntas en cada extremo del tubo y apriete fuertemente las dos tuercas.
Con el fin de evitar cualquier tipo de deterioro debido a fugas de agua cierre el grifo de entrada cuando no utilice la máquina

Su máquina está provista de una única entrada de agua fría. Monte sobre esta el tubo azul entregado en dotación con el aparato.

natural_image
Hand holding a tool interacting with a mechanical component, showing a blue arrow pointing to a black hole (no text or symbols visible)b) Tubo de evacuación de agua
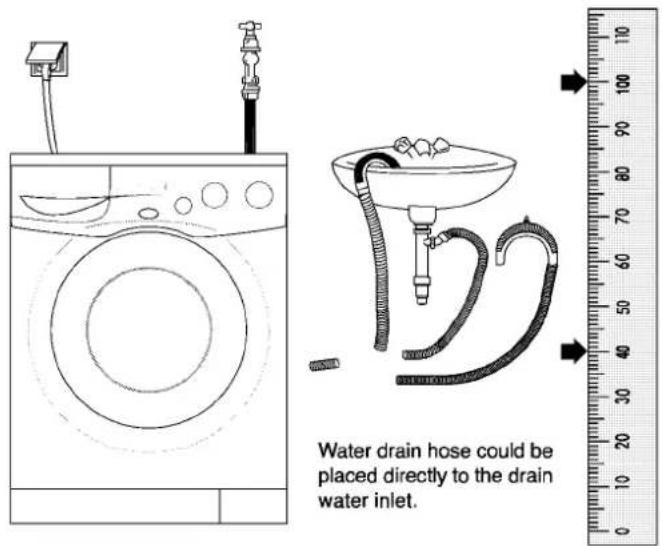
El tubo de evacuación de agua puede estar colocado en el reborde de un lavabo, o introducido directamente en un conducto de desagüe. Este tubo nunca debe estar doblado. Debe fijarse de manera apropiada con el fin de que no se pueda desprender o caer al suelo.

El tubo debe estar colocado a una distancia de 40 a 100 cm del suelo.

4. Conexiones eléctricas
Connectar el cable al sistema eléctrico apropiado; máximo voltaje de corriente indicado en la placa del interior del enchufe.
¡Atención! Ver página 3, Etapas previas a la utilización de su lavadora y precauciones de seguridad.

natural_image
Simple line drawing of a circular socket with three dots and a small square mark on the side (no text or symbols)Asegúrese de que su enchufe de sector está dotado de toma de tierra de calidad.

Atención! Antes de cualquier uso de la máquina verifique los siguientes puntos:
Ha cerrado usted la puerta delantera?
- Está instalado correctamente el tubo de evacuación de agua?
- Está abierto el grifo ?
Está enchufada a la red eléctrica?
Panel de control

Preparación
Carga de la lavadora
Verifique que la ropa permita cerrar bien la puerta. Cierre la puerta empujando ligeramente, Si la puerta no se cierra totalmente, la máquina no podrá ponerse en marcha porque actuará el mecanismo de seguridad, La puerta permanece cerrada hasta el fin del programa de lavado, y no se podrá abrir hasta pasados 2 minutos de la finalización del mismo.
Coloque la ropa de forma uniforme en el interior de la máquina, Las piezas tricotadas a mano deben ser puestas del revés antes de introducirlas en la máquina.
Elección de la ropa
Elija su ropa según las categorías siguientes y lave separadamente:
-tejidos blancos y colores resistentes.
- tejidos delicados (seda, etc..)
- lana
Tenga cuidado de vaciar los bolsillos, sacar los cinturones, alfileres, monedas, etc... Para los tejidos manchados, consultar la parte "Consejos prácticos" del manual de instrucciones. Puede poner pequeñas prendas (calcetines, guantes, etc) dentro de la funda de la almohada para evitar que caigan en el filtro de la bomba de desagüe.
Elección de los productos de lavado y del suavizante.
Elija un producto de lavado apropiado específicamente destinado a lavadoras automáticas. La cantidad recomendada está indicada en el embalaje de detergente.
No utilice productos o lejías que contengan cloro o azufre. La cantidad de producto a utilizar depende del nivel de suciedad de la ropa, de la cantidad de ropa y de la calidad del agua.
Elleccion de Programas
Distribución de los productos de lavado

a. Compartimiento I. Compartimiento de ciclo de prelavado b. Compartimiento II. Compartimiento de ciclo de lavado c. Compartimiento de "♣" para productos suavizantes d. Sifón

natural_image
Pure mechanical diagram showing a downward arrow inside a container (no text or symbols)Cubeta de detergente
La tabla de programas de lavado se puede consultar extrayendo la tarjeta situada sobre la cubeta del detergente como se muestra a continuación.

Programa Rapido
Acorta el tiempo de lavado para prendas delicadas. Esta función puede ser utilizada en los programas de algodón y sintéticos en temperaturas por debajo de 60°C.

Flot antiarrugas
Si usted prefiere dejar sus tejidos y ropa de lana dentro de la lavadora después del aclarado, puede presionar el boton de flot antiarrugas para evitar que se arruguen. Para continuar presione de nuevo el boton de cuba llena, ó seleccione P en el selector de programa para evacuar el agua.

Extra Aclarado
Usando esta función usted puede aumentar la cantidad de agua que la máquina pulsa durante las aclaraciones

Lavado Intensivo (EL 1001)
Con esta función las prendas pueden ser lavadas a temperaturas muy altas en un programa largo.

Selector De Velocidad (EL 1001)
Usando este mando podrás elegir la velocidad de centrifugado final hasta 1000° r.p.m. en programas de algodón, hasta 800 r.p.m. en sintéticos y 600 r.p.m. en lana. Si no quiere centrifugado en su ropa ponga el mando en la posición ... (sin centrifugado)
Rellene el suavizante hasta la señal. Si rebasa la señal, el suavizante se mezcla con el agua de lavado, lo que le obligará a rellenar de nuevo el compartimiento. Los restos del suavizante pueden embozar el sifón, añada entonces un poco de agua.

Observación importante: utilice la cantidad de suavizante recomendada por el fabricante (aprox.. 100 ml). No sobrepase el nivel "MAX" indicado en la cubeta.
Parte 4: Elección del programa y opciones de lavado
| Tipo de tejidos | Programa | Temperatura (°C) | Compartimento aDe Productos | Programa Rapido | Flot Antiarrugas | Extra Aclarado | Lavado Intensivo | Selector De Velocidad / Boton de Velocidad | CARGA KG | Duración del programa (-min) | Consumo de agua (l) | Consumo energía (kWh) |
| Algodón y ropa blanca muy sucios que no requieren cuidados especiales | A 90 | -90 | I + II | * | * | * | * | 5 | 140 | 65 | 2.10 | |
| Algodón y ropa blanca con suciedad normal que no requieren cuidados especiales | B 60* | -90 | II | * | * | * | * | 5 | 130 | 56 | 0.95 | |
| Tejidos de algodón ligeramente sucios que no destiñan | B 40 | -40 | II | * | * | * | * | 5 | 120 | 60 | 0.52 | |
| Fria Lavado | M | - | II | * | * | * | * | 5 | 70 | 60 | 0.18 | |
| Centrifugado Algodón | C | 5 | 10 | - | - | |||||||
| Lavado Delicado | F 60 | -60 | II | * | * | * | * | 2.5 | 110 | 50 | 0.85 | |
| Lavado Delicado | F 40 | -40 | II | * | * | * | * | 2.5 | 100 | 50 | 0.40 | |
| Fria Lavado | G | - | II | * | * | * | * | 2.5 | 70 | 50 | 0.13 | |
| Centrifugado Delicado | H | 2.5 | 10 | - | - | |||||||
| Descarga | N 40 | -40 | II | * | * | 2 | 55 | 50 | 0.30 | |||
| Lavado Principal Sintéticos | J 40 | -40 | II | * | * | 1.5 | 45 | 45 | 0.55 | |||
| Lavado Corto | K | * | 2 | 2.5 | - | - | ||||||
| Centrifugado Sintéticos | P | - | - | - |
**Programa de Etiquetado Energético conforme a las normas EN 60456:1999 e IEC 60456 Ed.4 2001.
Dependiendo del agua, del tejido y de las condiciones ambientales, los valores reales que indica la lavadora pueden diferir de los valores est ndar establecidos, ya que se han probado bajo condiciones de laboratorio
Selección de programas y funcionamiento de la lavadora
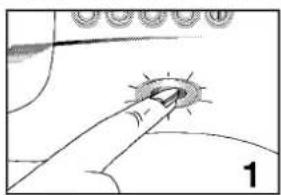
Conecte el aparato a la toma de corriente. Pulse el botón de apertura y abra la puerta. Coloque la ropa en el interior de la lavadora según la carga recomendada y cierre la puerta.
Presione los mandos para que sobresalgan antes de seleccionar el programa y la temperatura.
Seleccione el programa y la temperatura adecuados a la suciedad de la ropa utilizando la Tabla de Selección de Programas que figura en las siguientes páginas (situada también sobre la cubeta del detergente).
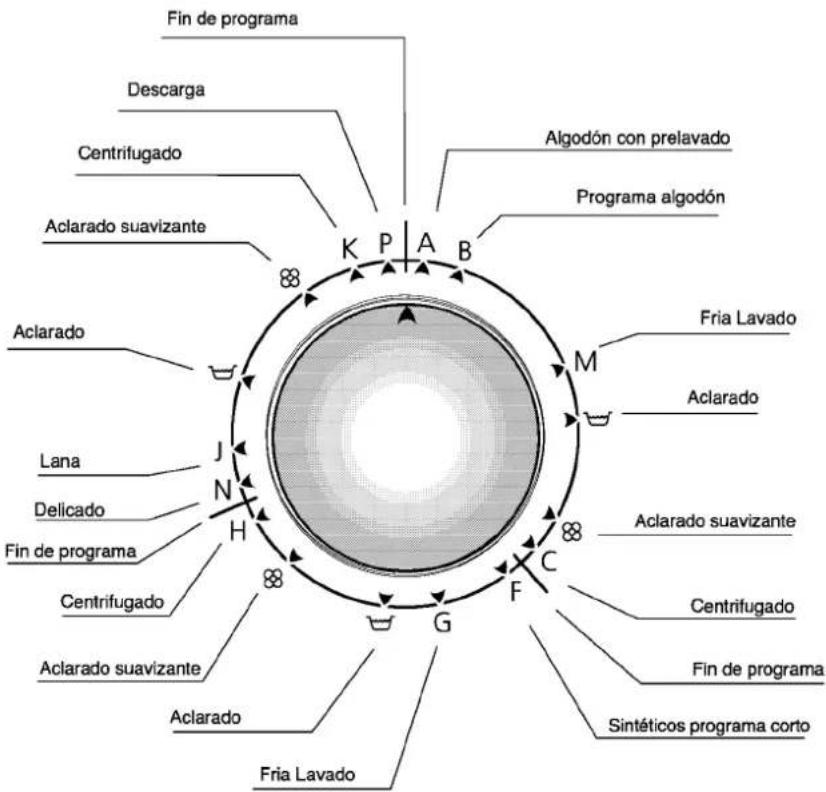
Gire hacia la derecha el mando selector de programas hasta que la letra deseada coincida con la marca superior. Ajuste el mando del termostato a la temperatura deseada. Con el mando en la posición “✗” el ciclo de lavado se realiza a la temperatura con la que el agua salga del grifo.
Seleccione las funciones auxiliares deseadas.
Si el selector de velocidad de centrifugado está en la posición "∅" la lavadora omitirá el centrifugado.
Una vez realizados todos los ajustes, empuje los mandos hacia dentro. De esta forma se impide que los niños puedan manipularlos.
natural_image
Illustration of a hand holding a circular object with a pointer, no text or symbols present
natural_image
Diagram of a mechanical component with directional arrows indicating motion or force (no text or symbols)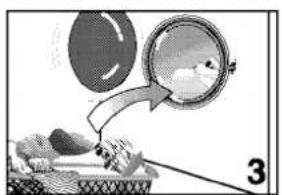
natural_image
Illustration of a biological process with a magnified view of a cell or particle inside a container (no text or symbols)
natural_image
Mechanical component diagram showing a rotating shaft and housing (no text or symbols)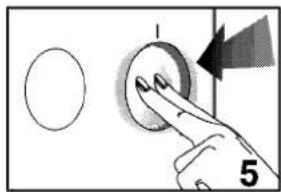

natural_image
Pure mechanical diagram showing a downward arrow inside a rectangular frame, no text or symbols present
natural_image
Hand holding a circular object with an arrow indicating rotation (no text or symbols)
natural_image
Illustration of two hands holding a circle, with an arrow indicating rotation (no text or symbols)A continuación añada el detergente y el suavizante y cierre la cubeta. Ponga en marcha la lavadora pulsando el botón "On/Off".
natural_image
Hand holding a finger pointing at five circles on a curved surface, with number 9 and a small symbol (no text or labels)
natural_image
Illustration of a hand holding a circular object with an arrow indicating direction (no text or symbols)

natural_image
Hand holding a pen with circular holes, no text or symbols visibleSelección de las funciones auxiliares

1
2
3
Ud. puede empezar el programa pulsando el boton marcha/paro. La puerta frontal se bloqueará y el led indicador se encenderá. Cuando el aparato se encienda gire el mando de programas en el sentido de las agujas del reloj y la lavadora cogera agua. En el programa B, el mando de seleccion de programas pasara rapidamente 4 pasos hacia adelante. Esto no supone ningún error, esto es así para permitir a la máquina coger el agua necesaria.
Si anade suavizante en el compartimanto para su uso, actuara en el último ciclo de aclarado. Si ha seleccionado el aclarado, apretando el boton, puede continuar el programa.
Si no desea centrifugar, usted puede dejar el boton de aclarado presionado. Apague la maquina, seleccione la letra P en el mando de seleccion de programas y encienda la maquina. Con esta operacion el agua de la lavadora sera descargada.
En los programas de algodón, lana y sintéticos, la acción de lavado puede estar funcionando por un periodo de 10 minutos hasta 55 minutos deacuerdo con el programa seleccionado antes de llegar al aclarado. Este periodo de tiempo no supone ningún error.
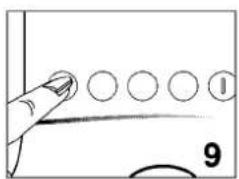
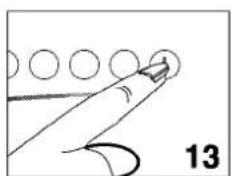
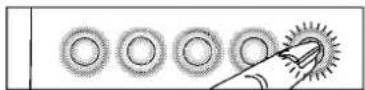
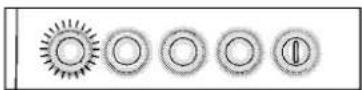
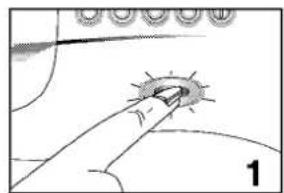
Antes de poner en marcha la lavadora pulsando el botón "On/Off", seleccione las funciones auxiliares deseadas. Los pilotos correspondientes se encenderán al poner en marcha la lavadora.
La puerta de la lavadora se bloquea transcurridos un máximo de dos minutos desde que se pulsa el botón "On/Off". Cuando la puerta está bloqueada, el piloto correspondiente permanece apagado.
Para anular una de las funciones seleccionadas, pulse de nuevo el botón correspondiente. Si la lavadora está en marcha, es necesario pararla antes de anular la función y el piloto correspondiente ha de estar apagado. Ponga de nuevo en marcha el programa desde el principio.
Fin del programa
Los programmas de lavado A, B, C finalizan cuando la línea gruesa despues de la letra C en el mando de programas esta en la parte superior.
Si no ha apretado el boton de la aclarado, el programa de lavado F finaliza despues de un centrifugado delicado H Y los programas de lavado (N) y (J) finaliza despues de un centrifugado delicado K.

flowchart
graph TD
    A["88"] --> B["K"]
    B --> C["P"]
    C --> D["A"]
    D --> E["B"]
    E --> F["M"]
    F --> G["C"]
    G --> H["F"]
    H --> I["G"]
    I --> J["G"]
    J --> K["N"]
    K --> L["H"]
    L --> M["J"]
    M --> N["J"]
    N --> O["88"]

flowchart
graph TD
    A["Outer Ring"] --> B["Inner Ring"]
    B --> C["Outer Ring"]
    C --> D["Inner Ring"]
    D --> E["Outer Ring"]
    E --> F["Inner Ring"]
    F --> G["Outer Ring"]
    G --> H["Inner Ring"]
    H --> I["Outer Ring"]
    I --> J["Inner Ring"]
    J --> K["Outer Ring"]
    K --> L["Inner Ring"]
    L --> M["Outer Ring"]
    M --> N["Inner Ring"]
    N --> O["Outer Ring"]
    O --> P["Inner Ring"]
    P --> Q["Outer Ring"]
    Q --> R["Inner Ring"]
    R --> S["Outer Ring"]
Vaciado de la lavadora
La lavadora se para automáticamente una vez finalizado el programa. El piloto del botón de apertura de la puerta se encenderá transcurridos 1 o 2 minutos. Cuando se encienda, podrá abrir la puerta pulsando el botón de apertura de la puerta. Desconecte la lavadora pulsando el botón "On/Off" y cierre la toma de agua. Saque la ropa y deje la puerta abierta para que se ventile el interior del aparato.
Parte 5: Mantenimiento y conservación
natural_image
Three-step diagram showing hand positioning of a mechanical device, with no visible text or symbols.Distribuidor detergentes
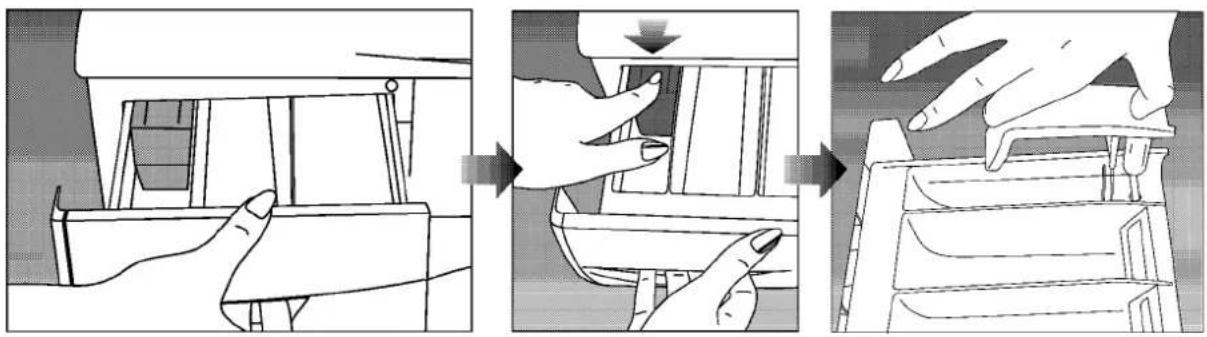
Para limpiar los residuos de los detergentes, extraiga el distribuidor de detergentes presionando sobre la parte indicada sobre el sifón. Lave el distribuidor con agua y limpie también su alojamiento antes de colocarlo de nuevo
Sifón
Limpie el sifón (pieza de color dentro del distribuidor) cada 30 o 40 lavados. Saque el sifón cogiéndolo por sus bordes. Para evitar su obturación, limpie los residuos de suavizante cuidadosamente y asegúrese que el sifón se coloca perfectamente.
Tubos
Para evitar cualquier tipo de fuga, solicite a un técnico que controle los tubos cada dos años. Si la máquina está instalada en un lugar con temperatura ambiente fría, vacíe el agua que se queda en la bomba y filtro. Además, para evitar el hielo, vacíe el tubo de entrada de agua desconectándolo del grifo.
Filtro de entrada de agua
El filtro está instalado en la entrada de agua a la máquina, impitiendo que se introduzca cualquier suciedad u objeto. Es aconsejable su limpieza cada 30-40 lavados. Para limpiar el filtro: cerrar el grifo, desenroscar el tubo de entrada y limpiarlo con un cepillo delgado. Si el filtro está muy sucio se puede extraer con unos alicates y limpiarlo con agua bajo el grifo.
Tambor
No deje objetos metálicos (agujas, alfileres, etc...) en el interior del tambor. Estos objetos pueden oxidar o deteriorar la superficie del tambor. No limpie el tambor con productos que puedan rayarlo.

natural_image
Line drawing of a hand holding a tool interacting with a mechanical component (no text or symbols visible)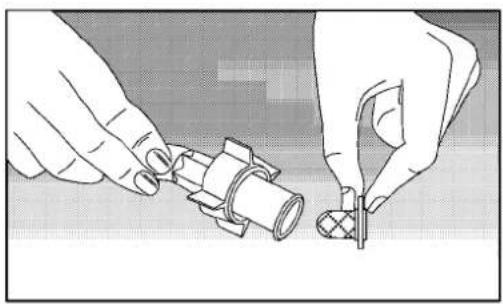
natural_image
Illustration of hands using a tool to adjust or install a mechanical component (no text or symbols visible)Limpieza del filtro de la bomba
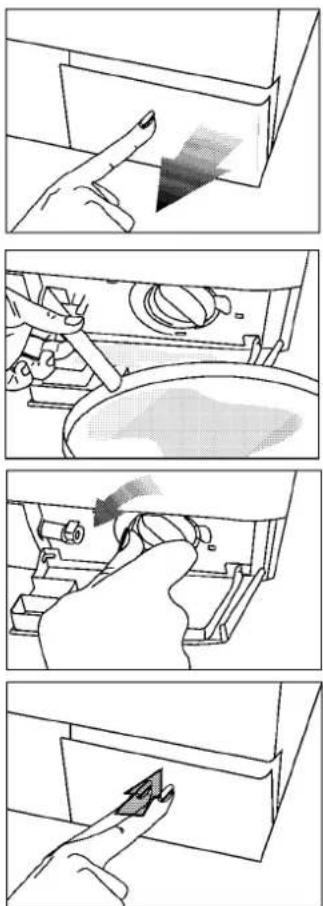
Desenchufe la lavadora. Retire la tapa del filtro presionando la zona marcada en el lateral.

Peligro! Agua caliente!. Puede haber unos 15 l de agua a 90 en el interior. Tenga cuidado al extraer el filtro.
Antes de extraer el filtro, descargue el agua mediante el tubo de desagüe. Extraiga el tubo de desagüe de su soporte, coloque un recipiente adecuado para recoger el agua del interior y abra la tapa.
Una vez descargada toda el agua, vuelva a colocar la tapa del tubo de desagüe y colóquelo en su soporte.
Abra el filtro girándolo hacia la izquierda y vacíe el agua que quede sobre la tapa del filtro (máx. 30 ml). Si el filtro está sucio, extráigalo y límpielo antes de volver a colocarlo girándolo hacia la derecha. Finalmente, cierre la tapa del filtro pulsando de nuevo en la zona marcada.

Atención! Si el filtro no está montado correctamente, el agua podría escaparse.
Parte 6: Consejos prácticos para eliminar las manchas
Los consejos siguientes para la eliminación de las manchas son indicativos y sólo conciernen a los tejidos lavables. Atienda las indicaciones de lavado de los fabricantes de la prenda.

Bebidas alcohólicas: Empiece por humedecer el tejido con agua, después con una solución con glicerina y luego aclare con una solución con vinagre.

Betún: Sin estropear el tejido, quite cuidadosamente la mancha y frótela con detergente. Si con ello no hace nada, prepare una solución de agua y alcohol (2 valores de agua por uno de alcohol) y frote el tejido, luegoável con agua caliente.

Té y café: Vierta agua caliente sobre la mancha cuando el tejido esté blanco, aplíquele lejía y aclare con agua.

Chicle: Endurezca el chicle colocando un cubito encima, luego frote con cuidado.

Moho: No deje las manchas de moho durante mucho tiempo sobre las prendas. Coloque la prenda en agua fría poco tiempo. Frote con jabón o con productos detergentes y lave con agua lo más caliente que el tejido pueda soportar. Si quedan manchas de grasa, lávela con agua oxigenada.

Chocolate y cacao: Coloque el tejido en agua caliente durante un tiempo. Frote con jabón o con detergente y lave la prenda con agua lo más caliente que pueda soportar. Si ha quedado grasa limpie con agua oxigenada.

Manchas de huevo: Si la mancha está dura, frótela y límpiela con una esponja húmeda o con un trapo suave. Frote con detergentes y límpiela con agua fría.

Manchas de grasa: Raspe la mancha y frote con productos detergentes de lavado.

Sangre: Deje la prenda durante 30 minutos en agua fría. Utilice una solución de amoniaco para sacar la mancha. (4 litros de agua por 3 cucharadas de amoniaco).

Helado, leche y crema: Introduzca la prenda en agua fría durante cierto tiempo. Frote con jabón y detergente y limpie con agua lo más caliente posible. Si quedan manchas de grasa, limpiela con agua oxigenada.

Tinta: Deje el agua fría correr sobre la mancha y espere a que la mancha desaparezca. Frote después con zumo de limón y detergente, deje la mancha reposar durante cinco minutos y aclare la prenda.

Hierba: Frote la mancha con detergente. Si el tejido lo permite, utilice agua de javel. Limpie la lana con alcohol.

Mostaza: Utilice glicerina y frote la prenda con detergentes de lavado. Si no marcha, limpie la mancha con alcohol. (Para las prendas con color y sintéticas, utilice 2 tazas de agua por una taza de alcohol).

Salsa de tomate: Frote la salsa de tomate dura y deje la prenda durante 40 minutos en agua fría. Frote con detergente y lave.

Fruta: Vierta agua fría sobre la mancha y no utilice agua caliente para aclarar. Deje reposar durante 2 horas y después limpie con vinagre y aclare.

Pintura: Utilice disolvente o tircloroetileno para suprimir la mancha. Coloque un trapo de algodón sobre los tejidos de lana. Frote la mancha con detergente y aclare con agua caliente.

Quemado: Utilice agua de jale si el artículo lo permite. Para las lanas, Coloque un trapo de algodón empapado en agua oxigenada sobre la mancha y planche. Aclare completamente y limpie la prenda.

Alquitrán: Esta mancha es la más difícil de sacar. Aplique tricloroetileno varias veces sobre la mancha y aclare con agua caliente.
Parte 7: Antes de llamar al servicio de postventa

Usted ha puesto en marcha la lavadora pero la luz de funcionamiento del panel está apagada.
Verifique el buen estado de los fusibles y la toma de tierra del cable de alimentación. Verifique que la puerta esté cerrada.

La máquina no se llena de agua.
Verifique que la puerta esté bien cerrada, y si el filtro de entrada de agua está obstruido. Verifique que el grifo de entrada de agua este abierto.

El agua no se evacua.
El tubo de vaciado está doblado ó el filtro de la bomba está obstruido. La tecla flot antiarrugas está obstruida.

Sale agua de debajo del aparato.
Verifique la entrada de agua y los conductos de evacuación. Apriete las tuercas. Puede ser también que las juntas de los tubos estén deterioradas. Si no es alguna de estas razones, podría ser que el filtro de la bomba no esté bien colocado.

Sale espuma del compartimiento jabonera.
Verifique que los detergentes sean aptos para máquinas automáticas. En el siguiente lavado, utilice menos cantidad.

La bomba no evacua el agua.
Limpie el filtro de la bomba. Verifique que los conductos de evacuación no estén doblados. Si fuese necesario, limpie el filtro de la bomba, siguiendo lo indicado en la parte de limpieza del filtro.
Descripción de los símbolos ITCL (International Textile Care Label, etiquetas internacionales de cuidado de los
tejidos)

Temperatura de lavado.

Posibilidad de utilizar lejia.

No utilizar lejia.

No lavar a máquina.

Secar sobre una superficie horizontal.

No lavar.

Limpieza en seco.
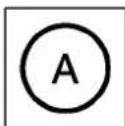
Permitidos productos químicos.

No limpiar en seco.

No centrifugar.
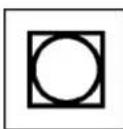
Puede ser lavado en máquinas centrifugas.

No lavar en máquinas
centrifugas.

Secar en el tendedero.

Permite plancha
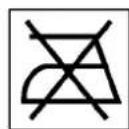
No planchar

Hacer un planchado
caliente
Este producto ha sido fabricado en unas instalaciones que respetan el medio ambiente.

natural_image
Illustration of two pine trees under a cloudy sky with distant mountains (no text or symbols)
natural_image
Cartoon illustration of a smiling washing machine character with arms and legs (no text or symbols)
FULL AUTOMATIC WASHING MACHINE
EL 0601
EL 1001
Dear Customer,
We wish that this product, manufactured at modern facilities with total quality notions, will deliver you the best performance. In order to guarantee this, please read this instruction manual thoroughly and keep it for your future reference.

BRU
CONTENTS
Part 1:
Technical features.
Part 2:
Steps before operating Fullautomatic Washing Machine and safety precautions.
Part 3:
Preparation
Part 4:
Program selection and washing operations.
Part 5:
Care and Maintenance.
Part 6:
Determining location and installation
Part 7:
Helpful tips on stain removal
Part 8:
Before calling service.
Part 1: Technical features
| Capacity (dry fabric) | 5 kg. |
| Height | 85 cm. |
| Width | 60 cm. |
| Depth | 54 cm. |
| Net weight | 61 kg. |
| Power requirement | 230 V, 50 Hz. |
| Nominal current | 10 A. |
| Power | 2350 Watts. |
| Washing speed | 52 rpm. |
| Spin speed | |
| EL 0601 | 600 rpm. |
| EL 1001 | 1000 rpm. |

The appearance and specifications are subject to change without notice to raise the unit quality. The graphics shown in the manual are schematic and it is possible that they not conform with your washing machine.
Part 2: Steps before operating Fullautomatic Washing Machine and safety precautions.
The current requirement in order for safe operation of this machine is 16 Ampheres. You will need to have a certified electrician to connect a 16 Amp fuse, if there is not enough current load.
Your washing machine is set to 230 Volts.
Do not forget to check the grounding in all cases of use with or without the transformer. Our company will not be responsible for any damages caused by operations without grounding.
In order to bring the machine to ready before use, please call your service technician or a certified plummer.
Please perform the first wash with detergent and do not place clothing inside your washing machine. This will ensure that any left over dirt from production will be cleared from inside of your machine.
The performance of the washing machine depends on the effectiveness of the cleaning agent. Stains can be permanent if low quality detergents are used. Please take necessary effort to clean the stained clothes as described in following pages before washing them in the machine.
Your washing machine is designed for home appliances.
In order to bring the machine to ready before use, please call your service technician or a certified plumber.
If the power cord or the plug is damaged, please call a certified person.
Do not connect used water inlet hose to your machine.
Please perform the first wash with detergent, at A (70) program and do not place clothing inside your washing machine. This will ensure that any left over dirt from production will be cleared from inside of your machine.

Due to the quality control processes during production, there may be some water left over in your machine. This does not cause any damage to your product.
Part 3: Preparation
Attention!
Before any operation of the machine check the following.
-Did you close the front door?
-Is the tap open?
-Is water drain hose placed properly?
-Is power connected?
Sorting laundry
Sort the laundry according to the following groups and wash them separately:
- white and resistant colored fabrics,
- colored fabrics,
- delicate fabrics (silk, rayon etc.),
- wool.
Be sure to empty pockets and remove any belts, buttons, pins, etc. from the clothing. You can place little clothing materials (baby socks, etc) inside of pillow cases to avoid them slip into the pump and filter. For stained fabrics, refer to the "Practical information" section of the operating manual.
To open the front door
While the machine is on, you can open the door by pushing the button only when the door open button led is on.


Loading the machine
Place the fabrics uniformly inside the machine. Hand knits should be placed inside out in the machine. Make sure that there is no clothing at the side of the door. Close the door by pushing lightly. If the door does not close completely, the machine could not be started-a safety measure. Front door is locked until the end of the washing program and it will not be opened about 2 minutes following the end of the program.
Detergent and softener selection
Choose the appropriate detergent specifically used at the full automatic washing machines. Suggested amount is given on the detergent cover.
Do not attempt to use detergents and bleaching elements that contain chlor and sulphur. The amount of the detergent depends on the dirt level of fabric, the amount of fabric and the softness of the water.
Detergent Dispenser
You can reach to the program table while plucking out the card, which is located above the detergent dispenser box shown below.
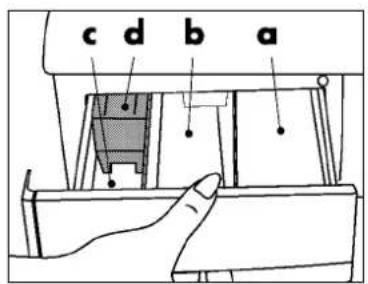
a. Compartment I. detergent compartment for prewash cycle.
b. Compartment II. detergent compartment for wash cycle.
c. "♣" Compartment for fabric conditioner.
d. Siphon.

natural_image
Pure mechanical diagram showing a downward arrow inside a container (no text or symbols)
Attention! Fill the softener according to the supplier recommendation (app. <100 ml). Do not exceed the "MAX level" marked on the detergent dispenser.
Control Panel

Functions

Quick wash
Shortens washing time for lightly soiled fabrics. This function can be used for cotton and synthetic programs for temperatures below 60°C.

Rinse hold
If you desire to leave your synthetic and wool fabrics in the machine after the wash program you may select the Rinse hold button to prevent them getting wrinkled. To continue the program, you can either press the Rinse hold button again or select P on the program selection knob to discharge the water.

Rinse plus
Using this function, you can increase the amount of water that the machine takes during rinses.

Intensive Wash
Cloths will be washed with higher temperatures and longer time.
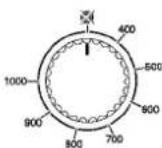
Spin speed selection knob (only for EL 1001)
Using this knob you can select final spin speed up to 1000 rpm in cotton programs, up to 800 rpm in synthetics and up to 600 rpm in woolens. If you do not want to apply spinning to your clothes, turn the knob onto Ⓞ (no spin) position.
Part 4:
Program Selection and Washing Machine Operation
Insert the plug. Push the Door Open button and open the door. Place your clothes into the machine according to the recommended load capacity and close the front door.
Push out the knobs before selecting the program and the temperature.
Select the proper program type according to the dirt strength and the thermostat value by means of Program Selection Table given on the following pages (or located above the detergent dispenser.)
Turn the program selection knob clockwise and adjust the program while bringing the letter on top. Adjust the thermostat knob to set the desired temperature. When the knob is at "✗" the wash cycle will be executed with the tap water temperature.
Select desired auxiliary functions.
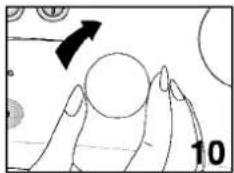
After you have finished the adjustments, you can push the knobs in. This will prevent the knobs from being played by your children.
natural_image
Diagram showing a hand holding a small object with a pointed tip, surrounded by curved lines and circular elements (no text or symbols)
natural_image
Diagram of a mechanical or optical component with directional arrows and a plus symbol, no readable text or labels present.
natural_image
Illustration of a hand holding a tool near a circular object with an arrow, next to a textured surface (no text or symbols)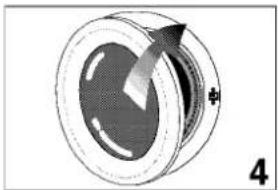
natural_image
Mechanical component diagram showing a rotating shaft and housing (no text or symbols)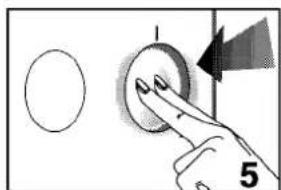

natural_image
Pure mechanical diagram showing a downward arrow inside a rectangular frame, no text or symbols present
natural_image
Illustration of a hand holding a circular object with an arrow indicating rotation (no text or symbols)
natural_image
Illustration of a hand holding a circle with an arrow indicating rotation (no text or symbols)Then, fill the fabric softener and the detergent, close the detergent dispenser box. Push the On/Off button and start the machine.

natural_image
Illustration of a hand holding a sphere with an arrow indicating rotation (no text or symbols)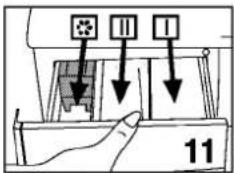
natural_image
Diagram showing a mechanical or architectural component with an arrow and number 12, no readable text or symbols present.
natural_image
Hand holding a pen with circular holes and a pointer, labeled '13' (no text or symbols on the diagram itself)Program selection
| FABRIC TYPE | PROGRAM | DEKLARATION TEMPERATURE | TEMPERATURE (°C) | PROGRAM NAME | DISPENSER COMPARTMENT | QUICK WASH | RINSE HOLD | RINSE PLUS | INTENSIVE WASH | SPIN SPEED | PROGRAM DURATION-Min | WATER CONSUPTION | ENERGY CONSUPTION | LOAD kg. | |
| Cotton | Heavy soiled fabrics made from cotton or linen, heat resistant | A | 90 | cold-90 | Pre-wash / Main wash /3 rinses /3 Intermediate spins / Final Spin | I + II | ● | ● | ● | ● | 140 | 65 | 2.10 | 5 | |
| Normal soiled fabrics made from cotton or linen, heat resistant | B* | 60 | cold-90 | Main wash /3 rinses /3 intermediate spins / Final Spin | II | ● | ● | ● | ● | 130 | 56 | 0.95 | 5 | ||
| Lightly soiled fabrics made from cotton, non-color fast | B | 40 | cold-40 | Main wash /3 rinses /3 intermediate spins / Final Spin | II | ● | ● | ● | ● | 120 | 60 | 0.52 | 5 | ||
| Lightly soiled fabrics made from cotton, non-color fast | M | Cold wash | II | ● | ● | ● | ● | 70 | 60 | 0.18 | 5 | ||||
| Heavy soiled fabrics made from cotton or linen, heat resistant | C | Final spin profile for cotton | 10 | - | - | 5 | |||||||||
| Synthetics | Normal soiled cotton and synthetics mixture fabrics | F | 60 | cold-60 | Main wash /3 rinses /3 intermediate spins/ Final Spin | II | ● | ● | ● | ● | 110 | 50 | 0.85 | 2.5 | |
| Normal soiled cotton and synthetics mixture fabrics (non-color fast) | F | 40 | cold-40 | Main wash /3 rinses /3 intermediate spins/ Final Spin | II | ● | ● | ● | ● | 100 | 50 | 0.40 | 2.5 | ||
| Normal soiled cotton and synthetics mixture fabrics (non-color fast) | G | Cold wash | II | ● | ● | ● | ● | 70 | 50 | 0.13 | 2.5 | ||||
| Spin for synthetics | H | Final spin profile for easy care | 10 | - | - | 2.5 | |||||||||
| Wool / Delicate | Sensitive, easy care fabrics made from cotton, synthetics or blended fabrics | N | 40 | cold-40 | Main wash /3 rinses / Final Spin (no intermediate spin) | II | ● | ● | 55 | 50 | 0.30 | 2 | |||
| Hand wash marked easy care, blended fabrics | J | 40 | cold-40 | Main wash /3 rinses / Final Spin (sensitive wash action / no intermediate spin) | II | ● | ● | 45 | 45 | 0.55 | 1.5 | ||||
| Woolens and delicates | K | Final spin profile for woollen | ● | 2.5 | - | - | 2 | ||||||||
| Discharging | P | Drainage | - | - | - | - | |||||||||
* Options available
I Detergent compartment for prewash cycle
II Detergent compartment for wash cycle
*Energy Labelling program acc. to EN 60456:1999 ve IEC 60456 Ed.4 2001
Depending on water, textile and ambient conditions the actual values given on or with the machine can deviate from the declared standard values, as they are tested according to the laboratory conditions.
Auxiliary Function Selection
Select the desired auxiliary function before you push the On/Off button. Related function will be selected but led will be on only after starting the machine. Front door will be locked between 2 minutes after pushing On/Off button. When the front door is locked, its led will be off. To cancel the selected function, you have to push on the related button again. If your machine is on, before canceling the function, you have to stop the machine first and then push the related function button again where the related led will be off. You have to start the program again.

1

2

3
Program operation
You can start the program by pushing On/Off button. Front door will be locked and the led indicator will go on. When machine is on, the program selection knob turns clockwise and takes water in. In B program the program selection knob turns fastly 4 steps forward. This does not mean a failure, it is necessary to allow the washing machine to take the needed amount of water.
If fabric softener is added in the softener compartment, it will be used in the last rinse cycle. If rinse hold is selected, by re-pressing this button, you can continue the program. If no spin is desired, you may leave the rinse hold button pushed. Turn off the machine, select the letter P on the program selection knob and turn on the machine. With this operation, water in the machine will be discharged.
During cotton, synthetic and woolen programs the washing action will stand still on a step before rinse and wash from a period of 10 minutes up to 55 minutes according to the chosen program. This waiting period does not mean a failure.

natural_image
Simple line drawing of a hand holding a pen with circular holes, no text or symbols presentEnd of the program
Wash programs A, B, M and C is finished when the solid line after C on the program selection knob is on top. If rinse hold button is not pushed, the wash program F, G end after delicate spin H and the wash programs N, J end after delicate spin K.

flowchart
graph TD
    A["88"] --> B["K"]
    B --> C["P"]
    C --> D["A"]
    D --> E["B"]
    E --> F["M"]
    F --> G["C"]
    G --> H["F"]
    H --> I["G"]
    I --> J["N"]
    J --> K["H"]
    K --> L["J"]
    L --> M["M"]
    M --> N["M"]
    N --> O["88"]
    O --> P["F"]
    P --> Q["G"]
    Q --> R["C"]
    R --> S["F"]
    S --> T["88"]
    T --> U["H"]
    U --> V["J"]
    V --> W["M"]
    W --> X["88"]
Unloading the machine
Machine stops automatically after the programs are completed. The front door open button led will be on in 1-2 minutes after the end of program. When the led is on, you can open the door, while pushing the door open button. Press the On/Off button to turn off your machine. Turn off the tap. Unload the machine and leave the front door open to air the machine.
Program selection
COTTONS
A, B, C Programs
These programs are used for white and color cotton fabrics.
A: Program with pre-wash (pre-wash, main wash, 3 rinses, spin)
B: Program with main wash (main wash, 3 rinses spin)
M: Cold wash (main wash, 3 rinses spin)
C: Spin
Spin program is applied automatically in A, B and M programs. Should an extra spin is desired, program selection knob should be brought to C.
SYNTHETICS
F, G, H Programs
These programs are designed for synthetic fabrics, naylon clothing, curtains and iron free wool fabrics. Clothing are washed with more water delicately.
F: Program with main wash (main wash, 3 rinses; delicate spin)
G: Cold wash (main wash, 3 rinses; delicate spin)
H: Delicate spin program is applied automatically at the end of F and G washing programs if the Rinse hold button is not selected. If additional delicate spin is desired, the program selection knob should be brought to H.
DELICATES
N: Delicate program is used for washing delicate cloths like curtain or silk fabrics. This program is without prewash and exists of main wash, 3 rinses and delicate spin. Rinse Hold button can be selected during the washing program if desired.
WOOLLENS
J: With program selection, which is without pre-wash, wool fabrics are washed throughly. Main wash, 3 rinses, woollen spin. Rinse hold button can be selected during the washing program if desired.
K: Delicate spin program. If rinse hold button is not selected during J program, 600 rpm delicate spin is applied after the wash cycle. K delicate spin program will be applied if delicate program (N) is chosen. Similarly woollen spin will be applied if woollen program (J) is selected. If additional delicate spin is desired, the program selection knob should be brought to K.
P: If Rinse hold button is selected during the wash programs F, N, J and spin is not desired, water in the machine can be discharged by bringing the program selection knob to P.


Warning! Before turning the program selection knob you should first turn off the machine, then make your selection, and then turn on the machine by pushing the on/off button. Before any washing operation, make sure the power cord is plugged and the tap is on. Also be sure that the discharge hose is placed properly and the front door is closed.
Part 5:
Care and maintenance

natural_image
Three-panel illustration showing hands operating a mechanical device, with no visible text or symbols.Detergent dispenser
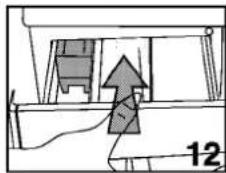
To clean the detergent residues, remove the detergent dispenser from its place by pressing on the area marked on siphon. Wash the dispenser with water and also clean the dispenser housing before inserting the dispenser to its place.
Siphon
Clean the siphon (coloured piece in the dispenser) every 30-40 washes. Pull out the siphon by holding from its edges. To prevent clogging, clean the softener residues thoroughly and make sure that the siphon fits into its place completely before any operation.
natural_image
Illustration of a hand holding a small object inside a device (no text or symbols visible)
natural_image
Illustration of hands using a tool to adjust or install a mechanical component (no text or symbols visible)Water intake filter
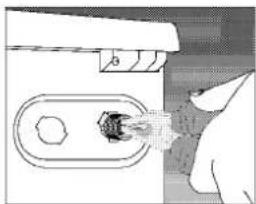
At the end of the water intake connection module and water inlet hose-tap side, there exists filters. These filters prevent any dirt and objects passing into the machine. It is advisable that these filters should be cleaned every 30-40 washes. To clean the filter, first turn the tap off. Then, disconnect the hose and clean the filter with a thin brush. If the filter is very dirty, you may clean it by pulling out with pliers. To clean the filter at the tap side of the hose, pull it out by hand and clean the filter under the tap water.
Hose
To prevent any leakage, have a technician to control the hoses every two years. If the machine is placed at cold ambient temperatures, the water remining inside the pump and hoses should be removed from the filters. Also to prevent freezing, empty the water intake hoses by disconnecting from taps.
Drum
Do not leave any metal objects (pins, needles, etc.) inside the drum. These objects may cause rust on the drum surface. Do not clean the drum with scratching elements.
Cleaning the pump filter
Remove the plug. Open the filter cover by pushing on the marked area shown beside.

Attention! Hot water danger! It is possible that app. 15 It, 90 hot water is inside. Be careful while taking out the filter!
Before taking out the filter, drain the water by means of pump drain hose. Take out the pump drain hose from its place. Take a proper holder to drain the water inside and then open the pump drain hose plug.
When all water is discharged, insert the plug into the pump hose again and replace the pump drain hose in its place.
Open the filter while turning it counterclockwise, drain the left water (max 30 ml) on to the filter cover. If there are any residual parts inside the filter, take them out and clean the filter before replacing it. Then, place the filter while turning it clockwise and at the end, close the filter cover by pushing on the marked area again.
Attention! If the filter and hose plug do not fit into its place, water will leak out from the filter.

Part 6: Determining location and installation
1. Removing transport safety bolts at the rear of the machine

The transport safety bolts must be removed before any operation of the machine. Bolt heads, marked "C".

"C", should be turned in a anti clockwise direction until the bolt can be partially withdrawn.

natural_image
Mechanical assembly diagram showing a shaft and housing with directional arrows indicating motion (no text or symbols)Remove transport safety bolts and rubber bushes by pulling outwards. (A up/down action and a small squirt of washing up liquid should ease
natural_image
Hand holding a circular object with a labeled point P, against a grid background (no text or symbols beyond the label)Plastic plugs, supplied inside the protective bag and designated as "P", should be placed in the safety bolt holes according to the direction shown.

Attention!
Please keep the safety bolts for future transportation and reinstate them before transporting your machine. Never transport your machine without the transport bolts in position.
Never place your machine on a carpet. This prevents air circulation. The electrical components of the machine may overheat and may cause damage.
2. Feet adjustment
In order for quiet and stable operation, the machine should be placed properly and leveled on its feet. Your machine comes with two adjustable feet. If the machine is unstable, loosen the plastic counternut and screw or unscrew the adjustable foot until the machine is leveled perfectly. After positioning, tighten the counternut for stability.

natural_image
Illustration of a hand holding a small object near a wooden frame (no text or symbols visible)3. Water connections
a) Water inlet hose
Cold water supply
For proper operation, the pressure of water should be between 1 and 10 atm. (1 atm corresponds to more than 8 liters per minute flow rate at fully open tap.)
To prevent water leaks sealing washers are supplied with the water inlet hose inside the machine, place these on each of the hose ends and tighten both ends fully.
In order to prevent any water leak damages, keep the water taps closed when not in use. Connect the cornered end of the hose to the machine water inlet.

Connect the cold water using the hose with blue printing and connect the hot water using the hose with red printing.

natural_image
Hand holding a tool interacting with a mechanical component (no visible text or symbols)b) Water drain hose
Water drain hose could be placed either at the side of the bath tub, or directly to the drain. The hose should not be bent. Water drain hose should be secured with the elbow so that it would not fall down on the ground.

The hose should be placed between 40 and 100 cm. from the ground.
4. Electrical connection
Connect the power cord to the appropriate electrical system which is being supported by the maximum voltage and current rating indicated on the rating plate placed inside the kick plate.
Look! Page 1, Steps before operating Fullautomatic Washing Machine and safety precautions.

natural_image
Simple line drawing of a circular electrical socket with three dots and a small square on the side (no text or symbols)Make sure that you have grounded power outlet.
Part 7: Helpful tips on stain removal
The following stain removing tips are approximate and can only be used at the washable fabrics. Please consult the washing information of the fabric manufacturer.
Ratios are approximated.

Alcoholic baverages: Wipe the fabric first with water, then water-glycerine solution and rinse with vinegar-water solution.

Shoe polish: Without harming the fabric, remove the stain carefully and grind it with detergent. If this doesn't help, prepare a water to alcohol solution (2 to 1) and rub the fabric, then wash it with warm water.

Tea and coffee: Pour hot water on to the stain and the fabric is white, pour some bleach and rinse it with water.

Bubblegum: Harden the gum stain by putting an ice on it. Then scrape off the stain carefully.

Chocolate and cocoa: Place the fabric into cold water for a period of time. Rub it with soap or detergent and wash it with the warmest water that the fabric can withhold. If any grease stain leftover wipe it with oxygen water.

Tomato paste: Scrape the hardened paste and leave the fabric for 40 minutes into cold water. Rub it with detergent and wash.

Egg stain: If the stain is hardened scrape the stain and wipe it with wet sponge or a soft cloth. Rub it with detergent and wash with cold water.

Grease stain: Scrape the stain and rub it with detergent. Then wash the fabric with warm water.

Mustard: Use glycerin and rub the fabric with detergent. If unsuccessful, wipe the stain with alcohol. (Colored and synthetic fabrics need 2 cups water and 1 cup alcohol solution.)

Blood stain: Leave the fabric for 30 minutes in the cold water. Use ammonia solution to remove the stain. (4 liters water-3 spoonful of ammonia.)

Ice-cream, milk and cream: Place the fabric into cold water for a period of time. Rub it with soap or detergent and wash it with the warmest water that the fabric can withhold. If any grease stain leftover wipe it with oxygen water.

Mildew: Do not let mildew stains stay for long periods of time. Place the fabric into cold water for a period of time. Rub it with soap or detergent and wash it with the warmest water that the fabric can withhold. If any grease stain leftover wipe it with oxygen water.

Fruit: Pour cold water on to the stain and do not use warm water to rinse. Let it sit for 2 hours and wipe it with white vinegar and rinse.

Ink: Let the cold water run on the stain and wait until the stain is gone. Later rub it with lemon juice and detergent, let the stain stay for five minutes and rinse the fabric.

Grass stain: Rub the stain with detergent. If the fabric lets, use bleaching element. Wools should be wiped with alcohol.

Paint: Use thinner to remove the stain. Put a cotton cloth on the wool fabrics. Rub the stain with detergent and rinse with cold water.

Burnt stains: Use bleach if permissible. For wool fabrics place a oxygen water inserted cotton cloth on the stain and iron. Rinse completely and wash the fabric.
Part 8:
Before calling service

You turned the machine on, but the leds are off on the panel.
Check the grounding on the power cable or a blown fuse. Check the front door proper closure.

Water coming from beneath the machine.
Check the water intake and drain hoses. Tighten the connections. The washers of the hoses may be worn out. If non of the both, the pump filter is not closed properly.

Machine does not take water.
Check the front door for proper closure. Either taps are closed or water intake filters are clogged.

Foam coming out of the detergent dispenser.
Check whether your detergent is suitable for automatic machines. Next time use less detergent.

Taken water is directly discharged.
Check if the discharge hose placed as described in the users manual or not.

Pump does not drain water.
Clean the pump filter. Check whether the drain hose is bent or not. If there is need to clean the pump filter, refer to the pump filter cleaning section of the manual.
Descriptions of the international textile care label (ITCL) symbols

Washing temperature

Bleach can be used

Do not use bleach

Do not machine wash

Dry on horizontal surface

Do not wash
Dry clean
Chemicals can be used

No dry cleaning

No spin

Can be washed at centrifugal machine

Do not wash centrifugal machine

Line dry

Iron permitted

Do not iron

Warm iron
- BRU
- TABLA DE TEMAS
- Parte 1:
- Parte 2:
- Parte 3:
- Parte 4:
- Parte 5:
- Parte 6:
- Parte 7:
- Parte 1: | Etapas previas a la utilización de vuestra lavadora y precauciones de seguridad.
- Apertura de la puerta delantera
- Parte 2: Características técnicas.
- Parte 3: Determinación de la colacación y preparación.
- Desmontaje de los anclajes de seguridad utilizados para el transporte
- Atención!
- Regulación de los pies
- Conexión de los tubos de agua
- a) Tubo de entrada de agua
- b) Tubo de evacuación de agua
- Conexiones eléctricas
- Panel de control
- Preparación
- Carga de la lavadora
- Elección de la ropa
- Elección de los productos de lavado y del suavizante.
- Elleccion de Programas
- Distribución de los productos de lavado
- Cubeta de detergente
- Programa Rapido
- Flot antiarrugas
- Extra Aclarado
- Lavado Intensivo (EL 1001)
- Selector De Velocidad (EL 1001)
- Selección de programas y funcionamiento de la lavadora
- Selección de las funciones auxiliares
- Fin del programa
- Vaciado de la lavadora
- Parte 5: Mantenimiento y conservación
- Distribuidor detergentes
- Sifón
- Tubos
- Filtro de entrada de agua
- Tambor
- Limpieza del filtro de la bomba
- Parte 6: Consejos prácticos para eliminar las manchas
- Parte 7: Antes de llamar al servicio de postventa
- Descripción de los símbolos ITCL (International Textile Care Label, etiquetas internacionales de cuidado de los
- CONTENTS
- Part 1: Technical features
- Part 2: Steps before operating Fullautomatic Washing Machine and safety precautions.
- Part 3: Preparation
- Attention!
- Sorting laundry
- To open the front door
- Loading the machine
- Detergent and softener selection
- Detergent Dispenser
- Control Panel
- Functions
- Quick wash
- Rinse hold
- Rinse plus
- Intensive Wash
- Spin speed selection knob (only for EL 1001)
- Part 4:
- Program Selection and Washing Machine Operation
- Program selection
- Auxiliary Function Selection
- Program operation
- End of the program
- Unloading the machine
- COTTONS
- A, B, C Programs
- SYNTHETICS
- F, G, H Programs
- DELICATES
- WOOLLENS
- Part 5:
- Care and maintenance
- Siphon
- Water intake filter
- Hose
- Drum
- Cleaning the pump filter
- Part 6: Determining location and installation
- Removing transport safety bolts at the rear of the machine
- Feet adjustment
- Water connections
- a) Water inlet hose
- Cold water supply
- b) Water drain hose
- Electrical connection
- Part 7: Helpful tips on stain removal
- Part 8:
- Before calling service
- Descriptions of the international textile care label (ITCL) symbols
Marque : BRU
Modèle : EL 0601
Catégorie : Lave-linge