
MC-E754 - Aspirateur PANASONIC - Notice d'utilisation et mode d'emploi gratuit
Retrouvez gratuitement la notice de l'appareil MC-E754 PANASONIC au format PDF.


| Type de produit | Aspirateur traîneau |
| Marque | Panasonic |
| Modèle | MC-E754 |
| Alimentation | Secteur |
| Puissance | 2000 W |
| Capacité du réservoir | 2 L |
| Type de filtre | HEPA lavable |
| Longueur du câble | 8 m |
| Rayon d'action | 10 m |
| Niveau sonore | 75 dB |
| Poids | 5,5 kg |
| Dimensions (L x P x H) | 40 x 30 x 25 cm |
| Matériau du corps | Plastique ABS |
| Accessoires inclus | Suceur sols, suceur fentes, brosse turbo, suceur meubles |
| Système de sac | Avec sac jetable |
| Indicateur de sac plein | Oui, visuel |
| Rangement | Vertical, avec crochet de câble |
| Entretien du filtre | Lavage à l'eau tous les 3 mois |
| Garantie | 2 ans |
FOIRE AUX QUESTIONS - MC-E754 PANASONIC
Questions des utilisateurs sur MC-E754 PANASONIC
0 question sur cet appareil. Repondez a celles que vous connaissez ou posez la votre.
Poser une nouvelle question sur cet appareil
Téléchargez la notice de votre Aspirateur au format PDF gratuitement ! Retrouvez votre notice MC-E754 - PANASONIC et reprennez votre appareil électronique en main. Sur cette page sont publiés tous les documents nécessaires à l'utilisation de votre appareil MC-E754 de la marque PANASONIC.
MODE D'EMPLOI MC-E754 PANASONIC
Operating Instructions
Vacuum Cleaner
MC-E750UK, MEC-E751UK, MC-E52UK
natural_image
Line drawing of a vacuum cleaner with armrests and a sofa in the background (no text or symbols)Panasonic
Dear Customer,
May we take this opportunity to thank you for purchasing this Panasonic Vacuum Cleaner.
We would particularly advise that you carefully study this Operating Instructions before attempting to operate the unit and that you note the listed Important Safety Instructions.
This appliance was produced to EN 55014:1987
TABLE OF CONTENTS
- Caution for AC Mains Lead.
- Important safety instructions/Cautions.
• Identification of main parts.
• A) How to assemble your cleaner.
• B) How to operate your cleaner.
• C) Dust bag check indicator.
• D) How to replace dust bag.
• E) Filter care.
• F) How to store your cleaner.
• G) Accessory (Optional).
REMINDER FOR CUSTOMER
The model and serial number of this product may be found on the name plate located at the back of your cleaner. You should note the model and serial number in the spaces provided and retain this book as a permanent record of your purchase.
Model Number:
Serial Number:
Date Purchased:
Where Purchased:
CAUTION FOR AC MAINS LEAD
FOR YOUR SAFETY PLEASE READ THE FOLLOWING TEXT CAREFULLY
This appliance is supplied with a moulded three pin mains plug for your safety and convenience.
A 13 amp fuse is fitted in this plug.
Should the fuse need to be replaced please ensure that the replacement fuse has a rating of 13 amps and that it is approved by ASTA or BSI to BS1362.
Check for the ASTA mark 📄 or the BSI mark 🌐 on the body of the fuse.
If the plug contains a removable fuse cover you must ensure that it is refitted when the fuse is replaced.
If you lose the fuse cover the plug must not be used until a replacement cover is obtained.
A replacement fuse cover can be purchased from your local Panasonic Dealer.
IF THE FITTED MOULDED PLUG IS UNSUITABLE FOR THE SOCKET OUTLET IN YOUR HOME THEN THE FUSE SHOULD BE REMOVED AND THE PLUG CUT OFF AND DISPOSED OF SAFELY.
THERE IS A DANGER OF SEVERE ELECTRICAL SHOCK IF THE CUT OFF PLUG IS INSERTED INTO ANY 13 AMP. SOCKET.
If a new plug is to be fitted please observe the wiring code as shown below.
If in any doubt please consult a qualified electrician.
IMPORTANT: The wires in this mains lead are coloured in accordance with the following code:
Blue: Neutral
Brown: Live
As the colours of the wire in the mains lead of this appliance may not correspond with the coloured markings identifying the terminals in your plug, proceed as follows:
The wire which is coloured BLUE must be connected to the terminal in the plug which is marked with the letter N or coloured BLACK.
The wire which is coloured BROWN must be connected to the terminal in the plug which is marked with the letter L or coloured RED.
Under no circumstances should either of these wires be connected to the earth terminal of the three pin plug, marked with the letter E or the Earth Symbol.
How to replace the Fuse
- There are two types of the supplied AC Mains Lead: Ⓐ and Ⓑ as shown below.
1 Open the fuse compartment with a screwdriver.
2 Replace the fuse and fuse cover if detachable.


Fuse cover Part No.: AMC8GD48C0000
TYPE A
IMPORTANT SAFETY INSTRUCTIONS FOR THE USER
When using this vacuum cleaner, please observe these basic precautions. WARNING: To reduce the risk of fire, electric shock, or injury:
- Do not leave the vacuum cleaner plugged in to mains outlet when not in use or when maintenance is required.
- Electric shocks can occur if used outdoors or on wet surfaces.
- Do not allow the cleaner to be used as a toy. Close attention is necessary when using by or near children.
- Do not use the cleaner with damaged cord or plug. If the vacuum cleaner is not working as it should be, or has been dropped, damaged, left outdoors, or come into contact with water, consult an authorised Panasonic Service Agent.
- Do not pull or carry by cord, use cord as a handle, close a door on cord, pull cord around sharp edges or corners. Do not run vacuum cleaner over the cord. Keep cord away from heated surfaces.
- Do not handle plug or vacuum cleaner with wet hands.
- Do not put any object into openings. Do not use with any openings blocked; keep free of dust, lint, hair and anything that may block or reduce air flow.
- Do not use without dust bag and/or filters in place.
- Turn off all controls before unplugging.
- Use extra care when cleaning on stairs.
- Do not use to pick up flammable or combustible liquids such as gasoline or use in areas where they may be present.
- This appliance should be serviced by an authorised Panasonic Agent, and only genuine Panasonic spare parts should be used.
NOTE: These vacuum cleaners have been designed for normal household use. Do not use in garage or outdoors.
CAUTIONS
This cleaner includes an automatic thermal safety device which automatically turns off the power if the suction inlet, hose or extension wand is clogged. If this occurs, disconnect from the mains, remove the material responsible for the clogging and then wait about ten minutes, before operating your cleaner again.

natural_image
Illustration of a cigarette crossed with a pen, no text or symbols present1) Never let the cleaner pick up wet matter, mud, burning ashes, etc.

natural_image
Abstract black-and-white sketch of crossed tools and objects (no text or symbols)2) Before using the cleaner, remove large or sharp objects from the floor to avoid damaging the dust bag.

natural_image
Illustration of a robotic car with a crossed-out sensor array and a diagonal line (no text or symbols)3) Keep the cleaner away from heat sources such as electrical fires, etc.
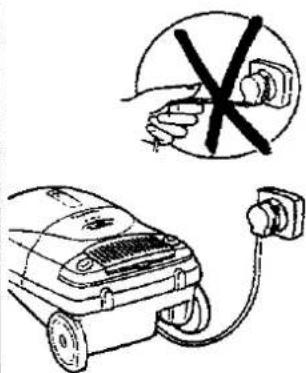
4) Do not pull on the cord when disconnecting it from the mains, always pull on the plug body itself.
This appliance is provided with a flexible cord and if this becomes damaged, it must be repaired by an Authorised Service Center, as a special tool is required.
IDENTIFICATION OF MAIN PARTS
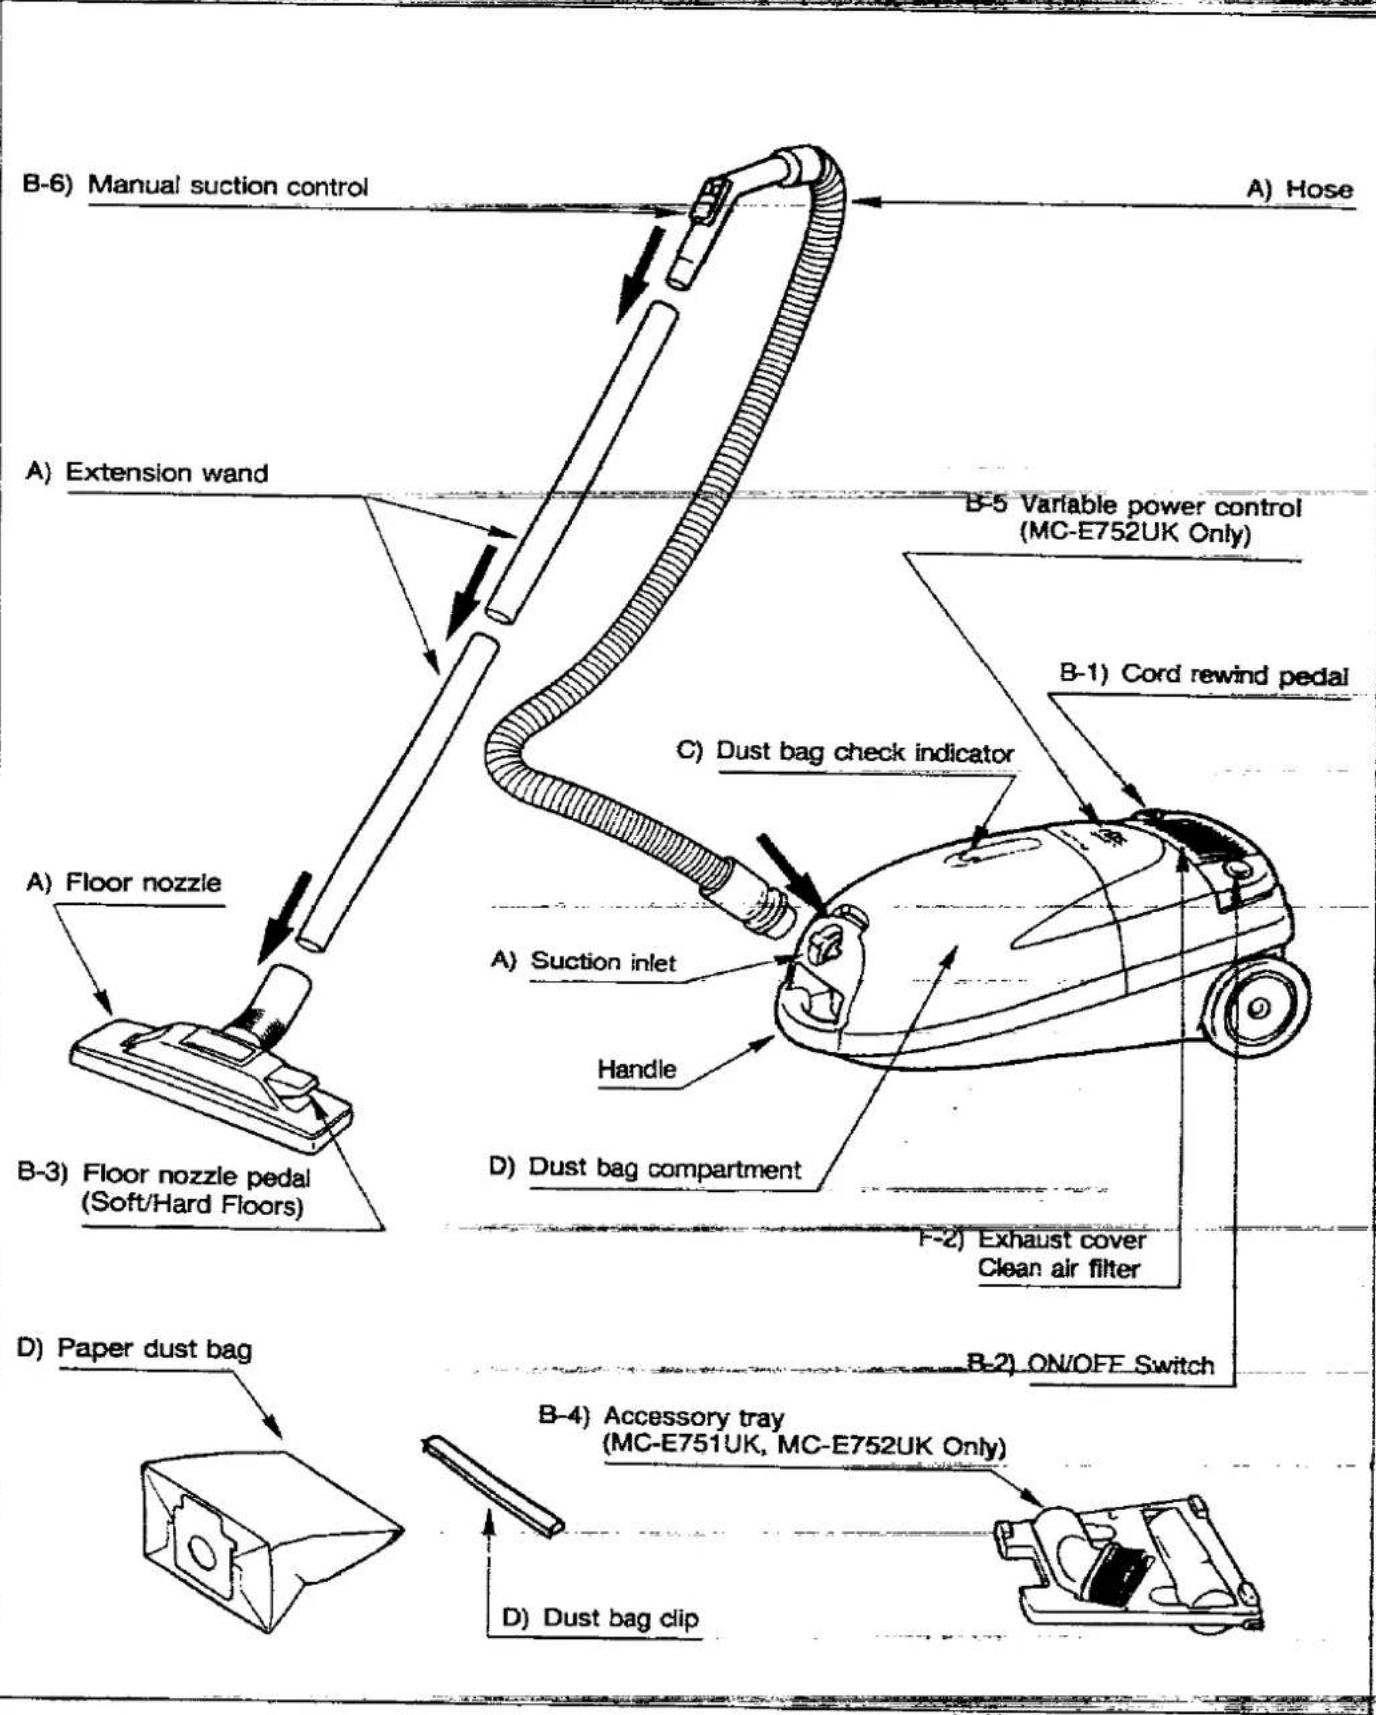
flowchart
graph TD
    A["Manual suction control"] --> B["A) Floor nozzle"]
    B --> C["B-3) Floor nozzle pedal (Soft/Hard Floors)"]
    C --> D["D) Paper dust bag"]
    D --> E["B-4) Accessory tray (MC-E751UK, MC-E752UK Only)"]
    E --> F["D) Dust bag clip"]
    F --> G["B-2) ON/OFF Switch"]
    G --> H["F-2) Exhaust cover Clean air filter"]
    H --> I["D) Dust bag compartment"]
    I --> J["Handle"]
    J --> K["A) Suction inlet"]
    K --> L["C) Dust bag check indicator"]
    L --> M["B-5 Variable power control (MC-E752UK Only)"]
    M --> N["A) Extension wand"]
    N --> O["B-6) Manual suction control"]
    style A fill:#f9f,stroke:#333
    style B fill:#ccf,stroke:#333
    style C fill:#cfc,stroke:#333
    style D fill:#fcc,stroke:#333
    style E fill:#cff,stroke:#333
    style F fill:#ffc,stroke:#333
    style G fill:#fcc,stroke:#333
    style H fill:#ffc,stroke:#333
    style I fill:#cfc,stroke:#333
    style J fill:#fcc,stroke:#333
    style K fill:#cfc,stroke:#333
    style L fill:#fcc,stroke:#333
    style M fill:#cfc,stroke:#333
    style N fill:#fcc,stroke:#333
    style O fill:#cfc,stroke:#333
    style P fill:#fcc,stroke:#333
    style Q fill:#cfc,stroke:#333
    style R fill:#fcc,stroke:#333
    style S fill:#cfc,stroke:#333
    style T fill:#fcc,stroke:#333
    style U fill:#cfc,stroke:#333
    style V fill:#fcc,stroke:#333
    style W fill:#cfc,stroke:#333
    style X fill:#fcc,stroke:#333
A) HOW TO ASSEMBLE YOUR CLEANER

B) HOW TO OPERATE YOUR CLEANER
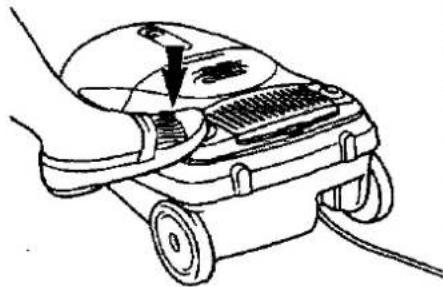
B-2) ON/OFF Switch
B-1) Cord connection
Automatic cord rewind

natural_image
Line drawing of a vacuum cleaner connected to a power outlet (no text or symbols)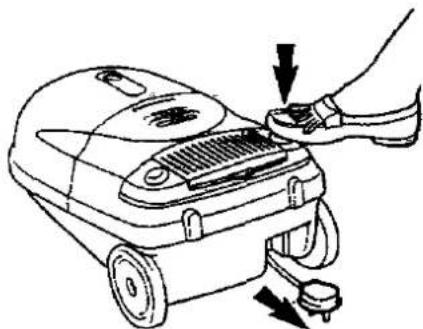
natural_image
Line drawing of a hand using a vacuum cleaner to adjust or install a component (no text or symbols present)Rewind the cord, pressing the pedal.
natural_image
Line drawing of a hand using a vacuum cleaner to clean or install a component (no text or symbols visible)Start or stop the cleaner pressing the pedal.
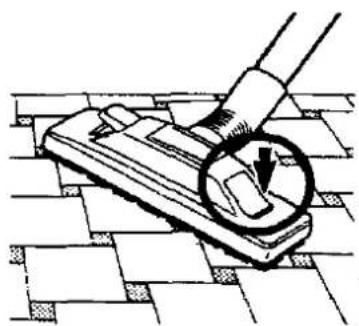
B-3) Floor nozzle selector pedal
natural_image
Technical line drawing of a mechanical component with a circular inset showing a tool (no text or symbols)
natural_image
Illustration of a hand using a tool to measure a surface, with a magnified inset showing a circular detail (no text or symbols)
natural_image
Technical line drawing of a mop handle assembly with two variants (no text or symbols)Hard floor
Carpet
Regularly clean the vacuum cleaner-head to remove entangled fibres
B-4) Accessories
Accessory tray (MC-E751UK, MC-E752UK Only)

B-5) Variable Power Control (MC-E752UK Only)
This vacuum cleaner has a variable power control to select the most suitable power required for your cleaning needs.

B-6) Manual suction control
Adjust the suction to suit the cleaning condition.

Curtains
Upholstery
Quick cleaning for hard flooring
For more in-grained dirt on carpets


natural_image
Five abstract geometric patterns with no text or symbolsNormal cleaning

natural_image
Four-panel illustration showing hand-cranked cleaning techniques: surface inspection, tool handling, metal cutting, and sand rolling (no text or symbols)Note: These vacuum cleaners have been designed for normal household use. Do not use in garage or outdoors.

DUST BAG CHECK INDICATOR
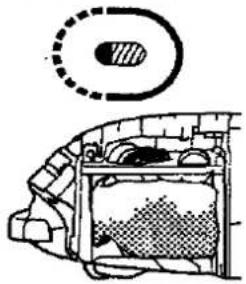
The check bag indicator (yellow mark) will appear in the window, when airflow through the bag is insufficient. Check the paper bag, it may be full or blocked with fine dust and needs to be emptied or replaced.
NOTE: If after emptied or replaced the bag, the indicator (yellow mark) continues appearing, check to see if the hose or connection pipe is clogged.
natural_image
Diagram of a mechanical or architectural component with a circular inset showing a circular feature and a textured interior (no text or symbols)
natural_image
Diagram of a mechanical or architectural component with a circular inset showing a circular feature (no text or symbols)
HOW TO REPLACE THE REUSABLE DUST BAG

1) Pull dust cover up to remove lid and accessories tray.

natural_image
Hand holding a pen with a magnified inset showing a pointed object (no text or symbols)3) Slide the clip off the bottom of the bag to empty its content. Fold the open end up and replace the clip.
The dust bag can be re-used once or twice. Dust bags should be changed regularly for maximum efficiency of vacuum cleaner.
IMPORTANT: Fold the dust bag 2 times to avoid dust leakage. (Be careful not to throw away the clip).

2) Puch the clamp forwards and take out dust bag by pulling cardboard up.

4) Insert new dust bag by guiding cardboard into the guide slots and push forwards.

5) Replace accessories tray and dust cover.
NOTE: When the dust bag is not installed or it has not been installed correctly, the dust cover will not close.
We recommend the use of genuine Panasonic bags Type C-2ER only.

FILTER CARE
Central Filter (Fig. 1) Part No. AMC8GF03D1100
The central filter (foam filter), is installed in the dust bag compartment to protect the motor from dirt.
When it becomes dirty, simply rinse it out in warm water and dry thoroughly before replacing.
To remove the central filter, hold filter at the top (as illustrated) and pull it up.
Important: Ensure that the filter is dry before re-installing it into the cleaner.
Clean Air Filter (Fig. 2) Part No. AMC8GF28E1000
The clean air filter (electrostatic filter), is installed in the exhaust cover situated in the top rear side of the cleaner.
This filter retains any small dust particles which may be present in the expelled air.
It is advisable to change the clean air filter when it becomes dirty. As a guide, once or twice a year is usually sufficient.
To change the clean air filter, pull up the exhaust cover (as illustrated) and remove the filter.
NOTE: Never use the cleaner without the correct filters properly installed. Failure to do so may result in motor damaged.

natural_image
Diagram of a car interior showing hand positioning and valve mechanism (no text or symbols)
Fig. 1
Fig. 2
IMPORTANT: Do not forget to re-install the filters before using the vacuum cleaner.

HOW TO STORE YOUR CLEANER
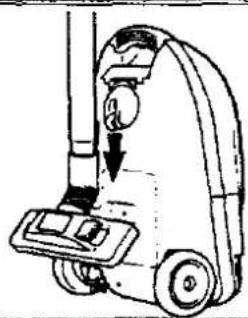
For easy storage and transportation, this vacuum cleaner has a clip system built onto the body, which will keep the extension wand, hose and nozzle in a vertical position.
natural_image
Line drawing of a vacuum cleaner with a downward arrow indicating motion (no text or symbols)
ACCESSORY (Optional)
Cloth re-usable bag
Part. no. AMC8GF9931300

natural_image
Simple line drawing of a folded garment or cushion (no text or symbols)Panasonic España, S.A.
DIVISION DE ASPIRADORAS
Zona Industriai del Polígono de CELRA
17460 CELRA (Girona-Spain)
- Operating Instructions
- Panasonic
- TABLE OF CONTENTS
- REMINDER FOR CUSTOMER
- CAUTION FOR AC MAINS LEAD
- FOR YOUR SAFETY PLEASE READ THE FOLLOWING TEXT CAREFULLY
- IMPORTANT SAFETY INSTRUCTIONS FOR THE USER
- CAUTIONS
- DUST BAG CHECK INDICATOR
- HOW TO REPLACE THE REUSABLE DUST BAG
- FILTER CARE
- Central Filter (Fig. 1) Part No. AMC8GF03D1100
- Clean Air Filter (Fig. 2) Part No. AMC8GF28E1000
- HOW TO STORE YOUR CLEANER
- ACCESSORY (Optional)
Marque : PANASONIC
Modèle : MC-E754
Catégorie : Aspirateur