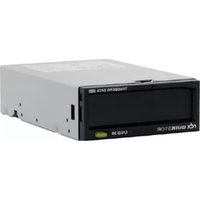
Overland RDX QuikStor - Stockage de données Tandberg Data - Notice d'utilisation et mode d'emploi gratuit
Retrouvez gratuitement la notice de l'appareil Overland RDX QuikStor Tandberg Data au format PDF.


| Type de produit | Stockage de données externe sur disque amovible RDX |
| Marque | Tandberg Data |
| Modèle | Overland RDX QuikStor |
| Dimensions (L x l x h) | 17,0 x 14,0 x 4,0 cm |
| Poids | 0,5 kg |
| Alimentation | Adaptateur secteur 100-240 V AC, 50/60 Hz |
| Interface de connexion | USB 3.0 et eSATA |
| Capacité maximale prise en charge | Jusqu'à 5 To par cartouche RDX |
| Vitesse de transfert | Jusqu'à 300 Mo/s en lecture, 250 Mo/s en écriture |
| Compatibilité système | Windows, macOS, Linux |
| Fonctions principales | Lecture/écriture de cartouches RDX, sauvegarde automatique, hot-swap |
| Logiciel inclus | Logiciel de sauvegarde et de restauration |
| Entretien et nettoyage | Nettoyer avec un chiffon doux et sec. Ne pas utiliser de solvants. |
| Sécurité | Protection contre les chocs, éviter les sources magnétiques et l'humidité |
| Pièces détachées et réparabilité | Cartouches RDX disponibles en option. Pièces non réparables par l'utilisateur. |
| Température de fonctionnement | 5 °C à 40 °C |
| Humidité de fonctionnement | 8 % à 90 % sans condensation |
FOIRE AUX QUESTIONS - Overland RDX QuikStor Tandberg Data
Questions des utilisateurs sur Overland RDX QuikStor Tandberg Data
0 question sur cet appareil. Repondez a celles que vous connaissez ou posez la votre.
Poser une nouvelle question sur cet appareil
Téléchargez la notice de votre Stockage de données au format PDF gratuitement ! Retrouvez votre notice Overland RDX QuikStor - Tandberg Data et reprennez votre appareil électronique en main. Sur cette page sont publiés tous les documents nécessaires à l'utilisation de votre appareil Overland RDX QuikStor de la marque Tandberg Data.
MODE D'EMPLOI Overland RDX QuikStor Tandberg Data
TANDBERG DATA

A SUBSIDIARY OF

Sphere3D
RDX® QuikStor™
Internal USB and Internal SATA

WHAT'S IN THE BOX?
1

natural_image
Two types of USB connectors shown in 3D rendering, labeled 'for USB 3.0' and 'for SATA', with no additional text or symbols present.2

3
4

5

6

- USB or SATA Cable
- Power Adapter Cable
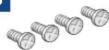
- Mounting Screws
- AccuGuard License Activation Card Note: AccuGuard software is only included with selected RDX products
- Quick Start Guide
- RDX Emergency Media Eject Pin
For RDX Warranty Registration and Technical Support Activation visit:
http://registration.tandbergdata.com/

natural_image
Exterior view of a black rack-mounted electronic device with ports and a logo (no readable text or symbols beyond branding)For More Information
Visit the support section of the Tandberg Data web site (www.tandbergdata.com) for more information, including product warranty and registration, knowledge base articles, user documentation and technical support.
Power Ratings
The following power ratings represent typical-use performance
| Power Source | DC Input Voltage and Rated Input Current |
| USB 3.0 | 5V/0.9A and 12V/0.003A |
| SATA | 5V/1.5A |
Available External RDX Drives:
8782-RDX: Tandberg RDX External USB3+ Drive, bare 8781-RDX: Tandberg RDX External USB3+ Drive, with software (Includes AccuGuard Server for RDX deduplication backup software)
FCC Compliance Notice

NOTE: This equipment has been tested and found to comply with the limits for a Class B digital device, pursuant to part 15 of the FCC Rules. These limits are designed to provide reasonable protection against harmful interference in a residential installation. This equipment generates, uses and can radiate radio frequency energy and, if not installed and used in accordance with the instructions, may cause harmful interference to radio communications. However, there is no guarantee that interference will not occur in a particular installation. If this equipment does cause harmful interference to radio or television reception, which can be determined by turning the equipment off and on, the user is encouraged to try to correct the interference by one or more of the following measures:
- Reorient or relocate the receiving antenna.
- Increase the separation between the equipment and receiver.
- Connect the equipment into an outlet on a circuit different from that to which the receiver is connected
- Consult the dealer or an experienced radio/ TV technician for help.
产品中有毒有害物质或元素的名称及含量
| 部件名称 | 有毒有害物质或元素 | |||||
| 铅(Pb) | 汞(Hg) | 镉(Cd) | 六价铬(Cr(VI)) | 多溴取苯(PBb) | 多溴二苯醚(PBDE) | |
| 机箱/风扇 | X | O | O | O | O | O |
| 印刷电路板组件 | X | O | O | O | O | O |
○:表示该有毒有害物质在该部件所有均质材料中的含量均在 SJ/T11363-2006 标准规定的限量要求以下。 X:表示该有毒有害物质至少在该部件的某一均质材料中的含量超出 SJ/T11363-2006 标准规定的限量要求。

P/N 433822 Rev. J
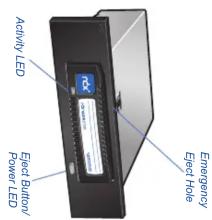
RDX QuikStor Features and LED Status
| LED State | Media LED | Drive LED | |||
| Color | Activity | Status | Description | Status | Description |
| OFF | NOT READY | Media is not inserted properly or is powered down due to low power/mode and host inactivity. | POWER DOWN | Drive does not have power. | |
| STEADY GREEN | READY | Media is ready | READY | RX is ready and working properly | |
| BLINKING GREEN | ACTIVITY | Reading, writing, seeking | EJECTING | Drive is ejecting Media | |
| STEADY AMBER | FAULT | RX has detected a Media full condition for more information, run a diagnostic application. | FAULT | RX has detected a Drive fault condition. Features information, run a diagnosis application. | |
| STEADY GREEN | N/A | PREVENT | Host computers accessing the media and the user has pressed the Eject button. The drive will eject the media after the Host access completes. | ||
Media LED
START HERE
1 Install RDX Utility
Note: The RDX Utility installs only on Windows.
- Go to www.Tandbergdata.com.
- Choose "Support" from the main menu.
- Click on "Drivers" and Downloads at the right hand side of the page.
- Click the "Go"-Button near RDX QuikStor.
- Choose "RDX_Utility.zip".
- Click on "Download RDX Utility".
- Register and download the RDX Utility.
- Unpack the zip-file, start "setup.exe" and follow the installation instructions.
2 Mount the RDX QuikStor

- Power off the computer and open the server cover.
- Slide the RDX QuikStor into the drive opening.
- Secure the dock with the four supplied mounting screws.
3 Connect Data and Power Cables

For further Product Information, Knowledge Base and Technical Support visit www.tandbergdata.com
- Connect the data cable to motherboard or controller card and then connect both data cable and power cable to the back of the RDX QuikStor. The Dock connections are keyed to ensure the correct fit.
SATA interface: SATA controller driver and BIOS support for AHCI is required, please verify and enable AHCI before you install the operating system on your computer device.
USB interface: If you encounter connectivity problems, please order the appropriate aaccessory cable:
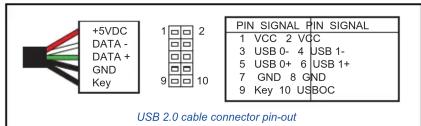
Partno. 1020916: USB 3.0 cable intern 810mm (2x10Pin to Type B) Partno. 433820: USB 2.0 cable intern 810mm (Type B to 2.54 Pitch 5PIN)
Warning: Connecting the USB 2.0 cable incorrectly to the PC will result in damage. Verify pin layout on the motherboard versus the cable connector pin-out (see diagram). Consult your motherboard manual for the pin1 location on the mating USB connector.
- Reinstall the server cover and turn on the computer.
- Download and install the latest RDX drive firmware.
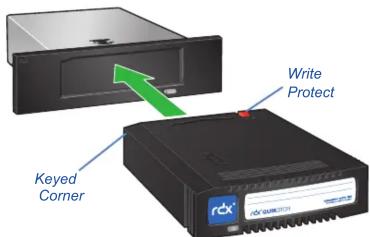
4 Load RDX Cartridge
5 Install AccuGuard Server for RDX
Tandberg Data AccuGuard is only included with selected RDX products. If your product includes a licence activation card, follow the instructions for download and installation.


Marque : Tandberg Data
Modèle : Overland RDX QuikStor
Catégorie : Stockage de données