
103 - Vélomoteur PEUGEOT - Notice d'utilisation et mode d'emploi gratuit
Retrouvez gratuitement la notice de l'appareil 103 PEUGEOT au format PDF.


| Type de produit | Vélomoteur |
| Marque | Peugeot |
| Modèle | 103 |
| Motorisation | Moteur 2-temps, 49 cm³ |
| Puissance | 1,5 ch |
| Transmission | Variateur automatique |
| Allumage | Électronique ou à rupteur |
| Démarrage | Au kick |
| Réservoir | 4 litres |
| Consommation | 2 L/100 km |
| Lubrification | Mélange huile-essence à 2% |
| Frein avant | Tambour |
| Frein arrière | Tambour |
| Suspension avant | Fourche télescopique |
| Suspension arrière | Amortisseurs |
| Pneus | 2.50-17 (avant et arrière) |
| Poids à vide | 45 kg |
| Hauteur de selle | 750 mm |
| Vitesse maximale | 45 km/h (bridé) |
| Cadre | Acier tubulaire |
FOIRE AUX QUESTIONS - 103 PEUGEOT
Questions des utilisateurs sur 103 PEUGEOT
0 question sur cet appareil. Repondez a celles que vous connaissez ou posez la votre.
Poser une nouvelle question sur cet appareil
Téléchargez la notice de votre Vélomoteur au format PDF gratuitement ! Retrouvez votre notice 103 - PEUGEOT et reprennez votre appareil électronique en main. Sur cette page sont publiés tous les documents nécessaires à l'utilisation de votre appareil 103 de la marque PEUGEOT.
MODE D'EMPLOI 103 PEUGEOT
PEUGEOT
OWNER'S MANUAL
OPERATION AND MAINTENANCE
MOPEDS
103

natural_image
Silhouette of a lion in dynamic pose, no text or symbols presentCYCLES PEUGEOT (U.S.A.), INC.
540 East Alondra Boulevard, Gardena, California 90247
Cycles Peugeot (U.S.A.), Inc. is a subsidiary of Cycles Peugeot S.A., 25700 Valentigney, France, a French Limited Company administered according to sections 118 to 150 of the law governing commercial companies.

natural_image
Black-and-white photo of a person standing beside a vintage three-wheeled bicycle outdoors, with bare trees and distant hills in the background (no visible text or symbols)MOPEDS
103 LS-U1
103 LVS-U2
103 LVS-U3
103 L2-U1
103 L2-U2
103 L2-U3
103 SP-U2
103 SP-U3
NOW THAT YOU HAVE CHOSEN A
PEUGEOT...
Thank you for your confidence in PEUGEOT. We hope that your Moped will give you long service, as well as all the riding pleasure and satisfaction you expect.
Like all good machines, your PEUGEOT will need some good care and attention in order to insure the long life of all of its fine qualities.
Vie hope you take an active part in caring for your PEUGEOT, and this handbook has been designed to give you our best advice on maintenance procedures. Please take time to read both the PEUGEOT manual and the warranty card.
All of us at PEUGEOT wish you safe and happy riding.
TABLE OF CONTENTS
INTRODUCTION Page 1
TECHNICAL INFORMATION 3
dimensions and weights 3
frame and equipment 3
suspension system 3
braking system 3
engine 3
performance chart 4
dutch and transmission 4
lighting equipment and horn 4
identification 4
security and tools 4
clutch and extensible pulley 5
INSTRUMENTS AND CONTROLS 6-7
OPERATING INSTRUCTIONS 8
fuel mixture 8
range 8
fuel valve 8
seat adjustment 8
handlebar adjustment 9
tire pressure 9
brakes, drive knob, lights 9
engine start: operating procedures 10
slowing and stopping 11
parking 11
locking system 11
moped as bicycle Page 12
extended storage 12
after storage 12
MAINTENANCE 13
maintenance schedule 13
chain maintenance 14
drive chain adjustment 14
bicycle chain adjustment 14
spark plug 15
tires 15
brake adjustment: 15
decarbonizing 16
cleaning 16
TROUBLE SHOOTING 17
front wheel removal 17
rear wheel removal 17
tire repair 17
engine trouble : a check list 18
ELECTRICAL SYSTEM 19
lights and ignition switches 19
headlight adjustment 19
lighting specifications 20
removing sealed beam and light bulbs 20
electrical wiring diagrams 21-22
SOME FINAL WORDS 23
TECHNICAL INFORMATION AND EQUIPMENT FEATURES
DIMENSIONS AND WEIGHTS
| 103 L2 U1 | 103 L2 U2 | 103 L2 U3 | 103 SP U2 | 103 SP U3 | 103 LS U1 | 103 LVS U2 | 103 LVS U3 | |
| Wheelbase | 44.09" (1.120 m) | 44.09" (1.120 m) | 44.09" (1.120 m) | 45.07" (1,145 m) | 45.07" (1,165 m) | 44.09" (1,120 m) | 44.09" (1.120 m) | 44.09" (1.120 m) |
| Overall length | 69.29" (1.760 m) | 69.29" (1.760 m) | 69.29" (1.760 m) | 70.27" (1,785 m) | 70.27" (1,785 m) | 69.29" (1,760 m) | 69.29" (1,760 m) | 69.29" (1,760 m) |
| Overall width | 25.30" (0.640 m) | 25.20" (0.640 m) | 25.20" (0.640 m) | 23.62" (0.600 m) | 23.62" (0.600 m) | 25.20" (0.640 m) | 25.20" (0.640 m) | 25.20" (0.640 m) |
| Ground clearance | 4.12" (0.120 m) | 4.72" (0.120 m) | 4.72" (0.120 m) | 6.30" (0.160 m) | 6.30" (0.160 m) | 4.72" (0.120 m) | 4.72" (0.120 m) | 4.72" (0.120 m) |
| Vehicle weight without fuel | 83.3bs. (42.5 kg) | 95.7bs. (42.5 kg) | 93.7bs. (42.5 kg) | 103.62bs. (47 kg) | 103.62bs. (47 kg) | 101.85bs. (46.2 kg) | 103.62bs. (47 kg) | 103.52bs. (47 kg) |
| Vehicle weight with fuel | 99.89bs. (45.3 kg) | 99.86bs. (45.3 kg) | 99.86bs. (45.3 kg) | 109.8bs. (49.8 kg) | 109.8bs. (49.8 kg) | 102.0bs. (49 kg) | 109.8bs. (49.8 kg) | 109.8bs. (49.8 kg) |
| Maximum allowable vehicle weight with fuel and ride | 360bs. (163 kg) | 360bs. (163 kg) | 360bs. (163 kg) | 360bs. (163 kg) | 360bs. (163 kg) | 360bs. (163 kg) | 360bs. (163 kg) | 360bs. (163 kg) |
FRAME AND EQUIPMENT
a. frame made of steel tubing and pressed steel
b. incorporated fuel tank : 1.05 gal (4 liters) capacity
c. tool compartment with tools
d. plastic engine covers
e. luggage carrier
f. central kickstand
g. stainless steel front fender with protective mudflap
h. full cover rear tender
i. tire: size 2 1/4" × 17"
j. soft saddle with tension springs and central "shock-absorber" spring
k. tire pump
SUSPENSION SYSTEM
a. telescopic front fork
b. rear suspension: shock absorbers and telescopic supports
BRAKING SYSTEM
a. front drum brake, internal expansion type, operated by the RIGHT-HAND BRAKE LEVER. Hub diameter 3.5 inches (8.87 cm)
b. rear drum brake, as above, operated by the LEFT-HAND BRAKE LEVER.
ENGINE
The PEUGEOT Moped engine is a single cylinder, air cooled, two-stroke engine, which can drive the rear wheel at a very low RPM.
Specifications :
a. bore and stroke : 40 mm ; 39 mm
b. chromed aluminium cylinder : 49 cm ^3
c. compression ratio: 8,5 to 1
d. carburetor: dia 8,5 mm (103 L5.U1-103 L2.U1) dia. 12 mm (other models) equipped with an intake silencer.
a. ignition: by high voltage "PEUGEOT" flywheel magneto with ignition lead of 0.06" (1.5 mm). Power: 26 w
f. fuel mixture of 50:1 unleaded gasoline and Exxon « Aquaglide » two-stroke motor oil.
g. PEUGEOT Moped is equipped with an approved radio interference suppressing device.
PERFORMANCE CHART
| Type | 103 L2.U1103 LS U1 | 103 L2.U2 | 103 LVS.U2103 SP U2 | 103 L2.U3 | 103 LVS.U3103 SP U3 |
| Speed | 26 mph (2/min) | 25 mph | 18 min | 30 mph | 18 min |
| Maximum RPM | 5,800 | 6,256 | 6,250 | 6,600 | 6,000 |
| Maximum RPM at Torque | 4,000 | 3,006 | 3,000 | 3,600 | 3,500 |
| RPM for Maximum Power | 2,500 | 4,506 | 4,500 | 5,000 | 5,000 |
| Transmission | single speed gear box | automatic | single speed gear box | automatic | |
| Maximum climbing grade | |||||
| Without Pedal Assistance | 12%-14% | 10%-12% | 18%-18% | 12%-14% | 16%-18% |
CLUTCH AND TRANSMISSION
The clutch is composed of two principal parts
1 - The starting clutch
It is a centrifugal clutch which engages automatically when the Moped attains a speed of 3.7 mph.
2 - The second clutch plate engages automatically at 2,500 rpm.
The primary transmission consists of a drive belt running between the pulley wheels on the drive shaft and the bottom bracket axle. The secondary transmission consists of a chain which runs from the bottom bracket axle (fixed sprocket attached) to the sprocket of the rear wheel in a manner similar to that of a bicycle.
Automatic gear change: The PEUGEOT 103 LVS-U2 - 103 SP-U2 - 103 SP U3 and 103 LVS-U3 models are equipped with an automatic gear change. For this purpose, the pulley wheel on the drive shaft is «extensible», that is, driven by the action of centrifugal weights which are moved by centrifugal force (Fig. 2 and 3).
The engine itself is mounted on an axle so that it can pivot backward to accommodate the expansion of the "extensible" pulley wheel. The extensible pulley (Fig. 2 and 3) drives, in turn, the large bottom bracket pulley. The engine is spring-mounted on its axle in order to maintain a proper tension on the drive belt of the primary transmission.
LIGHTING EQUIPMENT AND HORN
Electrical system: The PEUGEOT 6V-26W flywheel magneto Fig. 20.2) powers the headlamp, tail lamp, stoplight (activated by the use of either brake lever), electric horn, and speedometer light (except for types 103.L2 which are not provided with a speedometer light). The Moped is equipped with five reflectors: two amber reflectors mounted on each side of the fork and three red reflectors on the tail light, including the side reflectors and one red rear reflector.
IDENTIFICATION
The PEUGEOT Moped is provided with an identification plate attached to the head steering tube. The serial number of the vehicle is engraved on the plate. The serial number of the engine is engraved on the left side of the cylinder head. Owners should record and file both serial numbers.
SECURITY AND TOOLS
The PEUGEOT Moped is equipped with an anti-theft lock (Fig. 11, Page 11), which immobilizes the front fork in a turning position.
The fuel valve lever (Fig. 6, page 8) which is located under the fuel tank, has three positions: a. OFF, b. ON, c. RESERVE.
The tool compartment, which contains 1: spark plug wrench, 1: 21 m/m wrench, 3: tire levers, 1: 8 × 10 m/m wrench, 1: Schreeder to prestavalve adaptor, 1: tire repair kit, is located in the frame under the seat.


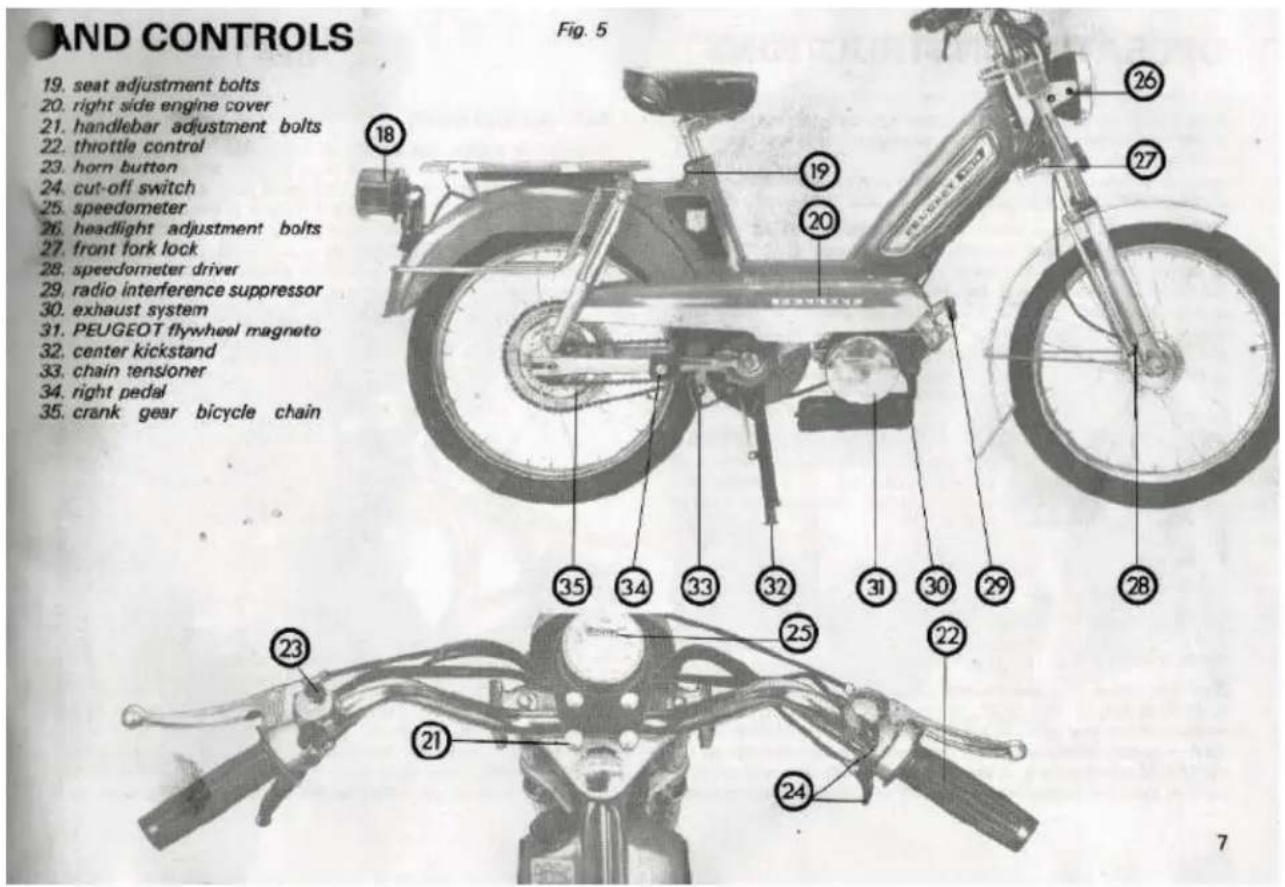
OPERATING INSTRUCTIONS
Note: Your careful attention to these operating instructions and to the maintenance section which follows will help you guarantee your own safe and comfortable riding.
FUEL MIXTURE
The two-stroke engine of the PEUGEOT Moped burns a gas-oil mixture. The fuel tank capacity of the Moped is 1.05 gallons (4 liters). Directions: Preferably, fill the tank with a pre-mixed 50:1 gas-oil mixture using regular, unleaded gasoline and the correct proportion (2%, or 2.5 ounces per gallon) of two-cycle, "water-cooled" engine oil. If you cannot pre-mix your fuel, fill the empty tank halfway with gasoline add the correct percentage of oil (2%, or 2.5 oz), and completely fill with gasoline. This 50:1 gas-oil proportion need not be altered after the initial breaking-in period.
Never burn pure gasoline in the PEUGEOT Moped. Always use a regular unleaded gasoline—not premium or leaded—together with EXXON « Aquaglide » two-stroke motor oil, or a similar BIA (Boating Industry Association) certified product for TC-W (two-cycle, water-cooled) service.
RANGE
Depending upon riding conditions, rider weight, and the particular 103 Moped model (U1, U2, U3), a full tank of gas should take you approximately 105 miles.
FUEL VALVE
The fuel valve on your Moped (Fig. 6) has three positions: a. OFF, b. ON, c. RESERVE. Put the fuel valve lever in the ON position when you want to start the engine. Set the lever in the OFF position after you have stopped the engine. Use the RESERVE position only if you happen to run out of fuel. The reserve gasoline supply in your Moped should take you six miles.
SEAT ADJUSTMENT
In order to adjust the height of your seat, loosen the bolts indicated by the arrows (Fig. 7) page 9, twist the seat post up or down as necessary, and retighten both seat adjustment bolts. Note: The "correct" saddle height for you is the one that allows you to sit on the saddle and place both feet firmly on the ground. This saddle position will easily allow you to keep the Moped in a balanced, upright position when the vehicle is stopped.

Fig. 6
Fig. 7

natural_image
Close-up of a security camera mounted on a device (no visible text or symbols)HANDLEBAR ADJUSTMENT (Fig. 8)
To change the position of the handlebars, simply loosen the four clamp bolts, adjust the bars, and retighten the bolts.

natural_image
Front view of a motorcycle with visible caliper and two side levers (no text or symbols)TIRES AND TIRE PRESSURE
Maintaining the proper tire pressure can significantly affect the tread wear, road-holding ability, braking ability, and riding comfort of your Moped. Check the pressure of your tires regularly at a service station or with your own pressure gauge. Both your riding comfort and your safety are involved.
Recommended tire pressure (printed on the tire sidewall):
Front Tire:25-26 lbs.(1.8 kg)
Rear Tire : 31-32 lbs. (2.2 kg)
Maximum tire pressure as indicated on tire sidewall:
36 lbs (2,5 kg).
BRAKES
Check your brakes often. If they do need an adjustment, follow the instructions for brake adjustment given in the maintenance section, p. 15.
DRIVE KNOB
Before starting, make sure that the engine drive knob on the large driven pulley is on the « B» position (see Fig. 9).

LIGHTS, STOPLIGHT, ELECTRIC HORN
Before riding, make sure that your lights and electric horn operate properly. Of course, the Moped engine must first be running in order to power the lights and horn.
ENGINE START : Operating Procedures
Many riders start their Moped engine in an improper or inefficient way. Get accustomed to the proper method of starting your Moped as soon as possible. We will detail this method and the succession of steps it involves in the paragraphs below. Following the proper steps to start your Moped will help you develop good riding habits from the beginning. Be assured, however, that after the third or fourth try, you will be able to perform this method without thinking. The PEUGEOT Moped is as easy to use as a bicycle.
First, depending upon your preference or the road conditions, there are really two good ways to start the Moped.
a. The first method involves kicking the pedal and crank arm sharply while the Moped is resting on its stand. This method is the easiest to follow, especially when you face an immediate up-grade. Stand to the left of the Moped and proceed as follows:
Put the engine drive knob in the « B » position (Fig. 9, page 9)
— Put the fuel valve in the ON position (bike on stand)
- Put the ignition switch (5) on the RUN position
— Get a good hold on the handlebar grips
— Turn the throttle twist grip (3) slightly with your right hand
- Squeeze the choke (2) with your left hand
- With your right thumb squeeze completely the decompressor control lever (1).

- Starting with the left-hand pedal at its top position kick the pedal down sharply and release the decompressor lever (1) (right thumb) when the left-hand crank arm reaches the bottom.
- Repeat this kicking operation two or three times if the engine is cold.
- As soon as the engine engages, use the throttle (3) to give it some more gas.
- After the engine has run for a few seconds, release the choke (2).
— Stop the rear wheel from spinning simply by squeezing the left hand rear brake lever (4). - To take the Moped off its stand, hold the seat firmly and push forward slowly.
- Briefly: Check to see that your stoplight operates properly when one or both brake levers are squeezed. Check your headlight, tail light, and horn.
- Sit in the saddle and, to get under way, push off with your feet and accelerate simultaneously.
b. The second method of starting involves pedaling the Moped like a bicycle in order to turn the engine over. This method is especially suited to starts you would make on a down-grade. - Put the engine drive knob in the « B » position (Fig. 9, page 9).
- Put the fuel valve in the ON position and sit in the saddle
- Put the ignition switch to its RUN (5) position and engage the throttle slightly
- Squeeze both the choke lever (2), and decompressor control lever (1)
- Push off and pedal the Moped
- As soon as the engine is turning, release the decompressor control lever (1) (right thumb) and open the throttle more
- After the engine has started end run for a few seconds, release the choke lever (left hand).
- Note: In cold weather you can prevent engine stalling by keeping the choke lever depressed for a few hundred yards of travel. But do not use the choke lever when you start up a Moped engine that is already warm.
Important Note on Breaking in Your New Machine: PEUGEOT's experience has demonstrated that Moped engine efficiency, power, and durability are directly tied to the kind of treatment you give your engine when it is brand new. To break your engine in properly, ride the Moped at moderate speeds for its first three hundred miles. Do not rece the engine when it is new, and be careful you do not overheat it either through long idling or in hot weather.
SLOWING DOWN AND STOPPING
To slow down and stop in a normal manner, close the throttle and apply both brakes simultaneously. When you have come to a full stop, your Moped engine will idle in a "neutral" gear as the clutch plate automatically disengages.
While your engine is idling with the Moped at a standstill, do not race or "rev-up" the engine. This action will cause the automatic clutch to re-engage.
When you are ready to move forward again, simply open the throttle and accelerate. If you are starting on an up-grade, you may have to pedal to help your engine get the Moped under way.
For your safety and convenience two devices have been provided to stop the engine. First, an ignition switch (Fig. 10.5), is located just ahead of the right handlebar grip. Second, the decompressor control lever, which will cut off engine compression and stop the motor, is located just under the right handlebar grip (Fig. 10.1).
PARKING: How to put your Moped on its stand
To park your Moped, hold both handlebar and seat. Lower the center stand with your foot, and pull the bike backwards and up onto the stand.
LOCKING SYSTEM
The PEUGEOT Moped is equipped with a front fork lock located on the right side of the "steering tube" or fork (Fig. 11). When the front wheel is turned to the left, the lock socket will align with the locking bolt. Turn the key counter-clockwise and push it down until the bolt engages the lock socket. Turn the key back and remove. To unlock the forks, insert the key, turn it counter-clockwise and pull up until the bolt disengages.

natural_image
Close-up of a robotic arm with visible mechanical components and a hand adjusting the part (no text or symbols)HOW TO USE YOUR MOPED AS A BICYCLE
Under certain circumstances (like an empty fuel tank I) you may have to pedal the Moped with the engine stopped. In order to pedal without cranking the engine, push the engine drive knob (Fig. 12) in towards the center of the crank to position (A). This operation must always be performed with the engine shut off. It is not recommended that you use your Moped as a bicycle for an extended period of time or especially when going down a slope. The driven-pulley might seize on the sprocket and rapidly be damaged.
EXTENDED STORAGE
If you have to store your Moped for an extended period of time, we recommend you prepare your bike in the following way:
a. Empty the fuel tank
b. Run the engine until the carburetor is empty of fuel
c. Remove the spark plug
d. Put a few drops of oil directly into the cylinder
e. Turn the engine over by pedaling in order to spread the oil in the cylinder.
f. Replace the spark plug, but do not tighten it
g. Clean and lubricate your Moped as specified in the section concerning maintenance (p. 13)
h. Oil-dampen a cloth and lubricate the metallic parts. This light oil coating will protect your bike against rust.
AFTER STORAGE
Before starting the engine after storage, put a small amount of gas directly into the cylinder to remove the oil coating.

Fig. 12
CHAIN MAINTENANCE
As we have indicated in the lubrication schedule above, the secondary transmission drive chain (and the crank gear bicycle chain) must be lubricated every 600 miles (1000 km). And before lubrication, both chains must be cleaned of the old grease and dirt which can cause premature wear. If the chains are not excessively dirty, simply clean them using a small brush, a solvent, and a cloth. If a thorough cleaning is called for, remove both chains and soak them in a good solvent. After you brush the chains clean, hang them up to dry. After drying, reassemble them on the Moped before you apply new oil. (With the Moped on its stand, rotate the rear wheel slowly and let the new oil drip on both the inside and outside links of the chain.)
DRIVE-CHAIN ADJUSTMENT (See Fig. 14)
In order to tighten up a drive chain that has more than 1/2" (12.5 mm) slack in it (i.e., movement up and down):
a. Loosen rear axle nuts (3).
b. Turn the adjuster nuts of chain tensioners (2) an equal amount in the rear drop-outs of the frame.
c. Check to see that the rear wheel is aligned in the center of the chain stays.
The correct chain tension may be gauged by pressing the chain down at its midpoint. Over-all slackness should not exceed 1/2" (12.5 mm). Always turn the rear wheel of the Moped to make sure that the tension in the chain is consistent. After you are satisfied with the chain tension, tighten the rear axle nuts and recheck the effectiveness of the rear brake.
Fig. 14
BICYCLE CHAIN ADJUSTMENT
The chain you use to pedal the Moped is automatically tensioned by the bicycle chain tensioner (similar to a derailleur). No adjustment is necessary. The PEUGEOT Mopeds have a spring which automatically keeps a proper tension in the primary transmission drive belt. No adjustment is necessary.

CLEANING
The quality of the chrome plating and enamel paints used on the PEUGEOT Mopeds allows for a maintenance program similar to one used for automobiles. Dirty parts of the Moped should be cleaned with water and a soft detergent, rinsed thoroughly, and dried with a chamois.
Spots of tar can be removed with a de-tarring solvent or turpentine. Rub the tar spot with a cotton pad or cloth dipped in solvent until the tar is gone. Rinse the area immediately afterwards and wipe dry with a soft cloth.
Your Moped will keep its high lustre if you follow a cleaning job with the application of a good polish or silicone-base wax. Use your polish on both painted and chromed surfaces.
If necessary, restore scratched or grazed enamel surfaces with an aerosol can of Peugeot spray paint or Peugeot touch-up paint available through your Peugeot dealer.
Important: DO NOT clean your Moped with solvents like gasoline, oil, or alkaline washes which always tarrish the lustre of the enamel. Also, plastic parts are to be washed only with water or soap and water.

TRAVEL LIMITATION OF THE OSCILLATING ENGINE
On models equipped with an automatic variable speed transmission unit, the engine which has been designed to ensure a constant tension of the drive belt is provided with a travel limitator which must be adjusted as follows:
- Remove the V-belt from the driven pulley.
- Screw or unscrew the adjusting nut A so as to obtain a clearance J = 1/25'' (1 mm) between the edge of the air intake silencer and the R.H. rear suspension arm.
- Re-install the drive belt.

natural_image
Close-up of an automotive engine bay with visible wiring and components (no text or symbols)TROUBLE SHOOTING
In case of a punctured tire, you may do your own repair by following the instructions below:
REMOVING THE FRONT WHEEL
a. Disconnect the speedometer cable from the driver unit by pulling the cable out.
b. Disconnect the brake cable by pushing the brake arm upwards (4, Fig. 16) page 16, and unhooking the cable stop.
Loosen the front axle nuts (5) and the wheel will drop out of the front fork ends.
REMOVING THE REAR WHEEL
- To disconnect the brake cable, push the brake arm (1, Fig. 17) forward and unhook the cable stop without unscrewing it.
b. Loosen wheel nuts (3) and disengage the chain tensioners (2) without changing their adjustment.
e. Lift the crankgear "bicycle" chain off without removing the master link spring clip.
d. Remove the drive chain by undoing the spring clip on the master link.
e. Pull rear wheel back until it is free.
REPAIRING THE FLAT
To remove the tire from the rim, you should use a good set of tire levers. First, let all the air out of your tube and break the "bead" or bond between tire and rim. Then pry the tire up and over the rim with the tire levers.
After you have patched the tube and checked the tire casing carefully inside and out for any nails, glass, or damage, inllate the tube slightly. Then, with one bead of the tire already on the rim, stuff the tube into the rim well and tire. Use the dull end of your tire levers to help pry the second bead of your tire onto the rim. Inflate the tire to the proper pressure and reinstall.
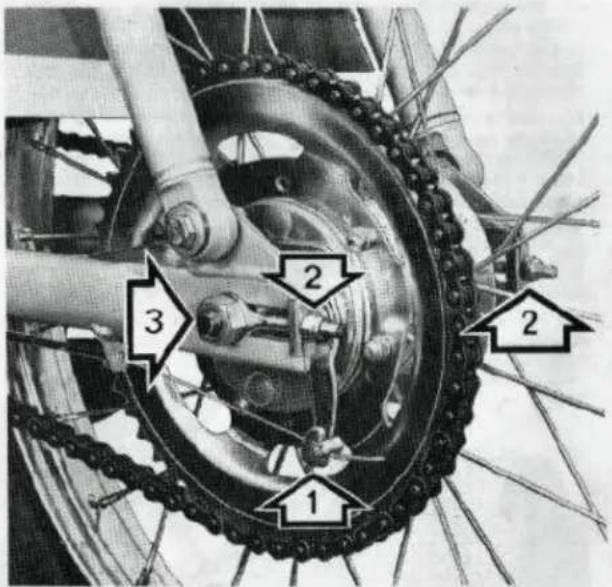
Fig. 17
ENGINE TROUBLE
If... the engine will not start, or stops completely while you are driving along, or misfires and skips... check first to see if your fuel tank is empty. If so, put your fuel line lever in the RESERVE position (Fig. 19). Your reserve supply of gas should take you about six miles... and to the nearest gas station.
If... your engine suddenly shuts off while you are driving, then you may have accidentally bumped your ignition switch to the "OFF" position. Put the ignition switch to "RUN" and restart. (Also, if your engine doesn't 'fire' at all when you try to start it, check the ignition switch and be sure it is in the « RUN » position).
If... your engine isn't getting the fuel it needs... your fuel line may be blocked. Disconnect the fuel pipe from the carburetor and open the tap to check the gas flow. If needed, clean both the tap filter (Fig. 19) and air holes in the tank cap (Fig. 18).
If... the jet is clogged (Fig. 20.1), take it out of the carburetor and blow it out with your tire pump. DO NOT try to clean it with any metal wire which could affect the output of the jet.

natural_image
Mechanical component diagram showing a stepped cylindrical assembly with mounting holes (no text or symbols)Fig. 18

natural_image
Close-up of a mechanical component with textured surface and no visible text or symbolsIf... the motor stops when you squeeze one or both brake levers, change the bulb of the rear stoplight.
If... the spark plug is dirty or worn, clean or replace it. It is always desirable to carry a new spark plug as a spare in the tool compartment. (Don't forget that it is a fragile part and should be kept in its original package.) If the spark plug gets wet, ignition cannot occur. Remove the plug, clean it, and dry it.
If... none of the remedies above improve an engine performance that is below par, you should take your Moped to your PEUGEOT dealer. He has the appropriate equipment and tools, and he is fully qualified to perform needed repairs and adjustments. Of course, consult your PEUGEOT dealer immediately should you experience any important failure regarding the carburetor, flywheel magneto, clutch, transmission, etc.

LECTRICAL SYSTEM
LIGHTS AND IGNITION SWITCHES
The electrical system (Fig. 21) of the PEUGEOT Mcped has been designed to function in a safe, efficient, and completely reliable way. All connections and lines have been shielded from the effects of weather and frictional wear.
The headlight switch (1) is located just ahead of the left handlebar grip. In the "L.O." (ON) position — either forward or backward — the switch controls the headlight, red tail light, and speedometer light. In order to shut the lights off, simply push the switch lever to the intermediate position labeled "LIGHTS" (OFF).
The button located just ahead of the left grip (2) operates the horn.
The ignition switch (3), located just ahead of the right throttle grip, controls the flow of electrical current to the engine. You must set this switch in the RUN position in order to start and operate the engine. When the ignition switch is pushed to the OFF position, the engine will stop.
Both right and left brake levers operate independently to activate the rear stoplight.
Note: Electric current is provided by means of a flywheel magneto (Fig. 20.2 - page 18).
HEADLIGHT ADJUSTMENT
In order to ride safely at night, your headlight should be kept in good adjustment. For night riding, your light must not be set so high as to blind other drivers coming towards you. To adjust your headlight, proceed as follows:
a. Slightly loosen the two headlight adjustment bolts (Fig. 22).
b. Station the bike thirty-three feet from a wall.
c. With a rider sitting on the Moped, which is off its stand, the focal point of the Moped headlight beam should appear on the wall about 1.66 feet (0.50 meter) above the ground. In order to adjust the lamp to attain the necessary angle, simply tip the light with your hands. Then tighten the headlight adjustment bolts.


natural_image
Mechanical component with lever and handle, labeled '3' (no text or symbols on the object itself)
natural_image
Mechanical device with transparent body and internal components, labeled Fig. 22 (no readable text or symbols)19
LIGHTING SPECIFICATIONS
(Refer to your PEUGEOT dealer for all Moped replacement lightbulbs and parts).
| Types\Equipment | Headlight | Tail light and Stoplight | Speedometer | |
| 103 L2.U1 | LUXOR: 6V, 18W G.E.Sealed Beam. | ULO: 6V, 5W Bulb-Screw Base: BA 10 5, 6V, 10W Bulb-Screw Base: BA 15 S. | not provided with a light | |
| 103 L2.U2 | ditto | ditto | ditto | |
| 103 L2.U3 | CEV: 6V 26W Sealed Beam. | CEV: 6V, 18/5W Bulb with Double Filaments Screw Base: BA 15 P. | ditto | |
| 103 SP.U2 | LUXOR: 6V, 18W G.E. Sealed Beam. | ULO: 6V, 5W Bulb-Screw Base: BA 15 3, 6V, 10W Bulb, Screw Base: BA 15 S. | 6V, 0.6W Bulb-Screw Base: E 10 | |
| 103 SP.U3 | ditto | ditto | ditto | |
| 103 LS.U1 | ditto | ditto | ditto | |
| 103 LVS.U2 | ditto | ditto | ditto | |
| 103 LVS.U3 | CEV: 6V, 20W Sealed Beam | CEV: 6V, 18/5W Bulb with Double Filaments Screw Base: BA 15 D. | ditto | |
Fig. 23
natural_image
Close-up of hands connecting wires to a mechanical component (no visible text or symbols)20
REMOVING THE SEALED BEAM AND LIGHT BULBS
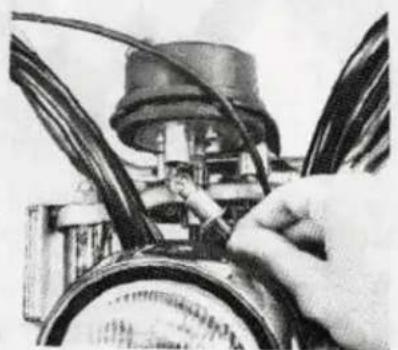
Headlight
a. Loosen screw at the bottom of the head lamp.
b. Pull the bottom part of the lens and chromed light cover away from the base.
c. Disconnect the two electric wires from the sealed beam.
d. In order to free the sealed beam from the chrome cover, remove the clips which fasten the lens to the chrome frame of the light unit. (Note : Exercise particular care in all these operations... the light unit is a fragile one. If you experience any problems, consult your PEUGEOT dealer).
Taillight (Fig. 24)
a. Loosen the two Lense cover screws and remove the cover.
b. Push the bulb in slightly and twist it counter-clockwise to free the pins in the base of bulb from the bulb socket.
Speedometer (Fig. 23)
Pull the bulb support down and out of its socket. Unscrew the bulb.

natural_image
Close-up of a mechanical device with a hand holding a cylindrical component (no visible text or symbols)Fig. 24

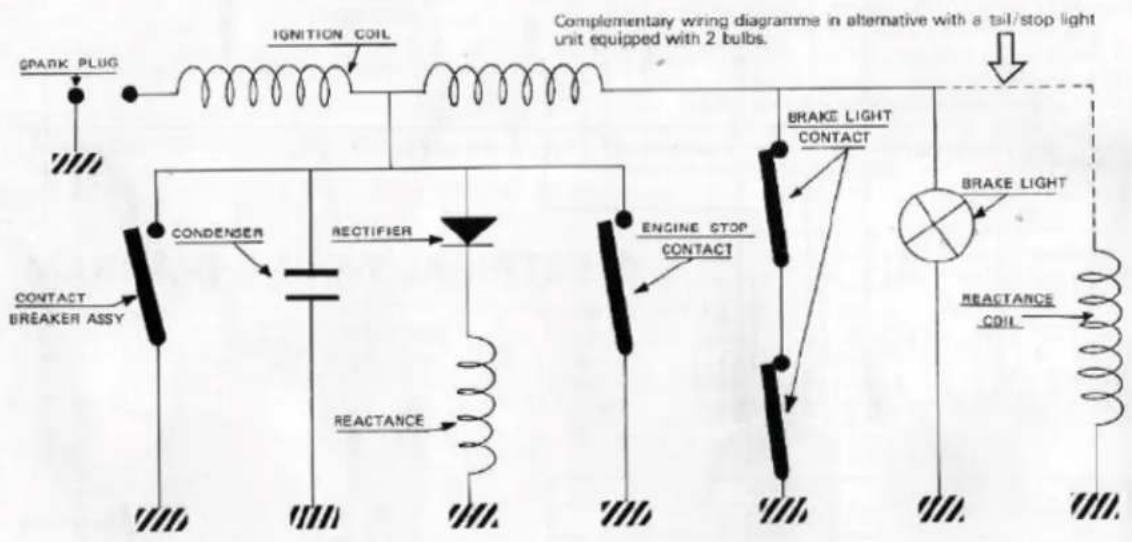
ELECTRICAL WIRING DIAGRAM
flowchart
graph TD
    A["SPARK PLUG"] --> B["IGNITION COIL"]
    B --> C["CONTACT BREAKER ASSY"]
    C --> D["CONDENSER"]
    D --> E["RECTIFIER"]
    E --> F["ENGINE STOP CONTACT"]
    F --> G["REACTANCE"]
    G --> H["BRAKE LIGHT CONTACT"]
    H --> I["BRAKE LIGHT"]
    I --> J["REACTANCE COIL"]
    J --> K["CONDUCTOR"]
    style A fill:#f9f,stroke:#333
    style K fill:#ccf,stroke:#333
Fig. 26
SOME FINAL WORDS
In order to promote and maintain a pollution-free environment, always beware of giving off too much noise, electrical interference, or exhaust fumes. Do not attempt to modify your « suppressor » equipment in any way from original factory standards.
And remember that a PEUGEOT Moped should be serviced only by your PEUGEOT dealer. Only your dealer knows all the parts and mechanical operations of the Moped and has the tools necessary to perform complete service and maintenance operations. Depend upon him to insure your continued safe and comfortable riding.
- PEUGEOT
- OWNER'S MANUAL
- OPERATION AND MAINTENANCE
- MOPEDS
- 103
- CYCLES PEUGEOT (U.S.A.), INC.
- NOW THAT YOU HAVE CHOSEN A
- PEUGEOT...
- TABLE OF CONTENTS
- TECHNICAL INFORMATION AND EQUIPMENT FEATURES
- FRAME AND EQUIPMENT
- SUSPENSION SYSTEM
- BRAKING SYSTEM
- ENGINE
- Specifications :
- CLUTCH AND TRANSMISSION
- LIGHTING EQUIPMENT AND HORN
- IDENTIFICATION
- SECURITY AND TOOLS
- OPERATING INSTRUCTIONS
- FUEL MIXTURE
- RANGE
- FUEL VALVE
- SEAT ADJUSTMENT
- BRAKES
- DRIVE KNOB
- ENGINE START : Operating Procedures
- SLOWING DOWN AND STOPPING
- PARKING: How to put your Moped on its stand
- LOCKING SYSTEM
- HOW TO USE YOUR MOPED AS A BICYCLE
- EXTENDED STORAGE
- AFTER STORAGE
- CHAIN MAINTENANCE
- DRIVE-CHAIN ADJUSTMENT (See Fig. 14)
- BICYCLE CHAIN ADJUSTMENT
- CLEANING
- TRAVEL LIMITATION OF THE OSCILLATING ENGINE
- TROUBLE SHOOTING
- REMOVING THE FRONT WHEEL
- REMOVING THE REAR WHEEL
- REPAIRING THE FLAT
- ENGINE TROUBLE
- LECTRICAL SYSTEM
- LIGHTS AND IGNITION SWITCHES
- HEADLIGHT ADJUSTMENT
- LIGHTING SPECIFICATIONS
- REMOVING THE SEALED BEAM AND LIGHT BULBS
- ELECTRICAL WIRING DIAGRAM
- SOME FINAL WORDS
Marque : PEUGEOT
Modèle : 103
Catégorie : Vélomoteur