TFTV323FHD - Téléviseur Palsonic - Notice d'utilisation et mode d'emploi gratuit
Retrouvez gratuitement la notice de l'appareil TFTV323FHD Palsonic au format PDF.


| Type de produit | Téléviseur LED |
| Marque | Palsonic |
| Modèle | TFTV323FHD |
| Taille de l'écran | 32 pouces (81 cm) |
| Résolution | 1366 x 768 pixels (HD) |
| Format de l'écran | 16:9 |
| Rétroéclairage | LED |
| Dimensions avec pied (L x H x P) | 73.5 x 48.5 x 18.5 cm |
| Dimensions sans pied (L x H x P) | 73.5 x 44.0 x 8.5 cm |
| Poids avec pied | 6.2 kg |
| Poids sans pied | 5.8 kg |
| Alimentation | 100-240 V, 50/60 Hz |
| Consommation électrique (max) | 65 W |
| Consommation en veille | < 0.5 W |
| Entrées HDMI | 2 |
| Entrées USB | 1 |
| Entrée VGA (PC) | 1 |
| Entrée antenne (RF) | 1 |
| Sortie casque | 1 |
| Fonctions principales | Télétexte, minuterie, verrouillage enfants, format d'image, réglage des chaînes automatique |
| Entretien et nettoyage | Nettoyer avec un chiffon doux sec. Ne pas utiliser de produits chimiques. |
| Sécurité | Ne pas exposer à l'eau ou à l'humidité. Ne pas ouvrir le boîtier. |
| Pièces détachées et réparabilité | Télécommande, pied, adaptateur secteur disponibles. Réparation par service agréé. |
| Informations générales | Téléviseur LED 32 pouces HD, idéal pour une utilisation quotidienne. |
FOIRE AUX QUESTIONS - TFTV323FHD Palsonic
Questions des utilisateurs sur TFTV323FHD Palsonic
0 question sur cet appareil. Repondez a celles que vous connaissez ou posez la votre.
Poser une nouvelle question sur cet appareil
Téléchargez la notice de votre Téléviseur au format PDF gratuitement ! Retrouvez votre notice TFTV323FHD - Palsonic et reprennez votre appareil électronique en main. Sur cette page sont publiés tous les documents nécessaires à l'utilisation de votre appareil TFTV323FHD de la marque Palsonic.
MODE D'EMPLOI TFTV323FHD Palsonic
Palsonic
80CM (31.5") LCD TV COMBINATION WITH DVB-T
INSTRUCTION MANUAL TFTV323FHD

natural_image
Front view of a flat-screen television displaying the 'Paleonia' brand logo (no additional text or symbols visible)PALSONIC CUSTOMER SERVICE TELEPHONE AUSTRALIA: 1300 657 888 www.palsonic.com.au
LCD TV
Product Specification
Product name:Color LCD TV
◆ System:PAL/BG
◆ Power supply: AC 100-240V
◆ Frequency:50/60Hz
Power consumption: 145W
(Note: Specifications to change without notice. Pictures for reference only, The picture is only for reference, the products are subject to material object, the power of interpretation belongs to our company)
LCD TV
Troubleshooting
No picture & No sound


Possible causes:
*Check whether the product is turned on. *Try another channel. The problem maybe with the broadcast *Is the power cord inserted into wall power outlet? *Check your antenna direction and/or location. *Test the wall power outlet, plug another product's power cord into the outlet where the products power cord was plugged in
No audio


Possible causes:
*The volume is too low or muted. *Incorrect sound system. solutions: *Press Volume key to turn up the volume; *Press Mute key to cancel Mute mode. *Change the sound system in the menu.
Snow and noises:


Possible causes: *The cable is damaged or is loose; *Incorrect channel preset; *Improper antenna positioning. solutions: *Check whether the connection of and other cables are correct; *Reset channels or fine tune the ch *Adjust the direction of the antenna
No or poor color or poor picture


Possible causes:
*Adjust Color in menu option. *Keep a sufficient distance between the product and the VCR. *Try another channel. The problem may be with the broadcast *Are the video cables installed properly? *Activate any function to restore the brightness of the picture.
The remote control doesn't work

Possible causes:
*Check to see if there is any object between the product and the remote control causing obstruction. Ensure you are pointing the remote control directly at the TV. *Ensure that the batteries are installed with correct polarity (+10+, -10+) *Ensure that the correct remote operating mode is set: TV, VCR etc. *Install new batteries
LCD TV
Warning

Warning

No any spare parts for maintenance attached. Do not open the back cover to avoid electric shock. Please contact our after-sale service personnel if necessary
Warning: Do not open the back cover to avoid electric shock. No additional spare parts are inside the case. Any questions, please contact our service personnel.

A triangle with a lightning arrow in: Remind you of probable high voltage here in case of electric shock.

A triangle with an excalmatory mark in :Remind you that the parts here are very important .if replacement etc.is needed,please refer to relevant technical Specifications.
Warning: Do not put the TV in rainy or foggy places to prevent from fire or electric shock. Do not apply hard objects to attrite or knock on the liquid crystal screen since these may cause scratches or damages.
Warning: Modifying the product without any authorization is forbidden.
LCD TV
Table of Contents
Warning....1
Table of Contents....2
Product Introduction....2
Product Specifications....3
Safety....4
Control Panel....6
Terminal Wiring Diagram....7
Remote Control....8
Battery Replacement....9
Preparation....10
Channel Selection....11
Channel Return....12
TV and DTV Searching....13
Channel....14
Picture....18
Sound....20
Timer 21
Optionl....23
Lock....24
Mediaplayer....25
Connecting to exterior devices....27
Troubleshooting....28
Product Specification....29
Product introduction
1. Production Introduction
Thank you for your purchasing the latest generation high definition LCD TV. Endowed with high display quality and light weight, it is power-saving and radiationless with high sensitivity television reception. This LCD TV will bring you safe & comfortable brand-new visual experience. Applying color active matrix TFT with brand-new technologies, the product can provide high quality display image, flicker free television, VCD & DVD programs. In addition, it can be used as definition digital television or computer display. We believe the product will surely make you satisfied.
LCD TV
Connecting to exterior devices
RCA terminal is used to connect the output device of DVD (480l/480p/576l/576p/1030l)

Notes:
- Y-Pb-Pr of DVD is corresponding to Y-Pb-Pr of LCD TV.
LCD TV
Media player

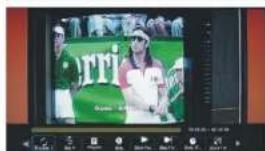
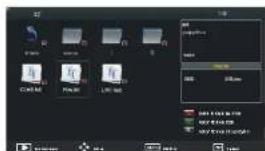

Movie
The user can play Movie files via the Movie player. In left Interface you you can press ▲▼▶ to select your desired
While the Movie is playing, you can operate as below:
Press Vol+/- to control volume.
Press ▶ to play the Movie.
Press II to pause the Movie
Press ◀◀/▶▶ to fast restograde/ fast forward the playing file
Press ■ to return the upper menu.
Press Skip to previous track or chapter.
Press ▶ Skip to next track or chapter.
When after move full playing, press OK to show the following
operation key
Pressthe ◀/▶ button to select the Repeat Sat A, Playlist, Info,
Slow, Step, Goto Time 250m in Zoom Cut, Asper: R. M. 59 V/4
Text
The user can play Text files via the Text player. In left Interface you
you can press ▲▼▼▶ to select your desired. While the Text is playing, you can operate as b
While the next is playing, you can operate as below.
Press 47 to last recognize last forward this playing me.
1.2.1.1.1.
Press Skip to previous track of chapter.
PT855 M1 Skip to next track or chapter.
When after text full playing press OK to show the following
operation key
Press the ◄/▶ button to select the Prev Page, Next page
Prev. Next, Stop, Music, Payment, Info
LCD TV
Safety precaution
◆Do not place the TV on unstable places, from which it may be fell off.
◆ Do not expose the TV to extreme temperature and humid environment.
◆Avoid subjecting the TV to direct sunlight and other heat sources.
◆Do not put the TV into any liquid.
◆Do not put anything inside the TV. or place water container on top of the TV.
◆ In thunder rainy days (especially with lightening), please plug out the power plug and antenna plug.
◆Do not stop on the power cable, or tangle them together.
◆Avoid overload of the exterior electric outlet to prevent fire hazard of electric shock.
◆ Clean the TV with dry and soft cloth (without evaporative matter).
◆If your TV is broken, do not repair it by yourself, but contact the maintenance personnel.
◆ If the remote control is left unused for a long time, please take the batteries out and store them in dry places.
◆ Avoid dropping the remote control
◆ If the LCD TV is installed for exhibition purpose, please do not place the overheated part on the ground or
carpet to prevent accident.
◆Please install the TV at proper position, such as wall or ceiling. Please install it under the guidance of
Professional staff. (When used or exhibit, please do not place the TV horizontally or vertically on the ground.)
This device complies with Part 15 of the FCC Rules. Operation is subject to the following two
conditions:(1)this device may not cause harmful interference, and (2)this device must accept any interference received including interference that may cause undesired operation.
This equipment should avoid from waterdrops, "and," things that fill with liquid, such as vases.
cannot be placed on this equipment.
This equipment is predetermined to work constantly (unless adding switch on this equipment)
◆ Please disconnect the power cord before long time unused.
Basic operations
Power on/off
-
Use AC 100-240V power outlet for the TV power supply.
-
If the screen of TV is not on, please press the power button on the remote control or on the TV.
-
If you want to shut off the TV temporary, please press the power button on the remote control or on the TV.
-
If you want to shut off the TV completely, please plug out the power plug.
Auto screen shut off function
- In TV/AV state, the TV will enter idle state if there is no signal input within 15 minutes.
2.In PC state, the TV will enter idle state if there is no signal input within 2 minutes.
Pre-shut off memory
- The setting and tuning of picture and sound will be saved when the TV is shut off, which will be working in the pre-shut off state when the TV is turn on again.
Precaution of signal source application
- If PC signal source is used, please first set the resolution of the PC display card as the following modes:
(1920×10 80 50Hz, 1680×1050 60Hz, 1360×768 60Hz, 1024×768 60Hz, 800×600 60Hz, 640×480 60Hz)
- If there is line-by-line output of the signal used by the user, signal source with line-by-line output is recommended.
LCD TV
Safe
Please immediately pull out the AC power plug from adapter if there is an abnormal sound or smell or the LCD TV has sound but no picture, and the contact after sales support.

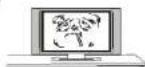
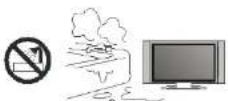
The LCD TV should be kept free from rain, damp and dust to prevent electrical shock and short circuits. Do not cover the ventilation openings with table clothes, curtains, newspapers etc.
The LCD TV should be kept away from high temperature objects or direct sunlight. It requires good ventilation. At least 10cm between the LCD TV and other appliances or built-in cabinet walls.

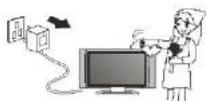
You may clean the display panel with a soft clean cloth after pulling out the power plug. Do not repeatedly wipe the panel, nor scrape, tap or strike the panel with a hard object.
Do not wipe the LCD TV with any petrol, chemical or alcohol based solvents, it will damage of the product of the panel and cabinet.
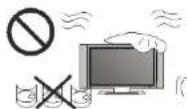
LCD TV
Media player
Below shortcut keys will be only available in USB mode

Insert the USB to the USB connector. Press the "▲/▼" button to select the Disk1, Disk2, Disk3, Disk4. you can press "◀/▶" to select photo, music, move, text.

Photo
The user can play photo files via the photo player. In left interface you you can press ▲▼◀▶ to select your desired.
While the photo is playing, you can operate as below
Press ▶ to play the photo,
Press || to pause the photo.
Press ■ to return the upper menu.
Press 🏠 Skip to previous track or chapter.
Press 🎨 Skip to next track or chapter,
When after photo full playing, press OK to show the following
Press the "◀/▶" button to select the Repeat Music Playlist, Info. Rotata, Zoom In, Zoom Out, Move View

natural_image
Close-up of a fluffy kitten resting on a keyboard (no visible text or symbols)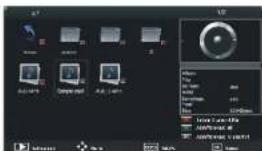
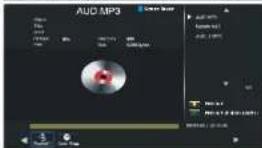
Music
The user can play Music files via the Music player. In left interface you you can press ▲▼◀▶ to select your desired.
While the Music is playing, you can operate as below:
Press Vol+/- to control volume.
Press ▶ to play the Music.
Press Ⅱ to pause the Music
Press ◀/▶ to fast restograde/ fast forward the playing file.
Press ■ to return the upper menu.
Press Skip to previous track or chapter.
Press Skip to next track or chapter.
When after Music full playing, press OK to show the following
operation ke
Press the "◀/▶" button to select the Repeat, Gold Time
Note: Press "Blue" button to turn off panel power.
LCD TV
Lock
-
Press the "MENU" button on the remote control to enter the OSD menu, then press "◀/▶" button to select the "LOCK" menu.
-
Press the "▼" or "OK" button to enter the "LOCK" menu setting, use "▲/▼" to move
the menu bar, and then press "◀/▶" button to adjust the value of selected item.
- Press "MENU" button to return to upper menu.

Lock Channel
Press the "▲/▼" button to select the "Lock Channel" item, and then use * ◀/▶ *button to
select the on/off lock system.
(Password is 0000.)
Set Password
Press the "▲/▼" button to select the "Set Password" item, and then use "◀/▶" button.
Enter: "Please enter old password".
New: "Please enter new password"
Confirm: "Confirm new password".
Block Programme
Press the "▲/▼" button to select the "Block Programme" item, and then use "◀/▶"
button enter "Block Programme" menu. Select the program you want to "Lock" press the
"Green" button

Parental Guidance
Press the "▲/▼" button to select the "Parental Guidance" item, and then use "◄/►" button to select desired parental guidance.
LCD TV
Safe

Do not place the LCD TV on an unstable surface.
Do not place the power cord or other cables across a walkway in case it is trampled on. Do not overload any power cord or power socket.

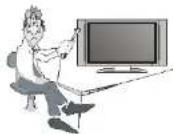
Do not disassemble the back cover as it contains high voltage parts inside and may cause electric shock. Internal adjustments and checks should only be conducted by a qualified technician.
Do not place naked flame sources, such as lit candles on or near the LCD TV.

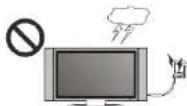
Pull out the power cord and antenna cable during electrical storms, keep LCD TV damage from possible electrical surge.
LCD TV
Control Panel
The control button for front panel is on the front housing panel of TV.
Introduction for Each Key

1 STANDBY
Press this button to enter into standby mode.
② SOURCE
Press this button to display the source list.
③ MENU
Press this button to display OSD menu.
④ VOL-
Volume decreasing short cut key; enter into the next menu and adjust OSD options (decreasing).
⑤ VOL+
Volume increasing short cut key; enter into the next menu and adjust OSD options(increasing).
6 CH-
Channel decreasing short cut key; decrease the channel No. and select the last option in the menu.
⑦ CH+
Channel increasing short cut key; increase the channel No. and select the next option in the menu.
8
This button can be used to switch the set between ON and OFF.
LCD TV
Option
- Press the "MENU" button on the remote control to enter the OSD menu, then press "◀/▶" button to select the "OPTION" menu.
- Press the "▼" or "OK" button to enter the "OPTION" menu setting, use "▲/▼" to move the menu bar, and then press "◀/▶" button to adjust the value of selected item.
- Press "MENU" button to return to upper menu


OSD Language
Press the "▲/▼" button to select the "OSD Language" item, and then use "◀/▶" buttons to select desired language.
Audio Languages 1st
Press the "▲/▼" button to select the "Audio Language 1st" item, and then use "◀/▶" buttons to select audio language.
Audio Languages 2nd
Press the "▲/▼" button to select the "Audio Language 2nd" item, and then use "◀/▶" buttons to select adjust the language.
Subtitle Language 1st
Press the "▲/▼" button to select the "Subtitle Language 1st" item, and then use "◀/▶" buttons to select subtitle language.
Subtitle Language 2nd
Press the "▲/▼" button to select the "Subtitle Language 2nd" item, and then use "◀/▶" buttons to select subtitle language.
OSD Duration
Press the "▲/▼" button to select the "O SD Duration" item, and then use "◀/▶" buttons to change the duration of the O SD menu.
Blue Screen
Press the "▲/▼" button to select the "Blue Screen" item, and then use "◀/▶" buttons to select the blue screen.
Country
Press the "▲/▼" button to select the "Country" item, and then use "◀/▶" buttons to select the country.
Restore Factory Default
Press the "▲/▼" button to select the "Restore Factory Default" item, and then use "◀/▶" button display "Are you sure?" Select "Yes" or "NO" restore factory default.
LCD TV
Sleep Timer
Press the "▲/▼" button to select the "Sleep Timer" item, and then use "◄/►" button to select sleep Time 10min, 20min, 30min, 60min, 90min, 120min, 180min, 240min or off.
Auto Sleep
Press the "▲/▼" button to select the "Auto Sleep" item, and then use ◀/▶ "button to select the auto sleep on/off.
Time Zone
Press the "▲/▼" button to select the "Time Zone" item, and then use "◀/▶" button to select the time zone mode.
Day light saving
Press the "▲/▼" button to select the "Daylight saving *item, and then use "◀/▶" button to select daylight saving time on/off.
LCD TV
LCD TV Panel(continued)

1) AC IN:
AC power input terminal.
2)HDMI1 HDMI2 HDMI3
High-definition multimedia interface.
Note: Acceptable video signal 480p/576p/720p/1080l/1080p.
3)VGA
Input terminal of simulation signal of PC.
4)PC AUDIO IN:
Sound input terminal of VGA input.
5)YCb/PbCr/Pr
Component input terminal.
6)COAXIAL
Digital sound output.
7)VIDEO-Audio-R
This can be connected to the left/right RCA video out connection of any vide resource. 8)RF:
Antenna/close circuit TV or Digital TV terminal.
9)EARPHONE:
Headphone to Headphones.
10)USB:
It is used to updating the software of the DVB-T and ATV, and it should only be operated by a qualified TV technician.
User can access multi-media files stored in the USB device.
The supported format includes
*.dat, *.vob, *.mpg and *.avi video formats. Besides, *.jpg, *.bmp and *.mp3.
LCD TV
Descriptions of television remote control
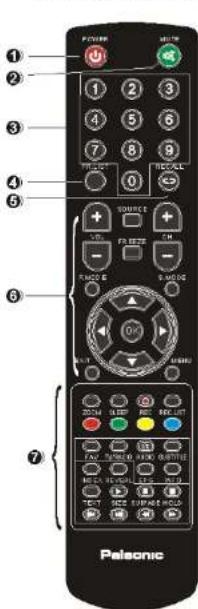
POWER
Switches the set between ON and STANDBY.
② MUTE
Switches the sound on or off.
30—9
Figures 0-8 are used to directly input channel number.
A. PRUST
Press to show the channel list programme.
6
Return to the channel selected last time.
Q. |vol+/-
lettores /decrete the evyed level
SOURCE
Display the source list of input signal.
FREEZE
Catch the current picture.
CH9-
Selects a program.
P.MODE
Select the different picture mode directly.
S.MODE
Select the different sound mode directly.
▲
Select the previous function option.
-
Select the next sanction option. Decrease the option value
▶
Increase the option value.
OK
Accepts your selection or displays the current mode.
EXIT
Returns to TV viewing from any menu.
MENG
Selects a method
ZOOM
Select the different image format.
SLEEP REC
Sets the sleep timer
RECLIS
Record show the REC list m
RED
Use in TXT, DTV and TV.
GREEN YELLOW
Use in TXT, DTV and TV. Use in TXT, DTV and TV
BLUE
Use in TXT, DTV and TV. (Turn off panel power.)
FAV
Displays the selected favorite programs.
Audi
Press AUDIO Chang audio mode left, right, mono, stereo (Nipem function)
SUETIT
Recalls your preferred subtitle in digital mode.
INDEX
Ask for the list of main TV letter broadcast page number. Display the characters, hided
REVEN EPG
To show the Electronic Program Guide during on-menu state only
INFO
Shows the present screen information
TEXT
Teletext switching.
SUBPA
Display the current sub-page.
HOLD
Hold the current page and prevent against being updated
▶ ||
Play the disc. Pause the disc
一
Stop the disc.
H M
Skip to previous track or chapter.
向
Skip to next track of Chapter. Fast reverse.
→
Fast forward.
Handle the remote control with care.
Avoid falling off or being trampled or splashed with liquids.
LCD TV
Time
- Press the "MENU" button on the remote control to enter the OSD menu, then press "◀/▶" button to select the "TIME" menu.
- Press the "▼" or "OK" button to enter the "TIME" menu setting, use "▲/▼" to move
the menu bar, and then press "◀/▶" button to adjust the value of selected item. - Press "MENU" button to return to upper menu.


Clock
Press the "▲/▼" button to select the "Clock" item, and then use "◀/▶" button to enter time set. Press the "▲/▼" button select Date, Month, Year, Hour or Minute, Press "◀/▶" button to set the time.
| Clock | |||
| Date | ◀ | 1 | ▶ |
| MHz | ◀ | Jin | ▶ |
| Vccu | ◀ | 2007 | ▶ |
| Hzr | ◀ | 00 | ▶ |
| Minute | ◀ | 00 | ▶ |
Off Time
Press the "▲/▼" button to select the "OffTime" item, and then use "◀/▶" button to enter time set.
Press the "▲/▼" button select Repeat, Hour or Minute, Press "◀/▶" button to cn/off repeat and set
the time
| Record | < | Once | > |
| Hour | < | III | > |
| Minute | < | III | > |
| Move | ## Back | ## Quick | |
On Time
Press the "▲/▼" button to select the "On Time" item, and then use◄/►" button to enter time set. Press the "▲/▼" button select Repeat, Hour, Minute, Source, Channel, Volume. Press "◄/►" button adjust
| On Time | ||
| Repeat | ◀ | Oncu ▶ |
| Host | ◀ | 12 ▶ |
| Minute | ◀ | 01 ▶ |
| Source | ◀ | DTV ▶ |
| Channel | ◀ | _ ▶ |
| Volume | ◀ | 31 ▶ |
LCD TV
Sound
- Press the "MENU" button on the remote control to enter the OSD menu, then press "◀/▶" button to select the "SOUND" menu.
- Press the "▼" or "OK" button to enter the "SOUND" menu setting, use "▲/▼" to move
the menu bar, and then press "◀/▶" button to adjust the value of selected item.


Sound Mode
Press the "▲/▼" button to select the "Sound Mode" item, and then use "◀/▶" button to select the sound mode Standard, Music, Movie, Sports, User.
Treble
Press the "▲/▼" button to select the "Treble" item, and then use "◀/▶" button to select to adjust the Treble.
Bass
Press the "▲/▼" button to select the "Bass" item, and then use *◄/►* button to select to adjust the bass.
Balance
Press the "▲/▼" button to select the "Balance" item, and then use "◀/▶" button to select to adjust the balance of sound.
Auto Volume
Press the "▲/▼" button to select the "Auto Volume" item, and then use "◀/▶" button to turn the autovolume function on/off.
Surround Sound
Press the "▲/▼" button to select the "Surround Sound" item, and then use "◀/▶" button to turn the surround sound function on/off.
SPDIF Mode
Press the *▲/▼* button to select the "SPDIF Mode" item, and then use "◀/▶* button to select to adjust the spdif mode of sound.
LCD TV
Battery replacement

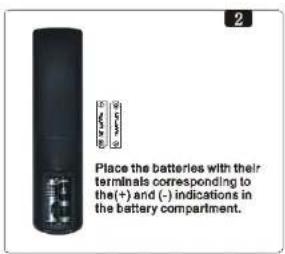

Notes:
- If the remote control will not be used for a long time, please take out the batteries and place the remote control in a shady, cool and dry place.
- Be careful with handling damaged or leaking batteries, wash your hands with soap and water after handling them..
- Do not throw away old batteries at will. Enquire your local government authority about recycling or the proper disposal system.
LCD TV
Connecting to satellite receiver or decoder

In order to receive TV program, signal should be received from one of the following signal sources:
◆Outdoor antenna.
◆ Cable TV network
Satellite broadcast network
-
In these three cases, the input cable of antenna or TV network should be plugged in the 75 Ohm coastal cable jack at the rear side of LCD TV.
-
If you are using indoor antenna and the effect of TV program is not satisfactory, you can adjust the position of the antenna until the picture is clear.
When installing LCD TV, please use special 75 Ohm coaxial Cable. If other coaxial cable is used, there may be noise and image disturbances.

Connecting to satellite receiver or decoder

In order to receive TV programs emitted by satellite, a satellite receiver should be connected to the rear of the LCD TV. Mean while, in order to receive encoded emit signal, a decoder should be connected to the rear of LCD TV.
Using the coaxial cable
Connect the coaxial cable connectors to
◆The decoder output terminal.
◆The antenna input terminal
If you want to connect the TV to satellite receiver (or decoder) and video recorder at the same time, the following operation should be followed:
◆ Connect receiver (or decoder) to video recorder.
◆ Connect video recorder to LCD TV, or connect receiver (or Decoder) directly to LCD TV.
LCD TV
Red
Press the "▲/▼" button to select the "Red" item, and then use "◀/▶" button to select to adjust the red.
Green
Press the *▲/▼* button to select the "Green" item, and then use *◄/► * button to select to adjust the green.
Blue
Press the "▲/▼" button to select the "Blue" item, and then use "◀/▶" button to select to adjust the blue.
Aspect Ratio
Press the "▲/▼" button to select the "Aspect Ratio" item, and then use "◀/▶" button to select the display mode.
Noise Reduction
Press the "▲/▼" button to select the "Noise Reduction" item, and then use "◀/▶" button to turn the surround function on/off.
Scre en
Press the "▲/▼" button to select the "Screen" item, and then use "◀/▶" button to enter into PC mode. Note: This function only works with in VGA mode.
| Screen | ||
| Auto Adjust | ||
| Horizontal Pos. | 50 | ▶ |
| Vertical Pos. | 50 | ▶ |
| Size | 50 | ▶ |
| Phase | 7 | ▶ |
Auto Adjust
Adjust VGA mode automatically.
Horizontal Pos.
Adjust the Horizontal position of the PC Screen.
Vertical Pos
Adjust the Vertical position of the PC Screen.
Size
Conduct image stretching.
Phase
When necessary, adjust the pixel phase of the picture to avoid picture interface.
LCD TV
Picture
- Press the "MEN U" button on the remote control to enter the OSD menu, then press "◀/▶" button to select the "PICTURE" menu.
- Press the "▼" or "OK" button to enter the "PICTURE" menu setting, use "▲/▼" to move the menu bar, and then press "◀/▶" button to adjust the value of selected item.
- Press "MENU" button to return to upper menu.

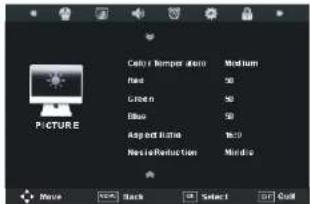

Picture Mode
Press the "▲/▼" button to select the "Picture Mode" item, and then use "◀/▶" buttons to select the picture mode Dynamic, Standard, Mild, User.
Contrast
Press the "▲/▼" button to select the "Contrast" item, and then use "◀/▶" button to select to adjust the contrast.
Brightness
Press the "▲/▼" button to select the "Brightness" item, and then use "◀/▶" button to select to adjust the brightness.
Color
Press the "▲/▼" button to select the "Color" item, and then use "◀/▶" button to select to adjust the color.
Sharpness
Press the "▲/▼" button to select the "Sharpness" item, and then use "◀/▶" button to adjust the sharpness of the picture.
Tint
Press the "▲/▼" button to select the "Tint" item, and then use "◀/▶" button to select to adjust the Tint.
Note: This function only works with NTSC input signal.
Color Temperature
Press the "▲/▼" button to select the "Color Temperature" item, and then use *◄/► * button to select the color temperature mode Cool, User, Warm, Standard.
18
LCD TV
Watching television programs
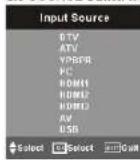
Connect the power cord, press STANDBY button to power on the television, then press the SOURCE button to select TV channel mode to watch television programs.
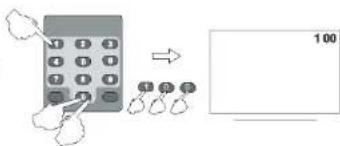
Select Channels Via Program No.
-
If you want to select program no. from 0-9: directly press numeral key to input the program no., it will enter into the selected program, e.g. select program no. 1
-
If you want to select program number from 10-10+, Input the channel number you desired, e.g. select channel 12.
- If you want to select program number from 100-100+: Input the channel number you desired, e.g. select channel 100.


Channel select
- Use the button on the television panel to conduct channel selection, press "CH+/-" button on front panel to select channel.
- "CH+/-" buttons of the remote control may also be applied to conduct channel selection.

11
LCD TV
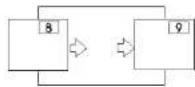
Channel return
Return to previous channel
Press RECALL button on the remote control to return to previous channel.

Volume control
Use the button VOL+/VOL- of television panel to increase/decrease the volume.
VOL+VOL- buttons on the remote control can also adjust the volume.


Sound elimination
Press "MUTE" button to eliminate the sound. Press the button again for audio recovery.

System state display
Press "INFO" button of the remote control, then it will display the current channel number, current input mode and relevant information.


LCD TV
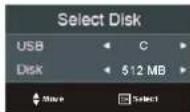
Select Disk:
Choose the disc to store whatever content need record, default as C:

Check PVR File System:
Check storage equipment PVR file System is well established. Default as Start, OK/Enter and Right key to inspect the USB files system and speed, the process along shows Checking ... When no inserting USB, or inspection failed, it shows FAIL. When inserting USB but didn't pass M Star Format, enter Format menu: When inserting USB but inspecting unnormal n opartition, it shows No Partition Found. If inspection normal, it shows SUCCESS
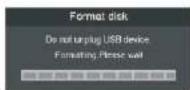
Format:
At Format, press OK key to start Checking PVR File System, after confirmed USB equip information, it pop out Format Disk menu After Formating, the system would establish PVR file system according to previous confirmed PVR File System Size

Time shift size
When finish Creating PVR file system, It pop out Time Shift Size setting menu, and clients can set the space size for time shift.
LCD TV
Then Press

Record List
Press the "▲/▼" button to select the "Record List" item, and then use "◀/▶" buttons to enter record list. (Pres s

The Recorded list is pulled out in Recording Mode. If there is a sign of "Rec" on the left of programm, it means the programm is being recorded. Press
Record Mode
Press the "▲/▼" button to select the "Record Mode" item, and then use "◀/▶" buttons to enter record mode.

Mode: Auto/Once/Everyday/Weekly. When the cursor focus on AUTO, it shows information of pre-setting programme in programme menu. Start Time/End Time will be not available.
Schedule List
Press the "▲/▼" button to select the "Schedule List" item, and then use "◀/▶" buttons to enter schedule list.

PVR File System
Press the "▲/▼" button to select the "PVR file system" item, and then use "◄/►" button to enter PVR file system.

LCD TV
TV AND DTV SEARCHING
The first time you open the TV, it will be asking you to search channels


OSD Language
Press the "▲/▼" button to select the "OSD Language" item, and then use "◀/▶" button to select desired language.
Country
Press the "▲/▼" button to select the "Country" item, and then use *◄/► * button to select country.
Tune Type
Press the "▲/▼" button to select the "Tune Type" item, and then use "◀/▶" button to select Tune Type. Press "▶" or "OK" button to enter Auto Scan search.
LCD TV
Channel
- Press the "MENU" button on the remote control to enter the OSD menu, then press "◀/▶" button to select the "CHANNEL" menu.
- Press the "▼" or "OK" button to enter the "CHANNEL" menu setting, use "▲/▼" to move
the menu bar, and then press "◀/▶" button to adjust the value of selected item. - Press "MENU" button to return to upper menu.
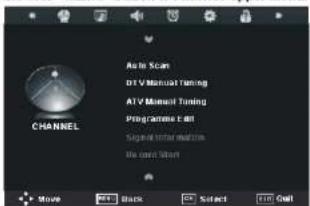

Auto Scan
Press the *▲/▼* button to select the "Auto Scan" item, and then use *◄/►* button to enter Auto Scan search.


DTV Manual Tuning
Press the "▲/▼" button to select the
"DTV Manual Tuning" item, and then use "◀/▶" button to enter DTV manual tuning search. Note: Please select channel then Press "OK" to search.

ATV Manual Tuning
Press the "▲/▼" button to select the "ATV Manual Tuning" item, and then use "◄/►" button to enter ATV manual tuning sub-menu.

Storage To
Press"◀/▶* to select the channel number you want to save to System
Press "◀/▶" to select the system mode L/L', DK, BG, I
Current CH Present ▶/▶ "to select the current channel"
Press 77 to select the current channel Search
Press"◀/▶ "to search backward/forward, MENU or EXIT to
stop the searching
Fine-Tune
Press"◀/▶ "to fine tuning when the signal of the current
channel is weak
LCD TV
Instruction of menus of PVR (Personal Video Record) Function:
Special Explanation: PVR function is a special function in DTV, the format of recorded file is *.ts*. Instruction about all key presses, which will be used in PVR operation as below:
: Display all recorded programm : pause playback mode, execute the function of Time Shift.
■: Stop watching the recorded program or stop the function of time shift.
: Fast-forward
«:Fast-backward
: display previous program, press 30 seconds to jump.
: display next program, press 30 seconds to jump.
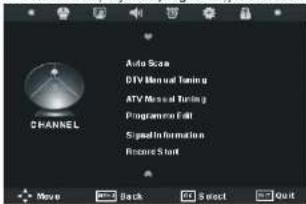

Signal Information
Record Start
Press the "▲/▼" button to select the "Signal Information" item, and then use "◀/▶" buttons to enter.
Press the "▲/▼" button to select the "Record Start" item, and then use "◀/▶" buttons to record start.
(Press
Following picture for your reference:
Then Press

Then press
button to exit from recording programm

Press

- Palsonic
- LCD TV
- Product Specification
- Troubleshooting
- Possible causes:
- Warning
- Table of Contents
- Product introduction
- Production Introduction
- Connecting to exterior devices
- Notes:
- Movie
- Text
- Safety precaution
- Basic operations
- Power on/off
- Auto screen shut off function
- Pre-shut off memory
- Precaution of signal source application
- Safe
- Media player
- Photo
- Music
- Lock
- Control Panel
- Option
- Sleep Timer
- Auto Sleep
- Time Zone
- Day light saving
- 1) AC IN:
- 3)VGA
- 10)USB:
- Time
- Sound
- Sound Mode
- Treble
- Bass
- Balance
- Auto Volume
- Surround Sound
- SPDIF Mode
- Connecting to satellite receiver or decoder
- Picture
- Picture Mode
- Contrast
- Brightness
- Color
- Sharpness
- Tint
- Color Temperature
- Watching television programs
- Channel select
- Channel return
- Volume control
- Sound elimination
- System state display
- TV AND DTV SEARCHING
- Channel
- Auto Scan
- DTV Manual Tuning
- ATV Manual Tuning
- Storage To
- Signal Information
- Record Start
Marque : Palsonic
Modèle : TFTV323FHD
Catégorie : Téléviseur