
Cookmaster CK110F332 - Cuisinière LEISURE - Notice d'utilisation et mode d'emploi gratuit
Retrouvez gratuitement la notice de l'appareil Cookmaster CK110F332 LEISURE au format PDF.


| Type de produit | Cuisinière autonome au gaz / mixte |
| Marque | Leisure |
| Modèle | Cookmaster CK110F332 |
| Dimensions (L x P x H) | 110 cm x 60 cm x 90 cm |
| Poids net | Environ 55 kg |
| Alimentation | Gaz (GPL ou gaz de ville) + Électricité 230 V / 50 Hz |
| Nombre de foyers | 6 feux gaz |
| Puissance totale des brûleurs | Environ 12 kW |
| Type de four | Four gaz multifonction avec thermostat |
| Capacité du four | 100 litres environ |
| Fonction grill | Oui, intégré dans le four |
| Allumage | Allumage électrique intégré pour les foyers et le four |
| Fonction de nettoyage | Par pyrolyse (nettoyage à haute température) |
| Vitre du four | Double vitrage amovible pour un nettoyage facile |
| Dispositifs de sécurité | Vanne de sécurité sur tous les foyers et four (thermocouple) |
| Minuterie | Programmateur électronique avec alarme |
| Éclairage du four | Lampe intérieure |
| Matériau de la surface de cuisson | Acier émaillé |
| Indice de réparabilité | 7.8 / 10 (selon les critères de l'indice) |
| Pièces détachées disponibles | Oui, chez les revendeurs agréés ou en ligne |
| Classe énergétique | A (four) |
FOIRE AUX QUESTIONS - Cookmaster CK110F332 LEISURE
Questions des utilisateurs sur Cookmaster CK110F332 LEISURE
0 question sur cet appareil. Repondez a celles que vous connaissez ou posez la votre.
Poser une nouvelle question sur cet appareil
Téléchargez la notice de votre Cuisinière au format PDF gratuitement ! Retrouvez votre notice Cookmaster CK110F332 - LEISURE et reprennez votre appareil électronique en main. Sur cette page sont publiés tous les documents nécessaires à l'utilisation de votre appareil Cookmaster CK110F332 de la marque LEISURE.
MODE D'EMPLOI Cookmaster CK110F332 LEISURE
NOTICE D'UTILISATION BEDINUNGSANLEITUNG GEBRUIKSHANDLEIDING
Elektrisch Kookfornuis Cooker

natural_image
Close-up of a black appliance front panel with three rotary buttons and a lid (no visible text or symbols)
natural_image
Front view of a kitchen oven with digital timer and control knobs (no visible text or symbols)
natural_image
Close-up of a mechanical fan or vent with internal blades and a central circular component (no visible text or symbols)CK110F332

Lees deze gebruikershandleiding eerst!
Beste klant,
Dank u voor het aanschaffen van dit Leisure product. We hopen dat u de beste resultaten verkrijgt uit uw product, dat vervaardigd is met de allernieuwste technologie van hoge kwaliteit. Lees daarom deze volledige gebruikershandleiding en alle andere bijgevoegde documenten zorgvuldig door voordat u het product in gebruik neemt en houd deze ter referentie voor toekomstig gebruik. Als u het product aan iemand anders overdraagt, voeg daar dan de gebruikershandleiding ook bij. Volg alle waarschuwingen en informatie in deze gebruikershandleiding op. Vergeet niet dat deze gebruikershandleiding ook van toepassing kan zijn op verschillende andere modellen. De verschillen tussen de modellen zijn duidelijk aangegeven in de handleiding.
Verklaring van symbolen
In deze gebruikershandleiding worden de volgende symbolen gebruikt:

Belangrijke informatie of nuttige aanwijzingen over het gebruik.

Waarschuwing voor levensgevaarlijke situaties en schade aan eigendommen.

Risico op een elektrische schok.

Waarschuwing voor brandgevaar.

Waarschuwing voor hete oppervlakken.
1 Belangrijke instructies en waarschuwingen voor veiligheid en milieu 4
Algemene veiligheid 4
Veiligheid bij het werken met gas....4
Elektrische veiligheid....5
Productveiligheid 6
Bedoeld gebruik....8
Kindveiligheid 8
Het oude product afvoeren 9
Verpakkingsmateriaal afvoeren 9
2 Algemene informatie 10
Overzicht....10
Inhoud pakket....11
Technische specificaties....13
Injectortabel 14
3 Installatie 15
Voor installatie....15
Installatie en verbinding....17
Gasomzetting 19
Toekomstig transport 20
4 Voorbereidingen 21
Tips om energie te besparen 21
Het eerste gebruik 21
Tijdinstelling 21
Eerste reiniging van het toestel 22
Eerste opwarming 22
5 De kookplaat gebruiken 23
Algemene informatie over koken 23
Gebruik van de kookplaten....23
6 Hoe de oven te bedienen 25
Algemene informatie over bakken, roosteren en grillen 25
Bedienen van de elektrische hoofdoven (LHS) ..... 26
Werkingsmodussen 26
Het gebruik van de ovenklok 27
De toetsvergrendeling gebruiken 28
Klok gebruiken als alarm 28
Tabel kooktijden voor hoofdoven (linksonder) ..... 29
Bedienen van de grill (voor LHS-hoofdoven) ...... 30
Bedienen van de grill (LHS-boven) 31
Bedienen van uw RHS-oven 32
7 Onderhoud en verzorging 33
Algemene informatie 33
Het reinigen van het fornuis 33
Het bedieningspaneel reinigen 33
Schoonmaken van de oven-/grillruimten 33
Verwijderen van de deur van de bovenste oven. .... 34
Binnenglas deur verwijderen 34
De ovenlamp vervangen 34
8 Problemen oplossen 36
1 Belangrijke instructies en waarschuwingen voor veiligheid en milieu
Dit gedeelte bevat veiligheidsvoorschriften die helpen persoonlijk letsel of schade aan eigendommen te voorkomen. Het niet opvolgen van deze instructies laat alle garantie vervallen.
Algemene veiligheid
- Dit apparaat kan worden gebruikt door kinderen vanaf 8 jaar en personen met verzwakte fysieke, zintuiglijke of mentale toestand, of met een gebrek aan ervaring en kennis, als deze onder toezicht staan of instructies zijn gegeven betreffende het veilige gebruik van het apparaat en op de hoogte zijn van de betrokken gevaren. Laat kinderen niet met het apparaat spelen. Reiniging en gebruikersonderhoud dienen niet zonder toezicht door kinderen uitgevoerd te worden.
- Plaats het product nooit op een vloer met vloerbedekking. Anders kan gebrek aan luchtstroom onder het product oververhitting van elektrische onderdelen veroorzaken. Dit geeft problemen met uw product.
- Installatie- en reparatiewerk moet altijd uitgevoerd worden door bevoegde serviceagenten. De fabrikant is niet aansprakelijk voor
schade die voortvloeit uit werkzaamheden door onbevoegde personen. Dit kan de garantie ongeldig maken. Lees alvorens de installatie de instructie zorgvuldig door.
- Gebruik het apparaat niet als het defect is of zichtbare schade vertoont.
- Verzeker u ervan dat de functieknoppen van het product na ieder gebruik zijn uitgeschakeld.
Veiligheid bij het werken met gas
- Werk aan gasapparatuur of gassystemen mag uitsluitend worden uitgevoerd door bevoegde gekwalificeerde personen.
- Voor installatie dient u te controleren of de omstandigheden van de plaatselijke distributie (gastype en gasdruk) en de afstelling van het toestel compatibel zijn.
- Dit toestel is niet verbinden aan een evacuatietoestel voor verbrandingsproducten. Het moet in overeenstemming met de huidige installatievoorschriften worden geïnstalleerd en aangesloten. Er moet in het bijzonder worden gelet op de
vereisten betreffende ventilatie; Zie
- Een kookgastoestel produceert hitte, vocht en verbrandingsproducten in de kamer waar dit apparaat wordt gebruikt. Zorg ervoor dat de keuken goed geventileerd is vooral bij gebruik van het toestel: zorg voor een natuurlijke ventilatie en laat de ventilatieopening open. Plaats eventueel een extra ventilatietoestel (dampkap). Bij langdurig intensief gebruik van het apparaat kan aanvullende ventilatie nodig zijn, bijvoorbeeld het vergroten van de mechanische ventilatie waar deze aanwezig is.
- Gastoestellen en -systemen moeten regelmatig worden gecontroleerd op correct functioneren. Regelaar, slang en zijn klem dienen regelmatig gecontroleerd te worden en door de fabrikant binnen aanbevolen termijn of indien nodig vervangen te worden.
- Reinig de gasbranders regelmatig. De vlammmen horen blauw te zijn en gelijkmatig te branden.
- Goede verbranding is vereist bij gastoestellen. In geval van onvolledige verbranding kan zich koolmonoxide (CO) ontwikkelen. Koolmonoxide is een kleurloos,
geurloos en zeer giftig gas, dat een dodelijk effect heeft in zelfs zeer kleine hoeveelheden.
- Vraag bij uw lokale gasleverancier informatie over telefoonnummers bij een gasnoodgeval en veiligheidsvoorschriften in geval van gasgeur.
Wat u moet doen wanneer u gas ruikt
- Gebruik geen open vuur en rook niet. Gebruik geen elektrische knoppen (bijv. lampschakelaar, deurbel en enz.) Gebruik geen vaste of mobiele telefoons. Explosie- en vergiftigingsgevaar!
- Open deuren en ramen.
- Sluit alle kleppen op gastoestellen en gasmeters.
- Controleer alle buizen en verbindingen op dichtheid. Indien u nog steeds gas ruikt, verlaat dan het appartement.
• Waarschuw de buren. - Bel de brandweer. Gebruik een telefoon buitenshuis.
- Ga de eigendom niet opnieuw binnen tot men u zegt dat het veilig is dit te doen.
Elektrische veiligheid
- Indien het product een defect heeft. moet het niet in gebruikt worden genomen zonder dat het gerepareerd is door een bevoegde onderhoudsdienst. Er is kans op elektrische schokken!
- Sluit het product uitsluitend aan op een geaarde uitgang/lijn met een voltage en beveiliging zoals gespecificeerd in de "Technische specificaties". Laat de aardingsinstallatie aanleggen door een bevoegd elektricien terwijl u het product met of zonder transformator gebruikt. Ons bedrijf is niet aansprakelijk voor problemen die zijn ontstaan doordat het product niet geaard is in overeenstemming met de plaatselijke voorschriften.
- Reinig het product nooit door er water overheen te gooien! Er is kans op elektrische schokken!
- Het product moet tijdens installatie, onderhoud, reiniging en reparatiehandelingen losgekoppeld zijn.
- Als het stroomkabel van het product beschadigd is, moet deze om gevaar te voorkomen worden vervangen door de fabrikant, door zijn onderhoudsdienst of door soortgelijke bevoegde personen.
- Gebruik uitsluitend de stroomkabel zoals gespecificeerd in de "Technische specificaties".
- Het apparaat dient dusdanig geïnstalleerd te zijn dat het volledig van het netwerk afgesloten kan worden. De loskoppeling dient te geschieden door het uitschakelen van een
schakelaar die in de vaste elektrische installatie is ingebouwd, volgens de constructievoorschriften.
- Achterkant van de oven wordt warm wanneer deze in gebruik is. Zorg ervoor dat de gas-/elektriciteitsaansluiting de achterkant niet raakt; dit kan leiden tot beschadiging van de aansluitingen.
- Zorg dat het netsnoer niet tussen de oven en het frame vastgeklemd zit en leidt het niet over de hete oppervlakken. Anders kan de kabelisolatie smelten en brand veroorzaken als gevolg van kortsluiting.
- Werk aan elektrische apparatuur of systemen mag uitsluitend worden uitgevoerd door bevoegde en gekwalificeerde personen.
- Zet in geval van schade het product uit en sluit het af van het elektriciteitsnet. Om dit te doen haalt u de geschikte schakelaar in de gebruikersunit in huis over.
- Zorg ervoor dat de stroomwaarde van de zekering compatibel is met het product.
Productveiligheid
- Het toestel en de toegankelijke onderdelen worden warm tijdens de werking. Zorg ervoor dat u geen verwarmingselementen aanraakt. Behalve als ze
voortdurend onder toezicht staan, moeten kinderen jonger dan 8 jaar uit de buurt worden gehouden.
- Gebruik het product niet wanneer uw beoordelingsvermogen of coördinatie nadelig beïnvloed worden door het gebruik van drugs en/of alcohol.
- Wees voorzichtig bij het gebruiken van alcoholische dranken in uw maaltijden. Alcohol verdampt bij hoge temperaturen en kan brand veroorzaken aangezien het vlam vat wanneer het in contact komt met warme oppervlakken.
- Plaats geen ontvlambare materialen dichtbij het apparaat aangezien de zijkanten heet worden tijdens gebruik.
- Tijdens het gebruik wordt het apparaat warm. Zorg ervoor dat u geen verwarmingselementen in de oven aanraakt.
- Houd alle ventilatiesleuven vrij van obstakels.
- Verwarm geen gesloten conservenblikken en glazen potten in de oven. De druk die zich in het blik/de pot ontwikkelt kan ervoor zorgen dat deze barst.
- Plaats geen bakschalen, schotels of aluminiumfolie rechtstreeks op de bodem van de oven. De
warmteaccumulatie kan de bodem van de oven beschadigen.
- Gebruik geen krassende schuurmiddelen of scherpe metalen schrapers om het glas van de ovendeur te reinigen. Deze kunnen het oppervlak krassen, wat tot barsten van het glas kan leiden.
- Gebruik geen stoomreinigers om het toestel schoon te maken, want dat kan elektrische schokken veroorzaken.
- Gebruik de roosters zoals beschreven in "Hoe de elektrische oven te bedienen".
- Gebruik het product niet wanneer de glazen ovendeur verwijderd of gebarsten is.
- Gebruik de ovenhendel niet om handdoeken aan te drogen. Hang hier geen handdoeken, wanten of soortgelijke stoffen voorwerpen aan als de grill met open deur werkzaam is.
- Gebruik altijd warmtebestendige ovenhandschoenen wanneer u schotels in de oven plaatst of eruit haalt.
- Zorg ervoor dat het apparaat is uitgeschakeld voordat u de lamp vervangt om de mogelijkheid van een elektrische schok te voorkomen.
- Onbeheerd koken op een kookplaat met vet of olie kan
gevaarlijk zijn en kan leiden tot brand. Probeer NOOIT een brand met water te blussen, maar schakel het apparaat uit en bedek vervolgens de vlam met bijvoorbeeld, een deksel of een branddeken.
- Brandgevaar: Bewaar geen items op de kookplaten.
Voorkoming van mogelijk brandgevaar!
- Zorg dat alle elektrische aansluitingen goed vastzitten om vonkvorming te voorkomen.
- Gebruik geen beschadigde of gesneden kabel of een verlengkabel.
- Zorg dat er geen vloeistof of vocht op de elektrische aansluiting kan komen.
- Zorg dat de gasaansluiting goed is en geen gaslekken kan veroorzaken.
Bedoeld gebruik
- Dit product is bedoeld voor huishoudelijk gebruik.
Commercieel gebruik laat de garantie komen te vervallen. - dit toestel is uitsluitend bedoeld voor het koken. Het mag niet voor andere doeleinden, zpals bijvoorbeeld verwarmingstoestel, worden gebruikt.
- Dit product dient niet te worden gebruikt voor het opwarmen van platen onder de grill, het drogen
van handdoeken, theedoeken enz. op de handgrepen. Dit product mag ook niet worden gebruikt voor verwarmingsdoeleinden.
- De fabrikant is niet aansprakelijk voor enige schade veroorzaakt door foutief gebruik of gebruiksfouten.
- De oven kan gebruikt worden voor het ontdooien, bakken, roosteren en grillen van voedsel.
Kindveiligheid
- Toegankelijke onderdelen kunnen tijdens gebruik heet worden. Houd jonge kinderen uit de buurt.
- De verpakkingsmaterialen kunnen gevaarlijk zijn voor kinderen. Houd de verpakkingsmaterialen buiten het bereik van kinderen. Doe alle delen van de verpakking weg volgens de milieunormen.
- Elektrische en/of gastoestellen zijn gevaarlijk voor kinderen. Houd kinderen bij het product vandaan als het in gebruik is en sta niet toe dat ze ermee spelen.
- Plaats geen items boven het apparaat binnen het bereik van kinderen.
- Plaats geen zwaar voorwerp op een open deur en laat kinderen er niet op zitten. De oven kan omkantelen of deurscharnieren kunnen beschadigd worden.
Het oude product afvoeren
In naleving met de WEEE-richtlijn inzake de afvoer van afvalproducten:

Het product voldoet aan de EU WEEE-richtlijn (2012/19/EU). Dit product draagt het symbool voor elektrisch en elektronisch afval (WEEE). Dit product werd vervaardigd uit kwalitatieve onderdelen en materialen die hergebruikt kunnen worden en geschikt zijn voor recycling. Gooi het afvalproduct aan het einde van zijn levensduur niet weg met het normale huisafval of ander afval. Breng het naar een verzamelpunt voor de recycling van
elektrische en elektronische apparatuur. Raadpleeg uw plaatstelijke gemeente over deze verzamelpunten.
In naleving met de RoHS-richtlijn:
Het door u aangekochte product voldoet aan de EU RoHS-richtlijn (2011/65/EU). Het bevat geen schadelijke en verboden materialen zoals bepaald in de richtlijn.
Verpakkingsmateriaal afvoeren
- Verpakkingsmateriaal is gevaarlijk voor kinderen. Houd verpakkingsmateriaal op een veilige plek buiten het bereik van kinderen. Verpakkingsmateriaal van het product wordt vervaardigd van recyclebaar materiaal. Voer het netjes af en sorteer het overeenkomstig de regels voor recyclebaar afval. Werp het niet weg bij het normale huisafval.
2 Algemene informatie
Overzicht

1 Branderplaat
2 Bedieningspaneel
3 Oven links -Grill
4 Oven links -Hoofdoven
5 Onderste deel
6 Oven rechts - Bovenste oven
7 Antispatplaat

1 hulpbrander Links achteraan
2 Snelbrander Links vooraan
3 Wokbrander Midden
4 Thermostaatlamp Oven links Bovenste oven-Grill
5 Functieknop van de grill Oven links Bovenste oven-Grill
6 FunctieknopOven links - Hoofdoven
7 Thermostaatlamp Oven links - Hoofdoven
8 Thermostaatknop Oven links - Hoofdoven
9 digitale timer
10 normale brander Midden - achter
11 normale brander Middenvoor
12 hulpbrander Rechts vooraan
13 Snelbrander Rechts achteraan
14 Thermostaatlamp Oven rechts - Oven onder
15 Ovenknop Oven rechts - Oven onder
Inhoud pakket

De bijgeleverde accessoires kunnen variëren, afhankelijk van het productmodel. Het is mogelijk dat uw product niet alle accessoires bevat die in de gebruikershandleiding worden beschreven.
Gebruikershandleiding
Ovenplaat
Wordt gebruikt voor gebakjes, bevroren voedsel en grote braadstukken.

natural_image
Simple 3D rendering of a square baking tray with no text or symbolsDraadrooster
Gebruikt bij het braden en voor het plaatsen van te bakken, roosteren of koken voedsel in stoofgerechten op het gewenste rek.

natural_image
Isometric view of a rectangular sheet with horizontal lines, no text or symbols present
natural_image
Line drawing of a rectangular metal grate or rack structure (no text or symbols)Klein draadrek (wordt gebruikt met de plaat die bij het product geleverd is)
Het wordt op de plaat gelegd om het afdruipende vet op te vangen tijdens het grillen, zodat de oven schoon blijft.

natural_image
3D rendering of a rectangular tray with internal compartments and a curved top surface (no text or symbols)Het grillrooster en de plaat correct op de uitschuifrekken plaatsen
Uitschuifrekken maken het mogelijk de platen en rooster makkelijk in te schuiven en te verwijderen. Als u de plaat en het rooster met uitschuifrekken gebruikt moet u zich ervan verzekeren dat de pennen aan de achterkant van het uitschuifrek tegen de zijkanten van het rooster en de plaat staan.

natural_image
Close-up of a mechanical component with grid pattern and internal structure (no visible text or symbols)
natural_image
Close-up of a metal rod with ribbed structure and magnified inset showing internal components (no text or symbols)Het rooster en de plaat correct op de draadrekken plaatsen
Het is belangrijk het rooster en/of de plaat correct op het rek te plaatsen. Schuif het rooster of de plaat tussen twee rails en zorg dat deze stabiel is voordat u er voedsel op legt (zie de afbeelding hieronder).

natural_image
Close-up of a metal rack with horizontal slats and a curved handle, no visible text or symbols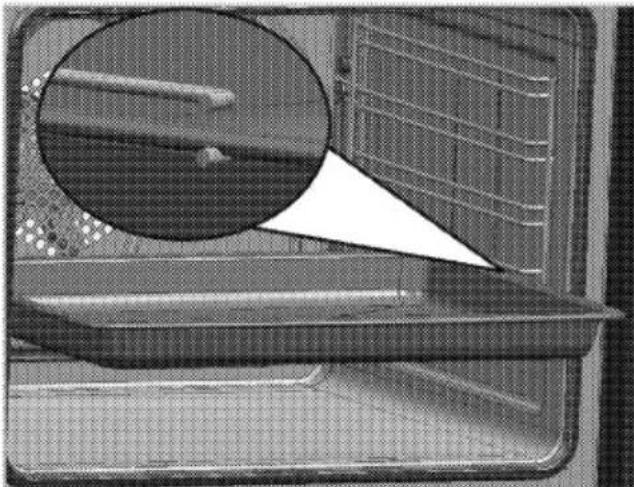
natural_image
Close-up of a mechanical component with a magnified inset showing internal structure (no visible text or symbols)Wokpanadapter
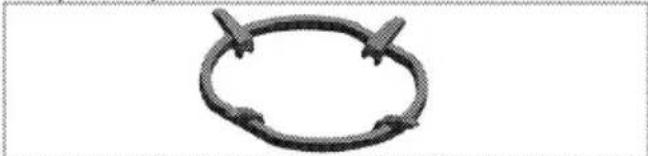
natural_image
Simple circular diagram with two cross-shaped connectors at the top (no text or symbols)Wordt gebruikt voor een wokpan met een ronde bodem.
Antispatplaat

natural_image
Line drawing of a four-hole electric stove with labeled component (no text or symbols)1 Antispatplaat
- Neem de antispatplaat en pakje schroeven en moeren.
- Plaats de antispatplaat volgens de tekening, plaats moer in de antispatplaat op het gat, schroef de antispatplaat met schroef onderop de branderplaat vast aan de branderplaat
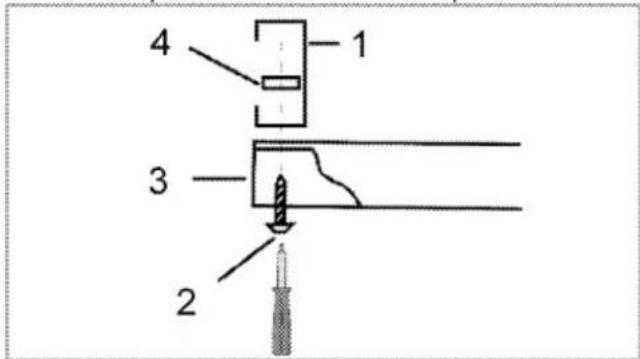
1 Antispatplaat
2 Schroef
3 Branderplaat
4 Moer
3. Draai de schroeven niet te stevig vast. Dit kan het formuis of de antispatplaat beschadigen.
Technische specificaties
| ALGEMEEN | |
| Buitenste afmetingen (hoogte/breedte/diepte) | 900 mm/1100 mm/600 mm |
| Voltage / frequentie | 220-240 V / 380 - 415 3N ~ 50 Hz |
| Totaal stroomverbruik | 6.6 kW |
| Zekering | min. 32 A / 3 x 16 A |
| Kabeltype / kabelfunctionaliteit | H05W-FG 3 x 4 mm2/ 5 x 1,5 mm2 |
| Kabellengte | max. 2 m |
| Categorie van gasproduct | Cat II 2E+3+ / Cat II 2L3B/P / Cat I 2E |
| Gastype / druk | NG G 20/20 mbar |
| Totaal gasverbruik | 12 kW |
| Omzetting naar gas type/druk$ | LPG G 30/28-30 mbar |
| - optioneel | NG G 25/25 mbar - Propaan 31/37 mbar |
| KOOKPLAAT | |
| Branders | |
| Links achteraan | hulpbrander |
| Stroom | 1 kW |
| Links vooraan | Snelbrander |
| Stroom | 3 kW |
| Midden | Wokbrander |
| Stroom | 4 kW |
| Midden - achter | normale brander |
| Stroom | 2 kW |
| Middenvoor | normale brander |
| Stroom | 2 kW |
| Rechts vooraan | hulpbrander |
| Stroom | 1 kW |
| Rechts achteraan | Snelbrander |
| Stroom | 3 kW |
| OVEN/GRILL | |
| Hoofdoven - Oven links | Multifunctionele oven |
| Binnenlamp | 15-25 W |
| Stroomverbruik grill | 2.2 kW |
| Bovenste oven - Oven links | Grill |
| Binnenlamp | 15-25 W |
| Stroomverbruik grill | 2.2 kW |
| Oven rechts | Conventionele oven |
| Binnenlamp | 15-25 W |

De technische specificaties mogen zonder voorafgaande kennisgeving gewijzigd worden om de productkwaliteit te verbeteren.

De afbeeldingen in deze handleiding zijn schematisch en komen mogelijk niet exact overeen met uw product.

Waarden vermeld op de productlabels of in de bijgeleverde documentatie worden verkregen onder laboratoriumomstandigheden overeenkomstig de relevante standaarden. Deze waarden kunnen schommelen afhankelijk van de werkings- en omgevingsomstandigheden van het product.
Injectortabel
| Position kookplaatzone | 1 kW Links achteraan | 3 kW Links vooraan | 4 kW Midden | 2 kW Midden - achter | 2 kW Middenvoor | 1 kW Rechts vooraan | 3 kW Rechts achteraan |
| Gastype / Gasdruk | |||||||
| G 20/20 mbar | 78 | 125 | 144 | 104 | 104 | 78 | 125 |
| G 30/28-30 mbar | 50 | 85 | 101 | 69 | 69 | 50 | 85 |
| G 25/25 mbar | 78 | 125 | 144 | 104 | 104 | 78 | |
| G 31/ 37 mbar | 50 | 85 | 101 | 69 | 69 | 50 | 85 |
3 Installatie
Product dient geïnstalleerd te worden door een bekwaam persoon in overeenstemming met de van kracht zijnde voorschriften. De fabrikant is niet aansprakelijk voor schade die voortvloeit uit werkzaamheden door onbevoegde personen. Dit kan de garantie ongeldig maken.
| De voorbereiding van de locatie en de elektriciteits- en gasinstallatie voor het product vallen onder de verantwoordelijkheid van de klant. | |
| GEVAAR:Het product moet aangesloten worden overeenkomstig de lokale gas- en elektriciteitsvoorschriften. | |
| GEVAAR:Controleer vóór installatie van het product of het zichtbare gebreken heeft. Zo ja, laat het dan niet installeren.Beschadigde producten vormen een gevaar voor uw veiligheid. |
Voor installatie
Om ervoor te zorgen dat alle luchtopeningen onder het toestel vrij blijven, moet dit toestel worden geplaatst op een harde ondergrond zodat de voetjes niet in vast tapijt of in een zachte vloerbekleding wegzakken. De keukenvloer moet in staat zijn het gewicht van het toestel te dragen plus het extra gewicht van kookwaren en bakwaren en voedsel.
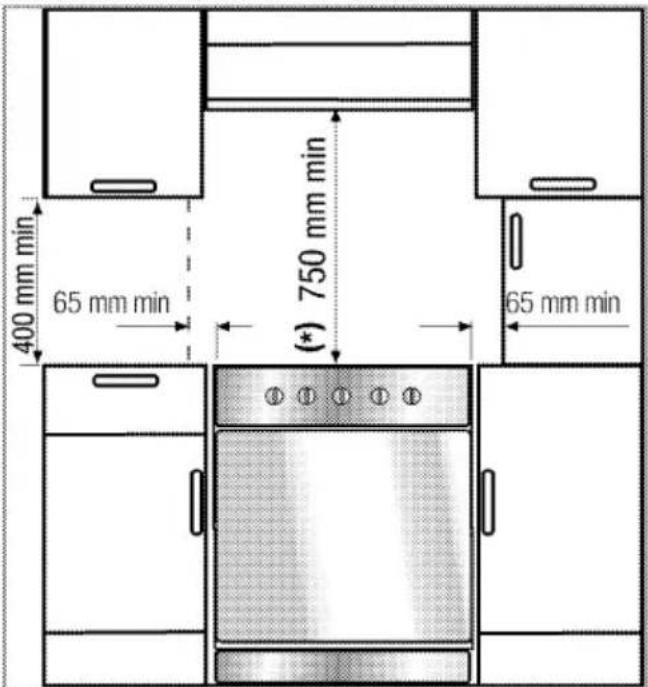
- Het kan worden gebruikt met elementen aan beide zijden maar om een minimumafstand van
400 mm te hebben boven de kookplaat moet u een vrije ruimte van 65 mm voorzien tussen het toestel en een muur, een keukendeel of een grote kast.
- Het fornuis kan ook losstaand worden geplaatst. Voorzie een minimumafstand van 650 mm boven het kookoppervlak.
- "Het fornuis is ontworpen om tussen keukenkasten te plaatsen die 900 mm of meer uit elkaar staan. Aan beide zijden dient zich voldoende vrije ruimte te bevinden om het fornuis uit te trekken in verband met onderhoud. Het kan worden gebruikt met kasten aan een of beide zijden, en ook als hoekopstelling. Het fornuis kan ook losstaand worden geplaatst".
(*) Indien boven het fornuis een afzuigkap wordt geplaatst, dient u de instructies van de fabrikant te raadplegen met betrekking tot de installatiehoogte (minstens 650 mm). - Het toestel kan het best worden verplaatst door het iets naar achter te kantelen en vervolgens naar u toe te trekken zoals aangegeven. Open de bovenste en onderste ovendeur voldoende om een goede grip te hebben op de voorste rand aan de bovenkant van de oven. Bij het vastgrijpen mag u de grillelementen of de binnenzijde van de oven niet beschadigen.
- Het toestel kan het best worden verplaatst door het iets naar voren te tillen zoals aangegeven in de afbeelding. Open de ovendeur om een goede greep te hebben aan het dak van de oven zonder de grillelementen en de binnenste delen van de oven te beschadigen. Het toestel niet verplaatsen door aan de deurgrendel of aan de knoppen te trekken. Verplaats het toestel steeds een klein beetje totdat het in de gewenste positie staat.

- Het toestel komt overeen met toestelklasse 1, d.w.z. het kan worden geplaatst met de achterzijde en één zijde naar de keukenwanden, keukenmeubilair of uitrusting van elke willekeurige grootte. Het keukenmeubilair of of de uitrusting aan de andere zijde mag enkel van dezelfde grootte of kleiner zijn.
- Elk keukenmeubilair naast het toestel moet warmtebestendig zijn (minimaal tot 100 °C).
Veiligheidsketting
Het toestel moet beveiligd zijn tegen omslaan via de twee bijgeleverde veiligheidskettingen.
Bevestig de haak (1) met gebruik van een geschikte plug aan de keukenwand (6) en verbind de veiligheidsketting (3) aan de haak door middel van het vergrendelmechanisme (2).

1 Stabiliteitshaak
2 Vergrendelmechanisme
3 Veiligheidsketting (meegeleverd en op de oven gemonteerd)
4 Bevestig de ketting stevig aan de achterzijde van het fornuis
5 Achterzijde van het fornuis
6 Keukenwand

Stabiliteitsketting zo kort mogelijk houden om te voorkomen dat de oven voorover kantelt en diagonaal om te voorkomen dat de oven opzij kantelt.
Stabiliteitsketting voor fornuizen die niet zijn uitgerust met een sleuf voor beugelverbinding
Kamerventilatie
In elke kamer moet een opengaand venster worden voorzien. In sommige kamers moet extra ventilatie worden voorzien.
De lucht voor verbranding wordt genomen van de kamerlucht en de uitlaatgassen worden rechtstreeks in de kamer uitgestoten.
Goede kamerventilatie is essentieel voor het veilige bediening van uw toestel. Indien er geen raam of deur beschikbaar is voor kamerventilatie moet er een extra ventilatie worden geïnstalleerd.
Het fornuis mag in een keuken, een keuken/eetkamer of een slaap-/woonkamer worden geplaatst, maar niet in een ruimte waarin zich een bad of douche bevindt. Het fornuis mag niet in een slaap-/woonkamer met een oppervlakte van minder 20 m ^3 worden geplaatst. Installeer dit toestel niet in een kelderverdieping tenzij er aan minstens een zijn vrije toegang is tot de gelijkvloerse verdieping.
| Kamergrootte | Ventilatieopening |
| kleiner dan 5 m^3 | min. 100 cm^2 |
| 5 m^3 tot 10 m^3 | min. 50 cm^2 |
| groter dan 10 m^3 | niet vereist |
| In de kelder | min. 65 cm^2 |
Installatie en verbinding
Het product mag slechts worden geïnstalleerd en aangesloten volgens de statutaire installatienormen.

Installeer het product niet naast koelkasten of diepvriezers. De door het product afgegeven warmte zal het stroomverbruik van koeltoestellen verhogen.
• Draag het product met minstens twee personen.
- Het product moet rechtstreeks op de vloer worden geplaatst. Het moet niet worden geplaatst op een draagvlak of een voetstuk.

Draag of verplaats het product niet met behulp van de deur- en/of handgreep. De deur, hendel of scharnieren beschadigen.
Elektrische aansluiting
Sluit het product aan op een geaarde uitgang/lijn die beveiligd is door een zekering met de capaciteit zoals vermeld in de tabel "Technische specificaties". Laat de aardingsinstallatie aanleggen door een bevoegd elektricien terwijl u het product met of zonder transformator gebruikt. Ons bedrijf is niet aansprakelijk voor schade die voortvloeit uit het gebruik van het product zonder een aardingsinstallatie overeenkomstig de plaatselijke voorschriften.
GEVAAR:
Het product mag uitsluitend door een bevoegde en gekwalificeerde persoon op de netvoeding aangesloten worden. De garantieperiode van het product gaat uitsluitend in na correcte installatie. De fabrikant is niet aansprakelijk voor schade die voortvloeit uit werkzaamheden door onbevoegde personen.
GEVAAR:
De stroomkabel mag niet worden vastgeklemd, verbogen of samengedrukt of in contact komen met warme onderdelen van het product. Een beschadigde stroomkabel moet door een bevoegde elektricien worden vervangen. Anders bestaat er een risico op een elektrische schok, kortsluiting of brand!
De gegevens over de stroomvoorziening moeten overeenkomen met de gegevens vermeld op het typeplaatje van het product. Het typeplaatje is zichtbaar wanneer de deur geopend wordt of bevindt zich op de achterkant van de eenheid afhankelijk van het type eenheid.
De stroomkabel van uw product moet voldoen aan de waarden in de tabel "Technische specificaties".

GEVAAR:
Koppel het product los van het elektriciteitsnet voordat met werk aan de elektrische installatie begonnen wordt. Er is kans op elektrische schokken!
Het aansluiten van de stroomkabel
- Als uw product niet met een stroomkabel geleverd is dient u een stroomkabel uit de tabel () te kiezen die overeenkomt met de elektrische installatie bij u thuis en dient u deze aan te sluiten op uw product volgens de instructies in het kabeldiagram.
Indien het niet mogelijk is alle polen in de stroomtoevoer af te sluiten dient er een afsluiteenheid met minstens 3 mm contactdoorlaat (zekeringen, lijnveiligheidschakelaars, schakelaars) aangesloten te worden en dienen alle polen van deze afsluiteenheid zich in de buurt (niet boven) van het product te bevinden overeenkomstig de IEE-richtlijnen. Het verzuim deze instructie op te volgen kan leiden tot werkingsproblemen en de productgarantie ongeldig maken.

Aanvullende bescherming door een overblijvende stroomonderbreker wordt aanbevolen.
- Open de klembeschermer met een schroevendraaier.
- Steek de stroomkabel door de kabelklem onder de sluitklem en maakt deze vast aan het hoofdgedeelte met de geïntegreerde schroef op het kabelklemdeel.
- Verbind de kabels volgens het geleverde diagram.

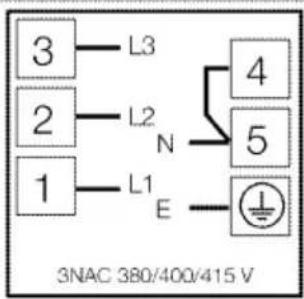
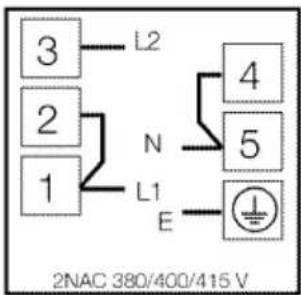
- Sluit, na de voltooiing van de draadaansluitingen, de klembeschermer.
- Leid de stroomkabel dusdanig dat het geen contact met het product maakt en dat het niet beklemd raakt tussen het product en de muur.

De stroomkabel mag om veiligheidsredenen niet langer zijn dan 2 m.
Gaskoppeling

GEVAAR:
Product mag slechts door een bevoegd en gekwalificeerd persoon aan het gastoevoersysteem worden aangesloten.
Explosie- of vergiftigingsgevaar door onprofessionele reparaties!
De fabrikant is niet aansprakelijk voor schade die voortvloeit uit werkzaamheden door onbevoegde personen.

GEVAAR:
Sluit de gastoevoer af voordat u begint te werken aan de gasinstallatie.
Er is explosiegevaar!
- Gasafstelcondities en -waarden zijn aangegeven op labels (of op modellabel).
- Raadpleeg de gedetailleerde gasaansluiting- en gasconversie-informatie in de bij dit product geleverde gebruikershandleiding.
GEVAAR:
De gasslang mag niet worden vastgeklemd, verbogen of samengedrukt of in contact komen met hete onderdelen van het product. Er bestaat explosiegevaar door een beschadigde gasslang.
Stel de poten van de oven
Het apparaat moet worden geplaatst op een vlak oppervlak. De voor- en achterpoten kunnen naar wens worden versteld om het apparaat naar omhoog of naar beneden te brengen door de poten links- of rechtsom te draaien.
Het apparaat mag niet hoger zijn dan 930 mm.

natural_image
Close-up of mechanical components with circular arrows indicating rotation or movement (no text or symbols)Voor producten met een koelventilator

1 Koelventilator
2 Bedieningspaneel
Om tijdens het grillen met de deur open het bedieningspaneel, de knoppen en de betrokken
ovengedeelten te beschermen, gaat er automatisch een ventilator werken.

Ventilator werkt voortdurend totdat het product is afgekoeld.
Laatste controle
- Sluit het product weer aan op het net.
- Controleer elektrische functies.
- Open de gastoevoer.
- Controleer gasinstallaties voor veilige installatie en dichtheid.
- Ontsteek branders en controleer het verschijnen van de vlam.

Vlam dient blauw te zijn een een regelmatige vorm te hebben. Als de vlam geelachtig is, controleer of de branderdeksel goed op zijn plek zit of reinig de brander.
Gasomzetting
GEVAAR:
Sluit de gastoevoer af voordat u begint te werken aan de gasinstallatie. Er is explosiegevaar!
Om het gastype van uw toestel te wijzigen, wijzigt u alle injectoren en maakt u vlaminstellingen voor alle kleppen bij verminderde stroomsnelheid.
Injector voor de branders verwisselen.
- Haal het branderdeksel en de branderkern weg.
- Schroef de injectoren los door deze tegen de klok in te draaien.
- Plaats nieuwe injectoren.
- Controleer alle aansluitingen op veilige installatie en dichtheid.

Nieuwe injectoren zijn op de verpakking of injectortabel voorzien van een positiemarkering of er kan naar toe worden verwezen.
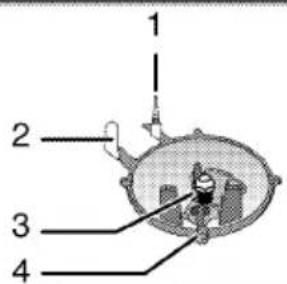
1 Vlambeveiliging
2 Ontsteking
3 Injector
4 Brander

Probeer de gasbranderkranen niet te verwijderen, tenzij er een abnormale toestand is. U moet een bevoegde serviceagent bellen indien het nodig is de kranen te vervangen.
Instelling verminderde gasstroomsnelheid voor kookplaatkraan.
- Ontsteek de brander die aangepast moet worden en draai de knop naar de laagste stand.
- Verwijder de knop van de gaskraan.
- Gebruik een schroevendraaier van de juiste afmeting om de stelschroef voor de stroomsnelheid af te stellen.
Voor lpg (butaan - propaan) draait u de schroef met de klok mee. Voor aardgas moet u de schroef eenmaal tegen de klok in draaien.
» De normale lengte van een rechte vlam in de laagste stand moet 6-7 mm zijn.
4. Als de vlam groter is dan de gewenste stand, draai de schroef dan met de klok mee. Als de vlam kleiner is, draai de schroef dan tegen de klok in.
5. Breng voor de laatste bediening de brander zowel naar hoge vlam als naar de laagste standen en controleer of de vlam aan of uit is.
Afhankelijk van het type gaskraan dat in uw toestel wordt gebruikt, kan de positie van de afstellingsschroef variëren.
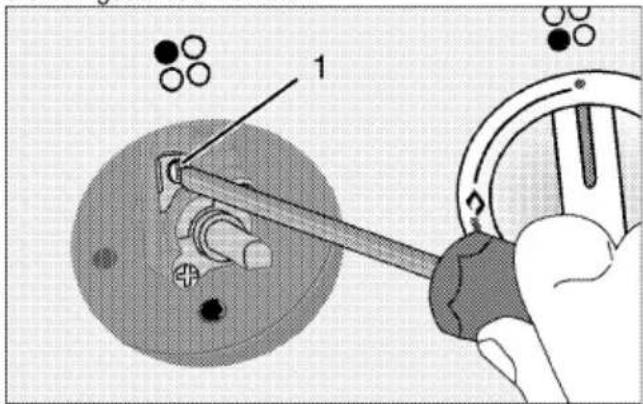
1 Stelschroef gasdebiet
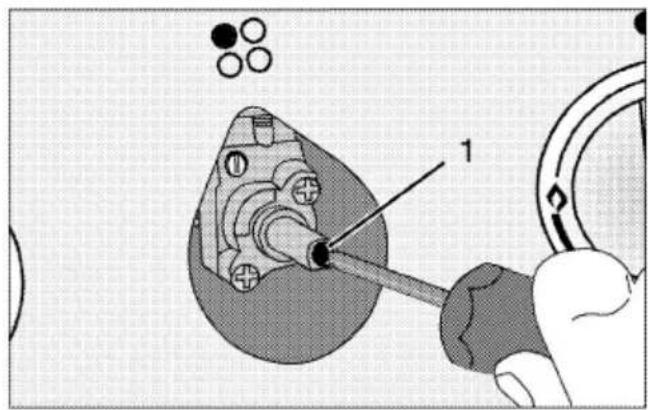
1 Stelschroef gasdebiet

Indien het gastype van de eenheid gewijzigd wordt, moet het typeplaatje dat het gastype van de eenheid vermeldt, ook gewijzigd worden.
Toekomstig transport
- Bewaar de originele doos van het product en vervoer het product daarin. Volg de aanwijzingen op de doos. Als u de originele doos niet hebt,
verpak het product dan in luchtkussenfolie of dik karton en tape het goed vast.
- Om te verhinderen dat de draadgrill en de plaat in de oven de ovendeur beschadigen, plaats een strip karton op de binnenkant van de ovendeur zodat deze overeenkomt met de positie van de plaat. Bevestig de ovendeur aan de zijkanten met tape.
- Bevestig de deksels en pannendragers met kleefband.
- Til of verplaats het product niet met behulp van de deur of handgreep.

Plaats geen voorwerpen op het product en verplaats het rechtopstaand. Verplaats het product niet als het water bevat. U kunt het product verplaatsen na afvoer van het daarin aanwezige water.

Controleer globaal het uiterlijk van uw product op eventuele schade die tijdens het transport werd veroorzaakt.
4 Voorbereidingen
Tips om energie te besparen
De volgende informatie zal u helpen om uw apparaat op een ecologische manier te gebruiken en energie te besparen:
- Gebruik donkerkleurige of gelakte kookwaren in de oven; dit zorgt voor een betere warmtetransmissie.
- Verwarm de oven tijdens het koken van uw gerechten voor als dit wordt aanbevolen in de gebruikershandleiding of kookbeschrijving.
- Open de ovendeur zo weinig mogelijk tijdens het koken.
- Probeer wanneer dit mogelijk is meer dan één gerecht tegelijkertijd in de oven te bereiden. U kunt koken door twee pannen op het draadrek te plaatsen.
- Bereid meer dan één gerecht na elkaar. De oven zal al warm zijn.
- U kunt energie besparen door uw oven een paar minuten voor het einde van de bereidingstijd uit te schakelen. Zet de ovendeur niet open.
- Ontdooi bevroren gerechten voor u ze bereidt.
- Gebruik tijdens het koken potten/pannen met deksels. Als u geen deksel gebruikt kan het energieverbruik tot 4 keer meer zijn.
- Kies de brander die geschikt is voor de bodemmaat van de pan die u gaat gebruiken. Kies altijd de juiste maat pan voor uw gerechten. Grotere pannen verbruiken meer energie.
Het eerste gebruik
Tijdinstelling

Voordat u de oven kan gebruiken, moet de timer worden ingesteld. Als de tijd niet is ingesteld zal de oven niet werken.

Wanneer u aanpassingen maakt, knipperen de betreffende symbolen op de klok.
Druk de toetsen „-“ of „+“ (5/6) in om de tijd in te stellen na de eerste ingebruikname van de oven.

1 Programmatoets
2 Kooktijd
3 Einde kooktijd
4 Alarmsymbol
5 Min-toets
6 Plus-toets
7 Instelling schermhelderheid
8 Alarmvolume
9 Huidige tijd
10 Toetsvergrendeling
11 Instellingsknop
Nadat de tijd is ingesteld, kunt u het koken beginnen en beëindigen door de gewenste positie te selecteren met de temperatuurknop en bedieningsknop.

Als de huidige tijd niet is ingesteld, begint de tijdinstelling vanaf 12:00 uur.
Kloksymbool '9' wordt weergegeven om aan te geven dat de huidige tijd niet ingesteld is. Dit symbool verdwijnt zodra de tijd wordt ingesteld.

Instellingen van de huidige tijd worden ongedaan gemaakt in geval van stroomdefect. Het uur moet dan opnieuw worden ingesteld wanneer er terug stroom is.
Het uur van de dag wijzigen
Om de door u voorafgaande ingestelde tijd van de dag te veranderen:
- Druk op de (11) toets om het huidige tijdsymbool te activeren '9'.
- Druk op „-“ of „+“ (5/6) om de huidige tijd in te stellen.
Instellingen van de schermhelderheid wijzigen
- Druk op de (11) toets om het schermhelderheidsymbool '7' te activeren en zo de helderheid van het scherm te regelen.
- Druk op „—“ of „+“ (5/6) om de gewenste helderheid in te stellen.
» Geselecteerd helderheidsniveau wordt op de display weergegeven als d-01, d-02 of d-03.
Eerste reiniging van het toestel

Het oppervlak kan beschadigd geraken door sommige detergenten of reinigingsmaterialen. Gebruik geen agressieve detergenten, reinigingspoeder/melk of scherpe voorwerpen tijdens het reinigen.
- Verwijder alle verpakkingsmaterialen.
- Veeg de oppervlakken van het toestel met een vochtige doek of spons en droog het met een doek.
Eerste opwarming
Warm het product ongeveer 30 minuten op en schakel het dan uit. Zo worden alle productieresten of -lagen afgebrand en verwijderd.
WAARSCHUWING
Hete oppervlakken veroorzaken brandwonden! Het product kan heet zijn wanneer het in gebruik is. Raak de hete branders, de binnenste delen van de oven, verwarmers enz. nooit aan. Houd kinderen uit de buurt. Gebruik altijd warmtebestendige ovenhandschoenen wanneer u schotels in de oven plaatst of eruit haalt.

Tijdens het eerste gebruik kunnen gedurende enkele uren geur en rook worden afgegeven. Dit is heel normaal. Zorg ervoor dat de keuken goed geventileerd is om de rook en geur af te voeren. Voorkom directe inademing van de geproduceerde rook en geur.
5 De kookplaat gebruiken
Algemene informatie over koken
Vul de de pan nooit voor meer dan eenderde met olie. Laat de kookplaat niet onbewaakt achter als u olie verhit. Oververhitte olie geeft brandgevaar. Probeer een mogelijk vuur nooit te doven met water! Bedek olie als het in brand vliegt met een branddeken of een vochtige doek. Zet de kookplaat, als dit veilig kan, uit en bel de brandweer.
- Droog eten steeds goed af voor het koken en plaats het voorzichtig in de hete olie. Zorg ervoor dat etenswaren volledig zijn ontdooid voor het koken.
- Dek de kookpot niet af als u olie verwarmt.
- Plaats potten en steelpannen zo op de kookplaat dat de handvatten niet over de kookplaat hangen om te voorkomen dat ze opwarmen. Plaats geen kookpotten op de kookplaat die gemakkelijk overhellen of omvallen.
- Plaats geen lege kookpotten en steelpannen op kookzones die zijn ingeschakeld. Ze kunnen beschadigd raken.
- Een kookzone bedienen zonder kookpot of steelpan zal schade veroorzaken aan het product. Schakel de kookzone uit nadat u klaar bent met koken.
- Plaats geen plastic of aluminium kookpotten op het oppervlak omdat dat heet kan zijn. Dergelijke potten worden best ook niet gebruikt om voedsel in te bewaren.
- Gebruik enkel steelpannen of kookpotten met een vlakke bodem.
- Plaats de aangewezen hoeveelheid voedsel in steelpannen en pannen. Zo hoeft u niet onnodig te reinigen door het overvloeien van voedsel te voorkomen.
Plaats geen deksels van steelpannen of pannen op kookzones.
Plaats steelpannen zo dat ze gecentreerd staan op de kookzone. Als u een steelpan van één kookzone naar een andere wenst te verplaatsen, heft u ze op in plaats van ze naar de andere kookzone te schuiven.
Koken met gas
- De vlam moet overeenkomen met de grootte van de kookpot. Pas de gasvlam aan zodat deze niet aan de onderkant van de kookpot komt en centreer de kookpot op het opzetstuk.
Gebruik van de kookplaten

1 hulpbrander 12-18 cm
2 Snelbrander 22-24 cm
3 Wokbrander 22-24 cm
4 normale brander 18-20 cm
5 normale brander 18-20 cm
6 hulpbrander 12-18 cm
7 Snelbrander 22-24 cm is een lijst lijst van aanbevolen kookpotdiameters om te gebruiken op de overeenkomstige branders.
Het grote vlamsymbool geeft het hoogste kookvermogen aan en het kleine vlamsymbool duidt op het laagste kookvermogen. In de uit-positie (top) wordt er geen gas naar de branders gevoerd.
Ontsteking van de gasbranders
- Houd de branderknop ingedrukt.
- Draai het tegen de klok in naar het grote vlamsymbool.
» Het gas wordt aangestoken met de ontstane vonk. - Pas het gewenste kookvermogen aan.
De gasbranders uitschakelen
Schakel de warmhoudzoneknop in de uit-positie (boven).
Veiligheidsonderbrekingssysteem van de gastoevoer

natural_image
3D rendered mechanical part with a circular base and mounting feet, no visible text or symbols1.
Veiligheidsonderbreking van de gastoevoer
Als maatregel tegen uitvallen veroorzaakt door het overkoken van vloeistoffen in de branders wordt het veiligheidsmechanisme in gang gezet en de gastoevoer afgesloten.
- Druk de knop in en draai hem tegen de klok in om te ontsteken.
- Nadat het gas is ontstoken, moet de knop nog 3 tot 5 seconden ingedrukt blijven om het veiligheidssysteem in te schakelen.
- Als het gas niet wordt ontstoken nadat u de knop indrukt en loslaat, herhaalt u deze procedure en houdt u de knop 15 seconden lang ingedrukt.

GEVAAR:
Laat de knop los als de brander niet binnen 15 seconden vlam vat.
Wacht minstens 1 minuut voor het nogmaals te proberen. Er is gasopeenhopings- en explosiegevaar!
Wokbrander
Wokbranders helpen u om sneller te koken. Een wok is een diep soort braadpan gemaakt uit bladmetaal die vooral in de Aziatische keuken wordt gebruikt. De wok wordt gebruikt om fijngehakte groenten en vlees voor een korte tijd op een heet vuur te bakken.
Omdat het eten maar voor een korte tijd op een heet vuur wordt gebakken in zulke braadpannen, die warmte snel en gelijkmatig kunnen verdelen, blijft de voedingswaarde van het eten behouden en blijven de groenten knapperig.
U kunt de wokbrander ook voor normale pannen gebruiken.
Als u een normale pan op de wokbrander wilt gebruiken, moet u het opzetstuk voor de wok van de kookplaat verwijderen.
6 Hoe de oven te bedienen
Algemene informatie over bakken, roosteren en grillen
WAARSCHUWING
Hete oppervlakken veroorzaken brandwonden! Het product kan heet zijn wanneer het in gebruik is. Raak de hete branders, de binnenste delen van de oven, verwarmers enz. nooit aan. Houd kinderen uit de buurt. Gebruik altijd warmtebestendige ovenhandschoenen wanneer u schotels in de oven plaatst of eruit haalt.

GEVAAR:
Wees voorzichtig bij het openen van de lovendeur, want er kan stoom ontsnappen. Ontsnappende stoom kan uw handen, gezicht en/of ogen verbranden.
Tips bij het bakken
- Selecteer de juiste plaathoogte voordat u de oven aanzet; de plaatstanden worden geteld van onder naar boven.
- Verwarm de oven altijd voor om er zeker van te zijn dat het gerecht op de juiste temperatuur is zodra het de oven ingaat.
- Maak gebruik van goede kwaliteit bakblikken zoals anti-aanbak of aluminium. Bekleed indien nodig blikken met vetvrij- of bakpapier om aankoeken te voorkomen.
• Vul een cakeblik niet meer dan halfvol. - Plaats, als u één bakplaat met voedsel of cake bakt, deze op de middelste plaathoogte en in het midden van de oven.
- Open tijdens bereiding de deur van de oven niet te veel.
- Steek om te controleren of de cake gaar is een spies of cocktailprikker in het midden. Als deze schoon uit de cake komt is deze gaar. Als er deeg aan blijft plakken dient de cake nog een paar minuten door te garen om daarna deze handeling te herhalen.
Tips bij het roosteren
Verwarm de oven eerst voor.
- Indien mogelijk dient u vlees of gevogelte 30 minuten voor de bereiding uit de koelkast te halen.
-
Weeg het vlees eerst en bereken hoe lang de bereiding zal duren.
-
Voordat u vlees of gevogelte gaat bereiden dient u dit in te smeren met boter of olie en te bestrooien met zout, peper, kruiden of andere specerijen. Plaats het in een bakschaal en gebruik een roosterom het vlees te kunnen laten uitdruipen. Zet de schaal in het midden van de oven.
• Keer het vlees halverwege de bereiding om. - Als het geroosterde vlees bedekt is met folie (wat uw oven helpt schoon te houden) moet u dit altijd het laatste half uur verwijderen om het vlees te laten bruinen.
- Verwijder het vlees uit de oven als dit gaar is en laat het afgedekt met folie 10-15 minuten staan om het vlees te laten rusten en het de vleessappen te laten opnemen, wat het geroosterde vlees mals en sappig maakt.
Tips voor het grillen
Grillen is een snelle en gezonde manier van vlees-, vis-, groenten- en gevogeltebereiden. Platte stukken zijn in het bijzonder geschikt voor grillen.
Verwarm de grill eerst voor.
- Bekleed om de grillpan schoon te houden met een siliconen bakvel. Bekleed niet met aluminiumfolie.
- De meeste gerechten lukken beter als ze voor de bereiding besmeerd worden met olie.
- Om de smaak en de malsheid van het vlees, de vis of het gevogelte op te halen, kunt u eerst te marineren.
- Week, indien u houten kebabprikkers gebruikt, deze eerst om te voorkomen dat ze gaan branden.
- Draai voor gelijkmatige bruining het gerecht halverwege de bereiding.
Voedsel dat niet geschikt is voor grillen heeft het risico te verbranden. Gebruik enkel grillvoedsel dat geschikt is voor intensieve grillwarmte.
Plaats het voedsel niet te ver naar achteren in de grill. Dit is het heetste gebied en hier kan vettig voedsel vlam vatten.
Bedienen van de elektrische hoofdoven (LHS)

Voordat u de oven kan gebruiken, moet de timer worden ingesteld. Als de tijd niet is ingesteld zal de oven niet werken.
Het product is voorzien van diverse ovens. Het overzichtsgedeelte geeft de relevante knoppen voor elke oven aan.
Selecteer temperatuur en werkingsmodus.
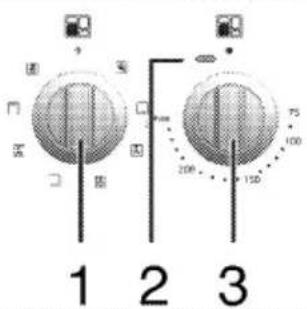
1 Functieknop Oven links- Hoofdoven
2 Thermostaatlamp Oven links - Hoofdoven
3 ThermostaatknopOven links - Hoofdoven
1. Stel de temperatuurknop in op de gewenste temperatuur.
2. Stel de thermostaatknop in op de gewenste werkingsmodus.
» De oven verwarmt tot de ingestelde temperatuur en behoudt deze. Tijdens het verwarmen blijft de temperatuurlamp aan.
De elektrische oven uitzetten
Draai de functieknop en temperatuurknop naar uit-positie (bovenste stand).

natural_image
Technical diagram of a mechanical component with internal structure and magnified detail view (no text or symbols)Roosterstanden (voor modellen met draadrooster)
Het is belangrijk dat het draadrooster goed in het zijrek wordt geplaatst. Het draadrooster moet tussen de zijrekken geschoven worden zoals afgebeeld op de figuur.
Laat het draadrooster niet tegen de achterwand van de oven rusten. Schuif uw draadrooster naar het voorste deel van het rooster en duw het voor goede grillresultaten met de deur op zijn plaats.
Werkingsmodussen
Alle functies op uw oven (hoofdoven inbegrepen) staan vermeld in dit gedeelte.
De volgorde van de hier getoonde werkingsmodi kan afwijken van de schikking op uw product.
Verwarming bovenaan en onderaan

Boven- en onderverwarming zijn in werking. Het voedsel wordt gelijk van de bovenkant en de onderkant verwarmd. Bijvoorbeeld geschikt voor cakes, gebak of cakes en stoofpotjes in bakvormen. Met één schaal koken.
Onderwarmte

Alleen de verwarmer onder is in werking. Bijvoorbeeld geschikt voor pizza en voor verder bruinen van gerechten aan de onderkant.
Verwarming bovenaan en onderaan met hete lucht

Boven- en onderverwarming en ventilator (in de achterwand) zijn in werking. Door de ventilator wordt hete lucht snel gelijkmatig door de oven verspreid. Met één schaal koken.
Werking met ventilator

De oven is niet verwarmd. Alleen de ovenverlichting en ventilator (in de achterwand) zijn in werking. Geschikt voor het langzaam ontdooien van korrelachtig diepvriesvoedsel bij kamertemperatuur en het afkoelen van bereid voedsel.
Andere functies dienen ter bereiding; selecteer de geschikte temperatuur voor uw gerecht.
Hete lucht

Warme lucht, verwarmd door de achterste verwarmer, wordt gelijkmatig en snel door de ventilator in de oven verspreid. Dit is geschikt voor het bereiden van maaltijden op diverse rekhoogtes. In de meeste gevallen is het niet nodig om voor te verwarmen. Geschikt voor koken met meerdere schalen.
"3D"-functie

Boven-, onderverwarming en ventilator (in de achterwand) zijn in werking. De gerechten worden gelijkmatig en snel rondom bereid. Met één schaal koken.
Volledige grill

De grote grill aan het ovenplafond is in werking. Deze is geschikt voor het grillen van grote hoeveelheden vlees.
- Plaats grote en middelmatige porties in de juiste roosterstand onder de grillverwarmer om te grillen.
- Stel de temperatuur in op het maximumniveau.
- Draai het voedsel na de helft van de grilltijd om.
Grill+Ventilator

Het grilleffect is niet zo sterk als op volledige grill
- Plaats kleine en middelgrote porties in juiste plaatpositie onder de grillverwarmer om te grillen.
- Stel de gewenste temperatuur in.
- Draai het voedsel na de helft van de grilltijd om.
Het gebruik van de ovenklok

1 Programmatoets
2 Kooktijd
3 Einde kooktijd
4 Alarmsymbol
5 Min-toets
6 Plus-toets
7 Instelling schermhelderheid
8 Alarmvolume
9 Huidige tijd
10 Toetsvergrendeling
11 Instellingsknop

De maximaal in te stellen bereidingseindtijd is 5 uur en 59 minuten.
Het programma wordt in geval van een stroomstoring geannuleerd. De oven moet opnieuw geprogrammeerd worden.

Bij het maken van aanpassingen knipperen de betreffende symbolen in de display. U moet even wachten voordat de instellingen zijn effect sorteren.

Als er geen bereidingsinstelling is gedaan kan de tijd niet worden ingesteld.

Kooktijd wordt weergegeven op de display zodra het koken begint.
Bereiden door de bereidingstijd te bepalen:
U kunt de oven dusdanig instellen dat deze aan het einde van de bepaalde tijd stopt door de bereidingstijd in te stellen op de klok.
-
Druk, om de bereidingstijd aan te passen, de programmatoets (1) en activeer het bereidingstijdsymbool (2).
-
Druk op '-' / '+' (5/6) toetsen om de bereidingstijd in te stellen.
» Als de bereidingstijd eenmaal ingesteld is wordt het bereidingssymbool continu weergegeven.
Indien u de bereidingseindtijd naar een latere tijd wilt instellen:
Na het instellen van de bereidingstijd op de klok kunt u de bereidingseindtijd naar een later tijdstip instellen.
-
Druk, om de bereidingstijd aan te passen, de programmatoets (1) en activeer het bereidingstijdsymbool [2].
-
Pas de bereidingstijd aan met de min- (5) en plus(6)toetsen.
» Het bereidingstijdsymbool blijft branden (continue weergegeven) na het instellen van de bereidingstijd.
-
Druk, om de bereidingseindtijd in te stellen, de programmatoets (1) en activeer het bereidingstijdsymbool (3).
-
Druk - (5) en + (6) toetsen om de bereidingseindtijd in te stellen.
» Zodra de bereidingseindtijd is ingesteld worden de symbolen voor bereidingseindtijd en bereiden continu weergegeven. Het symbool voor de bereidingseindtijd (3) verdwijnt zodra het bereiden is gestart.
-
Plaats uw schotel in de oven.
-
Selecteer werkingsmodus en temperatuur.
» De timer van de oven berekent automatisch de starttijd voor het bereiden door de bereidingseindtijd en de bereidingstijd die u heeft ingesteld te gebruiken. De gekozen werkingsmodus wordt geactiveerd wanneer de starttijd voor het bereiden is gekomen en de oven tot de ingestelde temperatuur is voorverwarmd. De oven behoudt deze temperatuur tot het einde van de bereidingstijd.
-
Nadat het bereidingsproces voltooid is, zal "eind" op het scherm verschijnen en het alarmsignaal klinken.
-
Alarmsignaal klinkt gedurende 2 minuten. Om het alarmsignaal te stoppen, drukt u gewoon op eender welke toets. Alarm wordt uitgeschakeld en de huidige tijd wordt weergegeven.

Als u het alarm annuleert door op een willekeurige knop te duwen, gaat de oven weer werken.
Als u op een willekeurige knop duwt aan het einde van de alarmperiode, gaat de oven weer werken.
- Schakel de oven uit met de temperatuur- en functieknop.
De toetsvergrendeling gebruiken
De toetsvergrendeling activeren
U kunt door de toetsvergrendeling te activeren voorkomen dat de oven gebruikt wordt.
- Druk op de toets (11) om het
toetsvergrendelingsymbool (10) te activeren.
» "UIT" zal op het scherm verschijnen. - Druk op '+' toets (6) om de toetsvergrendeling te activeren.
» Als de toestvergrendeling eenmaal geactiveerd is verschijnt 'aan' op het scherm en zal het toetsvergrendelingssymbool (10) blijven branden.

Wanneer de toetsvergrendelingsfunctie is geactiveerd kunnen bedieningspaneelknoppen uitgezonderd toets (11) niet worden gebruikt.
De toetsvergrendeling inactiveren
- Druk op de regeltoets (11) om het toetsvergrendelingsymbool (10) te activeren.
» "Aan" zal op het scherm verschijnen.
2. Druk op '-' toets (5) om de toetsvergrendeling te inactiveren.
» "UIT" zal worden getoond op de display nadat de toetsvergrendeling is uitgeschakeld.
Klok gebruiken als alarm
Behalve voor het kookprogramma kunt u de klok van het product gebruiken voor een waarschuwing of herinnering.
De alarmklok heeft geen invloed op de ovenfuncties. Deze wordt alleen gebruikt als waarschuwing. U kunt de alarmklok bijvoorbeeld gebruiken om voedsel op een bepaald moment in de oven te draaien. De alarmklok geeft een signaal af na het verstrijken van de u ingestelde tijd.
Alarmklok instellen
- Druk op de programmatoets (1) om het alarmtijdsymbool (4) te activeren.

De maximum alarmtijd kan 23 uur en 59 minuten bedragen.
- Pas de alarmtijd aan met de min- (5) en plus(6)toetsen.
» Als de alarmtijd eenmaal ingesteld is zal het alarmsymbool aan blijven en zal de alarmtijd op het scherm verschijnen. - Aan het einde van de alarmtijd zal het alarmtijdsymbool (4) gaan knipperen en zal het alarmsignaal klinken.
Alarm uitschakelen
- Om het alarmsignaal te stoppen, drukt u op een willekeurige toets.
» Alarm wordt uitgeschakeld en de huidige tijd wordt weergegeven.
Als u het alarm wilt annuleren:
- Druk om de alarmtijd te resetten op programmatoets (1) om het alarmsymbool (4) te activeren.
- Druk op min (5) toets en houd deze vast totdat "00.00" wordt weergegeven.

Alarmtijd wordt weergegeven. Als de alarm- en kooktijd gelijktijdig worden ingesteld, wordt de kortste tijd op de display weergegeven.
- Pas de gewenste toon aan met de min- (5) en plus(6)toetsen.
» Geselecteerde alarmtoon wordt op het scherm weergegeven als "b-01", "b-02" of "b-03".
Tabel kooktijden voor hoofdoven (linksonder)

De tijden in dit schema dienen als richtlijn. Tijden kunnen variëren door de voedseltemperatuur, dikte, soort en uw eigen bereidingsvoorkeuren.
Bakken en roosteren

1ste rek van de oven is het onderste rek.
Veranderen van de alarmtoon
- Druk op de instellingstoets (11) om het alarmtoonsymbool (8) te activeren.
| Gerecht | Nummer bereidingsniveau | Roosterstanden | Temperatuur (°C) | Kooktijd (ong. in min.) | |
| Cakes op plaat* | Eén niveau | 1 | 175 | 20 ... 30 | |
| Cakes in vorm* | Eén niveau | 1 | 175 | 40 ... 50 | |
| Cakes in bakpapier* | Eén niveau | 1 | 175 | 25 ... 30 | |
| Eén niveau | 1 | 175 | 25 ... 35 | ||
| Russisch gebak* | Eén niveau | 2 | 200 | 5 ... 10 | |
| Koekjes* | Eén niveau | 2 | 175 | 25 ... 30 | |
| 2 niveaus | 1 - 3 | 170 - 180 | 35 ... 45 | ||
| Deeggebak* | Eén niveau | 1 | 200 | 30 ... 40 | |
| Rijk gebak* | Eén niveau | 2 | 180 | 25 ... 35 | |
| 2 niveaus | 1 - 3 | 190 | 35 ... 45 | ||
| Zuurdeeg* | Eén niveau | 1 | 190 | 35 ... 45 | |
| Lasagne* | Eén niveau | 2 | 180 | 30 ... 40 | |
| Pizza*(dik) | Eén niveau | 1 | 200 | 15 ... 20 | |
| Biefstuk (volledig) /rosbief | Eén niveau | 2 | 25 min. 250/max., daarna 180 ... 190 | 100 ... 120 | |
| Lamsbout(stoofpotje) | Eén niveau | 2 | 25 min. 250/max., dan 190 | 70 ... 90 | |
| Eén niveau | 2 | 25 min. 250/max., dan 190 | 60 ... 80 | ||
| Gebraden kip | Eén niveau | 1 | 15 min. 250/max., daarna 190 | 55 ... 65 | |
| Eén niveau | 1 | 15 min. 250/max., dan 180 ... 190 | 55 ... 65 | ||
| Kalkoen (gesneden) | Eén niveau | 1 | 25 min. 250/max., daarna 180 ... 190 | 150 ... 210 | |
| Eén niveau | 1 | 25 min. 250/max., daarna 180 ... 190 | 140 ... 190 | ||
| Vis | Eén niveau | 2 | 200 | 20 ... 30 | |
| Eén niveau | 2 | 200 | 20 ... 25 | ||
| Wanneer er bij de bereiding twee platen tegelijkertijd worden gebruikt, plaatst u de diepe schaal bovenin en de ondiepe schaal onderin.* Voor alle eteriswaren wordt eerst voorverwarmen aangeraden. | |||||
(**) Wanneer voor bereiding voorverwarmen nodig is, verwarm de oven dan voor totdat de thermostaatlamp uit gaat.
Tips voor het bakken van cakes
- Als de cake te droog is, verhoog de temperatuur dan met zo'n 10°C en verkort de baktijd.
-
Als de cake vochtig is, gebruik dan minder vocht of verlaag de temperatuur met 10°C.
-
Als de cake bovenop te donker is, zet deze dan op een lager rooster, verlaag de temperatuur en verleng de baktijd.
- Als de cake goed van binnen gebakken is maar een plakkerige buitenkant heeft, gebruik dan minder vocht, verlaag de temperatuur en verhoog de baktijd.
Tips bij het bakken van gebak
- Als het gebak te droog is, verhoog de temperatuur dan met zo'n 10°C en verkort de baktijd. Bevocht de deeglagen met een sausje van melk, olie, eieren en yoghurt.
- Als het deeg te lang moet bakken, zorg ervoor dat de dikte van het deeg dat u bereid heeft niet hoger is dan de diepte van de schaal.
- Als de bovenkant van het deeg bruin wordt maar het onderste deel niet, zorg ervoor dat er niet teveel van de voor het deeg gebruikte saus onderin het deeg zit. Probeer de saus gelijkmatig te verdelen tussen de deeglagen en op het gebak voor gelijkmatig bruinen.

Bereid het gebak conform de modus en temperatuur die in de bereidingstabel staan vermeld. Als het onderste deel niet bruin genoeg is, plaats het gebak de volgende keer dan op een lager rooster.
Tips voor het bereiden van groenten
- Als het groentegerecht vocht tekort komt en droog wordt, bereid het dan in een pan met deksel in plaats van een open schaal. In afgesloten pannen blijft het vocht van het gerecht behouden.
- Als een groentegerecht niet gekookt wordt, kook de groenten dan eerst en bereid ze als ingeblikt voedsel en plaats het gerecht in de oven.
Bedienen van de grill (voor LHS-hoofdoven)

Voordat u de oven kan gebruiken, moet de timer worden ingesteld. Als de tijd niet is ingesteld zal de oven niet werken.

WAARSCHUWING
Sluit de ovendeur tijdens het grillen. Hete oppervlakken kunnen brandwonden veroorzaken!
De grill aanzetten
- Draai de functieknop naar het gewenste grillsymbool.
-
Stel dan de gewenste grilltemperatuur in.
-
Verwarm, indien gewenst, ongeveer 5 minuten voor.
» Het temperatuurlampje gaat aan.
De grill uitzetten
- Draai de functieknop naar uit-positie (top).
Voedsel dat niet geschikt is voor grillen heeft het risico te verbranden. Gebruik enkel grillvoedsel dat geschikt is voor intensieve grillwarmte. Plaats het voedsel niet te ver naar achteren in de grill. Dit is het heetste gebied en hier kan vettig voedsel vlam vatten.
Tabel kooktijden voor grillen (LHS-hoofdoven)
| Voedsel | Plaatsingsniveau | Grilltijd (ong.) |
| Vis | 4...5 | 20...25 min.# |
| Gesneden kip | 4...5 | 25...35 min. |
| Lamskoteletten | 4...5 | 20...25 min. |
| Rosbief | 4...5 | 25...30 min.# |
| Kalfskoteletten | 4...5 | 25...30 min.# |
| Geroosterd brood | 4...5 | 1...2 min. |
| afhankelijk van dikte | ||
Bedienen van de grill (LHS-boven)
WAARSCHUWING
Hete oppervlakken kunnen brandwonden veroorzaken! Houd kinderen bij het product vandaan.
Overdeur blijft enigszins aflopend bij volledige opening, zodat mogelijke spatten u niet kunnen bereiken.

GEVAAR:
WAARSCHUWING
* Dit product is ontworpen voor GRILLEN MET OPEN DEUR
De grill aanzetten

Door de grillbedieningsknop met de klok mee te draaien verkrijgt u verschillende grillniveaus.
- Open de deur van de grill.
- Verwarm de oven, indien gewenst, ongeveer 5 minuten voor door de grill naar positie 4 te draaien.
- Stel dan de gewenste grilltemperatuur in.
» Het temperatuurlampje gaat aan.
De grill uitzetten
- Draai de grillbedieningsknop naar de uit-positie (bovenste stand).
- Plaats grote en middelmatige porties in de juiste roosterstand onder de grillverwarmer om te grillen.
- Voor gerechten waarvan alleen de bovenkant gebruind dient te worden grillt u het gerecht ofwel door het op de draadgrill op de bakplaat ofwel door de bakplaat op de bodem van het grillgedeelte te plaatsen.
- Borden en schotels die op de bodem van het grillgedeelte worden geplaatst worden verwarmd wanneer de hoofdoven in gebruik is. Schakel de grill niet in als u dit deel voor voedselopslag gebruikt.

Voedsel dat niet geschikt is voor grillen heeft het risico te verbranden. Gebruik enkel grillvoedsel dat geschikt is voor intensieve grillwarmte.
Plaats het voedsel niet te ver naar achteren in de grill. Dit is het heetste gebied en hier kan vettig voedsel vlam vatten.
Tabel grilltijden (LHS-boven)

1ste rek van de oven is het onderste rek.
| Voedsel | Plaatsingsniveau | Grilltijd (ong.) |
| Vis | 1..2 | 20..25 min. # |
| Gesneden kip | 1..2 | 25..35 min. |
| Lamskoteletten | 1..2 | 20..25 min. |
| Rosbief | 1..2 | 25..30 min. # |
| Kalfskoteletten | 1..2 | 25..30 min. # |
| Geroosterd brood | 1..2 | 1..2 min. |
| # afhankelijk van dikte | ||
Bedienen van uw RHS-oven
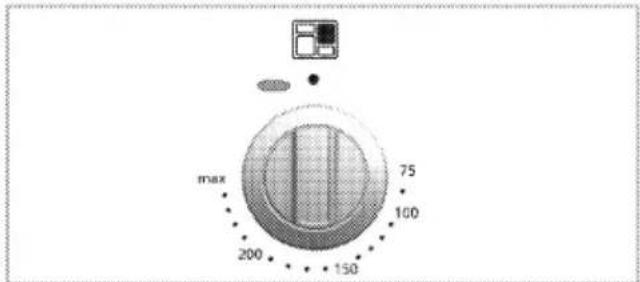
Selecteer temperatuur en werkingsmodus.
- Stel de functieknop in op de gewenste temperatuur.
» De oven verwarmt tot de ingestelde temperatuur en behoudt deze. Tijdens het verwarmen en het afkoelen gaat het thermostaatlampje aan.
De elektrische oven uitzetten
Draai de functieknop naar uit-positie (top).

natural_image
Cross-sectional diagram of a microwave oven with internal components and a magnified inset showing internal structure (no text or symbols)Roosterstanden (voor modellen met draadrooster)
Het is belangrijk dat het draadrooster goed in het zijrek wordt geplaatst. Het draadrooster moet tussen de Bakken en roosteren
zijrekken geschoven worden zoals afgebeeld op de figuur.
Laat het draadrooster niet tegen de achterwand van de oven rusten. Schuif uw draadrooster naar het voorste deel van het rooster en duw het voor goede grillresultaten met de deur op zijn plaats.
Tabel kooktijden voor RHS-oven

De tijden in dit schema dienen als richtlijn. Tijden kunnen variëren door de voedseltemperatuur, dikte, soort en uw eigen bereidingsvoorkeuren.

Maximum laadcapaciteit voor de ovenplaat: 4 kg (8,8 Engelse pond).

1ste rek van de oven is het onderste rek.
- Plaats geen schalen met een ruwe onderkant op de ovendeur
- Verzeker u ervan dat er minstens 25 mm ruimte naar het ovenplafond vrij is als u grote gerechten bereidt of grote schalen gebruikt.
| Gerecht | Aantal bakplaten | Roosterstanden | Temperatuur (°C) | Kooktijd (ong. in min.) |
| **Cakes op plaat | Een bakplaat | 3 | 175 | 30 ... 45 |
| **Cakes in vorm | Een bakplaat | 3 | 175 | 30 ... 50 |
| **Cakes in bakpapier | Een bakplaat | 3 | 160 ... 170 | 20 ... 30 |
| **Russisch gebak | Een bakplaat | 3 | 180 ... 200 | 10 ... 20 |
| **Koekjes | Een bakplaat | 3 | 160 ... 170 | 20 ... 30 |
| **Deeggebak | Een bakplaat | 3 | 200 | 20 ... 30 |
| **Rijk gebak | Een bakplaat | 3 | 190 | 25 ... 35 |
| **Zuurdeeg | Een bakplaat | 3 | 190 | 20 ... 40 |
| **Lasagne | Een bakplaat | 2 | 180 | 25 ... 45 |
| **Pizza | Een bakplaat | 2 | 200 | 15 ... 25 |
| Biefstuk (volledig) / rosbief | Een bakplaat | 2 | 25 min. 220, dan 180 ... 190 | 80 ... 120 |
| Lamsbout (stoofpotje) | Een bakplaat | 2 | 25 min. 220, dan 180 ... 190 | 70 ... 100 |
| Gebraden kip | Een bakplaat | 2 | 15 min. 220, dan 190 | 55 ... 75 |
| Kalkoen (gesneden) | Een bakplaat | 2 | 25 min. 220, dan 190 | 70 ... 120 |
| Vis | Een bakplaat | 3 | 200 | 20 ... 30 |
7 Onderhoud en verzorging
Algemene informatie
De levensduur van het product zal worden verlengd en er zullen minder vaak problemen zijn als het product regelmatig wordt gereinigd.
- Reinig het product grondig na ieder gebruik. Zo kunt u kookresten gemakkelijker verwijderen, en voorkomt u dat ze verbranden als u het apparaat de volgende keer gebruikt.
- Er zijn geen speciale reinigingsmiddelen vereist om het product te reinigen. Gebruik warm water met wasvloeistof, een zachte doek of spons voor het reinigen van het product en een droge doek om het te drogen.
- Zorg er steeds voor dat overvloedige vloeistoffen worden afgeveegd na de reiniging en dat gemorste vloeistoffen steeds meteen worden afgeveegd.
- Gebruik voor het reinigen van roestvrijstalen oppervlakken en de handgreep geen reinigingsmiddelen die zuur of chloride bevatten. Gebruik een zachte doek met een vloeibaar detergent (niet-schurend) om deze onderdelen schoon te vegen, en let erop dat u in één richting veegt.
| i | Het oppervlak kan beschadigd geraken door sommige detergenten of reinigingsmaterialen. Gebruik geen agressieve detergenten, reinigingspoeder/melk of scherpe voorwerpen tijdens het reinigen. |
| i | Gebruik geen stoomreinigers om het toestel schoon te maken, want dat kan elektrische schokken veroorzaken. |
Het reinigen van het fornuis
Gaskookplaten
- Verwijder de opzetstukken voor de steelpan en de branderdeksels en reinig ze.
- Reinig de kookplaat.
-
Installeer de branderdeksels en zorg ervoor dat ze correct geplaatst zijn.
-
Let erop dat de opzetstukken voor de steelpan zo worden geplaatst dat de branders centraal staan bij de installatie van de bovenste gril.
Het bedieningspaneel reinigen
Reinig bedieningspaneel en knoppen met een vochtige doek en veeg ze droog.
| Verwijder om het bedieningspaneel te reinigen niet de bedieningsknoppen.Het bedieningspaneel kan beschadigd worden! |
Schoonmaken van de oven-/grillruimten
Om de zijwand te reinigen
- Verwijder het voorste gedeelte van de zijkant door deze in de tegenovergestelde richting van de zijwand te trekken.
- Verwijder het rek aan de zijkant door deze in uw richting te trekken.

Katalytische wanden
Zijwanden of gewoon achterwand van de binnenkant van de oven kan bedekt zijn met katalytische lak. De katalytische wanden van de oven moeten niet worden gereinigd. Het poreuze oppervlak van de wanden is zelfreinigend door het absorberen en omzetten van spattend vet (stoom en koolstofdioxide).
Reinig de ovendeur
Gebruik, om de ovendeur te reinigen, warm water met wasmiddel, een zachte doek of spons om het product te reinigen en een droge doek om deze droog te wrijven.
| i | Gebruik geen sterkschurende reinigingsmiddelen of scherpe harde metalen schrapers om de ovendeur te reinigen. Zij kunnen het oppervlak en het glas beschadigen. |
Verwijderen van de deur van de bovenste oven.
- Open de ovendeur (1).
- Open de clips bij de scharnierbehuizing (2) aan de rechter- en linkerkant van de ovendeur door ze naar beneden te duwen zoals aangegeven in de figuur.

1 Ovendeur
2 Scharnier
3 Oven

natural_image
Technical diagram of a mechanical joint or bracket with a directional arrow indicating rotation (no text or symbols present)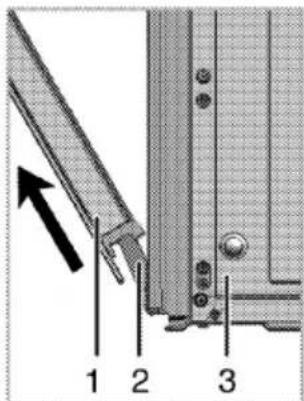
- Maak de ovendeur half open.
- Verwijder de ovendeur door deze omhoog te tillen waardoor hij loskomt uit de rechter- en linkerscharnieren.

Om de deur weer terug te plaatsen, voert u de stappen tijdens het verwijderen in omgekeerde volgorde uit. Vergeet niet om de clips bij de scharnierbehuizing te sluiten wanneer u de deur opnieuw installeert.
Binnenglas deur verwijderen
Het binnenglas van de grilldeur (LHS-boven) van de bovenste oven kan verwijderd worden om te reinigen.
- Open de ovendeur.

1 Schroef
2 Kunststof profiel
3 Binnenglaspaneel
4 Plastic groef
-
Draai de schroef (1) uit met een schroevendraaier
-
Neem het profiel (2) uit en houd dan het binnenglas (3) vast.
-
Zet dan de deur weer in elkaar, plaats het glazen paneel (3) in de kunststof groeven (4) en zet het profiel in elkaar.
De ovenlamp vervangen

GEVAAR:
Zorg voordat u de ovenlamp vervangt dat het product afgesloten is van het elektriciteitsnet en afgekoeld om het risico op een elektrische schok te vermijden.
Hete oppervlakken kunnen brandwonden veroorzaken!

De ovenlamp is een speciale elektrische gloeilamp die temperaturen tot 300°C kan weerstaan. Zie voor gegevens. Ovenlampen kunnen worden verkregen bij de bevoegde serviceagenten.

De positie van de lamp kan afwijken van de afbeelding.
Als uw oven is voorzien van een ronde lamp:
- Sluit het product af van het elektriciteitsnet.
- Draai de glazen kap tegen de klok in om deze te verwijderen.

natural_image
Close-up of a hand adjusting a mechanical component with a circular part (no visible text or symbols)-
Schroef de ovenlamp los door deze tegen de klok in te draaien en vervang deze door een nieuwe lamp.
-
Plaats het glazen deksel terug.
8 Problemen oplossen
De oven geeft stoom af als hij in gebruik is
- Het is normaal dat er stoom ontsnapt tijdens gebruik. >>> Dit is geen fout.
Er ontstaan waterdruppels tijdens het bereiden.
- De stoom die tijdens de bereiding ontstaat kan condens en waterdruppels vormen als het in aanraking komt met koude oppervlakken van het product. >>> Dit is geen fout.
Als de oven verwarmt en koelt geeft deze metaalachtige geluiden.
- Wanneer de metalen onderdelen worden verwarmd, kunnen deze uitzetten en geluid veroorzaken. >>> Dit is geen fout.
Het product werkt niet.
- De hoofdzekering is defect of doorgeslagen. >>> Controleer de zekeringen in de zekeringenkast. Vervang of reset deze indien nodig.
- De stekker van het product zit niet in het (geaarde) stopcontact. >>> Controleer de stekkeraansluiting.
- Knoppen/toetsen op het bedieningspaneel werken niet. >>> De toetsvergrendeling is mogelijk ingeschakeld. Schakel deze uit. (Zie. De toetsvergrendeling gebruiken, pagina 28)
- Indien de display niet oplicht als u de kookplaat weer aanzet. >>> Koppel het apparaat los bij de stroomonderbreker. Wacht 20 seconden en sluit deze weer aan.
Ovenverlichting werkt niet.
• Ovenverlichting is defect. >>> Vervang ovenlamp.
- De stroom is afgesloten. >>>. >>> Controleer of er stroom is Controleer de zekeringen in de zekeringenkast. Vervang of reset de zekeringen indien nodig.
Oven verwarmt niet.
- Functie en/of temperatuur zijn niet ingesteld. >>> Stel de functie en de temperatuur in met de functie- en/of temperatuurknop/toets.
- Bij modellen met een timer is de timer niet aangepast. >>> Pas de tijd aan. (In producten met een magnetron bedient de timer alleen de magnetron.)
- De stroom is afgesloten. >>>. >>> Controleer of er stroom is Controleer de zekeringen in de zekeringenkast. Vervang of reset de zekeringen indien nodig.
Er is geen ontstekingsvonk.
- Geen stroom. >>> Controleer de zekeringen in de zekeringenkast.
• Tijd is niet ingesteld >>> Stel de tijd in.
De koelventilator blijft werken ookal is het fornuis uitgeschakeld.
- Dit is geen fout. De koelventilator blijft werken totdat de elektronica in het fornuis tot een geschikte temperatuur zijn afgekoeld.
Er is geen gas.
• Hoofdgaskraan is afgesloten. >>> Open de gaskraan.
Gasleiding is gebogen. >>> Installeer de gasleiding op correcte wijze.
Branders branden niet juist of helemaal niet.
- Branders zijn vuil. >>> Reinig de branderonderdelen.
- Branders zijn nat. >>> Droog de branderonderdelen.
- De branderdeksel is niet veilig gemonteerd. >>> Plaats de branderdeksel op correcte wijze.
• Gaskraan is afgesloten. >>> Open de gaskraan.
• Gascylinder is leeg (bij gebruik van lpg). >>> Vervang gascylinder.
(Bij modellen met timer) Klokdisplay knippert of kloksymbool is aan.
• Er heeft zich eerder een stroomstoring voorgedaan. >>> Pas de tijd aan / schakel het product uit en weer aan.

Raadpleeg de bevoegde serviceagent of de dealer waarbij u het product hebt gekocht als u, ondanks het doorvoeren van de aanwijzingen in dit gedeelte, het probleem niet kunt oplossen. Probeer nooit om een product met gebreken zelf te repareren.
Please read this user manual first!
Dear Customer,
Thank you for purchasing this Leisure product. We hope that you get the best results from your product which has been manufactured with high quality and state-of-the-art technology. Therefore, please read this entire user manual and all other accompanying documents carefully before using the product and keep it as a reference for future use. If you handover the product to someone else, give the user manual as well. Follow all warnings and information in the user manual.
Remember that this user manual is also applicable for several other models. Differences between models will be identified in the manual.
Explanation of symbols
Throughout this user manual the following symbols are used:

Important information or useful hints about usage.

Warning of hazardous situations with regard to life and property.

Warning of electric shock.
Warning of risk of fire.

Warning of hot surfaces.
1 Important instructions and warnings for safety and environment 4
General safety 4
Safety when working with gas 4
Electrical safety 5
Product safety 6
Intended use 7
Safety for children....8
Disposing of the old product 8
Package information 8
2 General information 9
Overview 9
Package contents 10
Technical specifications 12
Injector table 13
3 Installation 14
Before installation....14
Installation and connection 16
Gas conversion....17
Future Transportation....18
4 Preparation 19
Tips for saving energy 19
Initial use 19
Time setting 19
First cleaning of the appliance 19
Initial heating....20
5 How to use the hob 21
General information about cooking 21
Using the hobs 21
6 How to operate the oven 23
General information on baking, roasting and grilling23
How to operate the main electric oven (LHS) ..... 23
Operating modes....24
Using the oven clock 25
Using the keylock 25
Using the clock as an alarm 26
Cooking times table for Main oven (Left bottom) .... 26
How to operate the grill (for LHS main oven)....27
How to operate the grill (LHS-Top) 28
How to operate the RHS oven....29
7 Maintenance and care 30
General information.... 30
Cleaning the hob 30
Cleaning the control panel 30
Cleaning the oven/grill cavities 30
Removing the top oven's door 30
Removing the door inner glass 31
Replacing the oven lamp.... 31
8 Troubleshooting 32
1 Important instructions and warnings for safety and environment
This section contains safety instructions that will help protect from risk of personal injury or property damage. Failure to follow these instructions shall void any warranty.
General safety
- This appliance can be used by children aged from 8 years and above and persons with reduced physical, sensory or mental capabilities or lack of experience and knowledge if they have been given supervision or instruction concerning use of the appliance in a safe way and understand the hazards involved. Children shall not play with the appliance. Cleaning and user maintenance shall not be made by children without supervision.
- Never place the product on a carpet-covered floor. Otherwise, lack of airflow beneath the product will cause electrical parts to overheat. This will cause problems with your product. - Installation and repair procedures must always be performed by Authorized Service Agents. The manufacturer shall not be held responsible for damages arising from procedures carried out by unauthorized persons which may
also void the warranty. Before installation, read the instructions carefully.
- Do not operate the product if it is defective or has any visible damage.
- Ensure that the product function knobs are switched off after every use.
Safety when working with gas
- Any works on gas equipment and systems may only be carried out by authorised qualified persons who are Gas Safe registered.
- Prior to the installation, ensure that the local distribution conditions (nature of the gas and gas pressure) and the adjustment of the appliance are compatible.
- This appliance is not connected to a combustion products or evacuation device. It shall be installed and connected in accordance with current installation regulations. Particular attention shall be given to the relevant requirements regarding ventilation; See
- The use of gas cooking appliance results in the production of heat and moisture in the room in which it is installed. Ensure that the kitchen is well ventilated: keep
natural ventilation holes open or install a mechanical ventilation device (mechanical extractor hood). Prolonged intensive use of the appliance may call for additional ventilation, for example increasing the level of the mechanical ventilation where present.
- Gas appliances and systems must be regularly checked for proper functioning. Regulator, hose and its clamp must be checked regularly and replaced within the periods recommended by its manufacturer or when necessary.
- Clean the gas burners regularly. The flames should be blue and burn evenly.
- Good combustion is required in gas appliances. In case of incomplete combustion, carbon monoxide (CO) might develop. Carbon monoxide is a colourless, odourless and very toxic gas, which has a lethal effect even in very small doses.
- Request information about gas emergency telephone numbers and safety measures in case of gas smell from you local gas provider.
What to do when you smell gas
- Do not use open flame or do not smoke. Do not operate any electrical buttons (e.g. lamp
button, door bell and etc.) Do not use fixed or mobile phones. Risk of explosion and toxication!
- Open doors and windows.
- Turn off all valves on gas appliances and gas meter at the main control valve, unless it's in a confined space or cellar.
- Check all tubes and connections for tightness. If you still smell gas leave the property.
- Warn the neighbours.
- Call the fire-brigade. Use a telephone outside the house.
- Do not re-enter the property until you are told it is safe to do so.
Electrical safety
- If the product has a failure, it should not be operated unless it is repaired by the Authorized Service Agent. There is the risk of electric shock!
- Only connect the product to a grounded outlet/line with the voltage and protection as specified in the “Technical specifications”. Have the grounding installation made by a qualified electrician while using the product with or without a transformer. Our company shall not be liable for any problems arising due to the product not being earthed in accordance with the local regulations.
- Never wash the product by spreading or pouring water onto it! There is the risk of electric shock!
- The product must be disconnected during installation, maintenance, cleaning and repairing procedures.
- If the power connection cable for the product is damaged, it must be replaced by the manufacturer, its service agent or similarly qualified persons in order to avoid a hazard.
- Only use the connection cable specified in the “Technical specifications”.
- The appliance must be installed so that it can be completely disconnected from the mains supply. The separation must be provided by a switch built into the fixed electrical installation, according to construction regulations.
- Rear surface of the oven gets hot when it is in use. Make sure that the gas/electrical connection does not contact the rear surface; otherwise, connections can get damaged.
- Do not trap the mains cable between the oven door and frame and do not route it over hot surfaces. Otherwise, cable insulation may melt and cause fire as a result of short circuit.
- Any work on electrical equipment and systems should only be carried out by authorized and qualified persons.
- In case of any damage, switch off the product and disconnect it from the mains. To do this, turn off appropriate switch in the consumer unit in your home.
• Make sure that fuse rating is compatible with the product.
Product safety
- The appliance and its accessible parts become hot during use. Care should be taken to avoid touching heating elements. Children less than 8 years of age shall be kept away unless continuously supervised.
- Never use the product when your judgment or coordination is impaired by the use of alcohol and/or drugs.
- Be careful when using alcoholic drinks in your dishes. Alcohol evaporates at high temperatures and may cause fire since it can ignite when it comes into contact with hot surfaces.
- Do not place any flammable materials close to the product as the sides may become hot during use.
- During use the appliance becomes hot. Care should be
taken to avoid touching heating elements inside the oven.
- Keep all ventilation slots clear of obstructions.
- Do not heat closed tins and glass jars in the oven. The pressure that would build-up in the tin/jar may cause it to burst.
- Do not place baking trays, dishes or aluminium foil directly onto the bottom of the oven. The heat accumulation might damage the bottom of the oven.
- Do not use harsh abrasive cleaners or sharp metal scrapers to clean the oven door glass since they can scratch the surface, which may result in shattering of the glass.
- Do not use steam cleaners to clean the appliance as this may cause an electric shock.
- Use the shelves as described in "How to operate the electric oven".
- Do not use the product if the front door glass removed or cracked.
- Do not use the oven handle to hang towels for drying. Do not hang up towel, gloves, or similar textile products when the grill function is at open door.
-
Always use heat resistant oven gloves when putting in or removing dishes into/from the hot oven.
-
Ensure that the appliance is switched off before replacing the lamp to avoid the possibility of electric shock.
- Unattended cooking on a hob with fat or oil can be dangerous and may result in fire. NEVER try to extinguish a fire with water, but switch off the appliance and then cover flame e.g. with a lid or a fire blanket.
- Danger of fire: Do not store items on the cooking surfaces.
Prevention against possible fire risk!
- Ensure all electrical connections are secure and tight to prevent risk of arcing.
- Do not use damaged cables or extension cables.
- Ensure liquid or moisture is not accessible to the electrical connection point.
- Ensure the gas connection is sound and not likely to cause a gas leak.
Intended use
- This product is designed for domestic use. Commercial use will void the guarantee.
- This appliance is for cooking purposes only. It must not be used for other purposes, for example room heating.
- This product should not be used for warming the plates under the grill, drying towels, dish cloths etc.
by hanging them on the oven door handles. This product should also not be used for room heating purposes.
- The manufacturer shall not be liable for any damage caused by improper use or handling errors.
- The oven can be used for defrosting, baking, roasting and grilling food.
Safety for children
- Accessible parts may become hot during use. Young children should be kept away.
- The packaging materials will be dangerous for children. Keep the packaging materials away from children. Please dispose of all parts of the packaging according to environmental standards.
- Electrical and/or gas products are dangerous to children. Keep children away from the product when it is operating and do not allow them to play with the product.
- Do not place any items above the appliance that children may reach for.
- When the door is open, do not load any heavy object on it and do not allow children to sit on it. It may overturn or door hinges may get damaged.
Disposing of the old product
Compliance with the WEEE Directive and Disposing of the Waste Product:

This product complies with EU WEEE Directive (2012/19/EU). This product bears a classification symbol for waste electrical and electronic equipment (WEEE).
This product has been manufactured with high quality parts and materials which can be reused and are suitable for recycling. Do not dispose of the waste product with normal domestic and other wastes at the end of its service life. Take it to the collection center for the recycling of electrical and electronic equipment. Please consult your local authorities to learn about these collection centers.
Compliance with RoHS Directive:
The product you have purchased complies with EU RoHS Directive (2011/65/EU). It does not contain harmful and prohibited materials specified in the Directive.
Package information
- Packaging materials of the product are manufactured from recyclable materials in accordance with our National Environment Regulations. Do not dispose of the packaging materials together with the domestic or other wastes. Take them to the packaging material collection points designated by the local authorities.
2 General information
Overview

1 Burner plate
2 Control panel
3 LHS oven -Grill
4 LHS oven -Main oven
5 Lower part
6 RHS oven - Top oven
7 Splashback

1 Auxiliary burner Rear left
2 Rapid burner Front left
3 Wok burner Middle
4 Thermostat lamp LHS oven Top oven-Grill
5 Grill function knob LHS oven Top oven-Grill
6 Function knobLHS oven - Main oven
7 Thermostat lamp LHS oven - Main oven
8 Thermostat knob LHS oven - Main oven
9 Digital timer
10 Normal burner Middle-rear
11 Normal burner Middle front
12 Auxiliary burner Front right
13 Rapid burner Rear right
14 Thermostat lamp RHS oven - Bottom oven
15 Oven knob RHS oven - Bottom oven
Package contents

Accessories supplied can vary depending on the product model. Not every accessory described in the user manual may exist on your product.
User manual
Oven tray
Used for pastries, frozen foods and big roasts.
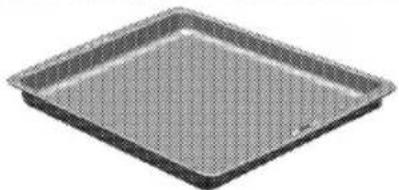
natural_image
Square baking tray with a mesh pattern (no text or symbols visible)Wire Shelf
Used for roasting and for placing the food to be baked, roasted or cooked in casserole dishes to the desired rack.

natural_image
Simple line drawing of a rectangular sheet with horizontal lines, no text or symbols present
natural_image
Line drawing of a rectangular metal grate with slats (no text or symbols)Small wire shelf (used with the tray supplied with the product)
It is placed into the tray in order to collect the dripping fat while grilling so that the oven is kept clean.

natural_image
Illustration of a layered electronic device with a grid-patterned top layer (no text or symbols)Placing the wire shelf and tray onto the telescopic racks properly
Telescopic racks allow you to install and remove the trays and wire shelf easily.
When using the tray and wire shelf with telescopic racks, make sure that the pins at the rear section of the telescopic rack stands against the edges of the wire shelf and tray.

natural_image
Close-up of a mechanical component with internal channels and a central shaft (no visible text or symbols)
natural_image
Close-up of a metal rod with a magnified inset showing internal structure (no text or symbols)Placing the wire shelf and tray onto the wire racks properly
It is important to place the wire shelf and/or tray onto the rack properly. Slide the wire shelf or tray between 2 rails and make sure that it is balanced before placing food on it (Please see the following figure).

natural_image
Two-panel technical illustration showing a metal rack and a close-up of a mechanical component (no text or symbols)Vok pan adaptor

natural_image
Simple circular diagram with two cross marks, no text or symbols presentUsed for hosting a wok pan with a round bottom.
Splash back assembly

natural_image
Line drawing of a portable stove with four circular vented seats and a tool inserted, no text or symbols present1 Splashback
- Please take splashback and package of screws and nuts.
- Place splashback according to the drawing, place nut inside splashback on to the hole, screw the splashback to the burner's plate with screw form under burner plate
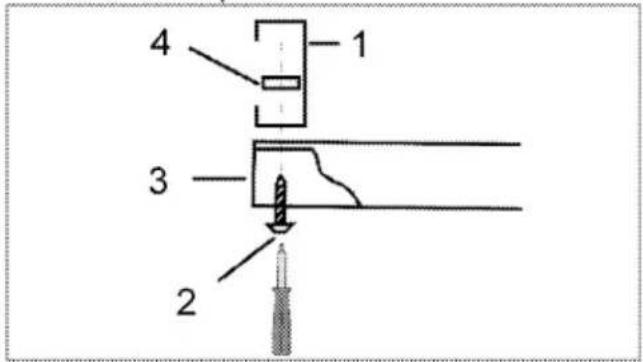
1 Splashback
2 Screw
3 Burner plate
4 Nut
3. Do not overtighten the screws as damage to the hob or splashback could occur.
Technical specifications
| GENERAL | |
| External dimensions (height / width / depth) | 900 mm/1100 mm/600 mm |
| Voltage / frequency | 220-240 V / 380 - 415 3N ~ 50 Hz |
| Total power consumption | 6.6 kW |
| Fuse | min. 32 A / 3 x 16 A |
| Cable type / section | H05W-FG 3 × 4 mm^2/5 × 1.5 mm^2 |
| Cable length | max. 2 m |
| Category of gas product | Cat II 2E+3+ / Cat II 2L3B/P / Cat I 2E |
| Gas type / pressure | NG G 20/20 mbar |
| Total gas consumption | 12 kW |
| Converting the gas type / pressure^§ | LPG G 30/28-30 mbar |
| - optional | NG G 25/25 mbar - Propane 31/37 mbar |
| HOB | |
| Burners | |
| Rear left | Auxiliary burner |
| Power | 1 kW |
| Front left | Rapid burner |
| Power | 3 kW |
| Middle | Wok burner |
| Power | 4 kW |
| Middle- rear | Normal burner |
| Power | 2 kW |
| Middle front | Normal burner |
| Power | 2 kW |
| Front right | Auxiliary burner |
| Power | 1 kW |
| Rear right | Rapid burner |
| Power | 3 kW |
| OVEN/GRILL | |
| Main oven - LHS oven | Multifunction oven |
| Inner lamp | 15-25 W |
| Grill power consumption | 2.2 kW |
| Top oven - LHS oven | Grill |
| Inner lamp | 15-25 W |
| Grill power consumption | 2.2 kW |
| RHS oven | Conventional oven |
| Inner lamp | 15-25 W |

Technical specifications may be changed without prior notice to improve the quality of the product.

Figures in this manual are schematic and may not exactly match your product.

Values stated on the product labels or in the documentation accompanying it are obtained in laboratory conditions in accordance with relevant standards. Depending on operational and environmental conditions of the product, these values may vary.
Injector table
| Position hob zone | 1 kW Rear left | 3 kW Front left | 4 kW Middle | 2 kW Middle-rear | 2 kW Middle front | 1 kW Front right | 3 kW Rear right |
| Gas type / Gas pressure | |||||||
| G 20/20 mbar | 78 | 125 | 144 | 104 | 104 | 78 | 125 |
| G 30/28-30 mbar | 50 | 85 | 101 | 69 | 69 | 50 | 85 |
| G 25/25 mbar | 78 | 125 | 144 | 104 | 104 | 78 | |
| G 31/37 mbar | 50 | 85 | 101 | 69 | 69 | 50 | 85 |
3 Installation
Product must be installed by a qualified person in accordance with the regulations in force. The manufacturer shall not be held responsible for damages arising from procedures carried out by unauthorized persons which may also void the warranty.
| Preparation of location and electrical and gas installation for the product is under customer's responsibility. | |
| DANGER:The product must be installed in accordance with all local gas and/or electrical regulations. | |
| DANGER:Prior to installation, visually check if the product has any defects on it. If so, do not have it installed.Damaged products cause risks for your safety. |
Before installation
To ensure that critical air gaps are maintained under the appliance, we recommend that this appliance is mounted on a solid base and that the feet do not sink into any carpet or soft flooring.
The kitchen floor must be able to carry the weight of the appliance plus the additional weight of cookware and bakeware and food.

- It can be used with cabinets on either side but in order to have a minimum distance of 400 mm above hotplate level allow a side clearance of 65mm between the appliance and any wall, partition or tall cupboard.
- It can also be used in a free standing position. Allow a minimum distance of 650 mm above the hob surface.
- "The cooker is designed to fit between kitchen cabinets spaced 900mm or more apart. The space either side of the cooker need only be sufficient to allow withdrawal of the cooker for servicing. It can be used with cabinets on one side or both sides, as well as in a corner setting. It can also be used free standing".
(*) If a cooker hood is to be installed above the cooker, refer to cooker hood manufacturer' instructions regarding installation height (min 650 mm). - Movement of your appliance is most easily achieved by lifting the front as follows and pulling towards. Open the top oven door and the bottom oven door sufficiently to allow a comfortable grip on the underside front edge of the oven roofs. While gripping, it should be avoided to damage any grill elements or oven interior furniture.
- Movement of your appliance is most easily achieved by lifting the front as indicated in the drawing. Open the oven door sufficiently to allow a comfortable and safe grip on the underside of the oven roof avoid causing any damage to the grill element or any internal parts of the oven. Do not move by pulling on the door handle or knobs. Move the appliance a bit at a time until placed in the position required.
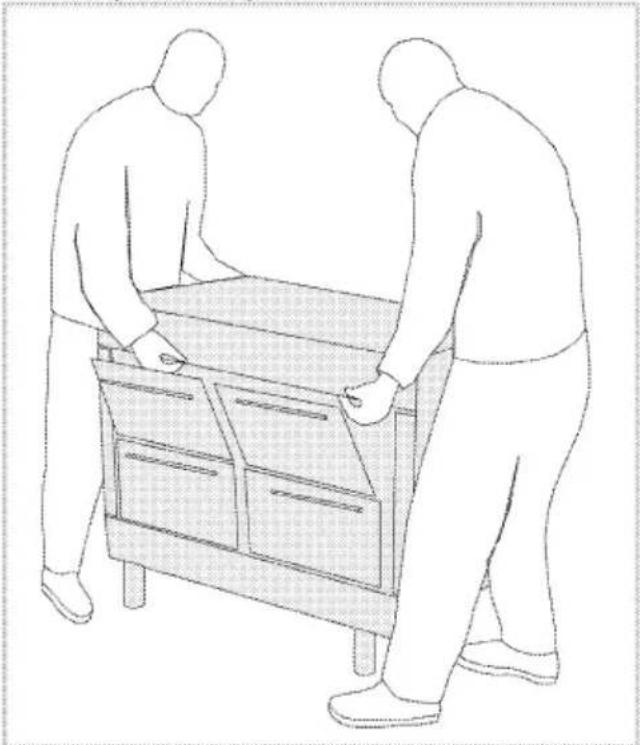
natural_image
Line drawing of two figures handling a cabinet with drawers (no text or symbols)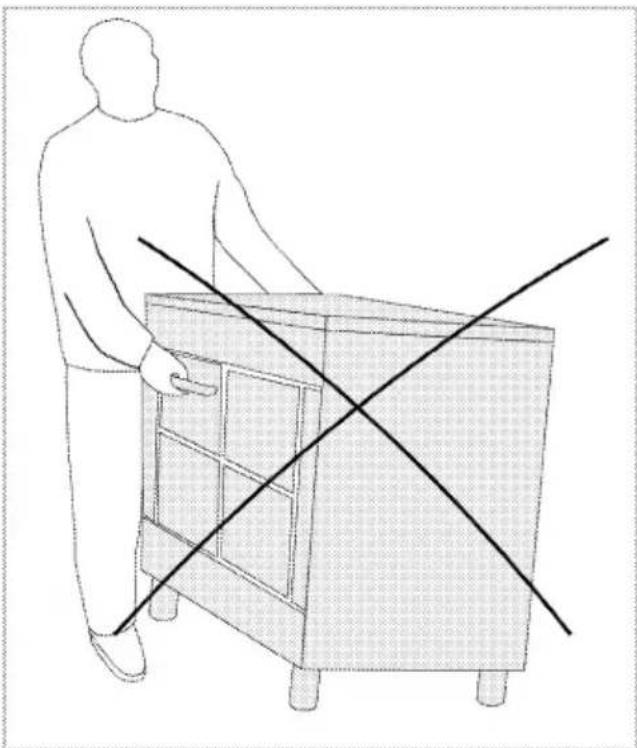
natural_image
Line drawing of a person pushing a cabinet with a diagonal line crossing through it (no text or symbols)
natural_image
Line drawing of a person handling a cabinet with two diagonal lines crossing (no text or symbols)- The appliance corresponds to device class 1, i.e. it may be placed with the rear and one side to kitchen walls, kitchen furniture or equipment of any size. The kitchen furniture or equipment on the other side may only be of the same size or smaller.
- Any kitchen furniture next to the appliance must be heat-resistant (100 °C min.).
Safety chain
The appliance must be secured against overbalancing by using the supplied two safety chains on your oven. Fasten hook (1) by using a proper peg to the kitchen wall (6) and connect safety chains (3) to the hook via the locking mechanism (2).

1 Stability hook
2 Locking mechanism
3 Safety chain (supplied and mounted to oven)
4 Firmliy fix chain to cooker rear
5 Rear of cooker
6 Kitchen wall

Stability chain to be as short as practicable to avoid oven tilting forward and diagonal to avoid oven side tilting.
Cooker stability chain for cookers not designed with bracket engagement slot.
Room ventilation
All rooms require an openable window, or equivalent, and some rooms will require a permanent vent as well. The air for combustion is taken from the room air and the exhaust gases are emitted directly into the room. Good room ventilation is essential for safe operation of your appliance. If there is no window or door available for room ventilation, an extra ventilation must be installed.
The appliance may be located in a kitchen, kitchen/diner or a bed-sitting room, but not in a room containing a bath or shower. The appliance must not be installed in a bed-sitting room of less than 20m ^3 . Do not install this appliance in a room below ground level unless it is open to ground level on at least one side.
| Room size | Ventilation opening |
| smaller than 5 m^3 | min. 100 cm^2 |
| 5 m^3 to 10 m^3 | min. 50 cm^2 |
| greater than 10 m^3 | not required |
| In the cellar or basement | min. 65 cm^2 |
Installation and connection
Product can only be installed and connected in accordance with the statutory installation rules.

Do not install the product next to refrigerators or freezers. The heat emitted by the product will increase the energy consumption of cooling appliances.
- Carry the product with at least two persons.
- Product must be placed directly on the floor. It must not be placed onto a base or a pedestal.

Do not use the door and/or handle to carry or move the product. The door, handle or hinges get damaged.
Electrical connection
Connect the product to a grounded outlet/line protected by a fuse of suitable capacity as stated in the "Technical specifications" table. Have the grounding installation made by a qualified electrician while using the product with or without a transformer. Our company shall not be liable for any damages that will arise due to using the product without a grounding installation in accordance with the local regulations.

DANGER:
The product must be connected to the mains supply only by an authorised and qualified person. The product's warranty period starts only after correct installation.
Manufacturer shall not be held responsible for damages arising from procedures carried out by unauthorised persons.

DANGER:
The power cable must not be clamped, bent or trapped or come into contact with hot parts of the product.
A damaged power cable must be replaced by a qualified electrician. Otherwise, there is risk of electric shock, short circuit or fire!
The mains supply data must correspond to the data specified on the type label of the product. The rating plate is either seen when the door or the lower cover is opened or it is located at the rear wall of the unit depending on the unit type.
Power cable of your product must comply with the values in "Technical specifications" table.
DANGER:
Before starting any work on the electrical installation, disconnect the product from the mains supply.
There is the risk of electric shock!
Connecting the power cable
- If a power cable is not supplied together with your product, a power cable that you would select from the table () in accordance with the electrical installation at your home must be connected to your product by following the instructions in cable diagram.
If it is not possible to disconnect all poles in the supply power, a disconnection unit with at least 3 mm contact clearance (fuses, line safety switches, contactors) must be connected and all the poles of this disconnection unit must be adjacent to (not above) the product in accordance with IEE directives. Failure to obey this instruction may cause operational problems and invalidate the product warranty.

Additional protection by a residual current circuit breaker is recommended.
- Open the terminal block cover with a screwdriver.
- Insert the power cable through the cable clamp below the terminal and secure it to the main body with the integrated screw on cable clamping component.
- Connect the cables according to the supplied diagram.


- After completing the wire connections, close the terminal block cover.
- Route the power cable so that it will not contact the product and get squeezed between the product and the wall.

Power cable must not be longer than 2 m because of safety reasons.
Gas connection

DANGER:
Product can be connected to gas supply system only by an authorised and qualified person or technician with licence.
Risk of explosion or toxication due to unprofessional repairs!
Manufacturer shall not be held responsible for damages arising from procedures carried out by unauthorised or unlicensed persons.

DANGER:
Before starting any work on the gas installation, disconnect the gas supply.
There is the risk of explosion!
- Gas adjustment conditions and values are stated on labels (or ion type label).
• Refer to the detailed gas connection and gas conversion information in the user manual supplied with your product.
DANGER:
The gas hose must not be clamped, bent or trapped or come into contact with hot parts of the product.
There is the risk of explosion due to damaged gas hose.
Adjusting the feet of oven
The appliance should be located on a level surface. The front and rear feet can be adjusted as required to raise or lower the appliance by turning the feet clockwise or anti clockwise.
The height of the appliance should not exceed 930mm.
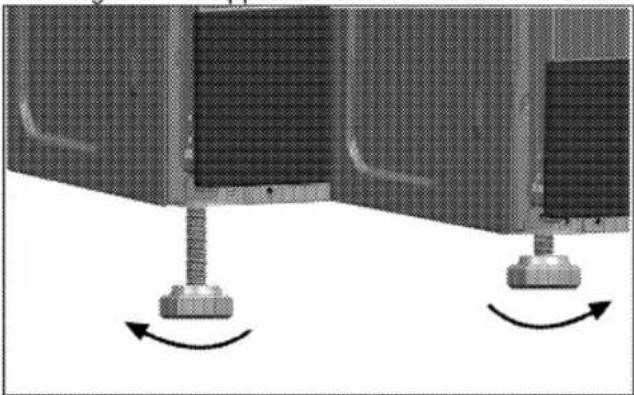
natural_image
Mechanical assembly diagram showing two components with rotating arrows indicating motion (no text or symbols)For products with cooling fan
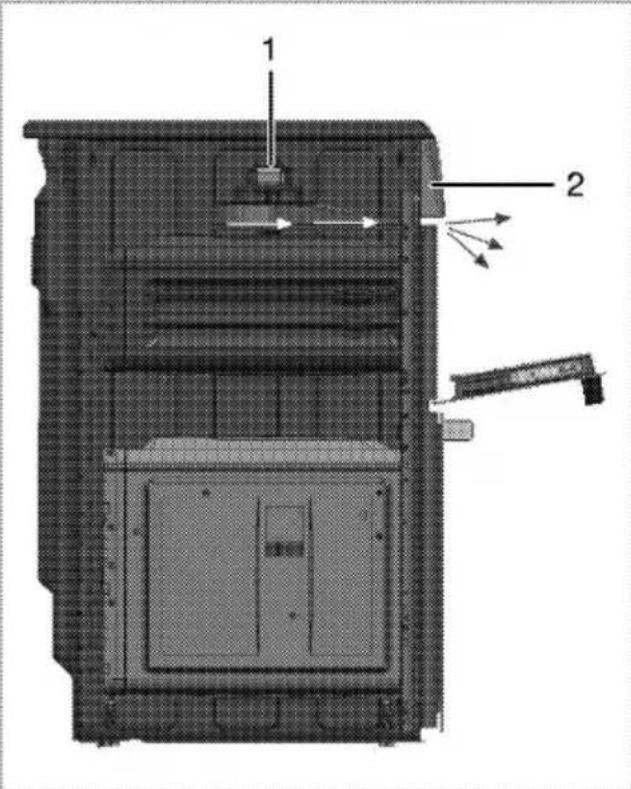
1 Cooling fan
2 Control panel
While open door grilling, in order to protect control panel, knobs and related oven parts; a fan automatically starts working.

Fan continues working until the product cools down.
Final check
- Reconnect the product to the mains.
- Check electrical functions.
- Open gas supply.
- Check gas installations for secure fitting and tightness.
- Ignite burners and check appearance of the flame.

Flame must be blue and have a regular shape. If the flame is yellowish, check if the burner cap is seated securely or clean the burner.
Gas conversion

DANGER:
Before starting any work on the gas installation, disconnect the gas supply. There is the risk of explosion!
In order to change your appliance's gas type, change all injectors and make flame adjustment for all valves at reduced flow rate position.
Exchange of injector for the burners
- Take off burner cap and burner body.
- Unscrew injectors by turning the counterclockwise.
- Fit new injectors.
- Check all connections for secure fitting and tightness.

New injectors have their position marked on their packing or injector table on can be referred to.

1 Flame failure device
2 Spark plug
3 Injector
4 Burner

Unless there is an abnormal condition, do not attempt to remove the gas burner taps. You must call an Authorised service agent if it is necessary to change the taps.
Reduced gas flow rate setting for hob taps
- Ignite the burner that is to be adjusted and turn the knob to the reduced position.
- Remove the knob from the gas tap.
- Use an appropriately sized screwdriver to adjust the flow rate adjustment screw.
For LPG (Butane - Propane) turn the screw clockwise. For the natural gas, you should turn the screw counter-clockwise once.
» The normal length of a straight flame in the reduced position should be 6-7 mm.
4. If the flame is higher than the desired position, turn the screw clockwise. If it is smaller turn anticlockwise.
5. For the last control, bring the burner both to high-flame and reduced positions and check whether the flame is on or off.
Depending on the type of gas tap used in your appliance the adjustment screw position may vary.

1 Flow rate adjustment screw
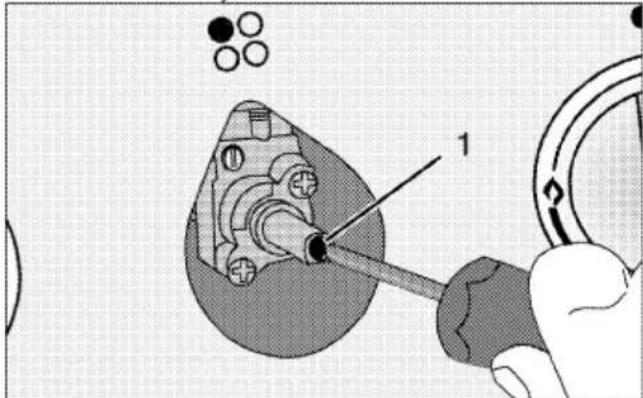
1 Flow rate adjustment screw

If the gas type of the unit is changed, then the rating plate that shows the gas type of the unit must also be changed.
Future Transportation
- Keep the product's original carton and transport the product in it. Follow the instructions on the carton. If you do not have the original carton, pack the product in bubble wrap or thick cardboard and tape it securely.
- To prevent the wire grill and tray inside the oven from damaging the oven door, place a strip of cardboard onto the inside of the oven door that lines up with the position of the trays. Tape the oven door to the side walls.
- Secure the caps and pan supports with adhesive tape.
- Do not use the door or handle to lift or move the product.

Do not place any objects onto the product and move it in upright position.
Do not move the product when there is water in it. You can move the product after draining the water in it.

Check the general appearance of your product for any damages that might have occurred during transportation.
4 Preparation
Tips for saving energy
The following information will help you to use your appliance in an ecological way, and to save energy:
- Use dark coloured or enamel coated cookware in the oven since the heat transmission will be better.
- While cooking your dishes, perform a preheating operation if it is advised in the user manual or cooking instructions.
- Do not open the door of the oven frequently during cooking.
- Try to cook more than one dish in the oven at the same time whenever possible. You can cook by placing two cooking vessels onto the wire shelf.
• Cook more than one dish one after another. The oven will already be hot. - You can save energy by switching off your oven a few minutes before the end of the cooking time. Do not open the oven door.
• Defrost frozen dishes before cooking them. - Use pots/pans with cover for cooking. If there is no cover, energy consumption may increase 4 times.
- Select the burner which is suitable for the bottom size of the pot to be used. Always select the correct pot size for your dishes. Larger pots require more energy.
Initial use
Time setting

Before you can use the oven, the time must be set. If the time is not set, oven will not operate.

While making any adjustment, related symbols on the clock will flash.
Press „−“ or „+“ (5/6) keys to set the time after the oven in energized for the first time.
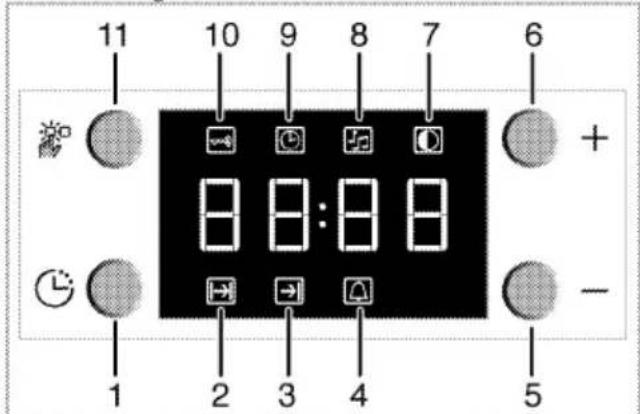
2 Cooking time
3 End of cooking time
4 Alarm symbol
5 Minus key
6 Plus key
7 Screen brightness setting
8 Alarm volume
9 Current time
10 Keylock
11 Adjustment key
After setting the time, you can start and end the cooking by selecting the desired position with temperature button and function button.

If the current time is not set, time setting will start increasing/moving up from 12:00. Clock symbol '9' will be displayed to indicate that the current time has not been set. This symbol will disappear once the time is set.

Current time settings are cancelled in case of power failure. It needs to be readjusted.
Changing the time of the day
To change the time of the day you have previously set:
-
Press (11) key to activate current time symbol '9'.
-
Press "-" or "+" (5/6) keys to set the current time.
Changing screen brightness adjustment
-
Press (11) key to activate screen brightness symbol '7' for screen brightness adjustment.
-
Press '-' or '+' (5/6) keys to set the desired brightness.
» Selected brightness level will appear as d-01, d-02 or d-03 on the display.
First cleaning of the appliance

The surface might get damaged by some detergents or cleaning materials.
Do not use aggressive detergents, cleaning powders/creams or any sharp objects during cleaning.
Do not use harsh abrasive cleaners or sharp metal scrapers to clean the oven door glass since they can scratch the surface, which may result in shattering of the glass.
- Remove all packaging materials.
- Wipe the surfaces of the appliance with a damp cloth or sponge and dry with a cloth.
Initial heating
Heat up the product for about 30 minutes and then switch it off. Thus, any production residues or layers will be burnt off and removed.
WARNING
Hot surfaces cause burns!
Product may be hot when it is in use. Never touch the hot burners, inner sections of the oven, heaters and etc. Keep children away. Always use heat resistant oven gloves when putting in or removing dishes into/from the hot oven.

Smoke and smell may emit for a couple of hours during the initial operation. This is quite normal. Ensure that the room is well ventilated to remove the smoke and smell. Avoid directly inhaling the smoke and the smell that emits.
5 How to use the hob
General information about cooking

Never fill the pan with oil more than one third of it. Do not leave the hob unattended when heating oil. Overheated oils bring risk of fire. Never attempt to extinguish a possible fire with water! When oil catches fire, cover it with a fire blanket or damp cloth. Turn off the hob if it is safe to do so and call the fire department.
- Before frying foods, always dry them well and gently place into the hot oil. Ensure complete thawing of frozen foods before frying.
• Do not cover the vessel you use when heating oil. - Place the pans and saucepans in a manner so that their handles are not over the hob to prevent heating of the handles. Do not place unbalanced and easily tilting vessels on the hob.
- Do not place empty vessels and saucepans on cooking zones that are switched on. They might get damaged.
- Operating a cooking zone without a vessel or saucepan on it will cause damage to the product. Turn off the cooking zones after the cooking is complete.
- As the surface of the product can be hot, do not put plastic and aluminum vessels on it.
Such vessels should not be used to keep foods either.
• Use flat bottomed saucepans or vessels only. - Put appropriate amount of food in saucepans and pans. Thus, you will not have to make any unnecessary cleaning by preventing the dishes from overflowing.
Do not put covers of saucepans or pans on cooking zones.
Place the saucepans in a manner so that they are centered on the cooking zone. When you want to move the saucepan onto another cooking zone, lift and place it onto the cooking zone you want instead of sliding it.
Gas cooking
- Size of the vessel and the flame must match each other. Adjust the gas flames so that they will not extend the bottom of the vessel and center the vessel on saucepan carrier.
Using the hobs
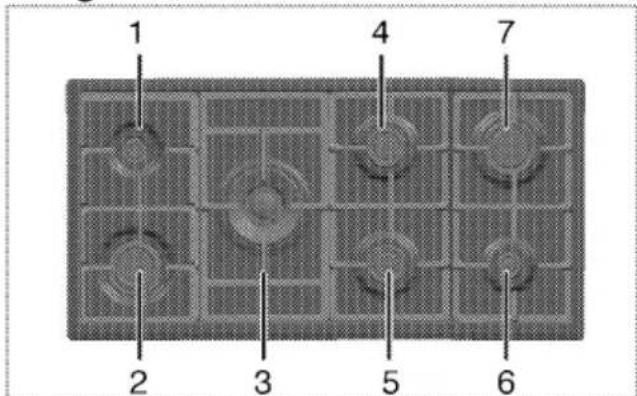
1 Auxiliary burner 12-18 cm
2 Rapid burner 22-24 cm
3 Wok burner 22-24 cm
4 Normal burner 18-20 cm
5 Normal burner 18-20 cm
6 Auxiliary burner 12-18 cm
7 Rapid burner 22-24 cm is list of advised diameter of pots to be used on related burners.
Large flame symbol indicates the highest cooking power and small flame symbol indicates the lowest cooking power. In turned off position (top), gas is not supplied to the burners.
Igniting the gas burners
- Keep burner knob pressed.
- Turn it counter clockwise to large flame symbol.
» Gas is ignited with the spark created. - Adjust it to the desired cooking power.
Turning off the gas burners
Turn the keep warm zone knob to off (upper) position.
Gas shut off safety system

natural_image
3D rendered image of a circular mechanical component with a central flat plate and a small protruding part (no text or symbols visible)As a counter measure against blow out due to fluid overflows at burners, safety mechanism trips and shuts off the gas.
1. Gas shut off safety
- Push the knob inwards and turn it counter clockwise to ignite.
• After the gas ignites, keep the knob pressed for 3-5 seconds more to engage the safety system. - If the gas does not ignite after you press and release the knob, repeat the same procedure by keeping the knob pressed for 15 seconds.
DANGER:
Release the button if the burner is not ignited within 15 seconds.
Wait at least 1 minute before trying again.
There is the risk of gas accumulation and explosion!
Wok burner

Wok burners help you to cook faster. Wok, which is particularly used in Asian kitchen is a kind of deep and flat fry-pan made of sheet metal, which is used to cook minced vegetable and meat at strong flame in a short time.
Since meals are cooked at strong flame and in a very short time in such fry-pans that conduct the heat rapidly and evenly, the nutrition value of the food is preserved and vegetables remain crispy.
You can use wok burner for regular saucepans as well. If you want to use regular saucepan on wok burner, you must take out the wok fry-pan carrier from the hob.
6 How to operate the oven
General information on baking, roasting and grilling

WARNING
Hot surfaces cause burns!
Product may be hot when it is in use. Never touch the hot burners, inner sections of the oven, heaters and etc. Keep children away. Always use heat resistant oven gloves when putting in or removing dishes into/from the hot oven.

DANGER:
Be careful when opening the oven door as steam may escape.
Exiting steam can scald your hands, face and/or eyes.
Tips for baking
- Select the correct shelf position before turning the oven on – shelf positions are counted from the bottom upwards.
• Always preheat the oven first to ensure the food is at the correct temperature as soon as it goes into the oven. - Use good quality baking tins such as non stick or aluminium. Line tins with greaseproof or baking paper to prevent sticking, if necessary.
• Do not fill cake tin more than half full. - If baking one tray of food or cake, place centrally on the shelf level and centrally in the oven.
- Do not to open the oven door too much during cooking.
- To check if a cake is cooked, insert a skewer or cocktail stick into the centre. If it comes out clean, the cake is done, if it has food stuck to it, continue to cook the cake for a few minutes more and repeat the process.
Tips for roasting
Preheat oven first.
- If possible take meat or poultry out of refrigerator 30 minutes before cooking.
- Weigh meat first and calculate how long it will take to cook.
-
Before cooking meat or poultry, lightly coat with butter or oil and season with salt, pepper, herbs, or other seasoning. Place in a roasting dish and use a rack to lift the meat out of its juices. Place dish in centre of oven.
• Turn meat over halfway through cooking. -
If the roasted meat is covered with foil, (it helps to keep the oven clean), always uncover for the last half an hour of cooking to allow browning.
- Remove meat from oven once cooked and stand covered in foil for 10-15 minutes to allow the meat to relax and juices to be reabsorbed which ensures the roast is tender and moist..
Tips for grilling
Grilling is a quick and healthy way of cooking meat, fish, vegetables and poultry. Flat pieces are particularly suitable for grilling.
Preheat grill first.
• To keep the grill pan clean, line with a silicone baking liner. Do not line with aluminium foil.
- Most foods benefit with being brushed with oil before cooking.
- To enhance the flavour and moistness of meat, fish or poultry, marinate first.
- If using wooden kebab sticks, soak first to prevent them catching on fire.
- Turn food halfway through cooking to ensure it is evenly browned.

Foods that are not suitable for grilling carry the risk of fire. Only grill food which is suitable for intensive grilling heat.
Do not place the food too far in the back of the grill. This is the hottest area and fatty food may catch fire.
How to operate the main electric oven (LHS)

Before you can use the oven, the time must be set. If the time is not set, oven will not operate.
Product is equipped with several ovens. Overview section indicates the relevant knobs for each oven.
Select temperature and operating mode
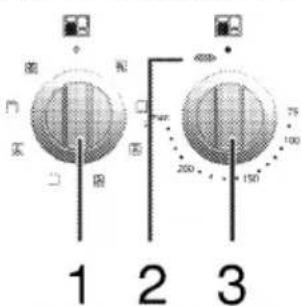
1 Function knob LHS oven- Main oven
2 Thermostat lamp LHS oven - Main oven
3 Thermostat knobLHS oven - Main oven
- Set the Temperature knob to the desired temperature.
- Set the Function knob to the desired operating mode.
» Oven heats up to the adjusted temperature and maintains it. During heating, temperature lamp stays on.
Switching off the electric oven
Turn the function knob and temperature knob to off (upper) position.

natural_image
Cross-sectional diagram of a microwave oven with internal structure and a magnified inset showing internal components (no text or labels)Rack positions (For models with wire shelf)
It is important to place the wire shelf onto the side rack correctly. Wire shelf must be inserted between the side racks as illustrated in the figure.
Do not let the wire shelf stand against the rear wall of the oven. Slide your wire shelf to the front section of the rack and settle it with the help of the door in order to obtain a good grill performance.
Operating modes
All functions in your oven (including the main oven) are described in this section.
The order of operating modes shown here may be different from the arrangement on your product.
Top and bottom heating

Top and bottom heating are in operation. Food is heated simultaneously from the top and bottom. For example, it is suitable for cakes, pastries, or cakes and casseroles in baking moulds. Cook with one tray only.
Bottom heating

Only bottom heating is in operation. It is suitable for pizza and for subsequent browning of food from the bottom.
Fan supported bottom/top heating

Top heating, bottom heating plus fan (in the rear wall) are in operation. Hot air is evenly distributed throughout the oven rapidly by means of the fan. Cook with one tray only.
Operating with fan
The oven is not heated. Only the oven lamp and the fan (in the rear wall) are in operation. Suitable for thawing frozen granular food slowly at room temperature and cooling down the cooked food.
Other functions are for cooking; select suitable temperature for your food.
Fan Heating

Warm air heated by the rear heater is evenly distributed throughout the oven rapidly by means of the fan. It is suitable for cooking your meals in different rack levels and preheating is not required in most cases. Suitable for cooking with multi trays.
"3D" function

Top heating, bottom heating and fan assisted heating (in the rear wall) are in operation. Food is cooked evenly and quickly all around. Cook with one tray only.
Full grill
Large grill at the ceiling of the oven is in operation. It is suitable for grilling large amount of meat.
- Put big or medium-sized portions in correct rack position under the grill heater for grilling.
- Set the temperature to maximum level.
- Turn the food after half of the grilling time.
Grill+Fan
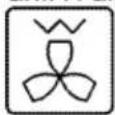
Grilling effect is not as strong as in Full Grill
- Put small or medium-sized portions in correct shelf position under the grill heater for grilling.
• Set the desired temperature. - Turn the food after half of the grilling time.
Using the oven clock
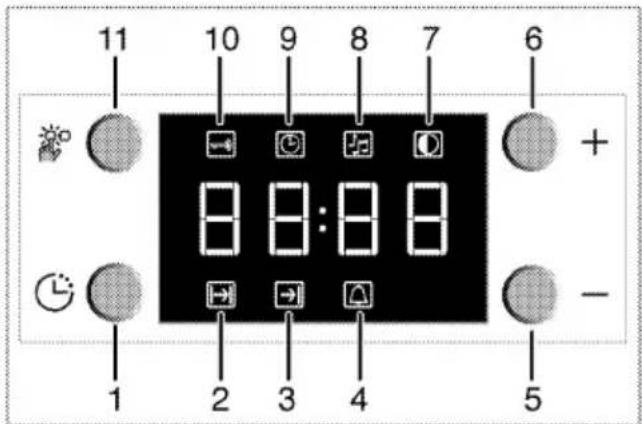
1 Program key
2 Cooking time
3 End of cooking time
4 Alarm symbol
5 Minus key
6 Plus key
7 Screen brightness setting
8 Alarm volume
9 Current time
10 Keylock
11 Adjustment key

Maximum time that can be set for end of cooking is 5 hours 59 minutes. Program will be cancelled in case of power failure. You must reprogram the oven.

While making any adjustments, related symbols will flash on the display. You must wait for a short time for the settings to take effect.

If no cooking setting is made, time of the day cannot be set.

Cooking time will be displayed once the cooking starts.
Cooking by specifying the cooking time:
You can set the oven so that it will stop at the end of the specified time by setting the cooking time on the clock.
- To adjust the cooking time, Press Program key (1) and activate the Cooking Time symbol (2).
- Press '-' / '+' (5/6) keys to set the cooking time.
» Once the Cooking Time is set, Cooking symbol will be displayed continuously.
If you want to set the end of cooking time to a later time:
After setting the cooking time on the clock, you can set the end of cooking time to a later time.
-
To adjust the cooking time, press Program key (1) and activate the Cooking Time symbol (2).
-
Adjust the cooking time with Minus (5) and Plus (6) keys.
» Cooking Time symbol remains lit (displayed continuously) after setting the cooking time.
-
To set the End of Cooking Time, Press Program key (1) and activate the Cooking Time symbol (3).
-
Press - (5) and + (6) keys to set the end of cooking time.
» Once the End of Cooking Time is set, End of Cooking symbol and Cooking symbol will be displayed continuously. The End of Cooking Time symbol (3) will disappear as soon as the cooking starts.
-
Put your dish into the oven.
-
Select operation mode and temperature.
» Oven timer automatically calculates the startup time for cooking by using the end of cooking time and the cooking period you have set. Selected operation mode is activated when the startup time of cooking has come and the oven is heated up to the set temperature. It maintains this temperature until the end of cooking time.
- After the cooking process is completed, "End" appears on the displayed and the alarm will sound.
- Alarm signal will sound for 2 minutes. To stop the alarm signal, just press any key. Alarm will be silenced and current time will be displayed.

If you mute the alarm by pressing any key, the oven will restart operating. If you press any button at the end of the alarm period, the oven will restart operating.
- Turn off the oven with the Temperature knob and Function knob.
Using the keylock
Activating the keylock
You can prevent oven from being used by activating the Keylock function.
- Press the key (11) to activate Keylock symbol (10). » "OFF" will appear on the display.
- Press '+' key (6) to activate the keylock.
» Once the keylock is activated, "On" appears on the display and the Keylock symbol (10) remains lit.

When the Keylock function is activated, control panel buttons except for the key (11) cannot be used.
Deactivating the keylock
- Press Adjustment key (11) to activate Keylock symbol (10).
» "On" will appear on the display.
2. Press '-' (5) to deactivate the keylock.
» "OFF" will be displayed once the keylock is deactivated.
Using the clock as an alarm
You can use the clock of the product for any warning or reminder apart from the cooking programme.
The alarm clock has no influence on the functions of the oven. It is only used as a warning. For example, this is useful when you want to turn food in the oven at a certain point of time. Alarm clock will give a signal once the time you set is over.
Setting the alarm clock
- Press Program key (1) to activate the alarm time symbol (4).

Maximum alarm time can be 23 hours and 59 minutes.
- Adjust the alarm time using „+“/„-“(5/6) keys.
» Alarm symbol will remain lit and the alarm time will appear on the display once the alarm time is set. - At the end of the alarm time, Alarm Time symbol (4) will start flashing and the alarm signal is heard.
Turning off the alarm
- To stop the alarm, just press any key.
» Alarm will be silenced and current time will be displayed.
If you want to cancel the alarm:
- To reset the alarm time, press Program key (1) to activate the alarm time symbol (4).
- Press and hold the '-' (5) key until "00:00" is displayed.

Alarm time will be displayed. If the alarm time and cooking time are set concurrently, shortest time will be displayed.
Changing alarm tone
- Press Setting key (11) to activate the Alarm Tone symbol (8).
- Adjust the desired tone using "+"/-" (5/6) keys. » Selected alarm tone will appear as "b-01", "b-02" or "b-03" on the display.
Cooking times table for Main oven (Left bottom)

The timings in this chart are meant as a guide. Timings may vary due to temperature of food, thickness, type and your own preference of cooking.
Baking and roasting

1st rack of the oven is the bottom rack.
| Dish | Cooking level number | Rack position | Temperature (°C) | Cooking time (approx. in min.) | |
| Cakes in tray* | One level | 1 | 175 | 20 ... 30 | |
| Cakes in mould* | One level | 1 | 175 | 40 ... 50 | |
| Cakes in cooking paper* | One level | 1 | 175 | 25 ... 30 | |
| One level | 1 | 175 | 25 ... 35 | ||
| Sponge cake* | One level | 2 | 200 | 5 ... 10 | |
| Cookies* | One level | 2 | 175 | 25 ... 30 | |
| 2 levels | 1 - 3 | 170 - 180 | 35 ... 45 | ||
| Dough pastry* | One level | 1 | 200 | 30 ... 40 | |
| Rich pastry* | One level | 2 | 180 | 25 ... 35 | |
| 2 levels | 1 - 3 | 190 | 35 ... 45 | ||
| Leaven* | One level | 1 | 190 | 35 ... 45 | |
| Lasagna* | One level | 2 | 180 | 30 ... 40 | |
| Pizza*(thick) | One level | 1 | 200 | 15 ... 20 | |
| Beef steak (whole) / Roast | One level | 2 | 25 min. 250/max, then 180 ... 190 | 100 ... 120 | |
| Leg of Lamb(casserole) | One level | 2 | 25 min. 250/max, then 190 | 70 ... 90 | |
| One level | 2 | 25 min. 250/max, then 190 | 60 ... 80 | ||
| Roasted chicken | One level | 1 | 15 min. 250/max, then 190 | 55 ... 65 | |
| One level | 1 | 15 min. 250/max, then 180 ... 190 | 55 ... 65 | ||
| Turkey (sliced) | One level | 1 | 25 min. 250/max, then 180...190 | 150...210 | |
| One level | 1 | 25 min. 250/max, then 180...190 | 140...190 | ||
| Fish | One level | 2 | 200 | 20...30 | |
| One level | 2 | 200 | 20...25 | ||
| When cooking with 2 trays at the same time, place the deeper tray on the upper rack and the other one on the lower rack.*It is suggested to perform preheating for all foods. | |||||
(**) In a cooking that requires preheating, preheat at the beginning of cooking until the thermostat lamp turns off.
Tips for baking cake
- If the cake is too dry, increase the temperature by 10°C and decrease the cooking time.
- If the cake is wet, use less liquid or lower the temperature by 10^ C.
- If the cake is too dark on top, place it on a lower rack, lower the temperature and increase the cooking time.
- If cooked well on the inside but sticky on the outside use less liquid, lower the temperature and increase the cooking time.
Tips for baking pastry
- If the pastry is too dry, increase the temperature by 10°C and decrease the cooking time. Dampen the layers of dough with a sauce composed of milk, oil, egg and yoghurt.
- If the pastry takes too long to bake, pay care that the thickness of the pastry you have prepared does not exceed the depth of the tray.
- If the upper side of the pastry gets browned, but the lower part is not cooked, make sure that the amount of sauce you have used for the pastry is not too much at the bottom of the pastry. Try to scatter the sauce equally between the dough layers and on the top of pastry for an even browning.

Cook the pastry in accordance with the mode and temperature given in the cooking table. If the bottom part is still not browned enough, place it on one lower rack next time.
Tips for cooking vegetables
- If the vegetable dish runs out of juice and gets too dry, cook it in a pan with a lid instead of a tray. Closed vessels will preserve the juice of the dish.
- If a vegetable dish does not get cooked, boil the vegetables beforehand or prepare them like canned food and put in the oven.
How to operate the grill (for LHS main oven)

Before you can use the oven, the time must be set. If the time is not set, oven will not operate.

WARNING Close oven door during grilling. Hot surfaces may cause burns!
Switching on the grill
- Turn the Function knob to the desired grill symbol.
- Then, select the desired grilling temperature.
- If required, perform a preheating of about 5 minutes.
» Temperature light turns on.
Switching off the grill
- Turn the Function knob to Off (top) position.
Foods that are not suitable for grilling carry the risk of fire. Only grill food which is suitable for intensive grilling heat.
Do not place the food too far in the back of the grill. This is the hottest area and fatty food may catch fire.
Cooking times table for grilling (LHS-Main oven)
| Food | Insertion level | Grilling time (approx.) |
| Fish | 4..5 | 20..25 min.# |
| Sliced chicken | 4..5 | 25..35 min. |
| Lamb chops | 4..5 | 20..25 min. |
| Roast beef | 4..5 | 25..30 min.# |
| Veal chops | 4..5 | 25..30 min.# |
| Toast bread | 4..5 | 1..2 min. |
| #depending on thickness | ||
How to operate the grill (LHS-Top)

WARNING
Hot surfaces may cause burns! Keep children away from the product.
Oven door remains slightly inclined when opened full and thus, possible splashes to not reach you.
DANGER:
WARNING
This product designed for OPEN DOOR GRILLING
Switching on the grill

Turning the Grill control knob clockwise provides various levels of grilling.
- Open the grill door.
- If required, perform a preheating of about 5 minutes by switching the grill to position 4.
- Then, select the desired grilling temperature.
» Temperature light turns on.
Switching off the grill
- Turn the Grill control knob to Off (upper) position.
- Put big or medium-sized portions in correct rack position under the grill heater for grilling.
- For food only whose top is required to be roasted, grill the food either by placing onto the wire grill in the tray or by placing the tray onto the floor of grilling compartment.
- Food and plates placed onto the floor of grill compartment will get heated when the main oven is in use. Do not switch on the grill compartment when using it for storing food.

Foods that are not suitable for grilling carry the risk of fire. Only grill food which is suitable for intensive grilling heat.
Do not place the food too far in the back of the grill. This is the hottest area and fatty food may catch fire.
Grill cooking times table (LHS-top)

1st rack of the oven is the bottom rack.
| Food | Insertion level | Grilling time (approx.) |
| Fish | 1..2 | 20..25 min.# |
| Sliced chicken | 1..2 | 25..35 min. |
| Lamb chops | 1..2 | 20..25 min. |
| Roast beef | 1..2 | 25..30 min.# |
| Veal chops | 1..2 | 25..30 min.# |
| Toast bread | 1..2 | 1..2 min. |
| *depending on thickness | ||
How to operate the RHS oven

Select temperature and operating mode
- Set the Function knob to the desired temperature. » Oven heats up to the adjusted temperature and maintains it. During heating and cooling, thermostat light turns on.
Switching off the electric oven
Turn the Function knob to Off (top) position.

natural_image
Cross-sectional diagram of a microwave oven with internal structure and a magnified inset showing internal components (no text or labels)Rack positions (For models with wire shelf)
Baking and roasting
It is important to place the wire shelf onto the side rack correctly. Wire shelf must be inserted between the side racks as illustrated in the figure.
Do not let the wire shelf stand against the rear wall of the oven. Slide your wire shelf to the front section of the rack and settle it with the help of the door in order to obtain a good grill performance.
Cooking times table for RHS Top oven
 | The timings in this chart are meant as a guide. Timings may vary due to temperature of food, thickness, type and your own preference of cooking. |
 | Maximum load capacity of oven tray: 4 kg (8.8 lb). |
 | 1st rack of the oven is the bottom rack. |
- Do not place cookware with rough bases on the oven door.
- Ensure that there is at least 25mm space at top of oven when cooking larger foods or using taller cookware.
| Dish | Cooking level number | Rack position | Temperature (°C) | Cooking time (approx. in min.) |
| **Cakes in tray | One level | 3 | 175 | 30 ... 45 |
| **Cakes in mould | One level | 3 | 175 | 30 ... 50 |
| **Cakes in cooking paper | One level | 3 | 160 ... 170 | 20 ... 30 |
| **Sponge cake | One level | 3 | 180 ... 200 | 10 ... 20 |
| **Cookies | One level | 3 | 160 ... 170 | 20 ... 30 |
| **Dough pastry | One level | 3 | 200 | 20 ... 30 |
| **Rich pastry | One level | 3 | 190 | 25 ... 35 |
| **Leaven | One level | 3 | 190 | 20 ... 40 |
| **Lasagna | One level | 2 | 180 | 25 ... 45 |
| **Pizza | One level | 2 | 200 | 15 ... 25 |
| Beef steak (whole) / Roast | One level | 2 | 25 min. 220, then 180 ... 190 | 80 ... 120 |
| Leg of Lamb (casserole) | One level | 2 | 25 min. 220, then 180 ... 190 | 70 ... 100 |
| Roasted chicken | One level | 2 | 15 min. 220, then 190 | 55 ... 75 |
| Turkey (Sliced) | One level | 2 | 25 min. 220, then 190 | 70 ... 120 |
| Fish | One level | 3 | 200 | 20 ... 30 |

Maintenance and care
General information
Service life of the product will extend and the possibility of problems will decrease if the product is cleaned at regular intervals.

DANGER:
Disconnect the product from mains supply before starting maintenance and cleaning works. There is the risk of electric shock!
DANGER:
Allow the product to cool down before you clean it. Hot surfaces may cause burns!
- Clean the product thoroughly after each use. In this way it will be possible to remove cooking residues more easily, thus avoiding these from burning the next time the appliance is used.
- No special cleaning agents are required for cleaning the product. Use warm water with washing liquid, a soft cloth or sponge to clean the product and wipe it with a dry cloth.
- Always ensure any excess liquid is thoroughly wiped off after cleaning and any spillage is immediately wiped dry.
- Do not use cleaning agents that contain acid or chloride to clean the stainless or inox surfaces and the handle. Use a soft cloth with a liquid detergent (not abrasive) to wipe those parts clean, paying attention to sweep in one direction.

The surface might get damaged by some detergents or cleaning materials.
Do not use aggressive detergents, cleaning powders/creams or any sharp objects during cleaning.
Do not use harsh abrasive cleaners or sharp metal scrapers to clean the oven door glass since they can scratch the surface, which may result in shattering of the glass.

Do not use steam cleaners to clean the appliance as this may cause an electric shock.
Cleaning the hob
Gas hobs
- Remove and clean the saucepan carriers and burner caps.
- Clean the hob.
-
Install the burner caps and make sure that they are seated correctly.
-
When installing the upper grills, pay attention to place the saucepan carriers so that the burners are centered.
Cleaning the control panel
Clean the control panel and knobs with a damp cloth and wipe them dry.

Do not remove the control buttons/knobs to clean the control panel. Control panel may get damaged!
Cleaning the oven/grill cavities
To clean the side wall
- Remove the front section of the side rack by pulling it in the opposite direction of the side wall.
- Remove the side rack completely by pulling it towards you.
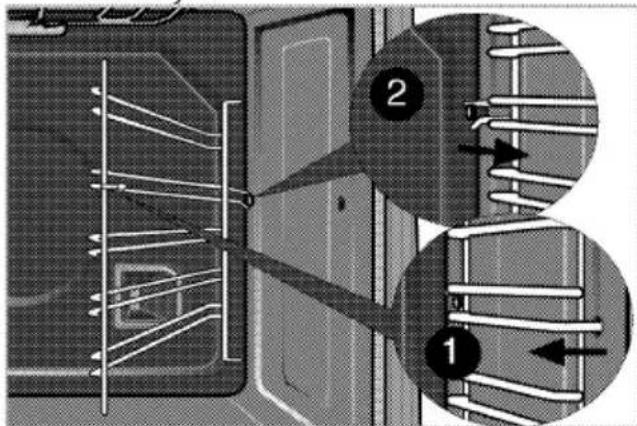
Catalytic walls
Side walls or just back wall of oven interior may be covered with catalytic enamel.
The catalytic walls of the oven must not be cleaned. The porous surface of the walls is self-cleaning by absorbing and converting spitting fat (steam and carbon dioxide).
Clean oven door
To clean the oven door, use warm water with washing liquid, a soft cloth or sponge to clean the product and wipe it with a dry cloth.

Don't use any harsh abrasive cleaners or sharp metal scrapers for cleaning the oven door. They could scratch the surface and destroy the glass.
Removing the top oven's door
- Open the front door (1).
- Open the clips at the hinge housing (2) on the right and left hand sides of the front door by pressing them down as illustrated in the figure.

1 Front door
2 Hinge
3 Oven

natural_image
Technical diagram of a mechanical joint or bracket with a directional arrow indicating rotation (no text or symbols present)
- Move the front door to half-way.
- Remove the front door by pulling it upwards to release it from the right and left hinges.

Steps carried out during removing process should be performed in reverse order to install the door. Do not forget to close the clips at the hinge housing when reinstalling the door.
Removing the door inner glass
The inner glass panel of the grill door (LHS-Top) at upper oven can be removed for cleaning.
- Open the oven door.

1 Screw
2 Plastic profile
3 Inner glass pane
4 Plastic slot
2. Take out the screw(1) with a screwdriver
3. Take out the profile (2) than hold up to inner glass (3).
4. Then group the door again, put the glass pane (3) to the plastic slots (4) and group the profile.
Replacing the oven lamp
DANGER:
Before replacing the oven lamp, make sure that the product is disconnected from mains and cooled down in order to avoid the risk of an electrical shock. Hot surfaces may cause burns!

The oven lamp is a special electric light bulb that can resist up to 300 °C. See for details. Oven lamps can be obtained from Authorised Service Agents or technician with licence.

Position of lamp might vary from the figure.
If your oven is equipped with a round lamp:
- Disconnect the product from mains.
- Turn the glass cover counter clockwise to remove it.

natural_image
Close-up of a hand holding a circular component with a ring, next to a mechanical component (no visible text or symbols)- Remove the oven lamp by turning it counter clockwise and replace it with the new one.
- Install the glass cover.
8 Troubleshooting
Oven emits steam when it is in use.
• It is normal that steam escapes during operation. >>> This is not a fault.
Water drops occur during cooking.
- The vapour that arises during cooking can condense and form water droplets when it hits cold surfaces of the product. >>> This is not a fault.
Product emits metal noises while heating and cooling.
- When the metal parts are heated, they may expand and cause noise. >>> This is not a fault.
Product does not operate.
• The mains fuse is defective or has tripped. >>> Check fuses in the fuse box. If necessary, replace or reset them.
• Product is not plugged into the (grounded) socket. >>> Check the plug connection.
- Buttons/knobs/keys on the control panel do not function. >>> Keylock may be enabled. Please disable it. (See. Using the keylock, page 25)
- If the display does not light up when you switch the hob on again. >>> Disconnect the appliance at the circuit breaker. Wait 20 seconds and then reconnect it.
Oven light does not work.
- Oven lamp is defective. >>> Replace oven lamp.
- Power is cut. >>> Check if there is power. Check the fuses in the fuse box. If necessary, replace or reset the fuses.
Oven does not heat.
- Function and/or Temperature are not set. >>> Set the function and the temperature with the Function and/or Temperature knob/key.
- In models equipped with a timer, the timer is not adjusted. >>> Adjust the time. (In products with microwave oven, timer controls only microwave oven.)
- Power is cut. >>> Check if there is power. Check the fuses in the fuse box. If necessary, replace or reset the fuses.
There is no ignition spark.
• No current. >>> Check fuses in the fuse box.
• Time is not set. >>> Set the time.
Cooling fan continues operating although the hob is turned off.
- This is not a fault. Cooling fan will continue operating until the electronics in the hob cools down to a suitable temperature.
There is no gas.
• Main gas valve is closed. >>> Open gas valve.
• Gas pipe is bent. >>> Install gas pipe properly.
Burners are not burning properly or at all.
- Burners are dirty. >>> Clean burner components.
• Burners are wet. >>> Dry the burner components. - Burner cap is not mounted safely. >>> Mount the burner cap properly.
• Gas valve is closed. >>> Open gas valve.
• Gas cylinder is empty (when using LPG). >>> Replace gas cylinder.
(In models with timer) Clock display is blinking or clock symbol is on.
• A previous power outage has occurred. >>> Adjust the time / Switch of the product and switch it on again.

Consult the Authorised Service Agent or the dealer where you have purchased the product if you can not remedy the trouble although you have implemented the instructions in this section. Never attempt to repair a defective product yourself.


- NOTICE D'UTILISATION BEDINUNGSANLEITUNG GEBRUIKSHANDLEIDING
- Elektrisch Kookfornuis Cooker
- Lees deze gebruikershandleiding eerst!
- Verklaring van symbolen
- Belangrijke instructies en waarschuwingen voor veiligheid en milieu 4
- Algemene informatie 10
- Installatie 15
- Voorbereidingen 21
- De kookplaat gebruiken 23
- Hoe de oven te bedienen 25
- Onderhoud en verzorging 33
- Problemen oplossen 36
- Belangrijke instructies en waarschuwingen voor veiligheid en milieu
- Algemene veiligheid
- Veiligheid bij het werken met gas
- Wat u moet doen wanneer u gas ruikt
- Elektrische veiligheid
- Productveiligheid
- Bedoeld gebruik
- Kindveiligheid
- Het oude product afvoeren
- In naleving met de WEEE-richtlijn inzake de afvoer van afvalproducten:
- In naleving met de RoHS-richtlijn:
- Verpakkingsmateriaal afvoeren
- Algemene informatie
- Inhoud pakket
- Gebruikershandleiding
- Ovenplaat
- Draadrooster
- Klein draadrek (wordt gebruikt met de plaat die bij het product geleverd is)
- Het grillrooster en de plaat correct op de uitschuifrekken plaatsen
- Het rooster en de plaat correct op de draadrekken plaatsen
- Installatie
- Voor installatie
- Veiligheidsketting
- Kamerventilatie
- Installatie en verbinding
- Elektrische aansluiting
- GEVAAR:
- Het aansluiten van de stroomkabel
- Gaskoppeling
- Stel de poten van de oven
- Laatste controle
- Gasomzetting
- Injector voor de branders verwisselen.
- Instelling verminderde gasstroomsnelheid voor kookplaatkraan.
- Toekomstig transport
- Voorbereidingen
- Tips om energie te besparen
- Het eerste gebruik
- Tijdinstelling
- Het uur van de dag wijzigen
- Instellingen van de schermhelderheid wijzigen
- Eerste reiniging van het toestel
- Eerste opwarming
- WAARSCHUWING
- De kookplaat gebruiken
- Algemene informatie over koken
- Koken met gas
- Ontsteking van de gasbranders
- De gasbranders uitschakelen
- Veiligheidsonderbrekingssysteem van de gastoevoer
- Wokbrander
- Hoe de oven te bedienen
- Algemene informatie over bakken, roosteren en grillen
- Tips bij het bakken
- Tips bij het roosteren
- Tips voor het grillen
- Bedienen van de elektrische hoofdoven (LHS)
- Selecteer temperatuur en werkingsmodus.
- De elektrische oven uitzetten
- Roosterstanden (voor modellen met draadrooster)
- Werkingsmodussen
- Verwarming bovenaan en onderaan
- Onderwarmte
- Verwarming bovenaan en onderaan met hete lucht
- Werking met ventilator
- Hete lucht
- "3D"-functie
- Volledige grill
- Grill+Ventilator
- Het gebruik van de ovenklok
- Bereiden door de bereidingstijd te bepalen:
- Indien u de bereidingseindtijd naar een latere tijd wilt instellen:
- De toetsvergrendeling gebruiken
- De toetsvergrendeling activeren
- De toetsvergrendeling inactiveren
- Klok gebruiken als alarm
- Alarmklok instellen
- Alarm uitschakelen
- Als u het alarm wilt annuleren:
- Tabel kooktijden voor hoofdoven (linksonder)
- Bakken en roosteren
- Veranderen van de alarmtoon
- Tips voor het bakken van cakes
- Tips bij het bakken van gebak
- Tips voor het bereiden van groenten
- Bedienen van de grill (voor LHS-hoofdoven)
- De grill aanzetten
- De grill uitzetten
- Bedienen van de grill (LHS-boven)
- Tabel grilltijden (LHS-boven)
- Tabel kooktijden voor RHS-oven
- Onderhoud en verzorging
- Algemene informatie
- Het reinigen van het fornuis
- Gaskookplaten
- Het bedieningspaneel reinigen
- Schoonmaken van de oven-/grillruimten
- Om de zijwand te reinigen
- Katalytische wanden
- Reinig de ovendeur
- Verwijderen van de deur van de bovenste oven.
- Binnenglas deur verwijderen
- De ovenlamp vervangen
- Als uw oven is voorzien van een ronde lamp:
- Problemen oplossen
- De oven geeft stoom af als hij in gebruik is
- Er ontstaan waterdruppels tijdens het bereiden.
- Als de oven verwarmt en koelt geeft deze metaalachtige geluiden.
- Het product werkt niet.
- Ovenverlichting werkt niet.
- Oven verwarmt niet.
- Er is geen ontstekingsvonk.
- De koelventilator blijft werken ookal is het fornuis uitgeschakeld.
- Er is geen gas.
- Branders branden niet juist of helemaal niet.
- (Bij modellen met timer) Klokdisplay knippert of kloksymbool is aan.
- Please read this user manual first!
- Explanation of symbols
- Important instructions and warnings for safety and environment 4
- General information 9
- Installation 14
- Preparation 19
- How to use the hob 21
- How to operate the oven 23
- Maintenance and care 30
- Troubleshooting 32
- Important instructions and warnings for safety and environment
- General safety
- Safety when working with gas
- What to do when you smell gas
- Electrical safety
- Product safety
- Intended use
- Safety for children
- Disposing of the old product
- Compliance with the WEEE Directive and Disposing of the Waste Product:
- Compliance with RoHS Directive:
- Package information
- General information
- Package contents
- User manual
- Oven tray
- Wire Shelf
- Small wire shelf (used with the tray supplied with the product)
- Placing the wire shelf and tray onto the telescopic racks properly
- Placing the wire shelf and tray onto the wire racks properly
- Installation
- Before installation
- Safety chain
- Room ventilation
- Installation and connection
- Electrical connection
- DANGER:
- Connecting the power cable
- Gas connection
- Adjusting the feet of oven
- For products with cooling fan
- Final check
- Gas conversion
- Exchange of injector for the burners
- Reduced gas flow rate setting for hob taps
- Future Transportation
- Preparation
- Tips for saving energy
- Initial use
- Time setting
- Changing the time of the day
- Changing screen brightness adjustment
- First cleaning of the appliance
- Initial heating
- WARNING
- How to use the hob
- General information about cooking
- Gas cooking
- Using the hobs
- Igniting the gas burners
- Turning off the gas burners
- Gas shut off safety system
- Gas shut off safety
- Wok burner
- How to operate the oven
- General information on baking, roasting and grilling
- Tips for baking
- Tips for roasting
- Tips for grilling
- How to operate the main electric oven (LHS)
- Select temperature and operating mode
- Switching off the electric oven
- Rack positions (For models with wire shelf)
- Operating modes
- Top and bottom heating
- Bottom heating
- Fan supported bottom/top heating
- Operating with fan
- Fan Heating
- "3D" function
- Full grill
- Grill+Fan
- Cooking by specifying the cooking time:
- If you want to set the end of cooking time to a later time:
- Using the keylock
- Activating the keylock
- Deactivating the keylock
- Using the clock as an alarm
- Setting the alarm clock
- Turning off the alarm
- If you want to cancel the alarm:
- Changing alarm tone
- Cooking times table for Main oven (Left bottom)
- Baking and roasting
- Tips for baking cake
- Tips for baking pastry
- Tips for cooking vegetables
- How to operate the grill (for LHS main oven)
- Switching on the grill
- Switching off the grill
- How to operate the grill (LHS-Top)
- Grill cooking times table (LHS-top)
- How to operate the RHS oven
- Cooking times table for RHS Top oven
- Maintenance and care
- General information
- Cleaning the hob
- Gas hobs
- Cleaning the control panel
- Cleaning the oven/grill cavities
- To clean the side wall
- Catalytic walls
- Clean oven door
- Removing the top oven's door
- Removing the door inner glass
- Replacing the oven lamp
- If your oven is equipped with a round lamp:
- Troubleshooting
- Oven emits steam when it is in use.
- Water drops occur during cooking.
- Product emits metal noises while heating and cooling.
- Product does not operate.
- Oven light does not work.
- Oven does not heat.
- There is no ignition spark.
- Cooling fan continues operating although the hob is turned off.
- There is no gas.
- Burners are not burning properly or at all.
- (In models with timer) Clock display is blinking or clock symbol is on.
Marque : LEISURE
Modèle : Cookmaster CK110F332
Catégorie : Cuisinière