
WR10 - Commande automatique marine SIMRAD - Notice d'utilisation et mode d'emploi gratuit
Retrouvez gratuitement la notice de l'appareil WR10 SIMRAD au format PDF.


| Type de produit | Télécommande sans fil pour pilote automatique |
| Marque | Simrad |
| Modèle | WR10 |
| Dimensions | 150 x 60 x 30 mm |
| Poids | 200 g |
| Alimentation | Pile bouton CR2032 (incluse) |
| Autonomie | Environ 1 an selon utilisation |
| Portée | Jusqu'à 100 m en champ libre |
| Fréquence | 2,4 GHz |
| Indice de protection | IPX6 (résistant aux embruns) |
| Matériau | Plastique ABS avec revêtement caoutchouc |
| Fonctions principales | Commande de direction (+10°/-10°), activation/désactivation du pilote, réglage du cap, mode sentinelle |
| Affichage | Écran LCD rétroéclairé |
| Compatibilité | Systèmes Simrad NAC-1, NAC-2, AC12, AC42 |
| Fixation | Support de montage avec dragonne incluse |
| Température de fonctionnement | -10°C à +50°C |
| Nettoyage | Chiffon doux et légèrement humide, éviter produits abrasifs |
| Entretien | Vérifier l'état du joint de pile et remplacer si nécessaire |
| Réparabilité | Pile remplaçable par l'utilisateur ; pièces détachées disponibles via SAV Simrad |
| Sécurité | Étanchéité IPX6, arrêt automatique après inactivité (5 minutes) |
| Garantie | 2 ans |
| Contenu de la boîte | Télécommande WR10, pile CR2032, dragonnette, support de fixation, manuel |
| Pays de fabrication | Norvège |
FOIRE AUX QUESTIONS - WR10 SIMRAD
Questions des utilisateurs sur WR10 SIMRAD
0 question sur cet appareil. Repondez a celles que vous connaissez ou posez la votre.
Poser une nouvelle question sur cet appareil
Téléchargez la notice de votre Commande automatique marine au format PDF gratuitement ! Retrouvez votre notice WR10 - SIMRAD et reprennez votre appareil électronique en main. Sur cette page sont publiés tous les documents nécessaires à l'utilisation de votre appareil WR10 de la marque SIMRAD.
MODE D'EMPLOI WR10 SIMRAD
Content of standard package


1 WR10 Wireless Autopilot Controller
2 AAA batteries
1 BT-1 Bluetooth Base Station
1 Micro-C drop cable 1.8 m (6 ft)
3 Lanyard straps (1 for each brand) + 1 carabiner clip
Accessories

Wrist strap (000-12360-001)
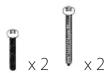
Kit for pole mounting:
2 pcs. M4 30 mm stainless steel Phillips head mounting screws (081-0008-11)
2 pcs. No. 6x 1.5 Phillips head bolts (083-0011-15)
Dash mount gasket (074-1253-000)


Mount Pole Cone (072-2970-000)
Pole mount locking nut (037-0105-00)

Micro-C drop cable 1,8 m (6 ft) (003-7872-00)
Micro-C T-Joiner (037-0491-01)

C€0980
Specifications
Base station
| Dimensions ∅ 90 mm, H 38 mm (∅ 3.54" H 1.50") | |
| Power supply and interface 9-16 V DC via Micro-C network | |
| Power consumption <100 mA at 12 V DC | |
| Temperature Operating: -25°C to +60°C, Storage: -40°C to +85°C | |
| Humidity 66°C, 95% RH, 18 hrs | |
| Environmental protection IPx7 | |
| In-rush current 2 A for 20 ms (@ internal 5 V) | |
| Connection cable: Micro-C drop cable 1.8 m (6 ft) | |
| Signal wire gauge 24 AWG | |
| Power wire gauge 22 AWG | |
| Power wire resistance 5.7 ohms per 100 meters | |
| Maximum current 3 A | |
| Connector | Micro-C T-Joiner |
| Remote controller | |
| Dimensions | H 72.64 mm, W 41.58 mm, D 22 mm, Weight: |
| Power supply | 2 AAA batteries |
| Temperature Operating: -20°C to +55°C, Storage: -30°C to +70°C | |
| Humidity 66°C, 95% RH, 18 hrs | |
| Environmental protection IPx6, IPx7 | |
| Operation | 5 buttons |
| Communication | Bluetooth via Base station, range >30 m |
| Mounting | Lanyard strap or wrist mounted |
| Brand | Supported autopilot systems |
| Simrad | NAC-1, AC12, AC42, SG05 |
| Simrad Pro | AC70 |
| Lowrance | Outboard Pilot |
| B&G | H5000, Triton |
LOWRANCE
SIMRAD
B&G
WR10 Wireless Autopilot Controller and BT-1 Bluetooth Base Station
Quick Reference Guide


natural_image
White Bluetooth Smart device with logo on top (no additional text or symbols visible)Dimensional drawings


Mounting location of base station
- Avoid installing the base station behind other electrical and electronic devices, as they may interfere with the signal and consistency of wireless communication.
- The base station should be at least 2 meters away from any other Bluetooth or wireless LAN (WiFi) transceiver.
- It is advisable to check Bluetooth connection throughout the boat by pairing the unit before permanently mounting the base station.

Pairing a remote to the base station
First, make sure that:
- the batteries in the remote are not low.
- the remote and the base station are placed as close together as possible.
- the AP system is OFF or in standby.
Then continue to:
- Remove power from the base station.
- Press and hold the buttons MODE and STBY on the remote for at least 5 seconds until a single quick green LED flashes. The remote is now in Discoverable mode and will stay in this mode for 60 seconds or until base station asks to pair.
- Power up base station. For the first 10 seconds, the base station will search for Discoverable remotes.
- Wait till remote quickly flashes the green LED every second, indicating that the base station is asking to pair.
-
Press the AUTO button for at least 1 second to start the pairing.
-
When successfully paired: The green LED will stay on for 2 seconds.
- When pairing failed: The red LED will stay on for 2 seconds.
Use of Lanyard strap or wristband

natural_image
Top-down line drawings of car components including suspension, steering wheel, and battery pack (no text or symbols)
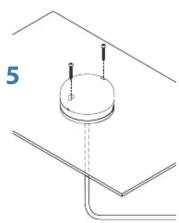
Surface mount the base station
1

3

natural_image
Pure technical diagram showing a circular component with two vertical pins and a dashed line, no text or symbols present.2

4

Wiring the base station

| A | 1.8 m (6 ft) Micro-C drop cable (male to female) |
| B | Micro-C T-Joiner |
| C | Micro-C backbone |
Add/replace batteries
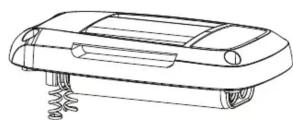
WR10 Wireless Autopilot Controller operates on 2 AAA batteries. Remove the cover to add or replace the batteries.


Operation
| Keys and LED | Action | Mode: | Auto | Standby | Wind | NoDrift |
| < Left arrow Port or> Right arrow Starboard | Short press: Adjust 1° to Port/Starboard i.e. heading in Auto mode, course in NoDrift mode and wind angle in Wind mode. | √√√ | ||||
| Long press (2s): Adjust 10° to Port/Starboard i.e. heading in Auto mode, course in NoDrift mode and wind angle in Wind mode. | √√√ | |||||
| < Left arrow +> Right arrow | Autotack (in Wind mode), press and hold until LED is flashing green rapidly, then press AUTO to confirm. | √ | ||||
| STBY Place the autopilot into Standby mode. √√√ | ||||||
| MODE Changes the autopilot mode: | ||||||
| 1. Boats set to SAIL: Toggles AUTO and WIND modes. √√ | ||||||
| 2. Other boat types: Toggles AUTO and NoDrift modes. | √ | √ | ||||
| AUTO | Engages the autopilot into AUTO mode. | √ | √ | √ | ||
| LED* | Green for 1s indicates message acknowledged. Red for 1s indicates message is either rejected or not acknowledged. | √ | √ | √ | √ | |
| Green rapid flashes for up to 10s, followed by solid green for 1s. Red for 1s indicates message is either rejected or not acknowledged. | √ | |||||
* Note: In addition to the LED behaviour specified: Red will flash for 1s every 10s when battery level is low.
Marque : SIMRAD
Modèle : WR10
Catégorie : Commande automatique marine