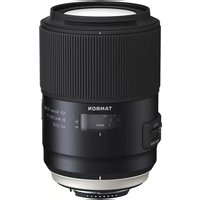
F004 - Objectif TAMRON - Notice d'utilisation et mode d'emploi gratuit
Retrouvez gratuitement la notice de l'appareil F004 TAMRON au format PDF.


| Type de produit | Objectif zoom téléobjectif |
| Marque | Tamron |
| Modèle | F004 |
| Monture | Canon EF / Nikon F / Sony A (selon version) |
| Distance focale | 70-200 mm |
| Ouverture maximale | f/2,8 |
| Ouverture minimale | f/32 |
| Stabilisation d'image | Oui, VC (Vibration Compensation) |
| Moteur autofocus | USD (Ultrasonic Silent Drive) |
| Diamètre du filtre | 77 mm |
| Poids | Environ 1470 g |
| Dimensions (Diamètre x Longueur) | 88 mm x 197 mm |
| Distance minimale de mise au point | 1,3 m |
| Angle de champ (plein format) | 34°21' - 12°21' |
| Construction optique | 23 éléments en 17 groupes |
| Nombre de lamelles de diaphragme | 9 (circulaires) |
| Alimentation | Via le boîtier de l'appareil photo |
| Fonctions principales | Zoom téléobjectif, stabilisation VC, autofocus silencieux, mise au point manuelle à tout moment |
| Entretien et nettoyage | Nettoyer les lentilles avec un chiffon microfibre sec. Éviter les solvants. Ranger dans un endroit sec à l'abri de la poussière. |
| Sécurité | Ne pas exposer à l'humidité, aux chocs ou aux températures extrêmes. Utiliser le pare-soleil pour protéger la lentille avant. |
| Pièces détachées et réparabilité | Contacter le service client Tamron ou un centre agréé pour les pièces détachées et les réparations. |
| Informations générales | Objectif conçu pour les reflex numériques plein format et APS-C. Compatible avec les téléconvertisseurs Tamron. |
FOIRE AUX QUESTIONS - F004 TAMRON
Questions des utilisateurs sur F004 TAMRON
0 question sur cet appareil. Repondez a celles que vous connaissez ou posez la votre.
Poser une nouvelle question sur cet appareil
Téléchargez la notice de votre Objectif au format PDF gratuitement ! Retrouvez votre notice F004 - TAMRON et reprennez votre appareil électronique en main. Sur cette page sont publiés tous les documents nécessaires à l'utilisation de votre appareil F004 de la marque TAMRON.
MODE D'EMPLOI F004 TAMRON
TAMRON
SP90mm F/2.8 Di MACR01:1 VC USD
(for Nikon, Canon)
SP90mm F/2.8 Di MACR01:1 USD
(for Sony *Models without the VC)
Model: F017


* F017: This model is Built-in Motor


* Common with the Konica Minolta α mount.



* The C€ Marking is a directive conformity mark of the European Community (EC).
* Das €-Zeichen entspricht der EC Norm.
* La marquage C€ est un marquage de conformité à la directive CEE (CE).
* La marca C€ es marca de conformidad según directiva de la Comunidad Europea (CE).
* Il marchio C€ attesta la conformita alla directtiva della Comunità Europea (CEE).
* CC 标志表示符合欧州共同体(EC)指标

Thank you for purchasing the Tamron lens as the latest addition to your photographic equipment. Before using your new lens, please read the contents of this Owner's Manual thoroughly to familiarize yourself with your lens and the proper techniques for creating the highest quality images possible. With proper handling and care, your Tamron lens will give you many years of photographing beautiful and exciting pictures.

- Explains precautions that help to prevent problems.

- Explains things you should know in addition to basic operations.
NOMENCLATURE (Refer to Fig. 1, if not specified)
① Lens hood ② Hood attaching alignment mark
③ Hood attaching indicator ④ Filter ring
⑤ Hood attaching bayonet ring ⑥ Focusing ring
⑦ Distance scale ⑧ Distance index
⑨ VC (Vibration Compensation) switch
⑪ Focus limiter ⑫ Lens attachment mark
⑬ Lens mount/Lens mount contacts
SPECIFICATIONS
| F017 | |
| Focal Length 90 mm | |
| Maximum Aperture F/2.8 | |
| Angle of View 27°2' | |
| Optical Construction 11/14 | |
| Minimum Object Distance 0.3 m (11.8") | |
| Maximum Magnification Ratio 1:1 | |
| Filter Size ø | 62 mm |
| Length/Overall Length | 114.5 mm (4.5")/122.9 mm (4.8")* |
| Maximum Diameter ø | 79 mm (3.1") |
| Weight | 600 g (21.2 oz)* |
| Lens Hood | HF017 |

- * values are specifications of Nikon products. Length: Distance from the lens front extremity to the mount surface.
Overall length: Distance from the lens front extremity to the rear projection extremity. Features and appearance of lenses listed in this owner's manual are subject to change without notice.
ATTACHING AND REMOVING THE LENS
■How to mount the lens
Removing the rear cap of the lens. Align the Lens attachment mark ⑫ on the lens barrel with its counterpart on the camera mount and insert the lens.
Rotate the lens clockwise until it click-locks. For Nikon models, align the lens attachment mark with the dot on the camera and rotate the lens counter-clockwise until it click-locks.
■How to detach the lens
Pressing the lens release button on the camera down, turn the lens counter-clockwise (in case of Nikon lens, clockwise), and lift the lens off the camera's lens mount.

- Ensure that the camera is turned off when attaching or removing the lens.

- For further details, please read the instruction manual of your camera.
FOCUSING (Autofocus) and using the full-time manual function
In case of a Nikon or Canon camera, switch the AF/MF switch ⑩ on the lens to AF (Fig. 3). In case of a Nikon camera with the focus mode selector dial, set the focus mode to S, C or A, and then set the AF/MF switch ⑩ on the lens to AF. Press the shutter button halfway down while viewing through the camera's viewfinder, the lens focuses automatically. An in-focus mark will light when lens focuses on the main subject sharply. Press the shutter button further to photograph.
In case of a Sony camera, switch the AF/MF switch ⑩ on the lens to AF (Fig. ③), and set the focus mode on the camera to Auto focus (AF). Press the shutter button halfway down while viewing through the camera's viewfinder, the lens focuses automatically. An in-focus mark will light when lens focuses on the main subject sharply. Press the shutter button further to photograph.
Using the full-time manual function
F017 is equipped with the full-time manual function.
The full-time manual function is a function that the focus can be fine-tuned by the manual focus without switching the AF/MF changing switch when taking a picture of auto focus.
- How to use the full-time manual function
First, set the focus mode to "AF".
You can adjust focus manually while turning the focus ring in the shutter button is pressed lightly.

- The distance scale ⑦ is marked for guidance purposes. The actual focal point may slightly differ from the distance marked on the focal length index.

- For further details, please read the instruction manual of your camera.
FOCUSING (Manual Focus) (Ref. Figs. 1, 2 & 4)
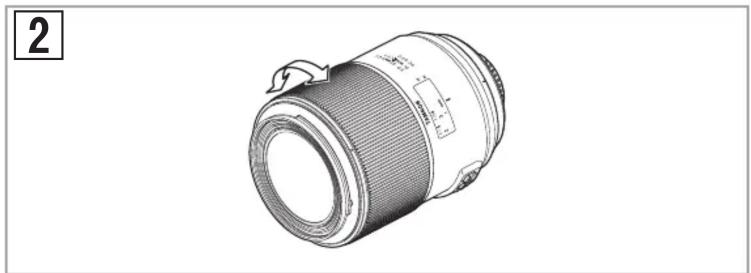
In case of a Nikon or Canon camera, switch the AF/MF switch ⑩ on the lens to MF (Fig. 4). Focus manually rotating the focusing ring ⑥ while viewing through the camera's viewfinder (Fig. 2). The main subject in the viewfinder will be sharp when the lens is focused correctly. In case of a Sony camera, switch the AF/MF switch ⑩ on the lens to MF (Fig. 4), and set the focus mode on the camera to Manual focus (MF). Focus manually rotating the focusing ring ⑥ while viewing through the camera's viewfinder (Fig. 2). The main subject in the viewfinder will be sharp when the lens is focused correctly.

- Even in the MF mode, when turning focusing ring ⑥ while pressing the shutter button halfway, the focus aid function lamp lights up when the picture is in focus.
- At infinity, make sure the image in the viewfinder appears sharp. The infinity position is made with certain allowances to insure proper focus under a variety of conditions.
- For further details, please read the instruction manual of your camera.
VC MECHANISM (Ref. Figs. 1, 5 & 6) (Mounted for Nikon and Canon models)
VC (Vibration Compensation) is a mechanism which reduces the image blur caused by hand-held shooting.
■How to use VC mechanism
1) Set the VC switch ⑨ on.
*When VC is not used, set the switch off.
2) Press the shutter button halfway to verify the effect of the VC.
When the shutter button is pressed down halfway, it takes about 1 second for the VC to provide a stable image.
■ The VC can be effective for hand-held shots under the following conditions.
- Dimly lit locations
- Scenes where flash photography is forbidden
- Situations where your footing is uncertain
• Taking panning shots of a moving subject
■The VC may not be able to give full effect in the following cases:
- When a photograph is taken from a fast moving vehicle
- Shooting during the excessive movement of the camera
- When taking photographs using a tripod
- Turn the VC switch OFF when taking pictures with the bulb setting or during long exposures. If the VC switch is ON, the VC mechanism may introduce errors.

- With the VC mechanism, there are occasions that the image in the viewfinder blurs right after the shutter button is pressed down halfway, but this is not a malfunction.
- When the VC is ON, the number of images recordable is reduced due to the power used from the camera.
- When the VC is ON, immediately after the shutter button is pushed halfway down and approximately 2 seconds after a finger releases the shutter button, the camera will "click". This sound is the VC's locking mechanism activating, not a malfunction.
- Turn the VC switch OFF when using tripod.

- When the lens is removed from the camera while VC is activating, the lens may make clicking sound when the lens is subjected to a jolt. This is not a malfunction.
- The VC activates while the “release” button is pushed halfway down. (It is activated 2 seconds after the shutter button is released)
- VC can be used in AF or MF mode.
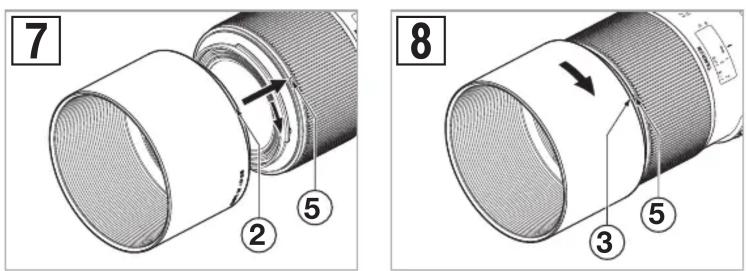
LENS HOOD (Ref. Figs. 1, 7 to 9)
A bayonet-type lens hood (referred to as “hood” below) is provided as standard equipment. We recommend shooting with the hood attached whenever possible as the lens hood eliminates stray light, which is harmful to the picture. However, please be aware of the precautions stated in the next section when your camera is equipped with a built-in flash.
■ Attaching the Lens Hood (Ref. Figs. 7 & 8)
Align Hood attaching alignment mark ② on the hood with the corresponding index mark ⑤ or the top of the index line of the distance scale on the lens. Press the hood lightly onto the hood attaching bayonet ring (Fig.7) and then rotate it clockwise to secure (Fig.7). The lens hood will be secure when the mark is at the top (Fig.8). When attaching the lens hood, hold the focus and zoom control rings so that they are not rotated unintentionally.
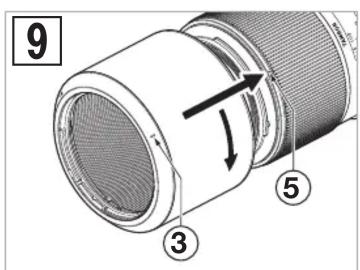
■ Stowing lens hood on the lens (Ref. Fig. 9)
1) Reverse the lens hood. Point the lens toward the opening, then align the hood attaching index ⑤ on the lens with the alignment on the hood attaching indicator ③.
2) Turn the hood clockwise until the alignment mark (●) is at the top to set it. (Fig. 9)
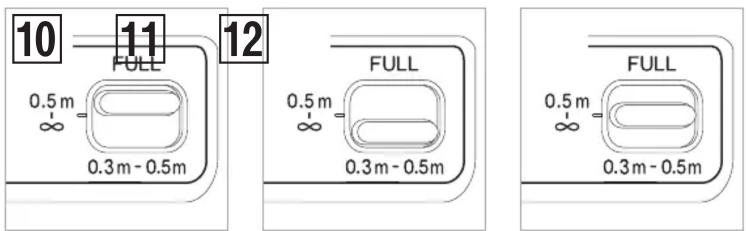
USING THE FOCUS LIMITER (Ref. Figs. 10 to 12)
When autofocus is set, the focusing operation can be accelerated by setting the focus limiter switch.
■ For the maximum close-up to infinity range (Ref. Fig. 10)
Set the focus limiter switch to "FULL".
■ For the close-up range (0.3 m to 0.5 m) (Ref. Fig. 11)
Set the focus limiter switch to "0.3m-0.5m"
■ For normal photos outside the close-up range (0.5 m to infinity) (Ref. Fig. 12)
Set the focus limiter switch to "0.5m-∞"
PRECAUTIONS IN SHOOTING
- The optical design for Di takes into consideration the various features of digital single reflex cameras. However, due to the configuration of the digital single reflex cameras, even when the autofocus accuracy is within specifications, the focal point may be a little forward or behind the optimum point when shooting with autofocus under some conditions.
- When the built-in flash on the camera is used, adverse photographic phenomena such as corner illumination fall-off or vignetting at the bottom part of the image may be observed, especially in close-up range. This is due to the inherent limitation of the coverage of the built-in flash, and/or the relative position of the flash to the edge of the lens barrel or lens hood which causes shadows on the image. Always use the built-in flash with the hood removed. It is strongly recommended to use a suitable separate flash unit provided by the camera manufacturer for all flash photography, even when using the camera with the hood removed. For further details, please read the “built-in flash” article on the instruction manual of your camera.
- Certain camera models may indicate the maximum and minimum aperture values of the lens in approximate numbers. This is inherent to the design of the camera and not an indication of an error.
- Using with a mirrorless interchangeable-lens camera will not be guaranteed.
TO ENSURE LONG-TERM SATISFACTION
- Avoid touching the glass element surface. Use a photographic lens cloth or blower to remove dust from the lens element surface. When not using the lens, always place a lens cap on it for protection.
- Use a lens cleaning tissue or lint cloth with a drop of cleaning solution to remove fingerprints or dirt on the glass lens surface with a rotary motion from the center to the edge.
- Use a silicon cloth to clean your lens barrel only.
- Mildew is an enemy of your lens. Clean the lens after shooting near water or in any humid place. Store your lens in a clean, cool and dry place. When storing the lens in an lens case, store it with commercially available drying agent such as silicagel, and change the agent occasionally. If you find mildew on your lens, consult an authorized repair shop or nearby photographic store.
- Do not touch the lens-camera interface contacts since dust, dirt and/or stains may cause a contact failure between the lens and camera.
- When using your equipment [camera(s) and lens(es)] in an environment where the temperature changes from one extreme to the other, make sure to put your equipment temporarily in a case or a plastic bag for a length of time in order for the equipment to go through a gradual temperature shift. This will reduce potential equipment trouble.

Disposal of Electrical and Electronic Equipment in Private Households. Disposal of used Electrical & Electronic Equipment (Applicable in the European Union and other European countries with separate collection systems)
This symbol indicates that this product shall not be treated as household waste. Instead it shall be collected separately for the recycling of electrical and electronic equipment.
If the new products are purchased, this product might be handed over to the distributor or the collection system of waste electrical and electronic equipment eventually.
By ensuring this product is disposed of correctly, you will help prevent potential negative consequences for the environment and human health, which could otherwise be caused by inappropriate waste handling of this product or components of this product.
If this product is disposed illegally, it might cause a possibility of penalties. For more detailed information about recycling of this product, please contact your local Civic Office, your household waste disposal service or the shop where you purchased the product.
- TAMRON
- SP90MM F/2.8 DI MACR01:1 VC USD
- SP90MM F/2.8 DI MACR01:1 USD
- NOMENCLATURE (REFER TO FIG. 1, IF NOT SPECIFIED)
- ATTACHING AND REMOVING THE LENS
- HOW TO MOUNT THE LENS
- HOW TO DETACH THE LENS
- FOCUSING (AUTOFOCUS) AND USING THE FULL-TIME MANUAL FUNCTION
- USING THE FULL-TIME MANUAL FUNCTION
- FOCUSING (MANUAL FOCUS) (REF. FIGS. 1, 2 & 4)
- VC MECHANISM (REF. FIGS. 1, 5 & 6) (MOUNTED FOR NIKON AND CANON MODELS)
- HOW TO USE VC MECHANISM
- THE VC CAN BE EFFECTIVE FOR HAND-HELD SHOTS UNDER THE FOLLOWING CONDITIONS
- THE VC MAY NOT BE ABLE TO GIVE FULL EFFECT IN THE FOLLOWING CASES
- LENS HOOD (REF. FIGS. 1, 7 TO 9)
- ATTACHING THE LENS HOOD (REF. FIGS. 7 & 8)
- STOWING LENS HOOD ON THE LENS (REF. FIG. 9)
- USING THE FOCUS LIMITER (REF. FIGS. 10 TO 12)
- FOR THE MAXIMUM CLOSE-UP TO INFINITY RANGE (REF. FIG. 10)
- FOR NORMAL PHOTOS OUTSIDE THE CLOSE-UP RANGE (0.5 M TO INFINITY) (REF. FIG. 12)
- PRECAUTIONS IN SHOOTING
- TO ENSURE LONG-TERM SATISFACTION
Marque : TAMRON
Modèle : F004
Catégorie : Objectif