Robotic Vacuum RV351 - Aspirateur Easy Home - Notice d'utilisation et mode d'emploi gratuit
Retrouvez gratuitement la notice de l'appareil Robotic Vacuum RV351 Easy Home au format PDF.


| Type de produit | Aspirateur robot |
| Marque | Easy Home |
| Modèle | Robotic Vacuum RV351 |
| Dimensions (diamètre x hauteur) | Environ 30 cm x 7 cm |
| Poids | Environ 2 kg |
| Alimentation | Batterie lithium-ion rechargeable |
| Autonomie | Environ 90 minutes |
| Temps de charge | Environ 4-5 heures |
| Capacité du bac à poussière | Environ 300 ml |
| Fonctions principales | Nettoyage automatique, programmation hebdomadaire, détection de obstacles, retour automatique à la base |
| Modes de nettoyage | Aléatoire, en spirale, le long des murs |
| Capteurs | Anti-chute, anti-collision, capteurs de poussière |
| Niveau sonore | Environ 55 dB |
| Entretien et nettoyage | Vider le bac après chaque utilisation, nettoyer les brosses tous les 15 jours, remplacer le filtre tous les 3 mois |
| Sécurité | Capteurs anti-chute pour éviter les escaliers, arrêt automatique en cas de surchauffe |
| Pièces détachées et réparabilité | Filtres, brosses latérales, roues, batterie disponibles |
| Garantie | 2 ans |
FOIRE AUX QUESTIONS - Robotic Vacuum RV351 Easy Home
Questions des utilisateurs sur Robotic Vacuum RV351 Easy Home
0 question sur cet appareil. Repondez a celles que vous connaissez ou posez la votre.
Poser une nouvelle question sur cet appareil
Téléchargez la notice de votre Aspirateur au format PDF gratuitement ! Retrouvez votre notice Robotic Vacuum RV351 - Easy Home et reprennez votre appareil électronique en main. Sur cette page sont publiés tous les documents nécessaires à l'utilisation de votre appareil Robotic Vacuum RV351 de la marque Easy Home.
MODE D'EMPLOI Robotic Vacuum RV351 Easy Home
User Manual
Manual del usuario
WITH QUICK
QUICK START
START GUIDE
CON MANUAL DE
INICIO RÁPIDO
EASY ^® HOME
ROBOTIC VACUUM
ROBOT ASPIRADORA
English .....1
Español .....9
DISTRIBUTED BY • DISTRIBUIDO POR:
ALDI INC., BATAVIA, IL 60510
WWW.ALDI.US
AFTER SALES SUPPORT
SERVICIO POSVENTA 48877


MODEL / MODELO:
RV351
48877
-
11/2017
1
YEAR WARRANTY
AÑO DE GARANTÍA

natural_image
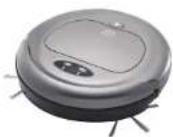
Exterior view of a modern robotic vacuum cleaner (no visible text or symbols)
QR codes take you where you want to go quickly and easily
Whether you require product information, spare parts or accessories, details on warranties or after sales services, or if you want to watch a product demonstration video, our QR codes will take you there in no time at all.
What is a QR code?
A QR code (QR = Quick Response) is a type of matrix that can be read with a smartphone camera and that contains a link to a website or contact details, for example.
Advantage: You do not need to manually enter a website address or contact details.
How it works
To scan the QR code, all you need is a smartphone with QR code reader software and an internet connection.
This type of software can be downloaded for free from your smartphone's app store.
Try it out now
Just scan the QR code with your smartphone and find out more about the ALDI product you have purchased

Contents
Product contents 1
Product features 1
Main unit & accessories ....1
Getting started 2
Cleaning & maintenance 4
Operation 5
Part names ....5
Symbol indicators 6
Schedule setting 6
Troubleshooting 7
Safety precautions 8
Important safety instructions 8
Depending on your smartphone plan you may be charged for the connection.

Product features
- Suitable for hard floor (wood, tile and marble) or carpet.
- One-Click button to switch between single mode or double clean mode.
• Equipped with fall prevention IR sensors.
• Equipped with soft touch sensitive bumper to prevent furniture damage.
• Automatically searches for its charging station when battery is low.
• 3M Filter. - Program robot with a custom cleaning schedule.
Main unit & accessories
Please check the main unit and all accessories before operation.
- Robotic Vacuum
- Charging Station with Scheduling
- Rechargeable Battery Pack
- Power Adapter
- Roller Brush
- Side Brushes
- Filter
- Dustbin
1 Fall prevention sensors
Light sensors prevent the robot from falling down stairs. Minimum step height approx. 8 inches (20 cm).
2 Battery installation
To change the battery, turn off the power switch and install battery pack into the battery compartment located under the unit. Tighten the screw to secure the battery pack.

natural_image
Technical line drawing of a mechanical assembly with gears and housing (no text or symbols)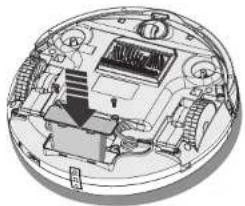
natural_image
Cross-sectional diagram of a computer monitor showing internal components and casing (no text or labels)3 Setting up the charging station
Plug the power adapter into your wall outlet, then into the charging station directly and charge the unit for more than 4.5 hours prior to first operation. The power switch should be TURNED ON when charging. The unit can be charged by power adapter or charging station, the power LED will flash red when charging and will turn off when full charged.
Make sure the charging station is installed correctly with at least 40 inches (102 cm) to one side, 12 inches (30 cm) to the opposing side and no obstructions are in front of the charging station.

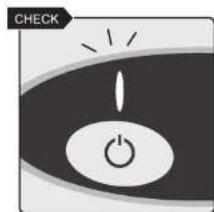
4 Verify the correct functions of the main unit.
natural_image
Simple icon of a power button with an exclamation mark, no text or symbols presentCheck the indicator is lit blue.

Check the wheel spring moves correctly.
natural_image
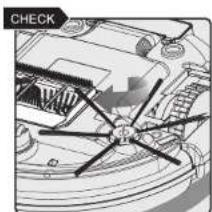
Close-up of a car engine bay with visible blades and hub (no text or symbols)Install the side brushes by inserting the brush into the grooves and use a coin-like item to turn the brush clockwise and lock the brush into place. Do the reverse to uninstall.

Carefully open the vacuum mouth as shown (1) by pushing the "top bar" forwards and pulling upwards as shown (2). Do the reverse to close the vacuum mouth.

Unlock the brush by twisting then removing from the groove. Reinstall by putting back into the groove then locking into place.
5 After pressing the "Power Button", the robot will start cleaning with both vacuum and mopping; Pressing the "Double Clean" button, the robot will clean a second time after a full recharge.

6 Cleaning the dustbin
To clean the dustbin, open the cover of the robot, remove and empty the dustbin as indicated, and clean the filter. Cleaning the dustbin after each use is recommended to maintain optimal suction and prevent bacterial growth, dust or allergen accumulation in the dustbin.

natural_image
Diagram of a mechanical device with rotating components and directional arrows (no text or symbols)Cleaning & maintenance
- To clean the main unit, unplug the unit and wipe with a dry or slightly damp cloth.
-
Thoroughly rinse out the roller brush/side brushes/dustbin by hand under cold running water or lukewarm water until debris/dust is removed. Let it dry for at least 24 hours at room temperature or until they are completely dry.
-
The filter CAN NOT be washed with water.


natural_image
Illustration of a robotic vacuum cleaner performing a manual operation with a tool and mechanical components (no text or symbols)Part names

Symbols and power indicators

Power switch
Turn on the power switch to operate and charge the unit.

Power button
ON -Press the button once to turn the unit ON; the robot activates and enters automatic cleaning mode.
OFF - While the unit is ON, press the button to turn the unit OFF and the robot will stop.

Working - Vacuum
Power LED turns blue.

Charging
Power LED turns flashing red.

Low Battery
Power LED turns red.

Full charged
No display lights.

Double clean button
ON -Press the button once to turn the unit ON; the robot activates and starts cleaning until the battery requires a charge, and the unit will return to its charging station to fully charge then start cleaning a second time.
OFF - While the unit is ON, press the button to turn the unit OFF and the robot will stop.

Working - Double clean
Power LED turns green.

Bin release
Press to open the dustbin cover and access the dustbin.
Schedule setting
SCHEDULE
PM8
ADJUST

O
SCHEDULE
O CLOCK
Setting the clock
-
Press "CLOCK" key to set the clock. The flashing digits will be adjustable. Notice that the "PM indicator" will turn on when the timer is set for the afternoon.
-
Press "ADJUST" key to adjust the clock.
-
Press "CLOCK" again to change the flashing item (hr/min).
-
Repeat steps 1-3, and complete the clock setting.
-
Make sure the screen displays the correct time.
Setting the scheduling
-
Press "SCHEDULE" key to set the scheduling. The flashing digits will be adjustable, and the "SCHEDULE indicator" (on the left of the screen) will flash at the same time.
-
Press "ADJUST" key to adjust the time. When setting minutes, users can only set in 15 minutes increments (00, 15, 30, 45).
-
Press "SCHEDULE" again to change the flashing item (hr/min).
-
Repeat steps 1-3, and complete the scheduling setting.
-
When finished setting, wait until the "SCHEDULE" light turns on; DO NOT press any key before it turns on as doing so may affect the setting.
-
To cancel the scheduling, press "SCHEDULE" key first then "ADJUST" key, and adjust the time until the screen displays "-- : --"; press "SCHEDULE" key again to finish it. The "SCHEDULE" light will turn off once the scheduling is cancelled.
Troubleshooting
Safety precautions
| Problem | Possible Cause | Possible Solution |
| The unit does not start. | The battery pack is completely empty. | Charge the unit and start again. |
| The battery pack is not installed /connected correctly. | Connect the battery pack as shown in Section 3.2. | |
| The power switch is not turned on. | Turn on the power switch when operating. | |
| The unit stops and the power LED turns red. | The battery power is low. | Charge the unit and start again. |
| The wheels/roller brush/side brushes is jammed/stuck. | Remove any dust or debris that may cause jamming of the wheels/roller brush/side brushes. | |
| The filter is not installed and the fan is jammed/stuck. | Remove any dust or debris that may cause jamming of the fan and install the filter. | |
| The error occurred. | Restart the unit. | |
| The unit spins in a circle. | One side of wheels is jammed/stuck. | Remove any dust or debris that may cause jamming of the wheel. |
| The side brushes do not rotate. | The side brushes stop rotating when battery is too low and the left LED is shining red. | Charge the unit and start again. |
| The unit moves backwards. | The fall sensor/bumper is jammed/stuck. | Remove any debris that may cause jamming of the fall sensor/bumper. |
| The unit makes buzzing noise when charging. | The power switch is not turned on. | Turn on the power switch when charging. |

Important safety instructions
- Follow the warnings and instructions in this user's manual to avoid product damage and safety hazards.
- It is an indoor robot, intended for indoor use only. Product damage may occur if not used indoors. If not used for the its intended purpose, the warranty will be voided.
- It is an electronic product. Do not immerse the device in water or rinse it directly with water. When the electronic components come into contact with water, product damage or electric shock may occur.
- Any person or animal standing on or any heavy objects placed on the robot may damage the machine and cause it to stop working. It may also cause harm to the person or animal.
- Keep away from any flammable or corrosive chemicals or detergents when cleaning and storing the machine to prevent fire, electric shock, or damage to the product.
- Do not attempt to repair, remove or adjust any mechanical or electronic functions of the machine without authorization. Any changes made to these functions can be dangerous and void your warranty.
- Please use the included adapter. Using any other adapters may result in product damage, electric shock or fire. Do not use a damaged power cable, otherwise electric shock or fire may occur.
- Before using the robot, clean up any items on the floor, such as clothes, toys, papers, curtain cords, power cables or fragile items, and make sure the furniture items are orderly arranged. This ensures an obstacle-free path for the robot and improves its cleaning efficiency.
- Remove the battery from the main unit and store it if the product will not be used for a long period of time.
- Please check the battery recycling policies and dispose it accordingly.
Product specifications
Battery | Li-ion 2600mAh 11.1V
Adapter | 15V / 1A UL Level6
Charging time | 4.5 Hrs
Dustbin filter | 3M Filter
Main unit dimensions
295x295x72 mm / 11.7x11.7x2.8 Inches

Los códigos QR le ayudan a encontrar la información que busca fácil y rápidamente
Si busca información sobre el producto, recambios o accesorios, datos sobre garantías o soporte posventa, o si quiere ver un video de demostración del producto, los códigos QR le ayudan a encontrar lo que busca rápidamente.
¿Qué es un código QR?
Un código QR (QR = respuesta rápida) es un tipo de matriz que se puede leer con la cámara de su teléfono inteligente y que contiene, por ejemplo, un enlace a una página web o información de contacto.
Ventaja: No es necesario introducir una dirección web o datos de contacto de forma manual.
Cómo funciona
Para escanear el código QR solo necesita un teléfono inteligente con software que pueda leer códigos QR y una conexión a Internet. Este tipo de software está disponible gratis en la tienda de aplicaciones de su teléfono inteligente.
Pruébelo ahora
Escanee el código QR con su teléfono inteligente para averiguar más sobre el producto ALDI que ha comprado.

Según la tarifa contratada, se le puede cobrar por la conexión.
Contenido
Características del producto 11
Características del producto ....11
Unidad principal y accesorios ....11
Para comenzar 12
Limpieza y mantenimiento ....14
Operación....15
Nombres de las partes ....15
Indicadores y símbolos ....16
Programación de horarios....16
Solución de problemas ....17
Precauciones de seguridad ....18
Instrucciones importantes de seguridad ....18

Características del producto
- Ideal para pisos duros (madera, cerámica y mármol) o alfombra.
- Cambia de modo sencillo a limpieza doble con oprimir un botón.
- Equipado con sensores IR para prevención de caídas.
- Equipado con un tope suave sensible al contacto para evitar daños al mobiliario.
- Busca automáticamente su estación de carga cuando la batería está baja.
- Filtro 3M.
- Programe el robot con un horario de limpieza a su medida.
Unidad principal y accesorios
Verifique la unidad principal y los accesorios antes de utilizarlo.
- Robot aspiradora
- Estación de carga con programación de horarios
- Batería recargable
- Adaptador de alimentación
- Rodillo de limpieza
- Cepillos laterales
- Filtro
- Depósito de suciedad
1 Sensores de prevención de caídas
Sensores de luz que evitan que el robot se caiga por las escaleras. Altura mínima aprox. 8 pulgadas (20 cm).
2 Instalación de la batería
Para cambiar la batería, apague el interruptor de alimentación e instale la batería en el compartimiento que se encuentra debajo de la unidad. Apriete el tornillo para sujetar la batería.
natural_image
Technical line drawing of a mechanical assembly with gears and housing (no text or symbols)
natural_image
Technical diagram of a mechanical device with labeled components (no readable text or symbols)3 Configuración de la estación de carga
Conecte el adaptador de alimentación en el tomacorrientes, y luego directamente en la estación de carga, y cargue la unidad durante más de 4.5 horas antes de usarla por primera vez. El interruptor de alimentación debe estar ENCENDIDO mientras se carga. Puede cargar la unidad con el adaptador de alimentación o con la estación de carga, el LED de encendido parpadeará en color rojo cuando se esté cargando y se apagará cuando esté completamente cargada.
Asegúrese de que la estación de carga esté instalada correctamente, con un espacio libre de al menos 40 pulgadas (102 cm) a un lado, 12 pulgadas (30 cm) del lado opuesto, y sin obstrucciones enfrente de la estación de carga.

4 Verifique que la unidad principal funciona correctamente.
VERIFIQUE
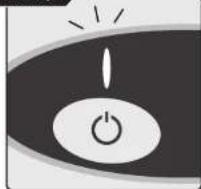
Verifique que el indicador esté encendido en color azul.
VERIFIQUE

Verifique que el resorte de
la rueda se mueve
correctamente.
VERIFIQUE
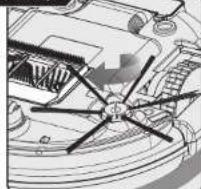
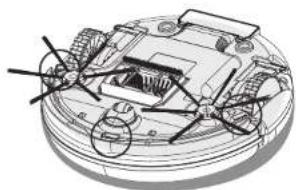
Instale los cepillos laterales, insertando el cepillo en las ranuras y usando una moneda u objeto similar para girar el cepillo en el sentido de las agujas del reloj para sujetarlo en su sitio. Haga lo contrario para quitarlos.
VERIFIQUE
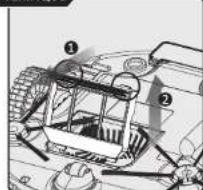
Abra cuidadosamente la boca de la aspiradora como se muestra (1) empujando la "barra superior" hacia adelante y jalando hacia arriba, como se muestra (2). Haga lo contrario para cerrar la boca de la aspiradora.
VERIFIQUE

Libere el rodillo girándolo y sacándolo de la ranura. Para volver a instalarlo, vuelva a colocarlo en la ranura y sujételo en su sitio.
5 Después de oprimir el "botón de encendido", el robot comenzará a limpiar, tanto aspirando como trapeando; Si oprime el botón "Limpieza doble", el robot limpiará dos veces después de una recarga completa.

7 Limpieza del depósito de suciedad
Para limpiar el depósito de suciedad, abra la cubierta del robot, saque y vacie el depósito de suciedad como se indica, y limpie el filtro. Se recomienda limpiar el depósito de suciedad después de cada uso para mantener una succión óptima y evitar el crecimiento bacteriano y la acumulación de polvo y alérgenos en el depósito.

natural_image
Diagram of a robotic arm with directional arrows indicating movement (no text or symbols)Limpieza y mantenimiento
- Para limpiar la unidad principal, desconéctela y limpiela con un trapo seco o ligeramente húmedo.
- Enjuague abundantemente el rodillo de limpieza, los cepillos laterales y el depósito de suciedad bajo un chorro de agua fría o tibia, hasta eliminar totalmente los residuos y el polvo. Deje secar al menos por 24 horas a temperatura ambiente, o hasta que estén completamente secos.
- El filtro NO se puede lavar con agua.


natural_image
Illustration of a hand cleaning a circular object and a tool with a tool, both without any text or symbols.Nombres de las partes

Símbolos e indicadores de encendido
- 01 Interruptor de alimentación Coloque el interruptor de alimentación en posición de encendido para operar y cargar la unidad.
Botón de encendido
ENCENDIDO
Oprima el botón una vez para ENCENDER la unidad; el robot se activa y entra en modo de limpieza automática.
APAGADO
Cuando la unidad está ENCENDIDA, oprima el botón para APAGAR la unidad y el robot se detendrá.
En funcionamiento - Aspiradora El LED de encendido se pone azul.
Cargando
El LED de encendido parpadea en rojo.
Batería baja El LED de encendido se pone rojo.
Carga completa
No se enciende ninguna luz.
Botón de limpieza doble
ENCENDIDO
Oprima el botón una vez para ENCENDER la unidad; el robot se activa y empieza a limpiar hasta que la batería necesita cargarse; entonces la unidad volverá a su estación de carga para cargarse por completo y luego empezar a limpiar por segunda vez.
APAGADO
Cuando la unidad está ENCENIDA, oprima el botón para APAGAR la unidad y el robot se detendrá.
En funcionamiento - Limpieza doble El LED de encendido se pone verde.
Desbloqueo del depósito de suciedad
Oprima para abrir la cubierta del depósito de suciedad y obtener acceso al mismo.
Programación de horarios
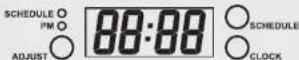
Configuración del reloj
- Oprima "CLOCK" para configurar el reloj. Los números que parpadeen podrán ajustarse. Observe que el "indicador PM" se encenderá cuando configure el temporizador para la tarde.
- Oprima "ADJUST" para ajustar el reloj.
- Oprima "CLOCK" de nuevo para cambiar los números que parpadean (horas/minutos).
- Repita los pasos 1-3 y termine la configuración del reloj.
- Asegúrese de que la pantalla muestra la hora correcta.
Configuración de horarios
- Oprima el botón "SCHEDULE" para configurar horarios. Los números que parpadeen podrán ajustarse, y el indicador "SCHEDULE" al lado izquierdo de la pantalla parpadeará al mismo tiempo.
- Oprima "ADJUST" para ajustar la hora. Al configurar minutos, el usuario sólo puede usar incrementos de 15 minutos (00, 15, 30, 45).
- Oprima "SCHEDULE" de nuevo para cambiar los números que parpadean (horas/minutos).
- Repita los pasos 1-3 y termine la configuración de horarios.
- Cuando termine la configuración, espere hasta que la luz "SCHEDULE" se encienda; NO oprima ningún botón antes de que se encienda, ya que de hacerlo podría afectar la programación.
- Para cancelar la programación, oprima primero el botón "SCHEDULE" y luego el botón "ADJUST" y ajuste la hora hasta que la pantalla muestre "-- : --"; oprima de nuevo el botón "SCHEDULE" para terminar. La luz "SCHEDULE" se apagará cuando canceled la programación.
| Problema | Posible causa | Posible solución |
| La unidad no se enciende. | La batería está completamente descargada. | Cargue la unidad y vuelva a comenzar. |
| La batería no está bien instalada /conectada. | Conecte la batería como se muestra en la Sección 3.2. | |
| El interruptor de alimentación no está encendido. | Coloque el interruptor de alimentación en posición de encendido para operar. | |
| La unidad se detiene y el LED de encendido se pone rojo. | La batería tiene poca carga. | Cargue la unidad y vuelva a comenzar. |
| Las ruedas, el rodillo o los cepillos laterales están atascados/atorados. | Elimine por completo el polvo y los residuos que puedan atascar las ruedas, el rodillo o los cepillos laterales. | |
| El filtro no está instalado y el ventilador está atascado/atorado. | Elimine por completo el polvo y los residuos que puedan atascar el ventilador e instale el filtro. | |
| Ocurrió un error. | Reinicie la unidad. | |
| La unidad se mueve en círculos. | Las ruedas de un lado están atascadas o atoradas. | Elimine por completo el polvo y los residuos que puedan atascar las ruedas. |
| Los cepillos laterales no giran. | Los cepillos laterales dejan de girar cuando la batería está muy baja y el LED de la izquierda se enciende en color rojo. | Cargue la unidad y vuelva a comenzar. |
| La unidad se mueve hacia atrás. | El sensor de caídas o el tope se encuentra atascado/atorado. | Elimine por completo el polvo y los residuos que puedan atascar el sensor de caídas o el tope. |
| La unidad zumba cuando se está cargando. | El interruptor de alimentación no está encendido. | Coloque el interruptor de alimentación en posición de encendido al cargar. |

Instrucciones importantes de seguridad
- Siga las advertencias e instrucciones de este manual del usuario para evitar daños al producto y riesgos de seguridad.
- Se trata de un robot para interiores, diseñado sólo para su uso en interiores. El producto puede sufrir daños si no se utiliza en interiores. Si no se usa para el propósito para el que fue diseñado, la garantía se anulará.
- Se trata de un producto electrónico. No sumerja el dispositivo en agua, ni lo enjuague directamente con agua. Cuando los componentes electrónicos entran en contacto con el agua, pueden ocurrir daños al producto o descargas eléctricas.
- Si una persona, animal u objeto pesado se coloca sobre el robot, puede dañar la máquina y hacer que deje de funcionar. También la persona o animal podrían sufrir lesiones.
- Mantenga lejos de todas las sustancias químicas inflamables o corrosivas y de detergentes cuando limpie y almacene la máquina, para evitar incendios, descargas eléctricas o daños al producto.
- No intente reparar, quitar o ajustar ninguna de las funciones mecánicas o eléctricas de la máquina sin autorización. Todo cambio a estas funciones puede ser peligroso y anular su garantía.
- Por favor, use el adaptador incluido. Usar cualquier otro adaptador puede causar daños al producto, descargas eléctricas o incendios. No use un cable eléctrico dañado, ya que podría causar descargas eléctricas o incendios.
- Antes de usar el robot, quite todos los objetos del piso, como ropa, juguetes, papeles, cordones de cortina, cables eléctricos y objetos frágiles, y asegúrese de que los artículos de mobiliario estén bien acomodados. Esto garantiza una ruta sin obstáculos al robot y mejora su eficiencia para limpiar.
- Quite la batería de la unidad principal y almacénela si no usará el producto durante un período prolongado.
- Verifique las políticas de reciclaje de baterías y deséchela de manera apropiada.
Especificaciones del producto
Batería | Li-ion 2600mAh 11.1V
Adaptador | 15V / 1A UL Nivel6
Tiempo de carga|4.5 Hrs
Filtro del depósito de suciedad | Filtro 3M
Dimensiones de la unidad principal
295x295x72 mm / 11.7x11.7x2.8 pulgadas

ALDI INC. FULL WARRANTY CONDITIONS
Dear Customer:
The ALDI warranty is a full warranty offering you the following benefits:
Warranty period: 1 year from date of purchase.
Costs: Free replacement product or refund.
ADVICE: Please contact our service hotline by phone, e-mail or fax before sending in the device. This allows us to provide support in the event of possible operator errors.
In order to make a claim under the warranty, please send us:
The faulty item with all component parts, the original receipt and the warranty card properly completed.
The warranty does not cover damage caused by:
Accident or unanticipated events (such as lightning, water, fire etc.) Improper use or transport.
Failure to follow the safety and maintenance instructions.
Other improper treatment or modification of the product.
After the expiration of the warranty period, you may wish to have your product repaired at your own expense. You will be notified of the repair costs in advance.
This warranty gives you specific legal rights, and you may also have other rights which vary from state to state but this warranty is not intended to exceed statutory minimum requirements beyond what is included above.
This warranty does not limit the statutory obligation of the seller arising from any implied warranties. The period of warranty can only be extended in accordance with applicable law.
Neither the service company nor ALDI will assume any liability for data or settings stored on any returned product.
CONDICIONES DE LA GARANTÍA COMPLETA DE ALDI INC.
Estimado cliente:
La Garantía ALDI es una garantía completa que le ofrece los siguientes beneficios:
Periodo de garantía: 1 año a partir de la fecha de compra.
Costos: Reemplazo gratis del producto o reembolso.
AVISO: Póngase en contacto con nuestra línea directa de atención por teléfono, correo electrónico o fax antes de retornar el producto. Esto nos permite proporcionar ayuda en caso de posibles errores del operador.
Para hacer una reclamación bajo la garantía, por favor envíenos:
El artículo defectuoso junto con todas las piezas, el recibo de compra original y la tarjeta de garantía completada de manera apropiada.
La garantía no cubre los daños ocasionados por:
Accidentes o eventos imprevistos (por ejemplo, rayos, agua, fuego) Uso o transporte inadecuados.
Incumplimiento de las instrucciones de seguridad y mantenimiento. Otro tratamiento o modificación inadecuados del producto.
Después del vencimiento del período de garantía, tiene la posibilidad de mandar a reparar su producto si usted corre con los gastos. Se le notificará por adelanta-do el costo de reparación.
Esta garantía le otorga derechos legales específicos y es posible que también tenga otros derechos que pueden variar de un estado a otro, pero no tiene como fin exceder los requisitos legales mínimos que aquí se incluyen.
Esta garantía no limita la obligación legal del vendedor derivada de cualquier garantía implícita, El período de garantía solo se puede extender hasta donde lo permita la ley.
Ni la compañía de servicio ni ALDI asumen ninguna responsabilidad por los datos o configuraciones que puedan haberse almacenado en cualquier producto retornado.

Your details:
Name:
Address:
E-mail:
Date of purchase*
*We recommend you keep the receipt with this warranty card
Location of purchase:
Description of malfunction:
Return your completed warranty card together with the faulty product to:
Techko Kobot, Inc.
11 Marconi Street,
Suite A,
Irvine, CA 92618
AFTER SALES SUPPORT 48877
USA 888 883 2456
info@techkokobot.com
MODEL:
RV351
Hotline:
888 883 2456
Phone lines available
Monday - Friday,
11am - 8pm EST

TARJETA DE GARANTÍA

ROBOT ASPIRADORA
Sus datos:
Nombre:
Dirección:

Correo electrónico:
Fecha de la compra*
*Le recomendamos que guarde el recibo con esta tarjeta de garantía.
Lugar de compra:
Descripción de la avería:
Devuelva su tarjeta de garantía completada junto con el producto defectuoso a:
Techko Kobot, Inc.
11 Marconi Street,
Suite A,
Irvine, CA 92618
SERVICIO POSVENTA 48877
USA 888 883 2456
info@techkokobot.com
MODEL:
RV351
11/2017
Línea directa:
888 883 2456
Líneas telefónicas
disponibles
Lunes a viernes,
11am a 8pm EST

FCC Statements
This device complies with Part 15 of the FCC Rules. Operation is subject to the following two conditions:
(1) This device may not cause harmful interference.
(2) This device must accept any interference received, including interference that may cause undesired operation.
Changes or modifications not expressly approved by the party responsible for compliance could void the user's authority to operate the equipment.
Note:
This equipment has been tested and found to comply with the limits for a Class B digital device, pursuant to part 15 of the FCC Rules. These limits are designed to provide reasonable protection against harmful interference in a residential installation. This equipment generates, uses and can radiate radio frequency energy and, if not installed and used in accordance with the instructions, may cause harmful interference to radio communications. However, there is no guarantee that interference will not occur in a particular installation.
If this equipment does cause harmful interference to radio or television reception, which can be determined by turning the equipment off and on, the user is encouraged to try to correct the interference by one or more of the following measures:
- Reorient or relocate the receiving antenna.
- Increase the separation between the equipment and receiver.
- Connect the equipment into an outlet on a circuit different from that to which the receiver is connected.
- Consult the dealer or an experienced radio/TV technician for help.
Declaración de la FCC
Este dispositivo cumple con la Parte 15 de las Normas de la FCC. Su operación está sujeta a las siguientes dos condiciones:
(1) Este dispositivo no puede causar interferencia dañina.
(2) Este dispositivo debe aceptar cualquier interferencia, incluyendo la que pueda causar la operación no deseada del dispositivo.
Los cambios o modificaciones no aprobados explícitamente por la parte responsable del cumplimiento de las normas pueden anular su autorización para operar este equipo.
Nota:
Este producto ha sido probado y se ha determinado que cumple con los límites para un dispositivo digital de Clase B, según los términos de la Parte 15 de las reglas de la FCC. Estos límites están diseñados para ofrecer protección razonable contra interferencia dañana en una instalación residencial. Este equipo genera, usa y puede irradiar energía que genera interferencia de radio y, si no se instala y usa de acuerdo con las instrucciones, puede causar interferencia dañana a las radiocomunicaciones. Sin embargo, no hay garantía de que no ocurrirá interferencia en una instalación específica.
Si este equipo causa interferencia dañina a la recepción de radio o televisión, lo que puede determinarse encendiendo y apagando el equipo, se anima al usuario a que trate de corregir la interferencia tomando una o varias de las siguientes medidas:
- Reoriente o reubique la antena receptora.
- Aumente la separación entre el equipo y el receptor.
- Conecte el equipo en un tomacorriente o circuito diferente a aquel al que está conectado el receptor.
- Consulte al distribuidor o a un técnico experimentado de radio/TV para obtener ayuda.
- User Manual
- Manual del usuario
- ROBOTIC VACUUM
- ROBOT ASPIRADORA
- QR codes take you where you want to go quickly and easily
- What is a QR code?
- How it works
- Try it out now
- Contents
- Product features
- Main unit & accessories
- Fall prevention sensors
- Battery installation
- Setting up the charging station
- Verify the correct functions of the main unit.
- Cleaning the dustbin
- Cleaning & maintenance
- Symbols and power indicators
- Power switch
- Power button
- Working - Vacuum
- Charging
- Low Battery
- Full charged
- Double clean button
- Working - Double clean
- Bin release
- Schedule setting
- Setting the clock
- Setting the scheduling
- Troubleshooting
- Safety precautions
- Important safety instructions
- Product specifications
- Los códigos QR le ayudan a encontrar la información que busca fácil y rápidamente
- ¿Qué es un código QR?
- Cómo funciona
- Pruébelo ahora
- Contenido
- Características del producto
- Unidad principal y accesorios
- Sensores de prevención de caídas
- Instalación de la batería
- Configuración de la estación de carga
- Verifique que la unidad principal funciona correctamente.
- Limpieza del depósito de suciedad
- Limpieza y mantenimiento
- Símbolos e indicadores de encendido
- Botón de encendido
- Botón de limpieza doble
- Desbloqueo del depósito de suciedad
- Programación de horarios
- Configuración del reloj
- Configuración de horarios
- Instrucciones importantes de seguridad
- Especificaciones del producto
- ALDI INC. FULL WARRANTY CONDITIONS
- CONDICIONES DE LA GARANTÍA COMPLETA DE ALDI INC.
- FCC Statements
- Note:
- Declaración de la FCC
- Nota:
Marque : Easy Home
Modèle : Robotic Vacuum RV351
Catégorie : Aspirateur