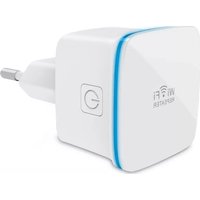
I-WL-REPEATER7 - Répéteur Wi-Fi Techly - Notice d'utilisation et mode d'emploi gratuit
Retrouvez gratuitement la notice de l'appareil I-WL-REPEATER7 Techly au format PDF.


| Type de produit | Répéteur Wi-Fi |
| Marque | Techly |
| Modèle | I-WL-REPEATER7 |
| Dimensions (L x l x H) | 7 x 4 x 3 cm |
| Poids | 50 g |
| Alimentation | Prise secteur directe, 100-240 V, 50/60 Hz |
| Normes Wi-Fi | IEEE 802.11 b/g/n |
| Débit maximal | 300 Mbps |
| Bande de fréquence | 2,4 GHz |
| Antennes | Internes |
| Bouton WPS | Oui |
| Voyants LED | Alimentation, connexion réseau |
| Fonctions principales | Extension de couverture Wi-Fi, répéteur, point d'accès (mode routeur) |
| Entretien et nettoyage | Nettoyer avec un chiffon sec, éviter l'humidité |
| Sécurité | Ne pas exposer à l'eau, utiliser dans un endroit ventilé |
| Pièces détachées et réparabilité | Aucune pièce détachable, appareil non réparable par l'utilisateur |
| Contenu de l'emballage | Répéteur, guide de démarrage rapide |
| Garantie | 2 ans |
FOIRE AUX QUESTIONS - I-WL-REPEATER7 Techly
Questions des utilisateurs sur I-WL-REPEATER7 Techly
0 question sur cet appareil. Repondez a celles que vous connaissez ou posez la votre.
Poser une nouvelle question sur cet appareil
Téléchargez la notice de votre Répéteur Wi-Fi au format PDF gratuitement ! Retrouvez votre notice I-WL-REPEATER7 - Techly et reprennez votre appareil électronique en main. Sur cette page sont publiés tous les documents nécessaires à l'utilisation de votre appareil I-WL-REPEATER7 de la marque Techly.
MODE D'EMPLOI I-WL-REPEATER7 Techly

Mini Wi-Fi AP/Repeater
Quick Installation Guide (Q.I.G)

REV.1
Getting Started
Setting up a Wireless Infrastructure Network
For a typical wireless setup at home (as shown below), please do the following:
Wireless AP Mode
The Device is connected to a wired network
than transforms the wired Internet access
into wireless so that multiple devices can share the Internet.
So this mode is fit for office, home and
places where only wired network is available

Wireless Repeater Mode
The Device is copies and reinforces the
existing wireless signal to extend the
coverage of the signal. This mode is especially useful for a large space to
especially useful for a large space to eliminate signal-blind corners.
So this mode is fit for large house, office
warehouse or other spaces where the
existing signal is weak.

4
Open Source Code
This product includes software codes developed by third parties. These software codes are subject to either the GNU General Public License (GPL), version 2, June 1991 or the GNU Lesser General Public License (LGPL), version 2.1, February 1995. You can copy, distribute, and/or modify in accordance with the terms and conditions of GPL or LGPL.
The source code should be complete, if you want us to provide any additional source code files under GNU General Public License (GPL), please contact us. We are committed to meeting the requirements of the GNU General Public License (GPL). You are welcome to contact us local office to get the corresponding software and licenses. Please inform us your contact details (full address) and the product code. We will send you a CD with the software and license for free.
Please refer to the GNU GPL Web site for further information. http://www.gnu.org/licenses.en.html
Introduction
The Device is mainly used for providing free Wi-Fi service in big area such as factory, community, street, etc. The Device can take an existing 802.11n wireless signal, repeat and extend it to a longer range where it is too far away for the router or access point to reach. The device supports 2.4G wireless network connection, and it can supports 2.4G transmission speeds of up to 300Mbps. It has 2 x Antennas providing even better wireless performance, transmission rates, stability technology automatically avoids channel conflicts using its channel selection feature.
1
Configure the Wi-Fi Repeater Mode
Configure the Wi-Fi Repeater Mode with WPS Button
This is the easiest way to configure the Device. First, check whether your wireless router supports WPS. For further details, please read the operating instructions for your wireless router.

Tips: if you want to keep the stable connection between your router and our repeater at REPEATER mode, Please install our Repeater at a suitable position. You can check the suitable position as the followings: You can check the Wi-Fi signal on your smartphone, if the signal is below 2 levels, we suggest to change the location of our repeater.
- Plug the Device into a wall socket.
- Press the WPS button on the Device for 1-2 seconds. The WPS LED fast
flashing for approx. 2 minutes. - Within these 2 minutes, please press the WPS button of your wireless Router directly for 2-3 seconds. (For further details, please read the operating instruction for your wireless router)
The Device that automatically connect to your wireless router and copies wireless key of the settings. The device Wi-Fi Password same your AP/Router.
After the reboot has been completed, please go to your device WLAN setting, connect to new SS/D.
Wireless Repeater Mode

Wireless AP Mode

Package Contents
Before you starting to use this router, please check if there's anything missing in the package, and contact your dealer of purchase to claim for missing items:
• 1 x Wi-Fi AP/Repeater (the Device)
- 1 x Quick Installation guide
2
You can configure the Wi-Fi Repeater Mode by connecting it with your computer/laptop with RJ45 cable or wirelessly.
A. Configure the Wi-Fi Repeater Mode wirelessly
A1. Plug the device into a wall socket.

A2. Click on the network icon
( or )
of your desktop
You will find the signal from the
Wireless-N. Click on "Connect
then wait for a few seconds.

A3. Open web browser and type
http://192.168.10.1 or
http://ap.setup in the browser
address box. This number is the default IR address for this device

Note: Please check whether the Device accord with factory default settings once you can't entered http://192.168.10.1 or http://ap.setup. If you are still not sure what reasons, you can reset the Device, just need to press the reset button.
6
Hardware overview
Default Parameters
Default IP: 192.168.10.1
Login Password: admin
URL: http://ap.setup
Wi-Fi Key: no
Mini series:
©
Power On LAN/Bus
② LAN Port ③ WBO/PO
WPS /Reset button Press 6 Seconds.
Press 1-2 Seconds, connect to your
WPS for Client connection, not supported
4 Status LED
ON: The Device is power on, working properly
OFF: The Device is not receiving electrical power
Slow Flashing: The Device network is disconnected Fast Flashing: The Device WPS connecting to your AP/Router

Operate Frequency: 2.412G-2.484G
EIRP Power (Max.): <20DBm
3
A4. The login screen below will appear. Enter the Password then click "Login" to login. The default Password is "admin".

A5. After logging in, you will see the web page below, click on the Wizard

7
WN519N2-A说明书中性-V1
尺寸:83x110mm
105铜版彩色,折叠
A6. Click on the Repeater.
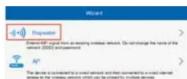
A7. From the list, select a Wi-Fi SSID. After having selected a Wi-Fi SSID, you must then specify the password of your wireless router.
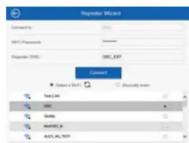
Completing the entry, click on the "Connect" button.
After the reboot has been completed, please go to your device WLAN setting, connect to new Wi-Fi SSID.
B. Configure the WI-Fi Repeater Mode with RJ45 cable.
1. Plug the Device into a wall socket. Connect your computer / laptop with the Device with RJ45 cable.
2. Follow process A3 to A7 to configure the Device.
8
Configure the Wi-Fi AP Mode
Use the AP Mode to obtain a "wireless access point". The wireless end devices will connect to the Device In this mode. You can also use this mode, for example, to make a formerly non-wireless-enabled router wireless-enabled.

1. Plug the Device into a wall socket.
2. Follow process A2 to A5.
3. Click on the AP button

9
The following message will be displayed on your web browser:

| SSID | Wireless SSID of the Device |
| Security type | Setup the wireless security and encryption to prevent from unauthorized access and monitoring.Supports WPA. WPA2. WPA/WPA2 encryption methods. |
| Security key | The "Wi-Fi Password" of the Device |
Click on "Apply" button, the Device will restart
After the reboot has been completed, please go to your device WLAN setting, connect to new Wi-Fi SSID.
10
Management via Web Browser
Wireless Base Configuration
Please follow the following instructions: Click "Wi-Fi -> Wi-Fi Setup" located at the web management interface, the following message will be displayed on your web browser:
You could configure the basic setting or Wireless settings for communication, such as Network Name (SSID) and Channel. The Access Point cart be set simply with only the minimum setting items.
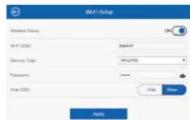
| Wireless Status | Wireless On/Off |
| SSID | Wireless SSID of the Device |
| Security type | Setup the wireless security and encryption to prevent from unauthorized access and monitoringSupports WPA, WPA2, WPA/WPA2 encryption methods |
| Security key | The "Password" of the Device |
Click "Apply" button, The Device will restart.
11
Change Management password
Default password of the device is "admin", and it's displayed on the login prompt when accessed from web browser. There's a security risk if you don't change the default password, since everyone can see it. This is very important when you have wireless function enabled.
To change password, please follow the following instructions: Please click "Setup -> System safety" menu on the web management interface, the following message will be displayed on your web browser:

Click "Apply" button, the Device will log off.
12
Firmware upgrade
The system software used by this router is called "firmware", just like any applications on your computer, when you replace the old application with a new one; your computer will be equipped with new function. You can also use this firmware upgrade function to add new functions to your router, even fix the bugs of this router.
Please click "Setup-> upgrade Firmware" located at the web management interface, and then the following message will be displayed on your web browser:
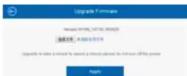
Click "Browse..." or "Choose File" button first; you'll be prompted to provide the filename of firmware upgrade file. Please download the latest firmware file from our website, and use it to upgrade your router.
After a firmware upgrade file is selected, click "Apply" button, and the device will start firmware upgrade procedure automatically. The procedure may take several minutes, please be patient.
NOTE: Never interrupt the upgrade procedure by closing the web browser or physically disconnect your computer from the device. If the firmware you uploaded is interrupt, the firmware upgrade will fail, and you may have to return the device to the dealer or purchase to ask for help.
Warranty voids if you interrupted the upgrade procedure.
How to connect your computer / laptop
with the device
Wireless Base Configuration
- Log on to the computer
- Open Connect to a Network by right-clicking the network icon (or in the notification area.
- Choose the wireless network from the
- Type the network security key or passphrase it you are asked to do so, and then click OK. You'll see a confirmation message when you are connected to the network.

- To confirm that you added the computer, do the following: Open Network by clicking the Start button, and then clicking "Control Panel". In the search box, type "Network", and then, under Network and Sharing Center, click "View network computers and devices". You should see icons for the computer you added and for the other computers and devices that are part or the network.
Note: It you don't see icons in the Network folder, then network discovery and file sharing might be turned off.
14
Adding a wireless computers to the Device with WPS button
This is the easiest way to establish a connection to the AP. First, check whether your end device supports WPS. For further details, please read the operating instructions for your end device.
-
Log on to the computer.
-
Press the WPS button on the device for 2 seconds. The WPS LED now #page for apprev. 3 minutes
-
Within these 2 minutes, please press the connection button (WPS) on your end device. (For further details, please read the operating instructions for your end device.)
Your end device then automatically connects to the Device and applies all of the settings. You should see icons for the computer you added and for the other computers and devices that are part of the network.
Adding a wired (Ethernet) computer to the Device
-
Plug the device to a socket. Connect your computer / laptop to the device with RJ45 cable.
-
To confirm that you added the computer, do the following:
Open Network by clicking the "Start" button, and then clicking "Control Panel". In the search box, type "Network", and then, under Network and sharing center, click "View network computers and devices". You should see icons for the computer you added and for the other computers and devices that are part of the network.

CE With the CE sign, Techly® ensures that the device is complies with the requirements of directives 2014/53/EU.
15
- Getting Started
- Open Source Code
- Introduction
- Configure the Wi-Fi Repeater Mode
- Wireless Repeater Mode
- Hardware overview
- Configure the Wi-Fi AP Mode
- Management via Web Browser
- Wireless Base Configuration
- Change Management password
- Firmware upgrade
- How to connect your computer / laptop
- with the device
- Adding a wireless computers to the Device with WPS button
- Adding a wired (Ethernet) computer to the Device
Marque : Techly
Modèle : I-WL-REPEATER7
Catégorie : Répéteur Wi-Fi