
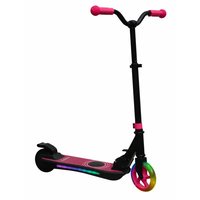
DSC-5000 MK2 - Scooter DENVER - Notice d'utilisation et mode d'emploi gratuit
Retrouvez gratuitement la notice de l'appareil DSC-5000 MK2 DENVER au format PDF.


| Type de produit | Trottinette électrique pliable |
| Marque | Denver |
| Modèle | DSC-5000 MK2 |
| Dimensions (déplié) | 1100 × 500 × 1200 mm |
| Dimensions (plié) | 1100 × 500 × 400 mm |
| Poids net | 12 kg |
| Poids maximum supporté | 100 kg |
| Alimentation | Batterie Lithium-ion 36 V / 7,8 Ah |
| Autonomie maximale | 25 km |
| Temps de charge | 4 à 6 heures |
| Moteur | Moteur sans balais 250 W |
| Vitesse maximale | 25 km/h |
| Pneus | Pneus anti-crevaison 8,5 pouces |
| Freins | Frein à disque arrière et frein électronique |
| Éclairage | Phare LED avant et feu arrière |
| Fonctions principales | Mode marche, mode sport, régulateur de vitesse, affichage LCD |
| Entretien et nettoyage | Nettoyer avec un chiffon humide, éviter les projections d'eau, vérifier la pression des pneus et serrer les vis régulièrement |
| Sécurité | Pliage sécurisé avec verrou, frein à disque, éclairage avant/arrière, réflecteurs |
| Pièces détachées et réparabilité | Disponibles via le service après-vente Denver : batterie, moteur, pneus, poignées, chargeur |
| Informations générales | Utilisation sur terrain urbain, recommandé pour adultes, pliage rapide pour transport |
FOIRE AUX QUESTIONS - DSC-5000 MK2 DENVER
Questions des utilisateurs sur DSC-5000 MK2 DENVER
0 question sur cet appareil. Repondez a celles que vous connaissez ou posez la votre.
Poser une nouvelle question sur cet appareil
Téléchargez la notice de votre Scooter au format PDF gratuitement ! Retrouvez votre notice DSC-5000 MK2 - DENVER et reprennez votre appareil électronique en main. Sur cette page sont publiés tous les documents nécessaires à l'utilisation de votre appareil DSC-5000 MK2 de la marque DENVER.
MODE D'EMPLOI DSC-5000 MK2 DENVER
Original Instruction
DSC-5000MK2
natural_image
Black Denver scooter with wheels and a handle, isolated on white background (no text or symbols visible)facebook.com/denverelectronics
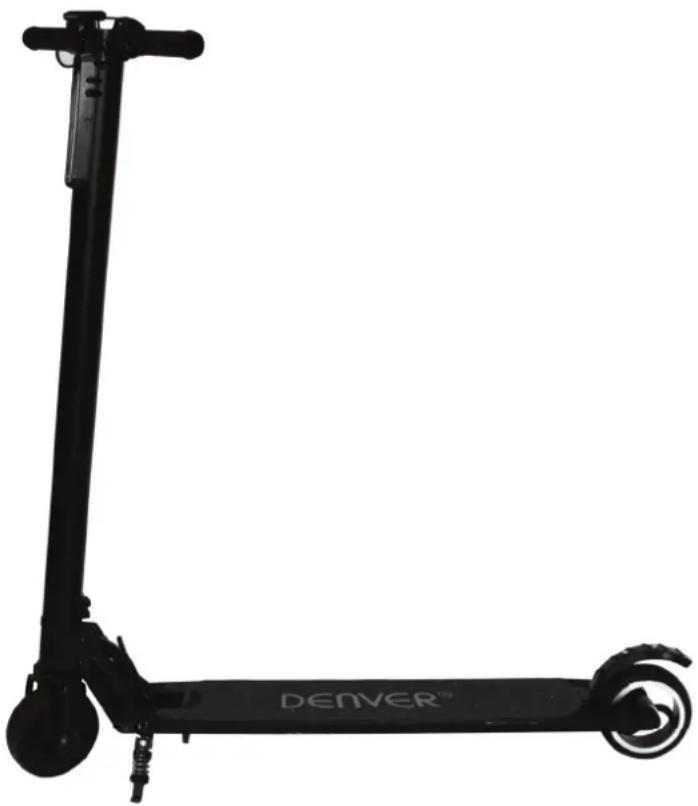
Before operating this vehicle, read all the instructions for safe assembly and operations. User's manual can guide you through the functions and usage of Electric kick scooter. Before using this scooter, familiarize yourself with how to operate, so that you can keep the scooter in the best condition possible.
1. Product and Accessories

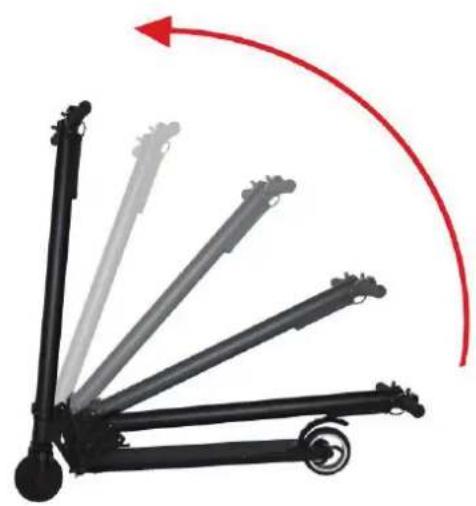
2. Folding steps
- Unfolding:
1) Stand the scooter on its wheels, press the unlock clasp.
2) Raise the handle slowly.
3) Unfolding process finished when you hear the "click".
natural_image
Black mechanical device with multiple arms and wheels, no visible text or symbols- Folding
1) Hold the clasp and pull it outward
2) Press the front tube of scooter downward (Attention: The limit position must be put right.)
3) After a click, folding process finishes.

natural_image
Diagram of a mechanical linkage system with five blades, one highlighted by a red curved arrow (no text or symbols)3. Right and Left Handlebar assembly
1) Parts in side the packaging: two handlebars
2) Assembly methods: Loosen the screw 🎨 on the handlebar, rotate the axle 🔍 to make the meter screen upwards while the 🔍 handlebar and display screen turn inwards in a horizontal level.

Figure (1)
Figure (2)
4. Charger connection
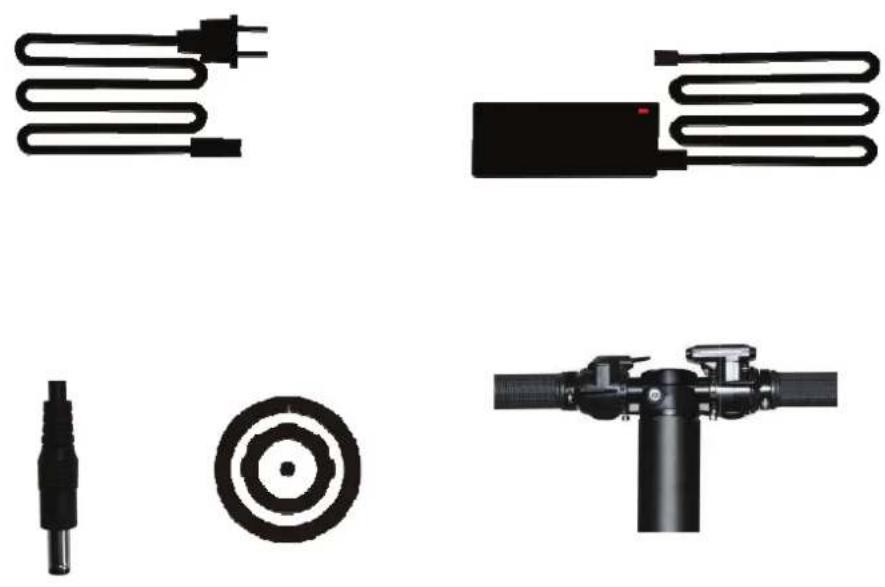
Plug the adapter into the charging port

natural_image
Close-up of a black bicycle steering wheel with a digital display and connector, showing no text or symbols.5. Safety Instruction
We recommend always wearing helmet and protective gear like elbow, knee and wrist protectors to ensure your personal safety.
Also make sure you have read the user manual, to ensure you know how to ride it in a safe and fun way.
Please also pay attention to the rules your country has regarding use of such products. In many countries it is not allowed to ride on public roads and places. Only on closed courts. It is always your own personal responsibility to live up to these rules. Even in countries where there are not any written rules, please keep in mind that you should always ensure your own and others safety.
Also pay attention to other persons. Always ride in a safe way and make sure not to drive faster than you can stop in a safe way. As with all other products like these, there is a risk of falling and hurting yourself. So please make sure to ride it in the safest way possible.
This is not a transport vehicle. More a sport/entertainment kick scooter for having fun.
If lending the kick scooter to friends and family, please make sure they use proper protective gear & know how to ride it.
Before riding the kick scooter, please check that all parts are working as supposed to. If any loose parts, abnormal noise, reduced battery life etc. Please contact the place of purchase about product service and warranty.
6. Daily Maintenance
• Storage and cleaning
If your kick-scooter gets dirty, please clean it with a damp cloth. (you can use a stiff brush first to get the worst dirt off and then use a cloth afterwards to clean it.). It is also possible to use a little toothpaste if the dirt is stuck. Remember to clean with damp cloth after this.
Please make sure to keep the kick scooter turned off while cleaning it, and make sure to cover the charging input to avoid problems with the electronics.
Please notice: Do not use alcohol, gas, kerosene or other corrosive and volatile chemical solvents. This can damage both the appearance and the internal structure of the kick scooter. You may not use pressured water-gun or running water either.
Please store your kick scooter in a dry and cool environment when not in use. Avoid leaving it outdoors, as it is not made for use in wet areas. Nor is it good to expose to high temperatures caused by direct sun for a long time.
- Maintenance of batteries
Please make sure the batteries do not get over 50° Celsius, or under 20° Celsius for a longer period of time. (e.g. don't leave the kick scooter in a hot car in summer, do not put batteries into fire et.) Low temperature (e.g. subzero temperature) can damage the battery cells.
Please avoid draining the batteries 100%. It is best to charge them while there is still power on them. This will extend battery life. Also if riding the kick scooter in cold or very hot areas, the battery time can be lower than when riding in temperatures from 15-25° Celsius. This is not a failure on the batteries, but are normal behavior.
Please notice: Even fully charged batteries will run out of power if the kick scooter is not used for a period of time. Expect between 90 and 120 days in off mode if batteries are fully charged. If only partially charged, this period of time is lower.
Please make sure to charge the batteries before they are 100% out of power, to avoid damaging the battery cells. (damaged battery caused by wrong handling are not covered by warranty)
It is forbidden to disassemble battery package. This is only to be handled by official service repair centers and professionals.
7. Instrument menu
For better operation, please read the instructions carefully.
7.1 Appearance
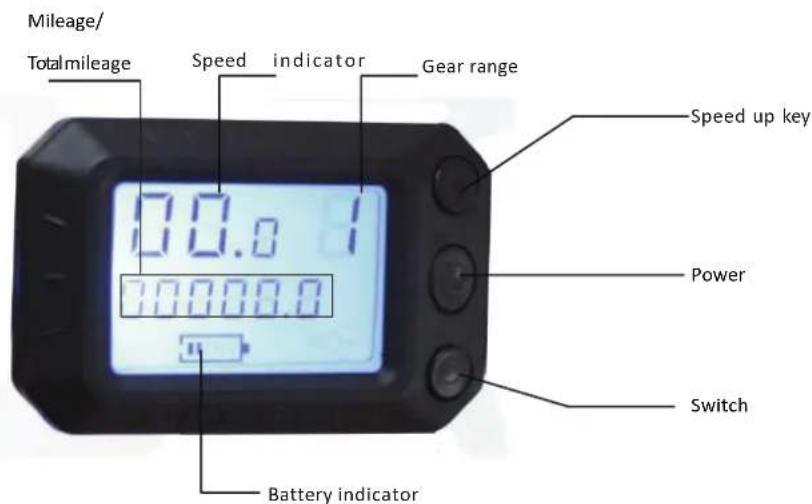
7.2 Keyboard
1) There are 3 instruments: Power on/off key ⏻, switch key ▶, Speed up key ○, the different functional and role exchanged by long press or short press the keys. Press any two keys at the same time will perform other function and role.
2) Battery level and speed is showing the instantaneous status, and changing from time to time. Single mileage and milti mileages etc show as you choose the different keys.
3) When short press ▶ key, each short-press will display the value of this current mileage (KM), Battery voltage (V), motor current value (A), motor speed value (rad / min), total mileage (KM) accordingly.
4) Short press key to change the speed.
5) Long press ⏻, turn on or turn off instrument indicator.
7.3 Operation Instructions
1) Long press instrument ⏻ key, instrument panel display white light, the scooter is on.
2) Push scooter and press the throttle near your right thumb, the scooter starts; continue to press the throttle, the speed increases, loosening the throttle, the speed decreases.
3) The left hand side is the electronic brake, press the electronic brake to execute the brake functions, release the electronic brake to cancel the brake function.
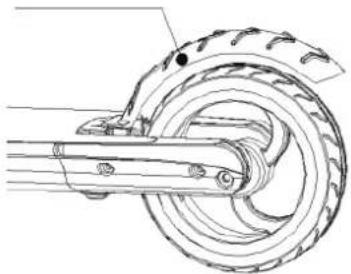
4) Heel touch on the mechanical brake, can implement the mechanical brake, as shown in figure.
5) Long press the instrument ⏻ key, instrument blue light disappears, the scooter power off.
Mechanical brake
natural_image
Technical line drawing of a mechanical assembly with a tire and chain (no text or symbols)Figure (3)
7.4 Parameter Settings
Long press▶ key + ○ at the same time enter to the SET (parameter setting), followed by zero or non-zero start, the motor pole log ratio, wheel diameter settings.
1). Short press ⏻ key, when display 1, enter zero start and non-zero start horizontal setting. When parameter value is 0, it will start with zero. When parameter value is 1, it will start non-zero.
(Zero start: When starting, the scooter in the stationary case, press the switch to start walking.)
(Non-zero start: When starting, the scooter is static, press the switch and the scooter does not work, manually start riding, the scooter works. Factory default is zero start.)
2). Long press ⏻ again to exit the setting state, and save the set parameters.
- Parameter table
| Performance | Item | Parameter |
| Size | Folding size(MM) | 1010*415*245 |
| Developed Size(MM) | 924*415*997 | |
| Carton size (MM) | 1030*175*254 | |
| Quality | Max Load(KG) | 125KG |
| Empty Quality(KG) | 8.0KG | |
| Ride Condition | Age(Year) | 16-50 |
| Height(CM) 130~200CM | ||
| Scooter | Max Speed(KM/H) | 24km/h |
| Endurance(KM) | 12~15km | |
| Max. grade ability | 20° | |
| Terrain | Hardened pavement, flat asphalt pavement, below 20 degrees the ramp, No higher than the 10CM stair, no more than 2CM channel | |
| Battery | Rated voltage(V) | 25.2V |
| Input voltage(V) | 29.4V | |
| Battery capacity(Ah) | 4.0Ah | |
| Motor | Motor Power (W) | 250W |
| Battery Charger | Rated Power (W) | 58.8W |
| Rated input voltage (v) | 110V-240V | |
| Rated output voltage (v) | 29.4 | |
| Rated current (A) | 2A | |
| Charging Time | 2~2.5H | |
WARNING
1.1. The risk of driving
WARNING
Learn how to drive safely before you drive fast on the Escooter.
- Failing, losing control, crashing, including violating the rules in the user's manual can lead to injury.
- Speed and range may differ based on rider weight, terrain, temperature, and driving style.
- Make sure to wear helmet and protective clothing before using the Escooter.
- Make sure to read the manual carefully before using the Escooter.
- Only for use in dry weather.
- We do not recommend the use of any Escooters on public roads
- Please make sure to check with your national laws in your country for usage this product.
1.2. The preparation before operation
Before using, the battery should be fully charged.
1.3. The weight limitation of the operator
The reason of the weight limitation:
• guarantee the safety of the operator;
• decrease the damage of overloading.
Maximum load: 125kg.
WARNING
You should never turn violently when driving fast.
WARNING
When the Escooter enters into the shutdown state, the system will lock down the machine automatically.
It can be unlocked when you press the power button. When the battery has been depleted or the system
gives out information with safety shutdown, please do not continue to drive the Escooter, otherwise, the Escooter cannot drive for the lack of battery.
• The product should only be used in temperatures between -10^ - +45^ .
2. Range per charge
The range per charge is related to many factors, for example:
- Topography: On even roads the range per charge will be increased, on uneven terrain, it will be decreased.
• Weight: The weight of the operator can influence the driving distance.
• Temperature: Extreme temperature will decrease the driving distance. - Maintenance: If the Escooter is charged properly and the battery is kept in good condition, this will maximize the driving distance.
- Speed and driving style: Keeping a steady speed will increase the driving distance, on the contrary, frequent start, stop, acceleration, deceleration will reduce the distance.
3. Safe driving
This chapter will focus on safety, knowledge and warnings. Before operating this vehicle, read all the instructions for safe assembly and operation.
WARNING
Before starting, familiarize yourself with how to operate, so that you can keep the Escooter in the best condition.
- When you are driving the Escooter, make sure that all safety measures are taken. You should be wearing a helmet, knee pads, elbow pads and other protective gear.
- The driver should not wear loose or hanging clothing, shoelaces, etc. that can get caught in the wheels of the Escooter.
- Escooter is only for personal entertainment. You are not allowed to ride it on public streets.
- Escooter is not allowed on the motor vehicle lanes.
• Children, the elderly, pregnant women are not allowed to drive.
- Persons with reduced balancing capacity should not drive the Escooter.
- Do not drive the Escooter under the influence of alcohol or any other substance.
• Do not carry items when driving.
- Please be alert to things in front of you, maintaining good vision will help you drive the Escooter safely.
• In the process of driving, make sure that your feet are always steeping on the pedals.
• Escooter can only carry one person.
- Do not start or stop suddenly.
- Avoid driving on steep slopes.
- Do not drive the Escooter up against a fixed object (f.inst. a wall or other structure) and continue driving the Escooter.
- Do not drive in dimly lit or dark places.
- Driving the Escooter is at your own risk and the company is not responsible for any accidents or damage you may cause.
- Ensure the vehicle speed is safe to yourself and others, and be ready to stop at any time when operating.
- When you are driving the Escooter, please keep a certain distance from each other to avoid collisions.
- When steering you should use your body's center of gravity, the violent shift of center of gravity may cause you to wreck or fall off the Escooter.
- Do not drive when raining or expose the Escooter to other wet conditions. Only to be driven in dry weather.
- Avoid driving on obstacles and avoid snow, ice, and slippery surfaces.
- Avoid driving on items made of cloth, small branches and stones.
- Avoid driving in narrow spaces or where there is an obstacle.
- Jumping on or off the Escooter can and will cause damage that is not covered by warranty. Risk of personal injury. Personal damage or abuse related to “trick riding” is not covered by the company and voids any warranty.
4. Charging steps
• Make sure that the Escooter, the charger and the DC power socket on the Escooter are kept dry.
- Note: ONLY use the supplied charger labelled XHK-916-29420 with the following output voltage to charge this Escooter: 29.4V - 2.0A.
• Using another charger may damage the product or create other potential risks.
- Plug the power adapter into the DC power port of the scooter and a standard power outlet. Make sure the green indicator on the adaptor lights up.
- When the red indicator lights on the charger indicate charging properly, otherwise check if the line is connected properly.
- When the indicator light on the charger changes from red to green, this indicates that the battery is fully charged.
• In this case, please stop charging. Over charging will affect the battery life.
- Charging may take up to 2-3 hours. Do not charge the battery for more than 3 hours. Disconnect the charger from the balance board and the power supply after 3 hours. Overcharging will reduce the lifetime of the battery.
• The product should not be charged over longer periods.
• Never charge the product without supervision.
• The product should only be charged in temperatures between 0^ C - +45°C.
- If charging at lower or higher temperatures, there is a risk that the performance of the battery will be reduced and a potential risk of damage to the product and personal injury.
- Charge and store the product in an open, dry area and away from flammable materials (i.e. materials that may burst into flames).
- Do not charge in sunlight or near open fire.
- Do not charge the product immediately after use. Let the product cool down for one hour before charging.
- If the product is left with other persons for example during a holiday period, it should be partially charged (20-50% charged). Not fully charged.
- Do not remove the product from the packaging, charge it fully and then put it back into the packaging.
- When shipped from the factory, the product has often been partially charged. Keep the product in a partially charged state, until it is going to be used.
• The Escooter must cool down for at least 1 hour before being packed.
- Must not be left inside a warm car sitting in the sun.
CATION
When charging do not ride the Escooter!
- When charging on then the LED light of the battery charger is red color.
- When charging is finished then LED light of the battery charger turns into green color.
- When charging finished unplug the battery charger from the mains power supply and from the Escooter.
WARNING
Only use the DC connector to connect with the DC cable from the charger that comes with the Escooter!
- Do not insert any foreign objects into DC connector!
WARNING
• Always keep the protective cap plugged onto the DC connector!
- Only take off the cap when charging the Escooter!
• After charging finished take out the DC plug and put on the protective cap onto the DC connector again!
WARNING
Make sure that water and other liquids do not enter the internal parts of the Escooter as this may permanently damage the electronics/batteries of the Escooter. There is a risk of personal injury.
WARNING
- To protect user safety, users are forbidden to open the scooter, or you give up your warranty rights
ALL RIGHTS RESERVED, COPYRIGHT DENVER ELECTRONICS A/S
DENVER®
denver-electronics.com

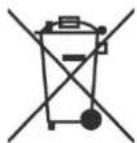

Electric and electronic equipment and included batteries contains materials, components and substances that can be hazardous to your health and the environment, if the waste material (discarded electric and electronic equipment and batteries) is not handled correctly.
Electric and electronic equipment and batteries is marked with the crossed out trash can symbol, seen below. This symbol signifies that electric and electronic equipment and batteries should not be disposed of with other household waste, but should be disposed of separately.
As the end user it is important that you submit your used batteries to the appropriate and designated facility. In this manner you make sure that the batteries are recycled in accordance with legislature and will not harm the environment.
All cities have established collection points, where electric and electronic equipment and batteries can either be submitted free of charge at recycling stations and other collection sites, or be collected from the households. Additional information is available at the technical department of your city.
Imported by:
DENVER ELECTRONICS A/S
Omega 5A, Soeften
DK-8382 Hinnerup
Denmark
facebook.com/denverelectronics
EC Declaration of Conformity (Machinery Directive)
The undersigned
Company Name: DENVER ELECTRONICS A/S
Address: Omega 5A, Soeften, DK-8382 Hinnerup, Denmark
certify that the design and manufacturing of this product
Product Brand Name: DENVER
Product Model No.: DSC-5000MK2
Product type: E-scooter – electric kick scooter
conforms to the following directives:
Machinery directive 2006/42/EC
MD Standards: Annex I of 2006/42/EC, EN ISO 12100:2010, EN 60335-1:2012+A11:2014
and therefore complies with the essential requirements of the Machine Directive.
Name and address of the person authorized to sign the declaration and collect the technical documentation
Serial no.: 10748-07/17/00001 to 10748-07/17/03445
Full Name: Alfred Blank
Position: CEO
Company: DENVER ELECTRONICS A/S
Address: Omega 5A, Soeften, DK-8382 Hinnerup, Denmark
Date: 25 May,2017


- Original Instruction
- Product and Accessories
- Folding steps
- Right and Left Handlebar assembly
- Charger connection
- Safety Instruction
- Daily Maintenance
- Instrument menu
- Appearance
- Keyboard
- Operation Instructions
- Parameter Settings
- WARNING
- The risk of driving
- The preparation before operation
- The weight limitation of the operator
- Range per charge
- Safe driving
- Charging steps
- CATION
- DENVER®
- EC Declaration of Conformity (Machinery Directive)
Marque : DENVER
Modèle : DSC-5000 MK2
Catégorie : Scooter