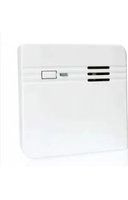
I-ALARM Water Leakage Detector - Détecteur Techly - Notice d'utilisation et mode d'emploi gratuit
Retrouvez gratuitement la notice de l'appareil I-ALARM Water Leakage Detector Techly au format PDF.


| Type de produit | Détecteur de fuite d'eau |
| Marque | Techly |
| Modèle | I-ALARM Water Leakage Detector |
| Dimensions | Environ 6 x 6 x 2 cm |
| Poids | Environ 50 g |
| Alimentation | 2 piles AAA (non incluses) |
| Autonomie des piles | Environ 12 mois (en veille) |
| Détection | Contact direct avec l'eau |
| Alarme | Sonore (85 dB) et visuelle (LED rouge) |
| Indicateur LED | Vert : fonctionnement normal ; Rouge : alarme |
| Portée | Jusqu'à 20 m (son audible) |
| Température de fonctionnement | 0°C à 50°C |
| Humidité de fonctionnement | 10% à 90% HR |
| Matériau du boîtier | Plastique ABS |
| Entretien et nettoyage | Nettoyer avec un chiffon doux et sec. Ne pas utiliser de produits chimiques. |
| Sécurité | Non adapté à une utilisation extérieure. Tenir hors de portée des enfants. |
| Pièces détachées | Non disponibles séparément |
| Réparabilité | Produit non réparable |
| Garantie | 2 ans |
| Contenu de l'emballage | Détecteur, notice d'utilisation |
FOIRE AUX QUESTIONS - I-ALARM Water Leakage Detector Techly
Questions des utilisateurs sur I-ALARM Water Leakage Detector Techly
0 question sur cet appareil. Repondez a celles que vous connaissez ou posez la votre.
Poser une nouvelle question sur cet appareil
Téléchargez la notice de votre Détecteur au format PDF gratuitement ! Retrouvez votre notice I-ALARM Water Leakage Detector - Techly et reprennez votre appareil électronique en main. Sur cette page sont publiés tous les documents nécessaires à l'utilisation de votre appareil I-ALARM Water Leakage Detector de la marque Techly.
MODE D'EMPLOI I-ALARM Water Leakage Detector Techly

Water Leakage Detector

natural_image
Line drawing of a portable electronic device connected to a wall-mounted cable (no text or symbols)www.techly.com
EN
Introduction
This product is a Water leakage detector, using the principle of electrode immersed resistor changes to detect water. The detector adopts MCU intelligent detection, rust-proof metal probe design with advantages of high accuracy and sensitivity, low power consumption, long-term stability and reliability, etc. It can be widely used in all water storage equipment, such as basement, water tank, machine room, water route, water tower, water cellar, pools, water room, solar energy and anywhere to detect water leakage area. Three optional models: Independent/ Network/ Wireless.
Product Profile
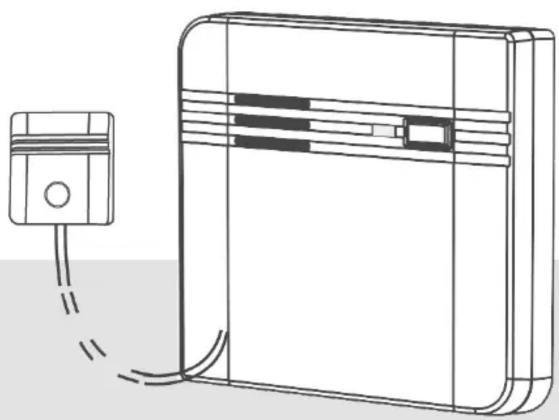
1) LED
2) TEST Button
3) Sensor
(Built-in magnet has absorbed function)

5-PIN connector instruction (Network type only)

Red: DC Power anode
Black: DC Power cathode
White: COM (relay)
Orange: N.O. (relay)
Yellow: N.C. (relay)
Technical Specification
| TypeWireless | ||
| Operating voltage DC3V (2x1.5V AA Alkaline Batteries) | ||
| Static current ≤10uA | ||
| Alarm current ≤40mA ≤50mA | ||
| Alarm indicator Red LED and buzzer sounding | ||
| Fault indicator Yellow LED | ||
| Alarm output 433MHz | ||
| Working Temperature 0-60°C | ||
| Humidity 0-80%RH (no congelation) | ||
| Sound level ≥85db/3M | ||
| Hush time 10 minutes | ||
| Installation | wall mounted or board installed | |
| Dimension | 89*89*28mm (bracket not included) | |
Features
• Rust-proof Metal Probe, Long Service Life
• Sound and Flash Alarm
- Low Power Consumption Design
• Test and Hush Button
- Low Battery Warning
• MCU Processing, Resist False Alarm Efficiently
• SMT Manufacture Technology, Good Stability
Installation Notice
- Install the detector where the water is likely to leak.
- Do not locate the detector in cabinet and other places where the alarm sound can not came out easily.
- Do not install it at the area with rain, oil smoke and steam of cooking range.
- Do not install the detector with submersed water.
Installation Steps
- Attach the mounting bracket on the wall or board firmly with screws.
- Mount the rest of the detector into the bracket.
- Put the probe in the floor where the water is likely to leak. Or use the sensor magnetic adsorption where required detects water.
- Connect the alarm to the power.
Operating Principle
- Insert 2pcs 1.5V AA batteries into the battery cabinet (independent or wireless type). Connect DC9-24V power to 5-pin connector (network type). While the connected DC power or battery voltage is more than 2.4V, the green LED flashes once with buzzer sounding. While the voltage is less than 2.4V, the yellow LED flashes rapidly for 3 times with buzzer sounding. Then the detector comes into normal working status.
- The green LED long lighting under DC power supply. While the operated with batteries, the green LED
flashes once every 25 seconds to indicate the normal power supply.
- Routinely long press the TEST/HUSH button (>2 seconds) for testing to make sure the detector works properly. The red & green LED flashes alternately after 2 seconds with buzzer sounding every 3 sounds paused until release the button. Moreover, the relay works (network type) and send out wireless alarm signal (wireless type) on testing.
- Once the sensor detects leakage water, the red LED flashes rapidly with buzzer sounding every 3 paused to warn the users. Moreover, the relay works and output alarm signal (network type); it will send out wireless alarm signal (wireless type) on alarming.
- During alarming status, long or short press the TEST/HUSH button to enters into mute status. The green LED flashes alternately once every 1 second, the buzzer stop sounding, relay or RF model shut off; The mute status will end automatically in 10 minutes later. If still detects leakage after 10 minutes, the detector will alarm again to warn users.
- Short press the TEST/HUSH button on normal state enter into mute status. The buzzer sounds 'Di' once and green LED flashes every 1 second. While has water, the red & green LED flashes alternate every 1 second, but without any alarm signal, such as sound, relay or RF. Users can mop floor or Wash pool on mute status. Re-press TEST/HUSH button to end up the mute status.
- Under alarming status, no matter long or short press the button, it will goes into mute status. On alarming and mute status, it will cancel mute after long or short pressed the button.
- The battery voltage will be down during usage process. When the battery voltage <2.4V, the detector will give out low battery signal. The yellow LED flashes once every 50 seconds with the buzzer sounding.
- The detector will stop alarm automatically and reset to normal working status after the leakage handled properly.
Register the detector on alarm system
Register the detector in the alarm system Switch to Connection Mode on the control panel, press the test button of the sensor twice. The control pannel beeps once: the detector is registered. If you hear two beeps, the detector has already been connected. To check if the registration is complete, arm the system and trigger the sensor again. If the siren rings out, the registration is successful.
Indications Summary
| IndicationAnalysis | |
| Green LED flashes once with buzzer sounding | The battery (>2.4V) or DC power supply |
| Yellow LED flashes rapidly for 3 times with buzzer sounding | The battery (<2.4V) power supply |
| Green LED flashes constantly Normal | DC power supply |
| Green LED flashes every 25s Normal | battery power supply |
| Red and green LED flashes alternately with buzzer sounding every 3 sounds paused | Testing state, release the button to exit |
| Red LED flashes with buzzer sounding every 3 sounds paused | Alarming state, detects water or touch conductive objects |
| Red and green LED flashes alternately once every 1 second without buzzer sounding | Alarming mute state, long/short press TEST/HUSH button to cancel mute state |
| Green LED flashes once every second without buzzer sounding | Normal mute state, short press TEST/HUSH button to cancel mute state |
| Yellow LED flashes once every 50s with the buzzer sounding | LOW battery warning, the voltage <2.4V, the battery should be replaced |
Emergency Alarm Treatments
Treatments for water leakage alarm:
- Shut of water valves.
- Drain away the water and overhaul the tubes to reduce the economic losses and water wastes caused by leakage water.
Notes
- When the sensor detects water leakage and the detector still sit on alarming state after drain away the water. It may the water residue of probe inside or surface. Dry the water residue on surface with towel to check whether the detector recovers to normal working status. If still on alarming state, take the sensor off and shake the residue water out, dry the surface with towel and installing then.
- Replace the battery timely on low battery warning to ensure the detector works properly,
- Do not store any other subjects on the surface of detector, as this may effect the indication and sounding.
- Test the detector routinely to ensure proper operation. Clean the surface with soft towel regularly.
- Read carefully and install correctly as required in this manual. In case the product is failure, do NOT try to fix it by yourself. Contact with your dealer for replacement.

in compliance with Eu Directive WEEE this product is market with this symbol. It means that used electrical and electronic products should not be mixed with general household waste. There is a
separate collections system for there products in compliance with WEEE directive, otherwise contaminative and hazardous substances can pollute the environment

With CE sign, Techly ensures that the product is conformed to the basic European standards and directives.

Rilevatore di perdite d'acqua
natural_image
Line drawing of a device with a cable and connector, no text or symbols presentwww.techly.com

Introduzione
Questo prodotto è un rilevatore d'acqua, per rilevare l'acqua usa il principio che gli elettrodi immersi modificano le resistenza. Il rilevatore usa un rilevamento intellignete MCU, è dotato di una sonda a prova di ruggine con il vantaggio di un'elevata precisione e sensibilità, basso consumo energetico, stabilità a lungo termine e l'affidabilità Può essere ampiamente usato in tutti gli ambienti a rischio allagamento, come scantinati, seminterrati, sala caldaia e boiler, bagni, lavanderie, cucine, piscine e qualsiasi altro luogo che possa presentare delle perdite o fuori-uscite d'acqua. Tre modelli opzionali: Indipendente/ via rete network/ rete senza fili.
Aspetto del prodotto
1) LED
2) Tasto di test
3) Sensore (con magnete incorporato con funzione di assorbimento)

Istruzioni per connettore 5-PIN (solo versione network)

Rosso: anodo alimentazione DC
Nero: catodo alimentazione DD
Bianco: COM (relay)
Arancio: N.O. (relay)
Giallo: N.C. (relay)
Specifiche tecniche
| TipoWireless | ||
| Voltaggio operativo DC3V (2x) batterie alcaline 1.5V AA) | ||
| Corrente statica ≤10uA | ||
| Corrente allarme ≤40mA ≤50mA | ||
| Indicatore allarme | LED rosso e allarme sonoro tramite cicalino | |
| Indicatore guasto LED giallo | ||
| Uscita allarme 433MHz | ||
| Temperatura d’esercizio 0-60°C | ||
| Umidità 0-80%RH (no congelamento) | ||
| Livello del suono ≥85db/3M | ||
| Tempo di silenzio 10 minuti | ||
| Installazione montaggio a muro | ||
| Dimensioni 89*89*28mm (staffa non incluse) | ||
Caratteristiche
- Sonda a prova di ruggine, lunga durata
- Allarme sonoro e visivo
• A basso consumo energetico
• Tasto di test e di silenzio - Avviso batteria scarica
- Elaborazione MCU, efficiente resistenza ai falsi allarmi
- Tecnologia di fabricazione SMT, buona stabilità
Informazione Installazione
- Installare il rilevatore dove è probabile rilevare delle perdite.
- Non posizionare il rilevatore all'interno di un armadio o in uno spazio dove l'allarme sonoro può venire attutito.
- Non installare l'apparecchio in un area con pioggia, fumo d'olio o vapore del piano di cottura.
- Non installare il sensore con acqua sommersa.
Fasi dell'installazione
- Installare la staffa al muro in modo saldo utilizzando le viti.
- Installare il resto del rilevatore sulla staffa.
- Posizionare la sonda sul pavimento dove è possibile riscontrare la perdita d'acqua.
- Collegare l'allarme all'alimentazione.
Principi di Funzionamento
-
Inserire 2 batterie 1.5V AA nell'apposito alloggiamento (tipo indipendente o wireless) Collegare l'alimentazione DC 9-24V al connettore 5-pin (tipo network). Quando l'alimentatore DC connesso o il voltaggio delle batterie è superiore a 2.4V, il led VERDE lampeggia una volta con l'emissione di un segnale audio dal cicalino. Se il voltaggio è inferiore a 2.4V, il LED giallo lampeggia rapidamente per 3 volte e il cicalino suona. Quindi il rilvatore passa allo stato di funzionamento normale.
-
Il LED verde rimane illuminato con alimentazione DC. Con il funzionamento a batteria, il LED verde lampeggia ogni 25 secondi per indicare la corretta alimentazione.
- Periodicamente premere il tasto TEST/HUSH (>2 secondi) per verificare che il rilevatore funzioni correttamente. I LED rosso e verde lampeggiano alternativamente dopo 2 secondi con il cicalino che ogni 3 suoni rimane in pausa fino al rilascio del pulsante. Inoltre, anche il relè si attiva (tipo network) e invia il segnale di allarme wireless (tipo wireless) per prova.
- Appena il sensore rileva una perdita d'acqua rosso lampeggia rapidamente con il cicalino che ogni 3 allarmi si interrompe per avvisare gli utenti. Inoltre, anche il relè si attiva e invia il segnale di allarme (tipo network); invierà il segnale di allarme wireless (tipo wireless) per avvisare.
- Durante la fase di allarme, premere il tasto TEST/HUSH per accedere alla modalità silenziosa. I LED rosso e verde lampeggiano alternativamente ogni secondo, il cicalino smette di suonare. Lo stato silenzioso terminerà automaticamente 10 minuti dopo. Se viene rilevata ancora una perdita d'acqua dopo 10 minuti, il rilevatore emetterà un nuovo segnale di allarme per avvisare gli utenti.
- Premere brevemente il tasto TEST/HUSH dallo stato normale per accedere allo stato silenzioso. Il cicalino emette un ‘Di’ e il LED verde lampeggia una condo. Anche in presenza di una perdita d'acqua, i LED rosso e verde lampeggiano, ma non viene inviato alcun avvertimento di allarme e non parte neanche il cicalino. Questo permette agli utenti di asciugare il pavimento ed eliminare l'acqua fuoriuscita. Ripremere il ta HUSH per mettere fine alla modalità silenziosa.
- Nella modalità allarme, non è importante se il tasto viene premuto a lungo o meno, in ogni caso questa operazione determina il passaggio alla modalità silenziosa. In stato di allarme e modalità silenziosa, premendo sia brevemente che a lungo il tasto si uscirà dalla modalità silenziosa.
- Il voltaggio della batteria cala durante l'uso. Quando il voltaggio della batteria è < a 2.4V, il rilevatore invia un segnale di batteria scarica. Il LED giallo lampeggia una volta ogni 50 secondi con il suono del cicalino.
- Il rilevatore terminerà l'allarme automaticamente e si imposta sul normale stato di funzionamento dopo che la perdita d'acqua è stata gestita correttamente.
Registrazione del rilevatore nel sistema di allarme
Passare alla modalità Connessione sul pannello di controllo, premere due volte il tasto di test sul sensore. Il pannello di controllo emette un beep: il rilevatore è stato registrato. Se udite due beep, il rilevatore è già stato connesso. Per verificare se la registrazione è completa, inserire il sistema di allarme e attivare il sensore. Se la sirena suona, la registrazione è avvenuta con successo.
Sintesi Indicazioni
| IndicazioneAnalisi | |
| II LED verde lampeggia con il cicalino che suona | La batteria >2.4V o alimentazione DC |
| II LED giallo lampeggia rapidamente per 3 volte con il cicalino che suona | Alimentazione batteria <2.4V |
| II LED verde lampeggia costantemente Normale, alimentazione DC | |
| II LED verde lampeggia ogni 25s Normale, alimentazione a batteria | |
| LED rossso e verde lampeggiano alternativamente con cicalino che suona e ogni 3 suoni fa una pausa | Test di stato, rilasciare il tasto per uscire |
| LED rosso lampeggia con cicalino che suona e ogni 3 suoni fa una pausa | Stato di allarme, rilevata acqua o tocca oggetti conduttivi |
| LED rosso e verde lampeggiano alternativamente una volta ogni secondo senza cicalino che suona | Stato di allarme in silenzioso, premere brevemente/a lungo il tasto TEST/HUSH per cancellare lo stato silenzioso |
| LED verde lampeggia ogni secondo senza suono del cicalino | Stato muto normale, premere brevemente il tasto TEST/HUSH per cancellare lo stato silenzioso |
| LED giallo lampeggia ogni 50s con il cicalino che suona | Allarme batteria sarica, il voltaggio è < a 2.4V, la batteria dovrebbe essere sostituita |
Gestione Allarme di Emergenza olta ogni se-
Gestione dell'allarme di rilevamento perdita d'acqua:
- Chiudere le valvole dell'acqua.
- Drenare l'acqua e revisionare le tubatura per ridurre la perdita economica dovuta alla fuoriuscita dell'acqua.
tasto TEST/
Note
- Quando il sensore rileva una perdita d'acqua e rimane in stato di allarme anche se l'acqua è stata drenata può essere che vi sia rimasto un residuo di acqua sulla superficie o all'interno della sonda. Asciugare il residu di acqua sulla superficie con un asciugamano e quindi verificare se il rilevatore riprende il suo normale funzionamento. Se permane nello stato di allarme, staccare la sonda e scuoterla per far uscire gli eventuali residui d'acqua rimasti all'interno, asciugare quindi la superficie con un asciugamano e rinstallare la sonda.
- Sostituire la batteria immediatamente appena si riceve l'avvertimento di batteria scarica per assicurare un funzionamento corretto del dipositivo.
- Non appoggiare alcun oggetto sulla superficie levatore, poichè questo potrebbe avere un effetto sul rilvamento e sull'allarme sonoro.
- Testare periodicamente il rilevatore per assicurarsi che funzioni in modo corretto. Pulire la superficie panno morbido regolarmente.
- Leggere con cura quanto contenuto nel presente manuale e installare correttamente il dispositivo seguendo le indicazioni fornite nel manuale. Nel caso in cui il prodotto risulti guasto, non provare ad aggiustarlo da soli. Contattate il vostro rivenditore per la riparazione/sostituzione.
In conformità alla normativa WEEE, le apparecchiature elettriche ed elettroniche non devono essere smaltite con i rifiuti domestici. Il presente prodotto deve essere consegnato ai punti di raccolta preposti
allo smaltimento e riciclo delle apparecchiature elettriche ed elettroniche. Contattate le autorità locali competenti per ottenere informazioni in merito allo smaltimento corretto della presente apparecchiatura.
CE Con il marchio CE, Techly® garantisce che il prodotto è conforme alle norme e direttive europee richieste.
- Introduction
- Product Profile
- Features
- Installation Notice
- Installation Steps
- Operating Principle
- Register the detector on alarm system
- Emergency Alarm Treatments
- Notes
- Introduzione
- Aspetto del prodotto
- Caratteristiche
- Informazione Installazione
- Fasi dell'installazione
- Principi di Funzionamento
- Registrazione del rilevatore nel sistema di allarme
- Gestione Allarme di Emergenza olta ogni se-
- Note
Marque : Techly
Modèle : I-ALARM Water Leakage Detector
Catégorie : Détecteur