
Extreme X6 - Caméra sportive NIKKEI - Notice d'utilisation et mode d'emploi gratuit
Retrouvez gratuitement la notice de l'appareil Extreme X6 NIKKEI au format PDF.


| Type de produit | Caméra sportive |
| Marque | Nikkei |
| Modèle | Extreme X6 |
| Résolution vidéo maximale | 4K à 30 ips |
| Résolution photo maximale | 20 mégapixels |
| Angle de vue | 170° grand angle |
| Étanchéité | Jusqu'à 30 mètres (avec caisson étanche inclus) |
| Écran | Écran tactile LCD 2 pouces |
| Stabilisation d'image | Oui, électronique |
| Capteur | Capteur CMOS 12 MP |
| Stockage | Carte microSD jusqu'à 128 Go (non incluse) |
| Batterie | Batterie Lithium-ion rechargeable 1050 mAh |
| Autonomie | Environ 90 minutes en enregistrement 4K |
| Connectivité | Wi-Fi intégré, Bluetooth |
| Dimensions (sans caisson) | 62 × 42 × 28 mm |
| Poids (sans caisson) | 85 g |
| Alimentation | Batterie interne rechargeable via USB-C |
| Fixation | Support adhésif et support rotatif inclus |
| Nettoyage et entretien | Essuyer avec un chiffon doux et sec ; ne pas utiliser de produits abrasifs |
| Sécurité | Ne pas exposer à des températures extrêmes ; utiliser uniquement le chargeur fourni |
| Pièces détachées et réparabilité | Batterie et câble USB remplaçables par l'utilisateur ; autres réparations en centre agréé |
| Garantie | 2 ans |
FOIRE AUX QUESTIONS - Extreme X6 NIKKEI
Questions des utilisateurs sur Extreme X6 NIKKEI
0 question sur cet appareil. Repondez a celles que vous connaissez ou posez la votre.
Poser une nouvelle question sur cet appareil
Téléchargez la notice de votre Caméra sportive au format PDF gratuitement ! Retrouvez votre notice Extreme X6 - NIKKEI et reprennez votre appareil électronique en main. Sur cette page sont publiés tous les documents nécessaires à l'utilisation de votre appareil Extreme X6 de la marque NIKKEI.
MODE D'EMPLOI Extreme X6 NIKKEI
Extreme X6 Actioncam
USER MANUAL


natural_image
Exterior view of a black EXTREME camera module with transparent casing and mounting bracket (no text or symbols on body)Table of contents
1 Intended use 3
2 Safety 4
2.1 Labels in this manual 4
2.2 General safety instructions 4
3 Preparations for use 6
3.1 Unpacking 6
3.2 Package contents 6
3.3 Charge the battery 7
4 Functions 8
4.1 Extreme X6 8
5 Use 9
5.1 Memory Card: Placement and access 9
5.2 Using the on/off button 9
5.3 Factory Settings 10
5.4 Start filming 10
5.5 Make a photo 11
5.6 Start slow filming 11
5.7 Play 12
5.8 Settings 12
5.9 Remove the battery 15
5.10 Connecting a USB to a computer 15
5.11 Make an HDMI connection with the television 16
6 Managing your camera using your smartphone 17
6.1 View your camera image on your mobile 17
6.2 Place the camera in the waterproof case 17
6.3 Mount the camera on the helmet 18
6.4 Mount the camera on your bike 19
6.5 Attach the camera with the clip 20
7 Cleaning and maintenance 21
8 Technical data 22
9 Disposal of used electric and electronic equipment 23
1 Intended use
The Extreme X6 is an actioncam to make pictures and movies. Use the delivered accesores by example to attach the Extreme X6 on your bike, helmet and belt. Use the XDV App on your smartphone to operate the Extreme X6. The actioncam may not be exposed to splashing or dripping water without the waterproofcase.
The device is intended for consumer use, not for professional use.
i Due the wide variety of products with USB ports, mobile devices and their manufacturer-specific functions we cannot guarantee that all devices will be recognized or all operating options can function.
2 Safety
2.1 Labels in this manual
WARNING A warning means that injury or death is possible if the instructions are not obeyed.
⚠️ CAUTION A caution means that damage to the equipment is possible.
i A note gives additional information, e.g. for a procedure.
2.2 General safety instructions
Warning! It is not permitted to open the product yourself or to have it opened, neither is it permitted to repair the product yourself or to have it repaired. This will void the warranties. Please let any maintenance be carried out by certified maintenance personnel.
⚠ Warning! Only use original accessories from the manufacturer.
⚠️ Always secure the camera in its housing when using the camera in or around water. Do not get the camera or the battery wet. The camera is not waterproof.
The rubber seal that lines the camera housing forms a waterproof barrier that protects the appliance in wet and underwater conditions. Keep the appliance housing's rubber seal clean. A single hair or grain of sand can cause a leak and damage your camera.
After every use in salt water, rinse the outside of the camera housing with non-salt water and dry. Not doing this can eventually cause corrosion of the hinge pin and salt buildup in the seal, which can damage the camera housing.
⚠ The camera contains sensitive components, including the battery.
Avoid exposing your camera and battery to very cold or very hot temperatures. Low or high temperature conditions may temporarily shorten the battery life or cause the camera to temporarily stop
working properly. Avoid dramatic changes in temperature or humidity when using the camera, as condensation may form on or within the camera.
Do not dry the camera or battery with an external heat source such as a microwave oven or hair dryer.
3 Preparations for use
3.1 Unpacking
- Unpack the appliance carefully.
- Check the package contents as described below. If any item is missing, please contact your reseller.
- We recommend that you retain the original carton and packing materials in case it ever becomes necessary to return your product for service. This is the only way to safely protect the product against damage in transit. If you do dispose of the carton and the packing materials, please remember to recycle with due care to the environment.
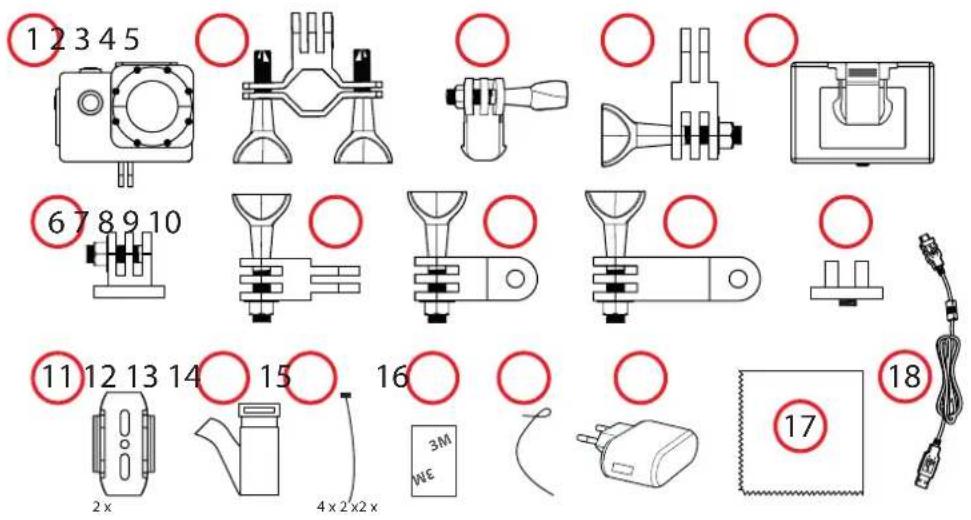
3.2 Package contents

The following items are included in the received package:
-
1x Waterproof case within the camera
-
1x communicator
-
1x Bicycle bracket
-
2x helmet pedestal for example
-
1x Pedestal 1
-
1x bandage
-
1x Pedestal 2
-
4x tie-wrap
-
1x Back clip
-
2x 3M sticker
-
1x fixed base
-
2x wire cable
-
1x switch support 1
-
1x Adapter
-
1x switch support 2
-
1x Micro USB cable
-
1x switch support 3
-
1x cleaning cloth
- 1x Quick start guide
i If any item is missing, please contact your reseller.
3.3 Charge the battery

- Open the battery door.
- Place the battery and close the battery door.
The battery is fully charged within 2 hours. The LED indicator is red during charging. When the battery is full the LED indicator is off.
4 Functions
4.1 Extreme X6

Filming

Make a photo

Slow filming

Play

Settings

- OK button
- PREVIOUS/wifi/ ZOOM OUT button
- FORWARD/ ZOOM IN button
- ON/OFF/MODE button
- HDMI-output
- Micro USB connection
- Slot-in for micro SD card
5 Use
5.1 Memory Card: Placement and access

i Due to the great variety of products with external memory connection (USB, SD/MMC, etc.) and their sometimes quite manufacturer-specific functions we can neither guarantee that all devices will be recognised, nor that all operating options that are possible in theory will actually work.
(7) Memory card slot max. 32 Gb
5.2 Using the on/off button
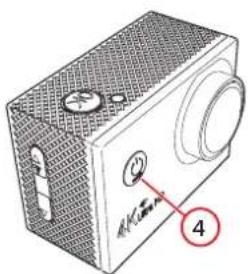
- Keep key MODE (4) pressed for 2 seconds
• The device has now been turned on.
5.3 Factory Settings
The factory settings are:
Exposure: 0
White balance: AUTO
G-sensor: LOW
Light Source Frequency: AUTO
LED Indicator Light: enabled.
Auto Shutdown: 5 minutes.
Time Watermark: set
5.4 Start filming


When you turn the appliance on, you are already in the film mode.
- Press repeatedly on the Mode button (4) until you reach the film mode
- Press on the button OK ((1)) to start filming.
- Use the buttons ZOOM (2) (3) to zoom in and zoom out.
- Press again on the button OK (1) to stop filming. The movie is saved.
5.5 Make a photo

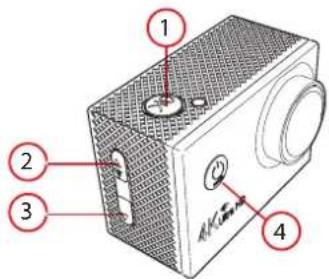
When you turn the appliance on, you are already in the film mode.
- Press repeatedly on the Mode button (4) until you reach the photo mode
- Use the buttons ZOOM (2) (3) to zoom in and zoom out.
- Press on the button OK (1) to make a photo.
5.6 Start slow filming

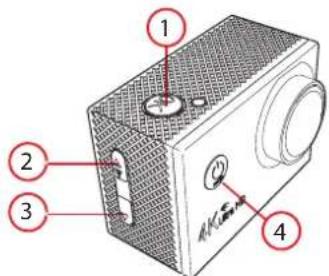
- Press repeatedly on the Mode button (4) until you reach the slow film mode 🖱️.
- Press on the button OK (1) to start filming.
- Use the buttons ZOOM (2) (3) to zoom in and zoom out.
- Press again on the button OK ((1)) to stop filming. The movie is saved.
5.7 Play


When you turn the appliance on, you are already in the film mode.
- Press repeatedly on the Mode button (4) until you reach the play mode ▶. You can display the photo's and watchthe recorded videos.
- Use the buttons (2) (3) to search for a photo or video.
- Press on the button OK (1) to view a photos and videos.
5.8 Settings

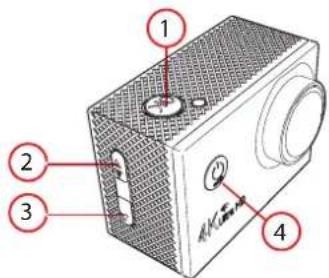
- Press repeatedly on the Mode button (4) until you reach the settings mode ⚙️.
- Press OK (1) to confirm your selection.
- The settings menu consists off five submenu's: 1) video, 2) photo, 3) general settings 4) camera settings 5) exit. Press on the button Mode (4) to choose on of these menu's.
- Press OK (1) to confirm your selection.
- Use the (2) and (3) keys to navigate within the menu.
- Press OK (1) to confirm your selection.
Settings for video recording
Video resolution: you can change here the resolution of the videos.
Recording sound: you can set here the recording sound on and off. Time Lapse (Not Slow Motion): Shorten the video from every 1 minute into 1 second, 2 seconds, 5 seconds etc.. when taking the video.
You could choose either 1 or 2 or 5 seconds etc... When you check the video it looks like fast forward.
Loop recording is the process of recording video feeds. This process is a never-ending one: at the end of the internal disk drive, the recording process continues to record at the beginning, erasing the previously recorded material and replacing it with the new content. Within this function you can set the duration of 1 video. You can choose the following settings: none, 2, 3 en 5 minutes.
Slow motion: Taking the video at 720P 120fps or 720P 60fps, and replay the video will be in 720P 30fps, if taking the video at
1080P 60fps, the video replay will be in 1080P 30fps. The video looks like slower than normal.
Settings for videos
Photo resolution: you can set here the resolution of the photo. You can choose from: 16M, 12M, 8M and 5M.
Timed: Here you can set the number of seconds for the camera to wait to take a picture. You can choose from 5, 7 or 10 seconds.
Auto: Here you can set the interval in seconds for the camera to wait to take a picture. You can choose from 5, 7 or 10 seconds.
Dramashot: Use this function to make action photo1s. You can set here how many photo's are taking per second. You can choose between: 3 p/s, 5p/s, 10p/s, and 20p/s.
General settings
White balance
Exposure: you can set the exposure here. You can choose from: 1, 2, 3.
Image rotation: If you need to mount your camera upside down, you can set the camera to save
the photo or video upside down so that it appears right side up when you review
it on your computer or TV. This eliminates the need to "?ip" the photo or video
later on your computer.
WIFI: display the WIFI SSD and the WIFI password.
G-sensor: here you can set the sensitivity of the sensor. You can choose from: low, medium or high. De video will be locked automatically by serious shocks like a car accident. The video will remain.
Light Source Frequency: for Europe 50Hz
LED Indicator Light: on the left of the camera's screen are two LED lights. You can set those lights off. For more information about these lights, see the chapter Technical specifications.
Auto Screensaver: here you can set after how many seconds the screen turns off. You can choose from 10, 20 and 30 seconden.
Auto Shutdown: you can set here after how many minutes the camera will shut down. You can choose from 1, 3 and 5 minutes.
Time Watermark: the date and time will appear on videos and photos.
System settings
Language: English, Simplified Chinese, Traditional Chinese, Korean, Russian, French, German, Dutch, Italian, Spanish, Polish, Japanese.
Date and Time Settings:
Here you can set the date and time.
Format: here you can format the memory card. All data will be lost.
Reset to factory settings: the camera settings will be reset to the factory settings.
Firmware version
Here you can see the systeminformation,
5.9 Remove the battery

flowchart
graph TD
    A["3D Block"] -->|Red Arrow Down| B["2D Grid Box"]
    B -->|Red Arrow Up| C["Top Panel"]
- Open the battery door.
• Take the tab on the batterij en move the batterij out of the camera.
5.10 Connecting a USB to a computer
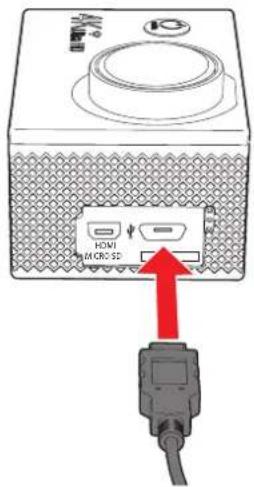
Insert the USB cable into the camera and the computer.
You can choose the following options:
USB Mode
View and export videos and photos.
Charging mode
You can make photos and videos with the computer.
USB Mode
Charging via USB to computer system
5.11 Make an HDMI connection with the television

- Keep key MODE (4) pressed for 2 seconds
- The device has now been turned off.
- Insert the mini HDMI cable (5) (not included) in the actioncam and connect the actioncam with the television.
- Turn the device and television on.
- Select the television on the desired source input (see the manual of the television).
• Perform the steps as described on the television screen.
6 Managing your camera using your smartphone
6.1 View your camera image on your mobile
13
To use the camera with your mobile Phone, you need to download the XDV app from the playstore.
Press the button WIFI for 2 seconds.
- Open the XDV app on your mobile phone. - Select the WIFI: X20V_040d and insert the password. Select connection. De actioncam is now connected with your mobile Phone. You can operate the actioncam with the app.
i The default password is (1234567890).
6.2 Place the camera in the waterproof case
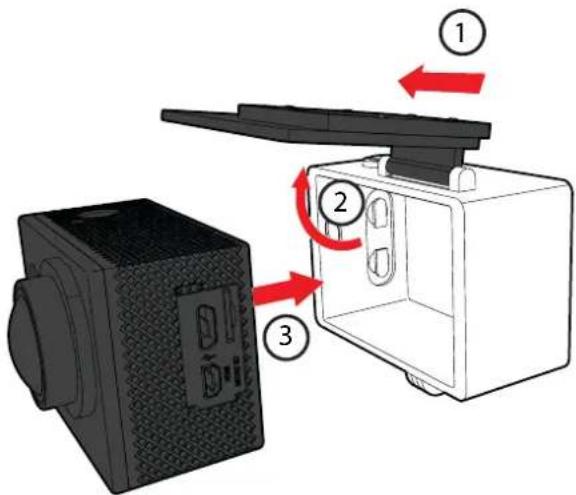
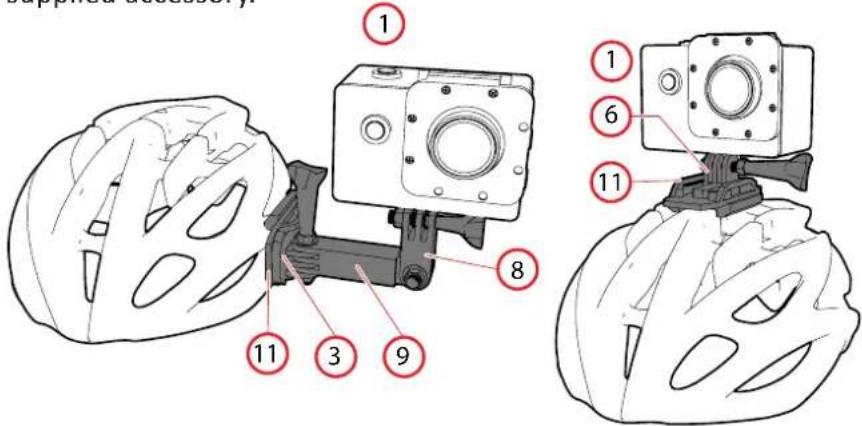
6.3 Mount the camera on the helmet

You can mount the actioncam two ways on the helmet. Only use the supplied accessory.
6.4 Mount the camera on your bike
You can mount the actioncam on your bike. Only use the supplied accessories.

6.5 Attach the camera with the clip
You can mount the camera on your belt (for example). Only use the supplied accessories.


natural_image
3D diagram of a mechanical device with labeled part 5 (no text or symbols beyond label)7 Cleaning and maintenance
Do not dry the camera or battery with an external heat source such as a microwave oven or hair dryer.
The rubber seal that lines the camera housing forms a waterproof barrier that protects the appliance in wet and underwater conditions. Keep the appliance housing's rubber seal clean. A single hair or grain of sand can cause a leak and damage your camera.
- If you do not use the appliance for an extended period, remove the batteries.
- Clean the lens with a camera lens brush/blower (not included) if the lens is dirty.
- Clean the outside of the appliance with a soft cloth.
- After every use in salt water, rinse the outside of the camera housing with non-salt water and dry. Not doing this can eventually cause corrosion of the hinge pin and salt buildup in the seal, which can damage the camera housing.
8 Technical data
- Model number: X20V
- Voltage: 5V/1A
- DSP: V3
- Sensor: OV4689
- Resolution of videos recorded: 4K 15FPS/2.7K 30FPS/1920*1080 60fps /1920*1080 30fps /1280*720 120fps /1280*720 60fps /1280*720 30fps
• Resolution of photos: 16M /14M /12M /10M /8M/ 5M - Lens: 170 HD wide-angle lens
- Exposure: -3, -2, -1, 0, 1, 2, 3
• ISO: Auto, 100, 200, 400, 800, 1600 - White balance: Automatic, default, Sunny day, Cloudy, Incandescent Light, Fluorescence
- Zoom: 4x
- Photo mode: General photos; Timed pictures; Auto photos; Motion pictures
• Video mode: General Video; Recycling Video; Time-lapse video - Slow shooting: 1080p 60fps, 720p 120fps, Default, Video mode: 1080p 60fps, 720p 120fps, Default,
• LCD Display 2.0" LCD, 960*240, ,
• Picture formats: JPEG
• Video formats: MP4
• Video compressed: H.264
• Max. 64G, HDMI, Micro USB2.0 and SD Card inputs
• Red LED: Product is charging
- Blue LED: Power is switched on
- Yellow LED:WIFI connection
- Microphone (MIC)
- SPK
- Battery capacity: 900MAH
- Recording time: 1080P/About 90 minutes
- Charging time (hours): 2
- WiFi connection
• Language: English, Simplified Chinese, Traditional Chinese, Korean, Russian, French, German, Dutch, Italian, Spanish, Polish, Japanese.
- OS of working: Windows XP/7/8 SP3/Vista and Mac 10.5 or above
- Dimensions main unit: 59 x 41 x29
• Weight: 44gr (without
- batteries), 58gr with
- batteries
• Working range: -10, +55
• Storage temperature: -20, +70
- Relative humidity: 5%, 95%, No frost
• Water resistant with case
9 Disposal of used electric and electronic equipment

The meaning of the symbol on the material, its accessory or packaging indicates that this product shall not be treated as household waste. Please, dispose of this equipment at your applicable collection point for the recycling of electrical and electronic equipments waste. In the European Union and Other European countries which there are separate collection systems for used electrical and electronic product. By ensuring the correct disposal of this product, you will help prevent potentially hazardous to the environment and to human health, which could otherwise be caused by unsuitable waste handling of this product. The recycling of materials will help conserve natural resources. Please do not therefore dispose of your old electrical and electronic equipment with your household waste.
For more detailed information about recycling of this product, please contact your local city office, your household waste disposal service or the shop where you purchased the product.
For more information and warranty conditions, please visit: www.akai.eu



- Extreme X6 Actioncam
- Table of contents
- Intended use 3
- Safety 4
- Preparations for use 6
- Functions 8
- Extreme X6 8
- Use 9
- Managing your camera using your smartphone 17
- Cleaning and maintenance 21
- Technical data 22
- Disposal of used electric and electronic equipment 23
- Intended use
- Safety
- Labels in this manual
- General safety instructions
- Preparations for use
- Unpacking
- Package contents
- Charge the battery
- Functions
- Extreme X6
- Use
- Memory Card: Placement and access
- Using the on/off button
- Factory Settings
- Start filming
- Make a photo
- Start slow filming
- Play
- Settings
- Settings for video recording
- Settings for videos
- General settings
- System settings
- Remove the battery
- Connecting a USB to a computer
- USB Mode
- Charging mode
- Make an HDMI connection with the television
- Managing your camera using your smartphone
- View your camera image on your mobile
- 13
- Place the camera in the waterproof case
- Mount the camera on the helmet
- Mount the camera on your bike
- Attach the camera with the clip
- Cleaning and maintenance
- Technical data
- Disposal of used electric and electronic equipment
Marque : NIKKEI
Modèle : Extreme X6
Catégorie : Caméra sportive