
1420T(A) - Téléviseur MATSUI - Notice d'utilisation et mode d'emploi gratuit
Retrouvez gratuitement la notice de l'appareil 1420T(A) MATSUI au format PDF.


| Type de produit | Téléviseur CRT |
| Marque | Matsui |
| Modèle | 1420T(A) |
| Taille d'écran | 14 pouces (diagonale) |
| Technologie d'affichage | Tube cathodique (CRT) |
| Résolution | 640 x 480 pixels (standard) |
| Entrées vidéo | Prise antenne, entrée Péritel (SCART) |
| Alimentation | 220-240 V, 50 Hz |
| Consommation électrique | ~70 W |
| Dimensions (L x H x P) | 360 x 330 x 380 mm |
| Poids | ~11 kg |
| Puissance audio | 2 x 2 W |
| Télécommande | Infrarouge, incluse |
| Fonctions principales | Recherche de chaînes, réglages image/son, minuterie |
| Entretien et nettoyage | Débrancher, nettoyer avec un chiffon doux et sec. Ne pas utiliser de produits abrasifs. |
| Sécurité | Ne pas ouvrir le boîtier (risque d'électrocution). Tenir hors de portée des enfants. |
| Pièces détachées et réparabilité | Contacter le service après-vente pour les pièces et réparations. |
| Température de fonctionnement | 5 °C à 35 °C |
| Humidité de fonctionnement | 20 % à 80 % (sans condensation) |
FOIRE AUX QUESTIONS - 1420T(A) MATSUI
Questions des utilisateurs sur 1420T(A) MATSUI
0 question sur cet appareil. Repondez a celles que vous connaissez ou posez la votre.
Poser une nouvelle question sur cet appareil
Téléchargez la notice de votre Téléviseur au format PDF gratuitement ! Retrouvez votre notice 1420T(A) - MATSUI et reprennez votre appareil électronique en main. Sur cette page sont publiés tous les documents nécessaires à l'utilisation de votre appareil 1420T(A) de la marque MATSUI.
MODE D'EMPLOI 1420T(A) MATSUI
Instructions
Matsui 1420T(A)
Your television is supplied with an approved 13AMP fused mains plug. When replacing the fuse always use a 5AMP (BS 1362) approved type. To obtain a replacement fuse contact your store. If the mains sockets in your home differ or are not suitable for the type of plug supplied, then the plug should be cut from the mains lead and a suitable type fitted. You must use a 13 AMP plug (BS 1363) and fit a 5 AMP fuse (BS 1362). If any other type of plug is used a 5 AMP fuse must be fitted, either in the plug, adaptor or at the distribution board. Please refer to the wiring instructions.
Damage
Never use your TV if it is damaged in
any way. Always place your TV on a flat
level surface avoiding anywhere which may be subject to strong vibration.
May be so Weather
It is advisable to unplug the aerial during
an electrical storm.
Moisture
Do not allow your TV to be exposed to spin, moisture dust. If any liquid is burnt
rain, moisture, dust. If any liquid is split into your TV it can cause serious
damage. If you spill any liquid into your
TV switch it off at the mains immediately.
Contact your store. Interference
Do not place >
appliances which may cause
electromagnetic interference (TV or Hi-Fi
speakers). If you do, it may adversely
affect the working of the unit, and cause a distorted picture or sound.
a disfavored picture of soda. Temperature
Avoid extremes
or cold, place your TV well away from
heat sources such as radiators or
gas/electric fires Ventilation
The TV must be
The TV must be well verified. Do not cover your TV or place it inside a small
confined space. Make sure that there is a
gap of at least 10cm on both sides and 20cm at the top
Zoch at the top. Batteries
Batteries are
children. Do not allow young children to
play with the remote control unit.
Covers
Do not remove any fixed covers as this
may expose dangerous voltages.
Standby
The standby button on the remote control doesn't switch off the TV completely and
doesn't switch off the TV completely and the TV will continue to draw electricity
from the mains supply. Therefore in the
interests of safety and to avoid
unnecessary energy consumption, never leave your TV in standby while
unattended for long periods of time, eq.
overnight, while on holiday or while out
of the hour
Naked Flames
Naked flames such as candles and night
lights should not be placed on or near your TV.
your TV. Ornaments
Vases and oth
lamps should not be put on top of your
TV set.
Power Cord
Make sure your TV or TV stand is not
resting on top of the power cord, as the weight of the TV may damage the cord.
weight of the TV may damage the cord and create a safety hazard.
Packaging
If you can store the packaging it will
prove useful should you need to transport the TV to protect it while it is in transit.
the TV to protect it while it is in transit. Try to reuse packaging wherever you
try to store packaging wherever you can. If you cannot store it, contact your
local authority for details of your nearest
recycling facilities.
Inserting batteries into the Remote Control

3K32501A V'02.07

Follow either instruction i) or ii) below:
All connections must be made with the power disconnected.
i)
Connect your TV to an aerial

ii) Connect your TV to an aerial and VCR
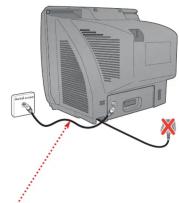
A Connect an external aerial (not supplied) to the aerial socket on the back of your TV.

A Connect an aerial lead (not supplied) to the socket marked RF IN on the back of your VCR.
Connect an RF lead to the socket marked RF OUT on your VCR (not supplied) and the other end to the aerial socket on your TV.
If you have a scart lead we recommend that you use one. Connect it to the scart socket on the back of your TV and one of the scart sockets on the back of your VCR.

Tune the channels

Press MENU on your remote control. The main control menu will appear on your TV screen.
Press PROG/PAGE ▲/▼ on your remote control to highlight CH tuning. Press ENTER to confirm. The CH tuning on-screen display will appear.
Press PROG/PAGE ▲/▼ to highlight auto. Press ENTER to confirm. This will start the automatic tuning process. This process will take a few minutes to complete. . . please be patient.
When the programme on the screen stops changing and the sound comes on, the tuning process is complete.
Press MENU twice to clear the display.
Since each programme may be picked up by your TV on more than one frequency the auto tune process will probably store more than one of each channel. For example there may be three BBC 2's. This means that once the automatic tuning process is complete you will need to allocate a channel number to the programmes with the clearest reception. To do this go to the next step - Sorting Channels...

Sort the channels
- Press MENU. The main control menu will appear.
- Press PROG/PAGE ▲/▼ on your remote control to highlight CH tuning.
- Press ENTER. The CH tuning on screen display will appear.
-
Press PROG/PAGE ▲/▼ on your remote control to
-
Press ENTER. The CH allocation on-screen display will appear and the current channel position for the programme on the TV screen will appear in the top right corner of the screen.
-
Press PROG/PAGE ▲/▼ on your remote control to find a programme with a clear reception. Press ENTER.
-
Press PROG/PAGE ▲/▼ to select the channel number that you want this programme to be stored in. For example if the TV has automatically stored a BBC2 programme in channel number 6, you will need to change the channel allocation number (in the middle of the screen) to 2 using the PROG/PAGE ▲/▼ buttons on your remote control. (If no channel is allocated, the on-screen display will disappear after 1 minute.)
-
Press ENTER once so that the channel number you have allocated to this programme is stored (the channel will now have changed position).
Repeat this process until you have allocated a channel number to all the programmes on your TV with the clearest reception.
- Press MENU 3 times to remove the on-screen displays from the TV screen.
Once you have tuned in and sorted all the channels you want to watch, you will be able to select them by pressing the numbered buttons on your remote control or by pressing PROG/PAGE ▲ /▼ to select channels in sequence: eg. 1,2,3,4,5 etc...

Switch on your TV and any other connected equipment

Make sure that your TV and aerial are properly connected.
Plug your TV and any other equipment that you have connected to your TV into the mains and switch on at the wall.
Press the POWER switch on the front of the TV, the red standby indicator will light.
Switch on your television by pressing STANDBY on the remote control. (The standby light will go out when the TV is on.)
If you have a VCR connected make sure that it is switched on and a video tape is playing. . . your TV screen will be fuzzy.
If you have a Satellite/Cable box system or games console connected make sure that it is switched on. Make sure your Satellite/Cable box has Sky News selected, . . your TV screen will be fuzzy. Please refer to your Satellite/Cable instruction book to see how to select Sky News.

Select your language

This feature allows you to select the language you want to appear on your TV on-screen display.
Press MENU on the remote control. The main control menu will appear on your TV screen.
Press PROG/PAGE ▲/▼ to select Language menu.
Press ENTER to select Language screen.
Press PROG/PAGE ▲/▼ to select desired language
Press ENTER to store your setting.
Press MENU to clear the screen.

Adjusting the picture settings

The picture settings have been adjusted by the factory under optimum signal reception conditions, however conditions may not be the same in your area. After turning on your television, allow it to warm up for a few minutes before making any adjustments. Should you wish to reset picture controls back to factory settings press NORMAL.
Press MENU on your remote control. The on screen display will appear.
Press PROG/PAGE▲/▼ on your remote control to highlight picture.
Press ENTER to view brightness.
Press PROG/PAGE▲/▼ to view the contrast, colour or sharpness on screen displays.
Press VOL + or - to adjust the levels.
Pictures appear sharpest in the daytime by increasing the contrast. In the evening (when surroundings are darker) the sharpest picture can be obtained by reducing the contrast.
Press MENU twice to remove the picture menu.
If you do not make an adjustment within 1 minute the menu will disappear.

Setting the sleep function

The sleep function allows you to automatically switch your television into standby after a preset amount of time (up to 120 minutes). In addition should you fall asleep or leave your TV unattended it will automatically switch into standby 15 minutes after the end of transmissions.
To set the sleep timer press SLEEP.
SLEEP 120 will appear on screen. The display will clear in five seconds and your television will switch off automatically after 120 minutes.
Repeated presses of SLEEP will decrease the sleep timer in 10 minute intervals from 120 minutes to 10 minutes. 1st press, 120 minutes.
2nd press 110 minutes. ...etc. ... 100, 90, 80
When you have set the sleep timer your TV will return to a normal picture and automatically switch off after the preset sleep time.
To cancel the sleep timer set the sleep timer to 0. The display will clear in five seconds and your television will not switch off automatically.

Manual tuning

In certain areas with poor reception, the Automatic Tuning System may not tune your television to the strongest broadcast signal. If you are not satisfied with the automatic tuning you may manually tune your television to obtain the best possible picture and sound.
Select the TV channel you want to manually tune.
Press MENU on your remote control. The main control menu will appear
Press PROG/PAGE ▲/▼ on your remote control to highlight CH tuning
Press ENTER on your remote control to confirm
The CH tuning on screen display will appear
Press PROG/PAGE ▲/▼ to highlight manual. Press ENTER to confirm.
Press VOL + to search up the waveband or VOL - to search down the waveband.
Each time a station is found the search will stop.
Press VOL 4 of - to continue searching until the station you want is found. Press FINE TUNING +/to find the clearest picture
Press ENTER to store the station you selected.
Press PROG/PAGE ▲/▼ to select your required channel number (1\~80)
Press ENTER to store the channel number.
Repeat this process to tune in other channels
Press MENU three times to remove the tuning menu.
If at a later date you wish to skip an unwanted channel when using PROG/PAGE ▲/▼, press SKIP on the remote control.
The channel number will flash when skip is selected for that channel.
To cancel the skip function, type in the channel number i.e. 2 and press SKIP. The channel number will stop flashing.
Fault finding guide
| SYMPTOM | CAUSE | SOLUTION |
| No standby light. | Is your TV plugged in itIs the main power switch on the front of your TV diffHas the fuse in the mains plug blow? | Plug your TV into mains socket (AC outlet).Press the main power switch.Replace fuse in mains plug. |
| No picture, no sound. | Is your TV plugged in itIs the serial connection lead broken or damaged?Possibly station trouble.Is the main power switch on the front of your TV diffHave you pressed mute or have you set the volume of minimum. | Plug your TV into mains socket (AC outlet).Check aerial connection for broken or damaged wires. If necessary replace with new leads.Move the aerial away from possible source of interference. If you live in a known poor reception area try using an aerial booster to improve the quality of broadcast signal.Press the main power switch. Press mute again or increase the volume using the volume control. |
| Unable to select channel numbers up to 80. | During automatic tuning your television didn’t find enough channels to place in these numbered positions? | If a television station has been missed try repeating the automatic tuning. |
| Poor or no colour. | Aerial or connection lead is not connected or less is damaged or broken.Colour control is not adjusted. | Check all aerial connections for broken or damaged wires. If necessary replace with new leads. Try using an aerial booster to improve the quality of broadcast signal.Adjust colour |
| No Teletext or strange characters letters on screen. | Aerial connection is poor or possibly station trouble. | Check aerial connection for broken wires or try another channel. |
| Remote control does not work or operates erratically. | Weak or exhaled batteries. | Replace batteries. |
| Unable to playback video tapes. | During automatic tuning your television you didn’t have your VCR switched on, therefore your television was unable to find it. | Before starting the automatic tuning operation make sure you have your VCR switched on and on tape playing. |
| Unable to watch Satellite stations. | During automatic tuning your television didn’t find the Satellite system. | Before starting the automatic tuning operation make sure you have your Satellite system switched on and Sky News selected. |

Teletext functions

Partmaster
Partmaster Direct
0870 90 90444
All calls charged at National Rate
Partmaster accessories and spares service can provide accessories, spares and replacement instruction books for this and virtually any other domestic electrical item you may have - with most items being dispatched within 24 hours!
We hope you enjoy your new Grundig P37-1010. To help you get the most from your new television, we recommend Partmaster Direct for accessories and spares.
Partmaster Direct's range includes AV leads, Remote Controls, Mains Leads, Mains Adapters, Batteries and
insect, most inore available for delivery direct to your door
You can also log on to the Partmaster website. Electrical accessories and spaces at www.pnrtr
So whether you have lost it, broken it, need a replacement or an extra accessory, don't worry, we're here to
help
Spefficuit en
| Model No. | .Grunley P37-1010 |
| Picture tube | .14" (34 cm visible) measured diagonally |
| Colour system | .PALI |
| Aerial | .Lamp aerial or 75 Ohm external aerial |
| Scart socket | .1 x 21 pin |
| Audio output power | .1.0W |
| Speaker | .3"/8 cm) 8Ohms |
| Power supply | .AC 230-240 50Hz |
| Power consumption | .44W (10W in standby) |
| Weight | .9.5Kg |
| Dimensions | .362(W) x 360(D) x 320(H)mm |
Setting your security code
When activated your TV is protected against unauthorised use.
WARNING: You cannot operate the unit if you forget the PIN code. Please ensure that you keep a record of the PIN code in a safe place. If you forget your PIN code you will have to take the unit to a store to have this feature reset where there will be a small charge. If the unit needs to be serviced, make sure that the security protect function is OFF, otherwise there will be a small charge for resetting this feature.
If you enter the wrong PIN code more than 3 times, the unit will be locked and you will not be able to operate your TV. To unlock the unit you must disconnect the mains supply and wait for more than 30 minutes. Reconnecting the mains supply after this time will allow you to enter the PIN code again.
Press MENU on the remote control. The main control menu will appear. Press PROG/PAGE ▲/▼ to select the pin code registration menu. Press ENTER to display the pin code registration screen. Press PROG/PAGE ▲/▼ to select owner's name. Then press ENTER. Press VOL +/- until the desired letter is
displayed. Press PROG/PAGE ▲/▼ to move to the next letter. You can enter up to 20 letters.
Press MENU to register your name.
Press PROG/PAGE ▲/▼ to select PIN code. Then press ENTER. Press numbered buttons on the remote control to enter the PIN code (4 digits). Your PIN code can be a combination of any 4 numbers. Press MENU to register the PIN code.
Then press ENTER to select ON. Press MENU to return to the main menu.
The security protect function will now be activated.
To cancel the security protect function select "protect OFF" from the PIN CODE REGISTRATION menu.
If you turn off the MAIN POWER switch on the front of the unit or the unit is unplugged from the mains supply for more than 30 minutes, the PIN code screen will appear on the screen when you next turn on the unit.
Enter your PIN code using the numbered buttons on the remote control. If you enter the correct PIN code, "PIN CODE OK" will be displayed on the screen and you will be able to operate the unit. If you enter the wrong PIN code, "PIN CODE ERROR" will be displayed on the screen, and you can try again.
Marque : MATSUI
Modèle : 1420T(A)
Catégorie : Téléviseur