
EM-3510 - Micro-ondes SANYO - Notice d'utilisation et mode d'emploi gratuit
Retrouvez gratuitement la notice de l'appareil EM-3510 SANYO au format PDF.


| Type de produit | Micro-ondes |
| Marque | Sanyo |
| Modèle | EM-3510 |
| Capacité | 20 litres |
| Puissance micro-ondes | 800 W |
| Type d'ouverture | Porte latérale avec poignée |
| Dimensions (L x H x P) | 45 x 26 x 35 cm |
| Poids net | 10,5 kg |
| Alimentation | 230 V ~ 50 Hz |
| Puissance consommée | 1200 W |
| Fonctions principales | Cuisson, réchauffage, décongélation, minuterie, horloge |
| Niveaux de puissance | 5 niveaux |
| Platine tournante | Oui, diamètre 25 cm |
| Affichage | LED numérique |
| Matériau extérieur | Acier inoxydable |
| Entretien et nettoyage | Nettoyer avec un chiffon humide; ne pas utiliser de produits abrasifs |
| Sécurité | Verrouillage enfant, arrêt automatique en cas de porte ouverte |
| Pièces détachées | Platine tournante, fusible, ampoule disponibles |
| Réparabilité | Indice de réparabilité 7,5/10 |
| Informations générales | Utilisation en intérieur uniquement |
FOIRE AUX QUESTIONS - EM-3510 SANYO
Questions des utilisateurs sur EM-3510 SANYO
0 question sur cet appareil. Repondez a celles que vous connaissez ou posez la votre.
Poser une nouvelle question sur cet appareil
Téléchargez la notice de votre Micro-ondes au format PDF gratuitement ! Retrouvez votre notice EM-3510 - SANYO et reprennez votre appareil électronique en main. Sur cette page sont publiés tous les documents nécessaires à l'utilisation de votre appareil EM-3510 de la marque SANYO.
MODE D'EMPLOI EM-3510 SANYO

SANYO
Microwave Oven
OPERATING INSTRUCTIONS
Model EM3510
Read these instructions carefully before use.
If you follow the instructions, your Microwave Oven will serve you long and well.
Table of Contents
General Instructions
• How a Microwave Oven Makes Cooking Faster, Easier and Much More Enjoyable ..... 3
• The Extra Features of Your Sanyo Microwave Oven.... 3
- WARNING – This appliance must be earthed. 3
- Installation 4
- Names of Oven Parts.... 4
- Oven Control Panel 5
User Instructions
- User Instructions — Cooking Guide 6
- Easy Use Chart 6
Detailed Directions
- "Minute Minder" 6
- "High-Power" Cooking 7
- Cooking Guide for "Multi-Power" Settings 8
- "Multi-Power" Cooking 9
How to Use Your Microwave Oven Safely 10
Taking Care of Your Microwave Oven.... 10
Usable Cooking Utensils and Materials 10
Utensils and Material to Avoid 11
A Few Other Precautions 11
What to Do If Repairs Are Needed 11
How a Microwave Oven Makes Cooking Faster, Easier and Much More Enjoyable
- A feast in minutes. High energy microwaves penetrate the food and cook it quickly, evenly and efficiently.
- Natural flavour. Microwave cooking preserves the natural taste and nutritive value of the food to a much higher degree than conventional cooking methods.
- Utensils. Glassware, earthenware, paper containers and practically all utensils EXCEPT METAL ONES are perfectly suitable for microwave cooking.
-
Simplified operation. You are cooking by time, and not by heat. Simply touch numbers for Cooking Time and touch "START" pad.
-
Clean, cool operation. No smoke, no grease, no heat. Your kitchen stays cool and clean at all times.
- Perfect for defrosting and re-heating. When there is no time for natural thawing of frozen foods, your microwave oven can reduce the process to a matter of seconds. It defrosts all kinds of frozen foods and it reheats fast.
- Economical. Since the required cooking time is extremely short, microwave cooking is more economical than conventional ovens.
The Extra Features of Your Sanyo Microwave Oven
-
Compact, light weight, easy to move. Fits easily on a kitchen work surface. Can be installed practically anywhere. Light enough to be moved to a summer house or seaside cottage.
-
Six separate safety features.
1) Primary safety interlock system: when the door handle is pulled, a built-in switch (under) turns off the oven before the door is opened.
2) Secondary safety interlock system: when the door handle is pulled a built-in switch (upper) turns off the oven before the door is opened.
3) Choke seal: a special seal around the door prevents all radiation leakage from the oven.
4) Radiation absorbent: this absorbent is made of durable ferrite rubber.
5) Thermal limiter: when the temperature of the magnetron rises above the limit, this switch automatically turns off all radiation.
6) Monitor switch: should the latch switch fail to function properly, this switch is activated to prevent microwave radiation. -
Multi power control. By selecting cooking power level the appropriate power between 100W to 680W may be selected.
- Simplified cooking. Simply touch numbers for cooking time and touch the "START" pad. Your oven does the rest, and a beep sounds when the food is ready.
- High-visible viewing window The progress of cooking can be observed while oven is operating.
- Practical dimensions. 1) Overall: 61.0(W) × 51.9(D) × 41.0(H)cm 2) Oven: 37.4(W) × 41.4(D) × 23.2(H)cm
WARNING-This appliance must be earthed.
IMPORTANT
The wires in this mains lead are coloured in accordance with the following code:
Green-and-yellow: Earth.
Blue: Neutral.
Brown: Live or Active.
As the colours of the wires in the mains lead of this appliance may not correspond with the coloured markings identifying the terminals in your plug, proceed as follows:
The wire which is coloured green-and-yellow must be connected to the terminal in the plug which is marked with the letter E or by the earth symbol 1/2 or coloured green or green-and-yellow.
The wire which is coloured blue must be connected to the terminal which is marked with the letter N or coloured black. The wire which is coloured brown must be connected to the terminal which is marked with the letter L or A or coloured red.
Installation
-
Install the oven on a flat, level surface,
-
Strong enough to safely bear the weight of the oven, which is 29kg. To avoid the possibility of causing vibration or noise the oven must be in a stable position.
- When oven is first plugged into power outlet, "0:00" will appear in the display window, if not, switch off at power outlet, unplug the unit and reinsert the plug into the wall outlet.
-
To set time of day, touch CLEAR; then touch TIME OF DAY; touch numbers for correct time (1:00 \~ 12:59); then touch TIME OF DAY. (This is also explained in the time of day "Easy Use Chart" Time of Day Section on Page 6.)
-
Keep the oven away from heat and water
Exposure to heat and water can lower oven efficiency and lead to malfunctioning, so be sure to install the oven away from heat and water sources.
- The exhaust vent of the oven is at the back on the left side, so keep it at least 5cm away from the rear wall and the side wall.
Covering the exhaust vent may lead to malfunctioning. Hot air escapes from this vent, so be sure not to obstruct it or let curtains come between the oven and the rear wall.
- Place the oven as far away from radios and T.V.'s as possible To prevent static and "snow" in T.V.'s and radios, place the oven as far away from radios and T.V.'s as possible.
Names of Oven Parts
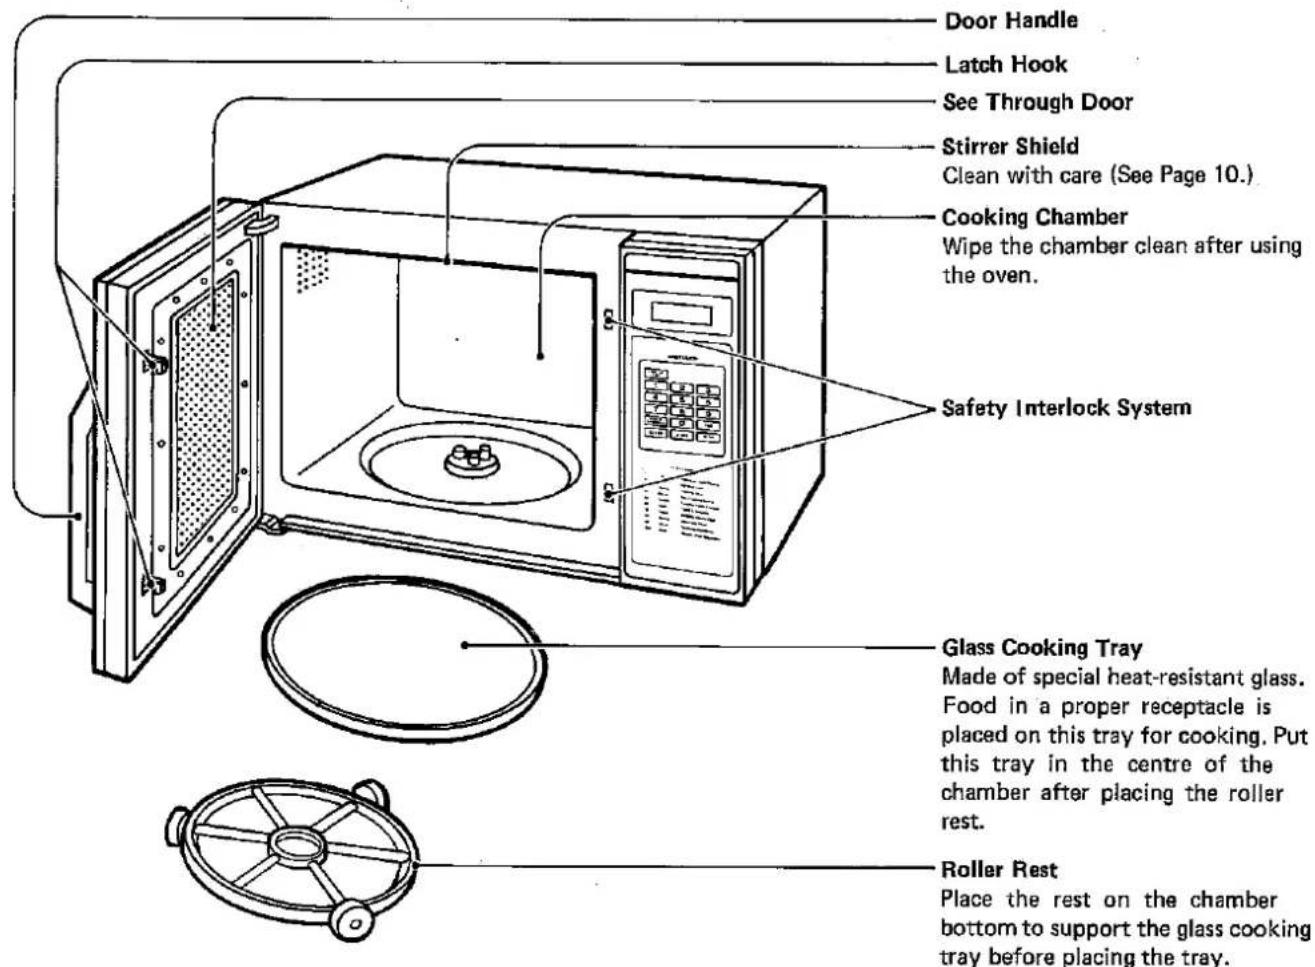
Remove your Oven and all material from the shipping carton. Your oven comes with the following material:
Glass Cooking Tray .... 1 each
Roller Rest .... 1 each
Microwave Miracles (cookbook) 1 each
Operating Instructions .... 1 each
Do not use this Microwave Oven for commercial purposes. This Microwave Oven is made for household use only.
Oven Control Panel
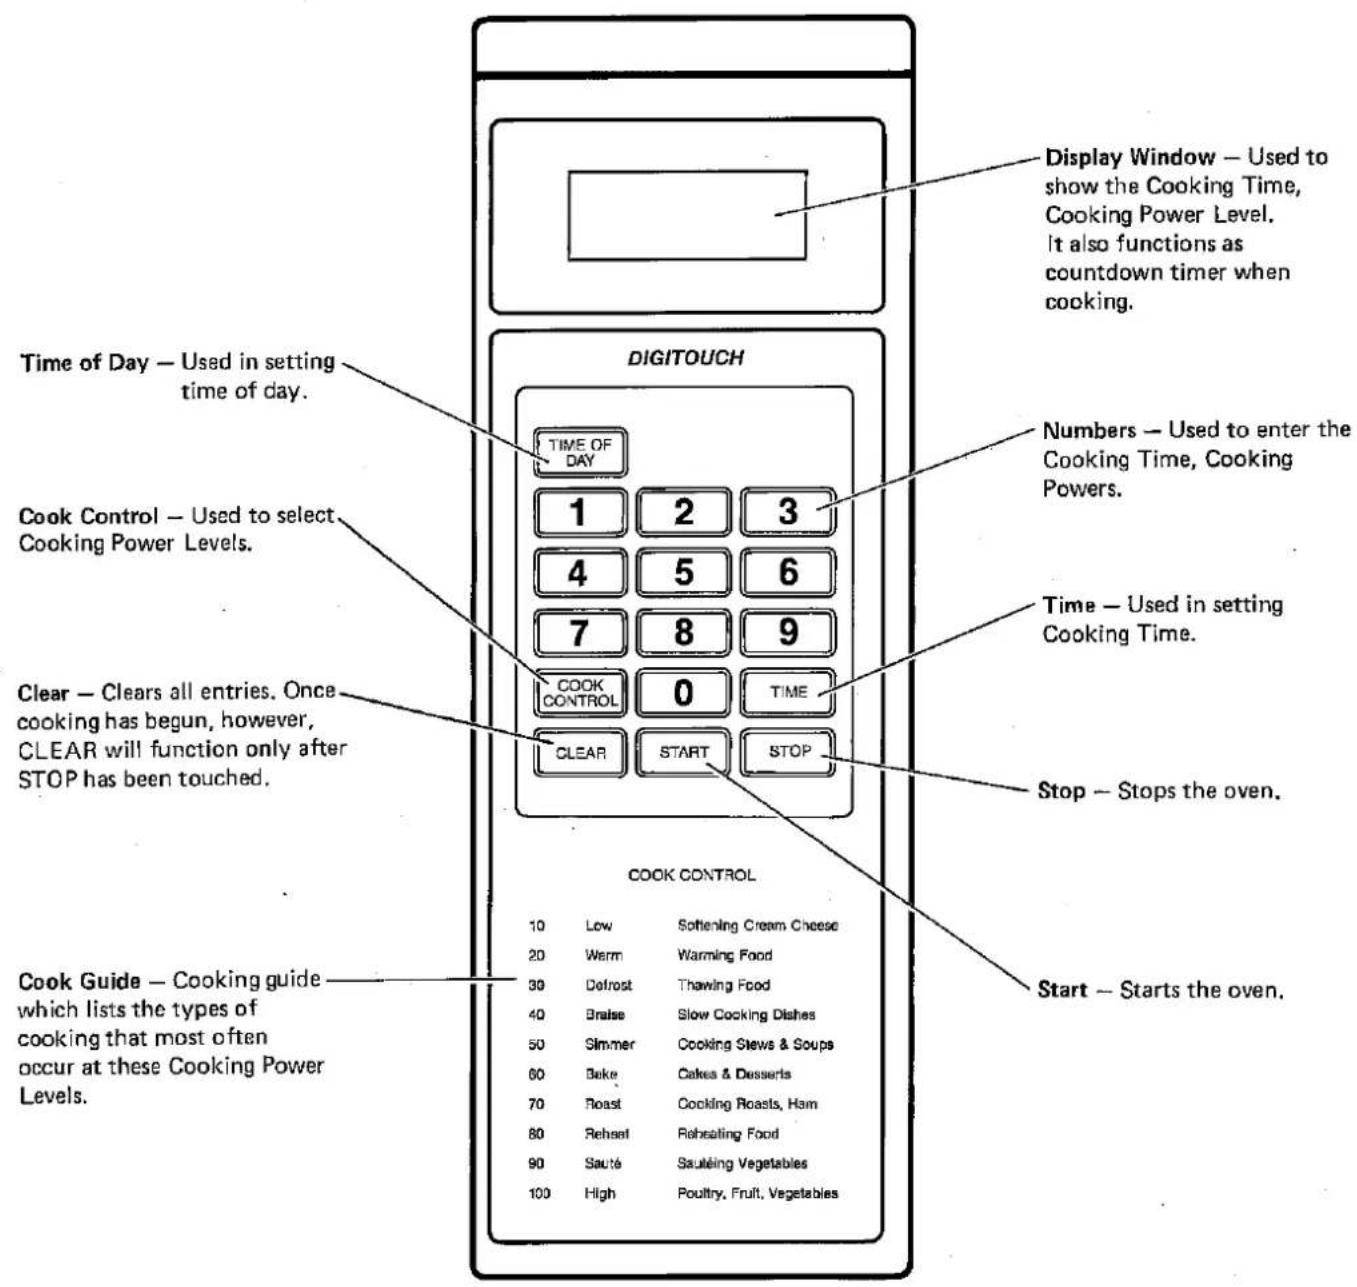
Note: A "beep tone" sounds when a "pad" on the control panel is touched, to indicate a setting has been entered.
User Instructions — Cooking Guide
"High-Power" Cooking
"High" gives the highest power cooking possible with your microwave oven. It is the recommended setting for cooking foods with high moisture content or for cooking foods that need fast cooking to maintain their natural flavour and texture. Your Microwave Miracles will tell you which foods are cooked best using highest microwave cooking power ("High"). For detailed directions on "High" (high power) cooking, see Page 7.
"Multi-Power" Cooking
Many foods need slower cooking (at less than full power) in order to give the best results. In addition to "High", there are ninety-nine "Multi-Power" settings. Detailed directions for "Multi-Power" cooking are on Page 8 and 9.
"Minute Minder"
Your oven also has a timer that can be used for non cooking functions. When used as a regular timer, the oven is not running. The timer is simply counting down in seconds. For detailed instructions on using this timer, see below.
Easy Use Chart
Your new solid state control panel allows you to use your microwave oven many ways.
| Time of Day | "High-Power" Cooking | "Multi-Power" Cooking |
| To Set:1. Touch CLEAR.2. Touch TIME OF DAY.3. Touch numbers for correct time of day.(1:00~12:59)4. Touch TIME OF DAY.**This "locks" in the time and starts the clock running. | To Set:1. Touch CLEAR.2. Touch TIME.3. Touch numbers for desired cooking time.4. Touch START.(See Page 7 for more detailed instructions.) | To Set:1. Touch CLEAR.2. Touch TIME.3. Touch numbers for desired cooking time.4. Touch COOK CONTROL.5. Touch numbers for desired cooking power level.6. Touch START.(See Page 9 for more detailed instructions.) |
To change setting, touch STOP and repeat "To Set" steps.
To check power setting, touch COOK CONTROL, and cooking power level will appear in the display window.
"Minute Minder"
Your oven also has a timer that can be used for non cooking functions. When used as a minute minder, the oven is not running. The timer is simply counting down in seconds.
To use the minute minder feature:
- Touch CLEAR.
- Touch TIME.
- Touch correct members for the time.
- Touch COOK CONTROL.
- TOUCH "0" (power level 0).
- Touch START. The time will begin counting down in the display window with no cooking or heating in the oven. A tone will sound when the time is over.
"High-Power" Cooking
- Touch CLEAR, and a beep tone will be heard. The CLEAR erases all previous settings.
- Touch TIME. "0" will show in the display window.
- Touch the correct numbers on the control panel to set the cooking time. The time set will show in the display window at the top of the control panel. For example:
- To set 30 seconds, you would touch "3" and then "0".
- To set 3 minutes, touch "3", "0" and "0".
- To set 3 1/2 minutes, touch "3", "3" and "0".
Remember, the timer is a digital clock that is divided into 60 seconds. Therefore, 1/2 minute is equal to 30 seconds. Touch 30 and not 50 as with a calculator to indicate 1/2 .
Note: It is not necessary to touch COOK CONTROL when cooking with the highest power ("High"). However, if COOK CONTROL is touched, the light above COOK will go on and the word "P100" will show in the display window. This is to let you know that the oven will be operating on "High" power unless a different power setting is chosen.
- Touch START. The oven will begin cooking, and the display window will show the time counting down in seconds. A tone will sounds for two seconds when the cooking time is completed. Then the oven shuts itself off.
Note: To stir food during cooking; open the oven door; stir or turn the food upside down; close the oven door; and touch START. The oven will automatically continue to count down the amount of time left on the timer.
Example: Fresh fish can be cooked quickly on "High" (maximum power) for 6 minutes. To do this, follow these 4 simple steps:
- Touch CLEAR.
-
Touch TIME.
-
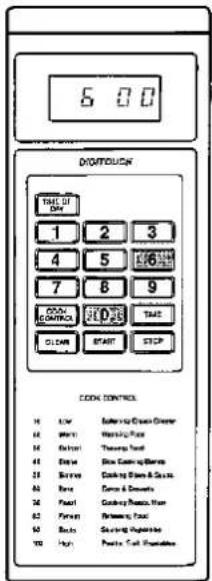
Set 6 minutes by touching "6", "0" and "0". "600" will show in the display window.
-
Touch START. The oven will begin to cook and the time will begin to count down in the display window. A tone will sound for 2 seconds when the 6 minutes are over, and the oven will shut itself off.


Cooking Guide for
"Multi-Power" Settings
The "Multi-Power" feature lets you cook at the best power level for the food being cooked. Cooking directions can be found in the microwave miracles.
| POWER LEVELS | POWER SETTINGS | EXAMPLES |
| 10 | Low | Softening cream cheese.Keeping casseroles and main dishes warm. |
| 20 | Warm | Softening chocolate.Heating breads, rolls, pancakes, tacos, tortillas and French toast.Clarifying butter.Taking the chill out of fruit.Heating small amounts of food. |
| 30 | Defrost | Thawing meat, poultry and seafood.Completing the cooking cycle of casseroles, stews and some sauces.Cooking small quantities of most food. |
| 40 | Braise | Cooking less tender cuts of meat in liquid or slow cooking dishes.Completing the cooking cycle of less tender roasts. |
| 50 | Simmer | Cooking stews and soups after bringing to a boil.Cooking baked custards and pasta. |
| 60 | Bake | Cooking scrambled eggs.Cooking cakes. |
| 70 | Roast | Cooking rump roast, ham, veal, and lamb.Cooking cheese dishes.Cooking eggs and milk.Cooking quick breads and cereal products. |
| 80 | Reheat | Reheating precooked or prepared food quickly.Heating sandwiches. |
| 90 | Sauté | Cooking onions, celery and green peppers quickly.Reheating meat slices quickly. |
| 100 | High | Cooking tender cuts of meat.Cooking poultry, fish, vegetables and most casseroles.Preheating a browning dish.Boiling water.Thickening some sauces. |
As you get to know your microwave oven, you may find that a particular setting is too low or too high for the results you desire.
Multiple-power control gives you the means to obtain greater precision in setting power levels. For instance, if you want a
power level between Roast and Reheat, you would set the time as usual: touch COOK CONTROL, and then touch "7" and "5". The display window will show "P75", indicating that your oven is set to run at power level 75—halfway between Roast and Reheat.
"Multi-Power" Cooking
The Microwave Miracles indicates which power setting is recommended for the food being cooked.
- Touch CLEAR.
- Touch TIME, "0" will show in the display window.
- Touch numbers for the desired cooking time. The time set will show in the display window.
- Touch COOK CONTROL. The word "P100" will show in the display window until a lower setting is entered. This is to tell you that the oven will be operating on "High" power unless a different power setting is chosen.
- Touch numbers for desired cooking power level. For example, if the recipe calls for cooking at the "20 (Warm)" setting, you would touch "2" and "0". The display window will show "P20". This means that in the Warm setting, the oven is cooking at power level 20.
- Touch START. The oven begins to cook and the display window will show the time counting down. A tone will sound for 2 seconds when the cooking time is over. Then the oven shuts itself off.
Example: To warm whole coffee cake you would cook at power level 80 (Reheat) for 1-1/2 minutes.
To do this, follow these 6 simple steps:
- Touch CLEAR.
- Set 1-1/2 minutes by touching "1", "3" and "0". "130" will
- Touch TIME.
show in the display window.


-
Touch COOK CONTROL. The display window will show "P100".
-
Choose the "80 (Reheat)" setting by touching the numbers "8" and "0". The display window will show "P80". This means the oven is cooking at power level 80.
- Touch START. The oven will begins to cook and the time will begin to count down in the display window. A tone will sounds for 2 seconds when the 1-1/2 minutes are over, and the oven will shut itself off.


How to Use Your Microwave Oven Safely
Although your oven is provided with safety features, it is important to observe the following:
a) It is important not to defeat or tamper with safety interlocks.
b) Do not place any object between the oven front face and the door or allow residue to accumulate on sealing surfaces. Wipe the sealing area frequently with a mild detergent, rinse and wipe dry. Never use abrasive powders or pads.
c) When opened, the door must not be subjected to strain, for example, a child hanging on an opened door or any load could cause the oven to fall forward to cause injury and also damaged to the door.
Do not operate the oven if it is damaged, until it has been repaired by a qualified service engineer. It is particularly important that the oven closes properly and that there is no damage to the:
i} Door (bent)
ii) Hinges and Latches (broken or loosened)
iii) Door seals and Sealing surfaces
d) The oven should not be adjusted or repaired by anyone except properly qualified service engineer.
NOTE
It is quite normal for steam to be emitted around the door during the cooking cycle.
The door is not intended to seal the oven cavity completely but its special SANYO design contributes to the complete safety of the appliance.
CAUTION
-
Do not attempt to operate the oven while empty as this will cause damage.
-
As an exhaust is located in the rear of the oven, install the oven so as not to block the outlet.
Taking Care of Your Microwave Oven
Wipe the oven inside and out with a mild detergent solution, rinse, and wipe dry. This should be done on a weekly basis — more often if needed. Never use abrasive powders or pads.
REMOVABLE PARTS
- The cooking tray can be removed for cleaning at the sink. Wipe up excess of spillage with paper towel or cloth prior to removal of tray.
- The stirrer shield (inside oven top) can be gently wiped in place or removed for washing at the sink. The shield is a flexible plastic, supported at front, side and rear. Carefully remove the shield secured at the front tabs, pull forward to remove.
Wash only in warm (not hot) detergent water, rinse and wipe dry. Avoid hitting or bending the metal stirrer blades, as this could change the heating pattern in the oven.
To replace the shield, position it on the rails on sides and rear of the cooking chamber and secure it between the front metal tabs, ensuring "cut-out" corner is in far left-hand corner.
- While stirrer cover is out of oven make sure to clean along the front ridge where cover sits. Any food left in oven could possibly cause arcing due to carbonization.
- Roller rest can be removed for easy cleaning.
Usable Cooking Utensils and Materials
OVENPROOF GLASS
Ovenware (treated for high-intensity heat), such as utility dishes, bread dishes, pie plates, cake plates, liquid measuring cups, casseroles, and bowls without metallic decoration.
CHINA
Bowls, cups, serving pieces, plates, and platters without metallic decoration.
POTTERY
Dishes, cups, mugs, and bowls.
PLASTIC
Plastic wrap may be used as a cover. Lay the plastic wrap loosely over the dish and press it to the sides. The dish should be deep enough so that plastic wrap will not touch the food. As the food heats, it may cause the wrap to melt wherever it touches the food. Plastic dishes, cups, semi rigid freezer containers, and plastic bags are usable for short cooking operations. Use with care as some softening of the plastic can occur with heat from the food.
Utensils and Materials to Avoid
METAL UTENSILS
Metal utensils are not recommended because the metal shields the food from microwave energy on the bottom and sides, causing uneven cooking results. Metal utensils will also cause arcing and damage the appliance.
METAL DECORATION
Metal-trimmed or -banded dinnerware, casseroles, etc., should not be used. The metal trim interferes with normal cooking and may damage the dish.
ALUMINUM FOIL
Foil may be used in any microwave oven provided—
a) The food must not be completely covered with foil.
b) The foil must not touch the side walls of the oven-at least
2.5cm (1") from the side walls of the oven.
Aluminium foil containers may also be used to reheat food provided the above two (2) points are followed.
WOOD
Wooden bowls and boards will become dried out when used in the microwave oven and may split or crack.
OTHER
Avoid using cracked, flawed, or defective utensils, including ovenproof glassware.
CAUTION: DO NOT USE METAL TIES ON ANY PAPER OR PLASTIC BAGS; THE TIES BECOME HOT AND COULD CAUSE A FIRE.
A Few Other Precautions
- Arcing in the oven during operation usually occurs from use of metallic utensils or overuse of aluminum foil. Arcing is denoted by a "snapping" or "cracking" noise and may be accompanied by bright flashes.
Continuous arcing can damage the unit. If continuous arcing occurs during operation, do not use the unit and call a service engineer.
- Always make sure that closed containers, such as jars of baby food, are opened and plastic pouches of vegetable are pierced before cooking.
Tightly closed containers could explode.
- Do not cook eggs in their shells because they will explode. Puncture the membrane around the yolk before frying eggs. This is because the yolk swells faster than the membrane and the egg explodes when heated quickly.
What to Do If Repairs Are Needed
Get in contact with your nearest Sanyo Service Centre. On no account remove or interfere with any parts or screws. "THIS COULD PROVE VERY DANGEROUS"
Make the following simple check-up before contacting the Sanyo Service Centre:
- If the interior lamp does not light when the "START" pad touched.
-
Make sure that the mains lead is securely plugged in.
-
Make sure that the door is properly closed.
-
Check the fuse or circuit breaker.
- If the lamp inside lights but the food is not heated:
Make sure that the food is not completely covered with a metal container.
- Noisy operation:
-
Make sure that sparks are not being produced due to the use of metal utensils.
-
Make absolutely sure that the contents of the oven are not touching the stirrer shield.

SANYO
SANYO ELECTRIC CO., LTD. OSAKA, JAPAN
- SANYO
- MICROWAVE OVEN
- OPERATING INSTRUCTIONS
- TABLE OF CONTENTS
- GENERAL INSTRUCTIONS
- USER INSTRUCTIONS
- DETAILED DIRECTIONS
- HOW TO USE YOUR MICROWAVE OVEN SAFELY 10
- HOW A MICROWAVE OVEN MAKES COOKING FASTER, EASIER AND MUCH MORE ENJOYABLE
- THE EXTRA FEATURES OF YOUR SANYO MICROWAVE OVEN
- WARNING-THIS APPLIANCE MUST BE EARTHED
- IMPORTANT
- INSTALLATION
- OVEN CONTROL PANEL
- USER INSTRUCTIONS — COOKING GUIDE
- HIGH-POWER" COOKING
- MULTI-POWER" COOKING
- MINUTE MINDER
- EASY USE CHART
- COOKING GUIDE FOR
- MULTI-POWER" SETTINGS
- HOW TO USE YOUR MICROWAVE OVEN SAFELY
- NOTE
- CAUTION
- TAKING CARE OF YOUR MICROWAVE OVEN
- REMOVABLE PARTS
- USABLE COOKING UTENSILS AND MATERIALS
- OVENPROOF GLASS
- CHINA
- POTTERY
- PLASTIC
- UTENSILS AND MATERIALS TO AVOID
- METAL UTENSILS
- METAL DECORATION
- ALUMINUM FOIL
- WOOD
- OTHER
- A FEW OTHER PRECAUTIONS
- WHAT TO DO IF REPAIRS ARE NEEDED
Marque : SANYO
Modèle : EM-3510
Catégorie : Micro-ondes