
EM-FL50N - Four à micro-ondes SANYO - Notice d'utilisation et mode d'emploi gratuit
Retrouvez gratuitement la notice de l'appareil EM-FL50N SANYO au format PDF.


| Type de produit | Four à micro-ondes |
| Marque | Sanyo |
| Modèle | EM-FL50N |
| Dimensions (L x H x P) | 45 x 25 x 35 cm |
| Poids net | 11 kg |
| Alimentation | 230 V ~ 50 Hz |
| Puissance micro-ondes | 900 W |
| Capacité | 25 L |
| Fonctions principales | Cuisson, décongélation, réchauffage, minuterie, verrouillage enfant |
| Niveaux de puissance | 5 niveaux |
| Type de commande | Boutons et molette |
| Affichage | LED numérique |
| Matériau de la cavité | Acier inoxydable |
| Porte | Charnière latérale, ouverture par poignée |
| Sécurité | Verrouillage enfant, arrêt automatique porte ouverte |
| Entretien et nettoyage | Nettoyer avec un chiffon humide et du détergent doux, ne pas utiliser de nettoyants abrasifs |
| Pièces détachées disponibles | Plateau tournant, guide d'ondes, fusible |
| Réparabilité | Indice de réparabilité estimé : 7,5/10 |
FOIRE AUX QUESTIONS - EM-FL50N SANYO
Questions des utilisateurs sur EM-FL50N SANYO
0 question sur cet appareil. Repondez a celles que vous connaissez ou posez la votre.
Poser une nouvelle question sur cet appareil
Téléchargez la notice de votre Four à micro-ondes au format PDF gratuitement ! Retrouvez votre notice EM-FL50N - SANYO et reprennez votre appareil électronique en main. Sur cette page sont publiés tous les documents nécessaires à l'utilisation de votre appareil EM-FL50N de la marque SANYO.
MODE D'EMPLOI EM-FL50N SANYO
INSTRUCTION MANUAL
EM-FL50N EM-FL50N(W)
Microwave Oven

TABLE OF CONTENTS
Oven Specifications 4
Safety Instructions
How To Use Your Oven Safely 4 Other Important Safety Instructions 5
Setting Up & Getting To Know Your Oven
Installation 6
Oven Parts and Accessories 7
Oven Control Panel 8
Operating Instructions
Setting the clock 9
Auto weight defrosting 9
Cooking in one stage 9
Cooking in two and three stages 10
Auto weight defrost and cooking in two stages 10
Plus time 11
Child lock 11
To stop the oven when it is operating 11
Direct Access
Pizza 12 Beverages 12 Potatoes 12 Prepackaged popcorn 12 Hold warm 13 Dinner plate 13
Care Of Your Microwave Oven
Care and Cleaning 14 Before Calling For Service 14
Easy Use Chart 15
SPECIFICATIONS
| EM-FL50N, EM-FL50N(W) | |
| Power Source | 230/240 V 50Hz |
| Maximum Output Power | 900 W* |
| Oven Capacity | 1.0 cu. ft. (27 L) |
| Outside Dimensions (W x D x H) | 520mm x 376mm x 292mm |
| Net Weight | 15.5 Kg |
*According to IEC 705 test procedures.
HOW TO USE YOUR OVEN SAFELY (MICROWAVE)
- When boiling water or other liquids, be sure to use a wide mouthed container, this will allow air bubbles to escape freely and prevent boiling over. Overheating the liquid beyond boiling point can occur without the evidence of bubbling. This could result in a sudden boil over of the hot liquid.
- Do not attempt to operate the oven while empty as this will cause damage.
- Do not deep fry in the microwave oven as the temperature of the oil cannot be controlled and it may overheat.
- Never completely seal containers in the microwave oven. Coverings are necessary but containers must not be airtight.
-
Small quantities of food with low moisture content or high fat or sugar content can burn, dry out or catch fire if cooked or re-heated too long. Please note that the heating/ cooking period required is extremely short: for example it only takes approximately 15 seconds to heat one mince pie or similar.
-
Always pierce food which has a skin or membrane, for example, potatoes, tomatoes, apples, sausages etc. If you don't pierce them steam will build up inside and they may explode.
-
When disposable containers of plastic, paper or other combustible materials are used to reheat food, it is advisable to check from time to time during the cooking cycle.
NOTE
It is quite normal for steam to be emitted around the door, for misting to occur on the door, or even for water droplets to appear below the door during the cooking cycle. This is merely condensation from the heat of the food and does not affect the safety of your oven. The door is not intended to seal the oven cavity completely but its special SANYO design contributes to the complete safety of the appliance.
WARNING:
Only allow children / Infirm Persons to use the microwave, without supervision, when adequate instructions have been given so that the child / Infirm person is able to use the microwave oven in safeway and understands the hazards of improper use.
ALTHOUGH YOUR OVEN IS PROVIDED WITH SAFETY FEATURES, IT IS IMPORTANT TO OBSERVE THE FOLLOWING:
a. Do not tamper with safety interlocks.
b. Do not place any objects between the oven and the door or allow any food residue to accumulate on sealing surfaces. Wipe the door sealing area frequently with a mild detergent, rinse and wipe dry. Never use abrasive powders or pads.
c. When opened, the door must not be subjected to strain, for example, a child hanging on an opened door may cause the oven to fall forward resulting in injury.
d. If any damage is apparent, do not operate the oven. Contact your nearest SANYO SERVICE CENTRE.
e. Children may use the appliance only without supervision as long as instructions had been given which enables the child for safe operation and makes the child aware of the dangers of false operation.
OTHER IMPORTANT SAFETY INSTRUCTIONS
The following safety precautions should be followed when using this appliance:
- Read all instructions before first use.
- As with most cooking appliances, close supervision is necessary.
If a fire should start:
* Keep the oven door closed.
* Turn the oven off.
* Disconnect the power cord or shut off the power at the mains.
Other important safety points to remember are:
WHEN COOKING BY MICROWAVE:
- Do not use wire ties in the oven. Be sure to inspect purchased items for wire ties and remove before placing food in the oven.
- It is important to keep the oven interior clean. Food particles left on the oven walls reduce the efficiency of the microwaves.
- Do not heat foods or liquids in bottles or jars with lids on. Air must be allowed to escape from the container.
- Milk or food for babies should be heated on 450W. It should then be stirred thoroughly and tested to ensure that it is at the correct temperature before giving it to the baby.
- Care must be taken when removing cups of hot liquid from the turntable. Cups should be lifted not slid to the edge of the turntable to prevent tipping.
WARNING
(a) Do not adjust or repair microwave oven yourself. Do not operate the oven if it is damaged, until it has been repaired by a service engineer trained by the manufacturer.
(b) It is dangerous for anyone other than a properly qualified engineer trained by the manufacturer to carry out adjustments or repairs.
(c) If the power supply cord is damaged, it must be replaced by the manufacturer or its service agent or a similarly qualified person in order to avoid a hazard.
(d) On no account remove or interfere with any parts or screws. THIS COULD PROVE VERY DANGEROUS.
(e) Liquids or other food must not be heated in sealed containers since they are liable to explode.
(f) Some products such as whole eggs and sealed containers - for example, closed glass jars - may explode and should not be heated in this oven. Occasionally, poached eggs may explode during cooking. Always pierce the yolk, then cover and allow the standing time of one minute before removing cover.
SAVE THESE INSTRUCTIONS
INSTALLATION
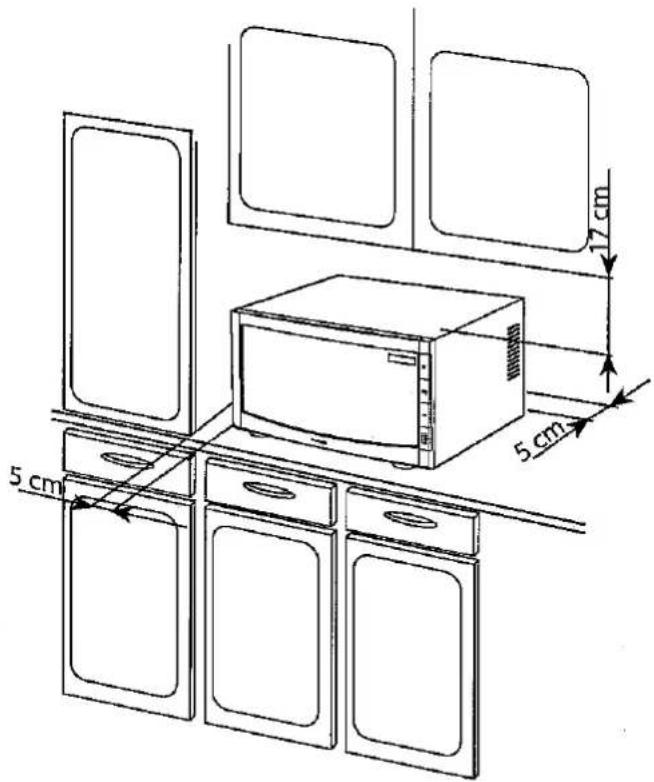
OVEN POSITIONING
- Install the oven on a flat, level surface strong enough to safely bear the weight of the oven.
- Do not locate the oven near areas where heat and moisture are generated as this may lower oven efficiency.
- Covering the air vents may lead to malfunctioning, therefore, leave a gap of at least 5cm from the walls and 17cm above the microwave.
- This oven conforms to EMC Radio interference Directive 89/336/EEC, however some interference may occur if it is placed too close to a radio or TV, so keep them as far apart as possible.
- The oven must be positioned so that the supply plug is easily accessible.
OVEN PARTS AND ACCESSORIES
Your oven is supplied with the following accessories:
Turntable 1
Turntable roller rest 1
Instruction manual 1
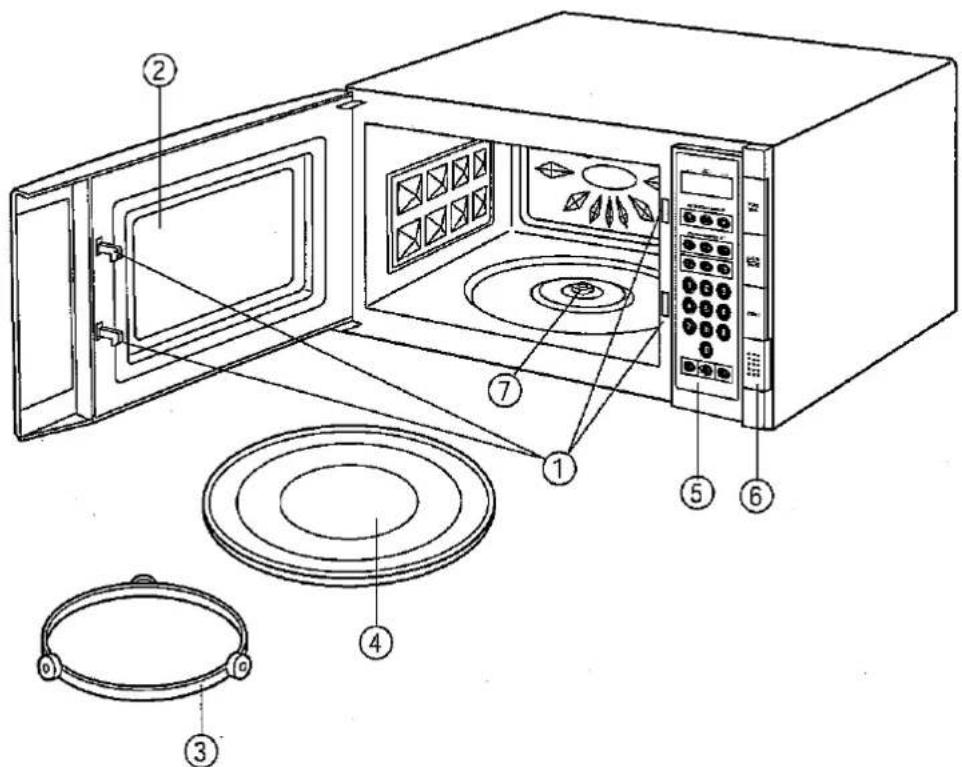
TURNTABLE INSTALLATION
- Door safety locks
- Oven window
- Roller rest
- Turntable
- Control panel
- Door release button
-
Hub and bearing washer
-
Remove packing tape securing the hub receptacle and bearing washer to the oven floor.
- Position the roller rest within the circular indentation.
- Place the turntable on top of the roller rest making sure it is centered and securely interlocked with the hub receptacle on the floor.
• Make sure the hub receptacle and bearing washer is installed in place all the time.
• Always place the turntable with the smooth side facing up. The turntable should never be restricted.
- Both turntable and the roller rest must always be used during the cooking.
- All food and containers of food must always be placed on the turntable for cooking.
OVEN CONTROL PANEL
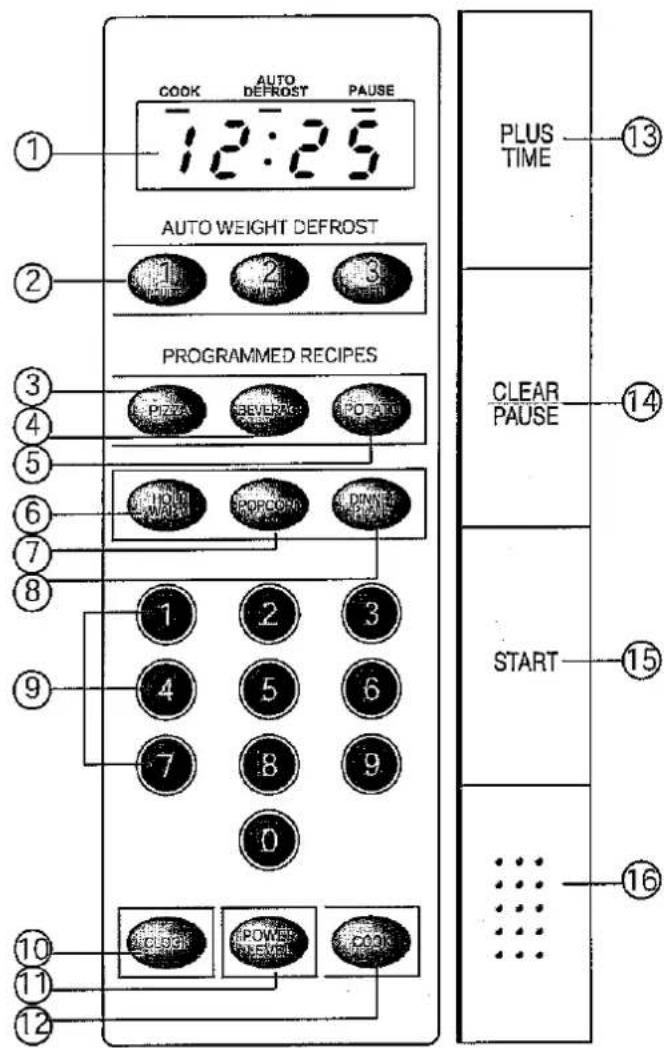
- Display
Shows cooking time, power level, clock time and function indicators.
- Auto Weight Defrost Keys
Use to set the desired defrosting category.
- Pizza Key
Touch to reheat precooked pizza.
- Beverage Key
Use to heat beverages.
- Potato Key
Touch to cook potatoes.
- Hold Warm Key
Use to keep the food warm after cooking is completed.
- Popcorn Key
Use to cook prepackaged popcorn.
- Dinner Plate Key
Use to reheat plated foods.
- Number keys (0-9)
Use to select the numbers for Stage 1, Stage 2 and Stage 3 cooking, present and Auto Weight Defrost times and the cooking power levels.
- Clock Key
Touch to set the present time.
- Power Level Key
Use to set the desired cooking power level.
- Cook Key
Use to set the cooking time
- Plus Time Button
Each touch adds 10 seconds to count down cooking time.
- Clear/Pause Button
Use to stop the oven operation or to delete the cooking data
- Start Button
Use to start a selected operation.
- Door Open Button
Pushing this button stops oven operation and opens the door.
OPERATING INSTRUCTIONS
SETTING THE CLOCK
When the oven is first plugged in, the display will flash "0:00" and a tone will sound. If the AC power ever goes off, the display will flash "0:00" when the power comes back on.
The display will flash "0:00" and a tone will sound.
- Press the Door Release button to open the door. Touch the Number pads to set the correct present time.
EXAMPLE: To set the time to "10:12", touch "1", "0", "1", "2" in sequence. The display will show the numbers pressed in the order you pressed them.
- Touch the CLOCK pad.
The display will show the present time and stops blinking. The 12 hour digital clock allows you to set it from "1:00" to "12:59".
NOTE: If the oven is used before the present time is set, the display will show "0" after the cooking is completed and the door is opened. To reset present time in the display window when the oven is off, touch the CLOCK pad. The colon starts blinking. Enter the correct present time by following the above procedures.
AUTO WEIGHT DEFROSTING
AUTO WEIGHT DEFROST lets you easily defrost foods by eliminating guesswork in determining defrosting time. The minimum weight for Auto Weight Defrost is 0.1kg. The maximum weight depends on the food category. Up to 3.0 kg for poultry, 2.0 kg for meat and 2.0 kg for fish. Follow the steps below for easy defrosting.
- Press the Door Release button to open the door. Enter the desired auto weight category.
EXAMPLE: To select POULTRY, touch "1"; the display will show "dEF 1" and the AUTO DEFROST indicator will light.
- Enter the food weight.
EXAMPLE: To select 0.5 (1/2) kg, touch "5".
| Category | Display | Food | Range |
| 1 | dEF 1 | Poultry | 0.1kg to 3.0kg |
| 2 | dEF 2 | Meat, Ground | 0.1kg to 2.0kg |
| 3 | dEF 3 | Fish | 0.1kg to 2.0kg |
- Close the door and then touch the START pad.
When the START pad is touched, the AUTO DEFROST indicator will blink, the display will count down the remaining defrosting time in minutes and seconds and will beep 5 times when defrosting is completed.
COOKING IN ONE STAGE
Use the 10 key pads (number pads) to select a cooking or other operational time.
- Press the Door Release button to open the door. Touch the COOK pad.
The display will show "0" and a tone will sound; the COOK indicator will light.
- Touch the Number pads for desired cooking time.
EXAMPLE: To set the cooking time to "13:40"(13 min. 40 sec.), touch "1", "3", "4" and "0" in sequence.
- Touch the POWER LEVEL pad and then the Number pad for the power.
EXAMPLE: To select 30% power, touch the POWER LEVEL pad and then "3". The display will show "PL 3".
NOTE: If this step is omitted, the oven will cook at full (100%) power.(PL10)
- Close the door and then touch the START pad.
When the START pad is touched, the COOK indicator will blink, the display will count down the remaining cooking time in minutes and seconds and will beep 5 times when cooking is completed.
OPERATING INSTRUCTIONS
COOKING IN TWO AND THREE STAGES
For best results, some recipes call for one power level for a certain length of time and another power level for a different length of time. Your microwave oven can be set to change from one power level to another, or you may Auto Weight Defrost in the first stage and then cook in the second and/or third stages.
- Press the Door Release button to open the door. Touch the COOK pad.
The display will show "0" and a tone will sound. The COOK indicator will light.
- Touch the Number pads for the desired cooking time for Stage 1.
EXAMPLE: To set the Stage 1 cooking time to "11:40" (11 min. 40 sec.), touch "1", "1", "4" and "0" in sequence. The display will show the numbers pressed in the order you pressed them.
- Touch the POWER LEVEL pad and then the Number pad for the power.
EXAMPLE: To select 30% power, touch the POWER LEVEL pad and then "3". The display will show "PL 3".
NOTE: If this step is omitted, the oven will cook at full (100%) power. (PL10)
- Touch the COOK pad.
The display will show "0" and a tone will sound.
- Touch the Number pads for the desired cooking time for Stage 2.
EXAMPLE: To set the Stage 2 cooking time to "11:20" (11 min. 20 sec.), touch "1", "1", "2" and "0" in sequence. The display will show the numbers pressed in the order you pressed them.
- Touch the POWER LEVEL pad and then the Number pad for the power.
EXAMPLE: To select 80% power, touch the POWER LEVEL pad and then "8". The display will show "PL8".
NOTE: If this step is omitted, the oven will cook at full (100%) power. (PL10)
- Close the door and then touch the START pad. The oven will begin cooking in Stage 1, then switch to Stage 2.
When the START pad is touched, the COOK indicator will start blinking to show the oven is cooking Stage 1. The display will count down the remaining cooking time in Stage 1, then the oven will beep and start Stage 2.
AUTO WEIGHT DEFROSTING AND COOKING IN TWO STAGES (COOKING IN THREE STAGES)
Some recipes require frozen foods to be thawed before cooking.
This oven can be programmed to automatically defrost foods before cooking.
-
Program the oven to perform the desired Auto Weight Defrost function as described on page 9. This is considered first stage when using the Auto Weight Defrost feature in conjunction with Stage 1 and Stage 2 cooking.
-
Press the COOK pad and program the oven to cook in the remaining two stages as described starting on page 10.
NOTE: To Auto Weight Defrost and Cook in one stage only, skip the programming of the first stage.
WATTAGE OUTPUT CHART
| Press | Power Level | Wattage Output |
| none | 10 | 900W |
| 9 | 9 | 810W |
| 8 | 8 | 720W |
| 7 | 7 | 630W |
| 6 | 6 | 540W |
| 5 | 5 | 450W |
| 4 | 4 | 360W |
| 3 | 3 | 270W |
| 2 | 2 | 180W |
| 1 | 1 | 90W |
OPERATING INSTRUCTIONS
PLUS TIME
The Plus Time Feature allows you to add cooking time in 10 second intervals.
- PlusTime pad can be used during cooking without door open in stage one through stage three only. Plus Time cannot be used during Auto Weight Defrost or preprogrammed recipes, such as Popcorn, Beverages, Potatoes.
- Plus Time pad adds 10 seconds for each touch to count down cooking time when cooking in stages one through three.
- Plus Time pad can be used for any cooking time up to 89:59 minutes. If cooking time displayed is 90:00 minutes or more, the Plus Time pad will not work.
CHILD LOCK
The Child Lock prevents unwanted oven operation by small children. The oven can be set so that the control panel is deactivated or locked.
TO SET CHILD LOCK
- Touch the "0" pad once.
- Touch the START pad 5 times.
The display will show "LO C".
TO CANCEL THE CHILD LOCK
- Touch the "0" pad once.
- Touch the START pad 5 times.
The display will return to the present time.
NOTE: No beep sound will be heard when touching the "0" pad.
TO STOP THE OVEN WHILE IT IS OPERATING
- Press the CLEAR/PAUSE button.
* The PAUSE indicator will start blinking.
* The oven can be restarted by pressing the START button.
* Push the CLEAR/PAUSE button one more time to erase all instructions.
* You must enter new instructions.
- Open the door.
* You can restart the oven by closing the door and touching the START button.
DIRECT ACCESS
PIZZA
Use the Pizza feature to reheat refrigerated pizza (1 - 3 slices).
- Press the Door Release button to open the door. Touch the PIZZA pad once for each slice.
When the PIZZA pad is touched, the display will show "P 1".
- Close the door and the touch the START pad.
When the START pad is touched, the display will count down the remaining cooking time in minutes and seconds and will beep 5 times when cooking is completed.
| 1 Slice | 2 Slices | 3 Slices |
| “P 1” | “P 2” | “P 3” |
| 0.25 | 0.50 | 1.10 |
BEVERAGES
Use the Beverage feature to heat up to 3 cups (250cc per cup) of beverage. Place each cup in the oven.
- Open the door and then touch the BEVERAGE pad repeatedly until the desired number of cups appear in the display window.
EXAMPLE: To select 2 mugs, touch the BEVERAGE pad 2 times; "CU P2" will appear in the display.
- Close the door and then touch the START pad; the beverage will be heated.
When the START pad is touched, the oven will start heating. The display will count down remaining heating time and will beep 5 times when cooking is completed.
NOTE: Up to 3 mugs of beverage can be heated. Heating time is as follows:
| 1 CUP | CU P1 ( 1 Min., 45 Sec.) |
| 2 CUPS | CU P2 ( 3 Min., 15 Sec.) |
| 3 CUPS | CU P3 ( 4 Min., 55 Sec.) |
POTATOES
Place 1 - 3 medium size potatoes in the oven.
- Press the Door Release button to open the door. Touch the POTATO pad once for each potato.
When the POTATO pad is touched, the display will show "PO 1"
- Close the door and then touch the START pad.
When the START pad is touched, the display will count down the remaining cooking time in minutes and seconds and will beep 5 times when cooking is completed.
| 1 Potato | 2 Potatoes | 3 Potatoes |
| “PO 1” | “PO 2” | “PO 3” |
| 3.20 | 5.40 | 7.15 |
PREPACKAGED POPCORN
Place the popcorn package (100 g) onto a microwaveable dish in the oven.
- Open the door and then touch the POPCORN pad.
When the POPCORN pad is touched, the display will show "PO P".
- Close the door and then touch the START pad.
When the START pad is touched, the display will count down the cooking time of 2:00 and will beep 5 times when cooking is completed.
NOTE:
- Use only 1 package (approx. 100 g) at a time.
- Use only a microwaveable popcorn package in the microwave oven.
- Do not try to pop unpopped kernels.
- Do not leave the oven unattended while popping popcorn. If the popcorn does not pop sufficiently, do not press the POPCORN pad again as the popcorn may burn. Check the popcorn bag for cooking instructions.
- When opening the package, face it away from you to avoid contact with any steam released.
DIRECT ACCESS
HOLD WARM
The Hold Warm feature can be used to keep food warm after microwave or conventional cooking is completed.
- Program the desired power level and cooking time as previously instructed.
EXAMPLE: Select a cooking time of "25:10".
- Touch the HOLD WARM pad for every 10 minutes of Hold Warm time desired (up to 30 minutes).
EXAMPLE: To select 20 minutes, touch the HOLD WARM pad 2 times.
- Close the door and then touch the START pad; the oven will begin cooking as programmed in step 1.
EXAMPLE: The HOLD WARM indicator will light, the oven will begin cooking and the display will count down the remaining cooking time.
When cooking is completed, the HOLD WARM indicator will start blinking. The display will count down the remaining Hold Warm time. When the Hold Warm time ends, you will hear 5 beeps.
When the cooking is completed, the oven will begin the Hold Warm mode as programmed in step 2.
NOTES:
The Hold Warm feature operates independently or together with Stage 1 cooking. To keep food warm after conventional cooking, omit step 1.
DINNER PLATE
Use the Dinner Plate feature to reheat pre-cooked foods from the refrigerator.
- Press the Door Release button to open the door. Touch the DINNER PLATE pad once for regular amount, twice for smaller amount and three times for a larger amount of food.
EXAMPLE: For regular amount of food, touch the DINNER PLATE pad once. "rE G" will be displayed.
REGULAR:
A regular amount of food: Approx. 250g (for example, 100g sliced meat or poultry, 90g potato or rice and 60g vegetables or equivalent.)
SMALL:
A smaller amount of food: Approx. 170g.
BIG:
A larger amount of food: Approx. 350g.
- Close the door and then touch the START pad.
The oven will start cooking and the display will count down the cooking time. When cooking is completed, the oven will beep 5 times.
| Regular | Small | Larger |
| “rE G” | “SAL” | “bl G” |
| 1.42 | 0.55 | 2.20 |
CARE AND CLEANING
It is important that no liquid food or grease particles are left in the oven as this ensures the correct performance of your oven and reduces the risk of corrosion. After use always wipe out your oven thoroughly and dry.
INTERIOR OF THE OVEN
It is essential to keep your oven clean at all times. The oven cavity should be cleaned and wiped dry after each use. Please ensure that the oven is cool before cleaning. Wipe out with a mild detergent solution, paying particular attention to the microwave outlet cover (see illustration opposite) and the door seal area. Take particular care not to allow water to seep through the small holes in the oven walls. Wipe dry with a soft cloth. Never use abrasive cleaning materials as these can damage the oven cavity.
EXTERIOR OF OVEN
Wipe with a damp cloth. Do not allow water to seep into vents. Never use abrasive cleaning materials as these can damage your oven.
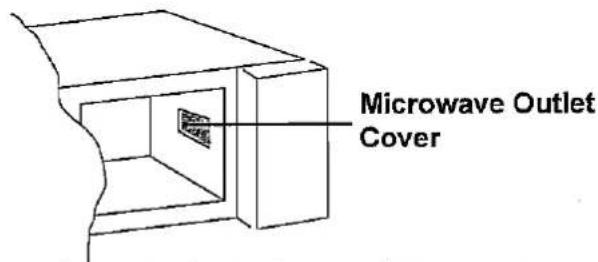
Do not use any type of oven cleaner on your microwave oven as this can cause severe damage.
REMOVABLE PARTS
The glass turntable, roller rest, hub receptacle and bearing washer can be removed for easy cleaning. Wash in warm soapy water and dry.
BEFORE CALLING SERVICE
You can often correct operating problems yourself. If your microwave oven fails to work properly, locate the operating problem in the chart below and try the solutions marked for each problem.
If the microwave oven still does not work properly, contact the nearest SANYO SERVICE CENTRE.
PROBLEMS
Oven will not start Arcing or sparking Unevenly cooked foods Overcooked foods Undercooked foods Improper defrosting

POSSIBLE CAUSES
er cord plugged in ? Is door closed ? Cooking time not set. Use microwave-safe cookware only.
Completely defrost food.
Check to see that ventilation ports are not restricted.
Turn or stir food.
Do not operate when empty.
Use correct time / cooking power level.
EASY USE CHART
SETTING THE CLOCK
- Open the door.
- Touch "Number pads" to set hour and minutes.
- Touch "Clock" pad.
MICROWAVE COOKING
- Open the door.
- Touch Number pads to set cooking time.
- Touch "Power Level" pad to set power level.
- Close the door and touch "Start".
AUTO WEIGHT DEFROST
- Open the door.
- Enter the desired "Auto Weight Defrost" category.
- Enter the food weight.
- Close the door and touch "Start".
PIZZA
- Open the door.
- Touch "Pizza" once for each slice.
- Close the door and touch "Start".
BEVERAGES
- Open the door.
- Touch "Beverage" once for each cup.
- Close the door and touch "Start".
POTATOES
- Open the door.
- Touch "Potato" once for each potato.
- Close the door and touch "Start".
PREPACKAGED POPCORN
- Open the door.
- Touch "Popcorn" once.
- Close the door and touch "Start".
EM-FL50NEUK
CODE No: MO-P5677
15
SANYO
SANYO Electric Co. Ltd. Printed in Thailand
- INSTRUCTION MANUAL
- EM-FL50N EM-FL50N(W)
- MICROWAVE OVEN
- HOW TO USE YOUR OVEN SAFELY (MICROWAVE)
- NOTE
- WARNING
- ALTHOUGH YOUR OVEN IS PROVIDED WITH SAFETY FEATURES, IT IS IMPORTANT TO OBSERVE THE FOLLOWING
- OTHER IMPORTANT SAFETY INSTRUCTIONS
- IF A FIRE SHOULD START
- WHEN COOKING BY MICROWAVE
- SAVE THESE INSTRUCTIONS
- INSTALLATION
- OVEN POSITIONING
- OVEN PARTS AND ACCESSORIES
- TURNTABLE INSTALLATION
- OVEN CONTROL PANEL
- OPERATING INSTRUCTIONS
- SETTING THE CLOCK
- AUTO WEIGHT DEFROSTING
- COOKING IN ONE STAGE
- COOKING IN TWO AND THREE STAGES
- AUTO WEIGHT DEFROSTING AND COOKING IN TWO STAGES (COOKING IN THREE STAGES)
- PLUS TIME
- CHILD LOCK
- TO SET CHILD LOCK
- TO CANCEL THE CHILD LOCK
- TO STOP THE OVEN WHILE IT IS OPERATING
- DIRECT ACCESS
- PIZZA
- BEVERAGES
- POTATOES
- PREPACKAGED POPCORN
- HOLD WARM
- NOTES
- DINNER PLATE
- REGULAR
- SMALL
- BIG
- CARE AND CLEANING
- INTERIOR OF THE OVEN
- EXTERIOR OF OVEN
- REMOVABLE PARTS
- BEFORE CALLING SERVICE
- PROBLEMS
- POSSIBLE CAUSES
- EASY USE CHART
- MICROWAVE COOKING
- AUTO WEIGHT DEFROST
Marque : SANYO
Modèle : EM-FL50N
Catégorie : Four à micro-ondes