
PS-70AP - Lave-linge HITACHI - Notice d'utilisation et mode d'emploi gratuit
Retrouvez gratuitement la notice de l'appareil PS-70AP HITACHI au format PDF.


| Type de produit | Lave-linge |
| Marque | Hitachi |
| Modèle | PS-70AP |
| Capacité de lavage | 7 kg |
| Vitesse d'essorage maximale | 1000 tours/min |
| Classe énergétique | A+ |
| Consommation d'eau par cycle | 50 L |
| Niveau sonore (lavage/essorage) | 58 dB / 75 dB |
| Dimensions (H × L × P) | 85 × 60 × 55 cm |
| Poids net | 68 kg |
| Type d'installation | Libre ou encastrable |
| Alimentation électrique | 230 V / 50 Hz |
| Puissance nominale | 2000 W |
| Programmes de lavage | Coton, Synthétiques, Délicats, Laine, Rapide, Rinçage + Essorage |
| Options supplémentaires | Départ différé, Prélavage, Arrêt cuve pleine |
| Système de contrôle | Électronique avec affichage LED |
| Type de tambour | Inox |
| Entretien et nettoyage | Nettoyage régulier du filtre, bac à lessive amovible, programme auto-nettoyant |
| Sécurité | Sécurité enfant, anti-débordement, arrêt automatique en cas de déséquilibre |
| Pièces détachées et réparabilité | Disponibles via service après-vente Hitachi, indice de réparabilité non communiqué |
| Garantie | 2 ans pièces et main-d'œuvre |
FOIRE AUX QUESTIONS - PS-70AP HITACHI
Questions des utilisateurs sur PS-70AP HITACHI
0 question sur cet appareil. Repondez a celles que vous connaissez ou posez la votre.
Poser une nouvelle question sur cet appareil
Téléchargez la notice de votre Lave-linge au format PDF gratuitement ! Retrouvez votre notice PS-70AP - HITACHI et reprennez votre appareil électronique en main. Sur cette page sont publiés tous les documents nécessaires à l'utilisation de votre appareil PS-70AP de la marque HITACHI.
MODE D'EMPLOI PS-70AP HITACHI
Model PS-70AP
Thank you for purchasing the Hitachi Twin-Tub Washer-Model PS-70AP
Please carefully read this Instruction Manual to ensure correct use of the machine.
After reading the manual please keep it for future reference.

natural_image
Line drawing of a washing machine with front panel and side panels, connected to a coiled hose (no text or symbols)Big Capacity and Large Size Spin Dryer Basket
● The Washer is not intended for use by young children or infirm persons without supervision.
● Young children should be supervised to ensure that they do not play with the Washer.
Contents
Features 2
Cautions 2
Parts Description and Functions of the Operation Panel 3\~4
Reference for Washing 5
Washing Procedure 5\~8
- Preparation 5
- Washing 6
- Preliminary Spinning 6
- Rinsing 7
- Spinning 8
- When washing is complete 8
Washing Various Clothes 9
Hints for Effective Washing 10
Precautions When Operating 11
Protection against Freezing....11
Cleaning the Machine 12
Installation 13
Before Calling for Service 14
About After-Sales Service and Warranty .....14
Checks for Safe Use 15
Features
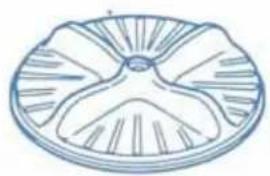
1 Large pulsator
● The large pulsator enables washing of large loads.
natural_image
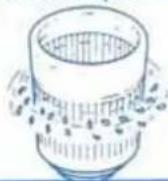
Simple line drawing of a cross-section of a biological structure (no text or symbols)2 Large-size spin dryer basket which facilitates putting in and taking out clothes
● Clothes can be put in and taken out with ease because this is a large-size spin dryer basket.
● Dewatering can be done quickly owing to the wave-form spin dryer basket.
Cautions
| Be sure to earth the Washer. | Do not put your hands into the spin dryer basket when it is spinning. | ||
| *To prevent electrical shock.(For 2-pin plug cord)*Where three-pin grounded outlets are used, the machine would have a three-wire cord and plug. | 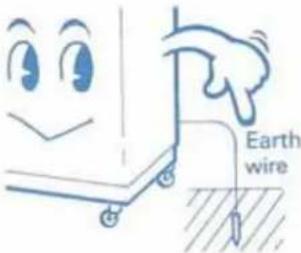 | ●Should you do so, clothes can catch your fingers and damage them. Keep children away from the washer.*If the spin dryer basket does not stop within fifteen seconds after you open the spin dryer lid, stop using the washer, and ask for repairs immediately. | 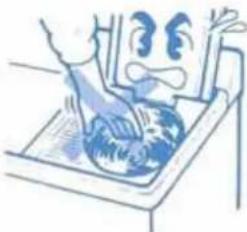 |
| Never put any of the following things into the washing tub or spin dryer basket. | Do not install the Washer in a bathroom or outdoors where it is exposed to wind and rain. | ||
| ●Kerosene, gasoline, benzene, alcohol, thinners, or clothes wet with any of these substances.*An explosion or fire can take place. |  |  *An electrical shock or malfunction may occur. *An electrical shock or malfunction may occur. | |
| Keep the Washer away from fire. | Never allow a child to peer into the washing tub. | ||
| ●Candle, tobacco, kerosene stove, etc.*The Washer can be deformed, or a fire can occur. | 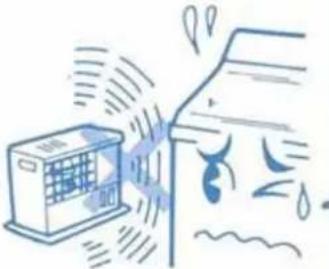 |  *A child can fall into the washing tub accidentally.Do not put a stand or box near the Washer. *A child can fall into the washing tub accidentally.Do not put a stand or box near the Washer. | |
Parts Description and Functions of t

Convenient excess water indicator outlet
Overflow from the excess water indicator outlet means too much water has been supplied. Adjust the tap accordingly.
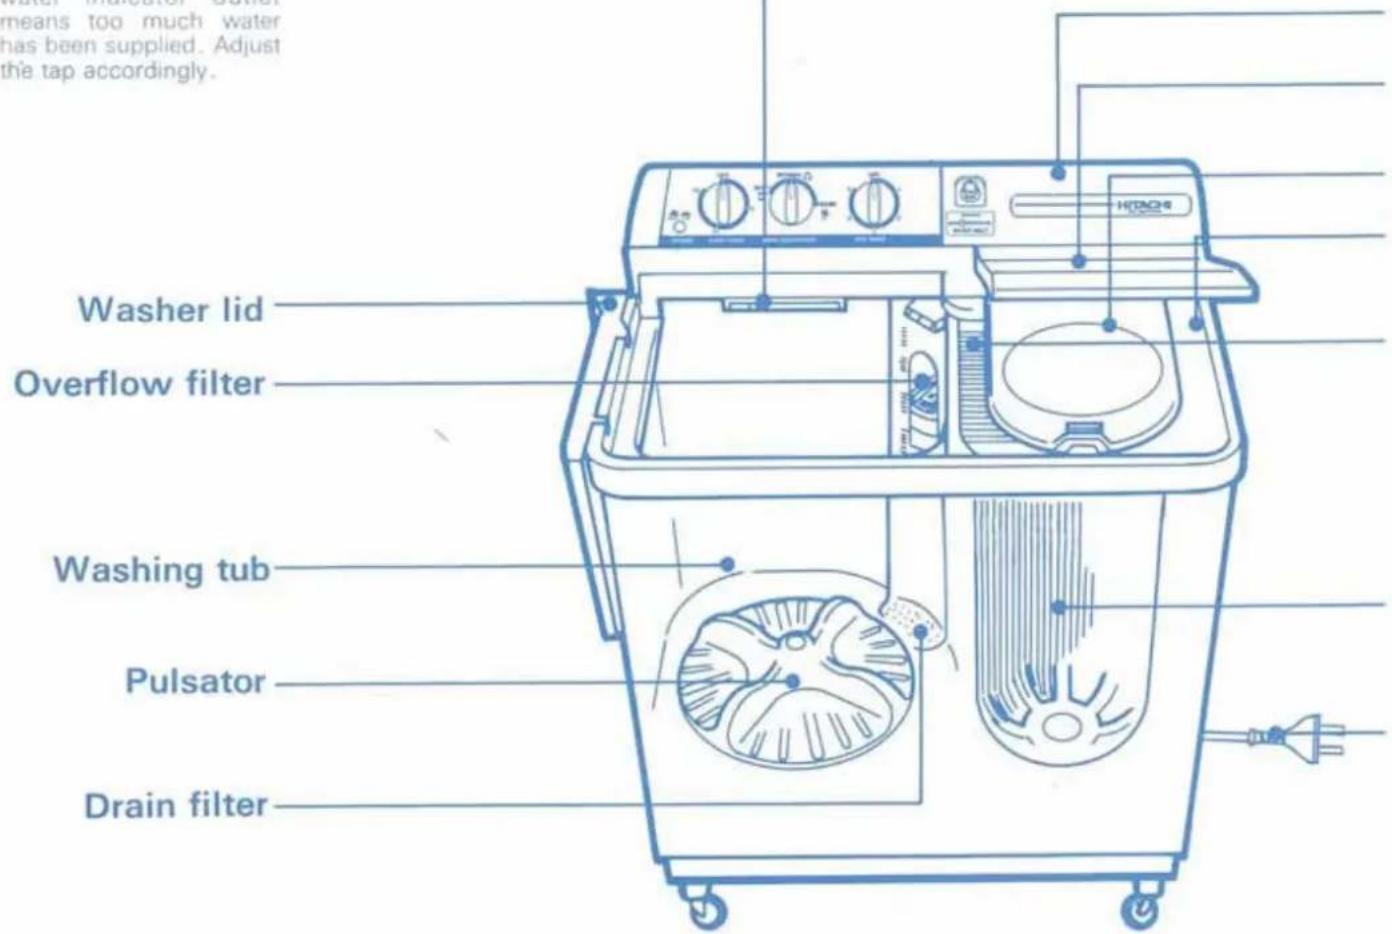
the Operation Panel
Spin timer
ed to set spinning time. you want to set it at less than e minute, turn the control yond the two minutes position, d then turn it back to the sired position.
Water inlet selector
You can select water supply to wash-tub side or spin-tub side.
- Don't spin supplying water to spin-tub. Because Spin-mortor will overheat.
Operation panel
Spin dryer lid
Inner safety lid
Spin dryer hatch
Hand washing corner
You can clean the collar and cuffs of shirts, etc. using the hand washing corner.
Spin dryer basket
Power cord
Attachments
Check that the following is contained in the washer package. If not contact your dealer.
Water supply joint (1)

Inner cover(1)

Water supply hose (1)

Water drain hose(1)
U pipe(1)
Castors (4)


Washing Procedure
1 Preparation
2 Washing
References for Washing
Table 1. Wash mode/drain and Washing Time.
| Kinds of clothing | Washing time | Wash mode/drain |
| Extremely soiled heavy fabric. Normal soiled cotton. | 10 to 15 minutes | Normal |
| Linen, cotton, etc. | 8 to 10 minutes | |
| Ordinary clothes (underwear, etc.) | 7 minutes | |
| Slightly soiled synthetic fiber | 2 to 5 minutes | |
| 100% wool, mixed wool knitting, thin synthetic fiber with tags indicating hand washing | 2 to 5 minutes | Soft |
NOTE: Cold water recommender for 100% wool items to avoid possible clothes damage.
Table 2. Water Level and Amount of Detergent
Use the detergent specified on a tag attached to the clothing.
| Maximum mass of dry cloth.WASH : 6 kg.SPIN : 3 kg. | Water level | Water | Suggested detergent Q'ty |
| 3 maximum | 56 L | 80g | |
| 2 | 49 L | 69g | |
| 1 | 42 L | 59g | |
| L_2 | 35 L | 48g | |
| L_1 | 28 L | 37g |
This is a guide only, follow detergent manufacturers instructions where provided.
1. Preparation
- See "Installation" (on page 13).
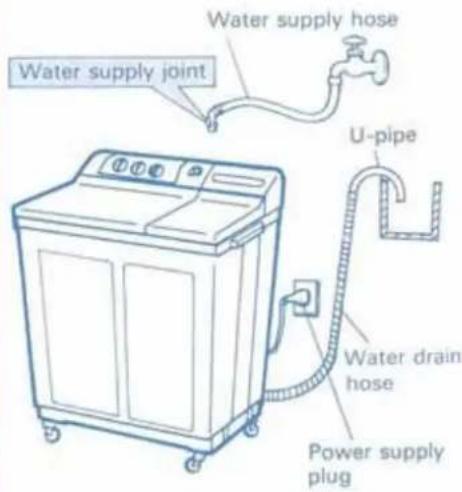
1 Attach the U-pipe to the end of the Drain Hose and hang onto the brim of a Sink.
②Connect the water supply joint and water supply hose (with an inner diameter of 15mm).
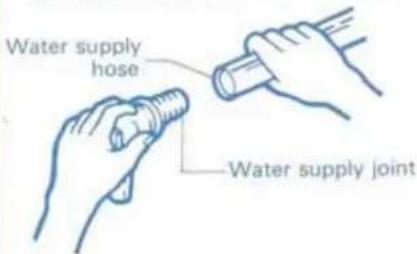
③ Insert the water supply joint into the water supply inlet.

=Before washing, see "Hints for Effective Washing" on page 10.
.Washing

he power switch to ON.
he wash mode/drain to "NORMAL, SOFT"
water to dissolve detergent.
with water until the drain filter is submerged d detergent.
For the suggested amount of detergent, see Table 2 on page 5.

the wash timer at about two minutes dissolve the detergent completely.
water splashes, it means the water level is too /。
clothes into the washing tub, and add water the water level is suitable for the amount of clothing.
d water until the water level reaches at least the rest water level limit marked inside the washing
: Table 2 on page 5.
wash mode/drain at "NORMAL", "SOFT" or wash mode/drain, see Table 1 on page 5.
:he wash timer.

clothes are not cleaned properly, wash them again.
on washing is completed, set the wash mode/ to DRAIN to drain water.
you want to use the same water again, you ed not drain it.
3. Preliminary Spinning
Before rinsing, be sure to perform preliminary spinning to remove as much soapy water as possible.
Thus, you can reduce the time for rinsing.
① Open the spin dryer lid and inner lid.
②Put the clothes into the spin dryer basket evenly, and apply the inner cover horizontally by putting it under the bottom of the balancer.
*The inner cover holds down the clothes while they are spun for drying.
Bottom of balancer

* Evenly loaded clothes reduces vibration and out of balance spinning.
③Close the inner lid and spin dryer lid.
④ Set the spin timer at two or three minutes, and perform spinning.
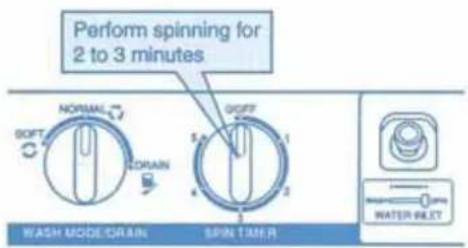
See 5. Spinning on page 8. For suggested spinning times.
4. Rinsing
You can perform either "pool rinse" or "overflow rinse"
● The former is recommended to save water.
- The latter rinses clothes completely.
① Put clothes into the washing tub.
② Set the wash mode/drain to "NORMAL", "SOFT".
③ Set the water level.

Pool Rinse
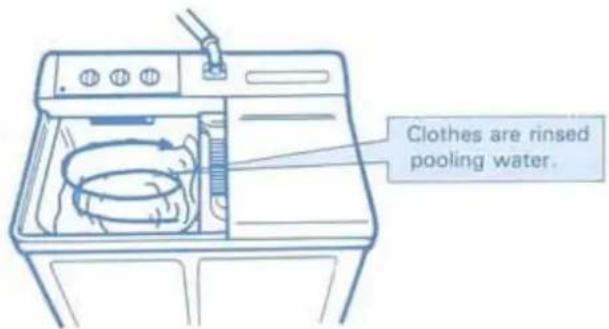
4Fill with water to the selected water level.
- Close the water tap when water level reaches the desired amount.
5 Set the timer at two or three minutes.
6 Put the clothes into the spin dryer basket, and perform spin for one minute.
7 About one minute after spinning, set the wash mode/ drain to DRAIN, and drain water.
* This is done for easy draining at the spin dryer side.
8 If rinsing is incomplete, repeat steps 4 through to 7 once or twice.
Overflow Rinse

4 When the water level has reached the applicable setting, reduce the amount of water and continue to supply water so that it will gently overflow to the outlet.
The water level during overflow rinse 'becomes higher than the water level limit inside the washing tub.
*The reason is that the overflow outlet is higher than the water level limit.

Excess water indicator outlet
⑤Set the washing time for 3 to 5 minutes, and perform rinsing.
Set it at 7 minutes if you did not perform preliminary spin-rinsing.
- If rinsing is incomplete, extend the rinsing time. When rinsing is complete, close the water tap.
Hints for Rinsing
- It saves water to wash clothes in the same water that was used for rinsing.
- If the difference between the ambient temperature and water temperature is too great, as in summer, the floor may get wet due to condensation on the outer surface of the washing tub. See "Installation" on page 13.
Washing Procedure
5. Spinning
Put the clothes into the spin dryer basket, and perform spinning referring to the table below.
(Perform steps 1 through to 3 for "Preliminary Spinning".)
Spinning Time
| Items | Spinning time |
| Sheets (cotton, towel) | 3 to 5 minutes |
| Underwear (knitted) | 2 to 4 minutes |
| Shirt (mixed fabric) | 1 to 2 minutes |
| Thin clothes (synthetic fabric) | 1 minute |
Hints for Spinning
- Place socks, handkerchiefs, and other small items on the bottom of the tub to prevent them from being tossed out of the tub.
- If an abnormal noise is heard during spinning, stop spinning, and uniformly spread clothes inside the tub.
- For easy draining, drain water from the washing tub after spinning.
- If any article falls out of the spin dryer basket, be sure to pick it out before operating the spin dryer basket.
- If the spin dryer does not stop within fifteen seconds after you open the lid, the brake is out of order. Stop using the machine, and ask for repairs immediately.
To pick out an article which has fallen between the basket and tub:
- For safety, pull the power supply plug out of the socket.
- Please call serviceman.
6 When washing is complete
① Completely remove water from the water drain hose and hang the hose. Press the power switch OFF. Disconnect the power supply plug from the electrical outlet.
- Do not tug on the cord. Be sure to grip the plug to remove it. *This precaution is to prevent cord damage. - Do not hold the power supply plug with a wet hand. *Be careful to avoid an electrical shock.
2 Remove lint attached to the filters. For details, refer to "Cleaning the machine" on page 12.
Washing Various Clothes
Washing Woollen Clothes
Wash woollen clothes with the wash mode/drain set at SOFT.
- Use the detergent specified on the tag attached to the clothes. Before use, dissolve the detergent in water. Follow detergent manufacturers instructions.
- Turn the clothes inside out, and put them in a commercially available washing net.
- Immerse the clothes in water, until they sink. Perform washing for two to three minutes.
- If the clothes are too soiled, they may be soaked in soapy water (for about five minutes) before washing.
● Cold water should preferably be used for knitted woolen clothes.
Water Level
| Water level | Medium (2) | High (3) |
| Wash load | Less than 1.0kg | 1.0kg to 1.5kg |
- If the tag on the clothes has "Dry Clean" only, and no "Hand washing" it cannot be washed. Avoid washing clothes made of animal hair (cashmere, angora rabbit, mohair, etc.) or special knits (lace).
Drying
Put clothes on a bath towel spread on a table. Shape them properly, and dry them in a shaded place.
Washing Sequence
| Wash mode/drain | Washing | Preliminary spinning | Extra Rinse | Spinning |
| SOFT | 2 minutes | Less than 30 seconds | 2 minutes | Less than 30 seconds |
Instruction for Soap Flakes
■ Dissolving soap flakes in the washing tub
Add water to such a level that the drain filter is submerged. Put washing soap flakes into the washing tub while agitating water. Then operate the machine for about two minutes.
If soap flakes will not dissolve easily:
1 Get about five liters of lukewarm water heated to about 30 degrees Celsius, and put it into a vessel.
2 While agitating the water, put washing soap flakes into the vessel little by little.
* Dissolve soap flakes completely so that there remains no hardened flakes or grain. Put the liquid into the washing tub.
- Rinse the clothes carefully because soap flakes is more likely to remain on the clothes than synthetic detergent. If clothes are not rinsed completely, they will turn yellow or smell of soap.
Hints for Effective Washing
Observe the instructions given on the tag attached to the clothes. | If you do not like small balls on washed socks, turn them inside out before washing. |
Put a big article, such as sheets or jeans, on the bottom of the tub. *The clothes can move more easily while they are washed. *The clothes can move more easily while they are washed. | To remove stains more easily, rub detergent against extremely soiled portions, such as the collar and cuffs of a shirt, before washing. You can use the hand washing corner. |
Put tights, stockings, or any other long articles into a commercially available washing net before washing.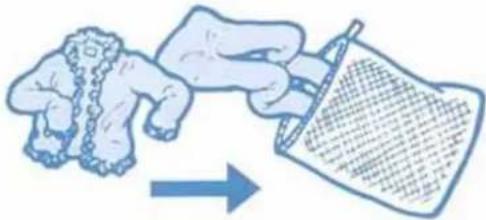 | If clothes are extremely soiled, they may be dipped in detergent liquid or pre wash stain remover before washing. |
Before washing, tie the strings of an apron or of a pillow cover, and close zippers and fasteners.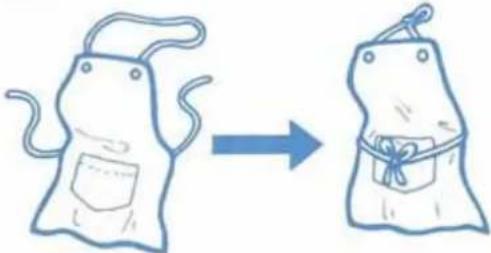 | Be sure to remove foreign objects (hair pin, coin, etc.) from the pockets before washing. *They can damage the washing tub, damage the clothes, or obstruct the drain pipe. *They can damage the washing tub, damage the clothes, or obstruct the drain pipe. |
Be sure to remove mud and sand from children's play clothes before washing. | Adjust the water level properly according to the wash load. A suitable amount of water prevents damage to the clothes, and assures effective washing. It saves water and detergent, and prevents splashing of water.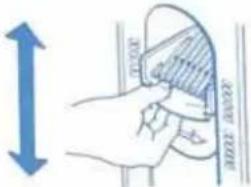 |
Precautions When Operating
| Never splash water on the operation panel. | Close the water tap a little if the water pressure is too high. | Do not leave the washer for many hours while it is filled with water. |
 *An electric shock or trouble will result. *An electric shock or trouble will result. |  *Water will splash, and wet the floor.*The water supply joint will come loose, or water may leak. *Water will splash, and wet the floor.*The water supply joint will come loose, or water may leak. |   *Dew may attach to the outside of the washing tub, and the floor may become wet. *Dew may attach to the outside of the washing tub, and the floor may become wet. |
| Be sure to put on the inner cover before spinning. | Never put a hand under the machine during operation. | If you do not like water splashes, close the washer lid. |
 *This prevents the clothes from being tossed out and from being damaged. *This prevents the clothes from being tossed out and from being damaged. | 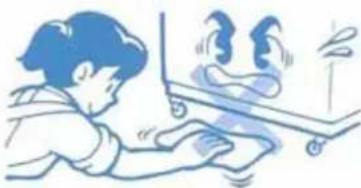 *You could touch a rotating part, and get hurt. *You could touch a rotating part, and get hurt. | Close the washer lid. *Thus, the floor will not get wet. *Thus, the floor will not get wet. |
| Do not use water with a temperature higher than 50 degrees Celsius. | Clean the floor under the washer from time to time. | Keep the machine away from sharp edged objects. |
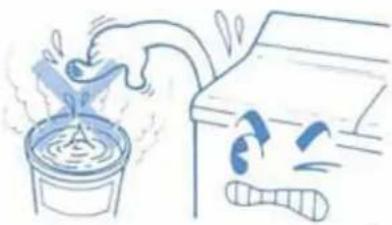 *Plastic parts will be deformed or damaged. *Plastic parts will be deformed or damaged. | Take out the power supply plug from the receptacle, move washer, and clean the floor.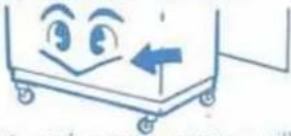 *Dust and paper scraps will accumulate as the machine is used for a long time. They can enter the motor, and damage it.*Cleaning helps you find water leakage. *Dust and paper scraps will accumulate as the machine is used for a long time. They can enter the motor, and damage it.*Cleaning helps you find water leakage. |  *Do not pencil pointed washing*Clothes or the washing tub will be damaged. *Do not pencil pointed washing*Clothes or the washing tub will be damaged. |
Protection against Freezing
- If there is fear that water may freeze, set the wash mode/drain to DRAIN and lay down the drain hose and drain the remaining water completely, after finishing draining, push the power switch OFF. Otherwise pump continues to run.
- If freezing has occurred, pour about two liters of water heated to about 40 degrees Celsius into the washing tub. Use the washer only when it becomes possible to turn the pulsator by hand.

Overflow Filter
1 Hold the knob and pull it toward you to remove the bubble removing overflow inlet. Remove lint.
2 Remove the recessed section of the inner hose from the overflow filter.
3 Pull the knob to remove the overflow filter. Remove dirt from the overflow filter and inner hose.
- A tooth brush may be used to clean the inner hose.
Bubble removing overflow inlet


Set them to their original places.
4. Insert the inner hose into the overflow filter. First, insert the lower side of the filter, and mount the upper knob.
- Insert the recessed section of the inner hose into the hinge section of the overflow filter.
Inner hose—

Drain Filter
1 Remove the overflow filter.
2 Pull the knob to remove the drain filter. Then, remove lint.
Set the wash mode/drain to DRAIN. Remove lint on the drain valve, and remove sand and dirt from the drain hole.
- Scrub with a tooth brush, and wash away.
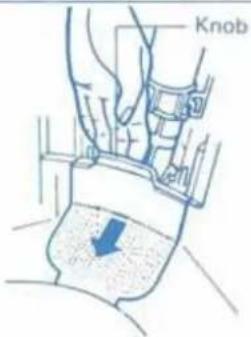
4 Replace the drain filter.
- Insert it from the pul-sator side.

Cleaning the Washer Body
When the washer is unpacked, dust may be found on plastic parts. Dust can accumulate during storage in the warehouse. Wipe it off with soft cloth
- Wipe off stains on the cabinet and operation panel using soft cloth.
- Do not use benzene, thinners, cleanser, or wax, nor scrub the washer with a brush.
*Painted surfaces or plastic parts will be damaged. - If you use chemical mops, follow the instructions strictly.
Installing the washer
Location:
Place the washer on a dry, well-ventilated, level floor.
PRECAUTIONS
- Avoid a place where the washer can be exposed to direct sunlight.
*Parts will be deformed or discolored - If the difference between the ambient temperature and water temperature is too great, as in summer, the floor will get wet due to moisture on the outer surface of the washing tub.
Installing the Earth Lead For2-Pin Plug Cord
- Be sure to install the earth lead to prevent a possible injury due to an electrical shock.
- Ask the dealer or electrical work shop for the earth lead.
- Do not connect the earth lead to a gas pipe or water pipe.
- Before installing or removing the earth lead; be sure to unplug the power supply plug from the electrical outlet.
- It is recommended to use an earth leakage breaker in addition.
*Where three-pin grounded outlets are used, the machine would have a three-wire cord and plug.
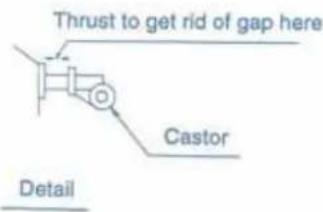
Installation of Castors
- Your washer has 4 castors which are taken off and packed in the washer for ease of transportation. Before installing, push them into the base of your washing machine as shown below.
Caution
4 castors are packaged with this washing machine.
Fix 4 castors securely before Installation.
Without fixing castors, the motor will be damaged due to overheating.

flowchart
graph TD
    A["Cabinet"] --> B["Base"]
    B --> C["Castor"]
    C --> D["Click"]
    D --> E["Output"]
    style A fill:#f9f,stroke:#333
    style B fill:#ccf,stroke:#333
    style C fill:#cfc,stroke:#333
    style D fill:#fcc,stroke:#333
    style E fill:#cff,stroke:#333
About the water drain hose
• The drain hose is packed in the washer.
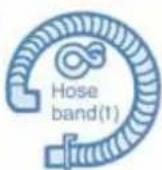
Before operating, insert the water drain hose on the water outlet and fix it with the hose band to avoid water leakage.

Before Calling for Service
If any abnormality is found, check the following before asking for service.
| Trouble | Check point | Trouble | Check point |
| Pulsator will not run. | Is the circuit breaker switched off?Is the power supply plug securely plugged into the electrical outlet?Is the water remaining around the pulsator frozen?See page 11.Is the power switch switched ON? | Incomplete spinning | Are the clothes arranged evenly?Is the drain hole closed by clothes falling out of the tub?Are there bubbles all around the spin dryer tub? |
| Washing water leaks from the hose. | Is the drain valve or drain outlet clogged with lint, dirt, or mud?See "Cleaning the machine" on page 12. | ||
| Clothes will not move freely. | Is the wash load too great? | ||
| The spin dryer basket will not run. | Is the spin dryer lid closed completely?Are clothes (socks, etc.) falling out of the spin dryer basket clinging to the axle?See"To pick out..." on page 8.Is the power switch switched ON? | Incomplete draining | Is the drain filter or overflow filter clogged with lint?See "Cleaning the machine" on page 12.Is the drain hose crushed?Is the power switch switched ON? |
About After-Sales Service and Warranty
Occurrence of Trouble during Operation
- Before asking for service, read this Instruction Manual carefully. Perform checks described in "Before Calling for Service". If the washer is found to have trouble, do not repair it by yourself. Ask the dealer for repair.
When you request after-sales service, please specify the following:
- Model Number: PS-70AP
- Problem: Describe it as precisely as possible.
Checks for Safe Use
If any of the following phenomena or abnormality is found, disconnect the power supply plug immediately, and contact the dealer for checks and repairs. (Checks and repairs may be charged depending on the seriousness of the trouble.)
● Never try to make repairs by yourself. It is very dangerous.
- If you have used the washer for more than four or five years, ask for safety checks even if you do not find any trouble with it.
Trouble:
● The washer sometimes refuses to run even when the switch is turned on.
● The power supply cord is cracked or damaged.
● Abnormal sound or vibration is caused during operation.
- It takes too much time before the spin dryer basket stops.
● Water leakage (from the washing tub, hose, joint, etc.)
- Burnt smell
● The washer gives you an electric shock when you touch it.
• Other abnormality
If the supply cord is damaged, it must be replaced by the manufacturer or its service agent or a similarly qualified person in order to avoid a hazard.
- Model PS-70AP
- Big Capacity and Large Size Spin Dryer Basket
- Contents
- Features
- Large pulsator
- Large-size spin dryer basket which facilitates putting in and taking out clothes
- Cautions
- Parts Description and Functions of t
- Convenient excess water indicator outlet
- the Operation Panel
- Spin timer
- Water inlet selector
- Hand washing corner
- Spin dryer basket
- Attachments
- Washing Procedure
- References for Washing
- Preparation
- .Washing
- he wash mode/drain to "NORMAL, SOFT"
- on washing is completed, set the wash mode/ to DRAIN to drain water.
- Preliminary Spinning
- Rinsing
- Hints for Rinsing
- Spinning
- Hints for Spinning
- To pick out an article which has fallen between the basket and tub:
- When washing is complete
- Washing Various Clothes
- Washing Woollen Clothes
- Wash woollen clothes with the wash mode/drain set at SOFT.
- Drying
- Instruction for Soap Flakes
- ■ Dissolving soap flakes in the washing tub
- If soap flakes will not dissolve easily:
- Hints for Effective Washing
- Precautions When Operating
- Protection against Freezing
- Overflow Filter
- Drain Filter
- Cleaning the Washer Body
- Installing the washer
- Location:
- PRECAUTIONS
- Installing the Earth Lead For2-Pin Plug Cord
- Installation of Castors
- Caution
- About the water drain hose
- Before Calling for Service
- About After-Sales Service and Warranty
- Occurrence of Trouble during Operation
- Checks for Safe Use
- Trouble:
Marque : HITACHI
Modèle : PS-70AP
Catégorie : Lave-linge