
FS680 - Clavier KAWAI - Notice d'utilisation et mode d'emploi gratuit
Retrouvez gratuitement la notice de l'appareil FS680 KAWAI au format PDF.


| Type de produit | Clavier numérique portable |
| Marque | Kawai |
| Modèle | FS680 |
| Dimensions (L x P x H) | Env. 130 x 30 x 10 cm |
| Poids | Env. 6 kg |
| Alimentation | Adaptateur secteur DC 12V (inclus) / 6 piles AA (optionnel) |
| Nombre de touches | 61 touches sensitives |
| Polyphonie | 64 voix |
| Sonorités intégrées | 100 sonorités |
| Rythmes intégrés | 100 rythmes |
| Haut-parleurs | 2 haut-parleurs intégrés |
| Connectique | Prise casque (6,35 mm), prise USB MIDI, entrée audio AUX |
| Fonctions d'apprentissage | Leçon intégrée, métronome, enregistrement |
| Fonctions avancées | Transposition, accord, split, layer |
| Entretien et nettoyage | Nettoyer avec un chiffon doux et sec. Éviter l'humidité et les solvants. |
| Sécurité | Ne pas exposer à l'eau, débrancher en cas d'orage, ne pas ouvrir l'appareil |
| Pièces détachées et réparabilité | Adaptateur secteur disponible auprès du SAV Kawai. Réparation par centre agréé. |
| Informations générales | Notice d'utilisation téléchargeable sur notice-facile.com |
FOIRE AUX QUESTIONS - FS680 KAWAI
Questions des utilisateurs sur FS680 KAWAI
0 question sur cet appareil. Repondez a celles que vous connaissez ou posez la votre.
Poser une nouvelle question sur cet appareil
Téléchargez la notice de votre Clavier au format PDF gratuitement ! Retrouvez votre notice FS680 - KAWAI et reprennez votre appareil électronique en main. Sur cette page sont publiés tous les documents nécessaires à l'utilisation de votre appareil FS680 de la marque KAWAI.
MODE D'EMPLOI FS680 KAWAI
KAWAI

PERSONAL KEYBOARD
FS680
Owner's Manual

Thank you for your purchase of the KAWAI FS680 Personal Keyboard.
How to use this manual
This manual is divided into two sections: Basic Operation and Advanced Operation.
The Basic Operation section will help you become familiar with the basic, but extremely powerful, features of the FS680. By the time you're through with this first section, you will have a clear understanding of how to select Tones and Rhythms, adjust Tempo, use Auto-Accompaniment and Recorder functions, and operate ONE FINGER AD-LIB.
The Advanced Operation section will help you explore FS680's more advanced features such as combining Tones, adding Effects, using the Synthesizer and MIDI, and programming Accompaniments or ONE FINGER AD-LIB phrases. To get the most from your FS680, please read this entire manual carefully -- beginning with the important information on page B - 1.
Should you have any trouble getting the FS680 to perform properly, please refer to the Table of Contents (on the next page) and review the pertinent section of this instruction manual.
Have fun learning to play your FS680!
■ WARNING:
This equipment generates, uses, and can radiate radio frequency energy. If not installed and used in accordance with the instruction manual, it can cause interference to radio communications. The rules with which it must comply afford reasonable protection against interference when used in most locations. However, there can be no guarantee that such interference will not occur in a particular installation. If this equipment should be suspected of causing interference with other electronic devices, verification can be made by turning its power off and on. If this equipment does appear to be the source of the interference, you should try to correct the interference by one or more of the following measures:
— reorient the receiving antenna.
— move the receiving away from the instrument.
— plug the instrument into a different outlet so that it and receiver are on different branch circuits.
— consult the dealer or a qualified service personnel.
■ This instrument complies with the limits for class B digital apparatus, pursuant to the Radio Interference Regulations, C.R.C., c. 1374.
Table of Contents
The Basic Operation
■ Before Using the FS680....B - 1
■ Overall Diagram and Explanation
(Operation panel)....B - 4
■ Overall Diagram and Explanation (Rear panel and Keys)....B-6
■ Getting Started on your FS680
Selecting Sounds......B - 7
■ Getting Started with Rhythm......B - 8
■ Other Important Rhythm Functions....B - 9
■ Changing Rhythm Tempo......B - 10
■ Using Auto-Accompaniment for easy ensemble play ....B - 11
■ Using Auto-Accompaniment Section: AUTO 1....B - 12
■ Using ONE FINGER AD-LIB
for an ad-lib performance ....B - 13
■ The Mixer Section......B - 16
■ Using the REGISTRATION
Memory ......B - 18
■ Using the Real Time RECORDER......B - 21
The Advanced Operation
■ Advanced Use of Sounds: ......A - 1
● Combing Two Sounds......A - 1
- Adding Effects......A - 2
■ Advanced Use of Auto-
Accompaniment Section:....A - 3
● Explanation of the AUTO 2......A - 4
● Explanation of the AUTO 3......A - 6
● Explanation of the AUTO 4......A - 7
- Introducing Accompaniment
Hold ....A - 8
■ Using Hand Percussion ......A - 9
■ Creating Your Own Sound:......A - 10
● the Synthesizer Function: ......A - 10
◆ Changing the Parameters......A - 11
♦ Storing Your New Sound .....A - 14
■ Creating Rhythm and Auto- Accompaniment Patterns:....A – 15
- Creating Basic Patterns ......A - 16
- Creating Fill in and
Intro/Ending Patterns......A - 17
● Storing the Newly Created Patterns....A - 19
■ Programmable ONE FINGER AD-LIB:....A - 20
- Creating Phrase......A - 20
● Storing Phrase ......A - 22
■ Using the SYSTEM Functions:......A - 24
● Tuning Control ......A - 24
● Transpose and Accompaniment
Hold Pedal....A - 25
■ Using the MIDI Functions:......A - 26
- Creating Songs ......A - 26
● Changing MIDI Channel ......A - 29
● Using the External Sequencer: .....A - 30
◆ Sending Automatic Function....A - 30
◆ Creating Patterns......A - 31
◆ Creating O.F. AD-LIB Phrase....A - 33
◆ Using Other Functions ......A - 34
Appendixes
■ Appendixes....Ap-1
■ MIDI Implement Chart.....Ap - 2
■ Specifications ......Ap - 4
Before Using the FS680
1. Cautions
● Do not subject the FS680 to severe shocks.
● Do not expose the FS680 to direct sunlight, or high temperatures such as inside your car on a warm day.
- Do not use the FS680 where there is excessive moisture or dust.
● Do not disassemble or attempt to modify the FS680.
● Should the FS680 become soiled, clean it using a soft, dry cloth. If this does not remove the stain, wet the cloth slightly before wiping. Never use alcohol or thinner to clean the FS680.
- Do not allow foreign matter to enter the gaps between the keys or around the buttons.
2. Connecting the power supply
The FS680 can use either your home AC power outlet or dry cell batteries as a power source.
■ To insert batteries:
- Turn the unit over and remove the battery cover.
- Insert the six Size C dry cell batteries included with your FS680. Be sure that they are aligned correctly.
- Replace the battery cover.
Notes:
— As the batteries reach the end of their usable lifespan, the sound of the FS680 will become quieter and the sound quality will begin to change. The unit may also begin to function improperly. At that time, you should replace all six of the batteries.
— Do not mix battery types, as this may cause problems such as battery fluid leakage.
— Remove the batteries when not using the FS680 for long periods of time.
2-2

Before Using the FS680

■ To use an AC power outlet:
Connect a PS-121 (or PS-123) adaptor (available separately) to the adaptor terminal on the rear panel of the FS680. Then, connect the adaptor to a wall socket.
■ Connecting the FS680 to an audio device
To enjoy listening to the sound of your FS680 through your home stereo system or other external audio device, purchase a standard connecting cord (Stereo RCA pins) at an electrical goods shop or an audio specialty store. Use it to connect the FS680's LINE OUT jacks to the LINE IN or AUX IN jacks on your audio system.
■ About the FS-680's internal memory
The contents of the FS-680's internal memory will be kept stored by a battery built into the unit for a period of up to five years. The data that are maintained by this battery are as follows:
— Song data recorded using the recorder.
— Sound data created using the synthesizer.
— Patterns created using the pattern maker.
— Phrase created using the programmable ONE FINGER AD-LIB feature.
— Registration settings.
Note that if you turn the power switch ON while holding down keys C and E at the left end of the keyboard, all of the contents of the memory will be erased, and the keyboard's factory settings will be restored.

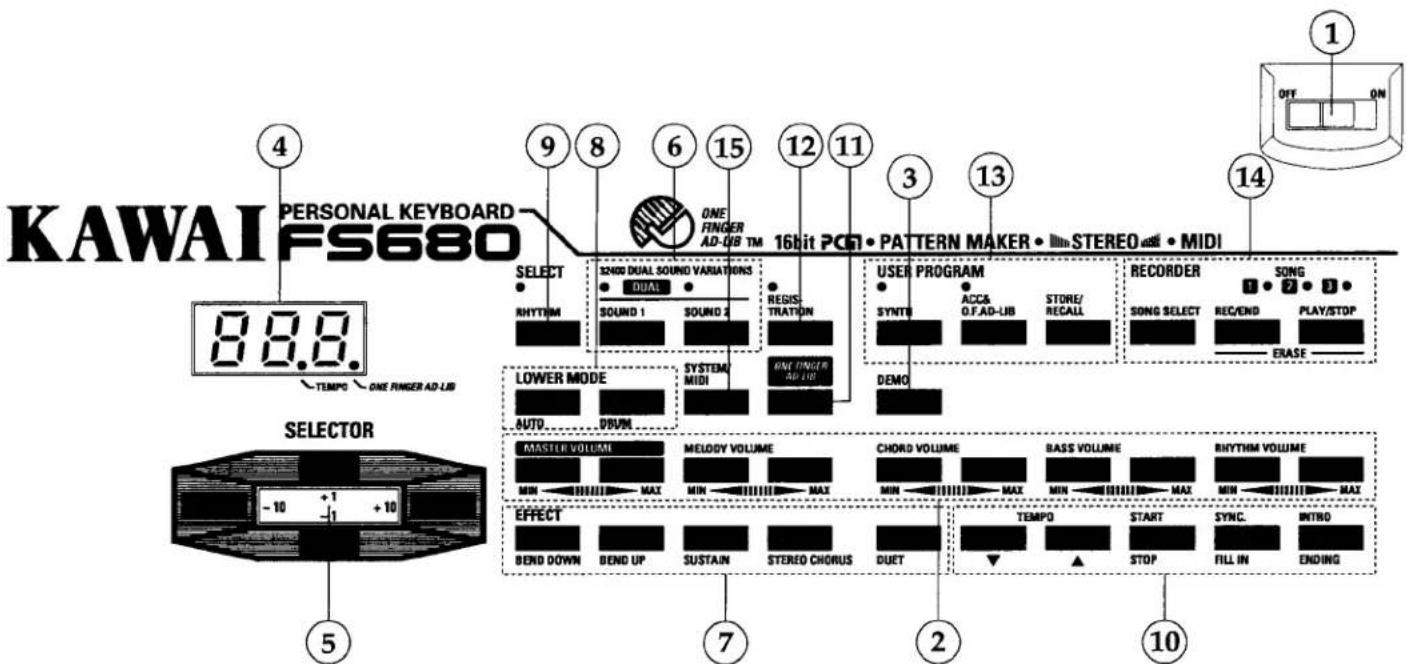

Overall Diagram and Explanation (Operation panel)
① POWER switch
This switch turns the power on and off.
When the power is turned on, the display window will light, showing the number 001.
② Volume Control buttons
The master volume buttons control overall volume of all notes played on the keyboard. Melody, Chord accompaniment, Bass, and Rhythm volume can be adjusted separately using the appropriate buttons found to the right of Master volume.
③ DEMO button
Pressing this button starts the built-in demo song contained in the FS680's memory. Press it again at any time to stop the demo song.
④ Display
The display window shows which sound or rhythm is currently selected. The window is also used to display a wide variety of other information which will be described later in this manual.
⑤ SELECTOR buttons
These buttons are used to increase or decrease the numbers in the display window by intervals of 1 or 10.
⑥ SOUND 1 and SOUND 2 buttons
These buttons are used to select from among the one hundred sounds stored in the FS680.
⑦ EFFECT buttons
These buttons allow you to add variety to the FS680's one hundred sounds by adding effects such as Pitch Bend, Sustain, Stereo Chorus, and Duet harmony to them.
⑧ LOWER MODE buttons
These buttons are used to select the playing mode for the nineteen keys on the left end of the keyboard (the Lower keyboard). There are three playing modes: Normal mode in which the Lower keyboards play the same sound selected for the Upper keyboard;
AUTO mode which lets the Lower keyboards control FS680's Auto-Accompaniment; and Drum mode which lets the lower keys play the percussion sounds pictured on the case above each key.
⑨ RHYTHM button
This button is used when selecting from among the one hundred rhythm and accompaniment patterns stored in the FS680's memory.
⑩ Rhythm Control buttons
The FS680's Rhythm and Auto-Accompaniment section gives you four types of patterns to work with: Intro Patterns that can be used at the start of a song; Fill-in Patterns, to add contrast and variety during a song; Ending Patterns; and Basic Patterns which will be the foundation at any song using Auto-Accompaniment. These four types of patterns are controlled using these buttons. The two tempo buttons can be used to control changes in Rhythm and Auto-Accompaniment tempo. Lastly, the SYNC button lets you start when you press a key in the Lower keyboard.
⑪ ONE FINGER AD-LIB button
This feature allows you to sound like a PRO. with the touch of a finger.
⑫ REGISTRATION button
⑬ USER PROGRAM buttons
These buttons allow users of the FS680 to:
1) create new sounds;
2) create Rhythm and Auto-Accompaniment Patterns. (Basic, Intro, Fill-in, and Ending); and
3) create ONE-FINGER AD-LIB phrases.
⑭ RECORDER buttons
These buttons allow you to record the songs you write or perform on the FS680.
⑮ SYSTEM/MIDI button


[Rear Panel]

![graph TD A["21"] --> B["DC IN"] C["20"] --> D["STRENO PHONES"] E["19"] --> F["OUTPUT"] G["R"] --> F H["L"] --> F](/content/2026/06/1312311/images/4486b6525b7fdb33043000b96a502941733ad096f7db71867dc8d8214504eed0.jpg)
KAWAI
![graph TD A["18"] --> B["ACC. HOLD PEDAL"] C["17"] --> D["HOLD PEDAL"] E["16"] --> F["OUT"] E --> G["MON"]](/content/2026/06/1312311/images/225f3d3995f11fc7b0f8cdb71132698f12be2536c2b7ba9421798f5b700ff8b2.jpg)
[Keys]


Overall Diagram and Explanation (Rear panel and Keys)
[Rear Panel]
⑯ MIDI IN and OUT jacks These jacks are used to connect the FS680 to other MIDI instruments and equipments.
⑰ Hold Pedal jack
This jack allows you to connect a hold pedal (model F1, available separately) to the FS680. When the hold pedal is depressed, notes played on the keyboard will play continuously for as long as the pedal is held down.
(This pedal has no effect on Rhythm and Auto-Accompaniment performance.)
⑱ Accompaniment Hold jack
The jack allows you to use the optional F1 pedal in a different way from above. When connected to the Accompaniment Hold jack, the F1 pedal can be depressed to add variety to Rhythm and Auto-Accompaniments. It can also function in the same manner as the SYNC/FILL IN button.
⑲ Output jacks
These jacks are used to send the FS680's sound through external speakers or a stereo system.
⑳ Stereo Headphone jack
When a stereo headphone are connected to this jack, the sound from the speakers is cut off. This allows you to play the FS680 at night and at other times when you might be concerned about disturbing others.
②1 Power Adaptor jack
This jack is used when connecting a power adaptor (model PS-121 or PS-123, available separately).
[Keys]
②22 Lower keys (C1 \~ F#2)
Used when the chord detection or hand percussion function are selected.
②3 ONE FINGER AD-LIB keys (G2 \~ B3) Used when the ONE FINGER AD-LIB function is selected.
②4 User program keys (C5 \~ C6)
Used when making synthesizer parameter, programmable Auto-Accompaniment, or programmable ONE FINGER AD-LIB settings.
Note:
Of course, the keys in the special keyboards named above also function as part of the normal keyboard.

Getting Started on your FS680 Selecting Sounds
1

2

3

This section will show you how to select and play any of the sounds listed in the "100 SOUND LIBRARY" on the FS680's front panel.
- First, check to be sure that the POWER switch is turned ON. The display should be lit, showing the number 001.
Try pressing one of the keys on the keyboard. You should hear the sound which is numbered 01 (BOW. STRINGS).
- Next, look at the SELECTOR buttons and find the button marked +1. If you press it, the number shown in the display should change to 002.
When you press one of the keys on the keyboard, you will hear sound number 02 (BOW. CELLO).
You can use the SELECTOR buttons to choose any of the FS680's one hundred sounds quickly and easily. The +1 button adds one to the number in the display, while the +10 button adds ten.
The -1 button subtracts one from the number, and the -10 button subtracts ten. The number shown in the display is the number of the sound currently selected.
- If you select one of the SPLIT sounds, which are numbered 41 through 50 in the "100 SOUND LIBRARY," you will find that the 19 keys on the left end of the keyboard (the Lower keyboard) produce a different sound from the rest of the keys to their right.
Also, note that the numbers "wrap around," so that pressing the +1 button when the display reads 100 will change the display to read 001.

Getting Started with Rhythms
1
2

Then press...

3 4
This section will show you how to select and play any of the rhythms listed under the "100 RHYTHMS" on the FS680's front panel.
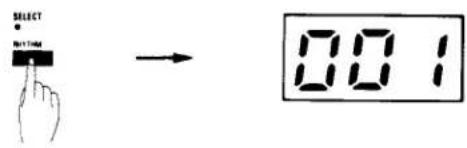
- Begin by pressing the RHYTHM button. The lamp above the switch will light, and the display will change to read ☐☐☐.
- If you press the START/STOP button at this point, rhythm number 01 (DANCE 1) will begin to play. Now find the SELECTOR buttons and press the +1 button. The display will change to read 002 and the rhythm will change to number 02 (DANCE 2).
You may use the SELECTOR buttons in this way to select any rhythm you desire. The number in the display will change to indicate the number of the rhythm currently selected.
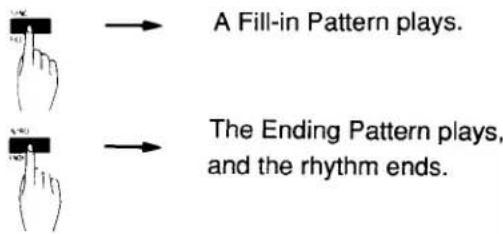
- Try pressing the SYNC/FILL IN button at this point. The rhythm should change to a "Fill-in" pattern suited to the rhythm currently selected. The Fill-in function is very effective when used to add variety within a song.
- Next, press the INTRO/ENDING button. An ending pattern which matches the currently selected rhythm will play, and the rhythm performance will end. You can use this Ending Pattern to bring a song to an Ending. Or, if you want the rhythm to end without the Ending Pattern, you can simply press the START/STOP button.

Other Important Rhythm Functions
1
Rhythm is stopped.

Pressing this button starts the Intro Pattern.
2
Rhythm is stopped.

3
![graph TD A["Hand press"] --> B["Then press..."] B --> C["Lower keyboard"] C --> D["Press a key on the Lower keyboard."] D --> E["Rhythm starts simultaneously with Intro Pattern."]](/content/2026/06/1312311/images/cbea177d638af0bbcd8e6747336f13bd6faf277ce8ee254a92bd35357138825c.jpg)
-
If you press the INTRO/ENDING button while the rhythm is off, you will hear an Intro Pattern, after which the Basic Pattern for the rhythm selected will begin to play.
-
If you press the SYNC/FILL IN button while the rhythm is off, the button functions as a SYNC button only, when SYNC is pressed the rhythm will begin to play the moment you press a key on the Lower keyboard. The rhythm will synchronize with your touch of the keyboard.
-
If you press the INTRO/ENDING button after first pressing the SYNC/FILL IN button, the rhythm will begin to play, (starting with the appropriate Intro Pattern), the moment you press one or more of the keys on the Lower keyboard.
-
Try pressing the INTRO/ENDING button while the rhythm is playing. In this case, it operates as an ENDING button. You will hear an Ending pattern in a few seconds after pressing the button.
Changing Rhythm Tempo
1

- You can use the TEMPO buttons to change the tempo of the rhythm. The TEMPO ▼ button makes the tempo slower. The TEMPO ▲ button makes the tempo faster. The longer you hold down each of these buttons, the more the tempo will change. When either of the TEMPO buttons are pressed, the display will change to show the current tempo. The small lamp at the bottom of the display will also blink in time with the tempo.
Pressing either of the TEMPO buttons once after changing your rhythm selection will change the tempo to a rate that suits to the new rhythm. The tempo can be adjusted within a range from 50 to 216 beats per minute. If you continue to press the TEMPO ▼ button for a tempo lower than 50, the display will change to read 55C, which is the FS680's abbreviation for SYNC. This setting is used for a different function related to MIDI operation. If you press the TEMPO ▲ button the display will return to a number indicating the tempo.
Using Auto-Accompaniment for easy ensemble play
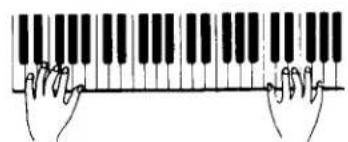
Chords with left hand.
Melody with right hand.
The FS680's Auto-Accompaniment section is one of the most powerful found on any portable keyboard. It has the capability of working in four different "modes". In this Basic Operation section of the manual, however, we will deal only with the first mode called "AUTO 1".
When your FS680 is turned on, it is automatically set to AUTO 1 operation. In AUTO 1 mode, you can play chords with your left hand (which will generate full accompaniment) while playing the melody with your right hand. Let's try the Auto-Accompaniment section in this mode.

Using Auto-Accompaniment Section: AUTO 1
![graph TD A["Lower keyboard"] --> B["1"] B --> C["Lower Book"] C --> D["2"] D --> E["3"] E --> F["Use"] F --> G["or"] G --> H["to start rhythm."] H --> I["Lower keyboard"] I --> J["Auto-Accompaniment starts playing."]](/content/2026/06/1312311/images/fd94dab0b7c0bacb4d1695512809a826b347e8acbf1a99e7836157c036e53871.jpg)
This Auto-Accompaniment mode (AUTO 1) allows you to create a realistic ensemble performance, simply by pressing and holding left hand chords as you play the melody.
The nineteen keys on the left end of the keyboard (which we call the Lower keyboard) are used to play the chords which control the Auto-Accompaniment. Up until now we have used the Lower keyboard as a regular keyboard.
- First, prepare the Lower keyboard for chord use.
Find the LOWER MODE buttons and press the AUTO button. The display will change to read Rut.
- Start the rhythm.
Select a rhythm using the RHYTHM button and the SELECTOR buttons. Then, start the rhythm by pressing the START/STOP button or the INTRO/ENDING button.
- Using the Lower keyboard to activate Auto-Accompaniment.
Now, try pressing one or more of the keys on the Lower keyboard. You should hear the Auto-Accompaniment begin to play.
Try using the SYNC/FILL IN button and the INTRO/ENDING button. The tempo of the Auto-Accompaniment can be controlled using the TEMPO buttons.
Using ONE FINGER AD-LIB for an ad-lib performance
By now you've become accomplished with the Auto-Accompaniment function of the FS680. But you may be wondering what you can do to spice up the melody a bit. Well, the ONE FINGER AD-LIB function is just for you! This feature separates KAWAI keyboards from all others.
1. What is ONE FINGER AD-LIB?
ONE FINGER AD-LIB is a patented feature which allows anyone, any level of musical ability, to sound like a Pro. With the touch of a finger, you can play hundred of impressive ad-lib melodies with full Auto-Accompaniment with chord progression. It's great fun! The ONE FINGER AD-LIB phrases are determined by rhythm you select. For example, there are funky ad-lib phrases for rhythm number 07 (SLAP FUNK), and some exciting rock'n roll phrases that go well with number 29 (R&R1). There are seventeen ONE FINGER AD-LIB phrases set for each of the FS680's one hundred rhythms: a total of 1,700 phrases in all!


2. How does ONE FINGER AD-LIB work?
a) Use the RHYTHM button and the SELECTOR buttons to select a rhythm. Next, press the ONE FINGER AD-LIB button. The small dot lamp on the lower right side of the display will light up.
b) Now, press and hold down one of the keys in the ONE FINGER AD-LIB section of the keyboard (shown in the drawing at left). By holding down a single key, you can play an entire ad-lib phrase! Try other ONE FINGER AD-LIB keys. Note that each key plays a different phrase.

Using ONE FINGER AD-LIB for an ad-lib performance
c) Adding Rhythm and Auto-Accompaniment Next, press the LOWER MODE AUTO button. The display should change briefly to read RUT.
Start the Rhythm using the INTRO/ENDING button or the START/STOP button. The Rhythm and Auto-Accompaniment should begin to play. Listen closely! Notice that the Auto-Accompaniment chords are changing automatically. The FS680 has been programmed so that each Rhythm is accompanied by an authentic sounding chord progression that plays automatically.
d) Now press one of the keys in the ONE FINGER AD-LIB section of keyboard. The ad-lib phrase will play. If you hold the AD-LIB key down, you'll notice that the phrase changes automatically with the chord progression!
e) If you decide that you'd like to change the preseted chord progression, play any chord on the Lower keyboard. This will override preseted progression. The ONE FINGER AD-LIB phrase will change to match your chords.
f) To return to the preset chord progression, press the ONE FINGER AD-LIB button twice.
A note about the ONE FINGER AD-LIB chord progressions.
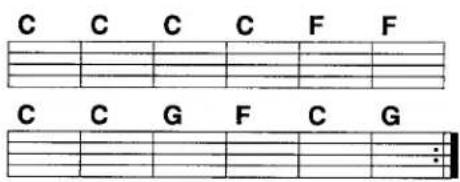
When you start the Auto-Accompaniment with the ONE FINGER AD-LIB function turned ON, the chord progression that plays is in the key of C. For example, the progression for rhythm number 32 (50'S ROCK) is as shown left.

Using ONE FINGER AD-LIB for an ad-lib performance
1-2

1-3
Press

or
to start
Auto-Accompaniment.
2-3

Cm7 Cm7 Bb Bb Ab Ab Bb Bb

Changing Keys
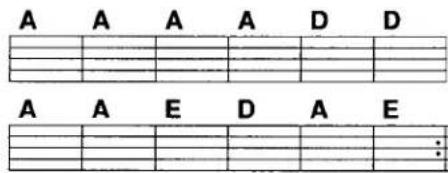
- Those of you who won't be happy unless the chord progression for 50'S ROCK is in the key of "A" should perform the following operation (after stopping the rhythm for a moment):
(1) Check that the ONE FINGER AD-LIB button and the LOWER MODE AUTO button have both been turned ON.
(2) Before starting the rhythm, press the A key shown in the illustration at left.
(3) Then press the INTRO/ENDING button or the START/STOP button to start the Rhythm and Auto-Accompaniment. The chord progression should now be as shown left.
- Some of you might be happier if the chord progression for 50'S ROCK were in a minor key. To do this, you can perform an operation like the one described below (again, you should stop the rhythm first):
(1) Check that the ONE FINGER AD-LIB button and the LOWER MODE AUTO button have both been turned ON.
(2) Play a Cm chord as shown in the illustration at left.
(3) Then press the INTRO/ENDING button or the START/STOP button to start the Rhythm and Auto-Accompaniment. The chord progression should now be as shown left.
There are two ONE FINGER AD-LIB chord progressions for each Rhythm -- one in a major key and one in a minor key. If you would prefer the chord progression to play in the key of Am, just perform the operation above playing an Am chord instead of the Cm chord we used as an example.
Now select different Rhythms and begin exploring the 1700 ONE FINGER AD-LIB phrases built into the FS680!
The Mixer Section
So far we have covered the basics of the FS680's Rhythm, Auto-Accompaniment, and ONE FINGER AD-LIB functions. This section will show you how to use the mixer section.
The volume of each part can be adjusted using the VOLUME buttons. Volumes may be set to any of sixteen levels, which are numbered 0 through 15. The number of each volume setting will appear briefly on the display each time a volume button is pressed.
- MASTER VOLUME buttons
These buttons control the volume of the FS680 in an overall fashion, including the volume of the Rhythm, Auto-Accompaniment, and ONE FINGER AD-LIB parts, as well as that of your own performance.
- MELODY VOLUME buttons
These buttons control the volume of Melody.
- CHORD VOLUME buttons
These buttons control the volume of the Auto-Accompaniment Chords.
- BASS VOLUME buttons
These buttons control the volume of the Auto-Accompaniment Bass part.
- RHYTHM VOLUME buttons
These buttons control the volume of the Rhythm part.
The Mixer Section
After turning OFF

The Volume goes back as before turning OFF, when the left button is pressed.
After turning OFF
The Volume goes up from 0, when the right button is pressed.


When you press a VOLUME button...
the current volume is displayed.
To eliminate the volume of any part:
Pressing both the left and right VOLUME buttons simultaneously for any one part will turn the volume for that part OFF.
When the volume of a part has been turned OFF, you can press the left-side button to return the volume for that part to the level it was set at before it was turned OFF.
Pressing the right-side button will raise the volume level, beginning from zero.
* The volume levels controlled by VOLUME buttons can also be controlled by MIDI input, as shown by the following chart:
MELODY....1 ch, 2 ch (N ch, N+1 ch) VOLUME
CHORD ....3 ch (N+2 ch) VOLUME
BASS ....4 ch (N+3 ch) VOLUME
RHYTHM....10 ch (D ch) VOLUME

Using the REGISTRATION Memory
What does
the REGISTRATION memory do?
Imagine that you want to use a quiet sixteen beat pattern for the majority of your song, but switch to another rhythm for the climax. Of course, it would be nice to raise the volume at that time, too. Such variations are not uncommon and add a lot to a song -- but you might find it hard to press all of those buttons! You will find the REGISTRATION memory very useful.
Up to 20 front panel set-ups can be stored in REGISTRATION memory. The following musical elements can be stored in REGISTRATION memory.
- Volume for each part
- Sound number to be selected
- Rhythm number to be selected
- Turn on or off status of the LOWER MODE buttons
- Turn on or off status of the ONE FINGER AD-LIB button
- Turn on or off status of the EFFECT buttons
- TEMPO setting
Using the REGISTRATION Memory
1
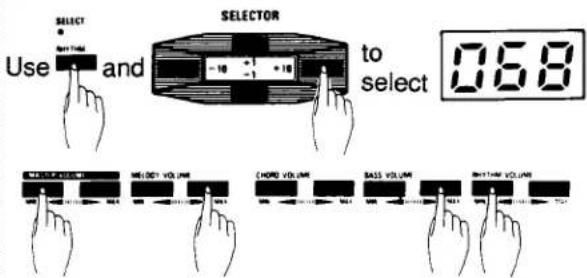
Adjust the volume of each part.
2
![graph TD A["Press again."] --> B["Start: REGISTATION"] B --> C{Start: begin to flash.} C --> D["Step 1: RESET"] D --> E["Step 2: Flash begins"] E --> F["Step 3: Selector with +10/−10 transition"] F --> G["Step 4: Stop flashing, stop digital display"]](/content/2026/06/1312311/images/b98e85132258ec766457c5bf4658eee6cd076baee52132039b257b5bec9aae6d.jpg)
How to use the REGISTRATION memory
As an example of the way REGISTRATION memory can be used, we will show you how to set the FS680 so that you can use the Rhythm and Auto-Accompaniment patterns for Tango and Habanera in a single song.
- Establish your panel setting (REGISTRATION)
Use the RHYTHM button and the SELECTOR buttons to select rhythm number 68 (TANGO). Start the Auto-Accompaniment, and use the VOLUME buttons to adjust the volume of each part to a level that balances with the others. Also, select the number of the sound which you would like to use for the melody.
- Storing your panel setting in REGISTRATION memory
Press the REGISTRATION button. The lamp above the button will light up and the display should change to read r - - . The "r" stands for REGISTRATION.
The FS680 can remember twenty settings using the REGISTRATION memory: These settings are given a number from 01 to 20. Press the STORE/RECALL button and the r -- in the display will begin to flash.
Now press the SELECTOR +1 button. The display should change to read r □ 1.
You are now ready to store the current panel setting to REGISTRATION memory number 01.
Press the STORE/RECALL button a second time and the display will stop flashing. This means that the rhythm number, sound number, and volume settings that you selected in step 1. above have been stored as REGISTRATION number 01.

Using the REGISTRATION
Memory
3
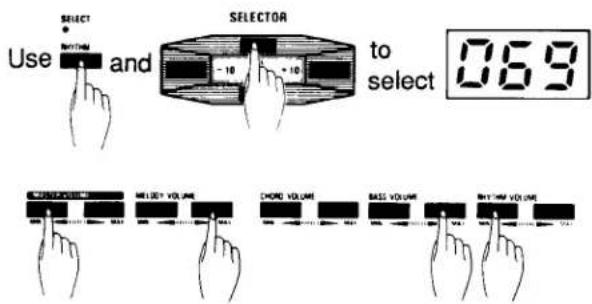
Adjust the volume of each part.
4

...press

to start rhythm.
5

- Storing a second REGISTRATION setting
Next, select rhythm number 69 (HABANERA1). Choose the melody sound number and set the volume of each part as you did in step 1. Then press the REGISTRATION button once again. Use the SELECTOR buttons to change the display to read -02. Press the STORE/RECALL button, and the display will stop flashing. The rhythm number, sound number, and volume settings that you just selected have been stored as REGISTRATION number 02.
- Using your REGISTRATION setting in a song.
Now try using the SELECTOR buttons to change the display to read r01 once again. Press either the START/STOP button or the INTRO/ENDING button to start the Rhythm pattern.
The rhythm that you hear should be rhythm number 68 (TANGO). When you press one or more of the keys on the Lower keyboard, you will hear the Auto-Accompaniment for that pattern at the volume you set in step 1. above.
- Now, while the TANGO rhythm is playing, press the SELECTOR +1 button. The display should change to read r02, and the HABANERA rhythm should begin to play. The volume levels should be as you set them in step 3. above.
Using the Real Time
RECORDER

To record your performances
This section will show you how to record the songs you perform using the FS680's many functions. The RECORDER allows you to record up to three different songs.
Here are the steps:
- First, set up the FS680 for your performance.
Begin by select the Sound, Rhythm, and Lower keyboard mode settings that you will require to perform your song. If you want to make changes in Sounds, Rhythm and Auto-Accompaniment patterns, or Volume during your song, you should use the REGISTRATION function. - Press the REC/END button. You will hear the sound of the metronome.
- Start playing! Everything you play including ONE FINGER AD-LIB phrases, and changes in Sounds or Rhythms will be recorded as you played it. That's what we mean by "Real Time". What you play is what you get.
- When you are done with your song, press the REC/END button once more. The recording will end, and your song will be recorded as SONG 1.
- Now let's try playing the song back. Press the PLAY/STOP button. The song you just recorded should begin to play. If you would like to stop the performance without listening through to the end, just press the PLAY/STOP button once more.
Using the Real Time
RECORDER
6
Press

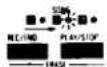
and the lamp will change.
7


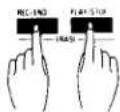
Check to be sure you're erasing the right song before pressing.
(The above illustration shows SONG 2.)
-
Next, if you would like to record a different song, press the SONG SELECT button. Check that the lamp above changes to indicate SONG 2. Then record your next song using the procedure described on the previous page.
-
If you would like to record over a song which has already been recorded, it is necessary to erase that song first. If, for example, you would like to record over SONG 1, you might try pressing the REC/END button; but you would find that the metronome will not start. (This is to prevent you from accidentally recording over a song which you would like to keep!)
In order to erase SONG 1, use the SONG SELECT button to change the lamp so that it indicates the song you want to erase. Then, press the REC/END button and the PLAY/STOP button simultaneously. The song will be erased instantly.
Note:
When recording songs using the RECORDER, the tempo information will not be recorded. This allows you to record songs at a slow tempo and play them back at a fast tempo.

Congratulations!
You've finished learning of the Basic Operations.
Have more fun to learn the Advanced Operation.
This completes the Basic Operation section of the FS680 instruction manual.
We trust that this first section has given you a good basic knowledge of FS680's powerful feature.
But you've only just begun to explore the full capability of the FS680!
The Advanced Operation section will help you to learn how much more can be done with this powerful instrument.

Advanced Use of Sounds: Combining Two Sounds
1

2

3
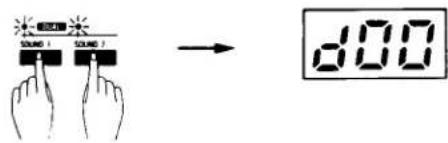
4

As a first step in this Advanced Operation section, let's try combining two of the sounds listed in the FS680's "100 SOUND LIBRARY," for a rich DUAL sound effect.
- First, select any sound you like using the SELECTOR buttons. As an example, we will choose sound number 11 (PIANO 1).
- Next, press the SOUND 2 button. The lamp above the button will light up. Now, select another sound. (We will choose number 12 (PIANO 2) for our example.)
- Now press both the SOUND 1 button and the SOUND 2 button simultaneously. The lamps above these buttons should start blinking, and the display should change to read doo.
If you press one of the keys on the keyboard, you will hear the combination of sounds 11 and 12, PIANO 1 and PIANO 2.
— What does doo mean? —
When two sounds are played at once, varying the pitch of the sounds slightly with respect to each other makes the combined sound much richer.
This varying of the pitch of two sounds is called "Detuning." The FS680 allows you to detune two sounds when combining them using the DUAL effect. The "ð" in the display therefore stands for "Detune," and the "☐☐" following it represents the difference in pitch between SOUND 1 and SOUND 2.
- Press the +1 button one time. The display should change to read ☐☐ 1. Now, when you press a key on the keyboard, you will hear a slightly richer sound. You can use the SELECTOR buttons to set a detune value of 00 to 07. The higher the number is, the greater the difference in pitch becomes. When our PIANO 1/PIANO 2 combination is set to a detune value of 07 (☐☐ 7), the result is a "honkytonk" sounding piano. Using the DUAL effect with 7 levels of detune, you have up to 32,400 different DUAL sound variations available.
![graph TD A["Advanced Operation"] --> B["1"] B --> C["BEND DOWN"] B --> D["BEND UP"] B --> E["SUSTAIN"] B --> F["STEREO CHORUS"] B --> G["DUET"]](/content/2026/06/1312311/images/79a1301c0afa532eced8ac5bf57442a1ad01156da0e279641ffdcf3ad358a3c3.jpg)
Advanced Use of Sounds: Adding Effects
The FS680 has a variety of effects which can add realism or excitement to your selected sound.
1. Pitch bend:
Pitch bend is an effect by which the pitch of a sound is bent smoothly upward or downward. It is useful for copying the sound of a guitar being played with a "Choking" technique. Try pressing the BEND DOWN button while holding down one of the keys on the keyboard. The pitch of the sound should bend smoothly down a single step, then return to its original pitch when the BEND DOWN button is released. In a similar way, the BEND UP button bends the pitch of a note smoothly upward a single step.
2. Sustain:
Sustain is an effect which lets notes "Sound" for a longer duration. The sustain effect is automatically on when the POWER switch of the FS680 is turned on. Pressing the SUSTAIN button cancels the effect. Pressing it a second time will turn the effect back on.
3. Stereo chorus:
Pressing the STEREO CHORUS button activates an effect which adds a deep stereo richness to the currently selected sound. Pressing the button a second time cancels the effect.
4. Duet:
When the DUET button is pressed, the FS680 will add a harmonizing note to each melody note that is played on the keyboard, so you can enjoy a duet performance while playing only one melody note at a time. This function is extremely effective when used together with the Auto-Accompaniment function. Pressing the button a second time turns the effect off.
Notes:
- When you choose the DUAL sound effect, the stereo chorus effect, or the duet effect, the number of notes that can be heard at once will be reduced.
- The DUAL sound effect is not possible when one of the SPLIT sounds, numbered 41 through 50, is chosen as SOUND 1. Also, a SPLIT sound cannot be selected as SOUND 2 when using the DUAL sound effect.
- If you press the STEREO CHORUS button while using the DUAL sound effect, the stereo chorus effect will be applied only to the sound selected as SOUND 1.
- If you press the DUET button while using the DUAL sound effect, the harmonizing note will be SOUND 1.

Advanced Use of Auto-Accompaniment Section:
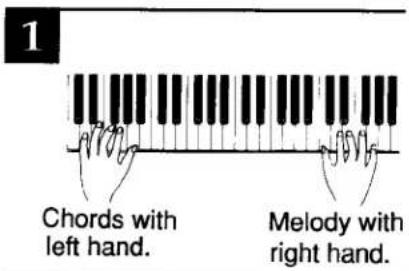


The FS680's Auto-Accompaniment section is one of the most powerful found on any portable keyboard. It has the capability of working in four different modes. In the Basic Operation section, we discussed only the first mode, AUTO 1, which is the standard operational mode for most portable keyboards. In this Advanced Operation section, we will introduce the remaining three modes: AUTO 2, AUTO 3, and AUTO 4.
Having four different Auto-Accompaniment modes allows the FS680 to be enjoyed by people at all levels of musical of musical ability – from beginners to experienced professionals.
Let's outline the four modes of Auto-Accompaniment offered by the FS680:
1. AUTO 1:
Lets you play single-finger or finger chords with your left hand while playing the melody with your right. Your left hand chords trigger the Auto-Accompaniment. For a review of AUTO 1 operation, see the Basic Operation section.
2. AUTO 2:
Lets you play bass line with your left hand while playing chords and melody with your right. Standard Auto-Accompaniment Chords will play -- but are triggered by the chords you play in your right hand.
3. AUTO 3:
Great for the persons who want to sing the melody as they play an Auto-Accompaniment! Like AUTO 2, you can play a bass line with your left hand while playing chords and melody with your right. With AUTO 3, however, the standard Auto-Accompaniment Chords do not play. Rather, the chords you play with your right hand (any chords) become part of the Auto-Accompaniment.
4. AUTO 4:
The mode to use when you're not sure what chords to play. AUTO 4 has a preset chord sequence for each rhythm (the same sequence used with ONE FINGER AD-LIB). You can play through the entire chord sequence by playing successive notes (in order starting with C1) in the Lower keyboard with your left hand.
Let's try using these three new Auto-Accompaniment modes, beginning with AUTO 2.
Note:
ONE FINGER AD-LIB is not operational when the FS680 is in AUTO 2 or AUTO 3.

Explanation of the AUTO 2
1
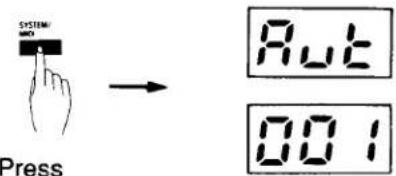
Press three times.
2
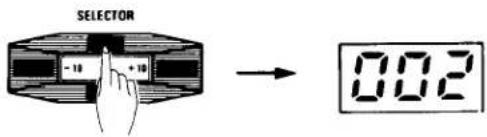
3

4
5

AUTO 2 is an advanced form of Auto-Accompaniment which lets you play a bass line with your left hand while your right hand plays the chords and melody.
How is AUTO 2 different from AUTO 1? In AUTO 1, the Auto-Accompaniment Chords are triggered by the chords you play in your left hand. In AUTO 2, your right hand notes trigger the Auto-Accompaniment Chords.
■ Why is AUTO 2 valuable? There are two primary reasons:
- Many people feel more comfortable playing chords with their right hand rather than their left. AUTO 2 suits that playing style better than AUTO 1 does.
- If you play the FS680 as you would normally play a piano while using AUTO 2, the Auto-Accompaniment will follow the chords of your performance.
Let's see how AUTO 2 works:
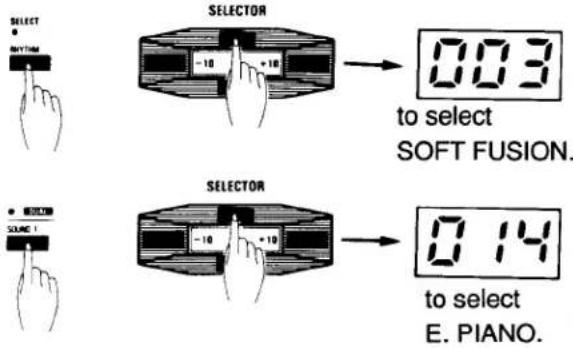
- With the rhythm stopped, press the SYSTEM/MIDI button three times. The display should begin to flash alternately between RUT and the number 001. This shows that the Auto-Accompaniment is currently set to AUTO 1.
- Press the SELECTOR +1 button to change the number in the display to 002.
- Press LOWER MODE AUTO button. The display should quickly flash RUT.
- Select a rhythm using the RHYTHM button and the SELECTOR buttons. This time try Rhythm pattern number 03 (SOFT FUSION). Also, select sound number 14 (E. PIANO) using the SOUND 1 button and the SELECTOR buttons.
- Press the START/STOP button. The rhythm will start. Try playing the music at left along with the rhythm.
Explanation of the AUTO 2
Can you hear how AUTO 2 allows the FS680 to follow your playing?
Now let's go on to the next Auto-Accompaniment mode -- AUTO 3.
Note: Here's some playing information about AUTO 2
- The Auto-Accompaniment changes when you press three or more keys (total) on the Lower or Upper keyboards.
- When you press only one key on the Lower keyboard, only the Auto-Accompaniment bass part will change.
- If you press more than one key on the Lower keyboard, the bass part will respond to the lowest key pressed.
- When only keys on the Upper keyboard are pressed, pressing three or more keys will cause the Auto-Accompaniment to change.
- When AUTO 2 is activated, both ONE FINGER AD-LIB and DUET will not function.

Explanation of the AUTO 3
1

Press three times.
2

3

4

5

The key aspect of AUTO 3 is "freedom in choosing chords."
Like AUTO 2, this third Auto-Accompaniment mode lets you play a bass line with your left hand while you play chords and melody with your right hand. AUTO 3 is different in that standard Auto-Accompaniment Chords do not play. Rather, the chords that you play with your right hand actually become part of the Auto-Accompaniment.
Furthermore, with AUTO 2, you are limited to only the chord forms that the FS680 can play as part of the Auto-Accompaniment. With AUTO 3 any chord form you play can become part of the Auto-Accompaniment. You have total freedom in using chords.
Let's try AUTO 3:
- With the rhythm stopped, press the SYSTEM/MIDI button three times. The display should begin to flash alternately between "Rut" and the number 001 (or 002).
- Use the +1 SELECTOR button to change the number in the display to 003. This indicates that you have selected AUTO 3.
- Press the LOWER MODE AUTO button until the display briefly flashes "RUT."
- Use the RHYTHM button and the SELECTOR buttons to choose Rhythm number 03 (SOFT FUSION) once again. Also, select sound number 14 (E. PIANO) using the SOUND 1 button and the SELECTOR buttons. (You may have already selected this panel setting from our AUTO 2 example).
- Press the START/STOP button. The rhythm will start. Try playing the music at left along with the rhythm.
- Can you hear how the chords you play with the right hand become part of the Auto-Accompaniment? Try playing the music to one of your favorite songs and sing the melody. You'll like the result! Plus, AUTO 3 will allow the FS680 to follow every chord you play.
Note: The playing information about AUTO 3 is the same as that of AUTO 2. Please refer to page A - 5.
Explanation of the AUTO 4
1

2

3

4

AUTO 4 is the best Auto-Accompaniment mode when you're not sure what chords to play. The FS680 has a preset chord sequence (the same one used with ONE FINGER AD-LIB) for each of the 100 Rhythms. You activate the preset sequence by pressing the notes of the Lower keyboard (beginning with C1) in successive order. Here are the steps:
- With the rhythm stopped, press the SYSTEM/MIDI button three times. The display should begin to flash alternately between "RUT" and the number 001 (or 002 or 003).
- Press the +1 SELECTOR button to change the number in the display to 004. This indicates that the FS680 is in AUTO 4.
- Press the LOWER MODE AUTO button. The display should briefly change to read "RUT".
- Select Rhythm number 03 (SOFT FUSION) and sound number 14 (E.PIANO) as you did in the previous pages.
- Press the SYNC/FILL IN button. The rhythm will not start until you press a key in the Lower keyboard.
- Now, count "ONE... TWO... THREE... FOUR" at the same tempo as the blinking red "Tempo" dot in the display. These are the "Beats" of the Auto-Accompaniment. Starting with the lowest "C" (called C1), hold each note of the Lower keyboard in successive order (C... C#... D... D#) for four beats. You'll hear the chord sequence change as you move up the chromatic scale.
With AUTO 4, you won't have to worry about chords. It lets you concentrate on making great melodies with your right hand.
Introducing Accompaniment Hold
Accompaniment Hold is an exciting new feature from KAWAI that allows you to control the rhythmic placement of Accompaniment Chords while you play. To operate Accompaniment Hold, you'll need to purchase a foot switch (model F1, sold separately).
- Connect the F1 foot switch to the Accompaniment Hold jack on the rear panel.
- Whenever you depress the foot switch pedal, the bass drum, open hi hat, bass, and chord will play in unison.
- If you hold the pedal down, the bass and chord sounds will be held until you release the pedal.
When will the Auto-Accompaniment Hold feature be most useful?
- When you want to add rhythmic variety to your accompaniment by holding some chords and letting others play normally;
- When you want to add syncopation to an accompaniment; and
- When you want to add accents to an accompaniment.
Try Accompaniment Hold with several different Auto-Accompaniment to see how effectively it can and interest and excitement to your performances.
Important:
Before moving on to the next section, press the SYSTEM/MIDI button three times and use the SELECTOR buttons to return to AUTO 1.
Using Hand Percussion

DRUM Assignment
| Key | MIDI Key # | Instrument name |
| C1 | 36 | Bass Drum |
| C#1 | 37 | Rim Shot |
| D1 | 38 | Low Snare |
| D#1 | 39 | Hi Clap |
| E1 | 40 | Hi Snare |
| F1 | 41 | Synthe Percussion 1 |
| F#1 | 42 | Hi-hat Close |
| G1 | 43 | Low Tam |
| G#1 | 44 | Low Clap |
| A1 | 45 | Low Conga |
| A#1 | 46 | Hi-hat Open |
| B1 | 47 | Mid Tam |
| C2 | 48 | Hi Conga |
| C#2 | 49 | Clash Cymbal |
| D2 | 50 | Hi Tam |
| D#2 | 51 | Ride Cymbal |
| E2 | 52 | Low Cymbal |
| F2 | 53 | Synthe Percussion 2 |
| F#2 | 54 | Small Cymbal |
In addition to its use with Auto-Accompaniment, the Lower keyboard can also be used to play percussion instruments.
- First, you must set the lower keyboard to play hand percussion. Press the LOWER MODE DRUM button. The letters dr u will appear in the display for a brief moment.
Now, when you press one of the keys on the Lower keyboard, you will hear the sound of the instrument pictured above that key. This feature allows you to enjoy playing simple drum solos in time with the rhythm. Of course, these drum sounds can be played even when the rhythm is turned off. The drum sounds are assigned to the keys on the Lower keyboard as shown in the chart left.
Note that if you press the LOWER MODE DRUM button once more, the display will briefly change to read nor for Normal, and the Lower keyboard will function as a Normal keyboard once again.
Creating Your Own Sounds: the Synthesizer Function


The sound you hear:

What is the synthesizer function?
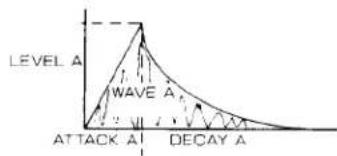
The built-in 11 parameters synthesizer allows you to create your own sounds and store them in the FS680's user memory. Before discuss the actual use of the synthesizer, let's take a look at the way the FS680's one hundred sounds are constructed. This information will be very helpful when you start to create your own sounds.
How sound is created on FS680.
The shape of each sound is determine by a variety of elements called "Parameters". Let's look at how each parameter affects the sound.
1. WAVE:
Every sound is composed of two waves, WAVE A and WAVE B, both of which are selected by changing the WAVE parameter. Each wave has a "Shape" which determines the character of its sound.
2. LEVEL (A, B):
This parameter controls the respective volume levels of WAVEs A and B.
3. ATTACK (A, B):
This parameter controls the amount of time it takes for WAVEs A and B to reach their peak volume levels after the key is struck. Sounds such as number 86 (VIBES) have a short attack, while sounds such as number 07 (SLOW VIOLIN) have a rather long attack.
4. DECAY (A, B):
This parameter controls the amount of time it takes for WAVEs A and B to change from their respective peak volume levels to their sustain levels (a volume level that will be held for as long as the key is held down). Sounds such as number 85 (XYLOPHONE) have a very short decay, whereas sounds like number 11 (PIANO1) have a long decay.
5. SUSTAIN (A, B):
This parameter controls the volume levels at which WAVEs A and B will be held while the key is held down. Sounds such as XYLOPHONE, which disappear even if you hold the key down, generally have SUSTAIN values of zero. The sustain volume of other sounds such as number 31 (JAZZ ORGAN) which continue to play as long as the key is held down, can be controlled by changing their SUSTAIN values.
6. RELEASE (A, B):
This parameter controls the amount of time it takes the sound to disappear after the key is released. Sounds such as number 78 (COSMIC) have a very long release.

The Synthesizer Function:
Changing the Parameters

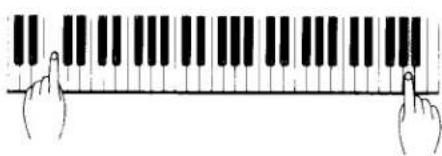
Now that you can understand the way sound is created on the FS680, lets discuss the method by which you can change parameters to create your own sounds. Parameters are selected using keys C5 through F5 on the right end of the keyboard. Once a parameter has been selected, its value can be changed using the SELECTOR buttons.
First, use the SELECTOR buttons to select the sound which you would like to modify by changing its parameters. Let's try changing the parameters for sound number 01 (BOW. STRINGS).
We will begin by pressing the USER PROGRAM SYNTH button. The lamp above this button will light, and the display will begin to flash, alternately reading _oo and oo1.
The _UU represents a W, the first letter in WAVE. The number 001 indicates that WAVE combination number 001 has been selected. (Remember that each of the one hundred sounds in the FS680's "100 SOUND LIBRARY" is actually a combination of two WAVEs, WAVE A and WAVE B.) The WAVE number can be changed using the SELECTOR buttons. (For example, if WAVE combination 100 is selected, the display will flash alternately between _UU and 100.)
1. Changing the LEVEL
Press the C#5 key. The display should begin to flash alternately between _LR and the number 011. The "L" in the display stands for "LEVEL," and the "R" means that the value shown is the LEVEL of WAVE A. Thus, the LEVEL of WAVE A is 11. If you press the SELECTOR +1 button once, the number shown by the display should change to read 012.
Next, try pressing the C#5 key once again. The display should begin to flash alternately between _Lb and the number 010. Again, the "L" in the display stands for "LEVEL" and the "b" is a lower case letter "B" indicating WAVE B. This indicates that the LEVEL of WAVE B is 10. Use the SELECTOR +1 button to change the number to 015.
You have now made WAVE B (at 0.15) louder than WAVE A (at 0.12).

The Synthesizer Function: Changing the Parameters
![graph TD A["2"] --> B["1.89 0 10"] B --> C{flash alternately.} C --> D["SELECTOR"] D --> E["0.02"] E --> F["Press again."] F --> G["1.86 0 10"] G --> H{flash alternately.} H --> I["SELECTOR"] I --> J["0.01"]](/content/2026/06/1312311/images/6b1e03e1cbeba79decc5d38aef0ca1cb9b1d6250162c58619b7ece97c8a2b188.jpg)
![graph TD A["3"] --> B["SELECTOR"] B --> C["0.04"] C --> D["flash alternately."] E["Press again."] --> F["0.00"] G["SELECTOR"] --> H["0.00"] H --> I["flash alternately."] J["0.10"] --> K["0.10"]](/content/2026/06/1312311/images/5632aba0c7d425e3b0218d362f98ee8f19c7bea4e89d766617ed8a20d1d8ccb6.jpg)
2. Changing the ATTACK
Press the D5 key. The display should begin to flash alternately between _RR and the number 010. The first "R" in the display stands for "ATTACK," and the second "R" means that the value shown is the ATTACK of WAVE A. Thus, the ATTACK of WAVE A is 10. Use the SELECTOR -1 button to change the number to 002.
Next, try pressing the D5 key once again. The display should begin to flash alternately between _Rb and the number 010. This indicates that the ATTACK of WAVE B is 10. Use the SELECTOR -1 button to change the number to 001.
Try playing a lower key on the FS680 (away from the User Program section). You'll hear that the BOW. STRINGS sound now has a much slower attack than it did previously.
3. Changing the DECAY
Press the D#5 key. The display should begin to flash alternately between _dR and the number 004. The "d" in the display stands for "DECAY," and the "R" means that the value shown is the DECAY of WAVE A. Thus, the DECAY of WAVE A is 4. Use the SELECTOR -1 button to change the number to 000.
Next, try pressing the D#5 key once again. The display should begin to flash alternately between _db and the number 000. This indicates that the DECAY of WAVE B is 0. Use the SELECTOR +10 button to change the number to 0:0.
Hold down one of the FS680's lower keys (away from the User Program section). After holding for about 1 seconds, you'll hear WAVE B drop suddenly in volume That's because you have assigned it a faster DECAY time than WAVE A.

The Synthesizer Function:
Changing the Parameters
4

5
![graph TD A["5"] --> B["Hand pressing keys"] B --> C["SELECTOR: -10 +10"] C --> D["Press again."] D --> E["SELECTOR: -10 +10"] E --> F["→ Flash alternately."] F --> G["0.09"] G --> H["→ Flash alternately."] H --> I["0.04"] I --> J["→ Flash alternately."] J --> K["0.05"] K --> L["→ Flash alternately."…](/content/2026/06/1312311/images/77e2568c4933df55ad51390d849dd05be12f3a0a88bb8debe650367eef883057.jpg)
4. Changing the SUSTAIN
Press the E5 key. The display should begin to flash alternately between _58 and the number 006. The "5" in the display stands for "SUSTAIN," and the "8" means that the value shown is the SUSTAIN of WAVE A. Thus, the SUSTAIN of WAVE A is 6. Use the SELECTOR +1 button to change the number to 008.
Next, try pressing the E5 key once again. The display should begin to flash alternately between _5b and the number 000. This indicates that the SUSTAIN of WAVE B is 0. Use the SELECTOR +1 button to change the number to 008.
Hold a lower key once again. After about 1 seconds, you'll notice that the volume of WAVE B drops suddenly --- but not to as low A volume level.
5. Last, changing the RELEASE
Press the F5 key. The display should begin to flash alternately between _rR and the number 009. The "r" in the display stands for "RELEASE," and the "R" means that the value shown is the RELEASE of WAVE A. Thus, the RELEASE of WAVE A is 09. Use the SELECTOR -1 button to change the number to 004.
Next, try pressing the F5 key once again. The display should begin to flash alternately between _r b and the number 005. This indicates that the RELEASE of WAVE B is 05. Use the SELECTOR -1 button to change the number to 002.
Now try pressing one of the lower keys on the keyboard. The sound that you now hear is quite different from the original sound, BOW. STRINGS. By changing the RELEASE parameter, you have lengthened the sound so that it continues to play after the key is released. Let's save this new sound using the procedure described in the next few pages.

The Synthesizer Function: Storing Your New Sound
1

2

Storing sounds
Now you're ready to store your newly created sound in the FS680's user memory.
- Press the STORE/RECALL button. The display should change to read U01.
It is possible to store up to five sounds created using the synthesizer function. Those five sounds will be stored as sounds 96 through 100, which are listed as USER 1 through USER 5 in the "100 SOUND LIBRARY" on the FS680's front panel. Therefore, the number "UQI" in the display indicates that USER 1 has been selected. You can use the SELECTOR +1 button to change this number to any value between 1 and 5. Let's leave it at 1 for now.
- Press the STORE/RECALL button one more time. The sound you just created will be stored as sound number 96 (USER 1). Try using the SELECTOR buttons to select this sound. When you press a key, you should hear the sound you just created.
Note:
If, while you're creating a sound using the synthesizer function, you should happen to press a key which activates one of the FS680's other functions, the FS680 will leave the synthesizer mode and return to its normal performance mode. Did you forget to store the sound you were creating? There's no need to worry. You can simply press the STORE/RECALL button to return to the synthesizer mode. (This is known as the "Restore" function.)
Creating Rhythm and Auto-Accompaniment Patterns:

Have you ever wished you could take your own musical ideas and put together a dynamite Auto-Accompaniment of your own? With the FS680, you can!
Using the programming functions of the FS680, it is possible for you to create Intro, Fill in, Ending, and Basic patterns for each of the FS680's Auto-Accompaniment parts: rhythm, bass, and chords. You can build these patterns from scratch, or you can alter one or more elements (chord, bass, drums) of a preset pattern. This is an extremely powerful feature that offers you tremendous creative freedom!
As an example, let's try making a few changes to Rhythm number 28 (POP ROCK) to develop a new pattern.
- Use the RHYTHM button and the SELECTOR buttons to select the POP ROCK pattern (number 28).
- Let's begin by changing the Basic pattern.
With the rhythm turned OFF, press the USER PROGRAM ACC & O.F. AD-LIB button. The lamp above that button will light up, and the display will change to read _b8, which is short for "Basic." This indicates that the Basic pattern has been selected.
● First, let's change the Rhythm pattern
Find the USER PROGRAM keys at the right end of the keyboard which are identified by ACC. above the keys (F#5 to A5). These are the USER PROGRAM keys for changing accompaniments.
Press the G#5 key. The display should change to show the number of the POP ROCK pattern (that is, number 28).
The basic Rhythm pattern for the POP ROCK pattern is at left:
Let's try adding the high clap sound on top of the snare drum. Just press the D#1 key, which controls the high clap sound, in time with the snare drum.
Feel free to add other rhythm sounds as you like. If you make a mistake with one sound for example, (high clap), use the RHYTHM ERASE key (A5) to remove the mistake. Hold down the RHYTHM ERASE key (A5) while you press the "high clap" key (D#1). All high clap sounds will be instantly erased.
Creating Basic Patterns

● Next, let's change the bass part
If you're finished with the Rhythm pattern, let's move on to the bass pattern. Press the G5 key (labelled "BASS CLEAR") on the keyboard twice. The bass pattern should disappear, and the display will change to show the number 358. This indicates that sound number 58 (E. BASS) is the sound being used for the bass part in this pattern.
Let's create a bass part like the one given left. Use the keys from C1 to B4 to input the bass part. If you want to use a sound other than E. BASS for the bass part, select the sound you prefer using the SELECTOR buttons to change the sound number shown in the display. You should also use the BASS VOLUME buttons to set the volume of the bass part at this time.
● Last, let's change the Chord part
Press the F#5 key. The number 0 : 1 should appear in the display. This indicates that sound number 11 (PIANO 1) is being used for the Chord part.
The basic Chord part for the POP ROCK pattern is as shown left. Let's try adding the notes shown left to the end of the second measure. Use the keys from C1 to B4 to input the Chord part. If you want to use a sound other than PIANO 1 for the Chord part, select the sound you want using the SELECTOR buttons to change the sound number shown in the display. You should also use the CHORD VOLUME buttons to set the volume of the Chord part at this time.
- Thus far, we have changed each of the elements (rhythm, bass, chord) of the POP ROCK Basic pattern --- but we have not yet stored the revised pattern in the FS680's user memory. Before we cover the procedure for storing, let's change the Fill in and Intro/Ending patterns as well.
Note:
As you're probably observed by now, pressing the ACC. USER PROGRAM keys (F#5, G5, G#5) once lets you add to that portion of the existing pattern.
Pressing the same key again erases that portion of the pattern allowing you to rebuild it from scratch.

Creating Fill in and Intro/Ending Patterns
1

The Fill in Pattern plays.
2
Press once...

...and the Intro Pattern plays.
Press again...

...and the Ending Pattern plays.
Fill in and Intro/Ending patterns can also be changed using the same procedure that you used to changed the Basic pattern in the previous page.
- Let's try changing the Fill in pattern.
Press the SYNC/FILL IN button. You should hear the POP ROCK Fill in pattern. Try to change this Fill in pattern to suit your taste, using the same procedure that you used to change the Basic pattern.
- Last, let's change the Intro and Ending patterns.
If you press the INTRO/ENDING button, you will hear the POP ROCK Intro pattern. Press it once more, and you will hear the Ending patterns. Go ahead and edit these patterns as you like, using the same procedure as before.
Notes:
- The tempo you use when creating Auto-Accompaniment patterns will not be memorized! When creating difficult patterns, feel free to slow down the tempo for input, then speed it up again when performing.
- The same bass and chord sounds will be used for all four pattern types (Basic, Intro, Fill in, and Ending) of a single Auto-Accompaniment pattern. The last sounds you choose for the bass and Chord parts are the ones that will be memorized when you store the pattern. For example, if you had chosen E. BASS for the bass part sound when creating the Basic pattern, but later changed it to A. BASS when creating the Ending pattern, then A. BASS will be memorized as the bass part sound for all four of the patterns. Note also that the SPLIT sounds, those numbered 41 through 50, cannot be chosen as the bass or Chord part sounds.
Creating Fill in and Intro/Ending Patterns
3
-
If you incorrectly enter one or more notes while creating any part of the Auto-Accompaniment pattern, just press the CLEAR key for that part and all of the notes that you input will be erased. (For example, if you press the F#5 key while creating the bass part for a pattern, the entire bass line will disappear.) You can use the RHYTHM ERASE key to remove individual rhythm sounds from a Rhythm pattern. (For example, to remove only the closed hi-hat sound from a Rhythm part, hold down the A5 key and press the F#1 key, which controls the closed hi-hat sound. That sound will be removed from the Rhythm pattern.)
-
As mentioned in an earlier note, the CLEAR key for each part operates in two ways. When pressed once, the original pattern for that part remains unchanged and you can actually add notes to the part. When you press the CLEAR key a second time, all the notes for that part will be erased --- allowing you to build an entirely new part from scratch. If you want to change the original pattern to something entirely different, however, press the CLEAR key two times to erase the entire part.

Storing the
Newly Created Patterns
1

2

Press again.
Now that we're create an entirely new pattern, let's store it in the FS680's user memory using the following procedure.
Storing patterns
- Press the STORE/RECALL button. The display should change to read UO I.
It is possible to store up to five patterns which you create. Those five patterns will be stored as patterns 96 through 100, which are listed as USER 1 through USER 5 in the "100 RHYTHMS" on the FS680's front panel. Therefore, the number "UO I" in the display indicates that USER 1 has been selected. You can use the SELECTOR +1 button to change this number to any value between 1 and 5. Let's store our pattern as number 1 this time.
- Press the STORE/RECALL button one more time. The pattern you just created will be stored as pattern number 96 (USER 1). Try using the RHYTHM button and the SELECTOR buttons to select this pattern. If you press a key, you should hear the pattern you just created.

Programmable ONE FINGER AD-LIB: Creating Phrase
1

2

Press any key...

...and the sound number will be displayed.

With the FS680's new programmable ONE FINGER AD-LIB capability, you have the power to create up to 85 different ONE FINGER AD-LIB phrases of your own. Here's how:
- Begin by choosing a rhythm using the RHYTHM button and the SELECTOR buttons.
Then, press the ACC & O.F. AD-LIB button. The lamp above that button will light up. Next, press the ONE FINGER AD-LIB button. The letters _Rd, which are short for "Ad-lib," will appear in the display. (You can produce the same results by pressing the A#5, B5, or C6 key on the keyboard.)
The Ad-lib phrase for the G2 key should also begin to play.
- Select the phrase which you want to modify by pressing the key for that phrase in the ONE FINGER AD-LIB section of the keyboard.
The Ad-lib phrase you're selected will begin to play.
The sound number for that phrase will be shown in the display. When you're ready to erase the phrase you're selected, press the C6 key (PHRASE CLEAR) and that phrase will disappear.
Programmable ONE FINGER AD-LIB: Creating Phrase
3
![graph TD A["Input new phrase using this range."] --> B["normal"] B --> C["down"] B --> D["up"] D --> E["normal"] E --> F["Normal"] style A fill:#f9f,stroke:#333 style B fill:#ccf,stroke:#333 style C fill:#cfc,stroke:#333 style D fill:#fcc,stroke:#333 style E fill:#cff,stroke:#333 style F fill:#ffc,s…](/content/2026/06/1312311/images/1515f6a9f96454dfa46049bd4ca7bf9ffb4507d1c083658ddf7bff3462b75e30.jpg)
- Inputting the new phrase.
Use the keys from C1 to B4 to input the new phrase.
If you find that this range isn't high or low enough to play the Ad-lib phrase you have in mind, press the B5 (OCTAVE SHIFT) key. This key can be used to shift the range played by the keys from C1 to B4 up or down an octave, as shown in the diagram left.
Pressing the OCTAVE SHIFT key one time causes the keyboard to shift up one octave. Pressing a second time restores the keyboard to the normal pitch.
Pressing the OCTAVE SHIFT key a third time causes the keyboard to shift down one octave. Pressing a fourth time restores the keyboard to the normal pitch.
You can also use the MELODY VOLUME buttons to set the volume of the Ad-lib phrase which will be memorized when you store the phrase.
- Inputting additional Ad-Lib phrases.
Suppose you want to input a second Ad-Lib phrase. To do this, make sure that your first customized Ad-Lib phrase (from Step 3 above) is finished. Now, press the POINT SELECT key (A# 5). This tells the FS680 that you are done with the current phrase.
Now, repeat Steps 2 and 3 above to input a new Ad-Lib phrase. When you are done with this second phrase, press the POINT SELECT key again. You can continue this process until all 17 Ad-Lib keys have been programmed with your own customized phrases.

Programmable ONE FINGER AD-LIB: Storing Phrase
1

2

Now use the SELECTOR buttons to select a voice for the phrase. The length of a ONE FINGER AD-LIB phrase is limited to one measure. You can change any number of ONE FINGER AD-LIB phrases, for a given rhythm --- up to seventeen for each Rhythm pattern. When you're finished changing the phrases, you can store them for future use.
Storing ONE FINGER AD-LIB phrases
- Press the STORE/RECALL button. The display should change to read U01.
The ONE FINGER AD-LIB phrases you create must be stored with the Rhythm patterns that accompany them. It is possible to store up to five patterns (and their ONE FINGER AD-LIB phrases) which you create. Those five patterns will be stored as patterns 96 through 100, which are listed as USER 1 through USER 5 in the "100 RHYTHMS" on the FS680's front panel. Therefore, the number "UU I" in the display indicates that USER 1 has been selected. You can use the SELECTOR +1 button to change this number to any value between 1 and 5. Let's store our new pattern as number 2.
- Press the STORE/RECALL button one more time. The pattern (with the new ONE FINGER AD-LIB phrase) you just created will be stored as pattern number 97 (USER 2). Try using the RHYTHM button and the SELECTOR buttons to select this pattern. Make sure that the ONE FINGER AD-LIB button and the LOWER MODE AUTO button are in the ON position. Press START/STOP button. When you press the ONE FINGER AD-LIB key on which you created the new phrase, you should hear your newly created phrase.
Programmable ONE FINGER AD-LIB: Storing Phrase
Notes:
-
The patterns listed as USER 1 through USER 5 in the "100 RHYTHMS" section are used for storing both the Auto-Accompaniment patterns and the ONE FINGER AD-LIB phrases that you create. Therefore, if you had saved the Ad-lib phrases created above as USER 1, the modified version of the POP ROCK rhythm pattern (which you created and stored as USER 1 previously) would be erased, and the Auto-Accompaniment rhythm pattern you selected in order to create the Ad-lib phrases would take its place. If you would like to create ONE FINGER AD-LIB phrases to go with a rhythm of your own invention, then you should edit and store the rhythm in advance on one of the user memories. Then, select this user rhythm when you are ready to create the Ad-lib phrases.
-
It is possible to input up to about 300 notes for a single Auto-Accompaniment pattern (combined total for Basic, Intro, Fill in, Intro and Ending patterns), and up to about 270 notes for all the ONE FINGER AD-LIB phrases for a single pattern (combined total for seventeen phrases).
-
If, while you're creating Auto-Accompaniment patterns or Ad-lib phrases using the functions described above, you should happen to press a key which activates one of the FS680's other functions, the FS680 will return to its normal performance mode. If you haven't stored the patterns or phrases you're working on yet, there's no need to worry. You can press the STORE/RECALL button to resume the creation of Auto-Accompaniment patterns and Ad-lib phrases. (This is known as the "Recall" function.)

Using the SYSTEM Functions:
Tuning Control
1

In this section we will outline the FS680's SYSTEM functions (which are concerned with the overall control of the FS680).
SYSTEM functions
The SYSTEM functions include:
-
TUNING CONTROL (pitch adjustment)
-
TRANSPOSE (key change)
-
Accompaniment Hold Pedal function selection
-
Selection among the four types of Auto-Accompaniment. (Please see the section on "Advanced Use of Auto-Accompaniment Section" above.)
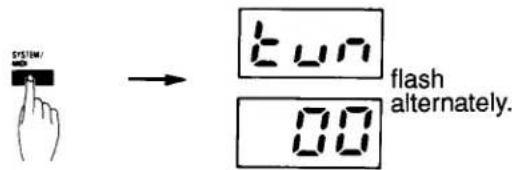
1. TUNING CONTROL
Press the SYSTEM/MIDI button once. The display should begin to flash, alternately showing the letters UN (short for TUNE) and the number .
If you press the SELECTOR +1 button once, the number in the display will change to read ☐ and the pitch will raise slightly. If you press the -1 button instead, the number will change to -☐ and the pitch will drop. You can use the TUNE function to adjust the FS680's pitch within a range of -08 to 07.

Transpose and
Accompaniment Hold Pedal
2
3

2. TRANSPOSE
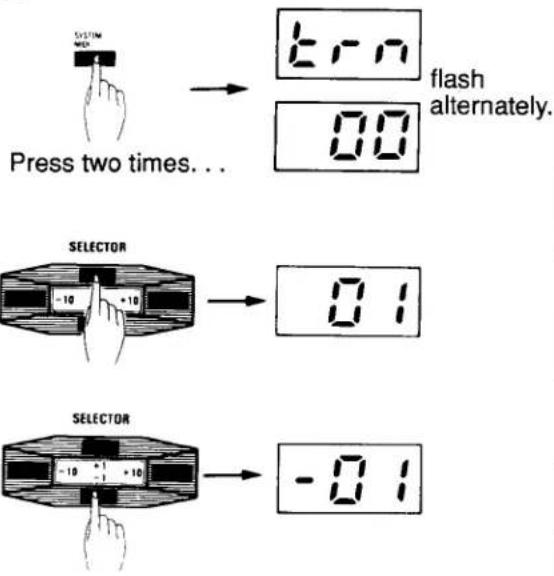
Press the SYSTEM/MIDI button twice. The display will begin to flash, alternately showing the letters E r n (short for TRANSPOSE) and the number 00.
If you press the SELECTOR +1 button, the number in the display will change to read ☐ and the pitch will raise by a half step. If you press the -1 button instead, the number will change to -☐ and the pitch will drop by a half step. You can use the TRANSPOSE function to adjust the FS680's pitch by a full octave upward or downward (that is, from -12 half steps to +12 half steps).
3. Accompaniment Hold Pedal function select
Press the SYSTEM/MIDI button four times. The display will begin to flash, alternately reading REC and PEd. The REC stands for Accompaniment. PEd lets you know that the Accompaniment Hold pedal, when depressed, will control the Accompaniment Hold function. If you press the SELECTOR +10 button, the display should begin to flash, alternately reading REC and FIL. The FIL stands for Fill in. Now, when the Accompaniment Hold pedal is depressed it will operate the in the same manner as the SYNC/FILL IN button. This lets you insert Fill in patterns without your fingers ever leaving the keyboard. Fill in patterns are activated when you depress the pedal. To return the Accompaniment Hold pedal to its normal function, press the SYSTEM/MIDI button four times, then press the SELECTOR -10 button.

Using the MIDI Functions: Creating Songs
MIDI functions
In this section we will outline the FS680's MIDI functions (which allow you to connect the FS680 to other MIDI instruments).
Upon seeing the word "MIDI," many people may think: "This section has nothing to do with me!" or "MIDI is too difficult to bother with!" However, if you try using the FS680's MIDI functions, you're sure to find that MIDI is a fun and useful tool for making music.
The FS680 is loaded with MIDI functions – if you don't use them, you're missing out on a lot of the fun the FS680 has to offer!
Unfortunately, however packed the FS680 may be with exciting MIDI functions, they are not much use if the FS680 is the only instrument you're using. These MIDI functions are used to connect the FS680 to other MIDI equipment. In this section we will give you some examples of how this is done.
■ Connecting the FS680 to a sequencer
1. Creating a song like the FS680's demo song
When using the FS680's MIDI functions, you can create a song with four parts plus a drum part. These four parts can all play together from the beginning of the song to the end of the song, just as the melody you play by hand and the Auto-Accompaniment part play together from the start of a song to its end.
a) First connect the FS680 to a sequencer
Connect the FS680 to a sequencer as shown in the diagram at left.
b) Create a drum part
First, set the lower mode to "DRUM".
Press the SYSTEM/MIDI button eight times. The display will begin to flash, alternately showing [hr and r01.
Use the SELECTOR +1 button to change the -01 to -10. This changes the FS680's MIDI Transmit channel to channel 10.
If you start the sequencer recording now, you can use it to record a drum part. If you raise or lower the volume while recording using the RHYTHM VOLUME buttons, these changes will also be recorded by the sequencer.
![graph TD A["FS-680"] -->|MIDI OUT| B["Sequencer"] A -->|IN| B B -->|OUT| C["MIDI IN"]](/content/2026/06/1312311/images/6b3fb9d165cd96b77ba920e320fa7bd9244bde7f283106fe201f28f76ca29188.jpg)
![1-b SYSTEM/ Press eight times... → [CH-] flash alternately. -0:1](/content/2026/06/1312311/images/a590a0a293ac0a9af85a27a8a74d8eba1c93819841e60534fd4b01ceea9b5eda.jpg)


Using the MIDI Functions: Creating Songs
1-c


to select any sound.
c) Create the other parts
If you have left the SYSTEM/MIDI mode, press the SYSTEM/MIDI button eight times. The display will begin to flash, alternately showing [br and r 10.
Use the SELECTOR -1 button to change the r 10 to r 01.
The FS680's MIDI Transmit channel is now set to channel 1. If you press one of the keys on the keyboard, the keyboard will play whatever sound is currently selected. Use the SELECTOR buttons to select the sound of your choice.
Now you can use the sequencer to record the part for that sound. Volume changes made using the VOLUME buttons for each part will of course be recorded by the sequencer as before.
To record other parts, use the SYSTEM/MIDI button and the SELECTOR buttons as before to change the MIDI Transmit channel to any channel from 2 through 4. Then select the sound you will use for the new part, and record it as before. Of course, if you change the sound you are using in the middle of the recording, the sound change will also be recorded. Therefore, it is not necessary to assign three solos – say, a sax solo, a guitar solo, and an organ solo – to three separate channels. You can record them all on one channel by simply changing the sound as you record.
To summarize, drums can be recorded by your external sequencer when the FS680 is set to MIDI Transmit channel 10. Sounds are recorded when you use MIDI Transmit channel 1 through 4.
This gives you five multi-timbral channels for recording separate tracks.
Using the MIDI Functions: Creating Songs
Note:
If you raise or lower the volume while recording using the MASTER VOLUME buttons, these changes will not be recorded by the sequencer.
Notes:
"MIDI" is an acronym for Musical Instrument Digital Interface.
MIDI provides a method for the FS680 to communicate with other MIDI equipped instruments or computers.
It is not the purpose of this manual to discuss in depth the many uses and techniques of MIDI operation.
For complete books on this subject, KAWAI recommend that you consult your local music dealer or contact the MIX BOOKSHELF (6400 Hollis St. Suiteiz Emeryuille, CA 94608 U.S.A. phone 415-653-3307) to request their catalog of MIDI materials.

Using the MIDI Functions: Changing MIDI Channel
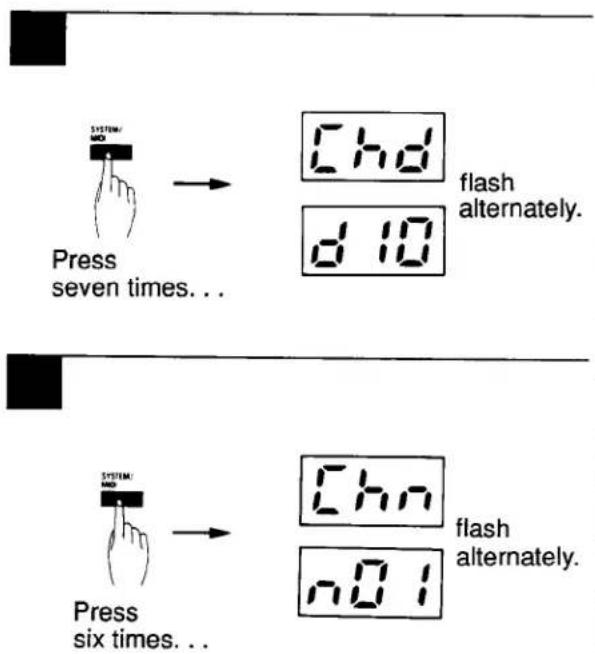
flash alternately.
flash alternately.
At some point during recording, you may find it necessary to change the MIDI channel for a specific part. Here's how it can be done:
● To change the Rhythm part channel
Press the SYSTEM/MIDI button seven times or until the display flashes, alternately between [hσ (which is an abbreviation for "Channel, Drum") and σ 10. This indicates that the Rhythm part is being output through channel 10. If you use the SELECTOR +1 button to change the number in the display to read σ 11, the Rhythm part will be output through channel 11.
● To change the channels of the other parts
Press the SYSTEM/MIDI button six times or until the display flashes, alternately between Chn and nQ . This indicates that the melody and ONE FINGER AD-LIB phrases you play using SOUND 1 will be output through channel 1.
If you use the SELECTOR +1 button to change the display to read n02, then the melody and ONE FINGER AD-LIB phrases you play using SOUND 1 will be output through channel 2; the melody and ONE FINGER AD-LIB phrases you play using SOUND 2 will be output through channel 3; the Auto-Accompaniment Chord part will be output through channel 4; and the bass part will be output through channel 5.
You can see that the channel number for melody using SOUND 1 determines the channels for the other three sounds – which are assigned to the next three successive channels.
In other words, if the channel which outputs the melody and ONE FINGER AD-LIB phrases is channel "N", then SOUND 2 outputs through channel N+1; the Chord part outputs through channel N+2; and the bass part outputs through channel N+3.
The number shown in the display is the channel number n.

Using the External Sequencer: Sending Automatic Function

During normal operation, the FS680 does not send (transmit) automatic information (Auto-Accompaniment and ONE FINGER AD-LIB) via MIDI. You can, however, enable the FS680 to send this information by using the SYSTEM/MIDI button.
■ Using a sequencer to record FS680's Automatic functions. (Auto-Accompaniment, ONE FINGER AD-LIB).
Begin by pressing the SYSTEM/MIDI button five times. The display should begin to flash, alternately showing the letters RCC and oFF.
The REC stands for Accompaniment. The off signifies that the FS680 is not currently sending "Automatic" information via MIDI.
If you press the SELECTOR +10 button, the oFF should change to read _on. This indicates that the Auto-Accompaniment will be transmitted via the MIDI connection.
You may now start the sequencer recording and begin your performance. Each part will be sent to the sequencer by way of a different MIDI channel, as shown below:
| Channel | Part |
| 1 | SOUND1 |
| (Your melody, ONE FINGER AD-LIB) | |
| 2 | SOUND2 |
| (Your melody, ONE FINGER AD-LIB) | |
| 3 | Chord part |
| 4 | Bass part |
| 10 | Rhythm part |
On Play back, your performance should sound exactly the same as it did when you recorded it.
To change any of the above MIDI channels, refer to the previous page and the procedure for changing MIDI channels.
Using the External Sequencer: Creating Patterns
Suppose you want to create a complete Accompaniment pattern on an external sequencer (such as KAWAI's professional MIDI sequencer, the Q-80) and store it in the FS680's user memory for use with the Auto-Accompaniment feature. Here's how it can be done:
■ Recording Auto-Accompaniment patterns created with an external sequencer for use with the FS680
Note: Quantize is set to ♩ = 24.
-
First program the Accompaniment pattern into your external sequencer.
-
Next, prepare the FS680 to record the pattern into user memory. Begin by pressing the USER PROGRAM ACC & O.F. AD-LIB button, just as you did when you created an Auto-Accompaniment pattern. Then select which of the four pattern types (Basic, Intro, Fill in, or Ending) you are going to record from the sequencer.
-
Record the Rhythm part first. Make sure that the external sequencer's Playback (Transmit) channel and the FS680's Rhythm channel are the same. You can check or change the Rhythm channel by pressing the SYSTEM/MIDI button seven times as described before. Then, repeat Step 2 above to prepare for recording. Next, use the TEMPO ▼ button to change the display until it reads 59C (Short for SYNC.). 59C appears after the Tempo is lowered below 48 beats per minutes. Now the FS680 is set to record your pattern from the external sequencer. When you playback the Rhythm pattern from the external sequencer, the FS680 will begin recording in SYNC with the sequencer.
Remember that the Intro and Fill in patterns you create should be one measure long. The Basic and Ending patterns should be two measures long.
Using the External Sequencer: Creating Patterns
-
Record the other parts (chord, bass) once again, make sure that your Playback (Transmit) channels for chords and bass are matched with the appropriate channels on the FS680. The chords should be set to transmit from the external sequencer on channel N+2. The bass should transmit on channel N+3. (Refer to page A - 29 of this manual to review the channel assignment procedure for the FS680.)
-
Repeat Step 2 above to prepare the FS680 for recording. Select the appropriate pattern type. Remember that Intro and Fill in patterns should be one measure long while Basic and Ending patterns should be two measures long.
-
Once again, use the TEMPO ▼ button to change the display to read S5C. Now play back the pattern from your external sequencer. The complete pattern should now be ready to be assigned to a user memory location.
-
Storing your pattern. The final step is to store your new pattern on one of the five user memory locations using the STORE/RECALL button and SELECTOR buttons.
If you need, see Page A - 19 of this manual to review this procedure.
Using the External Sequencer: Creating O.F. AD-LIB Phrase
You can also use the same procedure described in the preceding pages to create ONE FINGER AD-LIB phrases on an external sequencer and store them in the FS680's user memory.
■ Recording ONE FINGER AD-LIB phrases created with a sequencer for use with the FS680
- First, program your ONE FINGER AD-LIB phrase into the external sequencer. Remember that ONE FINGER AD-LIB phrases can only be one measure in length.
-
Prepare the FS680 to record.
-
Use the RHYTHM and SELECTOR buttons to select the Accompaniment pattern you want as background for your ONE FINGER AD-LIB phrases.
● Make sure that the Playback (Transmit) channel of your external sequencer matches the FS680's Receive channel for Sound1 (the default is channel 1). -
Now press the USER PROGRAM ACC.& O.F. AD-LIB button, just as you did when you were creating ONE FINGER AD-LIB phrases.
-
Record the phrase
Use the TEMPO ▼ button to change the display so that it reads 55C (which, you will recall, is short for SYNC). Now, when you playback the phrase from the sequencer, it will be recorded as the ONE FINGER AD-LIB phrase for the ONE FINGER AD-LIB key that is currently selected.
- By selecting different ONE FINGER AD-LIB keys, you can record different phrases from the external sequencer. When you are through recording new phrases, use the "storing" procedure (see page A - 22) to store the new Ad-Lib phrases in user memory along with the corresponding Accompaniment pattern.
Using the External Sequencer: Using Other Functions
1
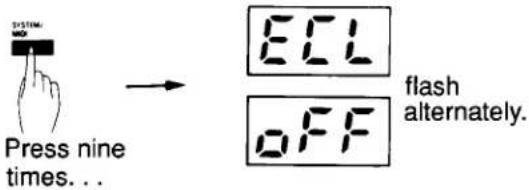
2
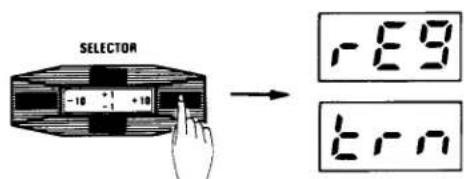
flash alternately.
As you know, it is possible to store the sounds and patterns you create in the FS680's user memory. However, the number of sounds and patterns you can store in this way is limited to five each. To increase your stock of sounds and patterns, the FS680 allows you to store them in an external sequencer (such the Q-80, a data filer, or some other external MIDI device). You can store the following data using this function:
● Five sounds created using the synthesizer function
● Five Auto-Accompaniment patterns plus corresponding ONE FINGER AD-LIB phrases
● Twenty sets of REGISTRATION data
■ Storing sounds and Auto-Accompaniment patterns you create for the FS680 in an external sequencer
- Begin by pressing the SYSTEM/MIDI button nine times. The display will begin to flash, alternating between the letters ECL (which is short for "Exclusive") and oFF.
- If you press the SELECTOR +10 button once, the display will change so that it reads rE9 (short for "REGISTRATION") and Ern (short for "Transmit") alternately. By this, the FS680 is asking whether you want to transmit your REGISTRATIONS to another MIDI device.

Using the External Sequencer: Using Other Functions
3

4
![graph LR A["SELECTOR"] --> B["Number 10"] B --> C["End"]](/content/2026/06/1312311/images/eb9e5c2c36741a12a5f6ef5bd5496eb5cdbf742ce2d42dc21e6a0cabb1bf7503.jpg)
- Since this is exactly what you want to do, press the +10 button once again. The display will change to read Sur, which means "Sure?"
- Press the +10 button one more time, and the display will read ____ for a few moments, then change to read End. Your data transmission is now complete.
After this, pressing the SYSTEM/MIDI button will change the display to read, first SYN (Synthesizer), then REC (Auto-Accompaniment), then oFR (ONE FINGER AD-LIB). Pressing the +10 button twice when you see any of these displays will cause the FS680 to transmit the data for the part indicated by the display to an external MIDI device.
Using the External Sequencer: Using Other Functions
■ Connecting the FS680 to another MIDI keyboard or tone generator module
First, connect the FS680 MIDI Out jack to the MIDI In jack of another keyboard or tone generator. Make sure that the FS680's MIDI transmit channel matches the MIDI receive channel of the tone generator or module. Then, pressing a key on the FS680's keyboard will cause both the FS680 and the other instrument to play a sound simultaneously. Or, if you connect the FS680 to a keyboard which has a multi-timbral function (which would allow it to receive signals over a number of different MIDI channels at once), then you can play the FS680's Auto-Accompaniment and Rhythm patterns through the other instrument as well. (See page A – 9 for Rhythm key numbers.)
These are a few examples of the ways in which the FS680's MIDI functions can be used. There are sure to be many more interesting and enjoyable things you can find to do with MIDI.
Its possibilities are limitless!

Appendixes
How to play chords that FS680 can recognize (C root)
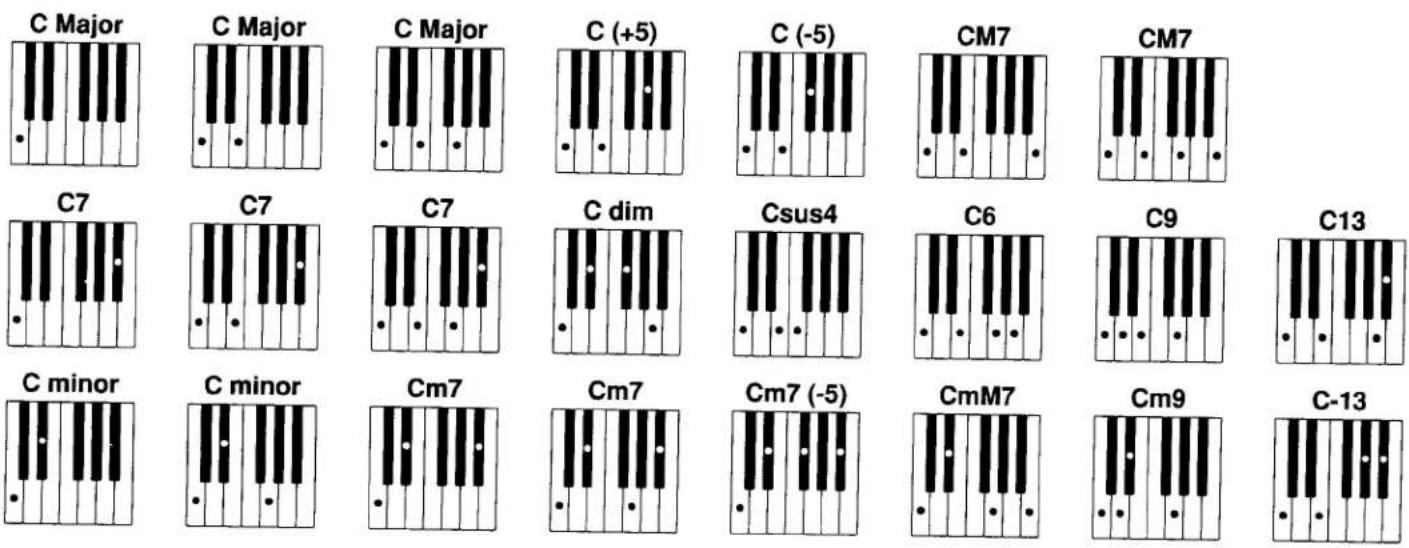


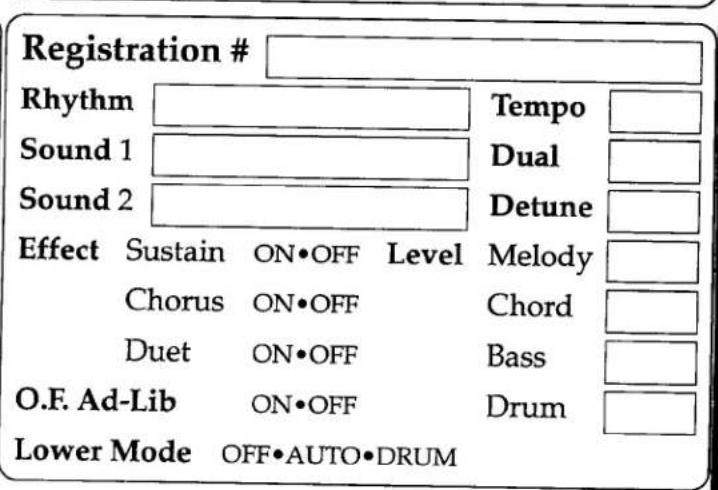

[KAWAI Electronic Keyboard]
Model FS680 MIDI Implement Chart
Date: Oct 20 '89
Version: 1.0
| Function... | Transmitted | |||||
| (SOUND 1/2) | (CHORD/BASS) | (RHYTHM) | SYSTEM | Remarks | ||
| Basic Channel | Default Changed | 1/21-16 (N/N+1) | 3/41-16 (N+2/N+1) | 101-16 (D ch) | 11-16 (R ch) | |
| Mode | Default Message Altered | 3X********** | 3X********** | 3X********** | 3X********** | |
| Note Number | True voice | 24-108********** | 0-12712-108 | 36-5412-108 | 24-108********** | |
| Velocity | Note ON Note OFF | O X 9n v=0 | O X 9n v=0 | O X 9n v=0 | O X 9n v=0 | |
| After Touch | Key's CH's | X X | X X | X X | X X | |
| Pitch Bend | O | O | X | O | 5bit rese ±2semi | |
| Control Change | 176493 | X O O (N)O (N) | X O X X | X O X X | X X * O * O | Modulation Volume Hold Chorus |
| Prog. Change: True # | O 0-99 | O 0-99 | O 0-99 | ********** | ||
| System Exclusive | ********** | ********** | ********** | O | ||
| Common : Song Pos | ********** | ********** | ********** | X | ||
| ********** | ********** | ********** | X | |||
| ********** | ********** | ********** | X | |||
| System : Clock | ********** | ********** | ********** | O | ||
| Real Time : Commands | ********** | ********** | ********** | O | ||
| Aux : Local ON/OFF | ********** | ********** | ********** | X | ||
| ********** | ********** | ********** | X | |||
| Mes-sages : Reset | ********** | ********** | ********** | O | ||
| ********** | ********** | ********** | X | |||
| Notes | * When "Auto Send" is off. | |||||
Mode1: OMNI ON, POLY Mode2: OMNI ON, MONO
Mode3: OMNI OFF, POLY Mode4: OMNI OFF, MONO
O: Yes
X: NO
[KAWAI Electronic Keyboard]
Model FS680 MIDI Implement Chart
Date: Oct 20 '89
Version: 1.0
| Function... | Recognized | |||||
| (SOUND 1/2) | (CHORD/BASS) | (RHYTHM) | SYSTEM | Remarks | ||
| Basic Channel | Default Changed | 1/21-16 (N/N+1) | 3/41-16 (N+2/N+1) | 101-16 (D ch) | 11-16 (R ch) | |
| Mode | Default Message Altered | 3X****** | 3X****** | 3X****** | 3X****** | |
| Note Number | True voice | 0-12712-108 | 0-12712-108 | 36-5412-108 | ****** | |
| Velocity | Note ON Note OFF | O X | O X | O X | ****** | |
| After Touch | Key's CH's | X X | X X | X X | ****** | |
| Pitch Bend | O | O | X | ****** | 5bit rese ±2semi | |
| Control Change | 176493 | O O O O O | O O O O X | X O X X | ****** ****** ****** ****** ****** | Modulation Volume Hold (Chorus) Modulation → Vib Depth |
| Prog. Change: True # | O0-99 | O0-99 | O0-99 | O100-119 | 100-119→ Registration | |
| System Exclusive | O | O | O | O | ||
| Common : Song Pos Common : Song Sel : Tune | *************** | *************** | *************** | XX | ||
| System : Clock Real Time : Commands | *************** | *************** | *************** | OO | Only when TEMPO=SYNC | |
| Aux : Local ON/OFF : All notes OFF Mes- : Active Sense sages : Reset | ********O ****** ****** | ********O ****** ****** | ********O ****** ****** ****** | X ****** O X | ||
| Notes | ||||||
Mode1: OMNI ON, POLY Mode2: OMNI ON, MONO
Mode3: OMNI OFF, POLY Mode4: OMNI OFF, MONO
O: Yes
X: NO

Specifications
FS680
| Keyboard: | 61 keys, standard |
| Sounds: | 100 |
| Rhythms: | 100 |
| Effects: | stereo chorus, sustain,pitch bend, duet |
| Rhythm controls: | START/STOPINTRO/ENDINGSYNC./FILL INTEMPO |
| Recorder: | REC/ENDPLAY/STOPSONG/SELECT |
| Auto accompaniment: | LOWER MODE select |
| User program: | SynthesizerAuto-AccompanimentONE FINGER AD-LIBREGISTRATIONSTORE/RECALL |
| Volume controls: | MASTER VolumeMELODY VolumeCHORD VolumeBASS VolumeRHYTHM Volume |
| Miscellaneous controls: | ONE FINGER AD-LIB buttonON/OFF buttonDEMO buttonSYSTEM/MIDI button |
| Speakers: | 12 cm x 2 |
| Rated voltage: | 9-12 V DC: six size C dry cell batteriesor power adaptor (PS-121 or PS-123) |
| Accessory jacks: | MIDI IN/OUTHOLD PEDALACC. HOLDRCA STEREO OUTDC (9-12 V) INHEADPHONE |
| Accessories: | six size C dry cell batteriesmusic stand |
KAWAI
Kawai Musical Instruments Manufacturing Co., Ltd. 200 Terajima-cho, Hamamatsu, Japan
- KAWAI
- PERSONAL KEYBOARD
- FS680
- THANK YOU FOR YOUR PURCHASE OF THE KAWAI FS680 PERSONAL KEYBOARD
- HOW TO USE THIS MANUAL
- WARNING
- TABLE OF CONTENTS
- THE BASIC OPERATION
- THE ADVANCED OPERATION
- APPENDIXES
- BEFORE USING THE FS680
- CAUTIONS
- CONNECTING THE POWER SUPPLY
- NOTES
- OVERALL DIAGRAM AND EXPLANATION (OPERATION PANEL)
- OVERALL DIAGRAM AND EXPLANATION (REAR PANEL AND KEYS)
- [REAR PANEL]
- [KEYS]
- NOTE
- GETTING STARTED ON YOUR FS680 SELECTING SOUNDS
- GETTING STARTED WITH RHYTHMS
- OTHER IMPORTANT RHYTHM FUNCTIONS
- 1
- 2
- 3
- CHANGING RHYTHM TEMPO
- USING AUTO-ACCOMPANIMENT FOR EASY ENSEMBLE PLAY
- USING AUTO-ACCOMPANIMENT SECTION: AUTO 1
- USING ONE FINGER AD-LIB FOR AN AD-LIB PERFORMANCE
- WHAT IS ONE FINGER AD-LIB
- HOW DOES ONE FINGER AD-LIB WORK
- A NOTE ABOUT THE ONE FINGER AD-LIB CHORD PROGRESSIONS
- CHANGING KEYS
- THE MIXER SECTION
- TO ELIMINATE THE VOLUME OF ANY PART
- USING THE REGISTRATION MEMORY
- WHAT DOES
- HOW TO USE THE REGISTRATION MEMORY
- USING THE REGISTRATION
- MEMORY
- USING THE REAL TIME
- RECORDER
- TO RECORD YOUR PERFORMANCES
- CONGRATULATIONS
- ADVANCED USE OF SOUNDS: COMBINING TWO SOUNDS
- WHAT DOES DOO MEAN
- ADVANCED USE OF SOUNDS: ADDING EFFECTS
- PITCH BEND
- SUSTAIN
- STEREO CHORUS
- DUET
- ADVANCED USE OF AUTO-ACCOMPANIMENT SECTION
- AUTO 1
- AUTO 2
- AUTO 3
- AUTO 4
- EXPLANATION OF THE AUTO 2
- EXPLANATION OF THE AUTO 3
- EXPLANATION OF THE AUTO 4
- INTRODUCING ACCOMPANIMENT HOLD
- IMPORTANT
- USING HAND PERCUSSION
- CREATING YOUR OWN SOUNDS: THE SYNTHESIZER FUNCTION
- WHAT IS THE SYNTHESIZER FUNCTION
- HOW SOUND IS CREATED ON FS680
- WAVE
- LEVEL (A, B)
- ATTACK (A, B)
- DECAY (A, B)
- SUSTAIN (A, B)
- RELEASE (A, B)
- THE SYNTHESIZER FUNCTION
- CHANGING THE PARAMETERS
- CHANGING THE LEVEL
- THE SYNTHESIZER FUNCTION: CHANGING THE PARAMETERS
- CHANGING THE ATTACK
- CHANGING THE DECAY
- CHANGING THE SUSTAIN
- LAST, CHANGING THE RELEASE
- THE SYNTHESIZER FUNCTION: STORING YOUR NEW SOUND
- STORING SOUNDS
- CREATING RHYTHM AND AUTO-ACCOMPANIMENT PATTERNS
- CREATING BASIC PATTERNS
- ● NEXT, LET'S CHANGE THE BASS PART
- ● LAST, LET'S CHANGE THE CHORD PART
- CREATING FILL IN AND INTRO/ENDING PATTERNS
- STORING THE
- NEWLY CREATED PATTERNS
- STORING PATTERNS
- PROGRAMMABLE ONE FINGER AD-LIB: CREATING PHRASE
- PROGRAMMABLE ONE FINGER AD-LIB: STORING PHRASE
- STORING ONE FINGER AD-LIB PHRASES
- USING THE SYSTEM FUNCTIONS
- TUNING CONTROL
- SYSTEM FUNCTIONS
- TRANSPOSE AND
- ACCOMPANIMENT HOLD PEDAL
- TRANSPOSE
- ACCOMPANIMENT HOLD PEDAL FUNCTION SELECT
- USING THE MIDI FUNCTIONS: CREATING SONGS
- MIDI FUNCTIONS
- CONNECTING THE FS680 TO A SEQUENCER
- CREATING A SONG LIKE THE FS680'S DEMO SONG
- CREATE THE OTHER PARTS
- USING THE MIDI FUNCTIONS: CHANGING MIDI CHANNEL
- ● TO CHANGE THE RHYTHM PART CHANNEL
- ● TO CHANGE THE CHANNELS OF THE OTHER PARTS
- USING THE EXTERNAL SEQUENCER: SENDING AUTOMATIC FUNCTION
- USING A SEQUENCER TO RECORD FS680'S AUTOMATIC FUNCTIONS. (AUTO-ACCOMPANIMENT, ONE FINGER AD-LIB)
- USING THE EXTERNAL SEQUENCER: CREATING PATTERNS
- RECORDING AUTO-ACCOMPANIMENT PATTERNS CREATED WITH AN EXTERNAL SEQUENCER FOR USE WITH THE FS680
- USING THE EXTERNAL SEQUENCER: CREATING O.F. AD-LIB PHRASE
- RECORDING ONE FINGER AD-LIB PHRASES CREATED WITH A SEQUENCER FOR USE WITH THE FS680
- USING THE EXTERNAL SEQUENCER: USING OTHER FUNCTIONS
- STORING SOUNDS AND AUTO-ACCOMPANIMENT PATTERNS YOU CREATE FOR THE FS680 IN AN EXTERNAL SEQUENCER
- CONNECTING THE FS680 TO ANOTHER MIDI KEYBOARD OR TONE GENERATOR MODULE
- SPECIFICATIONS
Marque : KAWAI
Modèle : FS680
Catégorie : Clavier