
MR210 - Clavier KAWAI - Notice d'utilisation et mode d'emploi gratuit
Retrouvez gratuitement la notice de l'appareil MR210 KAWAI au format PDF.


| Type de produit | Clavier numérique arrangeur |
| Nombre de touches | 61 touches (sensibilité au toucher) |
| Polyphonie maximale | 32 voix |
| Sonorités | Plus de 100 sonorités intégrées (piano, orgue, cordes, etc.) |
| Rythmes | Plus de 50 styles rythmiques avec accompagnement automatique |
| Modes d'apprentissage | Leçon intégrée avec partition et évaluation |
| Enregistrement | Enregistreur 1 piste (MIDI) |
| Connectivité | Prise casque, sortie ligne, MIDI In/Out, pédale sustain |
| Haut-parleurs intégrés | 2 x 3 W |
| Alimentation | Adaptateur secteur 9V DC (inclus) ou 6 piles LR6/AA |
| Dimensions (L x P x H) | environ 950 x 320 x 110 mm |
| Poids | environ 4,5 kg (sans piles) |
| Matériau du châssis | Plastique ABS |
| Entretien et nettoyage | Essuyer avec un chiffon doux et sec. Ne pas utiliser de solvants. |
| Sécurité | Ne pas exposer à l'humidité, ne pas ouvrir. Utiliser uniquement l'adaptateur fourni. |
| Pièces détachées et réparabilité | Contactez un service agréé Kawai pour les pièces et réparations. |
| Accessoires inclus | Adaptateur secteur, pupitre, guide de démarrage rapide |
| Garantie | 2 ans (pièces et main-d'œuvre) |
FOIRE AUX QUESTIONS - MR210 KAWAI
Questions des utilisateurs sur MR210 KAWAI
0 question sur cet appareil. Repondez a celles que vous connaissez ou posez la votre.
Poser une nouvelle question sur cet appareil
Téléchargez la notice de votre Clavier au format PDF gratuitement ! Retrouvez votre notice MR210 - KAWAI et reprennez votre appareil électronique en main. Sur cette page sont publiés tous les documents nécessaires à l'utilisation de votre appareil MR210 de la marque KAWAI.
MODE D'EMPLOI MR210 KAWAI
KAWAI
Digital Piano

Owner's Manual

Basic Control

Front Panel

●Front (left)

① VOLUME
Move the volume slider to the right to increase the instrument's volume.
Move the slider to the left to decrease the volume.
② TRANSPOSE control
Shifting the slider to the right raises the piano's key (C - C# - D - E b - E - F).
Shifting it to the left lowers the key (C - B - B b - A - A b - G - F#).
You can therefore play the music as written - in C major, for example - and have the instrument transpose the output to a higher or lower key to match your voice.
TONE SELECTORS
Select the desired instrument by pressing the appropriate switch.
4 CHORUS
This function causes the output to become more animated.
⑤ PAN
Setting the sound in the normal position will give you the full stereophonic quality of an actual piano.
⑥ REVERB switches
These add REVERB (echo) effect to the sound for greater beauty.
7 DEMO
The DEMO button plays the three demo songs stored in the keyboard's internal memory.
8 POWER
This switch turns the instrument on and off. Be sure to turn off the instrument when finished playing.
HEADPHONE jack
This jack is for headphones sold separately (SH-2).

Rear Panel

LINE OUT
These jacks provide stereo output to amplifiers, stereo systems, tape recorders, or similar equipment.
Use the L/MONO jack when using only one output.
② LINE IN
These jacks connect two channels of output from other electronic instruments to the piano's speaker. Use the L/MONO jack when using only one input.
•Note: This input bypasses the piano's VOLUME control.
To adjust the balance, you must use the output volume controls on the individual instruments.
MIDI
These jacks allow communication with other gear equipped with MIDI.
④ PEDAL jacks
These jacks are used to connect the damper, the sostenuto and soft pedals.
• The pedals
From right to left, the pedals are the damper pedal and the soft pedal.

Damper pedal: Pressing this pedal sustains the sound even after removing the hands from the keyboard.
Soft pedal: Pressing this pedal softens the sound, and also reduces its volume.
※ The soft pedal can be used as the sostenuto pedal by turning on the power while depressing this pedal.
Sostenuto pedal: Depressing this pedal after pressing the keyboard and before releasing the keys sustains the sound of only the keys just played.
©
MR210 has a dual mode which can play two preset sounds at the same time. The result is a timbre and effect that is not obtainable with only one preset sound.
(1) While holding down one tone select button, push a second tone button. The LEDs for the 2 selected tone buttons will come on.

While holding down this button
(2) Let's try playing a note on the keyboard.
The two sounds selected (in this case the PIANO 1 and FULL ORGAN) will play simultaneously.
-Note:
- When both the Dual Mode and Chorus or Pan effect are set at once, the two selected preset sounds will be played with the preset sound whose select button is on the left side being heard from the left speaker, and the one whose select button is on the right side being heard from the right speaker.
- By using Dual Mode and pressing the keys on multiple keyboards, you can produce up to 10 sounds at one time.
(3) To Cancel Dual Mode;
Press another tone select button, or push either of the lit buttons once again.
There are three demo songs stored in the keyboard's internal memory. Using the following method you can listen to an automatic recital of these songs.
(1) Press the DEMO button.
![graph TD A["1"] --> B["2"] B --> C["3"] C --> D["REVERB"] D --> E["ROOM"] D --> F["STAGE"] D --> G["HALL"] D --> H["DEMO"] H --> I["Hand icon pointing to bottom right"]](/content/2026/06/1312306/images/3977743ed0610bd2f0b26d429b6bddb1a7a621ec7541099cb24c8412b66b812c.jpg)
The three demo songs will play automatically one after another and repeat until stopped.
![graph TD A["Demo Song 1"] --> B["Demo Song 2"] B --> C["Demo Song 3"] C --> A](/content/2026/06/1312306/images/35b0a4a75c93ee826c6ef56790319a3e46b459ecf428c249947946d5b89309d2.jpg)
(2) You can select the specific song or songs to be played by holding down the song's number key while pressing the DEMO button.
The selected song(s) will play repetitively.
![graph TD A["1"] --> B["ROOM"] C["2"] --> D["STAGE"] E["3"] --> F["HALL"] G["DEMO"] --> H["Hand Recognition Icon"]](/content/2026/06/1312306/images/1ef5e3a27b14346018b71795b681989728b4264be9bb153ff71ec15d0ffeb431.jpg)
In the above example Demo songs 2 and 3 will be played repetitively.
(3) Pressing the DEMO button again stops the demo song.
Advanced Features
1) Programming Mode
The programming mode allows you to change the keyboard's tuning, and temperament, and utilize the various MIDI capabilities. These programming functions are preformed using the panel switches and keyboard, so please try them after reading and understanding the programming instructions completely.
A. Entering the programming mode
(1) Press the CHORUS switch.
(2) Holding down the CHORUS switch, press the first three tone selector switches (PIANO 1, PIANO 2, and E. PIANO).

(3) The LEDs above the CHORUS and PIANO 1 switches should then start flashing to indicate that the piano is in the programming mode.
In this mode, striking the keyboard produces no sound.
(4) Press a TONE SELECTOR switch to select the desired programming mode.
The correspondence between switches and 6 types of programming mode is as below.
![graph TD A["MIDI"] --> B["PIANO 1"] A --> C["PIANO 2"] A --> D["E PIANO"] A --> E["CLAVI"] A --> F["JAZZ ORGAN"] A --> G["FULL ORGAN"] A --> H["HARPSICHORD"] A --> I["VIBRAPHONE"] A --> J["CHORUS"] K["Choosing a Touch Curve"] --> L["Tuning"] L --> M["LOCAL CONTROL on/off"] L --> N["Setting MIDI chan…](/content/2026/06/1312306/images/42ca671b46994378f8b66a42efeefdda5ef690580b8829f044a429b53ce2fc08.jpg)
B. Leaving the programming mode
(1) Press the CHORUS switch.
(2) The flashing will stop, and you will return to the timbre in effect when you entered the programming mode
- Note: You can also continue into another programming mode by pressing another TONE SELECTOR without pressing the CHORUS switch.
2) Choosing a Touch Curve
Touch curve is the term used describe the volume of sound produced by pressing keys on the keyboard at a given pressure.
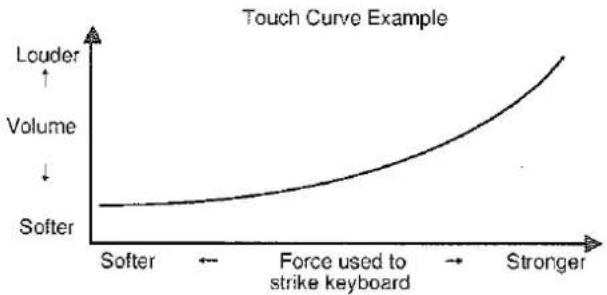
You can choose from 3 different touch curves with this unit.
(1) Press the PIANO 1, PIANO 2, and E. PIANO buttons at the same time while also pressing the CHORUS button.
This puts the unit in Programming Mode (see p. 7).
The LEDs above the CHORUS and PIANO 1 buttons will flash.
(2) Press the FULL ORGAN button

The flashing light will move from above the PIANO 1 button to the FULL ORGAN button. The unit is now in the mode to select the touch curve.
- Note: If you press the keyboard while the unit is in this mode, the preset sound you had selected before entering "Programming Mode" will play. If you want to change the preset sound, exit the "Programming Mode" (see p.7), select the new preset sound, and the repeat steps above (1) and (2).
(3) Use the 3 white keys on the extreme left end of the keyboard to select your touch curve.

① Light: A loud sound is emitted even when you play with a soft touch. This is best suited for people who lack finger strength.
② Normal: Volume changes in accordance with a normal touch. (Unit is set at this whenever power is turned on.)
③ Heavy: A loud sound is produced with a hard touch. This touch curve is suited for those with strong fingers, or for practice purpose.
(4) After selecting your touch curve, press the CHORUS button.
This takes you out of the "Programming Mode" (See p. 7). You can now move on to other set up modes.
- Note: When you turn on the power, the touch curve is set at Normal.
3) Tuning
• Procedure
(1) Make sure that the piano is in the programming mode.
(2) Press the CLAVI switch so that it flashes to indicate that the piano is ready to be tuned.

(3) Unlike the other functions in the programming mode, this one produces sound so that you can compare the piano's pitch with another instrument.
•Note: Playing the keyboard when set up this way produces the timbre selected before entering the programming mode. Tuning is done using this timbre. If you want to change the timbre, leave the programming mode (see p. 7), select the new timbre and repeat steps (1) and (2).
(4) Press the highest black key to lower the pitch.
Or press the highest white one to raise it.
It may be necessary to press these keys repeatedly to achieve proper tuning.
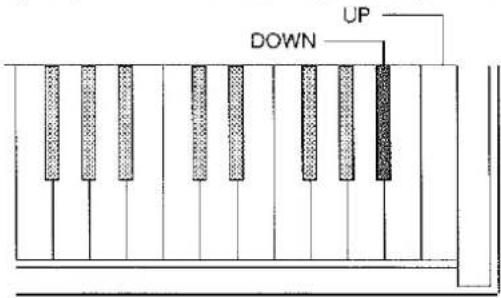
(5) Leave the programming mode.
- Note: Momentarily turning off the power restores the original pitch.
4) Temperament
Your Kawai digital piano offers not only equal temperament (the modern standard) but also immediate access to those popular during the Renaissance and Baroque period.
•Procedure
(1) Make sure that the piano is in the programming mode.
(2) Press the JAZZ ORGAN switch so that it flashes to indicate that the piano is waiting for a temperament specification.
(3) Press one of the seven white keys at the lower end of the keyboard to select one of these corresponding temperaments.

① Equal temperament without the tuning curve
② Mersenne pure temperament
③ Pythagorean temperament
④ Meantone temperament
⑤Werckmeister III temperament
⑥ Kirnberger III temperament
⑦ Equal temperament with the tuning curve
(4) Leave the programming mode.
- Note: When the power is first applied or reapplied after a short break, the piano returns to the modern standard (equal temperament with the tuning curve = #7).
Key set function is also available at this point. As you know, limitless modulation of the key became available only after the invention of Equal temperament. When we use a temperament except Equal temperament, we must carefully choose the key signature to play in.
To select the key signature setting, simply press one of the key. For example, if the tune you are going to play is written in D major, press D key to set the keys. Please note that this will only change the "balance" of the tuning, and the pitch of the keyboard will remain unchanged. Use the TRANSPOSE control to change the pitch of the whole keyboard.

Temperament characteristic
• Equal temperament
This, by far the most popular piano temperament, divides the scale into twelve equal semitones and has the advantage of producing the same chords for all transportation.
• Mersenne temperament
This temperament, which eliminates consonances for thirds and fifth, is still popular for choral music.
• Pythagorean temperament
This temperament, which uses mathematical ratios to eliminate consonances for fifth, has problems with chords, but produces a very beautiful melodic lines.
• Meantone temperaments
This temperament, which uses a mean between a major and minor whole tone to eliminate consonances for thirds, was devised to eliminate the lack of consonances experienced with certain fifth for the Mersenne pure temperament. It produces chords that are more beautiful than those with the equal temperament.
• Werckmeister III Temperament, Kirnberger III Temperament
For key signature with accidentals, this temperament produces the beautiful chords of the mean tone, but, as the accidentals increase, the tension increases, and the temperament produces the beautiful melodies of the Pythagorean temperament. It is used primarily for classical music written to take advantage of these characteristics.
1) What's MIDI
Before attempting to set the MIDI function, let's take a brief look at what MIDI is.
The letters MIDI stand for Musical Instrument Digital Interface, an international standard for connecting synthesizers, drum machines, and other electronic instruments so that they can exchange performance data.
Instruments equipped with MIDI have three jacks for exchanging data: IN, OUT, and THRU. Each uses a special cable with a DIN connector for connection (see p. 14)
IN: For receiving keyboard, timbre, and other data
OUT: For sending keyboard, timbre, and other data
THRU: For sending received data to another instrument without processing
Electrical and electronic musical instruments equipped with MIDI are able to transmit and receive performance data such as for keyboard and timbre.
Depending on the connection method, instruments are grouped as those which receive data (producing sound according to data received from the connected instrument), those which send data (to the instruments to which they are connected), and those which both send and receive data.
The cable is connected to the MIDI IN jack of the instrument receiving data and to the OUT jack of the sending instrument. The THRU jack is used when the data received is to be sent to another instrument.
MIDI uses what are known as "channels" as a means of transmitting data for playing a specified instrument.
There are two types of channels, one for receiving and one for sending, and MIDI instruments are normally equipped with both types. Receive channels are used when an instrument receives data from another instrument, and send channels are used for transmission to another instrument.
For instance, let's say that three instruments are connected for playing in this way:
![graph TD A["Transmit"] -->|OUT| B["In"] B --> C["THRU"] C --> D["IN"] D --> E["Receive"] style A fill:#f9f,stroke:#333 style B fill:#ccf,stroke:#333 style C fill:#cfc,stroke:#333 style D fill:#fcc,stroke:#333 style E fill:#cff,stroke:#333](/content/2026/06/1312306/images/36f7a30e75a4a4c2c2d927ca903c970ad2b58a55d6a00d92dfe743b7c255de30.jpg)
Instrument ①, which is sending, transmits the send channel along with keyboard and other data to instruments ② and ③, which are receiving. This data is sent to instruments ② and ③, but the data will not be received unless the receive channel for these two instruments matches the send channel used by instrument ①.
There are 16 channels each (1 through 16) available for both sending and receiving.
2) Connections
(1) Connection to another MIDI-compatible keyboard
(connection with instruments such as the Kawai digital synthesizers KC10/K1II/K4)

When connected as shown in the illustration, data on how the digital piano is played (what keys are struck and how hard) is sent to the synthesizer unchanged. Also, by connecting the synthesizer's OUTPUT jack and the LINE IN jack on the digital piano, the sound from the digital piano can be layered over the sound of the synthesizer. Since timbre can be set separately, you can assembly a wide variety of sound combinations, such as a PIANO tone from the digital piano layered with a STRING tone from the synthesizer for a thick sound.
(2) Connection to a drum machine
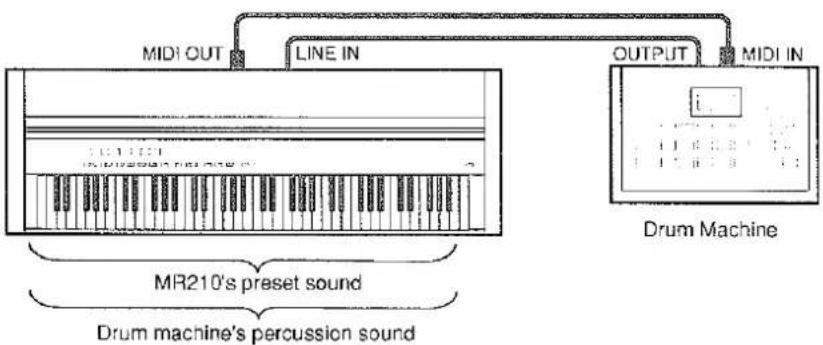
When connected as shown in the illustration, you can not only play along with the rhythm from the drum machine, you can also play the drum machine by striking the keys on the digital piano.
(3) Connection to a sound generator module
(connection with instruments such as the Kawai K4r/PHm)

When connected as shown in the illustration, you can layer sounds like (1) as well as playing a large number of tones.
(4) Connection to a sequencer and sound generator module
(connection with instruments such as the Kawai Q-50/PHm)
![graph TD A["PHm (Module)"] -->|MIDI IN| B["Q-50 (sequencer)"] A -->|OUTPUT| C["Line IN"] A -->|MIDI OUT| D["MIDI IN"] A -->|MIDI IN| E["MIDI OUT"] A -->|MIDI IN| F["MIDI MIX OUT"] style A fill:#f9f,stroke:#333 style B fill:#ccf,stroke:#333 style C fill:#cfc,stroke:#333 style D fill:#fcc,stroke:#333…](/content/2026/06/1312306/images/7eacdb0bc07c3a765efec097fe27b63bd1e8a2cb59982f1a21a4842db6819a4f.jpg)
When connected as shown in the illustration, you can record songs played on the piano with the sequencer and play them back as may times as you like, and layer the module's tones made with the piano's MULTI TIMBRE function to assemble a complex automatic performance.
3) MIDI Implementation
The MIDI interface on your Kawai Digital Piano allows you to:
- Receive and transmit keyboard data.
You can play the digital piano to output sound on a synthesizer or other instrument, or vice versa.
- Set channel numbers for sending and receiving.
You can set send or receive channels to any number from 1 to 16.
- Receive and transmit program numbers (codes for changing timbres).
You can operate the digital piano to change the programmed timbre of a synthesizer or other instrument connected with the MIDI interface to the piano, or vice versa (see p. 17).
- Receive and transmit pedal data.
You can receive and transmit ON/OFF data for the soft and damper pedals.
- Receive volume data.
You can control the volume of the digital piano from an external source connected via the MIDI interface.
- Set MULTI TIMBRE.
When the digital piano is used as a receiving instrument, you can receive keyboard data on a number of different channels, producing different timbres for each one.
★ For details of the MIDI function of this instrument, please refer to the MIDI Implementation Chart.
4) MIDI Operation
A. Setting the channel
In order to be able to exchange information with a connected MIDI instrument, you must first set the interconnected instruments to the same channel.
• Procedure
(1) Make sure that the digital piano is in the programming mode. (see p. 7)
(2) Press the PIANO 2 switch so that it flashes to indicate that the interface is waiting for a channel specification.
(It is also possible to turn the MULTI TIMBRE function on and off. See following section.)
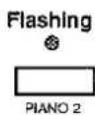
(3) Select the channel by pressing the one of the first 16 white keys at the lower end of the keyboard.
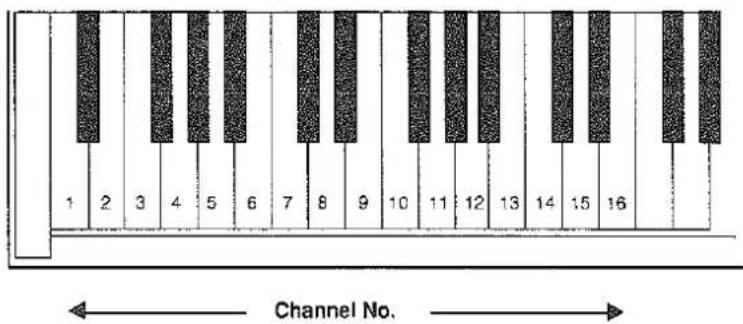
•Note: You have 16 channels to choose from.
(4) Pressing one of these keys automatically sets the instrument's transmitting and receiving channel to the number selected.
(5) Leave the programming mode. (see p. 7)
- Note: When the power is first applied, the interface uses Channel 1 and has the OMNI parameter on. Changing to another channel automatically turns the OMNI parameter off. In OMNI mode, information from all channels is received.
B. Sending a program number (timbre code)
(a) Transmitting with the TONE SELECTORS
You can use the eight TONE SELECTORs during normal playing to transmit program number 0 through 7 shown in the chart below.
| Tone Selector | Program No. |
| PIANO 1 | 0 |
| PIANO 2 | 1 |
| E. PIANO | 2 |
| CLAVI | 3 |
| JAZZ ORGAN | 4 |
| FULL ORGAN | 5 |
| HARPSICHORD | 6 |
| VIBRAPHONE | 7 |
Transmission with these TONE SELECTORs can be switched on and off as described below.
(1) Enter the programming mode (see p. 7).
The LEDs for CHORUS and PIANO 1 will flash. The flashing of the PIANO 1 LED shows that the instrument is in the programming mode for transmitting the program number, so move on to the next step.
★ No sound will be played if the keyboard is pressed at this time.
(2) Press the highest black or white key.

Pressing the black key (OFF) disables transmission by the TONE SELECTORS. Pressing the white key (ON) enables transmission.
(3) Press the CHORUS switch to leave the programming mode.
You may then change to another programming mode.
★ The setting described above is automatically set on when the power is turned on, so you can also turn the setting simply by turning the power off and then on again, instead of using the procedure described above.
(b) Using black keys
In addition to transmission with the TONE SELECTORS, you can also use the black keys on the instrument to send program numbers 0 through 127.
- Procedure
(1) Make sure that the digital piano is in the programming mode. (see p. 7)
The flashing LED of the PIANO 1 switch indicates that the interface is ready to transmit a program number.

(2) Select the program number by pressing the corresponding pair of black keys at the lower end of the keyboard.
There are a total of 128 numbers possible: the first thirteen black keys give the first and second digits ("00" - "127") of this three digit numbers; the next ten, the final digit ("0" - "9").
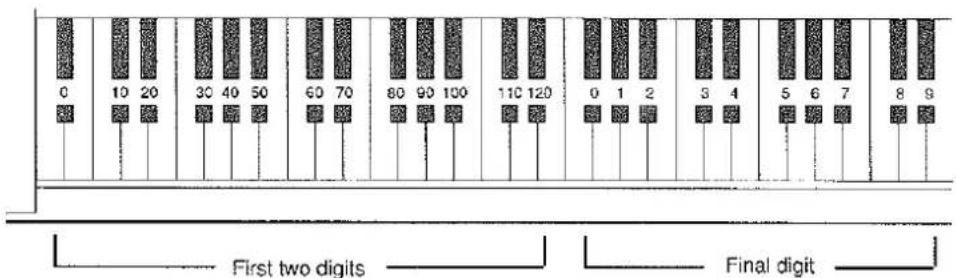
- Note: You must press the two keys in order from left to right.
• Example
- Program No. 3
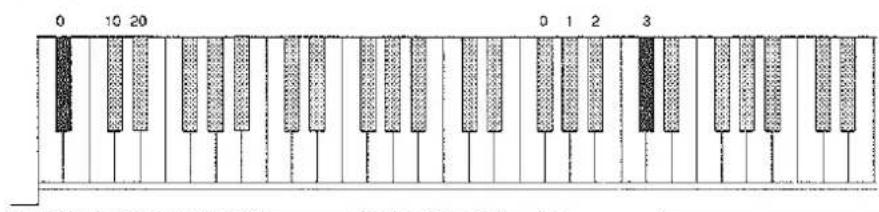
- Press the "00" key and then the "3" key.
- Program No. 20

- Press the "20" key and then the "0" key.
• Program No. 42

- Press the "40" key and then the "2" key.
Note: • When transmitting a program number that has the same tens digit as the number being sent (such as, for instance, transmitting 33 after sending 31), you don't need to press the tens digit. The number can be transmitted simply by pressing the ones digit.
- The tens digit is set at "0" when the programming mode is entered.
(3) Leave the programming mode. (see p. 7)
C. Turning MULTI TIMBRE on and off
Normally, the procedure described above is used to transmit or receive data on a set MIDI channel (any one of 1 through 16), but by turning the MULTI TIMBRE function on you can receive more than one MIDI channel and simultaneously play a different type of timbre on each one. With this feature, you can use a sequencer such as the Kawai Q-80/Q-50 to assemble performances with a number of timbres (MULTI TIMBRE) on the digital piano.
• Procedure
(1) Make sure that the digital piano is in the programming mode. (see p. 7)
(2) Press the PIANO 2 switch to set the LED above the PIANO 2 switch flashing.
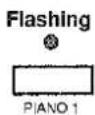
(3) Press the highest black key to turn the function "off". Or press the highest white one to turn it "on".
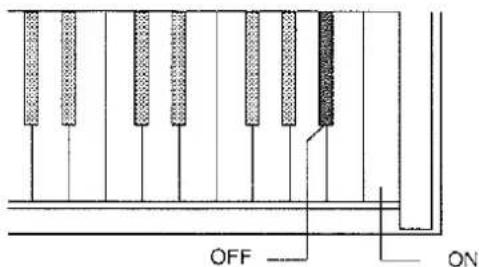
When MIDI data is received while the MULTI TIMBRE function is off, it will be played according to the TONE SELECTOR currently selected.
When the MULTI TIMBRE mode is on, the received MIDI data will be played in the timbre corresponding to the MIDI channel shown in the chart below, regardless of the TONE SELECTOR currently in effect.
| Channel | Timbre | Channel | Timbre |
| 1 | PIANO 1 | 6 | FULL ORGAN |
| 2 | PIANO 2 | 7 | HARPSICHORD |
| 3 | E. PIANO | 8 | VIBRAPHONE |
| 4 | CLAVI | 14~16 | WOOD BASS |
| 5 | JAZZ ORGAN |
★ The MULTI TIMBRE mode is off when the power is turned on.
(4) Leave the programming mode. (see p. 7)
D. LOCAL CONTROL
This mode is used to set whether the sound from the piano's keyboard will be played or not, and is called the LOCAL CONTROL ON/OFF mode.
(1) Make sure that the piano is in the programming mode.
After turning off the MULTI TIMBRE mode, press the E. PIANO switch.
The flashing LED will change from PIANO 2 to E. PIANO.
(2) Press the highest white or black key to turn LOCAL CONTROL on or off.

White key (ON): The piano will output sound when the keys are struck.
Black key (OFF): Sound will be output only when MIDI data is received, and not when the keyboard is played.
★ You can also turn this on by turning the power off and then on again, instead of using the highest key as described above.
(3) Press the CHORUS switch to leave the programming mode.
Specifications
| Keyboard | 88 keys |
| Tone Colors | Piano 1,2, E.Piano, Clavi, Jazz Organ, Full Organ, Harpsichord, Vibraphone |
| Effects | REVERB (ROOM, STAGE, HALL)CHORUS, PAN |
| Temperaments | Equal, Mersenne purePythagorean, MeantoneWerckmeister-IIIKirnbergerIII |
| Controls | Volume, Transpose, Tune, |
| Other Fittings | Headphone Jack, Line In Jacks (L(MONO)/R),Line Out Jacks (L(MONO)/R),MIDI Jacks (IN, OUT, THRU),PEDAL Jacks (Damper/Soft) |
| Output Power | 20 W x 2 |
| Speakers | 16 cm x 2 |
| Power Consumption | 70W |
| Finish | Cosmo Black |
| Dimensions | 1380(W) x 440(D) x 780(H) mm (including stand) |
| Weight | 45.0 Kg (including stand) |
KAWAI
Kawai Musical Instruments Manufacturing Co., Ltd.
200 Terajima-cho, Hamamatsu, Japan
- KAWAI
- BASIC CONTROL
- FRONT PANEL
- ① VOLUME
- ② TRANSPOSE CONTROL
- TONE SELECTORS
- 4 CHORUS
- ⑤ PAN
- ⑥ REVERB SWITCHES
- 7 DEMO
- 8 POWER
- HEADPHONE JACK
- REAR PANEL
- LINE OUT
- ② LINE IN
- MIDI
- ④ PEDAL JACKS
- THE PEDALS
- ADVANCED FEATURES
- PROGRAMMING MODE
- ENTERING THE PROGRAMMING MODE
- LEAVING THE PROGRAMMING MODE
- CHOOSING A TOUCH CURVE
- TUNING
- TEMPERAMENT
- PROCEDURE
- LEAVE THE PROGRAMMING MODE
- TEMPERAMENT CHARACTERISTIC
- EQUAL TEMPERAMENT
- MERSENNE TEMPERAMENT
- PYTHAGOREAN TEMPERAMENT
- MEANTONE TEMPERAMENTS
- WERCKMEISTER III TEMPERAMENT, KIRNBERGER III TEMPERAMENT
- WHAT'S MIDI
- CONNECTIONS
- CONNECTION TO ANOTHER MIDI-COMPATIBLE KEYBOARD
- CONNECTION TO A DRUM MACHINE
- CONNECTION TO A SOUND GENERATOR MODULE
- CONNECTION TO A SEQUENCER AND SOUND GENERATOR MODULE
- MIDI IMPLEMENTATION
- MIDI OPERATION
- SETTING THE CHANNEL
- SENDING A PROGRAM NUMBER (TIMBRE CODE)
- TRANSMITTING WITH THE TONE SELECTORS
- EXAMPLE
- TURNING MULTI TIMBRE ON AND OFF
- LOCAL CONTROL
- SPECIFICATIONS
Marque : KAWAI
Modèle : MR210
Catégorie : Clavier