
Vintage Star 8 BM - Casque de moto Premier - Notice d'utilisation et mode d'emploi gratuit
Retrouvez gratuitement la notice de l'appareil Vintage Star 8 BM Premier au format PDF.


| Type de produit | Casque de moto |
| Marque | Premier |
| Modèle | Vintage Star 8 BM |
| Tailles disponibles | XS, S, M, L, XL, XXL |
| Poids (taille M) | Environ 1 500 g |
| Matériau de la coque | Polycarbonate ou fibre de verre |
| Système de fermeture | Boucle double D |
| Écran | Écran transparent anti-rayures, démontable |
| Intérieur | Doublure amovible et lavable, mousse absorbante |
| Certification | ECE 22.05 |
| Ventilation | Entrées d'air frontales et extracteurs arrière |
| Lunette | Non |
| Couleurs disponibles | Noir mat, blanc, rouge vintage |
| Garantie | 2 ans |
| Entretien | Nettoyer avec un chiffon doux et de l'eau savonneuse ; ne pas utiliser de solvants |
FOIRE AUX QUESTIONS - Vintage Star 8 BM Premier
Questions des utilisateurs sur Vintage Star 8 BM Premier
0 question sur cet appareil. Repondez a celles que vous connaissez ou posez la votre.
Poser une nouvelle question sur cet appareil
Téléchargez la notice de votre Casque de moto au format PDF gratuitement ! Retrouvez votre notice Vintage Star 8 BM - Premier et reprennez votre appareil électronique en main. Sur cette page sont publiés tous les documents nécessaires à l'utilisation de votre appareil Vintage Star 8 BM de la marque Premier.
MODE D'EMPLOI Vintage Star 8 BM Premier

www.premierhelmet.com

natural_image
Sketch of a racing helmet with visible branding and sketched details (no text or symbols)
www.premierhelmet.com
Istruzioni smontaggio e montaggio Visiera AVENGER - CITY FLY DRAGON - DEVIL
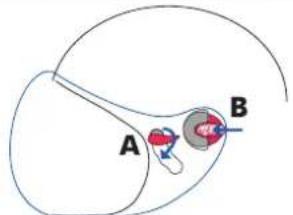
A Con la visiera chiusa ruotare la "Virgola" verso il basso, in modo da farla passare nell'asola presente sulla visiera.
B Sollevare la linguetta con il logo premier verso l'esterno.

natural_image
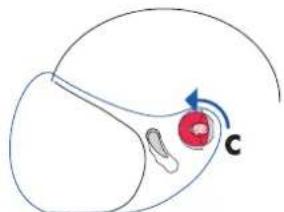
Diagram of a biological structure with a red circular component and curved arrow, labeled 'C' (no text or symbols beyond label)C Ruotare di 90° in senso antiorario la placca in zama ed estrarla. Per il lato opposto il senso di rotazione è contrario.
Per rimontare la visiera eseguire le suddette operazioni in ordine contrario, facendo attenzione alle placche in zama diverse fra loro e controllando, ad operazione ultimata, che la placca in zama aderisca perfettamente al lato esterno della visiera.
Per ulteriori dettagli clicca il video sul nostro sito www.premierhelmet.com

Istruzioni smontaggio e montaggio Visiera MONZA - JT2 - STYLE
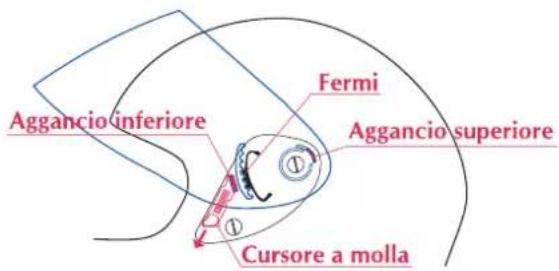
Smontaggio
Aprire la visiera fino a far coincidere l'aggancio inferiore con il cursore a molla, quindi abbassare il cursore a molla ed afferrare la visiera tirandola verso il basso. Ripetere le stesse operazioni anche sul lato opposto.
Montaggio
Applicare l'aggancio superiore nella apposita cavità e far coincidere l'aggancio inferiore con il cursore a molla. Abbassare il cursore a molla imprimere una lieve pressione sulla visiera in modo da inserire l'aggancio inferiore nell'apposito canale, lasciare il cursore a molla e assicurarsi dell'avvenuto aggancio. Ripetere le stesse operazioni anche sul lato opposto.
Avvertenza:
Nell'apertura della visiera non forzare oltre il fine corsa della medesima onde evitare la rottura dei fermi.
Per ulteriori dettagli clicca il video sul nostro sito www.premierhelmet.com

Istruzioni smontaggio e montaggio Visiera JET TOURING 3
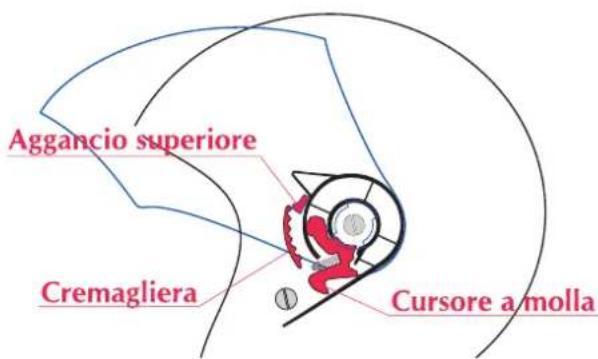
Smontaggio
Aprire la visiera fino a far coincidere l'aggancio superiore con la fine della cremagliera, afferrare la visiera e contemporaneamente spingere verso il basso il cursore a molla. Tirare e rimuovere la visiera.
Ripetere le stesse operazioni anche sul lato opposto.
Montaggio
Inserire l'aggancio superiore alla fine della cremagliera, contemporaneamente abbassare il cursore a molla, spingere la visiera e lasciare il cursore assicurandosi dell'avvenuto aggancio.
Ripetere le stesse operazioni anche sul lato opposto.
Per ulteriori dettagli clicca il video sul nostro sito www.premierhelmet.com

Istruzioni smontaggio e montaggio JET TOURING 4

Smontaggio Visiera
Aprire la visiera fino a far coincidere l'aggancio superiore con la fine della cremagliera.
Con l'ausilio di una chiave a brugola di ∅ 5 rimuovere la vite che sostiene la placca in alluminio afferrare e contemporaneamente spingere verso il basso il cursore a molla. Tirare e rimuovere la visiera.
Ripetere le stesse operazioni anche sul lato opposto.
Montaggio Visiera
Inserire l'aggancio superiore alla fine della cremagliera, contemporaneamente abbassare il cursore a molla, spingere la visiera e lasciare il cursore assicurandosi dell'avvenuto aggancio. Inserire la placca ferma visiera in alluminio, applicare e serrare la vite a brugola.
Ripetere le stesse operazioni anche sul lato opposto.
Per ulteriori dettagli clicca il video sul nostro sito www.premierhelmet.com
Smontaggio Mentoniera
Premere verso il basso le due leve, poste ai lati e tirare verso l'esterno la mentoniera.
Montaggio Mentoniera
Inserire la mentoniera nelle placche di innesto laterali, spingere e agganciarla a scatto.

Istruzioni smontaggio e montaggio Visiera Dream Liner

Smontaggio
Dopo aver posizionato il casco come in figura premere e ruotare verso il basso la placca, estarla insieme al perno antirotazione, afferrare la visiera, prestando attenzione al fermo, quindi provvedere con cautela alla rimozione della stessa.
Ripetere le stesse operazioni anche sul lato opposto.
Montaggio
Inserire la visiera in corrispondenza del fermo, applicare il perno antirotazione e la placca ferma visiera, quindi premere e ruotare la placca verso l'alto fino a portare il logo Premier in posizione orizzontale.
Ripetere le stesse operazioni anche sul lato opposto.
Per ulteriori dettagli clicca il video sul nostro sito www.premierhelmet.com

Istruzioni smontaggio e montaggio Visiera ANGEL

Smontaggio
Con l'ausilio di una chiave a brugola di ∅ 5 svitare ed estrarre la vite insieme alla placca ferma visiera in alluminio ed il perno antirotazione.
Afferrare la visiera, prestando attenzione al fermo, quindi provvedere con cautela alla rimozione della stessa.
Ripetere le stesse operazioni anche sul lato opposto.
Montaggio
Inserire la visiera in corrispondenza del fermo, applicare il perno di antirotazione e successivamente la placca ferma visiera in alluminio quindi avvitare la vite a brugola.
Ripetere le stesse operazioni anche sul lato opposto.
Per ulteriori dettagli clicca il video sul nostro sito www.premierhelmet.com

Istruzioni smontaggio e montaggio Visiera VINTAGE

Smontaggio
Afferrare ed estrarre verso il basso le guance, successivamente tirare delicatamente verso il basso la visiera fino ad oltrepassare il bordo visiera, quindi afferrare e tirare la visiera verso l'esterno, prima da un lato e poi dall'altro fino a sganciarla dal meccanismo di movimento.
Montaggio
Inserire la visiera da un lato nella rispettiva sede del meccanismo, spingere e agganciarla a scatto. Ripetere l'operazione anche sul lato opposto. Successivamente spingere la visiera verso l'alto fino ad oltrepassare il bordo visiera e controllare il corretto funzionamento della stessa. Infine applicare le guance inserendole a pressione negli appositi canali presenti sulla calotta di polistirolo. Ripetere le stesse operazioni anche sul lato opposto.
Per ulteriori dettagli clicca il video sul nostro sito www.premierhelmet.com

Istruzioni smontaggio e montaggio fodera interna lavabile
1° Rimuovere le guance (sono applicate ad incastro o con bottoni).
2° Estrarre il paranuca (è applicato ad incastro).
3° Rimuovere la plastica ferma interno tipo A o tipo B.

Tipo A sollevare verso l'alto la fodera in corrispondenza dei tre fermi (vedi figura), sbottonare la fodera nella parte posteriore ed estrarla.
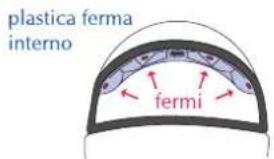
Tipo B estrarre la plastica ferma interno (è applicata ad incastro) e successivamente sbottonare la fodera nella parte posteriore del casco.

Per rimontare l'interno ripetere le operazioni in senso inverso prestando attenzione alle guance, le quali devono essere rimontate seguendo il seguente schema: 1) inserire il sottogola nell'asola - 2) appoggiare la parte anteriore della guancia al mentone - 3) premere la parte posteriore della guancia fino ad incastrarla e a farla aderire perfettamente con la calotta.

Sistemi di ritenzione (sottogola)
A Sottogola con chiusura a doppio anello
B Sottogola con tasto a chiusura rapida
C Sottogola con sistema di chiusura micrometrico
A Sottogola con chiusura a doppio anello
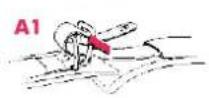

La chiusura con doppio anello a D permette una facile e precisa regolazione della lunghezza del sottogola.
A1 Infilare l'estremità libera del sottogola nella chiusura a doppia D
A2 Stringere il sottogola tirando l'estremità libera
A3 Piegare l'estremità libera del sottogola e fissarla con il bottone a pressione integrato.
Per aprire tirare la piccola bandierina rossa della chiusura a doppia D in modo da allentare il sottogola.
B Sottogola con tasto a chiusura rapida


Questo sistema consente una chiusura semplice e sicura del sottogola.
B1 La lunghezza del sottogola può essere regolata tirandolo o allentandolo attraverso la fibbia metallica, la lunghezza deve essere regolata in modo tale che la cinghia risulti tesa.
Per chiudere il sottogola bisogna inserire la linguetta metallica nel fermo fino a sentire lo scatto.
Per aprirlo è sufficiente premere il pulsante rosso.

C Sottogola con sistema di chiusura micrometrico


Questo sistema consente una chiusura semplice e sempre regolata del sottogola.
C1 Per chiudere il sottogola inserire la linguetta di plastica nel fermo fino quando la cinghia non risulti tesa. Per aprirlo tirare la piccola bandierina rossa in modo che il sottogola si allenti.
* Al fine di garantire il perfetto funzionamento del sistema di ritenzione micrometrico occorre sempre far scorrere la corda del sottogola nelle asole del passante.
Aerodinamica ed Aeroacustica
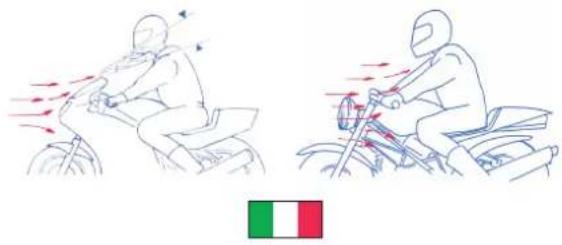
Il casco PREMIER è stato realizzato e studiato con particolare attenzione all'aerodinamica ed all'eroacustica. Tuttavia la tipologia di moto e le caratteristiche fisiche del conducente possono creare alcune turbolenze a discapito dell'aeroacustica, soprattutto quando i flussi d'aria vanno ad impattare sulla parte inferiore del casco, creando dei vortici di aria in grado di ridurre l'ottima insonorizzazione del casco.
natural_image
Illustration of two motorcyclists riding bicycles with motion arrows, no text or symbols presentDeterminazione della misura corrispondente del casco
Avvertenza:
Per una adeguata protezione, il casco deve essere ben calzato sulla testa.
| 49 a 50 | xxxxs |
| 51 a 52 | xxs |
| 53 a 54 | xs |
| 55 a 56 | s |
| 57 a 58 | m |
| 59 a 60 | l |
| 61 | xl |
| 62 a 63 | xxl |
Manutenzione
La Calotta
Per la pulizia e la cura della calotta esterna consigliamo di utilizzare acqua e sapone neutro. L'impiego di altri detergenti potrebbe causare danni alla calotta ed alla vernice.
Visiera
Per la pulizia del lato esterno della visiera usare acqua fredda, sapone neutro ed un panno in microfibra morbido. Per la pulizia del lato interno utilizzare esclusivamente un panno morbido in microfibra, se necessario inumidito.
Avvertenza:
Il rivestimento attivo anti appannamento è soggetto ad un processo di usura e di invecchiamento, la cui durata dipende dalla intensità di utilizzo del casco e dalle condizioni climatiche. Per tanto consigliamo la sostituzione della visiera nel caso in cui gli effetti del rivestimento cominciano a venir meno.

How to replace your AVENGER - CITY FLY DRAGON - DEVIL Visor

A Put the visor in the close position and rotate the little side "comma" downwards so to allow it to pass through the eyelet on the visor.
B Lift the small flap with the Premier logo outward.
natural_image
Diagram of a biological structure with a red circular component and curved boundary, labeled 'C' (no text or symbols beyond label)C Rotate the visor plate counter clockwise for 90° and remove it. For the opposite side the rotation is clockwise.
To reassemble the visor just follow the steps from C to A. Take care that the correct plate is used for the correct side. Once the visor is mounted and the plate turned into its locking position, the plate must adhere perfectly to the helmet shell.
For further information view the video on our web site www.premierhelmet.com

How to replace your MONZA - JT2 Visor - STYLE
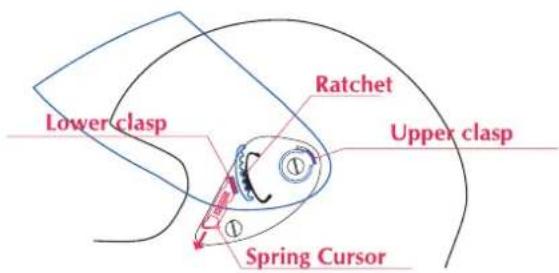
To REMOVE the visor, open and align the lower clasp to the spring cursor, lower the cursor, grab the visor and pull it downwards.
Repeat the same operation on the other side.
To REMOUNT the visor, insert the upper clasp in its cavity and align the lower clasp with the spring cursor. Lower the spring cursor and lightly press the visor so that the lower clasp anchors to the guide on the side plate, release the spring cursor and ensure that the visor has properly anchored to place.
Repeat the same operation also on the other side.
Warning:
While opening the visor do not force upwards too much in order to prevent the breaking of the visor locks.
For further information view the video on our web site www.premierhelmet.com

How to replace your JET TOURING 3 Visor

To REMOVE the visor, align the upper clasp to the end of the ratchet, grab the visor and, at the same time, pull the spring cursor downwards. Pull and remove the visor. Repeat the same operation also on the other side.
To REMOUNT the visor, insert the upper clasp to the end of the ratchet and contemporarily pull the spring cursor downwards. Push the visor and release the cursor and verify that the visor is well anchored to the helmet. Do the same on the other side.
For further information view the video on our web site www.premierhelmet.com

How to replace your JET TOURING 4

How to remove the visor
Open the visor fully to align visor fitting with ratchet mechanism. Use an Allen key ( 5) to remove the screw that holds the aluminum plate. Then hold and push down the spring-slider and at the same time pull and remove the visor.
How to remount the visor
Insert the visor fitting at the ratchet mechanism and at the same time bring down the spring-slider, push the visor and leave the spring-slider making sure the visor is hooked. Insert the aluminum plate that holds the visor, tighten with the Allen screw.
Repeat the same operation on the other side.
For further information view the video on our web site www.premierhelmet.com
How to remove the mouth piece
Push downwards both levers on the sides and pull towards the outside the mouth piece.
How to remount the mouth piece
Insert the mouth piece into the lateral holes, while pushing and attach it until it clicks.

How to replace your Dream Liner Visor

Removal
After you've positioned the helmet as in the picture push and rotate the plate downwards, remove it together with the anti-rotation pin. Grab the visor, be careful at the lock, with caution proceed to remove the visor. Repeat the same operation on the other side.
Fitting
Insert the visor at the same level as the lock, apply the anti-rotation pin then the aluminum plate that holds the visor, then push and rotate the plate upwards until the PREMIER logo is in horizontal position. Repeat the same operation on the other side.
For further information view the video on our web site www.premierhelmet.com

How to replace your ANGEL Visor

Removal
Use an Allen key ( 5) to remove the screw that holds the aluminum plate and the anti-rotation pin.
Grab the visor, be careful at the lock, with caution proceed to remove the visor.
Repeat the same operation on the other side.
Fitting
Insert the visor at the same level as the lock, apply the anti-rotation pin and then the aluminum plate that holds the visor and tighten with the Allen key.
Repeat the same operation on the other side.
For further information view the video on our web site www.premierhelmet.com

How to replace your VINTAGE Visor
Visor trim

Removal
Remove the cheek pads by gently pushing them down out of the shell. Then pull the visor down gently until you pass the border of the visor, one side at a time until the visor is released from the mechanism.
Fitting
Insert the visor in one side of the mechanism, push and click it in. Repeat the same operation on the other side. After push up the visor until you pass the visor border and make sure that the visor works correctly. At the end apply the cheek pads pushing them in the appropriate section on the polystyrene shell.
Repeat the same operation on the other side.
For further information view the video on our web site www.premierhelmet.com

How to remove and reassemble the washable inner lining
1 Remove the cheek pads (normally just press it in or fixed by means of press buttons)
2 Remove the neck roll by gently pulling it out
3 Remove the front plastic ventilation grid as per type A or type B chin

TYPE A Pull the lining upwards in correspondence of the three studs (see drawing), unbutton the lining at the back and remove it.
TYPE B Remove the front plastic ventilation grid (simply pressed in) and unbutton the lining at the back.

front plastic ventilation grid

To remount the lining, just repeat all the steps backwards taking care that the cheek pads are reassembled following this sequence: 1) pass the chin strap through the eyelet; 2) lay the forepart of the cheek pad in the shell so that it touches the mouthpiece; 3) press the back part of the cheek pad and block it back to perfectly adhere to the shell.

Helmet retention system
A Chinstrap with DD ring fastener
B Chinstrap with quick release fastener
C Chinstrap with micrometric fastener
A Chinstrap with DD ring fastener
The DD ring fastening system allows you to obtain an easy and precise regulation of the length of the chinstrap.

A1 Insert the free end of the chin strap in the DD rings.
A2 Tighten the free end of the chinstrap by pulling it.
A3 Bend the end of the chinstrap which hangs loose and fix it to the other strap by means of the press button.
If you want to loosen the chin strap just pull the red tongue on the DD ring.
B Chinstrap with quick release fastener

natural_image
Technical illustration of a belt buckle and belt buckle assembly (no text or symbols)B) This system allows you to fasten your helmet easily and safely.
B1 The length of the chinstrap can be regulated through the metallic buckle and the strap must be tight.
To fasten the chinstrap, you must insert the metallic part in the buckle until it clicks into place.
To release the buckle just press the red button.

C Chinstrap with micrometric fastener.
With this system you will always be able to easily fasten and regulate your chinstrap.

C1 Insert the plastic tongue in the buckle until the strap is tight. To unfasten the buckle, just pull on the red flag till the strap is loose.
*To guarantee the perfect functioning of the micrometric retention system, the chinstrap must always be passed through the slide.
Aerodynamics and Acoustics
The Premier helmet has been designed and developed with particular attention to aerodynamics and acoustics. The type of motorcycle and the physical characteristics of the driver may create turbulences that affect the acoustics of the helmet especially when airflows hit the lower part of the helmet creating vortexes that reduce the helmet's noise reduction features.

natural_image
Two line drawings of a person riding a motorcycle, showing motion direction with arrows indicating speed (no text or symbols)
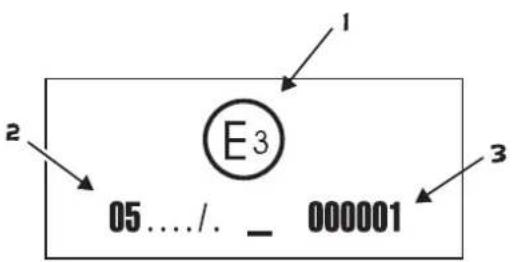
Homologation Label
The international homologation label is composed of:
1) a circle containing the letter E identifying the country where the helmet model has been approved; in the case of Italy the number is 3, Spain 9, Luxembourg 13 etc.
2) the homologation number is followed by a dash (/) and a letter:
"J" if the helmet is an open face and does not protect your face
"P" if the helmet is a full face and protects your face "NP" if the helmet is a full face but does not offer facial protection.
3) a hyphen (-) followed by the production serial number for the helmet model homologated in a determined country. The country's authority will keep trace of the correspondence between the helmet type and the serial numbers.

How to determinate the correct size of your helmet
Warning:
To ensure adequate protection the helmet must fit snugly on your head.
| 49 a 50 | xxxs |
| 51 a 52 | xxs |
| 53 a 54 | xs |
| 55 a 56 | s |
| 57 a 58 | m |
| 59 a 60 | l |
| 61 | xl |
| 62 a 63 | xxl |
Maintenance
The outer shell
The outer shell can be cleaned with water and mild soap. The use of other detergents may cause damages to the paint and to the shell.
The visor
To clean the external surface of the visor, wipe with a soft cloth, water and mild soap. The internal surface of the visor may be cleaned exclusively with a soft micro fibre cloth, lightly damp if necessary.
Warning:
The antifog treatment present on the internal surface of the shell is subject to deteriorate with use and climatic conditions. We suggest to replace the visor once the treatment starts to wear off reducing the antifog action.


www.premierhelmet.com

www.premierhelmet.com
info@premier.it

- Istruzioni smontaggio e montaggio Visiera AVENGER - CITY FLY DRAGON - DEVIL
- Istruzioni smontaggio e montaggio Visiera MONZA - JT2 - STYLE
- Smontaggio
- Montaggio
- Avvertenza:
- Istruzioni smontaggio e montaggio Visiera JET TOURING 3
- Istruzioni smontaggio e montaggio JET TOURING 4
- Smontaggio Visiera
- Montaggio Visiera
- Smontaggio Mentoniera
- Montaggio Mentoniera
- Istruzioni smontaggio e montaggio Visiera Dream Liner
- Istruzioni smontaggio e montaggio Visiera ANGEL
- Istruzioni smontaggio e montaggio Visiera VINTAGE
- Istruzioni smontaggio e montaggio fodera interna lavabile
- Sistemi di ritenzione (sottogola)
- A Sottogola con chiusura a doppio anello
- B Sottogola con tasto a chiusura rapida
- C Sottogola con sistema di chiusura micrometrico
- Aerodinamica ed Aeroacustica
- Determinazione della misura corrispondente del casco
- Manutenzione
- La Calotta
- Visiera
- How to replace your AVENGER - CITY FLY DRAGON - DEVIL Visor
- How to replace your MONZA - JT2 Visor - STYLE
- Warning:
- How to replace your JET TOURING 3 Visor
- How to replace your JET TOURING 4
- How to remove the visor
- How to remount the visor
- How to remove the mouth piece
- How to remount the mouth piece
- How to replace your Dream Liner Visor
- Removal
- Fitting
- How to replace your ANGEL Visor
- How to replace your VINTAGE Visor
- How to remove and reassemble the washable inner lining
- Helmet retention system
- C Chinstrap with micrometric fastener.
- Aerodynamics and Acoustics
- Homologation Label
- How to determinate the correct size of your helmet
- Maintenance
- The outer shell
- The visor
Marque : Premier
Modèle : Vintage Star 8 BM
Catégorie : Casque de moto