
TU-1000 - Accordeur électronique ROLAND - Notice d'utilisation et mode d'emploi gratuit
Retrouvez gratuitement la notice de l'appareil TU-1000 ROLAND au format PDF.

| Type d'appareil | Accordeur électronique |
| Alimentation | Pile ou adaptateur secteur |
| Affichage | Écran LCD |
| Plage de fréquence | Non précisé |
| Précision d'accordage | Non précisé |
| Modes d'accordage | Standard, chromatique |
| Compatibilité instruments | Guitare, basse, autres instruments à cordes |
| Fonction métronome | Non précisé |
| Dimensions | Compact |
| Poids | Léger |
| Matériau du boîtier | Plastique robuste |
| Connectivité | Entrée jack 6,35 mm |
| Arrêt automatique | Oui |
| Langues du manuel | Anglais, français, allemand, japonais |
| Garantie | Non précisé |
| Accessoires inclus | Non précisé |
FOIRE AUX QUESTIONS - TU-1000 ROLAND
Questions des utilisateurs sur TU-1000 ROLAND
0 question sur cet appareil. Repondez a celles que vous connaissez ou posez la votre.
Poser une nouvelle question sur cet appareil
Téléchargez la notice de votre Accordeur électronique au format PDF gratuitement ! Retrouvez votre notice TU-1000 - ROLAND et reprennez votre appareil électronique en main. Sur cette page sont publiés tous les documents nécessaires à l'utilisation de votre appareil TU-1000 de la marque ROLAND.
MODE D'EMPLOI TU-1000 ROLAND

Owner's Manual
Thank you, and congratulations on your choice of the BOSS TU-1000 Stage Tuner.
Before using this unit, carefully read the sections entitled: "USING THE UNIT SAFELY" and "IMPORTANT NOTES" (supplied on a separate sheet). These sections provide important information concerning the proper operation of the unit. Additionally, in order to feel assured that you have gained a good grasp of every feature provided by your new unit, this manual should be read in its entirety. The manual should be saved and kept on hand as a convenient reference.
Copyright © 2009 BOSS CORPORATION
All rights reserved. No part of this publication may be reproduced in any form without the written permission of BOSS CORPORATION.
■ Main Features
- Main Features - Ultra-smooth, accurate motion and superior brightness of the meter's large-size LEDs makes tuning fast and easy - Includes the Accu-Pitch sign function, which uses the motion of the meter's lights to show when tuning is completed - Choose from two selectable display modes: "CENT," where the LED meter functions like a needle-type meter, and "STREAM," in which the lights' stream-like motion indicates when notes are out of tune.
- Switching on the tuner automatically mutes the output signal, allowing you to tune without outputting the sound - Handles open tunings, DADGAD, and other alternate tunings, as well as flat or "down" tunings up to six semitones below
standard tuning
• Supplies power to up to six effects processors
- Connecting an external footswitch lets you switch the tuner on and off remotely
How to Use the Tuner
-
Connect the instrument you want to tune to the TIL 1000's INPUT jack (this switches on the power).
-
Connect the instrument you want to turn
- Press [MODE] to select the tuning mode
| Mode | Description | Displayed |
| CHROMATIC | Permits tuning to any of the twelve semitones. | The note name is displayed. |
| GUITAR | Allows tuning by guitar string numbers. | |
| BASS | Allows tuning by bass string numbers. | The string number is displayed. |
| OPEN D-A | Enables open guitar tunings. | |
| DROP D | Enables DROP D guitar tuning. | |
| DADGAD | Enables DADGAD guitar tuning. |
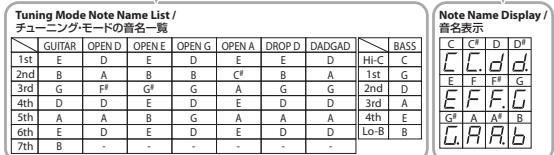
For more on the note names in each tuning mode, refer to the Tuning Mode Note Name List.
-
Press the TUNER ON/OFF switch to turn the tuner on.
-
Play a single note on the instrument.
The note name or string number for the note closest to the tone being played appears in the display. The meter and Tuning
Guide show how far the note is from t
- Tune the instrument. When the instrument is carried out, we are in the direction of the instrument that both Tuiy, Gidi
When the desired note name or string number appears in the display, tune the instrument so that both Tuning Guide indicators are lit and the pitch matches that displayed by the meter.
When you reach a stable pitch, the meter's lights then stream to the center from the left and right, indicating that tuning is
completed (Accu-Pitch sign function).
* The display method varies depending on the display pattern selected for the meter
Tuning to a Flat Tuning
Press [FLAT TUNING] to lower the actual pitch one or more semitones below the note shown in the display. Each press of the button changes the display, from no flat symbols (regular tuning) to "b" (lowered one semitone), "bb" (lowered two semitones), and so on down to "bbbbbb" (lowered six semitones).
Changing the Reference Pitch
Changing the Reference Pitch
Where [PITCH] the largest limit of the current of capital ("60" is not to 140 Hz) is stated. Flushing in Note Number
When you press [PITCH], the lowest digit of the current reference pitch ( ^-0 when set to 440 Hz) starts to flash in the Note Name/String Number display.
Each time you press [PITCH] while the display is flashing, it changes the reference pitch by 1 Hz; you can adjust the pitch over
a range from 436 Hz to 445 Hz.
■ Switching the Meter Display Pattern
Each time you press [DISPLAY], the meter display alternately switches between the CENT and STREAM patterns.
CENT Display
The light moves further to the left the more the pitch of the input note drops; as the pitch rises, the light moves further to the right.
STREAM Display
The movement of the light to the left or right indicates how far the input note is out of tune
The light streams to the left when the input pitch is flat and to the right when it is sharp.
The movement of the light slows down as the no
■ Convenient Functions
Using the Meter Display to Indicate Tuning is Completed (Accu-Pitch Sign Function)
Using the Meter Display to indicate Tuning is completed (Accu Pitch Sign Function)
The TU-1000 features an Accu-Pitch sign function that uses the meter display to indicate that tuning is complete after the pitch stabilizer at the correct pitch. When tuning is completed, the lights stream toward the center from the left and right
stabilizes at the correct pitch. When tuning is completed, the high Switching the Asey Pitch Sign Function On and Off
Switching the Accu-Pitch Sign Function On and Off
-
Turn off the power (unplug the instrument from the INPUT jack).
-
Hold down [DISPLAY] and turn on the power (plug the instrument into the INPUT jack).
The [DISPLAY] indicator lights up
- Press [DISPLAY] to switch the Accu-Pitch Sign function on and off
* When three seconds pass without [DISPLAY] being pressed, the setting is stored and the tuner returns to its normal mode
On: The meter lights stream to the center from the left and right.
Off: The meter lights up at the left and right.
Memory Function
The Fig.103: Section of the Information and Data Collection and Staff
| Flat Tuning settings (number of flats) | Accu-Pitch sign function setting |
| Tuning mode setting | OUTPUT jack output setting |
| Reference pitch setting | Number of meter lights setting |
| Meter display setting | - |

Outputting the Signal from the OUTPUT Jack Regardless of the Tuner's On/Off Setting
You can set the TUL 1000 so that sounds input at the INPUT jack are always output from the OUTPUT jack, regardless of whether the
You can set the 10-1000 so that tuner itself is switched on or off
-
Turn off the power (unplug the instrument from the INPUT jack)
-
Turn on the power (unplug the instrument from the INR 61 jack).
-
Hold down the TUNER ON/OFF switch and turn on the tuner (plug the instrument into the INPUT jack).
-
Hold down the TUNER ON/OFF switch and turn on the tuller (plug the
- Press the TUNER ON/OFF switch to select the desired output function
* When three seconds pass without the TUNER ON/OFF switch being pressed, the setting is stored and the tuner returns to its normal
operating mode.
Sounds output from the OUTPUT jack: the meter light streams from right to left.
Sounds not output from the OUTPUT jack: the meter lights up at the left and right
Turning Off the Meter's Backlight and Rear Panel Light
Turning On the Meter's Backlight and Rear Panel Light
You can turn off the meter's backlighting and rear panel light by holding down the TUNER ON/OFF switch for at least two seconds.
To turn the light back on, press
Make the moving light differently lighted
A. This function is available for CENT direct and
This function is only available for CENT display mode.
-
Turn off the power (unplug the instrument from the INPUT Jack)
-
Hold down [PITCH] and turn on the power (plug the instrument into the INPUT jack).
-
Press [PITCH]
* When three seconds pass without [PITCH] being pressed, the setting is stored and the tuner returns to its normal mode.
By every single touch of the [PITCH], number of the moving light can be changed.
■ Restoring the Original Factory Settings (Factory Reset)
You can reset the various settings you have saved to the TU-1000's memory and restore the the original settings that the tuner had
at the time it was shipped.
-
Turn off the power (unplug the instrument from the INPUT jack)
-
Hold down [MODE] and turn on the power (plug the instrument into the INPUT jack).
The green light at the center of the meter lights up.
- Press [MODE]
* If you let three seconds pass without pressing [MODE], or if you press any button other than [MODE], the tuner returns to its normal
operating mode without the factory settings being restored.
The green light at the center of the meter flashes three times, and the TU-1000 returns to its normal mode, with the original
default factory settings restored
■ Storefront Demo Display
-
Turn off the power/(upply on the instrument from the INPUT jack)
-
Turn on the power (unplug the instrument from the INPUT jack).
-
Hold down [FLAT TUNING] and turn on the power (plus the instrument into the INPUT jack).
-
Hold down [FLAT TUNING] at
The storefront display appears.
The storefront display remains until you turn the TU-1000's power off and then on again, or until you press the TUNER ON/OFF switch.
switch.
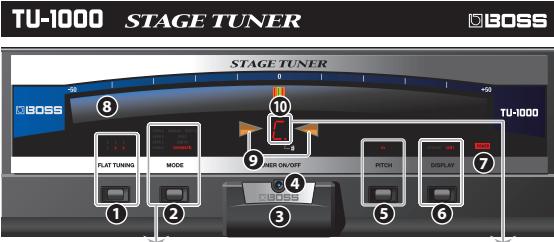
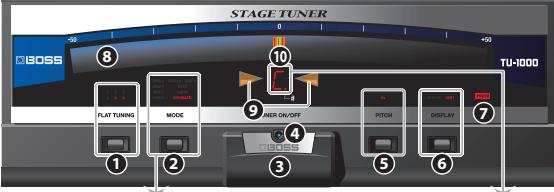
Panel Descriptions
Front Panel
Front Panel
- FLAT TUNING Button: Sets the amount the pitch is lowered in flat tunings.
FLAT TUNING Indicator: Indicates the flat tuning setting.
- MODE Button: Switches the tuning mode.
MODE Indicator: Indicates the tuning mode
-
TUNER ON/OFF Switch: Switches the tuner on and off
-
TUNER ON/OFF Indicators Lights when the tuner is on
-
TUNER ON/OFF INDICATOR: LIGHTS WHEN THE
-
PITCHUP PATTONE Displays THE REFERENCE CITOL
-
PITCH Button: Displays the reference pitch.
PITCH Indicator: Lights while the reference pitch is being set.
- DISPLAY Button: Switches the meter's display pattern
DISPLAY Indicator: Indicates the meter's display mode
-
POWER Indicator: Lights when the power is on.
-
Meter: Indicates the input sound's pitch
-
Tuning Guide Indicator: Indicators when the proper tuning is reached
| Pitch is flat | Pitch is sharp | Pitch is in tune |
- Note Name/String Number Indicator: Indicates the note name, string number, or reference pitch
Rear Panel
Heart Panel
- Security Slot (m) http://www.kensington.com
13 INVEUT
- INPUT Jack
Connect the guitar, bass guitar, or other instrument to be tuned here.
The INPUT jack doubles as a power switch. Connecting the instrument's plug turns on the tuner's power, and disconnecting the plug switches the power off. Disconnect the cord from the INPUT jack when not using the TU-1000
the plug switches the power 12 PARALLEL OUT lock
13.PARALLEL OUT JACK Use this when you want to split the signal from the INPUT in each and send it to a connected effect response as quite empty.
use this when you want to
- TUNER ON/OFF Jack
Connect an external footswitch (FS-SU; sold separately) here.
* Set the FS-5U's polarity switch to the jack side.
15 OUTPUT Jack
- OUTPUT JACK Connect an effects processor, guitar amp, or other such device here
Connect an effects processor, guitar amp, or other such device here. Normally, the output is muted while the tuner is on. However, you can set the tuner so that the signal is output regardless of
Normally, the output is muted while the tuner is on. However, you can set the tuner so that the signal is output regardless of whether the tuner is on or off.
* The signal output from the OUTPUT jack passes through a buffer amp, and is converted to a low-impedance signal that is highly
resistant to external noise.
- Grounding Terminal
Connect an external ground cable here.
* Depending on the circumstances of a particular setup, you may experience a discomforting sensation, or perceive that the
surface feels gritty to the touch when you touch this device, microphones connected to it, or the metal portions of other
objects, such as guitars. This is due to an infinitesimal electrical charge, which is absolutely harmless. However, if you are
concerned about this, connect the ground terminal (see figure) with an external ground. When the unit is grounded, a slight burn may occur, depending on the particular use of your installation. If you are unsure of the connection method
a slight half may occur, depending on the particulars of your installation. If you are unsure of the connection method, contact the nearest Poland Service Center, or an authorized Poland distributor, as listed on the "Information" page.
Contact the nearest Roland Service C Unsuitable places for connection
• Water pipes (may result in shock or electrocution)
• Gas pipes (may result in shock or electric)
• Telephone-line ground or lightning rod (may be dangerous in the event of lightning)
17.DC OUT Jack
You can use the 7-pin parallel DC cable to supply power to effects processors and other
PSA adaptor-compatible gear. Connect the L-shaped DC plug to the DC OUT jack, then
connect to the effects processor or other device using additional plugs as needed.
* Make sure that the total amount of current consumed by the TU-1000
compatible device powered by the TU-1000 does not exceed 500 mA.
* Use a cap included with the TU-1000 to cover any plug of the 7-pin parallel DC cable that is not being used.
18.DC IN Jack
Connect the included AC adaptor here.
* Place the AC adaptor so the side with the indicator (see
illustration) faces upwards and the side with textual
Information faces downwards
• The indicator will light when you plug the AC adaptor into an AC outlet. Indicator
an AC outlet.
- Cord Hook
Fasten the AC adaptor cord using this hook to prevent the cord from being disconnected accidentally. * To prevent the inadvertent disruption of power to your unit (should the plus be pulled out accidentally).
- To prevent the inadvertent disruption of power to your unit (should the plug be pulled out accidentally), and to avoid applying undue stress to the AC adaptor jack, anchor the power cord using the cord book, as
and to avoid applying and use stress to the AC adaptor jack, anchor the power cord using the cord hook, a shown in the illustration.
* Keep the grounding terminal screw you may remove and the plug cans of the included 7-pin parallel Dr
Keep the graduating terminal suret you may remove and the plug traps of the number 1 p-in parallel. I can be able in a safe place out of children's reach, so there is no chance of them being swallowed accidentally.
(1) 2017年,公司与关联方发生的交易金额为人民币4,500万元。
1
T
Y
ππ
...
[Non-Text]
[Non-Text]
[Non-Text]
[Non-Text]
[Non-Text]
[Non-Text]
m = 311
The Ground Truth image displays a single, solid horizontal line. According to Rule 2 (UNDERSCORE & LINE RULES), this is a stylistic or background line, not a placeholder underscore. Therefore, the OCR result must ignore it and output nothing or only meaningful text. The provided OCR content is "____", which consists of four underscores. This is an incorrect interpretation of the line as a placeholder, violating the rule that stylistic lines must be ignored. The OCR has hallucinated underscores where none should exist based on the GT's visual context. Hence, the OCR result is inconsistent with the Ground Truth.
1
m = 311
[Non-Text]
[Non-Text]
[Non-Text]
[Non-Text]
•
et
→
[Non-Text]
[Non-Text]
m = 311
000
-
。
)
-
-
* To prevent malfunction and/or damage to speakers or other devices, always turn down the volume, and turn off the power on all
* Our operations are not limited to the requirements that are otherwise not but possible.
* Once the connections have been completed, turn on power to your guitar amp or other amplification system last. By turning on devices in the wrong order, you risk causing malfunction and/or damage to speakers and other devices.
* This unit is equipped with a protection circuit. A brief interval (a few seconds) after power-up is required before the unit will operate.
This unit is equipped with a protection circuit. A brief interval (a few seconds) after power up is required before the unit will operate normally.
* Some connection cables contain resistors. When connection cables with resistors are used, the sound level may be extremely low, or
Some connection cables contain resistors. When connection cables with resistors are used, the sound level may be extremely low, or impossible to hear. For information on cable specifications, contact the manufacturer of the cable.
■ specifications
■ Specifications
Tuning Range C0 (16.35Hz)–C8 (4186Hz) Dimensions 414 (W) x 160 (D) x 61 (H) mm
Fuming Range | Dimensions 16-5/16 (W) x 6-5/16 (D) x 2-7/16 (H) inches
Reference Pitch A4=436–445 Hz (1Hz step) Weight 2.2 kg / 4 lbs 14 oz (excluding AC adaptor)
± 1 cent AC adaptor (Roland PSB-1U), 7-pin Parallel DC
Tuning Accuracy | Accessories | Cable, owner's manual, leaflet ("USING THE
UNIT SAFELY" and "IMPORTANT NOTES," and "Information".
Information ) Power Supply AC adaptor (Poland PSR 1.10) Option Footswitch FS 511
Power Supply AC adaptor (Roland P3B-10) Option Footswitch P3-50 Current Draw 350 mA
Current Draw 350 mA | - |
* In the interest of product improvement, the specifications and/or appearance of this unit are subject to change without prior notice.
取扱説明書
このたびは、BOSS ステージ・チューナー TU-1000 をお買い上げいただきまして、まことにありがとうございます。
この機器を正しくお使いいただくために、ご使用前に別紙「安全上のご注意」と「使用上のご注意」をよくお読みください。
また、この機器の優れた機能を十分ご理解いただくためにも、取扱説明書をよくお読みください。取扱説明書は必要なとき
にすぐに見ることができるよう、手元に置いてください。
© 2009 ホス株式会社 本書の一部、もしくは全部を無断で復与・転載することを宗じます。
■主な特長
・圧倒的な滑らかさと明るさで動く大型LEDメーターで、スピーディーなチューニングが可能です
・ チューニング完了を光の流れで知らせるアキュピッチ・サイン機能を搭載しています
- LED メーターの動きを針式メーターに似た動きのCENT、音のズレを光の流れで表すSTREAMの2種類から選べます
・ チューナー・オンと同時に OUTPUT の信号を自動的にミュートし、音を出さずにチューニングが行えます
・ オーフツ・チューニングや DADGAD など、様々な変則チューニングに対応、6 半音までのタウン・チューニングに
も対応しています 最大6台までのエフェクターへの電源供給可能です
・最大60日までのエフェクターへ電源供給可能です ・外部フットスイッチを接続することにより、チューナーのオン/オフを離れたところからコントロールすることも可
外部タクト十八タクトを接続することにより(タントリー)のガタナガタを離れたところからコントロールすることも可能です
■
■ チューニングのしかた
-
チューニングする楽器を INPUT ジャックに接続します。(電源オンになります)
-
[MODE] を押してチューニング・モードを選びます。
| モード | 解説 | 表示 |
| CHROMATIC | 半音每 12 個全部の音程をチューニングできます。 | 音名が表示されます。 |
| GUITAR | ギターの弦番号でチューニングできます。 | |
| BASS | ベースの弦番号でチューニングできます。 | |
| OPEN D~A | ギターのオープン・チューニングができます。 | 弦番号が表示されます。 |
| DROP D | ギターの DROP D チューニングができます。 | |
| DADGAD | ギターの DADGAD チューニングができます。 |
各チューニング・モードでの音名については、「チューニング・モードの音名一覧」をご覧ください。
-
TUNER ON/OFF スイ
-
楽器を単音で鳴らします。
鳴らした音に近い音名/弦番号がディスプレイに表示されます。正確な音程とのズレが、メーターとチューニング・
ガイドで表示されます。
- 楽器をチューニングします。
目的の音名/弦番号がディスプレイに表示され、チューニング・ガイドが両方点灯し、メーターのピッチが合うよう
に楽器をチューニングします。
チューニングを合わせるときは、弦を緩めてから締める方向で合わせると良いでしょう。
安定してピッチが合うと、メーターの光が左右から中央に流れ、チューニング完了を知らせます。(アキュピッチ・
サイン機能)
※ メーターは表示パターンの設定によって、表示のしかたが異なります。
フラット・チューニングをする
[ELAT TUNING]を押して、表示している音名に対し、子中際の音を何半音下ばるかを選びます。
[FLAT TUNING]を押じて、表示している音名に対して実際の音を何半音下げるかを選びます。
ディスプレイのプラット表示が、表示無し(レキュラー). b(半音下げ)、b(2半音下げ)… b(b) (6半音下げ) に変わります。
わります。
基準ビッチを変更する
[PITCH]を押すと、現在の甚満ピッチの1桁目(440Hzなら0)が音名/弦番号インジケーターに点滅表示されます。
[PICH]を押すと、現在の基本ヒタカの1番日(13Hz サル)が首日、仮置与タンタータに無滅表示されます。点滅中に [PITCH] を押すと、基準ピッチは 436~445Hz の間で 1Hz ずつ変化します。
■
■ メーターの表示パターンを切り替える
[DISPLAY]を押すたびに、CENTとSTREAMが切り替わります。
CENT 表示
人力音が低いは
STREAM 表示
入力音のヒッチのスレを、左右への先の流れ具合で表示します。 入力音が低いときは左に流れ、高いときは右に流れます。
入力者が低いときは左に流れ、高いときは右に流れます。 ピッチのブレが小さくなるほど、光の流れる速さが遅くなり、ピッチが合うと光の流れが止まります。
ヒリフのメレが小
■ 便利な機能
チューニング完了をメーター表示で知らせる(アキュピッチ・サイン機能)
フェニランクルをメーラ表示で知つせる(フェニランクルタイプ機能)
安定してピッチが合うと、メーター表示でチューニング完了を知らせるアキュピッチ・サイン機能を搭載しています。チューニングは発行するマネルターマック。
ニックが完了すると、メーターの光が左右から中央に流れます。
アキュピッチ・サイン機能をオン/オフする
-
電源をオフ(INPUT ジャックからプラグを抜く)にします。
-
[DISPLAY] を押しながら、電源をオン(INPUT ジャックにプラグを差し込む)にします。
DISPLAY インジケーターが点灯します。
- [DISPLAY] を押して、アキュピッチ・サイン機能のオン/オフを切り替えます。
※ [DISPLAY] を押さずに 3 秒以上経過すると、設定は記憶され通常の状態に移ります。
オン:メーターの光が左右から中央に流れます。
オフ:メーターの左右が点灯します。
¥王リー機能
メヒリー機能
TU-1000は電源をオフにしても以下の設定を記憶します。
フラット・チューニングの設定(フラット数) アキュピッチ・サイン機能のオン/オフ
チューニング・モードの設定 アンドヒスタータイド機能の対応がつ
リエーニング・ヒートの設定 OUTPUTシャックの出力設定 基準上げ、チ バーケーのと拡数の設定
基準ヒッチ メーターの点灯数の設定
メーターの表示パターン設定
チューナー・オン/オフにかかわらず OUTPUT ジャックから出力する
- 2017年,公司与上海浦东发展银行股份有限公司上海市分行签订了《上海浦东发展银行股份有限公司上海分行之承兑汇票协议》,约定在本期债券存续期内每年付息一次。
チューナー・オブノオブにかがわらず、INPUT シャックからの人方管を OUTPUT シャックから出力することができます。
-
電源をオブ(INPUT シャックからプラグを抜く)にします。
-
TUNER ON/OFF スイッチを踏みながら、電源をオフ(INPUT ジャックにフラグを差し込む)にします。
-
TUNER ON/OFF スイッチを踏みます。
※ TUNER ON/OFF スイッチを踏まずに3秒以上経過すると、設定は記憶され通常の状態に移ります。
OUTPUT シャックから出力する:メーターの光が右から左に流れます。
OUTPUT シャックから出力しない:メーターの左右が点灯します。
メーターのバック・ライトとリア・パネルのライトを消灯する
TUNER ON/OFF フィッチを 2 秒以上警おと、メーターのピック・ライトヒリア・パネルのライトを消灯することができ
TUNER ON/OFF ストップを 2 秒以上踏むと、メーターのパラブ・ソフトとガナ・八本ルのソフトを消灯することがございます。再度 TUNER ON/OFF フィッチを 3 秒以上踏むと点灯します。
ます。再度 TUNEN FUN/SP スイブを 2 秒以上語心ご点でします。 GEN 現元の 5 ラード 3 サ灯数を設定です。
CENT 表示でのメーターの点灯数を設定する
-
電源をオフ(INPUT ジャックからプラグを抜く)にします。
-
[PITCH] を押しながら、電源をオン(INPUT ジャックにプラグを差し込む)にします。
-
[PITCH] を押します。
※ [PITCH] を押さずに 3 秒以上経過すると、設定は記憶され通常の状態に移ります。
[PITCH]を押すたびに、メーターの点灯数が切り替わります。
flowchart
graph TD
    A["BOSS"] --> B["STAGE TUNER"]
    B --> C["MOOD"]
    C --> D["FLAT TUNING"]
    D --> E["MODE"]
    E --> F["ANER ON/OFF"]
    F --> G["PICH"]
    G --> H["DISPLAY"]
    H --> I["TU-1000"]
    I --> J["+90"]
    J --> K["8"]
    K --> L["10"]
    L --> M["9"]
    M --> N["4"]
    N --> O["3"]
    O --> P["6"]
| Elenco dei nomi della note nella modalità di accordatura /Lista de nombres de notas en el modo de afinación | Visualizzazione nome della nota / Visualizzazione del nombre de notas | |||||||||||
| GUITAR | OPEN D | OPEN E | OPEN G | OPEN A | DROP D | DADGAD | C | C# | D | D# | ||
| 1st | E | D | E | D | E | E | D | Hi-C | C | |||
| 2nd | B | A | B | B | C# | B | A | 1st | G | |||
| 3rd | G | F# | G# | G | A | G | G | 2nd | D | |||
| 4th | D | D | E | D | E | D | D | 3rd | A | |||
| 5th | A | A | B | G | A | A | A | 4th | E | |||
| 6th | E | D | E | D | E | D | D | Lo-B | B | |||
| 7th | B | - | - | - | - | - | - | |||||

Manuale dell'utente
Grazie e congratulazioni per aver scelto il BOSS 10-1000 Stage Tuner. Prima di utilizzare questa unità, leggere attentamente le sezioni intitolate: "UTILIZZO SICURO DELL'UNITÀ" e "NOTE IMPORTANTI" (su un foglio a parte) che contengono importanti informazioni sul corretto impiego dell'unità. Inoltre, per avere la sicurezza di aver acquisto una buona conoscenza di ogni funzione formita dalla nuova unità, è necessario leggere questo manuale nella sua interezza. Si consiglia di conservare il manuale e tenerlo a disposizione come riferimento utile.
Copyright © 2009 BOSS CORPORATION
Tutti i diritti riservati. Nessuna parte di questo documento può essere in alcun modo riprodotta senza autorizzazione scritta di BOSS CORPORATION.
■ Funzioni principali
- Grazie all'estrema uniformità, alla precisione del movimento e alla luminosità di qualità superiore dei LED di grandi dimensioni dell'indicatore, l'consolidatore è grande e comparazione.
- Include la funzione segno Accu-Pitch, che utilizza il movimento delle spie dell'indicatore per segnalare il completamento dell'accordatura. - Possibilità di scegliere tra due modalità di visualizzazione selezionabili: "CENT", in cui l'indicatore a LED presenta un funzionamento di tipo ad ago e "STREAM", in cui lo scorrimento delle spie segnala quando le note sono scordate.
- L'accensione dell'accordatore disattiva automaticamente il segnale di uscita, consentendo di accordare senza emettere suono. - Gestisce le accordature aperte, DADGAD e altre accordature alternate aperte come quelle flat o "verso il basso" fino a sei semitoni al di sotto dell'accordatura standard.
- Fornisce l'alimentazione a un massimo di sei processori di effetti. - Il collegamento di un interruttore a pedale esterno consente di accendere e spennere l'accordatore in remoto
■ Uso dell'accordatore
-
Collegare lo strumento da accordare al jack INPUT del TU-1000 (in tal modo l'unità si accende).
-
Premere [MODE] per selezionare la modalità di accordatura.
| Modalità | Descrizione | Visualizzazione |
| CHROMATIC | Consente di eseguire l'accordatura su uno dei dodici semitoni. | Viene visualizzato il nome della nota. |
| GUITAR | Consente di eseguire l'accordatura in base ai numeri delle corde della chitarra. | |
| BASS | Consente di eseguire l'accordatura in base ai numeri delle corde del basso. | Viene visualizzato il numero di corda. |
| OPEN D -A | Consente di eseguire accordature aperte della chitarra. | |
| DROP D | Consente di eseguire l'accordatura della chitarra DROP D. | |
| DADGAD | Consente di eseguire l'accordatura della chitarra DADGAD. |
Per ulteriori informazioni sui nomi delle note in ciascuna modalità di accordatura, fare riferimento all'Elenco dei nomi delle
note nelle modalità di accordatura. 3. Premere l'interruttore TUNER ON/OFF per accendere l'accordatore.
- Suonare una nota sullo strumento.
Sul display viene visualizzato il nome della nota o il numero di corda della nota più vicina al tono riprodotto. L'indicatore o la Guida por l'accordatura indicano quanto manca alla corrotta intonazione della nota.
- Accordare lo strumento.
Quando sul display viene visualizzato il nome o il numero di corda della nota desiderata, accordare lo strumento finché non si accendono entrambi gli indicatori Guida per l'accordatura e il tono non corrisponde a quello visualizzato dall'indicatore. Un volta raggiunto un tono stabile, le spie dell'indicatore si accendono, quindi scorrono verso il centro da sinistra e da destra per segnalare il completamento dell'accordatura (funzione segno Accu-Pitch).
Il metodo di visualizzazione varia a seconda del rispettivo modello selezionato per l'indicatore. Accordatura flat
Accordatura flat Premere [FLAT TUNING] per abbassare la tonalità effettiva di uno o più semitoni rispetto alla nota indicata sul display. A ciascuna pressione del pulsante il display varia, dai simboli senza flat (accordatura normale) a "b" (abbassato di un semitono), "b", (abbassato di due semitoni) e così via fino a "b", "b", "b", "abbassato di sei semitoni).
Modifica del tono di riferimento
Quando si preme [PITCH], la cifra più bassa del tono di riferimento corrente ("0" se impostato su 440 Hz) inizia a lampeggiare
sul display Nome nota/numero di corda. A ogni pressione del tasto [PITCH] mentre il display lampeggia, il tono di riferimento cambia di 1 Hz; è possibile regolare il tono
su un intervallo compreso tra 436 Hz è 445 Hz. ■ Passaggio da un modello di visualizzazione dell'indicatore all'altro
A ogni pressione del pulsante [DISPLAY], la visualizzazione dell'indicatore alterna tra i modelli CENT e STREAM.
Visualizzazione CENT La spia si sposta progressivamente verso sinistra man mano che il tono della nota immessa diminuisce: all'aumentare del tono
La spia si sposta progressivamente verso destra.
Visualizzazione STREAM Lo spostamento della spia a sinistra o a destra indica in che misura la nota immessa è scordata.
La spia si sposta verso sinistra quando il tono immesso è basso e verso destra quando è alto. Lo spostamento della spia rallenta quando la nota si avvicina al tono corretto, quindi si interrompe una volta raggiunto il tono corretto.
■ Funzioni comuni
Utilizzo della visualizzazione dell'indicatore per segnalare il completamento dell'accor-
datura (funzione segno Accu-Pitch)
Il TU-1000 presenta una funzione segno Accu-Pitch che utilizza la visualizzazione dell'indicatore per segnalare il completamento
dell'accordatura una volta che il tono si è stabilizzato sul valore corretto. Al termine dell'accordatura, le spie si spostano verso il centro da sinistra e da destra.
Attivazione e disattivazione della funzione segno Accu-Pitch
-
Spegnere l'unità (scollegare lo strumento dal jack INPUT).
-
Tenere premuto il pulsante [DISPLAY] e accendere l'unità (collegare lo strumento al jack INPUT).
L'indicatore [DISPLAY] si accende. 3. Premere il pulsante [DISPLAY] per attivare e disattivare la funzione segno Accu-Pitch
* Se il pulsante [DISPLAY] non viene premuto entro tre secondi, l'impostazione viene memorizzata e l'accordatore ritorna alla modalità normale.
Attivata: le spie dell'indicatore si spostano verso il centro da sinistra e da destra.
Disattivata: l'indicatore si accende a sinistra e a destra.
Funzione memoria
| Il TU-1000 salva in memoria le seguenti impostazioni anche dopo aver spento l'unità. | |
| Impostazioni dell'accordatura flat (numero di semitoni flat) | Impostazione della funzione segno Accu-Pitch |
| Impostazione della modalità di accordatura | Impostazione di uscita del jack OUTPUT |
| Impostazione del tono di riferimento | Impostazione del numero di spie dell'indicatore |
| Impostazione della visualizzazione dell'indicatore | - |
Uscita del segnale dal jack OUTPUT indipendentemente dall'impostazione dell'accordatore su acceso o spento
È possibile impostare il TU-1000 in modo che i suoni in ingresso sul jack INPUT siano sempre emessi dal jack OUTPUT, indipenden-
temente dal fatto che l'accordatore sia acceso o spento.
- Spegnere l'unità (scollegare lo strumento dal jack INPUT).
-
Tenere premuto l'interruttore TUNER ON/OFF e accendere l'accordatore (collegare lo strumento al jack INPUT).
-
Tiere premato interruttore TUNER ON/OFF e addendere l'accordatore (collegare lo strumento al jack INF 01).
- Premere l'interruttore TUNER ON/OFF per selezionare la funzione di uscita desiderata.
* Se l'interruttore TUNER ON/OFF non viene premuto entro tre secondi, l'impostazione viene memorizzata e l'accordatore ritorna alla
modalità di funzionamento normale.
Suoni emessi dal jack OUTPUT: le spie dell indicatore si spostano da destra verso sinistra. Suoni non emessi dal jack OUTPUT: l'indicatore si accende a sinistra e a destra.
Spegnimento della retroilluminazione dell'indicatore e dell'illuminazione del pannello
Specgimento della retromammazione dei indicatore e dei immatturazioni del panthero posteriore
È possibile speqnere la retroilluminazione dell'indicatore e l'illuminazione del pannello posteriore tenendo premuto l'interruttore TUNER ON/
OFF per almeno due secondi. Per ripristinare l'illuminazione, premere nuovamente l'interruttore TUNER ON/OFF per due o più secondi.
Modifica dell'illuminazione della spia in movimento
* Questa funzione è disponibile solo nella modalità di visualizzazione CENT.
-
Spegnere l'unità (scollegare lo strumento dal jack INPUT).
-
Tenere premuto [PITCH] e accendere l'unità (collegare lo strumento al jack INPUT).
-
Premere [PITCH]. * Se il pulsante [PITCH] non viene premuto entro tre secondi, l'impostazione viene memorizzata e l'accordatore ritorna alla modalità normale.
A ogni singolo tocco di [PITCH] il numero della spia può variare.
■ Ripristino delle impostazioni di fabbrica originali (Factory Reset)
È possibile ripristinare le diverse impostazioni salvate nella memoria del TU-1000 e ripristinare le impostazioni originali presenti
nell'accordatore al momento della spedizione.
- Spegnere l'unità (scollegare lo strumento dal jack INPUT).
-
Tenero premuto [MODE] a secondare l'unità (scollegare lo strumento al jack INPUT).
-
Tenere premuto [MODE] e accendere l'unita (collegare lo strumento al Jack INPOT). La spia verde al centro dell'indicatore si accende.
-
Premere [MODE].
* Se [MODE] non viene premuto entro tre secondi o se si preme un pulsante diverso da [MODE], l'accordatore ritorna alla modalità di funzionamento normale spesa che un spesa rìssistinate la importazioni di fabbrile.
I am il 1900, il 1900, il 1900, il 1900, il 1900, il 1900, il 1900, il 1900, il 1900, il 1900, il 1900, il 1900, il 1900, il 1900, il 1900, il
La spia verde di centro dell'indicatore lampeggià tie volte e il 10° 1000' informa alla modalità normale, con le impostazioni di fabbrica originali ripristinate.
■ Schermata demo iniziale
-
Spegnere l'unità (scollegare lo strumento dal jack INPUT).
-
Tenere premuto [FLAT TUNING] e accendere l'unità (collegare lo strumento al jack INPUT).
Viene visualizzata la schermata iniziale. La schermata iniziale rimano visualizzata finché non ci spogno o ci riasconde il TII 1000 onpura finché non ci promo
La schiemnata iniziale finiante visualizzata finliche non si spegne e si naccende il 10-1000 oppure finliche non si premie l'interruttore TUNER ON/OFF.
■ Descrizioni del pannello
Pannello anteriore
- Pulsante FLAT TUNING: imposta la quantità di cui viene abbassato il tono nelle accordature flat.
Indicatore FLAT TUNING: indica l'impostazione dell'accordatura flat.
- Pulsante MODE: cambia la modalità di accordatura.
Indicatore MODE: indica l'impostazione della modalità di accordatura.
-
Interruttore TUNER ON/OFF: accende e spegne l'accordatore.
-
Indicatore TUNER ON/OFF: si illumina quando l'accordatore è acceso.
-
Pulsante PITCH: visualizza il tono di riferimento.
Indicatore PITCH: si accende durante l'impostazione del tono di riferimento.
-
Pulsante DISPLAY: cambia il modello di visualizzazione dell'indicatore. Indicatore DISPLAY: segnala la modalità di visualizzazione dell'indicatore
-
Indicatore POWER: si illumina quando l'unità è accesa.
-
Indicatore: indica il tono del suono immesso.
-
Indicatore Guida per l'accordatura: indica quando viene raggiunta l'accordatura corretta.
| Il tono tende al bemolle | Il tono tende al diesis | L'accordatura è esatta |
- Indicatore del nome della nota/numero di corda: indica il nome della nota, il numero di corda o il tono
di riferimento.
Pannello posteriore
11 Alleggiamento di civvazione ( ) http://www.kazington.com/
-
Alloggiamento di sicurezza (K) http://www.kensington.com/ 12. lack INPUT
-
JACK INFO! Collegare qui una chitarra, un basso o qualsiasi altro strumento da accordare.
* Il jack INPUT funge anche da interruttore di alimentazione. Collegando lo spinotto dello strumento l'unità si accende
e scollegandolo si spegne. Scollegare il cavo dal jack INPUT quando non si utilizza il TU-1000. 12 Jack PARALI FLOUT
- Jack PARALLEL OUT Utilizzare questa uscita quando si desidera dividere il segnale proveniente dal jack INPUT e inviarlo a un processore di effetti
o utilizzare questa uscita quando si desiendà dividere il segnale proveniente sul jack in? Or e inviano d'un processore di effettivo un amplificatore chitarra collegato.
- Jack TUNER ON/OFF
Collegare qui un interruttore a pedale (FS-5U, venduto separatamente). Il collegamento di un interruttore FS-5U consente di accendere e spregnere l'accordatore a distanza
* Impostare l'interruttore di polarità di FS-SU sul lato jack.
15.Jack OUTPUT
Collegare qui un processore di effetti, un amplificatore chitarra o altro dispositivo simile. Normalmente, l'uscita vione dicattivata quando l'accordatore è accoro. Tuttavia, è possibile impostare l'accordatore in modo
Normalmente, l'uscita viene disattivata quando l'accordatore e acceso. Tuttavia, e possibile impostare l'accordatore in modo che il segnale sia emesso indipendentemente dal fatto che l'accordatore sia acceso o spento.
* Il segnale in uscita dal jack OUTPUT passa attraverso un amplificatore buffer e viene convertito in un segnale a bassa impedenza che
è estremamente resistente al rumore esterno. 16. Terminale di masso a terre
- Terminale di messa a terra Collegare qui un cavo per la messa a terra esterna.
* In caso di configurazioni particolari, è possibile che toccando la superficie del dispositivo, i microfoni a esso collegati o le parti
metalliche di altri oggetti, ad esempio le chitarre, si avverta una sensazione sgradevole. Ciò è dovuto alla presenza di una azion slattiera infinitesimola assolutamente innarve. Se tuttavia tale azione diversa generale presunzione, collare
canica elettrica minnitesimale, assolatamente innocua. Se tuttavia tale canica dovesse generare preoccupazione, collegare il morsetto di terra (vedere la figura) a una messa a terra esterna. Quando l'unità è collegata a terra, è possibile che venga
generato un leggero ronzio, a seconda dell'installazione. Se non si è sicuri del metodo di collegamento, contattare il Centro di
assistenza Rolana più vicino oppure un distributore Rolana autorizzato, come indicato nella pagina "informazioni". Punti non indicati per il collegamento.
- Con strutture dell'acqua (potrebbero provocare scosse elettriche anche letali)
- Tubi del gas (potrebbero causare incendi o esplosioni)
- Messa a terra della linea telefonica o pararulimine (potrebbe risultare pericoloso in caso di ruimini) 17. Jack DC OUT
È possibile utilizzare il cavo CC parallelo a 7 pin per fornire l'alimentazione ai processori
di effetti e ad altri dispositivi compatibili con l'adattatore PSA. Collegare lo spinotto CC
a forma di L al jack DC OUT, quindi collegare il processore di effetti o altro dispositivo utilizzando eventualmente spinotti aggiuntivi
* Assicurarsi che il consumo di corrente complessivo del TU-1000 e del dispositivo compatibile
con l'adattatore PSA alimentato dal TU-1000 non superi 500 mA.
* Utilizzare un cappuccio incluso nel TU-1000 per coprire eventuali spinotti non utilizzati del cavo CC a 7 pin. 18. Jack DC IN
- Jack DC IN Collegare qui l'adattatore CA in dotazione. Adattatore CA
* Posizionare l'adattatore CA in modo che il lato con Adattatore CA Cavo di alimentazione
l'indicatore sia rivolto verso l'alto e il lato con le informazioni di testo sia rivolto verso il basso (consultare la figura) Presa CA
- L'indicatore si illumina quando l'adattatore CA viene inserito Indicatore
in una presa CA.
- Gancio per cavo
Fissare il cavo dell'adattatore CA utilizzando questo gancio per evitare che possa essere scollegato accidentalmente.
* Per evitare l'interruzione involontaria dell'alimentazione dell'unità (qualora la spina venga scollegata
accidentalmente) e sollecitazioni eccessive dell'adattatore CA, fissare il cavo di alimentazione con l'apposito gancio come mostrato nell'illustrazione.
* Conservare la vite del terminale di messa a terra eventualmente rimossa e i cappucci degli spinotti del cavo CC parallelo
a 7 pin in dotazione, in luogo sicuro, lontano dalla portata dei bambini, per evitare rischi di ingestione accidentale.
* Per evitare malfunzionamenti e/o danni agli altoparlanti o ad altri dispositivi, abbassare sempre il volume e spegnere tutti i
dispositivi prima di eseguire qualsiasi collegamento. * Una volta offattuati i collegamenti, accordare l'amplificatore della chitarra o altri impianti di amplificazione per ultimi. So si segue un
Una volta erettuati collegamenti, accendere l'amplicatore della chittura o altri implanti di amplificazione per altri. Se si segue un ordine di accensione sbagliato, è possibile che si verifichino guasti e/o danni agli altoparlanti e agli altri dispositivi.
* Questa unità è dotata di un circuito di protezione. Dopo l'accensione, è necessario attendere alcuni secondi prima che l'unità cominci
* Alcuni cavi di collegamento contengono resistori. Quando si utilizzano cavi di collegamento con resistori, il livello dell'audio potrebbe
Se quali e atta segnalmente consegnoi rassionali quali a utilizzano con la collegamento con rassionali, involta utilizzano potraccio essere estremamente basso o inudibile. Per informazioni sulle specifiche dei cavi, contattare il produttore del cavo.
■ Specifiche
Gamma di C0 (16 35Hz)–C8 (4186Hz) | 414 (W) x 160 (D) x 61 (H) mm
L'Altura di accordatura 25 (10.03.12) - 26 (11.03.12) Dimensioni 6-5/16 (W) x 6-5/16 (D) x 2-7/16 (H) pollici
Tono di riferimento A4=436–445 Hz (passo a 1Hz) Peso 2.2 kg / 4 lbs 14 oz (escludendo l'adattore CA)
Tremimento ± 1 centesimo Adattatore CA (Roland PSB 1U), cavo CC a 7 pin.
Precisione | Accessori | Manuale dell'utente, foglio esplicativo ("UTILIZZO
dell'accordatura Accessori SICURO DELL'UNITÀ" e "NOTE IMPORTANTI" e "Informazioni")
Alimentazione Adattatore CA (Roland PSB-1U) Opzione Interruttore a pedale FS-5U
Corrente assorbita 350 mA - -
* Allo scopo di migliorare il prodotto, le specifiche e/o l'aspetto di questa unità sono soggetti a modifiche senza preavviso.
Manual del Propietario
Muchas gracias y enhorabuena por haber elegido el afinador de escenario BOSS TU-1000.
Antes de utilizar este equipo, lea atentamente las secciones "UTILIZACIÓN SEGURA DE LA UNIDAD" y "NOTAS IMPORTANTES" (vua encontrará en una hrip anesto). En este sesiones encontrará información importante ##ara de la utilización presente de la
(que encontrara en una hoja aparte). En estas secciones encontrara información importante acerca de la utilización correcta de la unidad. Además, para asegurarse de que conoce adecuadamente todas las características de su nuevo equipo, lea íntegramente
el presente manual. Guarde el manual en un lugar accesible para consultarlo cuando sea necesario.
Copyright © 2009 BOSS CORPORATION Todos los derechos reservados. Prohibida la reproducción total o parcial de la presente publicación sin la previa
Todos los derechos reservados: Prombiada la reproducción total o particular de la presente publicación sin la previa autorización por escrito de BOSS CORPORATION.
■ Principales características
- Los LED ultranítidos, precisos, brillantes y de gran tamaño del medidor facilitan y agilizan la afinación
- Induye la función signo Accu-Pitch, que utiliza el movimiento de las luces del medidor para indicar que la afinación ha concluido - Es posible seleccionar dos modos de visualización: "CENT", en el que indicador LED funciona como un medidor de agua.
y "STREAM", en el que el movimiento secuencial de las luces indica cuando las notas están desafinadas.
- La activación automática del afinador silencia la señal de salida, lo cual permite afinar sin salida de sonido - Compatible con afinaciones abiertas, DADGAD y otras afinaciones alternativas, así como con afinaciones homel o "caídar".
- Compatible con alinaciones abiertas, DADGAD y otras alinaciones alternativas, así como con alinaciones debior o caldas de hasta seis semitonos por debajo de la afinación estándar
- Alimentación de hasta seis procesadores de efectos
- La conexión a un pedal externo permite encender y apagar el afinador a distancia - Cómo utilizar el afinador
■ Como utilizar el almador 1. Conecto al instrumente que dose afízuel experto INPUT del TU 1000 (de este modo se reportará la alimentación eléctrica).
- Conecte el instrumento que desee aninar al conector INPO I del 10-1000 (de este modo se conectara la alimentación electrica).
- Pulse [MODE] para seleccionar el modo de afinación.
| Modo | Descripción | Visualizado |
| CHROMATIC | Permite afinar a cualquiera de los doce semitonos. | Se visualiza el nombre de la nota. |
| GUITAR | Permite afinar por números de cuerda de guitarra. | |
| BASS | Permite afinar por números de cuerda de bajo. | Se visualiza el número de la cuerda. |
| OPEN D-A | Permite afinaciones abiertas de guitarra. | |
| DROP D | Permite afinaciones caídas de guitarra. | |
| DADGAD | Permite afinaciones DADGAD de guitarra. |
Consulte más información sobre los nombres de las notas en cada modo de afinación en la Lista de nombres de notas en ¿¿¿¿¿¿¿¿¿¿¿¿¿¿¿¿¿¿¿¿¿¿¿¿¿¿¿¿¿¿¿¿¿¿¿¿¿¿¿¿¿¿¿¿¿¿¿¿¿¿¿¿¿¿¿¿¿¿¿¿¿¿¿¿¿¿¿¿¿¿¿¿¿¿¿¿¿¿¿¿¿¿¿¿¿¿¿¿¿¿¿¿¿¿¿¿¿¿¿¿?
-
Pulce el interruyter TIJNFR ON/OFF para encondor el afinados
-
Pulse el interruptor TONER ON/OFF para enceluder el almador.
- Toque una nota en el instrumento.
En la pantalla aparecerá el nombre de la nota o el número de la cuerda más próximos al tono de la cuerda pulsada. El medidor
y la guía de afinación indicarán cuan alejada que está la nota del tono correcto. 5. Afine el instrumento
Cuando en la pantalla aparezca el nombre de la nota o el número de cuerda que desee, afine el instrumento para que
se iluminen los indicadores de la guía de afinación y su tono se ajuste al indicado por el medidor.
Cuando alcance un tono estable, las luces del medidor se iluminarán secuencialmente hacia el centro desde la derecha y la izquierda, indicando que la afinación ha concluido (función signo Accu-Pitch).
* El método de visualización puede variar en función del patrón de visualización seleccionado para el medidor.
Afinación de bemol
Pulse [FLAT TUNING] para bajar el tono uno o más semitonos por debajo de la nota indicada en la pantalla. Cada pulsación del
botón cambiará el contenido de la pantalla, desde símbolos no de bemol (atinación normal) a " b" (un semitono inferior), " b" (dos semitonos inferiores), y así sucesivamente hasta " bbbb b" (seis semitonos inferiores).
Cambio del tono de referencia
Al pulsar [PITCH], el díquito más bajo del tono de referencia actual ("0", si está ajustado a 440 Hz) comenzará a parpadear
en la pantalla de nombres de notas/números de cuerdas.
Cada vez que pulse [PITCH] mientras la pantalla este parpadeando, el tono de referencia cambiará en 1 Hz. El tono puede ajustarse en un intervalo desde 436 Hz hasta 445 Hz.
■ Cambio del patrón de visualización del medidor
Cada vez que pulse [DISPLAY], el medidor alternará entre los modos CENT y STREAM.
Pantalla CENT
La luz se desplazará hacia la izquierda cuanto más caiga el tono de la nota introducida. Al aumentar el tono, la luz se irá dorplazando hacia la dorocha
desplazando hacia la derecha. Pantalla STREAM
El movimiento de la luz hacia la izquierda o hacia la derecha indica cuán alejada está la nota de su afinación.
Cuando el tono introducido sea bemol, observará una secuencia de iluminación hacia la izquierda; cuando sea agudo, hacia la derecha. La secuencia luminosa se salontizará a medida que la nota se aproximo al tono correcto. Una vez llegado al mismo, se interrumpiró
La secuencia iluminosa se talentizara a medida que la nota se aproximie al tono correcto. Ona vez llegado al mismo, se interrumpila. ■ Funciones prácticas
E- Funciones prácticas Uso de la pantalla de medición para indicar que la afinación ha terminado
Oso de la pantalla de medición para indicar que la atmación ha terminado (función signo Accu-Pitch)
(Fluclion signo Accu-Pitch)
El TU-1000 incorpora la función signo Accu-Pitch, que utiliza la pantalla de medicion para indicar que la afinación ha concluido una vez que la nota se haya estabilizado en su tono correcto. Una vez concluida la afinación, la secuencia luminosa se desplazará hacia
el centro desde la izquierda y desde la derecha. Activación y desactivación de la función signe Acy Pitch
Activación y desactivación de la función signo Accu-Pitch 1. Desconecto la alimentación (deschufe el instrumento del conector INRUT)
- Desconecte la alimentación (desenchufe el instrumento del conector INPUT).
- Pulse [DISPLAY] v. sin soltarlo, conecte la alimentación (enchufe el instrumento al conector INPUT).
De este modo se iluminará el indicador [DISPLAY].
- Pulse [DISPLAY] para activar y desactivar la función signo Accu-Pitch. * 1) intracumran tres segundos singular (DISPLAY), el nivuto quadraú guardado y al afino devaluará al modo normal
- Si transcurren tres segundos sin pulsar [DISPEAT], er ajuste queada guardado y el inmador volvera al modo normal. Activada: la secuencia luminosa del medidor se centrará desde la izquierda y la derecha.
Actividad: la secuencia luminosa del medidor se centrura desde la izquierda y la derecha. Desactivada: el medidor se iluminará en la izquierda y la derecha.
Función de memorización
El TU-1000 guardará en la memoria los siguientes ajustes, incluso si se desconecta la alimentación eléctrica.
Ajustor de la afinación de hemol (número de homoles) Ajuste de la función ciano Accu Pitch
Ajuste de la afinación de definió (número de debinoles) Ajuste de la función signo Accu-Fitch Aiuste del modo de afinación Aiuste de la salida del conector OUTPUT
Ajuste del tono de referencia Número del ajuste de la secuencia luminosa del medidor
Ajuste de la visualización del medidor -
Salida de la señal desde el conector OUTPUT independientemente de si el afinador está
encendido o apagado
Es posible configurar el TIJ-1000 para que la entrada de sonidos del conector INPUT salna siempre a través del conector OUTPUT
ES posible configurar el 10-1000 para que la entrada de sonidos del conector INV. Of salea siempre a través del conector 0011-07, independientemente de si el propio afinador está o no encendido.
-
Desconecte la alimentación (desenchufe el instrumento del conector INPUT).
-
Pulse el interruptor TUNER ON/OFF para encender el afinador (enchufe el instrumento al conector INPUT).
-
Pulse el interruptor TUNER ON/OFF para encender el afinador (enchufe el instrumento al conector INPUT).
-
Pulse el interruptor TUNER ON/OFF para seleccionar la función de salida de su preferencia. * Si transcurren tres segundos sin pulsar el interruptor TUNER ON/OFF, el ajuste quedará guardado y el afinador volverá al modo
de funcionamiento normal.
Salida de sonido desde el conector OUTPUT: la secuencia luminosa del medidor se desplazará desde la derecha hacia la izquierda.
No salida de sonido desde el conector OUTPUT: el medidor se iluminará a la izquierda y a la derecha.
Apagado de la retrolluminación y de la luz del panel posterior del medidor
Es posible apagar la retroiluminación y la luz del panel posterior del medidor pulsando el interruptor TUNER ON/OFF durante el meso dos segundos. Para valor a apanderlos puls previamente el interruptor TUNER ON/OFF durante el meso dos segundos.
al menos dos segundos. Para volver a encenderlos, pulse nuevalmente el interruptor TONER ON/OFF durante al menos dos segundos.
[Non-Text]
[Non-Text]
[Non-Text]
* Esse equipamento está equipado com um circuito de proteção. É necessário aguardar um breve intervalo (alguns segundos) após
ligar o equipamento para que ele funcione normalmente.
* Aiguns cabos de conexao possuem resistores. Quanão cabos de conexao com resistores são usados, o nível do som pode ser extremamente baixo ou inaudível. Para obter informações sobre as especificações dos cabos, entre em contato com o fabricante
do cabo.
■ Especificações
Eaixa de afinação | C0 (16,35Hz)–C8 (4186Hz) | Dimensões | 414 (L) x 160 (P) x 61 (A) mm
Faixa de almação Dimensões 16-5/16 (L) x 6-5/16 (P) x 2-7/16 (A) pol. Altura: A4,426,445(H (I,4,4,4H)) 20h / 4h 14 (a, a, b, c, d, e, F)
Altura de referência | A4=436-445 Hz (de 1 em 1 Hz) | Peso | 2.2 kg / 4 lbs 14 oz (sem o adaptador AC)
± 1 centésimo Adaptador AC (Roland PSB-1U), Cabo DC paralelo
Precisão da afinação Acessórios de 7 pinos, manual do proprietário, folheto ("USO SEGULO DO EQUIPAMENTO" e "OPSERVACÕES
alinação | SEGÚRO DO EQUIPAMENTO e OBSERVAÇÕES IMPORTANTES" e "Informações")
Fonte de Adaptador AC (Roland PSB-1U) Oprção Pedal FS-5U
alimentação Consumo 250 mA
Consumo | 350 mA | - | -
Gebruikershandleiding
Bedankt en gefeliciteerd met uw keuze voor de BOSS TU-1000 Stage Tuner.
Lees zorgvuldig de volgende hoofdstukken voordat u dit apparaat gebruikt: "HET APPARAAT VEILIG GEBRUIKEN" en "BELANGRIJKE OPMERKINGEN" (bijvolgeerd op een apart blad). Deze hoofdstukken hovatten belangrijke informatie over de
BELANGRIDE OF IMERRINGEN (bijgeleverd op een apart blad). Deze hoofdustukken bevatten belangrijke informatie over de juiste bediening van het apparaat. Om er bovendien zeker van te zijn dat u elke functie van uw nieuwe apparaat goed begrijpt,
leest u best de hele handleiding. De handleiding moet als handige referentie worden bewaard en voorhanden zijn.
Copyright © 2009 BOSS CORPORATION Alle rechten voorbehouden. Niets uit deze uitgave mag op enige manier worden gereproduceerd zonder schriftelijke
The following table provides the results of the 2016 and 2017 estimates for the years ended March 31, 2018. The results are presented in Table 1.
■ Belangrijkste functies
- Snel en gemakkelijk stemmen dankzij de uiterst vloeiende en nauwkeurige beweging van de meter en de uitstekende helderheid van de grote LED's
- Accu-Pitchfunctie, waarmee de beweging van de lampjes op de meter aangeeft dat het stemmen is voltooid.
- Keuze uit twee weergavemodi: "CENT", waarbij de LED-meter functioneert als een meter met naald, en "STREAM", waarbij de beweging van de lampier aangooft wanneer de noten vak zijn.
- Door het stemapparaat in te schakelen, wordt het uitvoersignaal automatisch gedempt, waardoor u kunt stemmen zonder dat
er geluid wordt uitgevoerd.
- Ondersteunt open stemmingen, DADGAD en andere alternatieve stemmingen, en "flat tuning" of "down tuning" tot maximaal zes halve tonen lager dan de standaardstemming.
- Stroomtoevoer naar maximaal zes effectprocessoren.
- Door een externe voetschakelaar aan te sluiten, kunt u het stemapparaat op afstand in- en uitschakelen.
■ Het stemapparaat gebruiken 1. Sluit het instrument dat u wilt stemmon aan op de INPUT ingang van de TIL 1000 (hierdoor wordt de stroom ingerschakold)
- Slijt het instrument dat u wirt stemmien aan op de INF OT-ingang van de 10-1000 (merdoor wordt de stroom ingeschakeld).
- Druk op [MODE] om de stemmodus te selecteren.
| Modus | Beschrijving | Weergave |
| CHROMATIC | Hiermee kunt u stemmen tot op gelijk welke van de twaalf halve tonen. | De nootnaam wordt weergegeven. |
| GUITAR | Hiermee kunt u stemmen per gitaarsnaarnummer. | Het snaarnummer wordt weergegeven. |
| BASS | Hiermee kunt u stemmen per basgitaarsnaarnummer. | |
| OPEN D–A | Hiermee kunt u een open stemming voor de gitaar instellen. | |
| DROP D | Hiermee kunt u een DROP d-stemming voor de gitaar instellen. | |
| DADGAD | Hiermee kunt u de DADGAD-stemming voor de gitaar instellen. |
Raadpleeg de Lijst met notennamen voor stemmodi voor meer informatie over de notennamen in elke stemmodi.
-
Druk op de TUNER ON/OFF-schakelaar om het stemapparaat in te schakelen.
-
Speel een enkele noot op het instrument. De nootnaam of het spaarnummer van de noot die het dichtst bij de gespeelde toon lint wordt op het scherm weergeneven
De hootbaum of het sladrummiet van de noot die het dientst bij de gespectie toon ligt, wordt op het schenin weergegeven. De meter en de stemgids tonen hoe ver de noot van de correcte toonhoogte ligt.
- Stem het instrument.
Als de gewenste nootnaam of het gewenste snaarnummer weergegeven wordt, stemt u het instrument zodat de beide
stemgidslampjes oplichten en de toonhoogte overeenstemt met de toonhoogte die door de meter wordt aangeduid. Wanneer u een stabiele toonhoogte bereijkt, bewegen de lampies van de meter van links en rechts naar het midden om aan te
Waltker. A van stabel de technologie betelij, de wegen de lampjes van de motor van links en rischt naar het imalien aan dat geven dat het stemmen is voltooid (Accu-Pitchfunctie).
* De weergavemethode verschilt naar gelang het weergavepatroon dat u voor de meter hebt geselecteerd.
Een hat tuning gebruiken
Druk op [FLAT TUNING] om de eigenlijke toonhoogte te verlagen tot een of meer halve tonen onder de noot die op het scherm wordt afgebeeld. Met elke druk op de toets wordt de weergave gewijzigd, van geen moltekens (normale stemming) naar "b"
Verlaagd met een halve tonon), " |b" (verlaagd met twee halve tonen), enzovoort, tot " |bbb|bbb" (verlaagd met zes halve tonen).
De referentietoonhoogte wijzigen
Als u op [PITCH] drukt, begint het laagste cijfer van de huidige referentietoonhoogte ("0" indien ingesteld op 440 Hz) te knipperen
in de Nootnaam/Snaarnummer-indicator. Als de indicator knippert wordt de referentietoonhoogte met 1 Hz gewijzigd telkens als u op [RITCH] drukt. U kunt de toonhoogte
Als de indicator klippert, wordt de feierheidtoonmbogte met 1 Hz gewijzige teikens als d'op [H en] drukt. O kunt de toonhoogte instellen binnen een bereik van 436 Hz tot 445 Hz.
■ Het weergavepatroon van de meter wijzigen
Telkens als u op [DISPLAY] drukt, schakelt u afwisselend tussen de weergavepatronen CENT en STREAM.
CENT-weergave Het lampie beweegt verder naar links naarmate de toonhoogte van de ingevoerde noot verlaagt. Naarmate de toonhoogte
verhoogt, beweegt het lampje verder naar rechts.
STREAM-weergave De havering van het limpie neelink of newsrechts heeft aan in bovem de inpreende postuels is
De beweging van het lampje naar links of naar rechts geeit aan in hoeveerde ingevoerde hoot vals is. Het lampje beweegt naar links als de ingevoerde toonhoogte te laag is, en naar rechts als de ingevoerde toonhoogte te hoog is.
Het lampje begint trager te bewegen naarmate u de correcte toonhoogte nadert, en stopt wanneer u de correcte toonhoogte hebt bereikt.
■ Handige functies
De meterweergave gebruiken om aan te geven dat het stemmen voltoold is (Accu-Pitchfunctie)
De TU-1000 is voorzien van een Accu-Pitchfunctie, waarbij de meterweergave aangeeft dat het stemmen is voltooid wanneer de teonhaarste zich en de erwaste teonhaarste stabilisert. Wagesse het stemmen is voltooid, bewegen de lamping van link en
toonmoogte zich op de correcte toonmoogte stabiliseert. Waanneer het stemmen is voltoold, bewegen de lampjes van links en rechts naar het midden.
De Accu-Pitchfunctie in- en uitschakelen.
-
Schakel de stroom uit (koppel het instrument los van de INPUT-ingang).
-
Houd [DISPLAY] ingedrukt en schakel de stroom in (sluit het instrument op de INPUT-ingang aan).
Het [DISPLAY]-lampje licht op.
- Druk op [DISPLAY] om de Accu-Pitchfunctie in- of uit te schakelen. * Als u niet binnen drie seconden op [DISPLAY] drukt, wordt de instelling opgeslagen en wordt de meter terug in de normale modus geschakeld.
Aan: De lampjes van de meter bewegen van links en rechts naar het midden.
Uit: De lampjes links en rechts op de meter gaan branden.
Geheugenfunctie
De volgende instellingen worden in het geheugen van de TU-1000 opgeslagen, zelfs wanneer de stroom is uitgeschakeld.
Flat tuning-instellingen (aantal verlaagde halve tonen) Instelling van de Accu-Pitchfunctie
Instelling van de stemmodus Instelling van de OUTPUT-uitgang
Instelling van de referentietoonhoogte Instelling aantal meterlampjes
Instelling van de meterweergave -
Het signaal van de OUTPUT-uitgang instellen onafhankelijk van de Aan/Uit-instelling
van het stemapparaat
U kunt de TU-1000 instellen zodat de geluidsinvoer van de INPUT-ingang altijd via de OUTPUT-uitgang wordt uitgevoerd,
-
Schakel de stroom uit (koppel het instrument los van de INPUT-ingang).
-
Houd de TUNER ON/OFF-schakelaar ingedrukt en schakel het stemapparaat in (sluit het instrument op de INPUT-ingang aan).
-
Druk op de TUNER ON/OFF-schakelaar om de gewenste uitvoerfunctie te selecteren.