
FW 356C - Système Hi-Fi PHILIPS - Notice d'utilisation et mode d'emploi gratuit
Retrouvez gratuitement la notice de l'appareil FW 356C PHILIPS au format PDF.


| Type de produit | Système Hi-Fi intégré |
| Marque | Philips |
| Modèle | FW 356C |
| Dimensions (L x H x P) | Environ 350 x 250 x 300 mm |
| Poids | Environ 5 kg |
| Alimentation | 230 V ~ 50 Hz |
| Puissance de sortie | 2 x 50 W RMS |
| Fonctions principales | Lecteur CD, tuner FM/AM, platine cassette, amplificateur, haut-parleurs intégrés |
| Entrées | Entrée auxiliaire (RCA), antenne FM/AM |
| Sorties | Sortie casque (jack 3.5 mm) |
| Télécommande | Incluse |
| Entretien et nettoyage | Débrancher avant nettoyage. Utiliser un chiffon doux et sec. Éviter les solvants. |
| Sécurité | Ne pas exposer à l'humidité. Ne pas obstruer les grilles de ventilation. Utiliser uniquement la tension indiquée. |
| Pièces détachées et réparabilité | Consulter un technicien agréé. Indice de réparabilité : 6/10 |
| Informations générales | Système Hi-Fi compact avec design argenté et façade noire |
FOIRE AUX QUESTIONS - FW 356C PHILIPS
Questions des utilisateurs sur FW 356C PHILIPS
0 question sur cet appareil. Repondez a celles que vous connaissez ou posez la votre.
Poser une nouvelle question sur cet appareil
Téléchargez la notice de votre Système Hi-Fi au format PDF gratuitement ! Retrouvez votre notice FW 356C - PHILIPS et reprennez votre appareil électronique en main. Sur cette page sont publiés tous les documents nécessaires à l'utilisation de votre appareil FW 356C de la marque PHILIPS.
MODE D'EMPLOI FW 356C PHILIPS
PHILIPS
FW 356C Mini HiFi System

natural_image
Black-and-white illustration of a portable electronic device with two speakers and a control panel (no text or symbols visible)Instructions for use
Mode d'emploi
Instrucciones de manejo
使用說明書
Manual de Instruções

PHILIPS
INDEX
México

Es necesario que lea cuidadosamente su instructivo de manejo.

PRECAUCION · ADVERTENCIA
NO ADR, RIESCO DE CHOQUE ELECTICO
ATENCION
VERIFIQUE QUE EL VOLTAJE DE ALIMENTACIÓN
CEA EL REQUERIDO PARA GU APARATO
PARA EVITAR EL RIESGO DE CHOQUE ELECTRICO, NO QUITE LA TAPA.
EN CASO DE REQUERIR SERVICIO, DIRUASE AL PERSONAL AUTORIZADO DE PHILIPS

English 4
Français 24
Español 46
中文 66
Português 86
Warranty 106
Brasil Australia/New Zealand-Mexico
English
Français
Español
中文
Portugues

CONTENTS
General Information 5
Safety Information 5
Preparation 6-7
Controls 8-9
Operating The System 10 - 11
CD 12-14
Tuner 15 - 16
Tape 17 - 18
Aux 18
Karaoke 19
Recording 19-20
Clock 20
Timer 21
Maintenance 22
Specifications 22
Troubleshooting 23
GENERAL INFORMATION
SAFETY INFORMATION
General Information
- The type plate (which contains the serial number) is located at the rear of the system.
- Recording is permissible if copyright or other rights of third parties are not infringed.
Environmental Information
All unnecessary packaging material has been omitted. We have done our utmost to make the packaging easily separable into three mono-materials: cardboard (box), polystyrene foam (buffer) and polythene (bags, protective foam sheet).
Your system consists of materials which can be recycled and reused if disassembled by a specialized company. Please observe the local regulations regarding the disposal of packaging materials, exhausted batteries and old equipment.
Accessories (Supplied)
- Remote control
- Batteries (2 x AAA size) for remote control
- AM loop antenna
- FM antenna wire
- AC power cord
Safety Information
- Before operating the system, check that the operating voltage indicated on the typeplate (or the voltage indication beside the voltage selector) of your system is identical with the voltage of your local power supply. If not, please consult your dealer. The type plate is located at the rear of your system.
- When the system is switched on, do not move it around.
- Place the system on a solid base (e.g. a cabinet).
- Place the system in a location with adequate ventilation to prevent internal heat build-up in your system.
- Do not expose the system to excessive moisture, rain, sand or heat sources.
- Under no circumstances should you repair the system yourself, as this will invalidate the warranty!
- If the system is brought directly from a cold to a warm location, or is placed in a very damp room, moisture may condense on the lens of the CD unit inside the system. Should this occur, the CD player will not operate normally. Leave the power on for about one hour with no disc in the system until normal playback is possible.
- Electrostatic discharge may cause unexpected problems. See whether these problems disappear if you unplug the AC power cord and plug it in again after a few seconds.
- To disconnect the system from the power supply completely, remove the AC power plug from the wall socket.
PREPARATION
Rear Connections

PREPARATION
(A) AM Antenna Connection
Connect the supplied loop antenna to the AM AERIAL terminal. Place the AM loop antenna far away from the system and adjust its position for the best reception.
(B) FM Wire Antenna Connection
Connect the supplied FM wire antenna to the FM 75 Ω terminal. Adjust the position of the FM antenna for the best reception.
Outdoor Antenna
For better FM stereo reception connect an outdoor FM antenna to the FM AERIAL 75 Ω terminal using a 75 Ω coaxial wire.
© Speaker Connections
- Connect the right speaker to Front terminal R, with the red wire to + and the black wire to - .
- Connect the left speaker to Front terminal L, with the red wire to + and the black wire to -
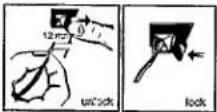
- Clip the stripped portion of the speaker wire as shown.
(D) Connecting other equipment to your system
You can connect the audio left and right OUT terminals of a TV, VCR, Laser Disc or DVD player to the AUX IN terminals at the rear of the system.
⑤ Adjusting the Operating Voltage (not available for version /30)
Before connecting the AC power cord to the wall outlet, make sure that the voltage selector at the rear of the system is set to the local power line voltage. If not, reset the selector before connecting to the wall outlet.
⑤ AC Power Supply
After all other connections have been made, connect the AC power cord to the system and to the wall outlet.
Inserting batteries into the Remote Control
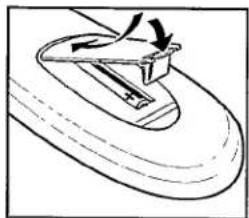
- Insert the batteries (Type R03 or AAA) into the remote control as shown in the battery compartment.
natural_image
Diagram of a mechanical component with directional arrows indicating motion (no text or symbols)- To avoid damage from possible battery leakage, remove dead batteries or batteries that will not be used for a long time. For replacement, use type R03 or AAA batteries.
CONTROLS


CONTROLS
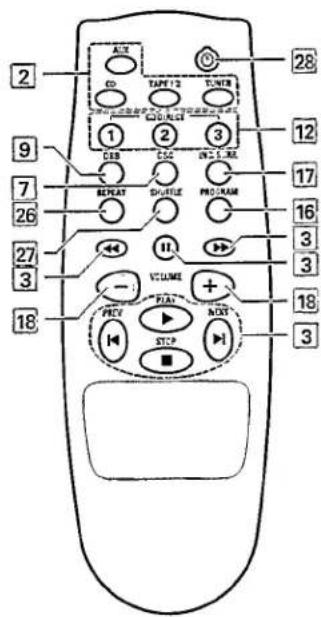
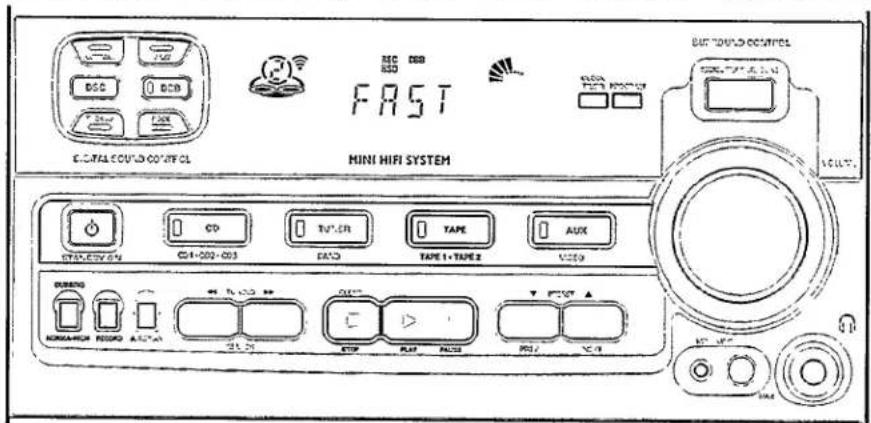
Controls on the system and remote control
1 STANDBY-ON
- to switch the system on or to standby mode.
- to store radio stations automatically by pressing and holding for 2 seconds.
2 SOURCE : to select the following.
CD / (CD 1•CD 2•CD 3)
- to select CD mode. When CD in stop mode; to select the respective disc tray.
TUNER / (BAND)
- to select Tuner mode. When in tuner mode; to select the waveband: FM or MW.
TAPE / (TAPE 1•TAPE 2)
- to select Tape mode. When tape in stop mode; to select either tape deck 1 or 2.
AUX / (VIDEO)
- to select sound from an external source (e.g. TV, Laser Disc, DVD or VCR player).
3 MODE SELECTION
SEARCH ◀◀ ▶▶ (TUNING ◀◀ ▶▶)
for CD ...... to search backward/forward.
for TUNER ..... to tune to a lower or higher radio frequency.
for TAPE ..... to rewind or fast forward on tape deck 2 only.
STOP ■ (CLEAR)
for CD ...... to stop CD playback or clear a program.
for TUNER ..... to stop programming.
for TAPE ...... to stop playback or recording.
PLAY PAUSE ▶ II
for CD ...... to start or interrupt playback.
for TAPE ...... to start playback.
PREV ◀ / NEXT ▶ (PRESET ▲ ▼)
for CD .... to skip to the beginning of the current or previous/next track.
for TUNER ..... to select a preset station in memory.
4 AUTO REPLAY (available in tape deck 2 only)
- to select playback mode either in continuous AUTO PLAY or ONCE only.
5 RECORD
- to start recording on tape deck 2 only.
6 DUBBING
— to dub a tape in normal or high speed.
7 DIGITAL SOUND CONTROL (DSC)
- to select the desired sound effect: OPTIMAL, JAZZ, ROCK or TECHNO.
8 DIGITAL SOUND CONTROL DISPLAY PANEL
- to view the selected DSC display.
9 DYNAMIC BASS BOOST (DBB)
— to switch on bass boost to enhance bass response or to switch off bass boost.
10 DISPLAY
- to view the current setting of the system.
11 CD CAROUSEL TRAY
12 3 CD DIRECT PLAY
- to select a CD tray for playback.
13 OPEN·CLOSE
- to open or close the CD carousel tray.
14 DISC CHANGE
- to change CD(s).
15 CLOCK•TIMER
- to view clock, set clock or timer.
16 PROGRAM
- to program CD tracks in CD mode or preset radio stations in tuner mode.
17 INCREDIBLE SURROUND
- to switch on or off the surround sound effect.
18 VOLUME
- to adjust the volume level.
19
- to connect headphones.
20 MIC LEVEL (not available for version /30)
— to adjust the mixing level for karaoke or microphone recording.
21 MIC (not available for version /30)
— to connect microphones jack.
22 OPEN
- to open tape deck 2.
23 TAPE DECK 2
24 TAPE DECK 1
25 OPEN
- to open tape deck 1.
26 REPEAT
- to repeat a CD track.
27 SHUFFLE
- to play all the available discs and their tracks in random order.
28
- to switch the system to standby mode.
Notes for remote control:
- First select the source you wish to control by pressing one of the source select keys on the remote control (e.g. CD, TUNER, TAPE 1/2 or AUX).
- Then select the desired function (PLAY, NEXT, etc.).

OPERATING THE SYSTEM


Important: Before you begin operating the system, complete the preparation procedures.
Demonstration mode
The system has a demonstration mode that shows the various features offered by the system. Whenever the system is switched on from the wall socket, the demonstration mode will start automatically.
Note:
- During demonstration mode, if you press any source (or standby-on) button, the system will switch to the respective (or standby) mode.
- When the system is switched to standby mode, 5 seconds later, the demonstration mode will resume.
To cancel demonstration mode
- Press and hold STOP ■ (on the system only) for 3 seconds to stop the demonstration.
→ The demonstration mode will be switched off permanently.
→ The system will switch to standby mode.
Easy Set
EASY SET allows you to store all available radio stations in a particular band (FM or MW) automatically.
- Press and hold STANDBY•ON (on the system only) for 2 seconds; when the system is in standby or demonstration mode.
→ "EASY SET" will be displayed and followed by "TUNER".
→ EASY SET will start with the last active band
→ All available radio stations with sufficient signal strength will be stored or until 40 presets are filled.
Notes
- When EASY SET is used, all previously stored stations will be erased.
- The last preset station will appear on the display when EASY SET is completed.
Switching the system ON
- Press STANDBY•ON (on the system only), CD, TUNER, TAPE or AUX.
You can also switch on the system by pressing any one of the 3 CD DIRECT PLAY buttons.
Switching the system to standby mode
- Press STANDBY•ON again.
→ The system will switch to standby mode.
OPERATING THE SYSTEM
Selecting the Source
- Press the respective source selection button: CD, TUNER, TAPE or AUX.
→ The display indicates the selected source.
Note:
- For an external source, make sure that you have connected the audio left and right OUT terminals of the external equipment (TV, VCR, Laser Disc or DVD player) to the AUX IN terminals.
Sound Control
Volume Adjustment
Adjust VOLUME to increase or decrease the sound level.
For Personal Listening
Connect the headphones plug to the ⏻ socket at the front of the system. The speakers will be muted.
Digital Sound Control (DSC)
The DSC feature enables you to enjoy special sound effects that have preset equalizer settings, providing the best music reproduction.
- Press DIGITAL SOUND CONTROL (DSC) to select OPTIMAL, JAZZ, ROCK or TECHNO.
→ The Digital Sound Control display panel will light up respectively.
→ "OPTIMAL, JAZZ, ROCK or TECHNO" will be displayed.
Automatic DSC-DBB selection
The best setting for the DBB is automatically generated for the respective DSC selection. You can manually select the DBB setting that best suits your listening environment.
| DSC Selection | DBB On/Off |
| Optimal | On |
| Techno | On |
| Rock | Off |
| Jazz | Off |
Dynamic Bass Boost (DBB)
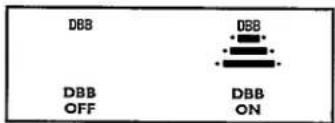
The DBB mode enhances the bass response.
- Press DBB to switch on bass boost.
→ The DBB button lights up.
→ "BBB ON" will be displayed.
To switch off DBB
- Press DBB again.
→ The DBB button light is switched off.
→ "BBB OFF" will be displayed.
Note:
- Some CDs or tapes might be recorded in high modulation. It may cause a distortion at high volume. If this occurs, switch off Incredible Surround (if available), DBB level or reduce the volume.
Incredible Surround
Normal stereo sound is determined by the distance between the front speakers. When Incredible Surround is switched on, it magnifies the virtual distance between the front speakers for an incredibly wide, enveloping, stereo effect.
- Press INCREDIBLE SURROUND to switch on.
→ The INCREDIBLE SURROUND button lights up.
→ "IS" will be displayed.
To switch off Incredible Surround
- Press INCREDIBLE SURROUND again.
→ The INCREDIBLE SURROUND button light is switched off.
→ "IS OFF" will be displayed.
CD


Loading the CD Changer
1 Press CD to select CD mode.
2 Press OPEN•CLOSE
→ The CD compartment slides out.
3 Load a CD with the printed side up in the right tray.
- You can load another disc in the left tray.
- To load the third disc, press the DISC CHANGE button.
- The CD changer carousel will rotate until the empty tray is at the right hand side and is ready for loading.
- Playback will always start with the disc in the outer right disc tray.
4 Press OPEN•CLOSE to close the CD compartment
→ The total number of tracks and playing time of the last selected disc appear on the display.
3 CD Direct Play
You can play a CD directly by pressing the 3 CD DIRECT PLAY (1 - 3) buttons. The CD player will stop at the end of playback of the selected disc.
- When the button is lighted, it indicates that there is a disc loaded in the disc tray.
Warning!
1) This system is designed for conventional CDs. Do not use any accessories like disc stabilizer rings or CD treatment sheets, etc., which may damage the CD mechanism.
2) Do not load more than one disc into each tray.
3) When the CD changer is loaded with CD(s), do not turn over or shake the system. This may jam the changer.
You can load up to three discs in the CD changer for continuous playback without interruption.
CD
Playing a CD
1 Press PLAY ▶ to start playback.
→ The disc tray, track number and elapsed playing time of the current track appear on the display.
• To interrupt playback, press PAUSE II.
→ The playing time flashes.
• To resume playback, press PLAY ▶ again.
2 To stop playback, press STOP ■.
Note:
- All the available discs will play once, then stop. When the CD has stopped playing, the system will switch to the standby mode after 15 minutes if no button is pressed.
Disc Change
You can change the outer 2 discs while the third inner disc is at the stop or playing mode.
1 Press DISC CHANGE.
→ The CD compartment slides out.
2 Replace the discs in the left and right disc trays.
If you press DISC CHANGE again during playback, the CD will stop playing.
→ The CD carousel tray will rotate until the inner tray is at the right hand side and is ready for changing.
3 Press OPEN•CLOSE to close the CD compartment.
Selecting a desired track
Selecting a desired track at the stop mode
1 Press PREV ◀ or NEXT ▶ until the desired track appears on the display.
2 Press PLAY ▶ to start playback.
→ The selected track number and elapsed playing time appear on the display.
Selecting a desired track during playback
1 Press PREV ◀ or NEXT ▶ until the desired track appears on the display.
→ The selected track number and elapsed playing time appear on the display.
- If you press PREV ▶ once it will skip to the beginning of the current track and play the track again.
Searching for a particular passage during playback
- Press and hold ◀◀ or ▶▶ until the desired passage is located.
→ The volume will be reduced. - Play returns to normal when or is released.
Programming Tracks
Programming tracks of a loaded CD is possible in the stop mode. The display will indicate the total tracks stored in the program. Up to 40 tracks can be stored in the memory in any order. When 40 tracks are stored and you attempt to store another track, the display will show "PROGRAM FULL".
1 Load the desired discs in the disc trays.
2 Press PROGRAM to start programming.
→ The PROGRAM flag starts flashing.
3 Press the CD 1•CD 2•CD 3 button to select the disc.
4 Press PREV ◀ or NEXT ▶ to select the desired track.
5 Press PROGRAM to store the track.
- Repeat steps 3 to 5 to store other discs and tracks.
6 Press STOP ■ once to end programming mode.
→ The total number of tracks programmed and total playing time appear on the display.
Note:
- If the total playing time is more than "39:59" or if one of the programmed tracks has a number greater than 30, then "--:" appears in the display instead of the total playing time.
- During programming, if no button is pressed within 20 seconds, the system will exit program mode automatically.
CD

Playing the program
1 Press PLAY ▶ to start program playback.
→ "PLAY PROGRAM" appears on the display.
→ The track number and elapsed playing time of the current track will appear on the display.
- If you press REPEAT during program playback, the current track will be played repeatedly.
→ The REPEAT and PROGRAM flags will be displayed.
2 Press STOP ■ to stop program playback.
Note:
- If you press any of the 3 CD DIRECT PLAY buttons, the system will play the selected disc or track and the stored program will be ignored temporarily. The PROGRAM flag will also temporarily disappear from the display and then reappear when the playback for the selected disc ends.
Reviewing the program
Reviewing of the program is only possible in the stop mode.
- Press PREV ◀ or NEXT ▶I repeatedly to review the programmed tracks.
- Press STOP ■ to exit review mode.
Erasing the program (in the stop mode)
- Press CLEAR on the system.
→ "PROGRAM CLEARED" will be displayed.
Note:
- The program will be erased when the system is disconnected from the power supply. If the CD carousel is opened, the tracks belonging to the outer two trays will be erased and the display will show "CERARED".
Shuffle (only on remote control)
It will play all the available discs and their tracks in random order. Shuffle may also be used when tracks are programmed.
To shuffle all the discs and tracks
1 Press SHUFFLE
→ "SHUFFLE" will be displayed.
— The SHUFFLE flag, the disc and the track selected at random appear on the display.
- The discs and the tracks will now be played in random order until you press STOP ■.
- If you press REPEAT during shuffling, the current track will be played repeatedly.
→ The REPEAT and SHUFFLE flags will be displayed.
2 Press SHUFFLE again to resume normal playback.
→ The SHUFFLE flag disappears from the display.
Repeat (only on remote control)
It will play the current track repeatedly.
1 Press REPEAT during CD playback.
→ "REPEAT TRACK" will be displayed.
→ The REPEAT flag appears on the display.
- The track will now be played repeatedly until you press STOP ■.
2 Press REPEAT again to resume normal playback.
→ The REPEAT flag disappears from the display
TUNER
Easy Set
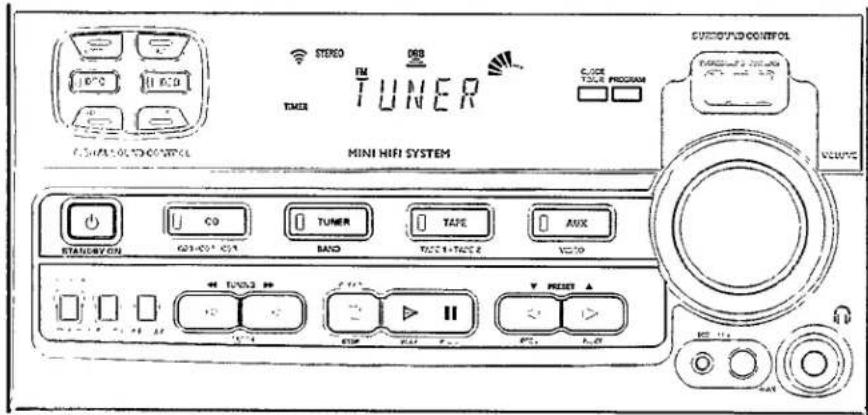
EASY SET allows you to store all available radio stations in a particular band (FM or MW) automatically.
- Press and hold STANDBY•ON (on the system only) for 2 seconds; when the system is in standby or demonstration mode.
→ "CASY SET" will be displayed and followed by "TUNER".
→ EASY SET will start with the last active band.
→ All available radio stations with sufficient signal strength will be stored or until 40 presets are filled. Notes :
- When EASY SET is used, all previously stored radio stations will be erased.
- The last preset radio station will appear on the display when EASY SET is completed.
Tuning to radio stations
1 Press TUNER to select TUNER mode.
→ "TUNER" will be displayed.
A few seconds later, the current frequency or the radio station name if available will be displayed.
2 Press TUNER (BAND) again to select the desired waveband: FM or MW.
3 Press TUNING ◀◀ or ▶▶ for more than one second, then release.
→ The display will show 'SEARCH' until a radio station with sufficient signal strength is found.
- Repeat this procedure until the desired station is reached.
- To tune to a weak station, briefly press TUNING ◀◀ or ▶▶ until the display shows the desired frequency and/or when the best reception has been obtained.
Storing Preset Stations
You can store up to 40 radio stations in the memory. When a preset radio station is selected, the preset number appears next to the frequency on the display.
Automatic programming
1 Press TUNER.
2 Press TUNER (BAND) again to select the desired waveband : FM or MW.
3 Press PROGRAM for more than one second.
— PROGRAM flag starts flashing and 'RUTO' will be displayed.
— Every available station for the selected waveband will be stored automatically. The frequency and preset number will be displayed briefly.
— The system will stop searching when all the available radio stations are stored or when the memory for 40 preset radio stations is used.
→ The system will remain tuned to the last stored preset radio station.
- Repeat the above procedure to store other preset radio stations for the other waveband. Remember to select the next available preset number before proceeding. If not, some of the preset radio stations may be erased.
Notes:
- You can cancel the automatic programming by pressing PROGRAM or STOP ■ on the system only.
- If you want to reserve a section of preset numbers, for example preset numbers 1 to 9, select preset 10 before starting automatic programming: now only the preset numbers 10 to 40 will be programmed.

TUNER

Manual programming
1 Press TUNER.
2 Press TUNER (BAND) to select the desired waveband : FM or MW.
3 Press PROGRAM for less than one second.
→ PROGRAM flag, the frequency and preset number start flashing.
→ The next available preset number will be displayed for selection.
4 Press TUNING ◀◀ or ▶▶ to tune to the desired frequency.
- If you wish to store the radio station to another preset number, press PRESET ▼ or ▲ to select the desired preset number.
5 Press PROGRAM again.
- PROGRAM flag will stop flashing, and the radio station will be stored.
- Repeat the above procedure to store other preset radio stations.
Notes:
- When 40 radio stations are stored and you attempt to store another radio station, the display will show "PROGRAM FULL". If you want to change an existing preset number; repeat steps 4 and 5.
- You can cancel manual programming by pressing STOP ■ on the system only.
- During programming, if no button is pressed within 20 seconds, the system will exit program mode automatically.
Tuning to Preset Radio Stations
- Press PRESET ▼ or ▲ to select the desired preset number.
→ The preset number, frequency and waveband appear on the display
Changing the MW tuning grid
(not available for version /30)
The frequency step can be changed if necessary. In North and South America, the frequency step between adjacent channels in the MW band is 10 kHz. In other parts of the world, it is 9 kHz. The frequency step preset in the factory is 9 kHz.
For MW Band
To change from 9 kHz to 10 kHz or vice versa
Changing of tuning grid will erase all previously stored preset stations.
1 Disconnect the system from the AC power supply (pull out the AC power cord).
2. Press and hold TUNER and TUNING ▶▶ while reconnecting the system to the AC power supply
→ Display will show "GRID 10" or "GRID 9"
Notes:
- GRID 9 indicates that the tuning grid is in step of 9 kHz in MW band. GRID 10 indicates that the tuning grid is in step of 10 kHz in MW band.
- FM tuning grid will also be changed from 50 kHz to 100 kHz or vice versa. All preset stations will also be erased.
TAPE

Loading a tape
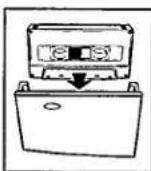
- Press OPEN.
• The tape deck door opens. - Load the tape with the open side downward and the full spool to the left.
- Close the tape deck door.

Tape Playback
1 Press TAPE to select TAPE mode.
→ "TRAPE 1" or "TRPE 2" will be displayed.
- Press TAPE again to select either tape deck 1 or tape deck 2.
2 Load the tape into the selected tape deck.
3 Press PLAY ▶ to start playback.
3a (For Tape Deck 2 only)
Press A. REPLAY to select the different type of play mode (see auto replay).
4 Press STOP ■ to end playback.
Note:
- When the tape has stopped playing, the system will switch to the standby mode automatically after 15 minutes if no button is pressed.
TAPE
AUX

Auto Replay (only on tape deck 2)
- Press A. REPLAY to select either continuous AUTO REPLAY or ONCE during tape playback.
→ "AUTO REPLAY" or "ONCE" will be displayed.
Notes:
- This feature is available during tape playback only.
- When RUTO REPLAY is selected, the tape will rewind automatically at the end of playback for the selected side. Then it will start playing again. It will replay up to a maximum of 20 times or when you press STOP ■.
- When ONCE is selected, the tape will play the selected side once and then stop.
Rewind/Fast Forward (only on tape deck 2)
At the stop mode
1 You can rewind or fast forward the tape by pressing ◀◀ or ▶▶ respectively.
→ "«" or "»" will be displayed depending on which button is pressed.
→ The tape will stop automatically at the end of the rewinding or fast forwarding.
2 Press STOP ■ to stop rewind or fast forward.
During playback
- Press and hold ◀◀ or ▶▶ respectively until the desired passage is located.
- During searching, the sound is reduced to a low volume.
→ When you release ◀◀ or ▶▶, the tape continues playing.
Notes:
- During rewinding or fast forwarding of a tape, it is possible to select another source (e.g. CD, TUNER or AUX).
- Check and tighten slack tape with a pencil before use. Slack tape may get jammed or may burst in the mechanism.
- C-120 tape is extremely thin and is easily deformed or damaged. It is not recommended for use in this system.
- Store the tapes at room temperature and do not put them too close to a magnetic field (for example, a transformer, TV or loudspeaker boxes).
Selecting External Equipment
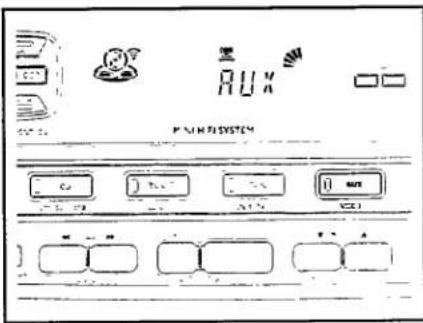
If you have connected the audio out terminals of the external equipment (TV, VCR, Laser Disc or DVD player) to the AUX IN terminals, you can hear the enhanced sound from the system.
- Press AUX to select the external mode.
→ "RUX" will be displayed.
Note:
- All the sound control features (e.g. DSC, DBB, etc.) are available for selection.
KARAOKE
RECORDING
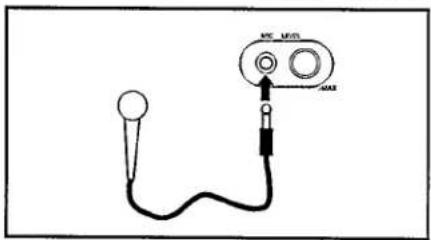
Microphone Mixing
(not available for version /30)
1 Set the MIC LEVEL control to the minimum level to prevent acoustic feedback (e.g. a loud howling sound) before you connect the microphone.
2 Connect a microphone to the MIC socket.
3 Press CD, TUNER, TAPE or AUX.
4 Play the selected source.
5 Adjust the volume level with VOLUME control.
6 Adjust the MIC LEVEL control to the mixing level that you want.
7 Start singing or talking through the microphone.

Notes:
- If you do not intend to record via the microphone, unplug the microphone to avoid accidental mixing with other recording source.
- For recording, use only tape of IEC type I (normal tape).
— The tape is secured at both ends with leader tape. At the beginning and end of tape, nothing will be recorded for six to seven seconds. - The recording level is set automatically, regardless of the position of VOLUME, DBB or Incredible Surround.
- To prevent accidental recording, break out the tab on the left shoulder of the tape side that you want to protect.
- If CHECK TRPC is displayed, the protection tab has been broken. Put a piece of clear adhesive tape over the opening. Do not cover the Chrome tape detection hole when covering the tab opening.
Recording the mixed sound / One Touch Recording
- During microphone mixing (not available for version / 30), you can record the mixed sound on a tape in tape deck 2.
- For One Touch Recording, as soon as you press RECORD, the current source will be recorded on tape deck 2.
1 Load a blank tape in tape deck 2.
2 Press RECORD to start recording. → REC flag starts flashing.
3 Press STOP ■ to stop recording.

Note:
- When you press RECORD at TAPE mode, "SELECT OTHER SOURCE" will be displayed. One Touch Recording is not possible at TAPE mode.
Dubbing tapes (from tape deck 1 to tape deck 2)
1 Press TAPE to select tape deck 2.
2 Load the prerecorded tape into tape deck 1 and a blank tape into tape deck 2.
→ Make sure that the tape in tape deck 1 has its full spool to the left.
3 Press DUBBING once for normal speed dubbing or twice within 2 seconds for high speed dubbing.
→ "NORMAL" (normal speed) or "FIRST" (high speed)
will be displayed and then followed by
"DUBBING".
→ HSD flag appears on the display for high speed dubbing.
- Dubbing will start immediately.
→ REC flag starts flashing.
4 Press STOP ■ to stop dubbing.
Notes:
- At the end of side A, flip the tapes to side B and repeat the procedure.
- Dubbing of tapes is only possible from tape deck 1 to tape deck 2.
- To ensure good dubbing, use tapes of the same length.
- During high speed dubbing in Tape mode, the sound is reduced to a low volume.
- You can switch to other source while dubbing.
CD Synchro Start Recording
1 Load a blank tape into tape deck 2 and a disc into the disc tray.
2 Press CD to select CD mode.
→ You can program the tracks in the order you want them to be recorded (see Programming Tracks). If not, the tracks are recorded according to the selected disc.
3 Press RECORD to start recording.
→ REC flag starts flashing.
• CD will start playback automatically.
4 Press STOP ■ to stop recording.
Recording from other sources (only on tape deck 2)
1 Load a blank tape into tape deck 2.
2 Press CD, TUNER or AUX.
- Start playback of the selected source.
3 Press RECORD to start recording.
→ REC flag starts flashing.
4 Press STOP ■ to stop recording.
Note:
— During recording, it is not possible to listen to another sound source.
View Clock
You can view the clock (if it is set) at standby or any source mode. It will be displayed for about 7 seconds
- Press CLOCK•TIMER briefly.
→ "10:25" (the current time) will be displayed
→“- - : - -”will be displayed if the clock is not set.
Clock Setting
The clock is set in 24-hour mode, e.g. "00:00" or "23:59". Before setting the clock, you must be in the View Clock mode.
1 Press CLOCK•TIMER to select clock mode.
→ "00:00" or the current time starts flashing.
→ "◀◀,▶▶, |◀,▶|, ■ light up.
2 Set the hour with
3 Set the minute with ◀ or ▶
4 Press CLOCK•TIMER again to store the setting → The clock starts running.
• To exit without storing the setting, press STOP ■
Notes:
- During clock setting, if no button is pressed within 90 seconds, the system will exit clock setting mode automatically.
- When a power interruption occurs, the clock setting is erased.
TIMER

Timer Setting
- The system can switch on to CD, TUNER or TAPE 1 mode automatically at a preset time. It can serve as an alarm to wake you up. After half an hour from the preset time, the system will return to the standby mode if no button is pressed.
- Before setting the timer, make sure the clock is set correctly.
- The timer has to be reset or start again for each subsequent preset time.
- The volume of the timer will be at the last setting before the set is switched to standby mode.
1 Press and hold CLOCK•TIMER for more than 2 seconds to select timer mode.
→ "ON 00:00" or the last set timer starts flashing.
The TIMER flag flashes.
→ The last selected source is lighted while other available sources are flashing.
→ "◀◀,▶▶,◀,▶|,■" light up.
2 Press CD, TUNER or TAPE to select the desired source.
3 Press ◀◀ or ▶▶ to set the hour for the timer to start.
4 Press ◀ or ▶ to set the minute for the timer to start.
5 Press CLOCK•TIMER to store the start time.
→ The TIMER is now set.
→ The TIMER flag remains on the display.
• To exit without storing the setting, press STOP ■.
- At the preset time, the TIMER will be activated.
→ The selected source will be played.
→ The TIMER flag disappears from the display.

Notes:
- During timer setting, if no button is pressed within 90 seconds, the system will exit timer setting mode automatically.
- If the source selected is TUNER, the last tuned frequency will be switched on.
- If the source selected is CD, playback will begin with the first track of the last selected disc. If the CD trays are empty, the TUNER will be selected instead.
- If the source selected is TAPE 1, and if the preset time is reached during high speed dubbing, the TUNER source will be selected instead.
To cancel the TIMER
1 Press CLOCK•TIMER for more than 2 seconds.
2 Press PAUSE II to cancel the timer.
→ "CANCEL" will be displayed.
→ The TIMER flag disappears from the display.
To start the TIMER again (for the same time)
1 Press CLOCK•TIMER for more than 2 seconds.
2 Press CLOCK•TIMER again to store the start time and the selected source.
MAINTENANCE
SPECIFICATIONS

Maintenance
Cleaning the Cabinet
- Use a soft cloth slightly moistened with a mild detergent solution. Do not use a solution containing alcohol, spirits, ammonia or abrasives.
Cleaning Discs
- When a disc becomes dirty, clean it with a cleaning cloth. Wipe the disc from the center out.
- Do not use solvents such as benzine, thinner, commercially available cleaners, or antistatic spray intended for analog records.

Cleaning the CD lens
After prolonged usage, dirt or dust may accumulate at the CD lens. To ensure good playback quality, clean the CD lens with Philips CD Lens Cleaner or any commercially available. Follow the instructions supplied with the Lens Cleaner.
Cleaning the Heads and the Tape Paths
- To ensure good recording and playback quality, clean the heads, the capstan(s), and pressure roller(s) after every 50 hours of tape operation.
- Use a cotton swab slightly moistened with cleaning fluid or alcohol.
- You can also clean the heads by playing a cleaning tape through once.
Demagnetizing the heads
- Use a demagnetizing tape available at your dealer.
Specifications
AMPLIFIER
Output power
PMPO 800 W
Signal-to-noise ratio ≥ 75 dBA (IEC)
Frequency response 60-16,000Hz,±3dB
Input sensitivity
Aux In.... 500mV
Microphone (not available for version /30) .... 2.5 mV
Output
Speakers .... ≥ 6 Ω
Headphones.... 32 Ω - 1000 Ω
(1) ±1dB
CD PLAYER
Number of programmable tracks 40
Frequency range 40 - 20000 Hz
Signal-to-noise ratio ≥ 80 dBA
Channel separation ≥ 60 dB (1 kHz)
Total harmonic distortion .... <0.003%
TUNER
FM wave range 87.5-108 MHz
MW wave range (9 kHz) 531-1602 kHz
MW wave range (10 kHz) 530-1700 kHz
Tuning grid 9/10 kHz
Number of presets 40
Antenna FM 75Ω wire
AM Loop antenna
TAPE DECK
Frequency range
Chrome tape (type II) 80 - 14000 Hz (8 dB)
Normal tape (type I) 80 - 12500 Hz (8 dB)
Signal-to-noise ratio Chrome tape (type II) .... ≥ 52 dBA Normal tape (type I) .... ≥ 48 dBA Wow and flutter .... ≤ 0.4% JIS
SPEAKERS
System 2 way; Double port bass reflex
Impedance 6Ω
Woofer 1x55'
Tweeter.... 1×2.5" Polydome
Dimensions (w x h x d) 210 x 310 x 230 (mm)
Weight 2.9kg
GENERAL INFORMATION
Material/finish Polystyrene
AC Power .... 110-127/220-240V; 50/60Hz; Switchable
Power Consumption
Active 44 W
Standby ≤ 14 W
Dimensions (w x h x d) 265 x 330 x 310 (mm)
Weight (without speakers) 591g
Subject to modification
TROUBLESHOOTING
Warning! Under no circumstances should you try to repair the system yourself, as this will invalidate the warranty.
- If a fault occurs, check the points listed below before taking the system for repair.
- Should any problems persist after you have made these checks, consult your nearest dealer or service center.
CD Player Operation
"NO DISC" is displayed.
• The disc is inserted upside down.
→ Place CD with printed side up.
• Moisture condensation at the lens.
→ Wait until lens has adjusted to normal room temperature.
• There is no disc in the CD tray.
→ Insert a CD.
• The CD is dirty, badly scratched or warped.
→ Clean or replace the CD.
• The CD lens is dirty or dusty
→ See section under Maintenance.
Radio Reception
Poor radio reception
• The signal strength is too weak.
→ Adjust the antenna.
• The TV or VCR is too close to the stereo system.
→ Separate the stereo system from the TV or VCR.
→ Connect an external antenna for better reception.
Tape Deck Operation
"RECORDING ACTIVE" is displayed.
• A recording is in progress.
→ Stop the recording or wait until it is finished.
"TRAPE DUBBING ONLY" is displayed.
- Tape dubbing is only possible in tape mode.
→ Switch source to tape mode.
Recording or playback cannot be made or there is a decrease in audio level.
- Dirty tape heads, capstans or pressure rollers.
→ See section on tape deck maintenance.
• Magnetic build-up in the record/playback head.
→ Use demagnetizing tape.
General
System does not react when any button is pressed.
• Electrostatic discharge.
→ Press STANDBY-ON to switch the system off. Remove the AC power plug from the wall outlet, then reconnect and switch on the system again.
No or poor sound.
• Volume is not turned up.
→ Adjust VOLUME.
• The headphones are connected.
→ Disconnect the headphones.
- Speakers are not connected or are connected wrongly.
→ Check that the speakers are connected correctly.
→ Make sure that the stripped speaker wire is clamped.
Reversed left and right sound.
- Speakers are connected wrongly.
→ Check the speaker connections and location.
Lack of bass sound or apparently imprecise physical location of musical instruments.
- Speakers are connected wrongly.
→ Check the speaker connection for proper phasing, red/black wires to red/black terminals.
Remote control has no effect on the system.
• The distance to the system is too large.
→ Reduce the distance.
• Batteries are inserted incorrectly.
- Insert the batteries with their polarities (+/- signs) as indicated..
• Batteries are exhausted.
→ Replace the batteries.
- Wrong source is selected.
→ Select the source (CD, TUNER, etc.) before pressing the function button, (PLAY, PREV/NEXT, etc.).
Timer not working.
- Timer is not switched on.
→ Press CLOCK•TIMER to switch on the timer.
• Dubbing/recording is in progress.
→ Stop dubbing/recording.
System displays features automatically; buttons flash continuously.
• Demonstration mode is switched on.
→ Press and hold STOP ■ for 3 seconds to switch off the demonstration.
AUSTRALIA – Philips product warranty for Australia
Warranty conditions valid for Colour Television, Video Cassette Recorders, Audio Systems, and Portable Audio.
The benefits given to the purchaser by this warranty are in addition to all other rights and remedies which the purchaser has in respect of the product under the Trade Practices Act or other Commonwealth or State Law. Philips Sound and Vision warrants it's products to the purchaser as follows and subject to the stated conditions.
12 months free service
Any defect in materials or workmanship in the product occurring within 12 months from the original date of purchase will be rectified free of charge by Philips Service or one of our authorised service centers.
Conditions of warranty
- All claims for warranty service should be made to your nearest Philips Service Branch or to a Philips authorised service dealer. Reasonable evidence of date of purchase must be provided.
- This warranty extends only to defects occurring under normal use of the product when operated in accordance with the instructions.
- Home service within the normal service area of Philips Service or one of our authorised service centres will be provided for television receivers with screen size 59cm and above. All other products are to be brought or sent to your nearest Philips Service Branch or to an authorised service centre.
- This warranty does not cover:
a) Mileage or traveling time, pickup or delivery, cost of insurance.
b) Service costs arising from failure to correctly adjust the controls of the product or to observe the instructions, or inspections that reveal that the product is in normal working order.
c) Product failures caused by misuse, neglect, normal wear and tear, accidental breakage, transit damage, inexpert repairs or modification by unauthorised persons, lightning strikes, vermin intestation or liquid spillage.
d) Cleaning of video or audio heads.
e) Inadequate receiving antennae.
f) Replacement of worn or used batteries, styli or other consumables.
The conditions contained in this warranty replace and override the provisions of the World-Wide Guarantee for Products sold in Australia.
Philips Service Branches
To contact your nearest Philips Service Branch call
13-13-92 from anywhere in Australia.
Sydney
Technology Park, Australia Centre
3 Figtree Drive, Homebush NSW 2140
Newcastle &-Central Coast
984 Hunter Street, Newcastle West NSW 2302
Perth
1 Fredrick Street, Belmont WA 6104
Melbourne
Cnr Wellington &, Springvale Roads, Mulgrave VIC 3170
Brisbane
10 Graystone Street, Tingalpa QLD 4173
Also Service Centres:
Adelaide
348 Torrens Road, Croydon Park SA 5008
Hobart
2A Pierce Street, Moonah TAS 7009
Wollongong
1/216 Corrimal Street, Wollongong NSW 2500
Canberra
Unit F, 66–70 Maryborough Street, Fyshwick ACT 2609
Service is also provided through 1,200 accredited service dealers throughout Australia. To find out about your nearest centre, call 13 13 92.
Call us direct on the Philips Customer Helpline
Philips customer care lasts as long as you keep the product. Whenever you need any information on the care or operation of your product, remember it's always best to go straight to the source. Phone Philips Helpline direct on
13 13 91
7 days a week
- your call is always welcome.
Please record the following information for your records and keep in a safe place.
Model No:
Serial No:
Please retain your purchase receipt which is required to claim service under warranty.
Philips Electronics Australia Limited
ACN 008 445 743, 3 Figtree Drive
Homebush NSW 2140
Version 2, 08/97, FPCP-030
Guarantee and Service for New Zealand
Thank-you for purchasing this quality Philips product. Philips New Zealand Ltd guarantees this product against defective components and faulty workmanship for a period of 12 months. Any defect in materials or workmanship occurring within 12 months from the date of purchase subject to the following conditions will be rectified free of charge by the retailer from whom this product was purchased.
Conditions
-
The product must have been purchased in New Zealand. As proof of purchase, retain the original sales docket indicating the date of purchase.
-
The guarantee applies only to faults caused by defective components, or faulty workmanship on the part of the manufacturer.
- The guarantee does not cover failures caused by misuse, neglect, normal wear and tear, accidental breakage, use on the incorrect voltage, use contrary to operating instructions, or unauthorised modification to the product or repair by an unauthorised technician.
- Reasonable evidence (in the form of a sales docket) must be supplied to indicate that the product was purchased no more than 12 months prior to the date of your claim.
- In the event of a failure, Philips shall be under no liability for any injury, or any loss or damage caused to property or products other than the product under guarantee.
This guarantee does not prejudice your rights under common law and statute, and is in addition to the normal responsibilities of the retailer and Philips.
How to claim
Should your Philips product fail within the guarantee period, please return it to the retailer from whom it was purchased. In most cases the retailer will be able to satisfactorily repair or replace the product. However, should the retailer not be able to conclude the matter satisfactorily, or if you have other difficulties claiming under this guarantee, please contact
The Guarantee Controller
Philips New Zealand Ltd.
P.O. Box 41.021
Auckland
(09) 84 94 160
fax (09) 84 97 858
Garantía para México
Este aparato está fabricado con materiales de alta calidad y ha sido cuidadosamente verificado Philips, por lo tanto, da a usted una garantía de 12 meses a partir de su fecha de compra.
La garantiá ampara la reposición de las piezas defectuosas debidas a fallas en su montaje o en los materiales, incluyendo la mano de obra necesaria para su reemplazo en nuestras Sucursales o talleres autorizados. En caso de fallas en su aparato le rogamos se sirva poner en contacto con su distribuidor.
Esta garantía no cubrirá las averías que resulten como consecuencia de una instalación incorrecta del aparato, manifiesto maltrato o uso inadecuado del mismo.
Philips se obliga a reparar y devolver a usted su aparato en un plazo no mayor de 30 días hábiles contados a partir de la fecha de haber ingresado su aparato a uno de nuestros talleres.
Para que esta garantía sea válida, es necesario que el certificado que figura en la parte posterior de esté instructivo haya sido debidamente llenado en el momento de la compra del aparato.
En caso de extravío del certificado con la presentación de la factura o remisión de su aparato podrá hacer efectiva la garantía correspondiente.
Si usted tiene alguna duda o pregunta que no le pueda solucionar su distribuidor, por favor ponerse en contacto con:
Centro de Servicio Philips
Blvd. de los Ferrocarriles No.339
Col. Industrial Vallejo, 02300
México, D.F.
728-4200
Centro de Información al Consumidor
368-77 88 ó 91 (800) 504-62 00

-
2017年1月1日,公司召开2017年第一次临时股东大会,并通知全体董事。
-
12 (a) 12 (b) 12 (c) 12 (d) 12 (e) 12 (f) 12 (g) 12 (h) 12 (i) 12 (j) 12 (k) 12 (l) 12 (m) 12 (n) 12 (o)

"Meet PHILIPS at the internet http://www.philips.com"
FW 356C

3139 116 17921
TL-9814/21-5
- PHILIPS
- INDEX
- México
- CONTENTS
- GENERAL INFORMATION
- SAFETY INFORMATION
- Environmental Information
- Accessories (Supplied)
- PREPARATION
- Rear Connections
- AM Antenna Connection
- FM Wire Antenna Connection
- Outdoor Antenna
- © Speaker Connections
- Connecting other equipment to your system
- ⑤ Adjusting the Operating Voltage (not available for version /30)
- ⑤ AC Power Supply
- Inserting batteries into the Remote Control
- CONTROLS
- Controls on the system and remote control
- OPERATING THE SYSTEM
- Demonstration mode
- Note:
- To cancel demonstration mode
- Easy Set
- Notes
- Switching the system ON
- Switching the system to standby mode
- Selecting the Source
- Sound Control
- Volume Adjustment
- Digital Sound Control (DSC)
- Automatic DSC-DBB selection
- Dynamic Bass Boost (DBB)
- To switch off DBB
- Incredible Surround
- To switch off Incredible Surround
- CD
- Loading the CD Changer
- CD Direct Play
- Warning!
- Playing a CD
- Disc Change
- Selecting a desired track
- Selecting a desired track at the stop mode
- Selecting a desired track during playback
- Searching for a particular passage during playback
- Programming Tracks
- Playing the program
- Reviewing the program
- Erasing the program (in the stop mode)
- Shuffle (only on remote control)
- To shuffle all the discs and tracks
- Repeat (only on remote control)
- TUNER
- Tuning to radio stations
- Storing Preset Stations
- Automatic programming
- Press TUNER.
- Notes:
- Manual programming
- Tuning to Preset Radio Stations
- Changing the MW tuning grid
- For MW Band
- Changing of tuning grid will erase all previously stored preset stations.
- TAPE
- Loading a tape
- Tape Playback
- AUX
- Auto Replay (only on tape deck 2)
- Rewind/Fast Forward (only on tape deck 2)
- At the stop mode
- During playback
- Selecting External Equipment
- KARAOKE
- RECORDING
- Microphone Mixing
- Recording the mixed sound / One Touch Recording
- Dubbing tapes (from tape deck 1 to tape deck 2)
- CD Synchro Start Recording
- Recording from other sources (only on tape deck 2)
- View Clock
- Clock Setting
- TIMER
- Timer Setting
- To cancel the TIMER
- MAINTENANCE
- SPECIFICATIONS
- Cleaning the Cabinet
- Cleaning Discs
- Cleaning the CD lens
- Cleaning the Heads and the Tape Paths
- Demagnetizing the heads
- AMPLIFIER
- CD PLAYER
- TAPE DECK
- SPEAKERS
- TROUBLESHOOTING
- CD Player Operation
- Radio Reception
- Tape Deck Operation
- General
- AUSTRALIA – Philips product warranty for Australia
- months free service
- Conditions of warranty
- Philips Service Branches
- Sydney
- Newcastle &-Central Coast
- Perth
- Melbourne
- Brisbane
- Adelaide
- Hobart
- Wollongong
- Canberra
- Call us direct on the Philips Customer Helpline
- 13 91
- days a week
- Please retain your purchase receipt which is required to claim service under warranty.
- Guarantee and Service for New Zealand
- Conditions
- How to claim
- The Guarantee Controller
- Auckland
- Garantía para México
- Centro de Servicio Philips
- México, D.F.
Marque : PHILIPS
Modèle : FW 356C
Catégorie : Système Hi-Fi