
SX-AX3 Midi - Clavier TECHNICS - Notice d'utilisation et mode d'emploi gratuit
Retrouvez gratuitement la notice de l'appareil SX-AX3 Midi TECHNICS au format PDF.


| Marque | Technics |
| Modèle | SX-AX3 |
| Type de produit | Clavier arrangeur |
| Nombre de touches | 61 touches sensitives |
| Dimensions (L x P x H) | 96 x 37 x 13 cm |
| Poids | 8 kg |
| Alimentation | Adaptateur secteur 12V DC (inclus) |
| Polyphonie | 32 notes |
| Nombre de sons | 100 sons internes |
| Rythmes | 100 rythmes intégrés |
| Effets | Reverb, chorus, arpège |
| Connectique MIDI | MIDI In / Out / Thru |
| Autres connecteurs | Casque, sortie audio, pédale sustain |
| Fonctions principales | Accompagnement automatique, enregistrement, leçon |
| Entretien et nettoyage | Nettoyer avec un chiffon doux et sec ; éviter l'humidité |
| Sécurité | Ne pas exposer à l'eau ; débrancher en cas d'orage |
| Pièces détachées et réparabilité | Adaptateur, câbles MIDI, supports disponibles |
| Informations générales | Clavier électronique polyvalent pour l'apprentissage et la création musicale |
FOIRE AUX QUESTIONS - SX-AX3 Midi TECHNICS
Questions des utilisateurs sur SX-AX3 Midi TECHNICS
0 question sur cet appareil. Repondez a celles que vous connaissez ou posez la votre.
Poser une nouvelle question sur cet appareil
Téléchargez la notice de votre Clavier au format PDF gratuitement ! Retrouvez votre notice SX-AX3 Midi - TECHNICS et reprennez votre appareil électronique en main. Sur cette page sont publiés tous les documents nécessaires à l'utilisation de votre appareil SX-AX3 Midi de la marque TECHNICS.
MODE D'EMPLOI SX-AX3 Midi TECHNICS
Technics
MIDI
sx-AX3
sx-AX5
sx-AX7
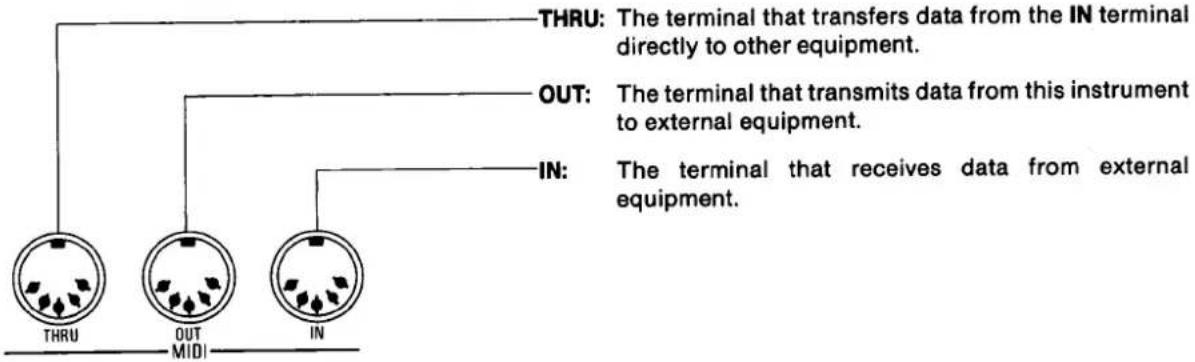
MIDI Terminals
MIDI (Musical Instrument Digital Interface) is the standard specification that enables connection to equipment such as keyboards and personal computers. Data transmission and reception are possible between the Technics Synthesizer Keyboard and equipment provided with MIDI terminals.
- Use a 5-pin DIN cord (less than 15 m long) for these connections.
This keyboard can transmit or receive data for SOLO, POLY, BASS, ACCOMP, DRUMS and CONTROL parts.
The following kinds of data can be transmitted/received
■ Key note (keyboard on/off) data
■ Velocity data (AX3: receive only)
■ Pitch bend data
■ Control change data
- modulation
- balance
• main volume, expression pedal
- sustain
- portamento
- rhythm variation
• ending, fill in & intro
- chorus
■ Program change data (voice for each part, and DRUMS instrument)
■ Song select data (AX5/AX7)
■ Clock signal
■ Start/stop data
Setting MIDI functions
Here is an outline of the procedures for setting the various MIDI functions:

flowchart
graph TD
    A["Enter the MIDI function-setting mode."] --> B["Set the functions for each part."]
    B --> C{Select the part.}
    C --> D["Repeat for each part."]
    D --> E["Set the functions common to all parts.<br>• MIDI CLOCK<br>• Song select<br>• START/STOP<br>• PITCH BEND<br>• MODULATION wheel<br>• BALANCE<br>• Main volume-Expression pedal<br>• PORTAMENTO<br>• Key note control (MIDI KEY ASSIGN, KEY NOTE ONLY, TRANSPOSE, AUTO PLAY CHORD, PANEL MEMORY)"]
    E --> F["Exit the MIDI function-setting mode."]
I. Enter the MIDI function-setting mode
- Press the RECORD button. The indicator flashes.

- Press the MODE SET button. The indicator flashes slowly.
II. Set the functions for each part
■ Select the part
-
Select the part whose functions you wish to set first with the left ⊕ and ⊖ buttons.
-
The indicator for the selected part will appear on the MUSICAL DISPLAY.
- For the AX5/AX7, the SEQUENCER part buttons may also be used to select the part.
- It is not necessary to set the functions for the CONTROL part, which is for transmitting/receiving MAIN VOLUME and expression pedal data. Basic channel 16 is automatically assigned for this part.
■ Basic channel
There are 16 basic channels (1—16) for MIDI signals. These channels must be matched with the appropriate parts for transmitting and receiving keyboard on/off, program change, chorus and other data.
- Press the BASIC CH & TUNE button to turn it on and enter the basic channel setting mode.
- On the AX3, press the MEMORY 1-8 button on, and then press the BASIC CH & TUNE button on.

-
Use the right ⊕ and ⊖ buttons to specify the basic channel for the selected part.
-
Channel 16 is reserved for the CONTROL part, so select from channels 1\~15.
- The same basic channel cannot be assigned to two or more parts. If you selected a channel which has already been set, “--” is shown on the MUSICAL DISPLAY.

■ Program change, chorus, sustain
Whether or not data for these items are transmitted/received can be set.
- Turn on the appropriate buttons if these data are to be transmitted/received. Turn off corresponding buttons if not.

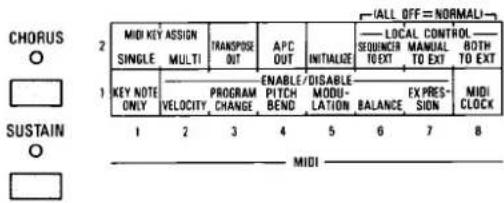
(AX3)
AX3
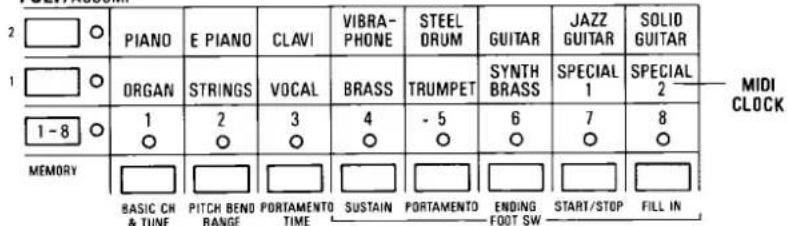
On the AX3, the POLY/ACCOMP voice buttons (as shown in the above diagram) are used to set MIDI functions other than the basic channel. For example, to enable transmit/receive of
program change data, press the 1 button from the vertical buttons on the left and the 3 button from the horizontal buttons across the bottom to turn the function on.


■ Octave shift
Sound can be shifted up or down one or two octaves.
-
Set octave shift for MIDI OUT using the OCTAVE buttons.
-
Octave shift for MIDI OUT and MIDI IN are directly correlated. For example, if MIDI OUT is set at +1, the MIDI IN is automatically set at -1.
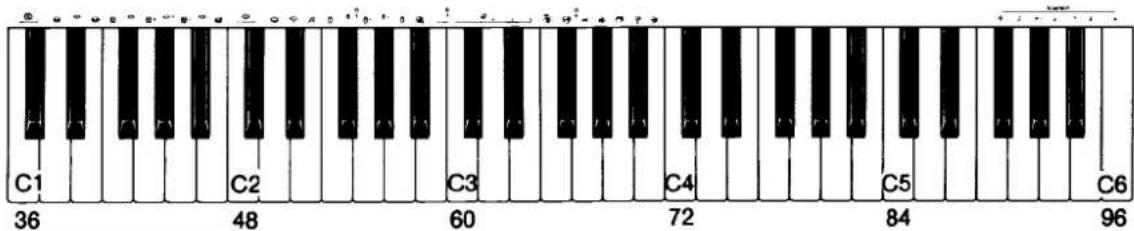
- In the initial mode, the relationship between the keyboard and note numbers is as shown below.

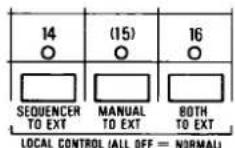
■ Local control
There are four modes for distributing performances played on the keyboard and performances played back with the SEQUENCER to this instrument and to an external instrument.
These modes can be selected for each part of a performance.
| Mode | Details | |
| NORMAL | Notes from the keyboard and those generated by the SEQUENCER are sounded from both this instrument and the external instrument. | keyboard→this instrument external instrument |
| SEQUENCER TO EXT | Notes from the keyboard are sounded from this instrument, and those generated by the SEQUENCER are produced on the external instrument. | keyboard→this instrument external instrument |
| MANUAL TO EXT | Notes from the keyboard are produced on the external instrument, and those generated by the SEQUENCER are sounded from this instrument. | keyboard→this instrument external instrument |
| BOTH TO EXT | Notes from the keyboard and those generated by the SEQUENCER are both sounded from the external instrument. | keyboard→this instrument external instrument |
- Use the LOCAL CONTROL buttons to set to the desired mode.

(AX3)
(AX5/AX7)
Repeat procedures 3\~8 to set the MIDI functions for each of the other parts.
III. Set the functions common to all parts
■ Clock selection
Select the internal clock if this instrument's clock will be used to control the performance. Select the MIDI CLOCK if the external instrument's clock will be controlling the performance.
-
Set to the required clock mode using the MIDI CLOCK button.
-
When MIDI CLOCK is selected, the rhythm can only be started if the MIDI clock signals are received from the external equipment.
- When the indicator is off, the internal clock is selected.
- The internal clock is automatically selected when the POWER is turned off once, then on again.
POLY/ACCOMP
(AX3)

(AX5/AX7)
■ Song select (AX5/AX7), start/stop, velocity, pitch bend, modulation wheel, balance, main volume, expression pedal, portamento
Whether or not data for these items are transmitted/received can be set.
- Turn on the appropriate buttons if these data are to be transmitted/received. Turn off corresponding buttons if not.
- The on/off status of the EXPRESSION button determines the transmit/receive status for both expression data and main volume data.


(AX3)

(AX5/AX7)


■ Key note data transmit/receive
Set the input mode, the key note modes and whether or not the PANEL MEMORY is to be selected for the program change data.
MIDI KEY ASSIGN mode: Choose from two key assign modes for receiving key note data.
| Key assign mode | Recognized key notes | CONDUCTOR | Application examples |
| SINGLE | POLY part only | Functions the same as when the Synthesizer Keyboard is played. | Use when an external instrument with touch response is played. |
| MULTI | All partsSOLO, POLY*, BASS, ACCOMP, DRUMS | Does not function. | Use for ensemble performance when each part is played independently. |
* Up to four notes can sound at one time for this part.
KEY NOTE ONLY: When it is on, the data for program change and control change are not transmitted/received.
APC OUT: When it is on, the AUTO PLAY CHORD function produces an accomp pattern for the ACCOMP and BASS MIDI outputs.
TRANSPOSE OUT: When it is on, transposed keyboard notes are output for all parts.
PANEL MEMORY = P CHANGE (AX5/AX7): When it is on, the PANEL MEMORY is selected as the program change data for the POLY part.
- Set the on or off state for each function with the respective buttons.
- For MIDI KEY ASSIGN, select either SINGLE or MULTI.


(AX5/AX7)
IV. Exiting the MIDI function-setting mode
- After completing the above steps, press the RECORD or MODE SET button off to exit the MIDI function-setting mode.
Loading stored MIDI data (AX5/AX7)
All MIDI data that have been set can be stored in the Synthesizer Keyboard's memory or in devices such as a memory card, simply by performing storage procedures for the SEQUENCER. When the Synthesizer Keyboard is in the initial mode, these stored MIDI settings are automatically recalled during playback. If you do not wish to recall the stored settings during playback, follow the procedure below.
- Press the RECORD button. The indicator flashes.
- Press the MODE SET button. The indicator flashes slowly.
- Press the LOAD button to turn it off.
Using the Foot Controller for a MIDI function (AX5/AX7)
You may use an optional Foot Controller to control a MIDI function.
- Press the RECORD button. The indicator flashes.
- Press the MODE SET button. The indicator flashes slowly.
- Press the FOOT CONTROLLER 2 button.
- Press the MIDI & CONTROL NO. button to turn it on.
SOLO/BASS

- Use the ⊕ and ⊖ buttons to specify the part and the control number of the function you wish to control with the Foot Controller.
- The range of the control number is 0\~31 and 64\~95.

- Press the MODE SET button to exit the function-setting mode.
Transmission/reception of the exclusive message signal
Between instruments within the same AX series, the following data can be sent and received using the MIDI exclusive message signal: COMPOSER contents (AX5/AX7), voice MEMORY (TONE MEMORY) contents, and SEQUENCER contents.
• These data can be received by a MIDI sequencer.
■ Sending
- Enter the MIDI function-setting mode (RECORD → MODE SET button on).
- Press one of the MIDI DUMP buttons (ALL, COMPOSER (AX5/AX7), TONE MEMORY), and data transmission starts.
- On the MUSICAL DISPLAY, S_nd (AX3) or S_End (AX5/AX7) is shown. When data transmission is completed, E_nd is shown.
- Press the MODE SET button to exit the MIDI function-setting mode.
■ Data which can be sent
AUTO PLAY CHORD

(AX3)
■ Receiving
-
Enter the MIDI function-setting mode (RECORD → MODE SET button on).
-
By this procedure, the exclusive message signal sent from another AX-series instrument can be received. During reception, rcu (AX3) or rEcu (AX5/AX7) is shown on the MUSICAL DISPLAY. When data reception is completed, End is shown.
- An E_rr (AX3) or E_r4 (AX5/AX7) message on the MUSICAL DISPLAY means that data reception was not successful.
- Data reception is not possible when the MEMORY PROTECT function of this instrument is on.
- Press the MODE SET button to exit the MIDI function-setting mode.
AUTO PLAY CHORD

(AX5/AX7)
| Pressed button | AX3 | AX5 | AX7 | |
| ALL | Voice MEMORY | SOLO 4POLY 8BASS 1 | SOLO 16POLY 16BASS 8 | SOLO 32POLY 32BASS 8 |
| SEQUENCER | A/D | S/P/A/B/D | S/P/A/B/D | |
| COMPOSER | —— | 8 | 12 | |
| COMPOSER | COMPOSER | —— | 8 | 12 |
| TONE MEMORY | Voice MEMORY | SOLO 4POLY 8BASS 1 | SOLO 16POLY 16BASS 8 | SOLO 32POLY 32BASS 8 |
S—SOLO, P—POLY, A—ACCOMP, B—BASS, D—DRUMS
- The keyboard keys do not function during data transmit/receive.
• Data transmit/receive of ALL takes about one minute.
MIDI Implementation Chart
[ Synthesizer Keyboard ]
[ SX-AX3/SX-AX5/SX-AX7 ]
(Transmitted)
| Function... | POLY | SOLO | ACCOMP | BASS | DRUMS | CONTROL | Remarks | |
| Basic Channel | Default Changed | 1~151~15 | 1~151~15 | 1~151~15 | 1~151~15 | 1~151~15 | 16— | memorized |
| Mode | DefaultMessages Altered | 3×— | 3×— | 3×— | 3×— | 3×— | 3×— | OMNI OFF POLY MODE |
| Note Number | True voice | 7~126— | 7~126— | 7~126— | 2~108— | 7~94 (AX3)7~101 (AX5/AX7) | —— | • Changes depending on the position of the MIDI octave shift• When SEQUENCER is off |
| Velocity | Note ONNote OFF | ×○×(9nH.V=0) | ×○×(9nH.V=0) | ×○×(9nH.V=0) | ×○×(9nH.V=0) | ×○×(9nH.V=0) | —— | (AX3)(AX5/AX7) |
| After Touch | Key'sCh's | ×× | ×× | ×× | ×× | ×× | ×× | |
| Pitch Bender | *○ × | *○ × | *○ × | *○ × | × | × | ||
| Control Change | 171164658182930~31, 64~95 | *○ ×*○ ××*○ ×*○ ×*○ ×*○ ×*○ ×*○ ×*○ × | *○ ×*○ ××*○ ×*○ ×*○ ×*○ ×*○ ×*○ × | *○ ×*○ ××*○ ×*○ ×*○ ×*○ ×*○ ×*○ × | *○ ×*○ ××*○ ×*○ ×*○ ×*○ ×*○ ×*○ × | *○ ×*○ ××*○ ×*○ ×*○ ×*○ ×*○ × | *○ ×*○ ×*○ ×*○ ×*○ ×*○ ×*○ × | modulationbalance (poly~drums)main volume (control)expression pedalsustainportamentorhythm variationending, fill in & introchorusControl number and basic channel can be set freely. |
| Prog Change | True # | *○ ×0-230-470-63 | *○ ×0-110-310-47 | *○ ×0-230-470-63 | *○ ×0-30-150-15 | *○ ×0-190-270-31 | —— | (AX3)(AX5)(AX7) |
| System Exclusive | ○ | Only in the MIDI function-setting mode. | ||||||
| System Common | Song PosSong SelTune | ×(AX3) *○ (0~3.AX5)(0~2.AX7) × | ||||||
| System Real Time | ClockCommands | ○*○ × | start/stop | |||||
| Aux Messages | Local ON/OFFAll Notes OFFActive SenseReset | ×○ | ×○ | ×○ | ×○ | ×○ | —— | |
| ○ | ||||||||
| Notes | *○ ×...... Whether or not the data for each of these items is transmitted can be set. | |||||||
Mode 1: OMNI ON, POLY Mode 2: OMNI ON, MONO ○: Yes Mode 3: OMNI OFF, POLY Mode 4: OMNI OFF, MONO ✗: No
MIDI Implementation Chart
[ SX-AX3/SX-AX5/SX-AX7 ]
(Recognized)
| Function... | POLY | SOLO | ACCOMP | BASS | DRUMS | CONTROL | Remarks | |
| Basic Channel | Default Changed | 1~151~15 | 1~151~15 | 1~151~15 | 1~151~15 | 1~151~15 | 16— | memorized |
| Mode | DefaultMessages Altered | 3×— | 3×— | 3×— | 3×— | 3×— | 3×— | OMNI OFF POLY MODE |
| Note Number | True voice | 2~1262~108 | 2~1262~108 | 2~1262~108 | 2~1262~108 | 2~12636~64 (AX3)36~71 (AX5/AX7) | ——— | Changes depending on the position of the Octave Shift or Transpose control. |
| Velocity | Note ONNote OFF | *○ ×× | *○ ×× | *○ ×× | *○ ×× | *○ ×× | ——— | |
| After Touch | Key'sCh's | ×× | ×× | ×× | ×× | ×× | ×× | |
| Pitch Bender | *○ × | *○ × | *○ × | *○ × | × | × | ||
| Control Change | 17116465818293 | *○ ×*○ ××*○ ×*○ ×—*○ × | *○ ×*○ ××*○ ×*○ ×—*○ × | *○ ×*○ ××*○ ××.—*○ × | *○ ×*○ ××*○ ×—*○ ×× | *○ ×*○ ××*○ ×*○ ×× | *○ ×*○ ××*○ ×—*○ ×× | modulationbalance (poly-drums)main volume (control)expression pedalsustainportamentorhythm variationending, fill in & introchorus |
| Prog Change | True # | *○ ×0~230~470~63 | *○ ×0~110~310~47 | *○ ×0~230~470~63 | *○ ×0~30~150~15 | *○ ×0~190~270~31 | ——— | (AX3)(AX5)(AX7) |
| System Exclusive | ○ | Only in the MIDI function-setting mode. | ||||||
| System Common | Song PosSong SelTune | ×(AX3) *○ (0~3:AX5) (0~2:AX7) × | ||||||
| System Real Time | ClockCommands | ○*○ × | start/stop | |||||
| Aux Messages | Local ON/OFFAll Notes OFFActive SenseReset | ×○ | ×○ | ×○ | ×○ | ×○ | ——— | (123~127) |
| ○ | ||||||||
| Notes | *○ ×...... Whether or not the data for each of these items is received can be set. | |||||||
Mode 1: OMNI ON, POLY Mode 2: OMNI ON, MONO ○: Yes
Mode 3: OMNI OFF, POLY Mode 4: OMNI OFF, MONO X: No
- This product adheres to MIDI specifications as published by the Japan MIDI Association.
Matsushita Electric Industrial Co., Ltd.
Central P.O. Box 288, Osaka 530-91, Japan
- Technics
- MIDI
- MIDI Terminals
- The following kinds of data can be transmitted/received
- Setting MIDI functions
- Enter the MIDI function-setting mode
- Set the functions for each part
- ■ Select the part
- ■ Basic channel
- ■ Program change, chorus, sustain
- AX3
- ■ Octave shift
- ■ Local control
- Set the functions common to all parts
- ■ Clock selection
- ■ Key note data transmit/receive
- Exiting the MIDI function-setting mode
- Loading stored MIDI data (AX5/AX7)
- Using the Foot Controller for a MIDI function (AX5/AX7)
- Transmission/reception of the exclusive message signal
- ■ Sending
- ■ Data which can be sent
- ■ Receiving
- MIDI Implementation Chart
Marque : TECHNICS
Modèle : SX-AX3 Midi
Catégorie : Clavier