
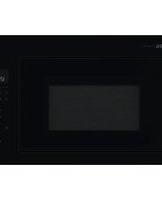
Micromat 115 E/U-m - Micro-ondes AEG - Notice d'utilisation et mode d'emploi gratuit
Retrouvez gratuitement la notice de l'appareil Micromat 115 E/U-m AEG au format PDF.


| Type de produit | Micro-ondes |
| Marque | AEG |
| Modèle | Micromat 115 E/U-m |
| Dimensions (L x H x P) | 45 x 26 x 35 cm |
| Poids | 12 kg |
| Alimentation | 230 V, 50 Hz |
| Puissance micro-ondes | 800 W |
| Capacité intérieure | 20 L |
| Fonctions principales | Décongélation, cuisson rapide, minuterie, horloge |
| Programmes automatiques | 4 programmes de cuisson |
| Type de commande | Boutons rotatifs et touches |
| Entretien et nettoyage | Nettoyer avec un chiffon humide et un détergent doux |
| Sécurité | Verrouillage enfant, arrêt automatique en cas de porte ouverte |
| Pièces détachées disponibles | Oui, auprès du service après-vente AEG |
| Réparabilité | Indice de réparabilité : 7,5/10 |
| Consommation électrique | 1200 W |
| Fabricant | AEG, Allemagne |
| Couleur | Blanc |
| Garantie | 2 ans |
| Numéro de modèle alternatif | Micromat 115 E/U-m |
FOIRE AUX QUESTIONS - Micromat 115 E/U-m AEG
Questions des utilisateurs sur Micromat 115 E/U-m AEG
0 question sur cet appareil. Repondez a celles que vous connaissez ou posez la votre.
Poser une nouvelle question sur cet appareil
Téléchargez la notice de votre Micro-ondes au format PDF gratuitement ! Retrouvez votre notice Micromat 115 E/U-m - AEG et reprennez votre appareil électronique en main. Sur cette page sont publiés tous les documents nécessaires à l'utilisation de votre appareil Micromat 115 E/U-m de la marque AEG.
MODE D'EMPLOI Micromat 115 E/U-m AEG
MICROMAT 115/125/1251/135
Microwave Oven
Dear Customer
Thank you for buying a MICROMAT microwave oven and showing trust in the AEG brand name.
Before using the AEG microwave for the first time please read the instruction booklet thoroughly.
It has been written to help you take advantage of all the features that this microwave offers.
In return the MICROMAT will reward you by giving you troublefree operation and also avoids unnecessary service calls.

Printed on recycled paper.
AEG - putting words into action.
Contents
| Microwaves - what are they? | 4 |
| Safety instructions | 5/6 |
| Other important points ... | |
| How to cook by time and power | 7 |
| General hints on cooking, heating, and defrosting | 7 |
| Standing time | 7 |
| The correct ovenware | 8 |
| Special browning skillet | 9 |
| Features MICROMAT 115/125/135 | 10/11 |
| First use | |
| Setting and correcting the time of day/timer | 13 |
| Cooking time and power | 14/15 |
| Automatic cooking | 16/17 |
| Automatic defrosting | 18/19 |
| Saving three cooking programmes of your own | 20/21 |
| Hints on power settings | 22 |
| Practical hints on working with microwave appliances | 23/24 |
| Cooking tables | 25-30 |
| Cleaning and care | 31 |
| If you think your microwave oven is not functioning properly | 31/32 |
| Installation and connection | |
| Table-top model | 32 |
| Built-in model | 33 |
| Service centre | 34 |
| Electrical connection | 37 |
| Technical data | 35/36 |
| Data for test centres | 38/39 |
Microwaves – what are they?
Microwaves belong to the family of electromagnetic waves. These waves are able to transmit energy similar to radio waves.
During cooking, the microwave energy penetrates inside the food, causing the food molecules to vibrate. The heat of friction through the food enables it to be defrosted, heated and cooked.
How quickly a microwave oven cooks food depends on the quantity, quality and shape of the food.
During microwave cooking it is important that the food is stirred or turned when large quantities are being cooked.
Since this cooking method involves generation of heat inside the food itself, it eliminates the need for large quantities of additional cooking liquid, ensuring that the food retains valuable vitamins, nutrients and flavour.
Safety instructions
The golden rules for trouble-free and save working with a microwave oven
- Switch the appliance on only when food has been placed in the cooking space, and only operate it when the turntable is inserted.
- Always keep the appliance clean, especially in the vicinity of the door seals and door seal surfaces.
- Never damage:
■ the door
■ the door hinges
■ the door seals and their surfaces
■ the door frame
(e.g. never jam anything between door and frame)
Clean the door seals and their surfaces (also the door frame) with a mild detergent and hot water.
Note:
Should the door seals and door seal surfaces be damaged, the appliance should not be operated until it has been repaired by the AEG Service Centre or by an AEG-trained electrician!
- Only use suitable ovenware.
- When heating liquids, please always additionally place a teaspoon in the container to avoid delayed boiling. But it must not touch the walls.
During delayed boiling, the boiling temperature is attained without typical steam bubbles rising. Even when the container is only slightly shaken, the liquid may then suddenly vigorously boil over or spurt. Risk of scalding.
- Food with a "skin" or "peel", such as potatoes, tomatoes, sausages, and the like should be pierced with a fork so that any steam present can escape and the food will not burst.
- Make sure that a minimum temperature of 70^ C is attained for the cooking/heating of food. This will be achieved if you follow the instructions given in the cooking tables (time/power). Never use a mercury or liquid thermometer for measuring the food temperatures.
- Babyfood in jars or bottles should basically be heated without a lid or top and well stirred or shaken after heating to ensure uniform distribution of the heat. Before giving your child the babyfood, please check the temperature.
- Please note that, at high power and time settings, the ovenware heats up. Therefore use protective mittens suitable for handling pots and pans.
Safety instructions for the user
Safety instructions for the user
- Do not leave the appliance to operate unattended if food is to be warmed or cooked in disposable containers made of plastic, paper, or other inflammable materials.
Should smoke be observed the oven door must be kept closed and the oven switched off or else disconnected from the power supply.
- Never use your microwave oven:
■ to boil eggs and escargots in their shells, since they will otherwise burst!
■ to heat large quantities of cooking oil (fondue, deep-frying) and drinks containing a high percentage of alcohol (danger of spontaneous combustion!)
■ to heat unopened cans, bottles, etc.
■ to dry animals, textiles, and paper
■ for crockery (porcelain, ceramics, earthenware, etc.) having voids that fill with water and which may cause vapour pressures to build up during microwave cooking. Please follow the respective manufacturer's instructions.
- Use your appliance only as instructed and as indicated in the "Cooking tables". Never overcook your food by excessive times and excessive power settings.
Specific areas of the food will otherwise dry out and my ignite.
- Should the power cable fitted to the appliance be damaged, it must be replaced with an identical one. This work may only be carried out by the manufacturer's staff or by qualified electricians who have been trained by the manufacturer.
AEG electrical appliances comply with all the relevant safety regulations. Never, ever use the microwave oven if it is no longer functioning properly.
In order to maintain the safety of your appliance, you may only have repairs, particularly to the live parts of the appliance, carried out by a qualified electrician trained by the manufacturer. In the case of any defect or breakdown you must therefore contact your electrical dealer or our Service Centre direct.
If repairs are carried out improperly, the result can be serious danger for the user.
The interior lighting in the cooking space can only be replaced by the AEG Service Centre or by an AEG-trained electrician.
What's also important:
To familiarise easily and quickly with the operation of the microwave oven, please use the "Cooking Tables" section.
Cooking time depends on the quantity of food. As a guide:
Double Quantity = Almost Double Time
Please refer to the Tables. Initially always select the shorter cooking time. Only when necessary extend the time as required.
Food comes in different qualities and is prepared in different quantities, therefore the times and amounts of energy necessary for defrosting, heating or cooking are different.
The standing time referred to in the "Cooking tables" means: Allow the food to stand without power i. e. inside or outside the appliance, to ensure that the heat in the food is uniformly distributed.
How to cook by time and power
General hints on cooking, heating, and defrosting
Standing time
The correct ovenware
The correct ovenware
| Utensil material | Microwave mode | ||
| Defrost-ing | Heating | Cook-ing | |
| Glass1) (heat proof) | X | X | X |
| Ceramic | X | X | X |
| Porcelain1) (heat proof) | X | X | X |
| Earthenware1) | X | X | X |
| Plasticware2) | X | X | X |
| Paper cups | X | - | - |
| Paper plates | X | - | - |
| Grease-proof paper5) | X | X | - |
| Board5) | X | X | - |
| Aluminium foil3) | X | X | X |
| Shallow foil containers(for convenience foods) | X | X | X |
| Metal objects4) | - | - | - |
| Crockery with metal base | - | - | - |
| Clingfilm non PVC | X | - | - |
| Roasting bags | X | X | X |
1) Without silver, gold, platinum or metal decor.
2) Please note the relevant manufacturer's instructions.
3) Please follow the instructions given under "Practical hints on working with microwave appliances".
4) For exceptions, see "Golden Rules".
5) With prolonged heating there is a risk of fire!
During microwave cooking roasting times are short and with very lean meat, therefore very little browning of the food takes place. Special browning skillets and grill plates are obtainable via your local microwave cookware supplier or cookshop to aid the browning of meat.
Browning skillets have a special coating on the base which becomes very hot when the skillet is preheated empty, the roast/meat is browned by this heat. The preheating time for the skillet varies depending on the type of food to be browned.
Caution: When working with a browning skillet, the grid (accessory available from the AEG Spare Parts) must be inserted on the turntable (see illustration)!
ET-no. 661 917 350 (MICROMAT 115)
ET-no. 661 917 375 (MICROMAT 125)
ET-no. 661 917 400 (MICROMAT 135)

WRONG
RIGHT
If this is not observed, the turntable can be damaged during operation or when the door of the appliance is opened!
Features

Features
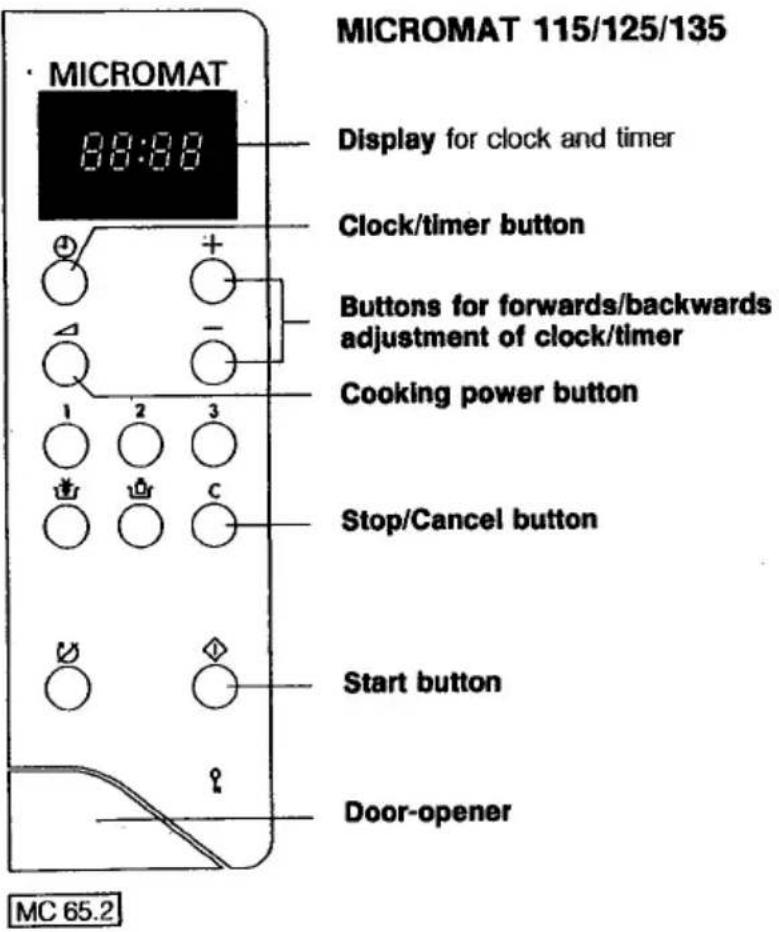
A Door closer and bolt
B Wave stirrer cover
C Interior lighting
D Turntable (must always be in oven during operation)
E Door seal

F Door with viewing window
G Electronic timer
H Button for time of day/cooking time
1 Buttons for advance and return run
J Button stop and/or cancel programme
K Button for cooking power
L Start button
M Off/On button for turntable
N Door release
- Buttons for programme sequence memory
P Button automatic cooking
Q Button automatic defrosting
First use
First use Time of day/ Short time alarm
As soon as the plug is inserted in the socket the clock display flashes.
-
Press button +/- for setting the hours. Press button ④ and set the minutes using the +/- buttons. Then press button ④ again. The appliance is ready to operate!
-
By pressing button Ⓐ twice you can delete the time of day set and enter a new one (as described above under step 1).
The clock can also be used as a short time alarm i.e. without any cooking function.
-
Press button ⏻. Hold the +/- button down until the time you wish to set on the timer appears in the display (maximum setting 99 minutes).
-
Press button ☑, and P 9 appears in the display. If you press the - button, and keep it pressed P 9 counts down until P 0 appears in the display. The short time symbol ⚙ starts to flash.
-
Press start button ⏻. The time you have set appears in the display, counting down in seconds.
-
When the timer has finished it gives an acoustic signal, which you can switch off by pressing cancel button C. The time of day appears in the display.
-
If you make an incorrect entry, the letter E appears in the display. This can be corrected by pressing button C - the cancel button, clearing the error and allowing you to enter new settings.
Setting the time of day
Hours/Minutes
Correcting time of day
Short time alarm
Starting the timer
What you should also know
Setting cooking time/ cooking power
Cooking time
Caution! Do not use the appliance without the turntable. Always place food inside before switching on - NEVER use the oven empty.
Cooking power
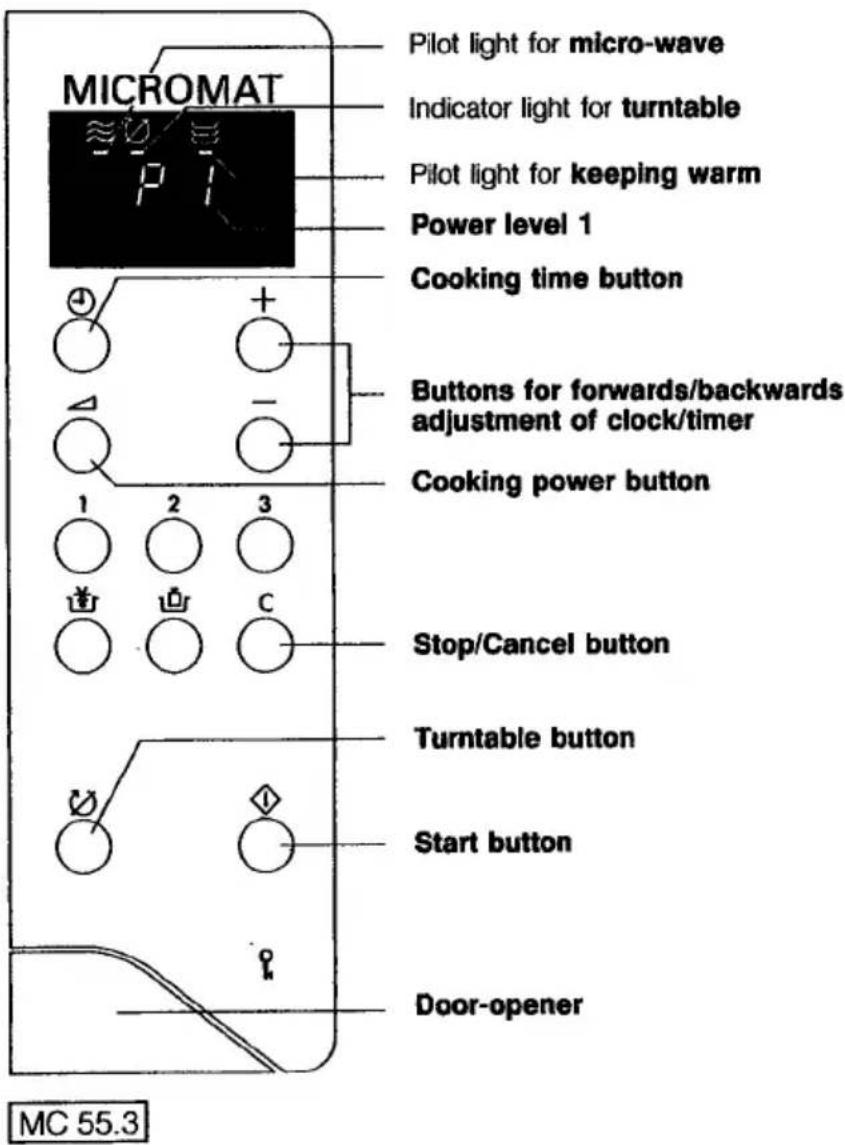
- Press button ⏻. The time of day disappears.
- Set the cooking time required with the +/- buttons. This will appear in the display (maximum cooking time up to 99 minutes).
-
Press button ☐, the highest power setting P 9 will now appear in the display (the light ≈ flashes).
-
You can alter the power setting with the +/- buttons, e.g. to P 1 (10).
- The turntable rotates whilst the appliance is in operation. If you have rectangular ovenware which is bigger than the turntable and may cause a jam, switch the turntable off using button ☑. The light for the turntable ☑ comes on in the display.
If the turntable is to be switched on or off while the programme is running, the programme must be stopped by using button C, and button ⏻ must be pressed afterwards. The programme can be restarted using start button ⏱.
- Press start button ⏻. After you have pressed the start button, the cooking time appears in the display counting down in seconds.
The micro-wave pilot light comes on and the interior lighting switches on.
- For programmes involving a power setting of P 5 or more, the keeping-warm setting turns itself on at the end of the cooking cycle for 15 minutes. Light ≡ comes on and H:H appears in the display. At the end of the keeping-warm cycle the time of day reappears in the display.
Caution! If the door is opened during this time, the keeping-warm setting switches off! (Light ≈ goes out.)
- If the door is opened during the cooking cycle (e.g. for stirring), the cooking time indicator stops. Light ≈ flashes.
When the appliance door has been closed again and start button ◆ pressed, the remaining cooking time automatically resumes. Light ≈ comes on and stays on.
- If you press in button C once, you can interrupt the programme, including the automatic ones (same effect as opening the door).
If you press it twice, all programmes are cancelled.
- The power level selected can be checked during operation by pressing button ☐.
Automatic cooking

You have 8 programmes at your disposal for automatic cooking, whereby you simply choose the type of food you wish to cook from the list below, enter the weight and the microwave oven calculates the cooking time.
| Programme C | Category of food | Max weight in grammes |
| C 1 | Chicken/potatoes | 4,000 |
| C 2 | Root vegetables, cabbage, peas, broad beans etc. | 3,400 |
| C 3 | Beef - rare/medium | 3,300 |
| C 4 | Simmering of meat sauces and casseroles | 1,400 |
| C 5 | Lamb - rare / re-heating liquids | 3,400 |
| C 6 | Lamb - medium / fish fillets | 4,000 |
| C 7 | Lamb - well done / whole fish | 3,700 |
| C 8 | Pork / frozen ready meals | 3,000 |
-
Press button 📁. C 1 appears in the display and the light automatic cooking is flashing. The individual automatic cooking programmes from C 1 to C 8 can be called up by pressing button 📁 repeatedly.
-
With the +/- buttons the weight of the item to be cooked can be entered.
-
Press start button ◆ Microwave pilot light and automatic cooking light comes on. The interior light switches on. The cooking time appears in the display and counts down.
-
If the door of the appliance is opened during the cooking cycle (e.g. for stirring), the cooking time indicator stops. Microwave pilot light flashes.
When the door has been closed again and start button pressed, the remaining cooking time automatically resumes, light ≈ comes on and stays on.
- The keeping-warm setting turns itself on at the end of the cooking cycle for 15 minutes. Light ≈ comes on.
Automatic cooking – General information
Selecting automatic cooking
What you should also know
Opening the door while cooking
What you should also know
Keeping-warm setting
Automatic defrosting

You have 4 programmes at your disposal for automatic defrosting, whereby you simply choose the type of food you wish to defrost from the list below, enter the weight and the microwave oven calculates the defrosting time.
| Programme D | Category of food | Max weight in grammes |
| d 1 | Poultry | 4,000 |
| d 2 | Meat | 4,000 |
| d 3 | Fish | 4,000 |
| d 4 | Delicate pastry items (e. g. cream cake) | 4,000 |
-
Press button ☑. D 1 appears in the display and the automatic defrosting light comes on.
The automatic defrosting programmes from D 1 to D 4 can be called up by pressing button 📊 repeatedly. -
With the +/- buttons the weight of the item to be defrosted can be entered.
-
Press start button ◆. Microwave pilot light and automatic defrosting light 15 come on. The interior lighting switches on. The defrosting time appears in the display and counts down.
-
If the door of the appliance is opened during the cooking cycle (e.g. for turning), the defrosting time indicator stops. Microwave pilot light flashes.
When the appliance door has been closed again and start button ⏻ pressed, the remaining defrosting time automatically resumes, light comes on and stays on.
- At the end of the defrosting cycle you will hear the acoustic signal.
The interior light switches off. The time of day appears again in the display.
Selecting and storing 3 frequently used programmes

With buttons 1, 2 and 3 you can enter and call up three programmes you select yourself (time/power).
This means you can store programmes which are used frequently in your household, e. g. warming up a mug of milk, 1 minute at P 9.
- Press button ⏻, set the required cooking time with +/- buttons.
- Press button ☑. The highest power setting P 9 appears in the display. You can change this setting with the +/- buttons. The microwave pilot light flashes.
- Press one of the buttons 1, 2 and 3 in order to save a cooking programme. The number of the programme appears in the display and the corresponding light comes on.
- Press button C as well, in order to save your programme. The time of day appears in the display.
- Press one of the buttons 1, 2 or 3, first the cooking time will appear in the display, e. g. 8:00, then the power setting you have selected, e. g. P 5, the microwave pilot light flashes and the programme store light comes on.
- Press start button ◆. The microwave pilot light comes on and the cooking time appears in the display, counting down.
The interior light is on. At the end of the cycle you will hear the acoustic signal. The time of day reappears in the display. - Caution: When storing a new time and power setting the former data is cancelled!
General points on storing your own cooking programmes
Entering your own cooking programme
Saving your own cooking programme
What you should also know
Calling up your own cooking programme
What you should also know
Hints on power setting

The following listing shows you what power setting in microwave operation allows what:
Setting 8-9 Maximum power
- to start the cooking sequence: to bring to the boil, start to roast, stew, etc.
- roasting of meat on the browning dish
- heating of ready meals
- defrosting and heating of frozen ready meals.
Setting 6-7
- heating of tender foods, such as: mushrooms, cheese, escargots, mussels, beaten eggs, thick beans, butter, baby food in jars, chocolate glazing
- cooking of fish.
Setting 3-5
- to simmer soups, single-portion meals, soufflés, noodles (after bringing to the boil on setting 9)
Setting 2-31)
- to defrost meat, fish, fruit, bread, and cakes
- making of milk puddings. (after bringing to the boil on setting 9).
Setting 1-2
- to warm cold food, drinks, and butter
- defrosting of fat-rich foods, sausage, and cheese
- raising of yeast dough
- defrosting of cream and butter
- defrosting of cream and butter-cream cakes.
1) Use setting 3 for defrosting only on model MC 115 (750 W)!
Practical hints on working with microwave appliances
Wherever possible, cook in a covered container. Only if crust is required or is to be retained should you cook food uncovered. After switching off your appliance, allow the food to stand inside for a few minutes (standing time).
Refrigerated or frozen foods require a longer cooking time.
Foods containing sauces should be stirred from time to time to ensure even cooking.
Meat:
Cook fatty pieces of meat (e. g. pork), game, or poultry on a non-metallic grid or inverted saucer inside a suitable container, this allows the fat to drain away. Cook leaner types of meat on a browning skillet (special accessory). Turn once during the cooking time.
Vegetables:
Always cook vegetables in a covered container and stir them from time to time. Cook vegetables with firm consistency, such as carrots, peas, and cauliflower, with a little water. Cook vegetables with soft consistency, such as mushrooms, peppers, and tomatoes without liquid.
Meat:
Place frozen, unpacked meat on an inverted plate in a suitable container so that the meat juice can drain. Turn during the defrosting period. Cover already defrosted areas with small pieces of aluminium foil. Keep foil at least 2 cm away from the walls and door. When the defrosting period has elapsed, the pieces of meat need standing time, this will vary depending on the type/cut of the meat.
Butter, pieces of sandwich cake, cottage cheese:
Remove aluminium foil packaging. Do not fully defrost in the appliance, but leave to finish outside (e.g. for cottage cheese and pieces of sandwich cake, 30 min - 1 hr depending on quantity).
Ready meals and cook-chill convenience foods in shallow foil or plastic containers with lids can be defrosted in your microwave oven only if they are explicitly marked as being suitable for microwave use. Please follow the operating instructions printed on the container (remove the foil lid or prick the plastic film).
Important: Metal objects must be placed at least 2 cm away from the interior walls and door.
Cooking
Defrosting
Ready meals
Cook-Chill foods
Your MICROMAT microwave oven is ideally suited to heating "Cook-Chill" ready meals. Select a power and cooking time in order to heat the food until it is piping hot. To help you microwave food more successfully the Ministry of Agriculture, Fisheries and Food in collaboration with food manufacturers and retailers, consumer organisations and oven manufacturers, have introduced a voluntary labelling scheme for ovens and food packs.
During 1992 the new label will be introduced onto the front of domestic microwave ovens, this will link up with information on food packs. Matching the information on the microwave oven label with the pre-packaged food will help you select the required heating-up time for the food.
Note: In all cases ensure that the food is heated piping hot (over 70 °C) before consuming.
Stir foods wherever possible to ensure even heating and allow standing time for the heat to spread through the food.
Micro-wave solo operation
Heating of refrigerated food and drink
| Type/quantity | Remarks/hints: | Power | Time/min. 750 W | Time/min. 850 W |
| Food | ||||
| 1 glass babyfood (125-250 ml) | Heat glass without lid, stir after warming | 5-6 | 1-2 | 1/2-2 |
| 1 convenience meal on plate (350-400 g) | Heat in covered container. Place gravy alongside separately in cup | 9 | 3-4 | 2-3 |
| 1 portion meat (around 150 g) | Heat breadcrumbmed meat in uncovered container, all other meat portions in covered container | 9 | 1^1/2-2^1/2 | 1-2 |
| 1 portion vegetables or potatoes or rice (around 200 g, each) | Heat in covered container | 9 | 2-3 | 1^1/2-2^1/2 |
| 1 cup soup (around 200 ml) | Heat clear soups in uncov-ered container, thick soups in covered container | 9 | 1^1/2-2 | 1-1^1/2 |
| Drinks* | ||||
| 200 ml milk or babyfood | Stir after warming Check the temperature! | 7-8 | 1-1^1/2 | 1/2-1 |
| 1 cup/glass water boil (around 180 m^3 ) | Stir in instant coffee or tea after around 1/2 minute when water ceases to boil vigorously | 9 | \( 1-1^1/2 | 1-2 |
| 1 cup milk | Heat milk hot enough to drink | 9 | 1-1^1/2 | 1/2-1 |
| 1 cup coffee (reheat) | 9 | 1/2-1 | 1/2-1 | |
* Additionally place teaspoon in container
Melting of food
| Type/quantity | Remarks/hints: | Power | Time/min. 750 W | Time/min. 850 W |
| Melting of food | ||||
| Chocolate/toppings (100 g) | Stir from time to time | 6-7 | 3-4 | 2-3 |
| Butter (50 g) | To heat, set 1 min. longer | 6-7 | 1-1^1/_2 | ^1/_2-1 |
Micro-wave solo operation
Defrosting
| Type/quantity | Remarks/hints: | Power | Time/min.750 W | Time/min.850 W | Standing time (min.) |
| Meat | |||||
| Whole meat(500 g) | Turn once. Cover fatty lean parts with aluminium foil after 1st half of defrost-ing time | 2-3 | 12-14 | 10-12 | 10-15 |
| Steaks (per 200 g) | During defrosting time in oven, turn once | 2-3 | 4-6 | 3-4^1/_2 | 5-10 |
| Mixed chopped meat(500 g) | Remove defrost chopped meat after 10 min. | 2-3 | 20-25 | 10-12 | 5-1010-15(750 W) |
| Goulash(per 500 g) | See chopped meat | 2-3 | 12-14 | 10-12 | 10-15 |
| Poultry | |||||
| Chicken(around 1 kg) | During defrosting time in oven, turn once.Cover legs with alu-minium foil after 1sthalf of defrosting time | 2-3 | 25-30 | 20-25 | 10-20 |
| Duck (1,5-2 kg) | See above | 2-3 | 30-40 | 25-35 | 40-60 |
Micro-wave solo operation
Defrosting
| Type/quantity | Remarks/hints: | Power 750 W | Time/min. 750 W | Power 850 W | Time min. 850 W | Standing time (min.) |
| Fish | ||||||
| Whole fish (500 g) | Turn once during defrosting time in oven. Possibly cover fins with aluminium foil | 2-3 | 12-14 | 1-2 | 10-12 | 15-20 |
| Shrimps/Crab (250 g) | Stir thoroughly after half defrosting time | 2-3 | 5-7 | 1-2 | 4-6 | 15-20 |
| Dairy produce | ||||||
| Cottage cheese (500 g) | Divide and stir frozen cottage cheese pieces from time to time | 2-3 | 18-25 | 1-2 | 18-25 | 15-20 |
| Butter (250 g) | Previously remove aluminium foil | 1-2 | 3-6 | 1 | 3-5 | 15-20 |
| Cheese (250 g) | Only start defrosting of cheese in appliance and allow to defrost in room | 1-2 | 3-4 | 1 | 3-4 | 30-60 |
| Cream (200 ml) | Previously remove aluminium lid. Stir occasionally, and whip together with small flakes of ice | 1-2 | 5-8 | 1 | 4-7 | 15-20 |
| Fruit | ||||||
| Strawberries, damsons, cherries, redcurrants, apricots, etc. (500 g) | Allow to defrost in covered container. During defrosting time in oven, stir once | 2-3 | 10-12 | 1-2 | 8-10 | 10-15 |
| Raspberries (250 g) | See above | 2-3 | 4-6 | 1-2 | 4-6 | 10-15 |
Micro-wave solo operation
Defrosting
| Type/quantity | Remarks/hints: | Power 750 W | Time/min. 750 W | Power 850 W | Time/min. 850 W | Standing time (min.) |
| Bread4 breadrolls | During defrosting time in oven, turn once | 9* | 1-1^1/2 | 9* | 1-1^1/2 | 5-7 |
| Wholemeal bread mixed bread, rye bread per slice (60-80 g) | Defrost individual slices in covered container | 2-3 | 1-2 | 1-2 | ^1/2-1^1/2 | 5-7 |
| Bread (around 500 g) | Cover cutting surface | 2-3 | 7-9 | 1-2 | 6-8 | 10-20 |
| CakesDry cakes, e.g. shortcrust pastry cakes (around 300 g) | Allow cakes to de-frost uncovered on serviette or plate | 2-3 | 3-4 | 1-2 | 3-4 | 5-10 |
| Fruit flans baked on baking sheet (400-450 g) | See above | 2-3 | 10-12 | 1-2 | 9-12 | 10-15 |
| 1 slice cheesecake or covered apple tart (around 400 g) | See above | 2-3 | 8-10 | 1-2 | 8-10 | 10-15 |
| Cream and butter-cream layer cakes (300-400 g) | Only start defrosting of cakes in appliance | 1-2 | 6-8 | 1 | 5-6 | 30-60 |
Defrosting and heating of frozen convenience foods
| Type/quantity | Remarks/hints: | Power 750 W | Time/min. 750 W | Power 850 W | Time/min. 850 W | Standing time (min.) |
| 1 portion meat with gravy (150 g) | Turn or stir from time to time | 8-9 | 4-5 | 8-9 | 3-5 | 3-5 |
| 1 portion meat with vegetables, garnish (350-450 g) | Stir food once before serving | 8-9 | 10-15 | 8-9 | 8-15 | 3-5 |
| Pizza, ready-topped (300 g) | Place pizza on browning skillet | 9* | 6-8 | 9* | 3-5 | 3-5 |
* Preheat browning skillet empty 1 ^1/2 -2 min.
Micro-wave solo operation
Cooking fish
| Type/quantity | Remarks/hints: | Power | Time/min.750 W | Time/min.850 W |
| Fish fillets(per 500 g) | Cover during cooking | 9 | 8-10 | 7-9 |
| Whole fish(1000 g) | Cover during cooking:cover flat parts withaluminium foil | 1. 92. 5-6 | 6-78-10 | 4-58-10 |
Cooking of vegetables and potatoes
| Type | Quantity | Liquid addi- tion | Remarks/hints:* | Power | Time/ min. 750 W | Time/ min. 850 W |
| Cauliflower | 500 g | ^1/_8 I | Top with butter | 9 | 8-12 | 8-10 |
| Frozen broccoli | 300 g | ^1/_8 I | Stalks facing outwards | 9 | 10-15 | 10-12 |
| Mushrooms | 250 g | none | Cut into slices | 9 | 5-6 | 4-5 |
| Frozen fresh peas and carrots | 300 g | ^1/_2 cup | 9 | 8-10 | 7-9 | |
| Carrots | 250 g | ^1/_2 cup | Cut into cubes or slices | 9 | 10-12 | 8-10 |
| Potatoes | 250 g | 2-3 teasp. | Peel an quarter | 9 | 4-6 | 4-5 |
Cooking of vegetables
| Type | Quantity | Liquid addi- tion | Remarks/hints:* | Power | Time/ min. 750 W | Time/ min. 850 W |
| Kohlrabi | 250 g | ^1/_2 cup | Cut into spikes or slices | 9 | 8-9 | 7-8 |
| Red/green peppers | 250 g | none | Cut into strips or pieces | 9 | 6-7 | 5-6 |
| Leeks | 250 g | ^1/_2 cup | Cut into rings or pieces | 9 | 6-7 | 5-6 |
| Frozen Brussels sprouts | 300 g | ^1/_2 cup | 9 | 8-10 | 7-9 | |
| Sauerkraut | 250 g | ^1/_2 cup | 9 | 10-14 | 8-12 |
Micro-wave solo operation
Roasting of meat and poultry
| Type/quantity | Remarks/hints: | Power | Time/min.750 W | Time/min.850 W |
| Beef | ||||
| Roast beef/roast fillet medium (per 500 g) | Use browning skillet.Turn after roasting has started | 9 | 7-10 | 4-6 |
| Fillet steaks4 pieces (150-200 g each) | See above | 9 | 3-5 | 2-4 |
| Pork | ||||
| Neck of porkShoulder of pork(per 750 g) | Turn after 1st setting | 1. 92. 6-7 | 8-1025-30 | 6-825-30 |
| Cutlet | See above | 1. 92. 6-7 | 6-712-14 | 5-612-14 |
| Poultry | ||||
| Roast chicken parts(per 500 g) | Use browning skillet.Turn once | 9 | 8-10 | 6-8 |
| Boiled chicken(per 1000 g) | Cook in covered container without liquid | 9 | 12-14 | 10-12 |
Cleaning and care

Cleaning should only be carried out when the appliance is unplugged from the mains supply.
Use only mild cleaners i. e. washing-up liquid and hot water.
Clean your appliance inside and outside with a soft cloth. Never use abrasive scouring agents.
You can neutralize odours inside the cooking space by boiling a cup of water with a little lemon juice for a few minutes in your oven.
If you think your microwave oven is not functioning properly
Before you ring Customer Service, please check to see if you cannot rectify the fault yourself on the basis of the following tips.
If the micro-wave has ceased to work, check whether:
■ the plug is in the socket
■ the fuses in the fuse-cupboard are in order
■ the door is properly shut
■ the start button has been pressed
■ the time of day in the display is flashing – if so, set the correct time of day.
If after you have made this check the micro-wave oven still does not work, please telephone AEG Customer Service or your nearest dealer.
Cleaning the appliance
Table top model
If after you have made these checks the microwave oven still does not work, please telephone AEG Customer Service.
If you decide to call the Service Centre to help with any of the above instructions or on grounds of faulty operation, the service engineer's visit cannot be made free of charge even during the guarantee period.
■ Therefore please take careful note of our instructions on the operation of your microwave oven.
■ AEG electrical appliances comply with all the valid safety requirements. Repairs to electrical appliances should only be performed by a trained electrician. Improper repairs may place the user at serious risk.
Installation/connections
A gap all around the oven of 5 cm is necessary in order to assure perfect ventilation.
Connect to a plug socket with protective earth contact and fused with a 13 A-L automatic device or 13 A slow-blowing fuse!
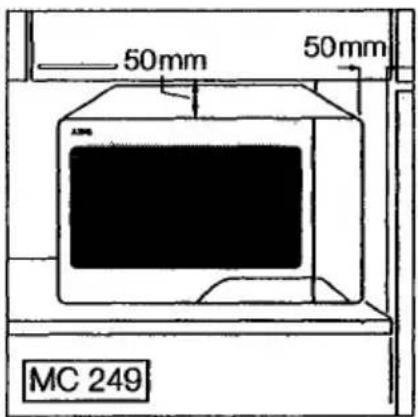
Installing built-under models 115 E/U and built-in models 115/125/135 E
MICROMAT models 115 E/U can be built under a kitchen wall cabinet with the aid of a set of fixings.

To install one of the MICROMAT models 115 E/U and 125/135 E in a kitchen cabinet, use the appropriate mounting frame.

Caution! When installing the MICROMAT model 125 behind a lift-up door, the door must always be open when the oven is in use.
If the door is closed the oven will be damaged and your guarantee invalid.
When the oven is installed with the built-in frame there must be the facility to disconnect it from the mains.
Installation/ connections
Service centre
If you cannot find any reference to a particular fault in the operating instructions, please contact AEG Service.
When doing so, quote the E-No. and F-No. of your oven, which you will find on the rating plate (arrow).

Indication of these numbers helps the Service centre to identify the required spare part so that the engineer can repair the oven on his first visit, thus saving you additional costs caused by repeated trips of the service engineer.
So that these numbers are always to hand, please enter them here.
E-No.
F-No.
AEG Service Locations in the United Kingdom
AEG Domestic
Appliances Limited
Head Office:
217 Bath Road
Slough, Berks. SL1 4AW
Tel.:017 53-87 25 06
Telefax:0 17 53-51 22 71
AEG Scottish
Service Centre:
Block 11, Unit 1
Dundyvan Industrial Estate
Coatbridge
Lanarkshire ML5 4AQ
Tel.:0 12 36-44 03 87
Telefax:0 12 36-44 02 56
AEG Northern
Service Centre:
Unit 20, Haigh Park/
Haigh Avenue
Stockport
Gt. Manchester SK4 1QR
Tel.:01 61-4 87 22 05
Telefax:01 61-4 74 11 91
Service Appointments:
Bristol:0 11 79-25 28 80
Norfolk:0 16 03-76 55 15
Technical data
MICROMAT 115
| Mains voltage: | 240 V, 50 Hz |
| Power input: | 1200 W |
| Output: | |
| - full power | 750 W (measured as in IEC 705: 1988) |
| - defrosting | 180 W |
| Micro-wave regulation: | 9 (75/110/150/225/375/450/530/640/750 W) |
| Fuse: | 13 amp L |
| Electronic timer: | 99 minutes |
| Table-top model: | |
| Diameter (height x width x depth) in mm: | |
| Housing: | 296 x 440 x 316 |
| Interior: | 205 x 260 x 260 |
| Net weight: | 15 kilos |
CE This appliance complies with the following EC Directives: 73/23/EEC of 10.2. 1973 – Low-Voltage Directive. 89/336/EEC of 3.5. 1989 (incl. Amendment Directive 92/31/EEC) – EMC (Electromagnetic Compatibility) Directive.
Technical data
Technical data
Technical data
MICROMAT 125
| Mains voltage: | 240 V, 50 Hz |
| Power input: | 1300 W |
| Output: | |
| - full power | 850 W (measured as in IEC 705: 1988) |
| - defrosting | 180 W |
| Micro-wave regulation: | 9(85/130/170/250/425/500/600/720/850 W) |
| Fuse: | 13 amp |
| Electronic timer: | 99 minutes |
| Table-top model: | |
| Diameter (height x width x depth) in mm: | |
| Housing: | 296 x 496 x 384 |
| Interior: | 205 x 315 x 315 |
| Net weight: | 17 kilos |
MICROMAT 135
| Mains voltage: | 240 V, 50 Hz |
| Power input: | 1350 W |
| Output: | |
| - full power | 850 W (measured as in IEC 705: 1988) |
| - defrosting | 180 W |
| Micro-wave regulation: | 9(85/130/170/250/425/500/600/720/850 W) |
| Fuse: | 13 amp |
| Electronic timer: | 99 minutes |
Table-top model:
| Diameter (height x width x depth) in mm: | |
| Housing: | 348 x 555 x 397 |
| Interior: | 245 x 360 x 360 |
| Net weight: | 21 kilos |
CE This appliance complies with the following EC Directives: 73/23/EEC of 10.2.1973 – Low-Voltage Directive. 89/336/EEC of 3.5.1989 (incl. Amendment Directive 92/31/EEC) – EMC (Electromagnetic Compatibility) Directive.
Electrical connection
WARNING - THIS APPLIANCE MUST BE EARTHED
Voltage and current
Please ensure that the voltage and current indicated on the rating plate agree with the voltage of your electricity supply. 220/240 volts - (i. e. 220/240 V a. c.)
Please note! (for users in the U.K.). If your appliance has been equipped with a mains lead with a moulded-on type plug, you must comply with the following regulations:
The plug moulded on to the lead incorporates a fuse. For replacement, use a 13 amp BS1362 fuse. Only ASTA approved or certified fuses should be used. If the fuse cover/carrier is lost, a replacement cover/carrier must be obtained from an electrical goods retailer. If the socket outlets in your home are not suitable for the plug fitted to the appliance, then the plug must be cut off and destroyed for safety reasons, and an appropriate plug fitted. When fitting the plug please note the following points:
Important
The wires in the mains lead are coloured in accordance with the following code:
| Green and yellow | Earth |
| Blue | Neutral |
| Brown | Live |
Some appliances have a twin core mains lead, when no earth is required.
As the colours of wires in the mains lead of this appliance may not correspond with the coloured markings identifying the terminals in your plug proceed as follows:
- The wire which is coloured green and yellow must be connected to the Earth terminal in your plug, which is marked with the letter E or by the earth symbol ⏻ or coloured green, or green and yellow.
- The wire which is coloured brown must be connected to the Live terminal which is marked with the letter L or coloured red.
- The wire which is coloured blue must be connected to the Neutral terminal which is marked with the letter N or coloured black.
When wiring the plug ensure that all strands of wire are securely retained in each terminal. Do not forget to tighten the mains lead clamp on the plug. This appliance meets the radio interference suppression requirements of EC Directive 82/499 EC and the standards concerning the effects of electrical appliances on power systems EN 60 555 Parts 1-3/DIN VDE 0838 Parts 1-3 June 1987.
Voltage 220/240 V AC
Fuse rating 13 amps
See rating plate for further information.
Test dish specifications
Microwave power: 750 W
| DINNo. 44 566Part 2 | Power | Durationin min. | Standing timein min. | Remarks1) |
| Defrosting and cooking fish fillet | 9 | 10–12 | 3 | Covered, turn after half the time so that the inside corners face outwards |
| IEC 705 | Power | Dura-tion in min. | Stand-ing time in min. | Remarks1) |
| Egg milk (Test A) | 5 | 20–22 | 120 | 2) |
| Cooking sponge (Test B) | 9 | 8 | 5 | |
| Cooking mincemeat (Test C) | 9 | 14–15 | 5 | Cover with foil3) |
| Defrosting mincemeat | 2 | 12–14 | 5 | Place directly on turntable, turn after half the time |
| Defrosting raspberries | 2 | 7–8 | 3 | Covered |
1) Unless otherwise specified, the turntable must be operational.
2) Pyrex container: 200 dia. ± 20 mm; height 50 ± 10 mm.
3) Corning borosilicate glass dish, 18 cm dia. x 8 cm height.
| DINNo. 44 566Part2 | Power | Durationin min. | Standing timein min. | Remarks1) |
| Defrosting and cooking fish fillet | 9 | 10–11(12–13) | 3 | Covered, turn after half the timeso that the inside corners face outwards |
| IEC 705 | Power | Dura-tion in min. | Stand-ing time in min. | Remarks1) |
| Egg milk (Test A) | 5(4) | 19–21(26–28) | 120 | |
| Cooking sponge (Test B) | 9 | 6 | 5 | |
| Cooking mincemeat (Test C) | 9 | 13–14 | 5 | |
| Defrosting mincemeat | 2 | 13–14(12–14) | 5 | Place directly on turntable, turn after half the time |
| Defrosting raspberries | 2 | 6–7(7–8) | 3 | Covered |
') Unless otherwise specified, the turntable must be operational. (...) MICROMAT 135
Test dish speci- fifications
Microwave power: 850 W
AEG Hausgeräte AG
Postfach 1036
D-90327 Nürnberg 1
© Copyright by AEG
H 259 227 340 - 0596/03 - 14782.02
AEG Domestic Appliances Ltd
Customer Care Department
55-77 High Street
Slough
Berkshire SL1 1DZ
Telephone: 08705 350350
- MICROMAT 115/125/1251/135
- Dear Customer
- Contents
- Microwaves – what are they?
- Safety instructions
- The golden rules for trouble-free and save working with a microwave oven
- Note:
- Safety instructions for the user
- What's also important:
- Double Quantity = Almost Double Time
- Features
- First use
- Setting cooking time/ cooking power
- Cooking time
- Cooking power
- Hints on power setting
- Setting 8-9 Maximum power
- Setting 6-7
- Setting 3-5
- Setting 2-31)
- Setting 1-2
- Practical hints on working with microwave appliances
- Meat:
- Vegetables:
- Butter, pieces of sandwich cake, cottage cheese:
- Cooking
- Defrosting
- Ready meals
- Cook-Chill foods
- Micro-wave solo operation
- Cleaning and care
- If you think your microwave oven is not functioning properly
- Installation/connections
- Service centre
- AEG Service Locations in the United Kingdom
- Technical data
- Electrical connection
- WARNING - THIS APPLIANCE MUST BE EARTHED
- Voltage and current
- Important
Marque : AEG
Modèle : Micromat 115 E/U-m
Catégorie : Micro-ondes