
BGO 5102 X - Four BLOMBERG - Notice d'utilisation et mode d'emploi gratuit
Retrouvez gratuitement la notice de l'appareil BGO 5102 X BLOMBERG au format PDF.


| Type de produit | Four encastrable |
| Marque | Blomberg |
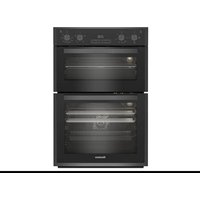
| Modèle | BGO 5102 X |
| Dimensions (H x L x P) | 59.5 x 59.5 x 56.4 cm |
| Volume intérieur | 71 L |
| Poids net | 35 kg |
| Tension d'alimentation | 220-240 V ~ 50/60 Hz |
| Puissance totale | 3000 W |
| Fonctions de cuisson | Chaleur tournante, gril, convection, décongélation, sole, voûte |
| Type de nettoyage | Pyrolytique (haute température) |
| Sécurité enfants | Verrouillage des commandes |
| Affichage | Écran LED tactile |
| Porte | Vitre froide amovible |
| Classe énergétique | A+ |
| Consommation énergétique (conventionnel) | 0.99 kWh |
| Consommation énergétique (chaleur tournante) | 0.79 kWh |
| Niveau sonore | 48 dB(A) |
| Couleur | Inox (X) |
| Type d'installation | Encastrable (meuble haut) |
| Accessoires inclus | Grille, lèchefrite, tournebroche |
FOIRE AUX QUESTIONS - BGO 5102 X BLOMBERG
Questions des utilisateurs sur BGO 5102 X BLOMBERG
0 question sur cet appareil. Repondez a celles que vous connaissez ou posez la votre.
Poser une nouvelle question sur cet appareil
Téléchargez la notice de votre Four au format PDF gratuitement ! Retrouvez votre notice BGO 5102 X - BLOMBERG et reprennez votre appareil électronique en main. Sur cette page sont publiés tous les documents nécessaires à l'utilisation de votre appareil BGO 5102 X de la marque BLOMBERG.
MODE D'EMPLOI BGO 5102 X BLOMBERG
Встроенная газовая духовка
Itaisytoji dujinè orkaitè
Einbau-Gasherd
Built-in Oven
BGO 5102
Gebrauschsanleitung
GB
Dear Customer,
It is our ultimate desire that you achieve the best results from our product, which has been passed through meticulous quality control checks and is manufactured in modern facilities.
We would therefore like to recommend you to read the entire guide carefully before operating the product and keep it handy as a reference guide.
Keep these operating instructions with your equipment. In case of selling or giving it to another person, be sure that the operating instructions accompany it. Thus the new user will be informed of its operating system and the related notices. These notices have been recorded for your security and others as well.
This appliance is not intended for use by persons (including children) with reduced pyhysical, sensory or mental capabilities, or lack of experience and knowledge, unless they have been given supervision or instruction concerning use of appliance by a person responsible for their safety.
Children should be supervised to ensure that they do not play with the appliance.
Electrical supply to your oven
* Before your appliance is connected to the mains electricity supply, check to ensure that the voltage and the frequency shown in the data plate corresponds with your power supply.
Warning!
This appliance must be earthed
Our company shall not hold responsible for any damage caused by the utilisation of the oven without ground socket.
* Before applying to Authorized service, have the electrical wiring of your home ready for connection. If the appliances is connected by a plug, that the plug is easily accessible after installation (but not above the hob)
*This product must only be installed by a qualified
electrician eg. local electricity company to a suitable double pole control unit with a minimum contact clearance of 3 mm in all poles which should be adjacent to (but not above) the cooker in accordance
Gas supply requirements
Warning!
Gas connection must be with a flexible metal hose
*Before your appliance is connected to the gas supply, check to ensure that the gas category and pressure specifications shown on the data plate corresponds with your gas supply. If necessary call authorized service for adjusting to gas category.
*This appliance shall be installed in accordance with the regulations in force and only used in a well ventilated space. Read the instructions before installing or using this appliance.
In the interest of safety this appliance must be installed and/or serviced by a competent person as stated in the gas safety regulations current editions.
* Please refer to the data plate for details about gas supply and pressures.
* The appliance must not be installed in a room without a window or other controllable opening. If is installed in a room without a door which opens directly to tohe outside, a permanent opening is required.
The air circulation should be 2 m3/h per kW of burners.
with IEE regulation, Failure to observe this instruction may result in operational problems and invalidation of the product warranty. If the appliance is connected by a plug, that the plug is easily accessible after installation (but not above the hob).
The cable length should be 2 mt max for isolation safety.
A cable supplied with a plug with your oven (H05 V V-F 3G 1 mm 4 )
*The mains cable must pass through the cable clamp.
*The mains cable should be routed away from the appliance and in particular ventilation slots, the vent outlet and should not be obstructed when pushed in to position between the appliance and the wall and/or cabinet.
Connection of the gas hose to the oven
Convenient position is selected by interchanging the hose nozzle and plug according to the location of the main gas inlet valve. If you make a connection with a flexible metal hose, locate a seal between the main gas pipe. The inner diameter of the flexible hose, which the butane hose nozzle is connected, should be 6mm for the house-type gas tubes.
The inner diameter of the flexible hose, which the natural hose nozzle is connected, should be 15mm. The hose should tightly be fitted to the hose nozzle by squeezing with a clamp. The plastic hose end is soaked in hot water for one minute to soften and inserted fully into the hose nozzle. The clamp is fastened securely by a screw driver. The other end of the hose is connected to the gas valve with the same operation.
The hose should be replaced before its last expiry date.
Caution!
Make the oven connection to the gas inlet valve, the hose length must be short and be sure that there is no leakage. The hose used should not be longer than 125 cm for safety.
Gas leakage control
During control, be sure that the control knobs are closed and the gas inlet valve is open. Apply soap bubbles to the connections for leakage control. In case leakage exists, bubble will appear. In such case, check the gas connection immediately. Do not control gas leaks by using fire.
Caution!
Never use lighter or match flame, for controlling the gas leakage.
- The appliance flexible connector should not be subject to undue forces, either in normal use whilst being connected or disconnected.
- The appliance flexible connector should not be subject to excessive heat by direct exposure to flue products or by contact with hot surfaces.
Note: The flexible connector must be able to withstand temperatures up to and including 95°C.
3. The socket into which the plug of the appliance flexible connector fits should be
permanently attached to a firmly fixed gas installation pipe and positioned such that the hose hangs freely downwards.
4. The appliance flexible connector should be positioned such that it will not suffer mechanical damage; eg abrasion from the surrounding kitchen furniture which may be moved in use, such as a door or drawer, or by being trapped by a stability device.
5. The plug-in-connector should be accessible for disconnection after moving the appliance.
Ventilation
All rooms are required to have a window which can be opened or the equivalent.
Some rooms will also be required to install a permanent vent in addition to a window (see table
below).
This unit must not be used in a room with a volume of less than 5m3 .
| Room Volume | Air vent necessary (effective area) |
| 5m3 to 10m3 | 50cm2 |
| Greater than 11m3 | No air vent necessary |
| A room 5m3 to 10m3 with a door opening to the outside | No permanent air vent necessary |
The above requirements allow also for use of a gas cooker but if there are other fuel burning appliances in the same room, it should be consulted to determine the necessary air vent requirements.
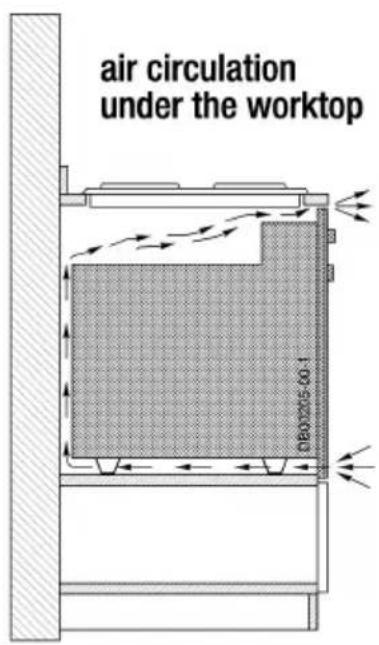
The oven is designed to fit into a cabinet of 600mm width. The oven should be built under the kitchen units. You must ensure that it is properly ventilated.
IMPORTANT: If the oven is being installed into a built under oven housing unit ensure that the front rail at the top of the unit is not installed as it could restrict ventilation.
Consult a qualified engineer for advice.
In order to install the gas cooker, please call an authorized person from the natural gas distribution company. Ask them to verify the gas pressure that must be 20 mBar natural gas or 30 mBar for LPG. In case the pressure does not correspond with specified one, it is necessary for a pressure regulator to be used.
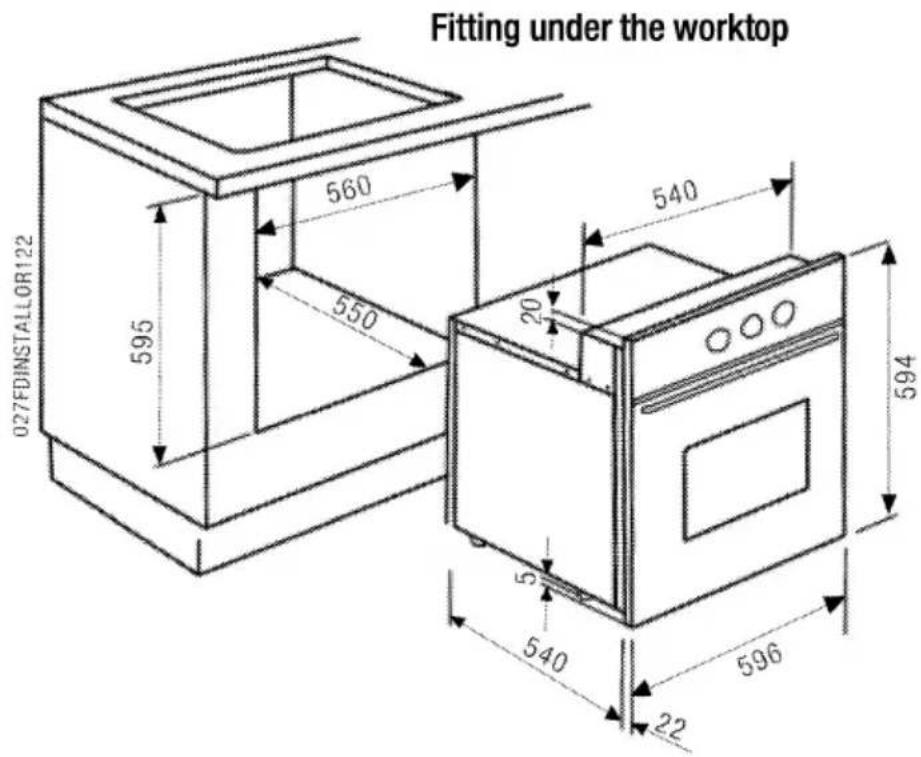
Ensure that air can flow freely around the housing area. If the oven is being installed into a fully enclosed built under oven housing unit it may be necessary to cut a small slot in the top of the plinth fitted under the unit. Cut a section 400mm wide and a minimum of 15mm high to allow air to pass under the unit.
Failure to allow adequate ventilation to the appliance may result in over heating or damage to adjacent units.
IMPORTANT: If the oven is being installed into a built under oven housing unit ensure that the front rail at the top of the unit is not installed as it could restrict
ventilation.
Lift the oven carefully into position on the shelf, taking care NOT to lift it by the door handle. If you lower the oven door, you will see 4 screw holes, 2 on each side of the oven. The oven should then be secured to the housing by fitting screws into these holes. Remember the housing should not be free standing but secured to the wall and/or adjacent fittings.


Installation to l.p.g. (for fitters use only)
Before switching over to a different type of gas, you should refer to the sticker on the appliance, which tells you to which type of gas the appliance has been factory-adjusted.
How to convert to LPG operation
* Disconnect appliance from the mains
* Change main nozzle of the oven:
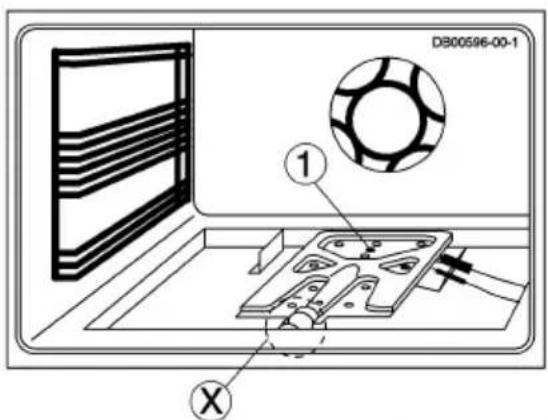
1) Remove floor plate (see 'How to remove the floor plate'). (Fig 3a).
2) Loosen locating screw of oven burner and pull out burner together with the holder for the thermocouple
and the ignition plug from the nozzle block (Fig 3b-1).
3) Screw out the nozzle from the nozzle block using a socket wrench (7mmAF - not supplied). (Fig 3c).
4) Screw in new nozzle (with embossed diameter in hundredths of a millimetre) and make sure that the thread fits exactly.
5) Re install burner (according to point 2) in reverse order.
6) Re insert floor plate and make sure that it sits properly.
Fig 3a

Fig 3c
Fig 3b

The diameters are printed on the nozzle in hundredths of a millimeter.
| Burner | kW nominal load | ø nozzle bore mm | ||
| Oven burner | G20 -20 mbar | G30 28- 30 mbar G31-37 mbar | G20 -13 mbar | |
| 2,15 (Hs) | 1.10 | 0.72 | 1.16 | |
| Grill burner | 2,25 (Hs) | 1.12 | 0.72 | 1.22 |
Regulation of the minimum flame (for fitters only)
Regulating the oven low-setting nozzle when switching to a different type of gas:
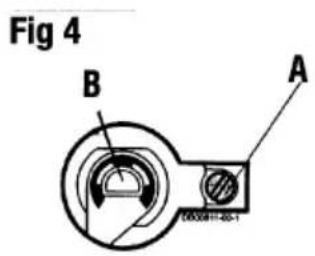
1) Switching from natural gas to liquid gas: Pull off the knobs, remove the panel (see figure 5) and turn the low setting nozzle (see figure 4) clockwise to the end using a screwdriver. Re-assemble the panel and put the knobs back into place.
2) Switching from liquid gas to natural gas: Set the oven thermostat to position "max" and heat the appliance for about 15 minutes. Then set to position "min" and pull off the knobs. Remove the panel (see figure 5) and using a screwdriver, turn the low setting nozzle (see figure 4) anticlockwise. Stop before the flames on the burner extinguish. Then assemble the panel and put the knobs back into place.

After switching to a different type of gas, amend the data on the appliance (type of gas, gas pressure)!
Flames regulation of the oven burner
Because of different gas mixtures in the distribution system, you may have flames with too much or too little air. In such cases, move the air ring to close or open the air flow, until the regular flame is obtained.
Warning: The regulation of the flames must only be carried out by a qualified technician.
How to use your gas oven
The rating plate can be found on the bottom left hand side of the oven body.
Before using the oven for the first time, we recommend that you clean it with soapy water, rinse carefully and heat for 30 minutes at maximum temperature. A slightly unpleasant smell may be produced, caused by grease remaining on the oven elements from the production process.
Commissioning the appliance
It is the responsibility of the installer to check that the appliance is functioning correctly before handing the appliance and instruction book over. ONLY National gas standart authority registered GAS OPERATIVES SHOULD COMMISSION THIS APPLIANCE.
PLEASE READ THE PRECAUTIONS BELOW BEFORE USING YOUR APPLIANCE.
DO make sure you understand the controls before using the appliance.
DO keep children away from the appliance when grilling as surfaces will get extremely hot during and after use.
DO turn off the appliance at the wall switch should any glass panel crack or shatter.
DO NOT USE THE APPLIANCE
DO make sure all controls are turned off when you have finished cooking and when not in use.
DO stand back when opening an oven door to allow any build up of steam or heat to disperse.
DO use dry, good quality oven gloves when removing items from the oven.
DO take care to avoid heat/steam burns when operating the controls.
DO make sure the shelves are in the correct position before switching on the oven/grill.
DO take care when removing items from a grill when the lower oven is on as the contents will be hot.
DO keep the oven/grill doors closed when the appliance is not in use.
DO keep the appliance clean, as a build up of grease or fat from cooking can cause a fire.
DO follow the basic principles of food handling and hygiene to prevent the possibility of bacterial growth.
DO keep ventilation slots clear of obstruction.
For your safety—Don't
DON'T leave children unsupervised where a cooking appliance is installed as all surfaces will be hot during and after its use.
DON'T allow anyone to sit or stand on any part of the appliance.
DON'T store items above the appliance that children may attempt to reach.
DON'T heat up unopened food containers as pressure can build up causing the container to burst.
DON'T store chemicals/food stuffs, pressurised containers in or on the appliance or in cabinets immediately above or next to it.
DON'T line a grill pan with aluminium foil as this may cause a fire hazard.
DON'T use the appliance as a room heater.
DON'T dry clothes on the oven doors.
DON'T install the appliance next to curtains or other soft furnishings.
DON'T operate the main oven with the inner glass door removed.
- Control panel
- Thermostat knob
- Grill function
- Indicator light
- Minute minder
- Knob protection sheet
- Oven door

PLEASE NOTE:
- Use the appliance exclusively for preparing and warming food, not for heating purposes!
- The appliance should not be left unattended.
- The surfaces become hot when in use, therefore keep children well away from them!
- Do not cover any part of the oven with aluminium foil - heat accumulation!
Technical data
Dimensions
| Height | : 594 mm |
| Width | : 596 mm |
| Depth | : 561 mm |
| Installation setting | |
| Height | : 585 mm |
| Width | : 560 mm |
| Depth | : 550 mm |
| Gas rating | : 2,25 kW |
| Grill rating | : 2,15 kW |
| Lamp | : 15 W |
| Supply voltage | : 220-230 V ~ 50 Hz |
| Gas type | : Natural gas or L.P.G. |
If your cooker has minute minder:
It just shows the time and not programmable.
You can adjust it to 120 minutes.

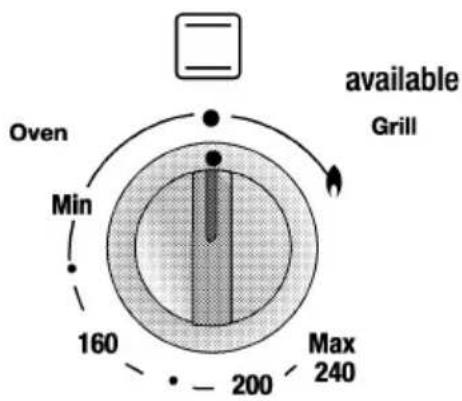
Oven thermostat
The thermostat regulates the desired oven temperature.
"0" - 0ff.
The "min" position represents a 140°C oven temperature.
The "max" position corresponds to 240°C , and it is the top position on the thermostat.
Ignition:
In order to ignite the oven burner, press the thermostat knob and turn it anti-clockwise to set
Grilling
To light the grill, turn the thermostat knob clockwise to the "Grill" symbol «¶» and push down for about 5-10 seconds until you see all the flames. The thermocouple heats up and opens the gas supply to the burner, up to the point where you can turn the thermostat knob to the "0" position.
While performing the grill or rotisserie function, keep the oven door OPENED completely.
As a safety feature, a switch prevents the grill from working when the door is closed. It will only work when the door is fully open.
The knob protection sheet against the air of the oven should be pulled out.
it at the desired temperature.
Keep the knob pressed for 5-10 seconds. During that time, the burner is ignited electrically, the thermocouple heats up and opens the gas supply to the burner, up to the point where you can turn the thermostat knob to the "0" position.
Do not push on the lighting mechanism for more than 15 seconds. If the burner has not lit during this period of time, do not push on the lighting mechanism again until you have left the oven door open for at least one minute.

Shelf levels oven and accessories
The 6 shelf levels are numbered starting from the bottom up. In the cooking tables, the levels is given for each dish.
Grill spit set
Consisting of :
- grill rack, chromium plated
- rotary spit with detachable handle
- The grill rack is put on the fifth level and fixed by the roller on the rotary spit after the spit is inserted into the grill motor.
Turn spit
The oven selector knob has the following functions:
Position "0" allows you to start the conventional gas oven or grill, by operating according to the description in the "OVEN THERMOSTAT" chapter.
The knob has the following functions:
You can also turn on the oven light, by turning the knob to the "LIGHT" symbol.
The “☐” symbol means that the turn spit is on and that you can use the spit.

Bended wire shelf should be inserted only such position as shown in the figure.


Information
Remove all accessories which are not required for the dish you are cooking from the oven. In most cases, the baking or roasting results are much better if you preheat the oven for about 10 minutes at the desired temperature. Different
Oven shelf levels
Conventional operation permits cooking or roasting food only at one level.
Depending on the roasts or pastries, you can choose one of six insertion levels, level "1" corresponding to the lowest position and "6" the highest.
Any pastry dish introduced directly at one insertion level should not be heavier than 3 kg.
baking tin materials give different baking results (e.g. light and dark tins). The 6 shelf levels are numbered from the bottom up. The settings and times given in the following tables are recommendations and should be complemented by your own experiences.
Cooking pastries and roasts
Cooking pastries - conventional operation
This type of heating allows you to use the oven as normal when working with recipes in cooking books.
In this case it is better to place the dish in the centre of the oven.
Temperature recipe guide
| DISHES | LEVEL | TEMP. (°C) | COOKING TIME (min) | PRE-HEATING+ |
| COOKED BISCUIT (GÂTEAU ROULÉ) | 4 | 210 | 15-20 | yes |
| BROKEN MIXTURE (DRY CAKES) | 5 | 200 | 10-12 | yes |
| KNEADED DOUGH(BLOCK CAKE) | 4 | 200 | 25-30 | yes |
| SHORTBREAD MIXTURE(SMALL PAPER SHAPE) | 4 | 190 | 20-25 | yes |
| LEAVEN DOUGH(ROLLED POPPY CAKE) | 4 | 180 | 40-50 | - |
| FLAKY PASTRY (TURNOVERS) | 4 | 190 | 20-30 | yes |
| SOUFFLÉ | 4 | 180 | 35-40 | yes |
| "SACHER" CAKE | 4 | 180 | 55-60 | yes |
| FRUIT CAKE | 2 | 160 | 160-180 | yes |
| CHOUX PASTRY | 5 | 200 | 35-40 | yes |
ROASTING
| DISH | SHELF LEVEL | TEMP C | GAS MARK | ROASTING TIME (min.) | PREHEATING |
| Roast beef (about 1.5kg) | 2 | 190 | 5 | 90 - 120 | yes |
| Roast pork (1.5kg) | 2 | 190 | 5 | 100 - 120 | yes |
| Pizza | 2 | 180 | 4 | 20 - 25 | yes |
| Fish souffle | 4 | 170 | 4 | 50 - 60 | yes |
| Vegetable souffle | 4 | 160 | 3 | 30 - 40 | yes |
| Poultry | 4 | 180/190 | 4/5 | 60 - 70 | yes |
Cleaning and maintenance
General Cleaning
Before cleaning, always disconnect the electrical supply to the oven.
We advise you to clean the appliance when it is cold, especially the enamelled surfaces. In order to maintain the condition of the enamelled parts, clean and wipe frequently with hot soapy water.
Rub gently so as not to damage the surface. Never
Detachable components
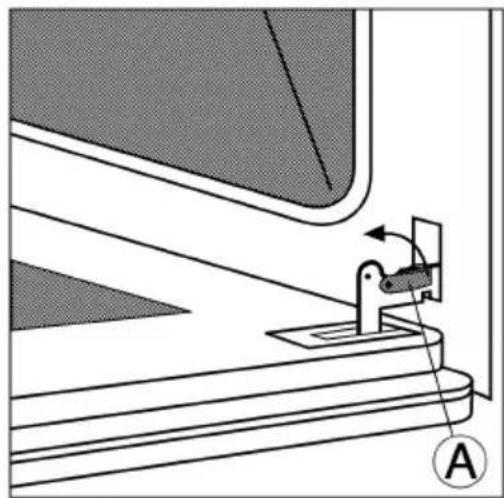
- How to remove the oven door:
Open oven door as far as possible. Turn metal shackles (A) on the hinges towards you as far as possible. Close oven door until it touches the two shackles, then close a bit more and take
use abrasive cleaning products. Do not leave acid or alkaline residues (lemon juice, vinegar, salt, tomato etc.) on the enamelled surfaces.
NOTE: Any cleaners such as spray or stick cleaners which are used on enamel must have the VEDC (Vitreous Enamel Development Council) seal of approval and the manufacturer's instructions must be followed.
door out (hold door at the sides!) To re attach the door, proceed in reverse order.
Note: Any service calls relating to removal of the oven door will be chargeable, as this is not covered by the guarantee.

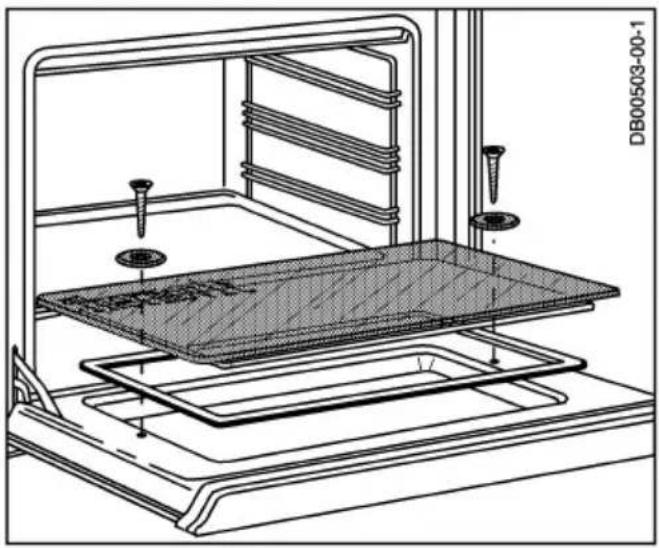
Taking out the interior oven door pane.
Unscrew both screws and remove Remove the pane for cleaning. If the pane has writing on it (LOW-E), make sure that it is replaced in the same manner it was taken out as the pane is outfitted with a heat-reflective coating.
How to remove the floor plate
Before removing the floor plate, take out the two side racks which support the baking trays by lifting slightly.
Start by pulling the floor plate slightly towards you and lifting a bit so that the two front fixing tongues are free. Then lift the front of the floor plate far enough to enable the back to be removed with the two rear shackles from the fixtures. To re insert floor plate, proceed in reverse order. Make sure that both the rear shackles and the front tongues sit properly.

Safety
NEVER allow fat to build on the oven base.
As with all cookers, clean and empty fat regularly from the trays and oven base to avoid the possibility of fat fires.
NEVER place anything on the bottom of the oven.
The wire-shelves supports can be removed for cleaning.
Un hook the supports to the side walls wipe over with a soapy cloth.
Do not use oven clearners aerosols, scoring pads or scoring powders, polish with a dry cloth.

019 FF
Oven light not working
If the oven light fails you can easily change it:
- Turn off the oven by switching the oven selector to 0. Switch off and isolate the power.
- Unscrew the light glass cover, replace the bulb with a new one of the same specification and screw the cover back until it is hand tight.
NOTE: Oven bulb replacement is not covered by
your guarantee.
Other bulbs cannot be changed by yourself and should be replaced by a qualified electrical engineer. Bulbs other than the oven bulb are covered by the guarantee.
IMPORTANT! WARNING – OVENS GET HOT. KEEP CHILDREN away from this appliance.
If you have a problem with your oven
Check the following items before calling customer service:
- The power is switched on (is there a power cut?).
- That the controls are switched on.
- The fuse in the plug and main fuse.
- Check that the timer is set to manual.

- GB
- DEAR CUSTOMER
- ELECTRICAL SUPPLY TO YOUR OVEN
- WARNING
- THIS APPLIANCE MUST BE EARTHED
- GAS SUPPLY REQUIREMENTS
- GAS CONNECTION MUST BE WITH A FLEXIBLE METAL HOSE
- A CABLE SUPPLIED WITH A PLUG WITH YOUR OVEN (H05 V V-F 3G 1 MM 4 )
- CONNECTION OF THE GAS HOSE TO THE OVEN
- CAUTION
- GAS LEAKAGE CONTROL
- VENTILATION
- INSTALLATION TO L.P.G. (FOR FITTERS USE ONLY)
- REGULATION OF THE MINIMUM FLAME (FOR FITTERS ONLY)
- FLAMES REGULATION OF THE OVEN BURNER
- HOW TO USE YOUR GAS OVEN
- COMMISSIONING THE APPLIANCE
- PLEASE READ THE PRECAUTIONS BELOW BEFORE USING YOUR APPLIANCE
- FOR YOUR SAFETY—DON'T
- PLEASE NOTE
- TECHNICAL DATA
- IF YOUR COOKER HAS MINUTE MINDER
- OVEN THERMOSTAT
- IGNITION
- GRILLING
- WHILE PERFORMING THE GRILL OR ROTISSERIE FUNCTION, KEEP THE OVEN DOOR OPENED COMPLETELY
- SHELF LEVELS OVEN AND ACCESSORIES
- GRILL SPIT SET
- TURN SPIT
- INFORMATION
- OVEN SHELF LEVELS
- COOKING PASTRIES AND ROASTS
- COOKING PASTRIES - CONVENTIONAL OPERATION
- CLEANING AND MAINTENANCE
- DETACHABLE COMPONENTS
- TAKING OUT THE INTERIOR OVEN DOOR PANE
- HOW TO REMOVE THE FLOOR PLATE
- SAFETY
- OVEN LIGHT NOT WORKING
- IF YOU HAVE A PROBLEM WITH YOUR OVEN
- CHECK THE FOLLOWING ITEMS BEFORE CALLING CUSTOMER SERVICE
Marque : BLOMBERG
Modèle : BGO 5102 X
Catégorie : Four